文章目录
- [0. 老男孩思想-人性十大需求](#0. 老男孩思想-人性十大需求)
- [1. ElasticStack介绍](#1. ElasticStack介绍)
-
- [1.1 ELK(**Elastic Stack**)](#1.1 ELK(Elastic Stack))
- [1.2 logstash和filebeat的区别](#1.2 logstash和filebeat的区别)
- [2. ElasticSearch单点部署](#2. ElasticSearch单点部署)
-
- [2.1 下载ElasticSearch软件包](#2.1 下载ElasticSearch软件包)
- [2.2 安装软件并修改配置文件](#2.2 安装软件并修改配置文件)
- [2.3 启动并测试服务](#2.3 启动并测试服务)
- [3. ElasticSearch集群部署](#3. ElasticSearch集群部署)
-
- [3.1 安装软件并分发配置文件](#3.1 安装软件并分发配置文件)
- [3.2 重置单点配置](#3.2 重置单点配置)
- [3.3 重启ES集群并测试](#3.3 重启ES集群并测试)
- [4. 面试题:ES集群的9200端口和9300端口使用的协议和作用?](#4. 面试题:ES集群的9200端口和9300端口使用的协议和作用?)
- [5. ES集群常用术语](#5. ES集群常用术语)
- [6. 面试题: ES集群的颜色分别代表什么含义?](#6. 面试题: ES集群的颜色分别代表什么含义?)
- [7. ElasticSearch的DSL语句初体验](#7. ElasticSearch的DSL语句初体验)
- [8. kibana环境部署](#8. kibana环境部署)
-
- [8.1 软件下载](#8.1 软件下载)
- [8.2 修改配置文件](#8.2 修改配置文件)
- [8.3 页面测试](#8.3 页面测试)
- [9. filebeat环境部署](#9. filebeat环境部署)
- [10. EFK架构实战案例](#10. EFK架构实战案例)
-
- [10.1 编写配置文件](#10.1 编写配置文件)
- [10.2 发送测试数据](#10.2 发送测试数据)
- [10.3 主机端口映射](#10.3 主机端口映射)
- [11. 思维导图](#11. 思维导图)
- [12. 麒麟系统部署EFK架构](#12. 麒麟系统部署EFK架构)
-
- [12.1 ES](#12.1 ES)
- [12.2 kibana](#12.2 kibana)
- [13.3 filebeat](#13.3 filebeat)
- [13. ansible一键部署EFK架构](#13. ansible一键部署EFK架构)
- [14. 完成Windows上网功能](#14. 完成Windows上网功能)
0. 老男孩思想-人性十大需求
1.生理需求:生存、生活、性
2.物质需求:金钱、豪车、豪宅、艺术品......
3.健康需求:运动、饮食、心理健康......
4.情感(关系)需求:爱情、友情、亲情、朋友、兄弟、同学......
与他人交流,有了较近的关系,双方才会有较强的情感
5.尊重/认可需求:每个人都需要被他人尊重、认可,同时需要对别人有价值。因此对待长辈、领导、老板时,要有素养、礼貌,体现对方对于自己的重要性。
6.赞美和鼓励:当感受到他人的理解、支持或鼓励时,会更有动力,更有自信;每一个成功的男人背后 ,都少不了一个默默支持他的妻子
7.成长需求:不断向上攀登、不断发展、不断提高精神境界的需求;人向高处走,向来如此。
8.形象需求:不仅仅是自身的形象,如自己的外貌、穿着打扮等;还有自己展现的形象,就是自己在别人心中的形象,如善良、勇敢、勇于承担等
9.自由需求:越努力越自由;人们不断的学习、努力工作,就是获得更多的机会、更多的物质条件,由此决定自己的选择,如去旅游、跳槽、做自己喜欢的事等。
10.好奇需求:与空心病(本质是价值观缺陷)相反,对新奇事物有着好奇心,有着活力。因为好奇,才有探索、创造的精神和自信。
1. ElasticStack介绍
1.1 ELK(Elastic Stack)
- E:ElasticSearch,数据存储、分析
- L:Logstash,数据采集
- K:Kibana,数据可视化
- Beats:一系列轻量级、单一用途的数据采集器
- Filebeat:轻量级日志数据采集器
- metricsbeat
- heartbeat
- XPack: 安全相关的工具包,为Elastic Stack提供了一系列增强功能,其中安全(Security) 是其最核心和基础的组件之一
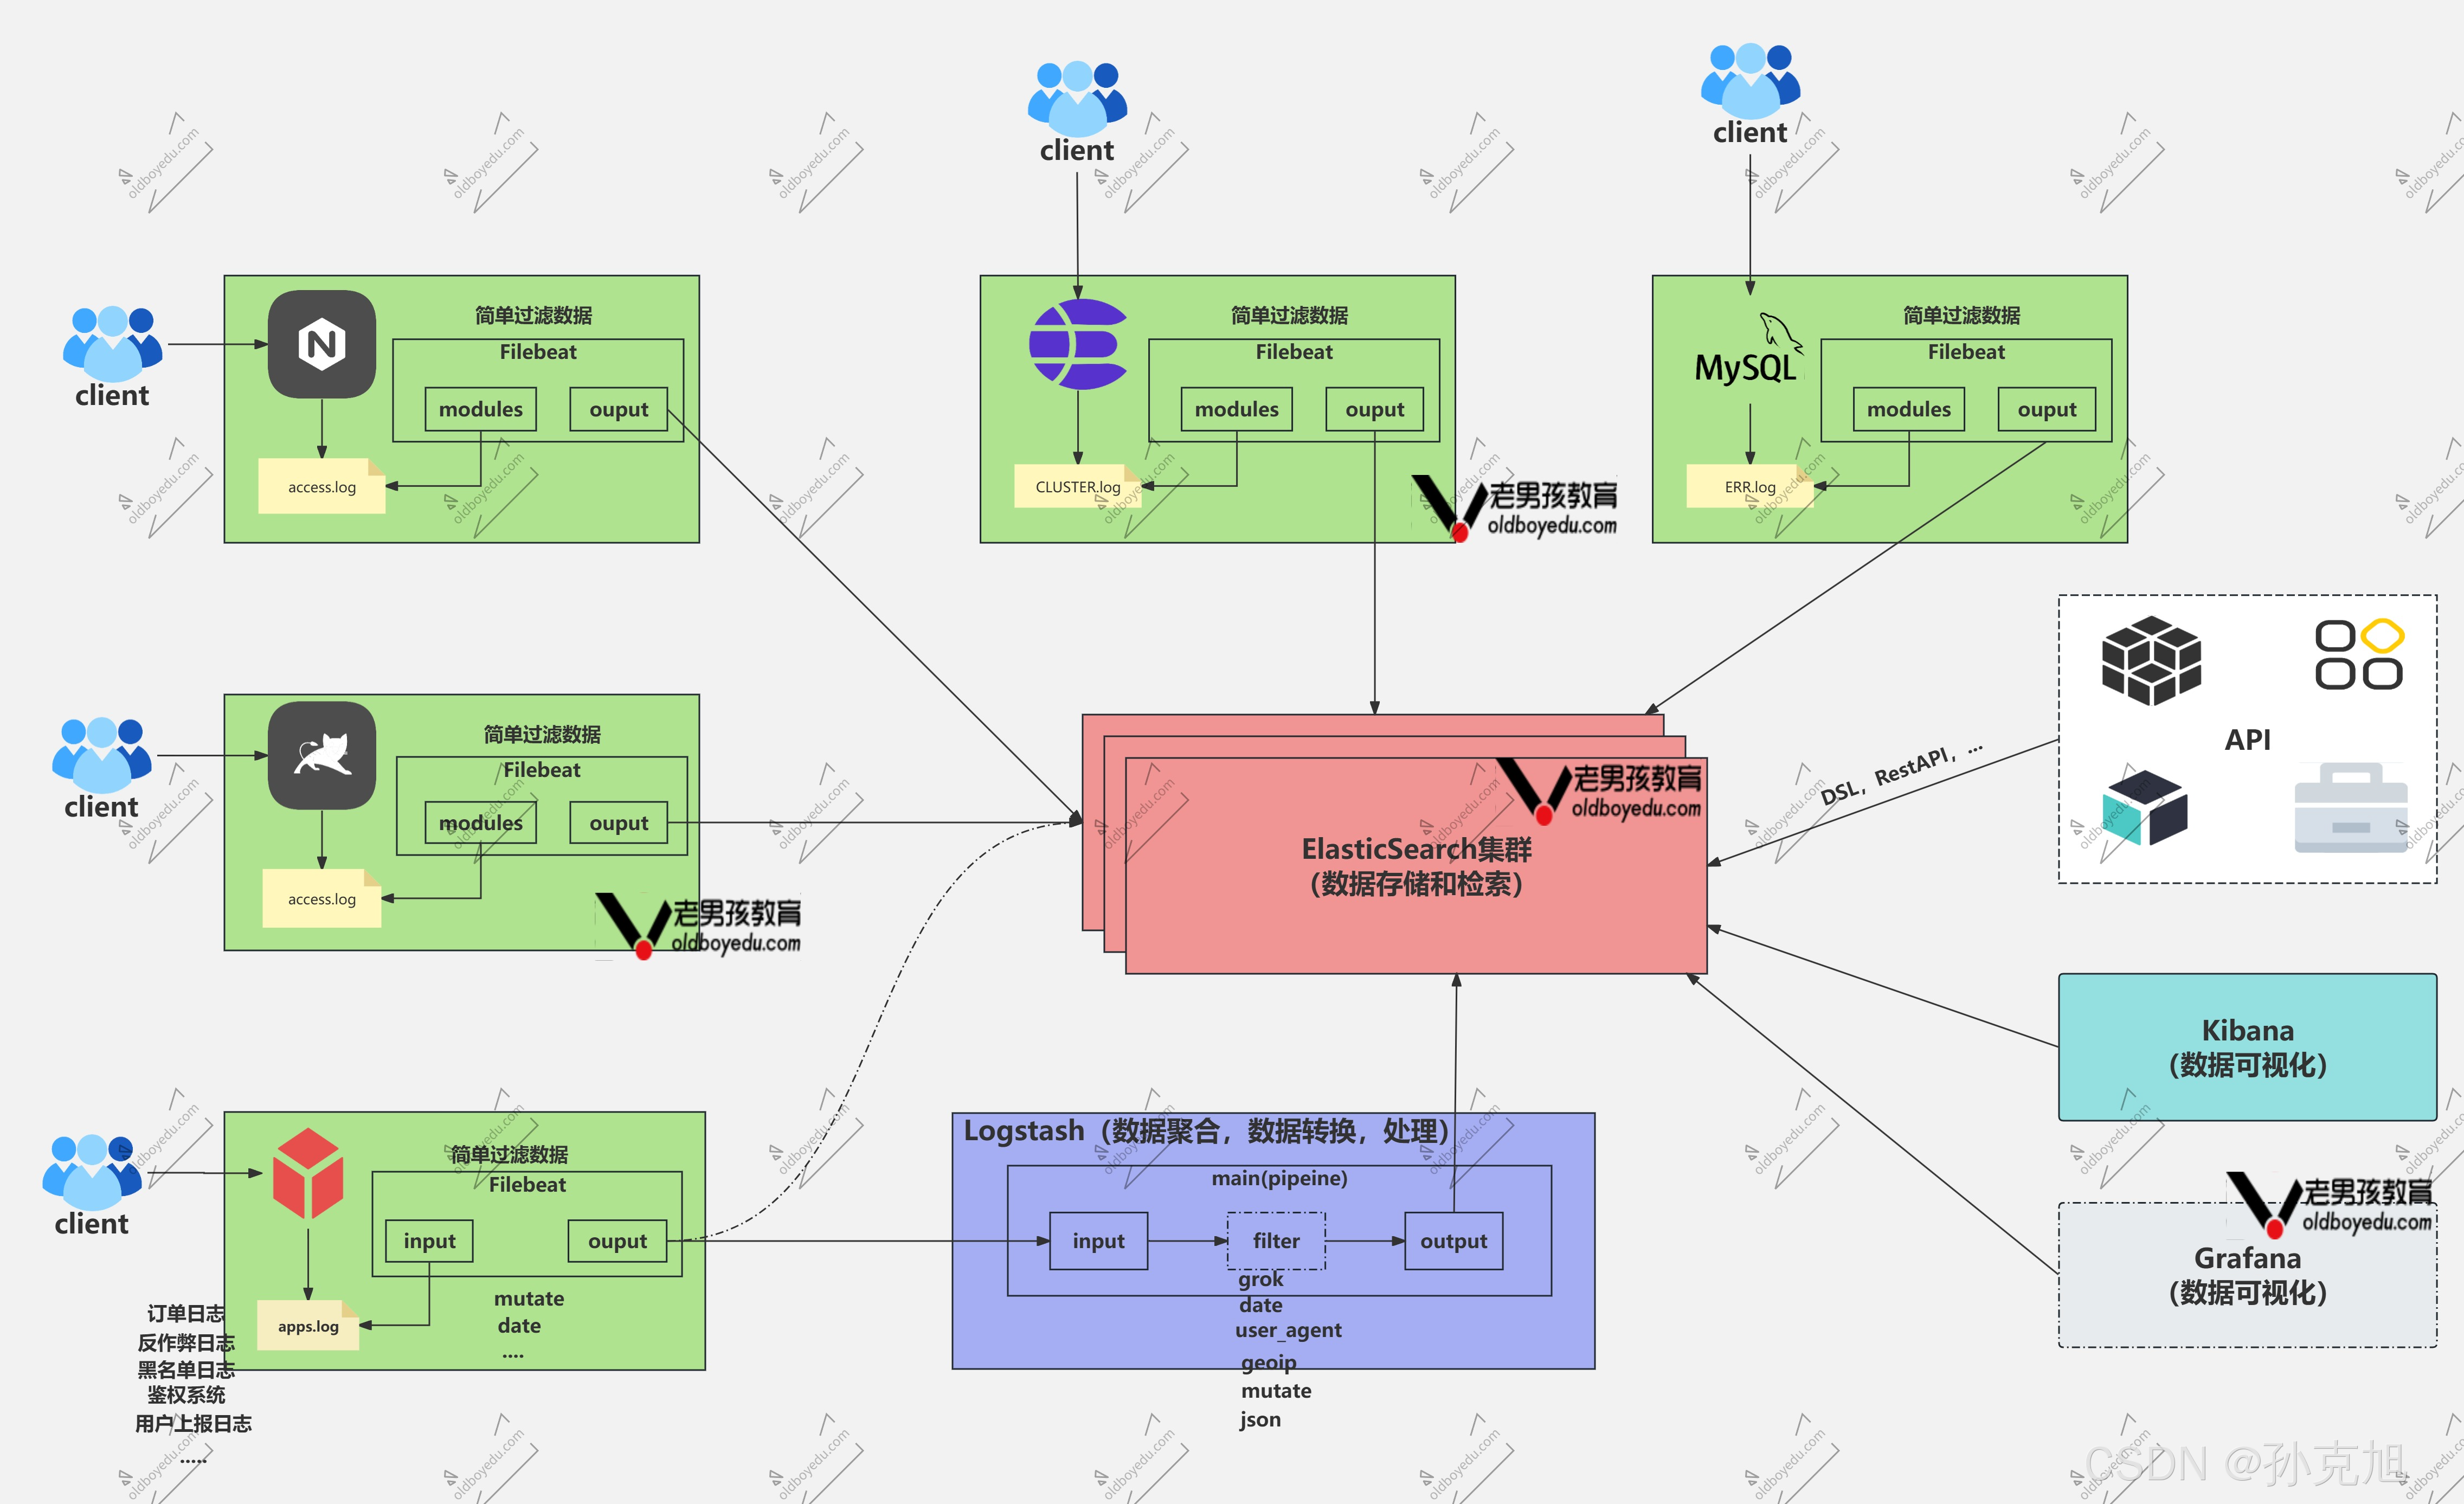
1.2 logstash和filebeat的区别
| 特性 | Filebeat | Logstash |
|---|---|---|
| 核心角色 | 日志转发器 (Forwarder / Shipper) | 日志处理器 (Processor / Aggregator) |
| 主要功能 | 收集 和 传输 日志文件。轻量级,资源占用少。 | 解析 、转换 、丰富 和过滤日志数据。功能强大,资源消耗高。 |
| 数据处理能力 | 非常有限。只能进行简单的多行合并、解析和过滤。 | 极其强大。拥有丰富的过滤器(Grok、KV、Date、GeoIP等), 能进行复杂的数据加工和格式化。 |
| 资源消耗 | 低(用 Go 编写,轻量级进程,占用 CPU 和内存很少)。 | 高 (用 JRuby 编写,运行在 JVM 上, 需要较多的 CPU 和内存资源)。 |
| 可靠性 | 支持"至少一次"投递,内置背压敏感协议,保证数据传输。 | 同样支持持久化队列,保证数据在处理过程中不丢失。 |
| 典型应用场景 | 安装在每台需要收集日志的服务器上, 负责读取日志文件并将其发送到 Logstash 或 Elasticsearch。 | 通常作为集中式服务器接收来自多个 Beats 或其他来源的数据, 进行统一处理后再输出。 |
| 协议与输出 | 主要输出到 Logstash 或 Elasticsearch。 | 支持大量输入(Beats、HTTP、Kafka、RabbitMQ等)和 输出(Elasticsearch、各种数据库、消息队列等)。 |
- Filebeat 负责高效收集,Logstash 负责深度处理。
2. ElasticSearch单点部署
2.1 下载ElasticSearch软件包
- 官网下载地址:
[Past Releases of Elastic Stack Software | Elastic](https://www.elastic.co/downloads/past-releases#elasticsearch)
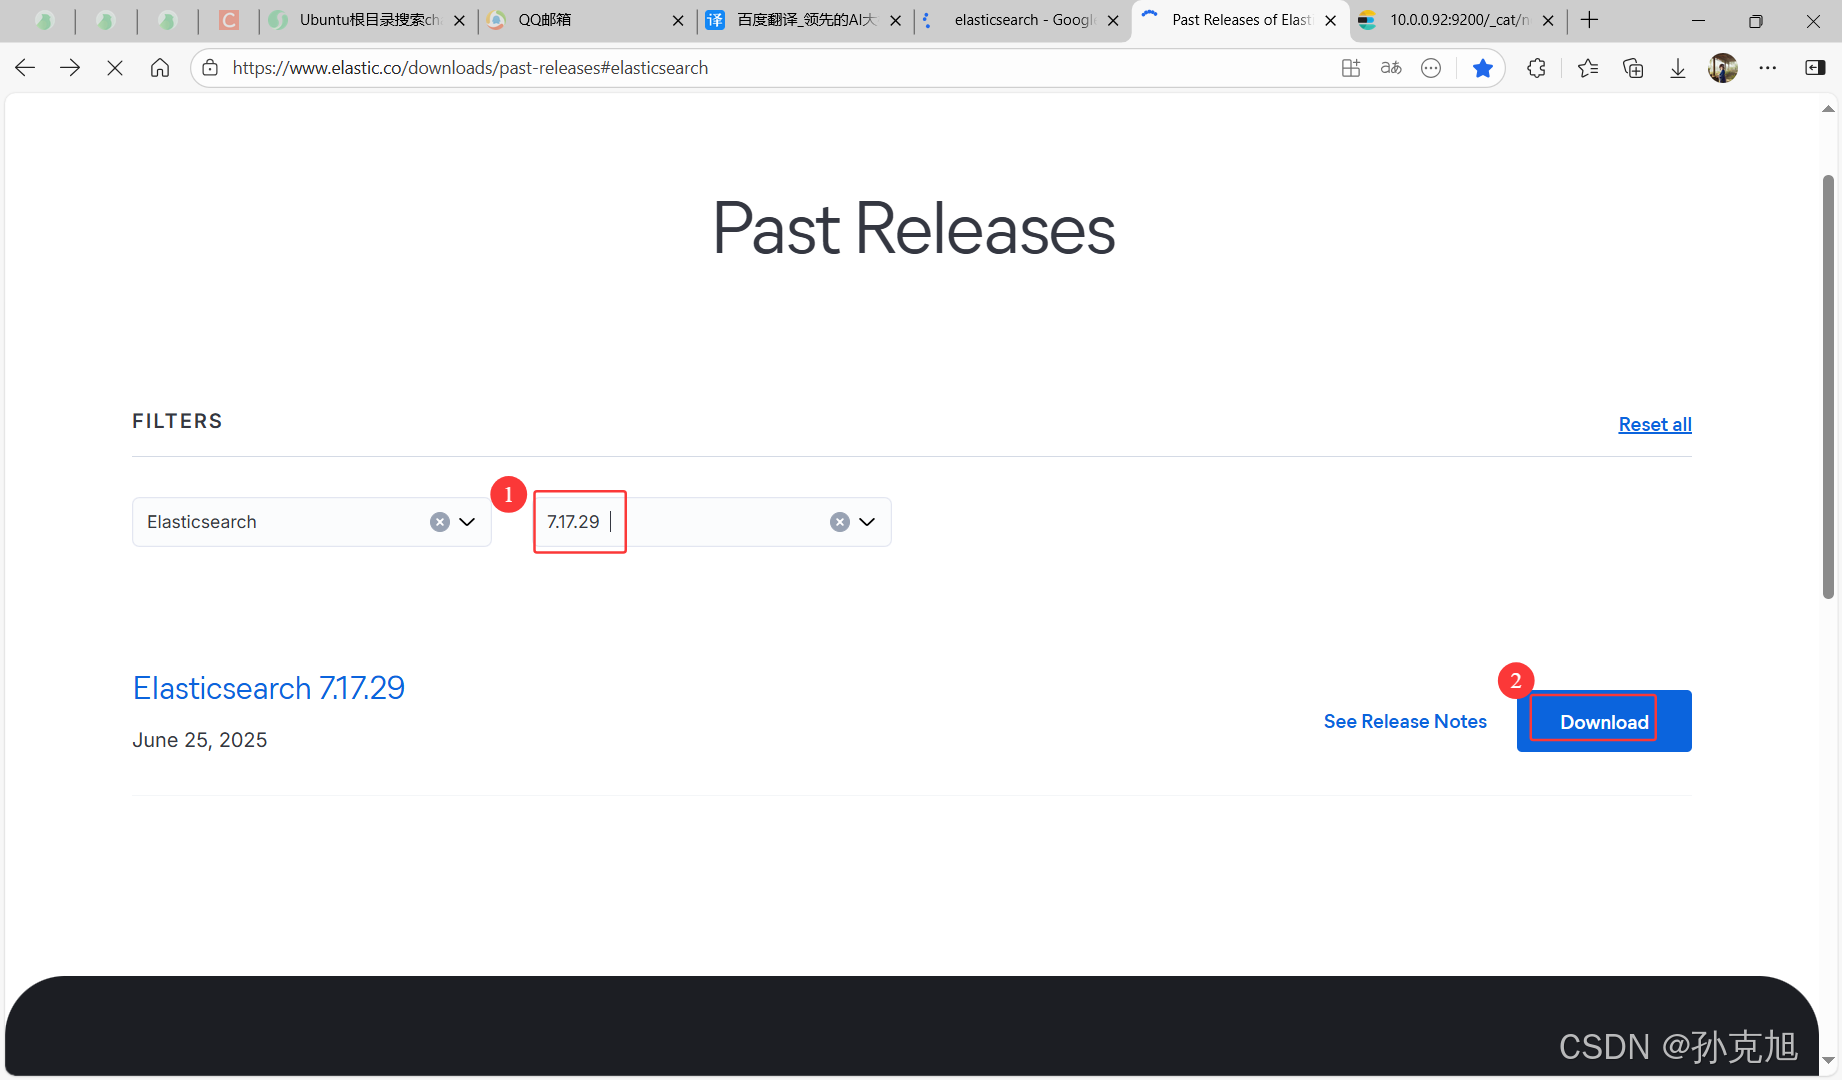
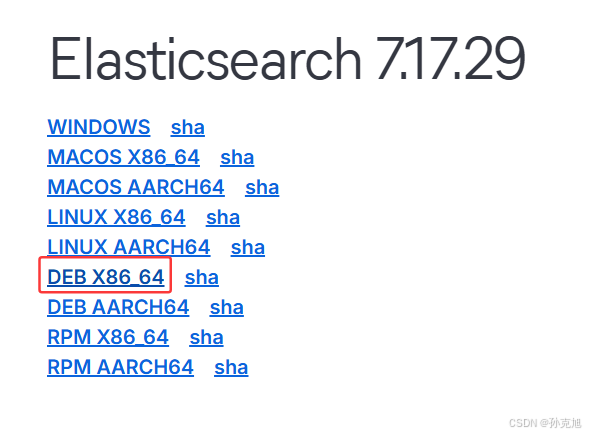
- 软件包:
elasticsearch-7.17.29-amd64.deb 链接: https://pan.baidu.com/s/1mnfZnhtbD3DtvznifaH4yg?pwd=bi39 提取码: bi39
2.2 安装软件并修改配置文件
shell
[root@elk91 ~]# dpkg -i elasticsearch-7.17.29-amd64.deb
......
[root@elk91 ~]# egrep -v "^#|^$" /etc/elasticsearch/elasticsearch.yml
cluster.name: oldboyedu-linux99-single
path.data: /var/lib/elasticsearch
path.logs: /var/log/elasticsearch
network.host: 0.0.0.0
http.port: 9200
discovery.type: single-node- 相关参数说明:
- cluster.name: 指定集群的名称。
- path.data: 数据存储路径。
- path.logs: 日志存储路径。
- network.host: 监听的IP地址。
- http.port: 监听的端口。
- discovery.type: 指定工作模式-单点部署。
2.3 启动并测试服务
shell
[root@elk91 ~]# systemctl enable --now elasticsearch
[root@elk91 ~]# ss -ntl | egrep "92|300"
LISTEN 0      4096               *:9300            *:*
LISTEN 0      4096               *:9200            *:*
[root@elk92 ~]# curl 10.0.0.91:9200
{
  "name" : "elk91",
  "cluster_name" : "oldboyedu-linux99-single",
  "cluster_uuid" : "F6SwEY9KQZq9VRpsCVbviw",
  "version" : {
    "number" : "7.17.29",
    "build_flavor" : "default",
    "build_type" : "deb",
    "build_hash" : "580aff1a0064ce4c93293aaab6fcc55e22c10d1c",
    "build_date" : "2025-06-19T01:37:57.847711500Z",
    "build_snapshot" : false,
    "lucene_version" : "8.11.3",
    "minimum_wire_compatibility_version" : "6.8.0",
    "minimum_index_compatibility_version" : "6.0.0-beta1"
  },
  "tagline" : "You Know, for Search"
}
[root@elk92 ~]# curl 10.0.0.91:9200/_cat/nodes?v
ip        heap.percent ram.percent cpu load_1m load_5m load_15m node.role   master name
10.0.0.91 5 97 0 0.09 0.13 0.05 cdfhilmrstw * elk91 
3. ElasticSearch集群部署
3.1 安装软件并分发配置文件
shell
1.准备安装包
[root@elk91 ~]# scp elasticsearch-7.17.29-amd64.deb 10.0.0.92:~
[root@elk91 ~]# scp elasticsearch-7.17.29-amd64.deb 10.0.0.93:~

2.所有节点安装ES
[root@elk92 ~]# dpkg -i elasticsearch-7.17.29-amd64.deb
[root@elk93 ~]# dpkg -i elasticsearch-7.17.29-amd64.deb

3.修改配置文件
[root@elk91 ~]# egrep -v "^#|^$" /etc/elasticsearch/elasticsearch.yml
cluster.name: oldboyedu-linux99-cluster
path.data: /var/lib/elasticsearch
path.logs: /var/log/elasticsearch
network.host: 0.0.0.0
http.port: 9200
discovery.seed_hosts: ["10.0.0.91", "10.0.0.92","10.0.0.93"]
cluster.initial_master_nodes: ["10.0.0.91", "10.0.0.92","10.0.0.93"]- 相关参数说明:
- discovery.seed_hosts:指定ES集群服务发现列表。
- cluster.initial_master_nodes:指定ES初始化时的master节点。
shell
4.同步配置文件
[root@elk91 ~]# scp /etc/elasticsearch/elasticsearch.yml 10.0.0.92:/etc/elasticsearch/
[root@elk91 ~]# scp /etc/elasticsearch/elasticsearch.yml 10.0.0.93:/etc/elasticsearch/
3.2 重置单点配置
- 将单点服务关闭,并删除日志数据
shell
[root@elk91 ~]# systemctl stop elasticsearch.service
[root@elk91 ~]# ss -ntl| grep 9200
[root@elk91 ~]# rm -rf  /var/{log,lib}/elasticsearch/*
3.3 重启ES集群并测试
shell
[root@elk91 ~]# systemctl enable --now elasticsearch
[root@elk91 ~]# ss -ntl | egrep "9200|9300"
LISTEN 0      4096               *:9300            *:*
LISTEN 0      4096               *:9200            *:*
[root@elk91 ~]#

[root@elk92 ~]# systemctl enable --now elasticsearch
[root@elk92 ~]# ss -ntl | egrep "9200|9300"
LISTEN 0      4096               *:9300            *:*
LISTEN 0      4096               *:9200            *:*
[root@elk92 ~]#


[root@elk93 ~]# systemctl enable --now elasticsearch
[root@elk93 ~]# ss -ntl | egrep "9200|9300"
LISTEN 0      4096               *:9200            *:*
LISTEN 0 4096 *:9300 *:* 
shell
[root@elk93 ~]# curl 10.0.0.93:9200/_cat/nodes
10.0.0.92 30 95 0 0.02 0.03 0.00 cdfhilmrstw * elk92
10.0.0.91 40 96 0 0.29 0.23 0.13 cdfhilmrstw - elk91
10.0.0.93 21 97 0 0.00 0.00 0.00 cdfhilmrstw - elk93
4. 面试题:ES集群的9200端口和9300端口使用的协议和作用?
plaintext
9200:
		使用http或者https协议,对外部用户暴露的端口。

9300:
		ES集群数据同步及选举的端口,使用tcp协议。
温馨提示:
	9300优于9200端口启动。
5. ES集群常用术语
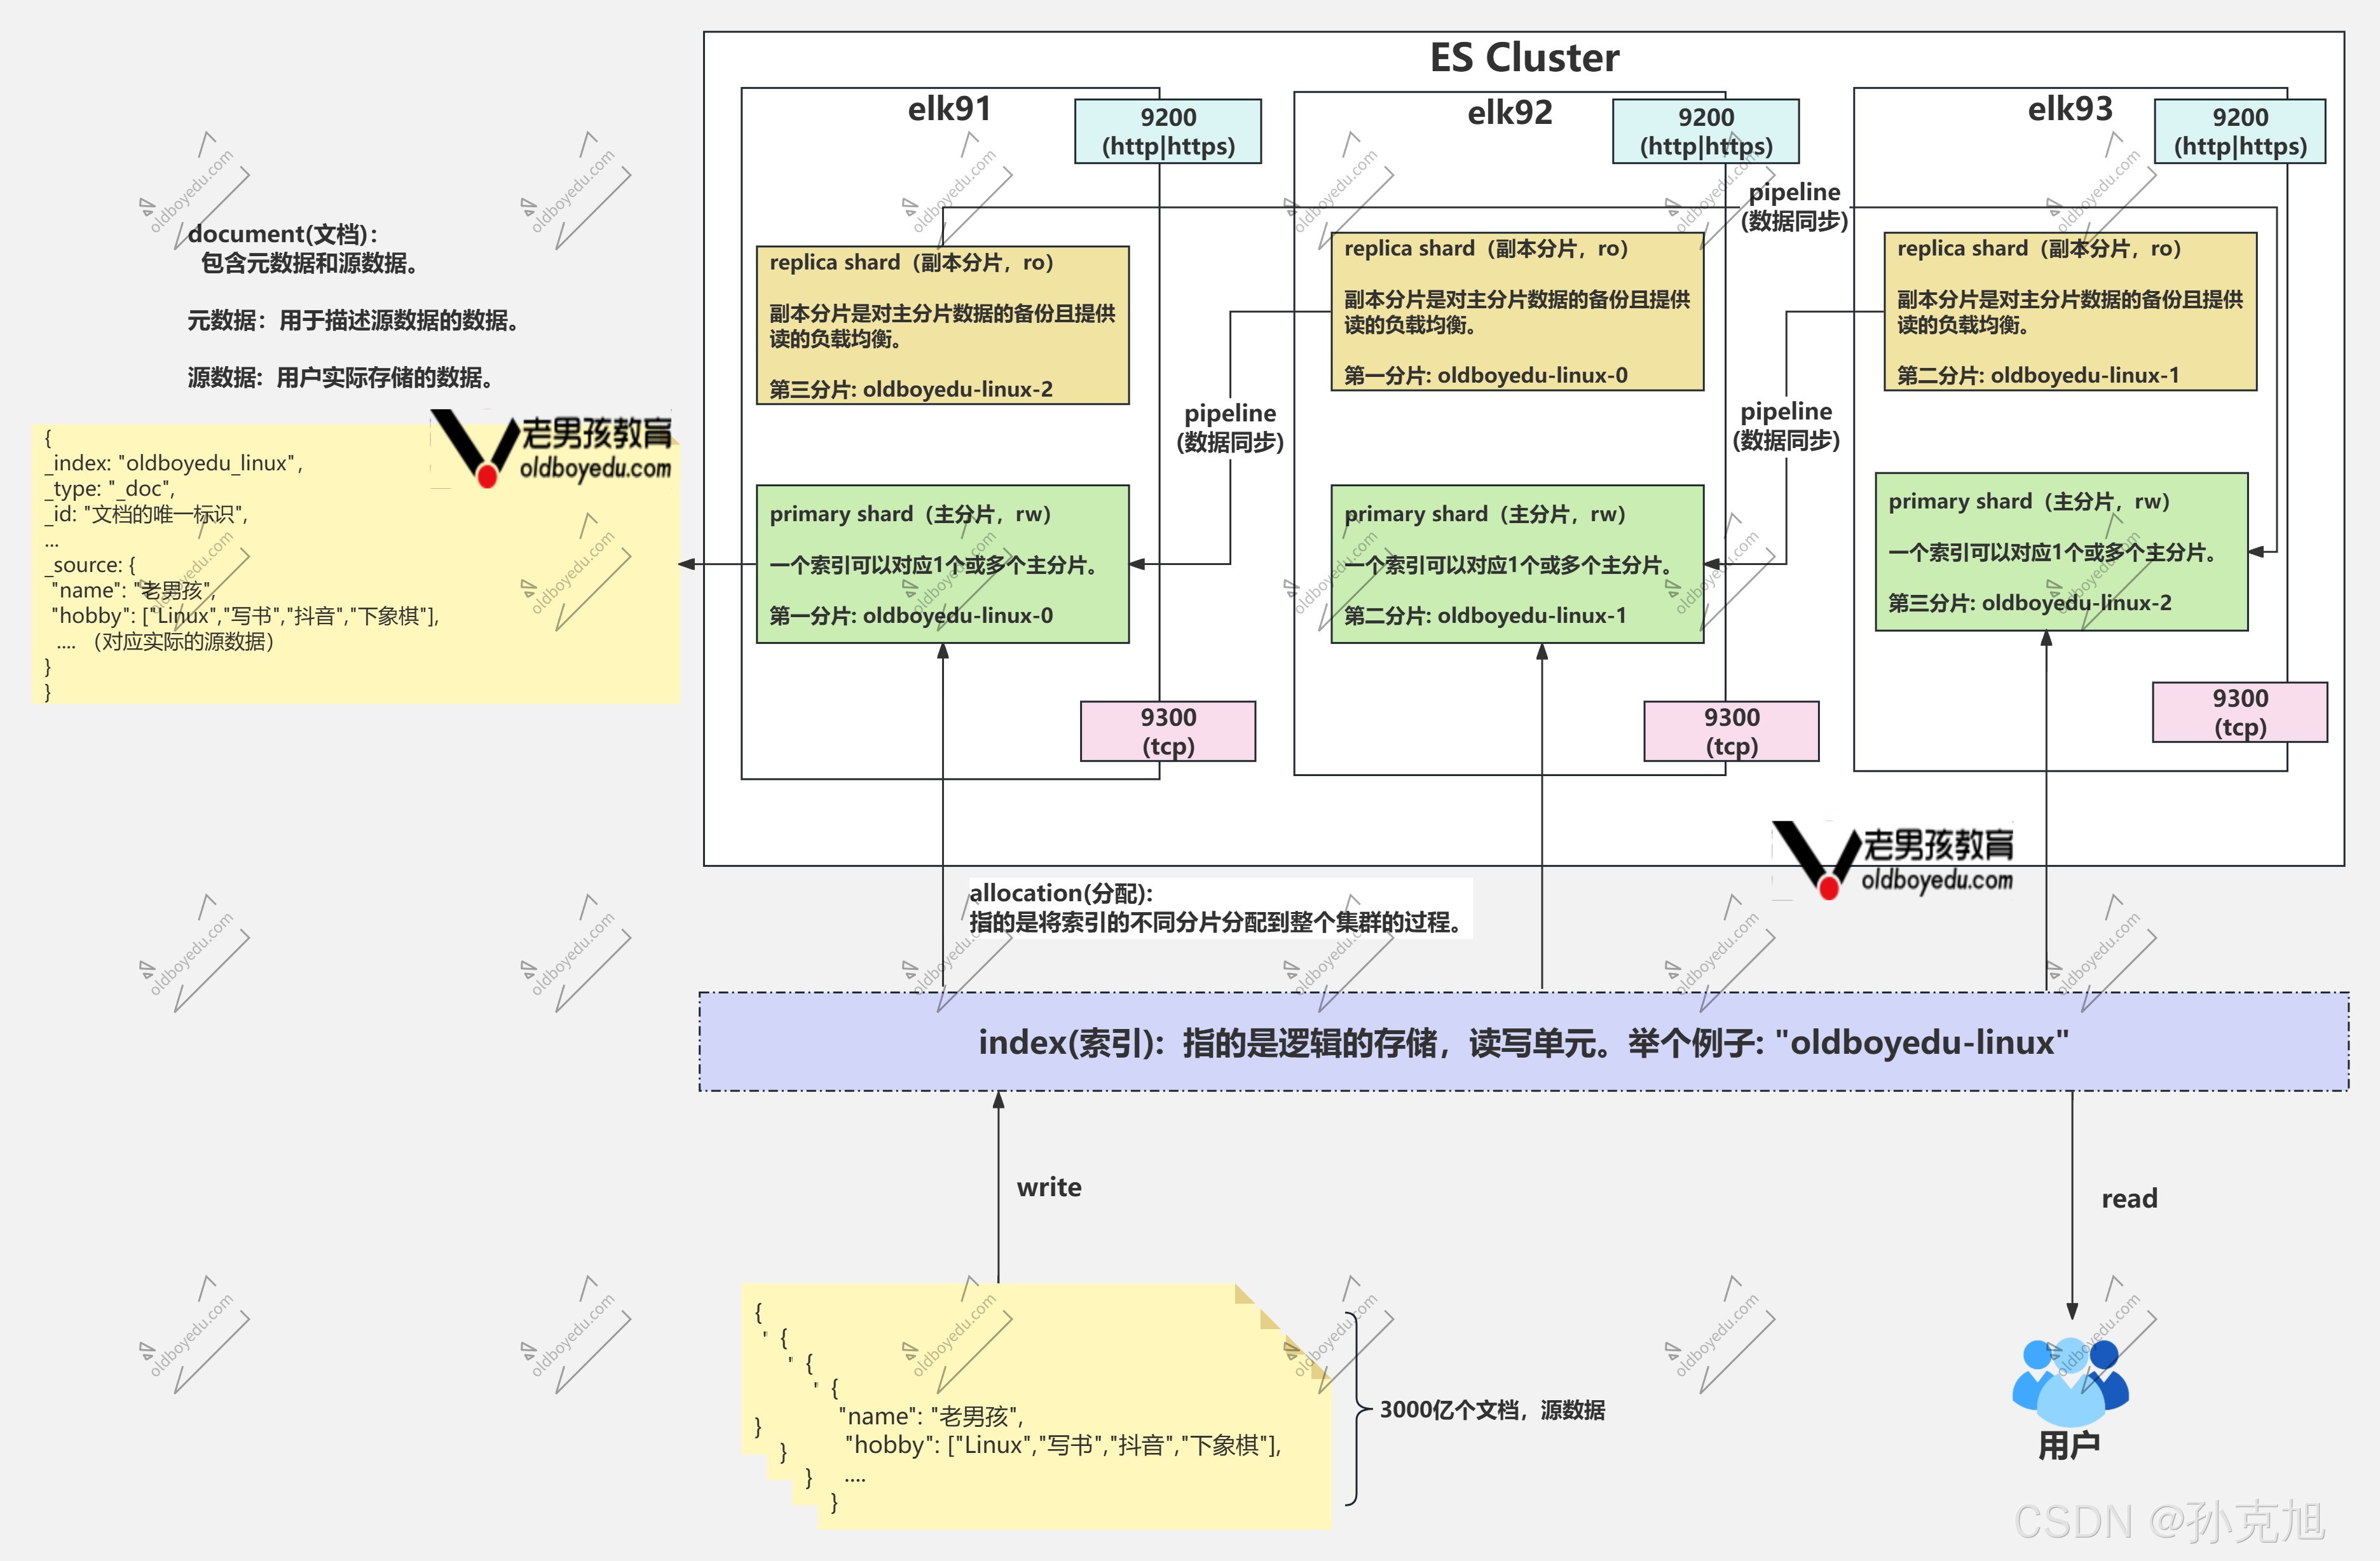
- 索引: index,索引 是文档的逻辑集合 ,类似于关系型数据库中的"数据库"或"表"
- ES集群数据存储的逻辑单元。对于客户端而言可以进行数据的读写。
- 分片: shard
- 一个索引对应一个或多个分片。当该索引的分片数量大于1时,意味着数据可以实现分布式存储。
- 负责处理写入请求(索引、更新、删除文档)
- 副本: replica,副本分片是主分片的完整拷贝
- 一个分片可以有0个或多个副本。当分片的数量大于等于1时,就可以对分片进行数据备份。
- 注意,副本分片和主分片的数据不能在同一个节点上,主分片负责数据的读写,而副本分片负责备份主分片,且可以负责读的负载均衡。
- 文档:文档 是 Elasticsearch 中可被索引和搜索的最小数据单元 ,类似于关系型数据库中的"一行记录"。
- 分片和副本存储的都是文档,文档是用户存储的数据实际载体。
- 文档分为元数据和源数据。
- 源数据指的是用户的实际数据。
- 元数据是用来描述源数据的数据,比如该文档术语哪个索引,文档的唯一编号等信息。
6. 面试题: ES集群的颜色分别代表什么含义?
plaintext
red: 红色
代表有部分主分片无法访问。一般情况下不会出现,如果数据量较大时启动时可能会短暂出现
yellow: 黄色
代表有部分副本分片无法访问。处于亚健康状态。
green: 绿色。
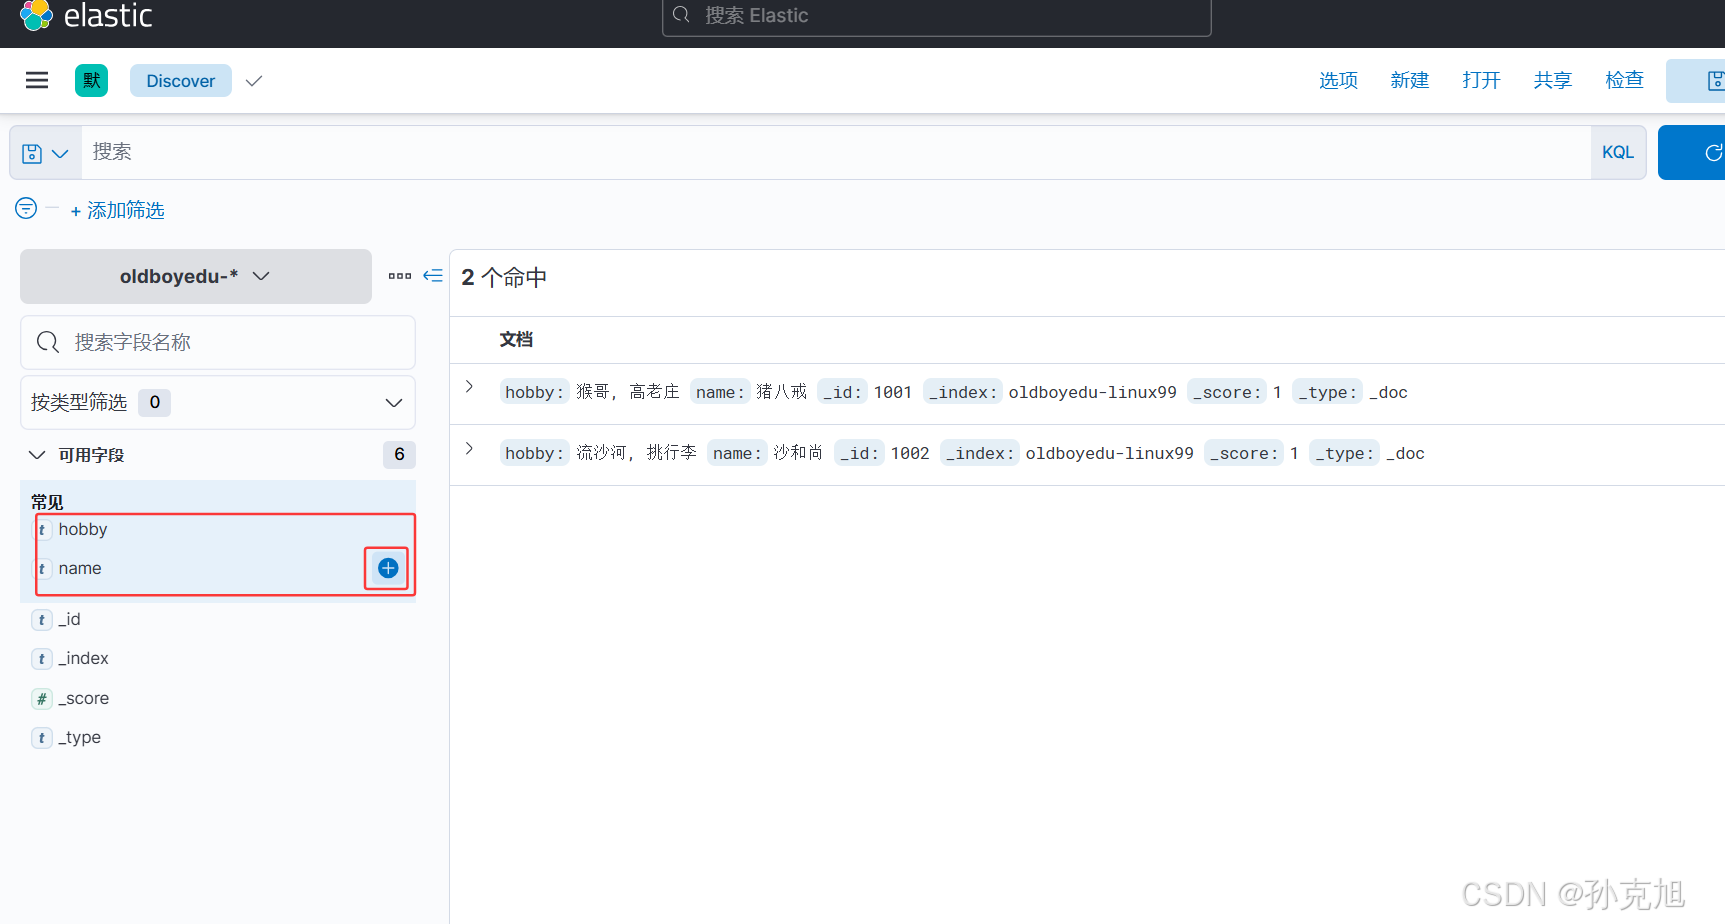
代表所有的主分片和副本分片均可以正常访问。7. ElasticSearch的DSL语句初体验
DSL语句:Domain Specific Language,DSL语句是/ElasticSearch的查询语言
shell
1.写入数据
curl --location --request POST 'http://10.0.0.91:9200/_bulk' \
--header 'Content-Type: application/json' \
--data-raw '{ "create" : { "_index" : "oldboyedu-linux99", "_id" : "1001" } }
{ "name" : "猪八戒","hobby": ["猴哥","高老庄"] }
{ "create" : { "_index" : "oldboyedu-linux99", "_id" : "1002" } }
{ "name" : "沙和尚","hobby": ["流沙河","挑行李"] }
{ "create" : { "_index" : "oldboyedu-linux99", "_id" : "1003" } }
{ "name" : "白龙马","hobby": ["大师兄,师傅被妖怪抓走啦"] }'

2.查询指定文档id的数据
[root@elk93 ~]# apt -y install jq
[root@elk93 ~]# curl -s --location --request GET '10.0.0.93:9200/oldboyedu-linux99/_doc/1003' | jq
{
  "_index": "oldboyedu-linux99",
  "_type": "_doc",
  "_id": "1003",
  "_version": 1,
  "_seq_no": 2,
  "_primary_term": 1,
  "found": true,
  "_source": {
    "name": "白龙马",
    "hobby": [
      "大师兄,师傅被妖怪抓走啦"
    ]
  }
}

3.查看所有数据
[root@elk93 ~]# curl -s --location --request GET '10.0.0.93:9200/oldboyedu-linux99/_search' | jq
{
  "took": 2,
  "timed_out": false,
  "_shards": {
    "total": 1,
    "successful": 1,
    "skipped": 0,
    "failed": 0
  },
  "hits": {
    "total": {
      "value": 3,
      "relation": "eq"
    },
    "max_score": 1,
    "hits": [
      {
        "_index": "oldboyedu-linux99",
        "_type": "_doc",
        "_id": "1001",
        "_score": 1,
        "_source": {
          "name": "猪八戒",
          "hobby": [
            "猴哥",
            "高老庄"
          ]
        }
      },
      {
        "_index": "oldboyedu-linux99",
        "_type": "_doc",
        "_id": "1002",
        "_score": 1,
        "_source": {
          "name": "沙和尚",
          "hobby": [
            "流沙河",
            "挑行李"
          ]
        }
      },
      {
        "_index": "oldboyedu-linux99",
        "_type": "_doc",
        "_id": "1003",
        "_score": 1,
        "_source": {
          "name": "白龙马",
          "hobby": [
            "大师兄,师傅被妖怪抓走啦"
          ]
        }
      }
    ]
  }
}

4.删除数据
[root@elk93 ~]# curl -s --location --request DELETE '10.0.0.93:9200/oldboyedu-linux99/_doc/1003' | jq
{
  "_index": "oldboyedu-linux99",
  "_type": "_doc",
  "_id": "1003",
  "_version": 2,
  "result": "deleted",
  "_shards": {
    "total": 2,
    "successful": 2,
    "failed": 0
  },
  "_seq_no": 3,
  "_primary_term": 1
}
8. kibana环境部署
8.1 软件下载
- 官方下载地址:
[Past Releases of Elastic Stack Software | Elastic](https://www.elastic.co/downloads/past-releases#kibana)
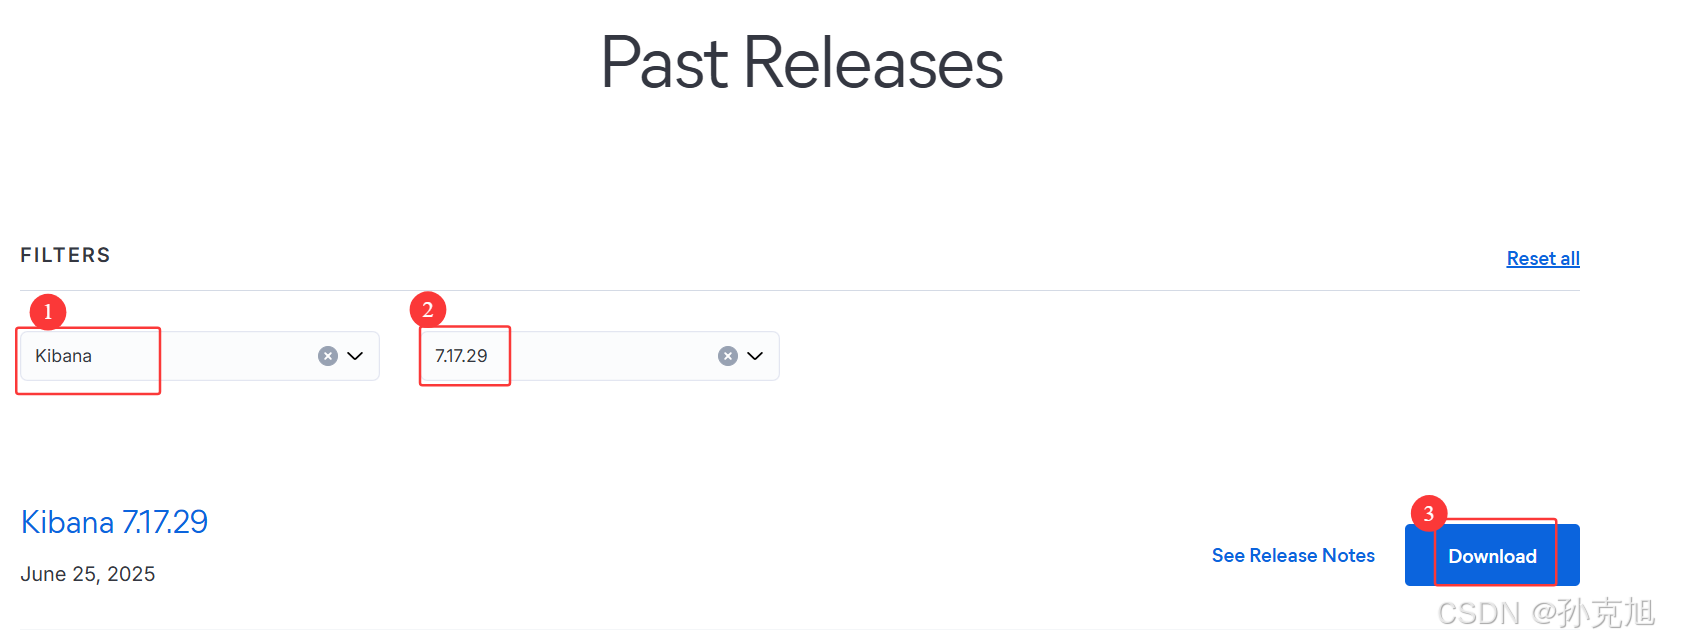
- 软件包:
kibana-7.17.29-amd64.deb 链接: https://pan.baidu.com/s/1NvQgPx8VFXwzCkB8zrKF4Q?pwd=uaje 提取码: uaje
8.2 修改配置文件
shell
1.安装kibana
[root@elk91 ~]# dpkg -i kibana-7.17.29-amd64.deb
2.修改kibana的配置文件
[root@elk91 ~]# egrep -v "^#|^$" /etc/kibana/kibana.yml
server.port: 5601
server.host: "0.0.0.0"
elasticsearch.hosts: ["http://10.0.0.91:9200","http://10.0.0.92:9200","http://10.0.0.93:9200"]
i18n.locale: "zh-CN"
3.启动kibana服务
[root@elk91 ~]# systemctl enable --now kibana.service
[root@elk91 ~]# ss -ntl | grep 5601
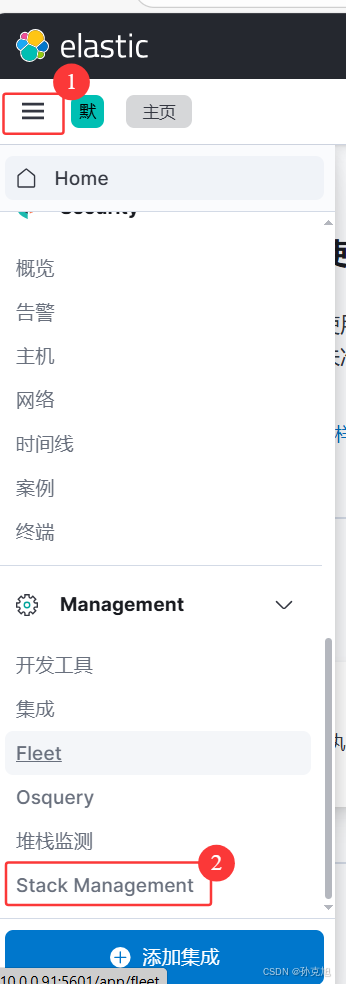
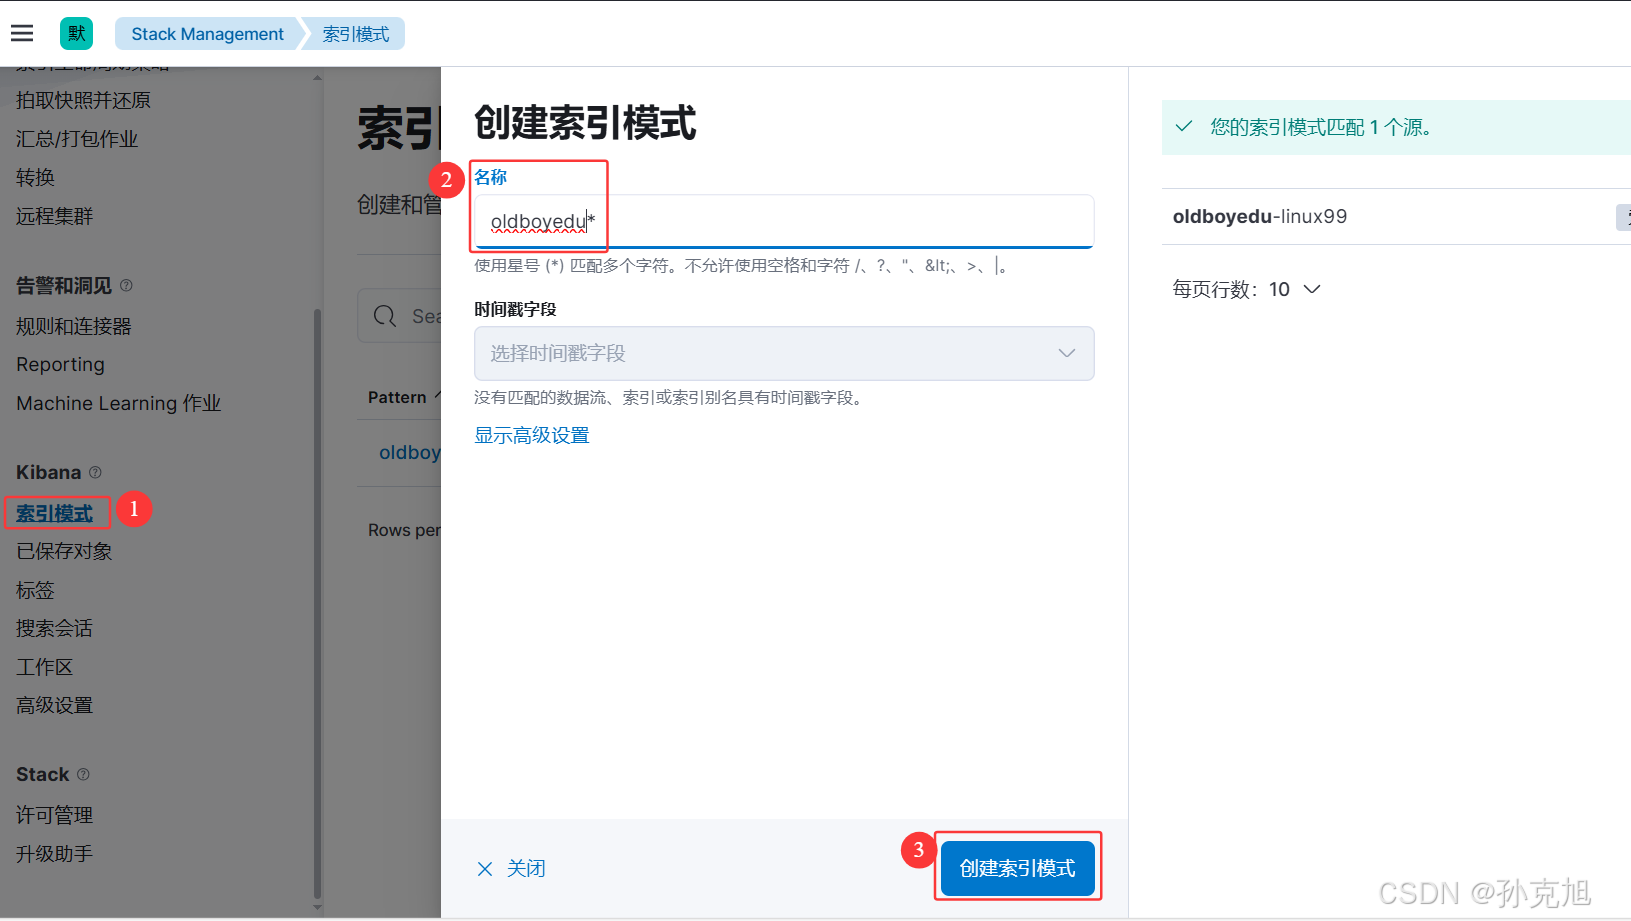
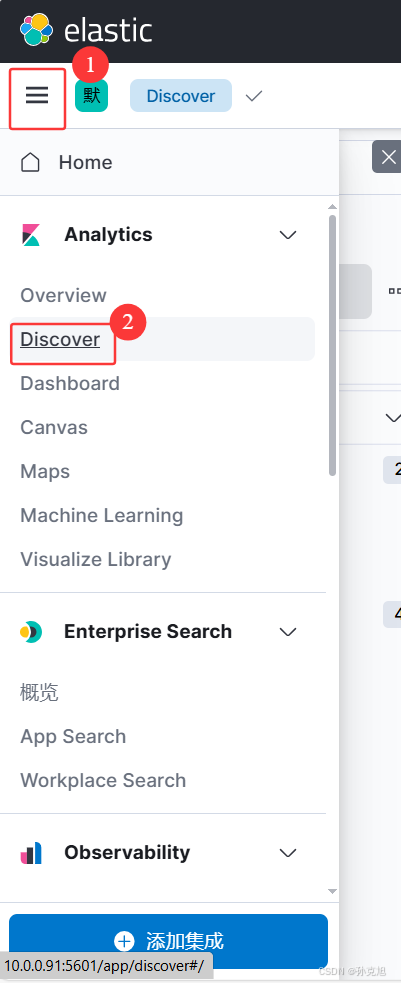
LISTEN 0 511 0.0.0.0:5601 0.0.0.0:*8.3 页面测试
9. filebeat环境部署
- filebeat的配置文件文档:
[TCP input | Filebeat Reference [7.17] | Elastic](https://www.elastic.co/guide/en/beats/filebeat/7.17/filebeat-input-tcp.html)
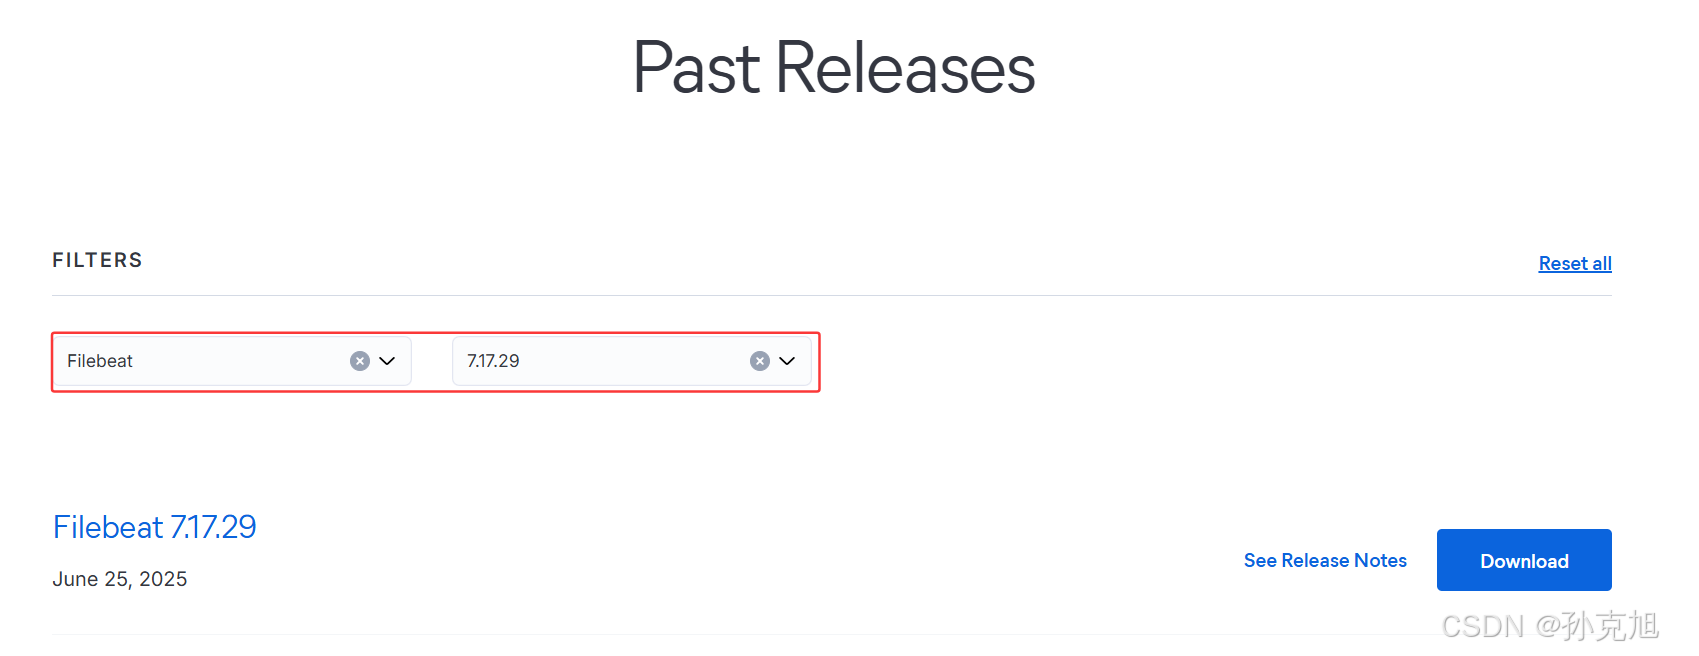
- 软件包:
filebeat-7.17.29-amd64.deb 链接: https://pan.baidu.com/s/1eO_YKLgp_RQF_63LGZf8CA?pwd=wecm 提取码: wecm
shell
2.安装Filebeat
[root@elk92 ~]# dpkg -i filebeat-7.17.29-amd64.deb


3.修改Filebeat的配置文件
[root@elk92 ~]# mkdir /etc/filebeat/config
[root@elk92 ~]# cat /etc/filebeat/config/01-stdin-to-console.yaml
filebeat.inputs:
- type: stdin


output.console:
  pretty: true

4.启动Filebeat程序
[root@elk92 ~]# filebeat -e -c /etc/filebeat/config/01-stdin-to-console.yaml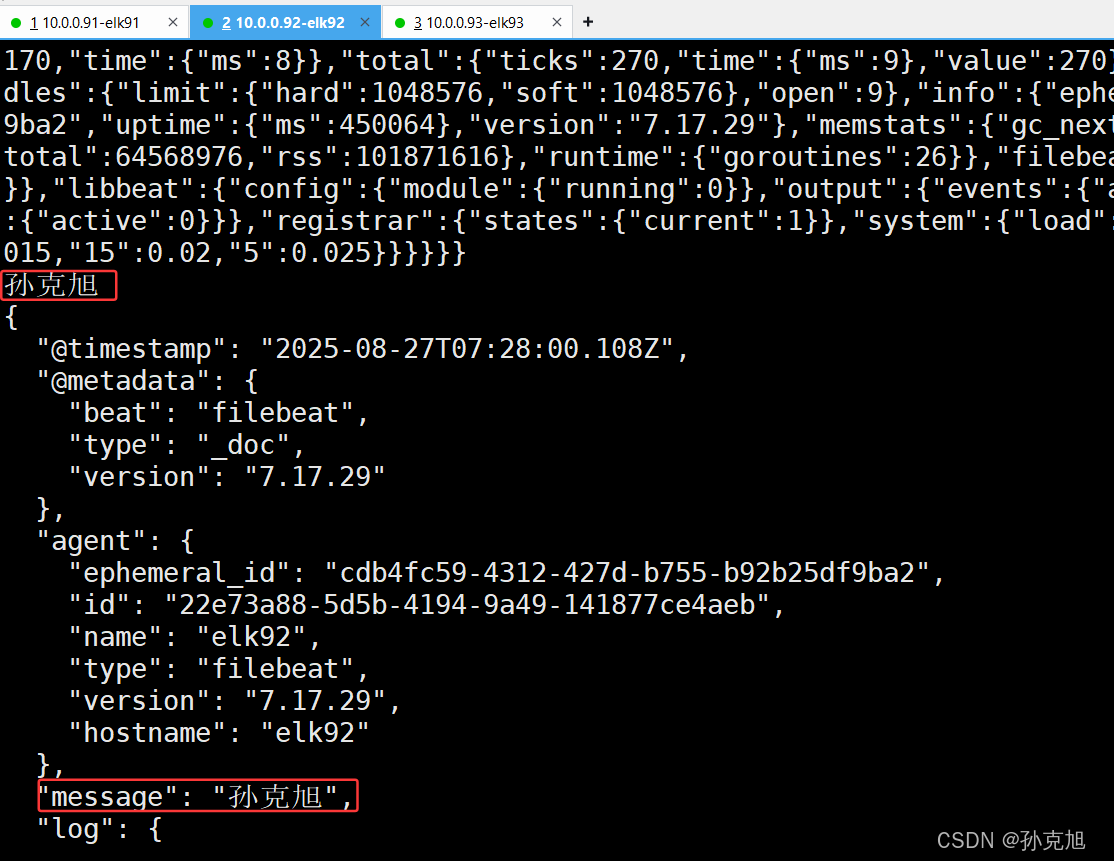
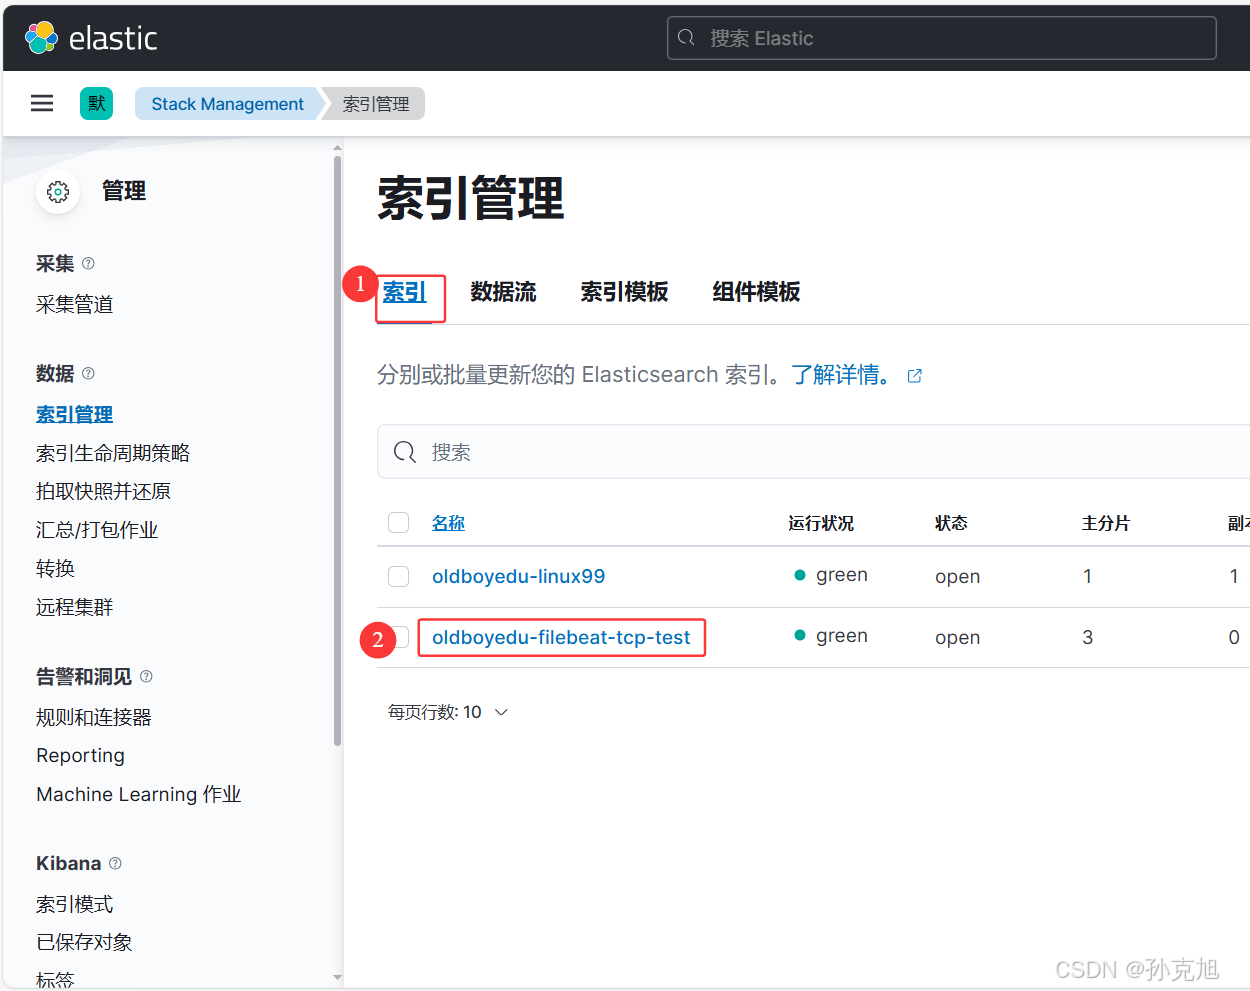
10. EFK架构实战案例
10.1 编写配置文件
shell
[root@elk92 ~]# cat /etc/filebeat/config/02-tcp-to-es.yaml
filebeat.inputs:
- type: tcp
host: "0.0.0.0:9000"
#output.console:
# pretty: true
# 将数据写入到ES集群
output.elasticsearch:
# 指定ES集群地址
hosts: ["http://10.0.0.91:9200","http://10.0.0.92:9200","http://10.0.0.93:9200"]
# 指定ES的索引名称
index: oldboyedu-filebeat-tcp-test
# 禁用索引的生命周期,否则自定义索引名称无效
setup.ilm.enabled: false
# 定义索引模板
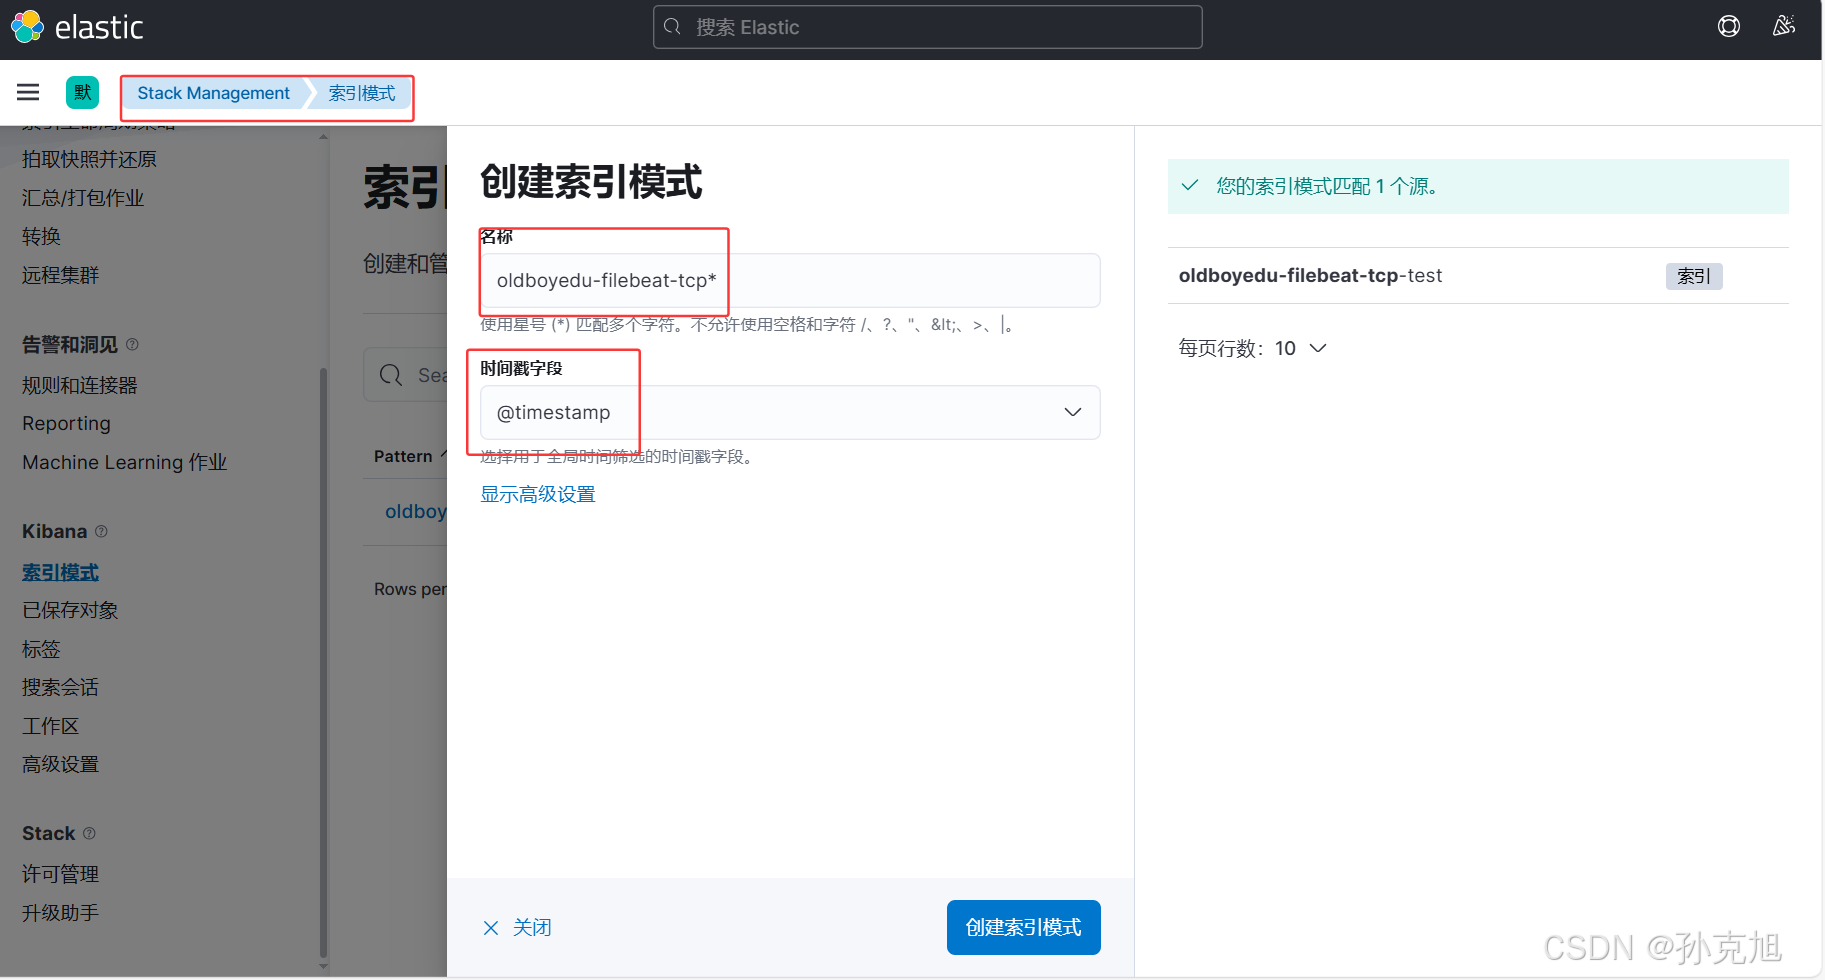
setup.template.name: "oldboyedu-filebeat-tcp"
# 定义索引模板的匹配模式
setup.template.pattern: "oldboyedu-filebeat-tcp*"
# 如果索引模板已经存在是否覆盖
setup.template.overwrite: false
# 配置索引模板
setup.template.settings:
# 指定分片数量
index.number_of_shards: 3
# 指定副本数量
index.number_of_replicas: 0
shell
2.启动Filebeat实例
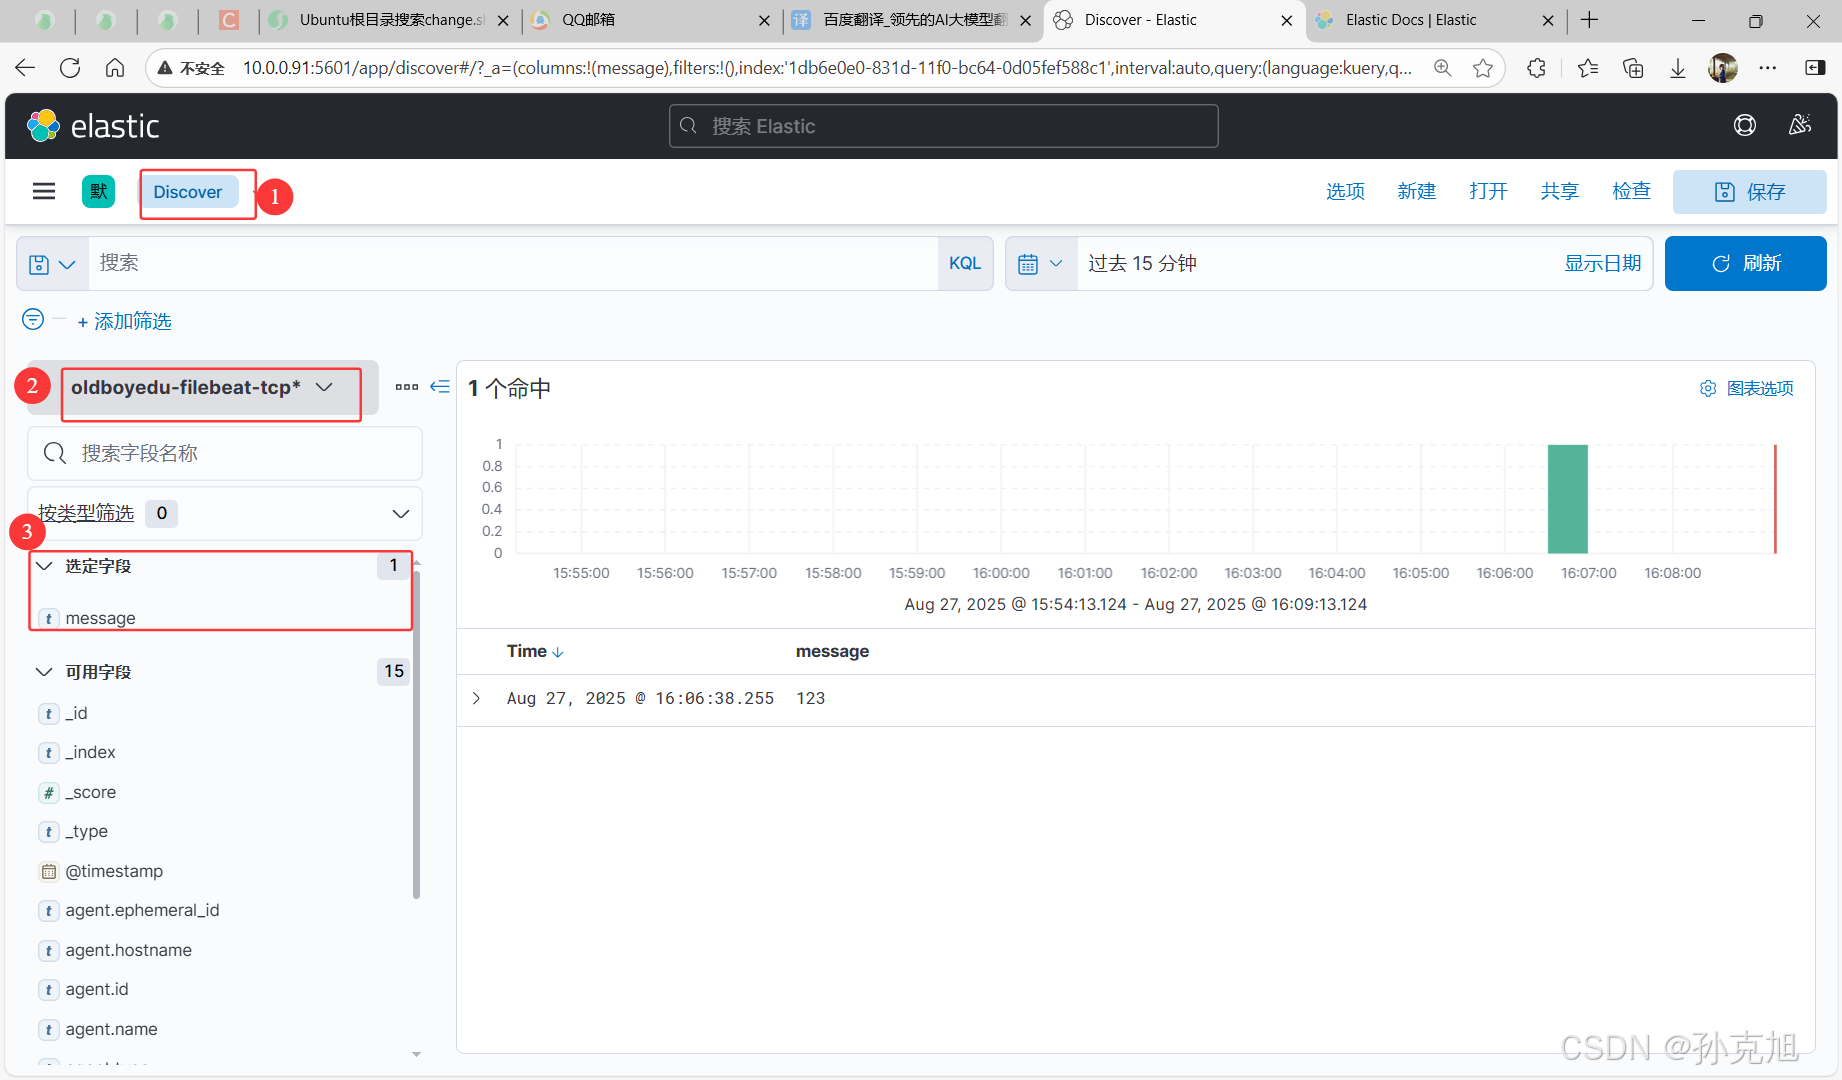
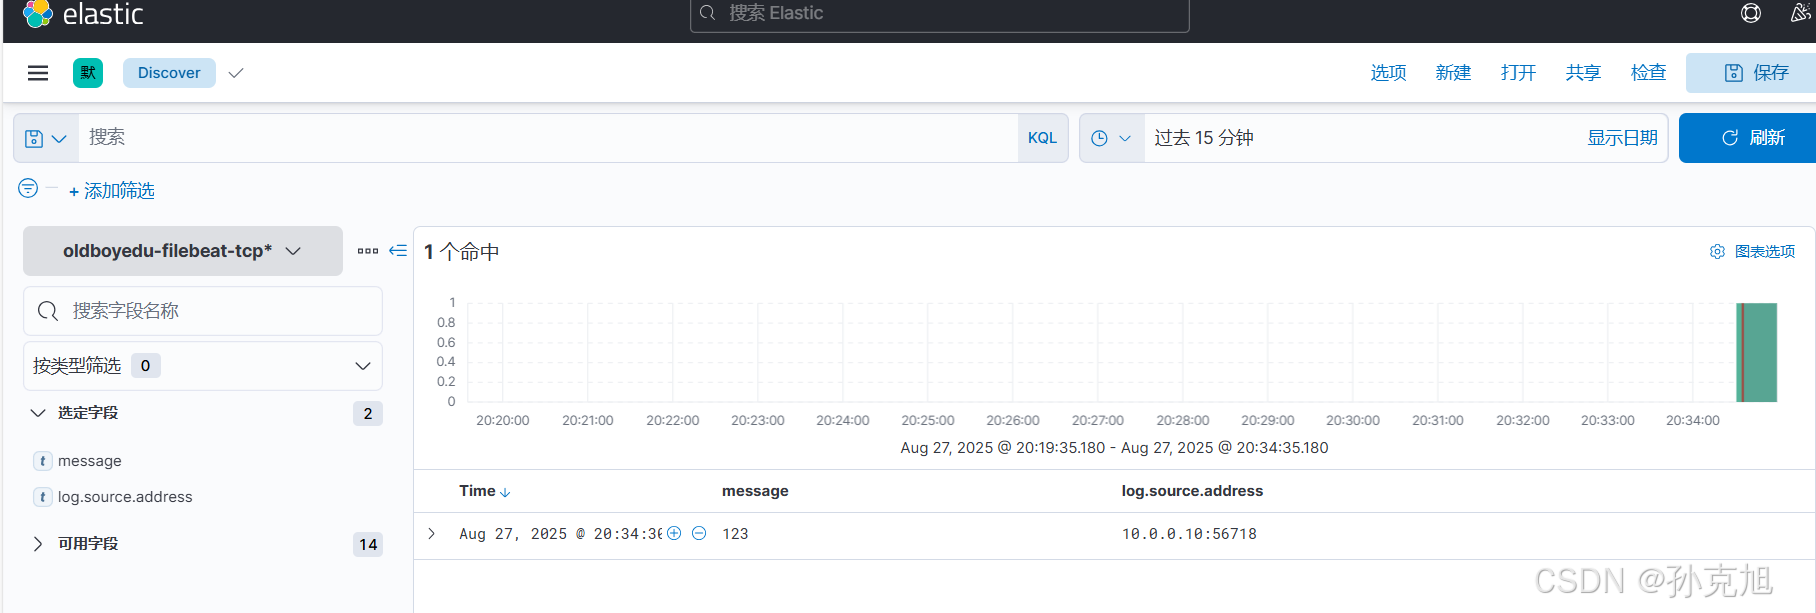
[root@elk92 ~]# filebeat -e -c /etc/filebeat/config/02-tcp-to-es.yaml10.2 发送测试数据
shell
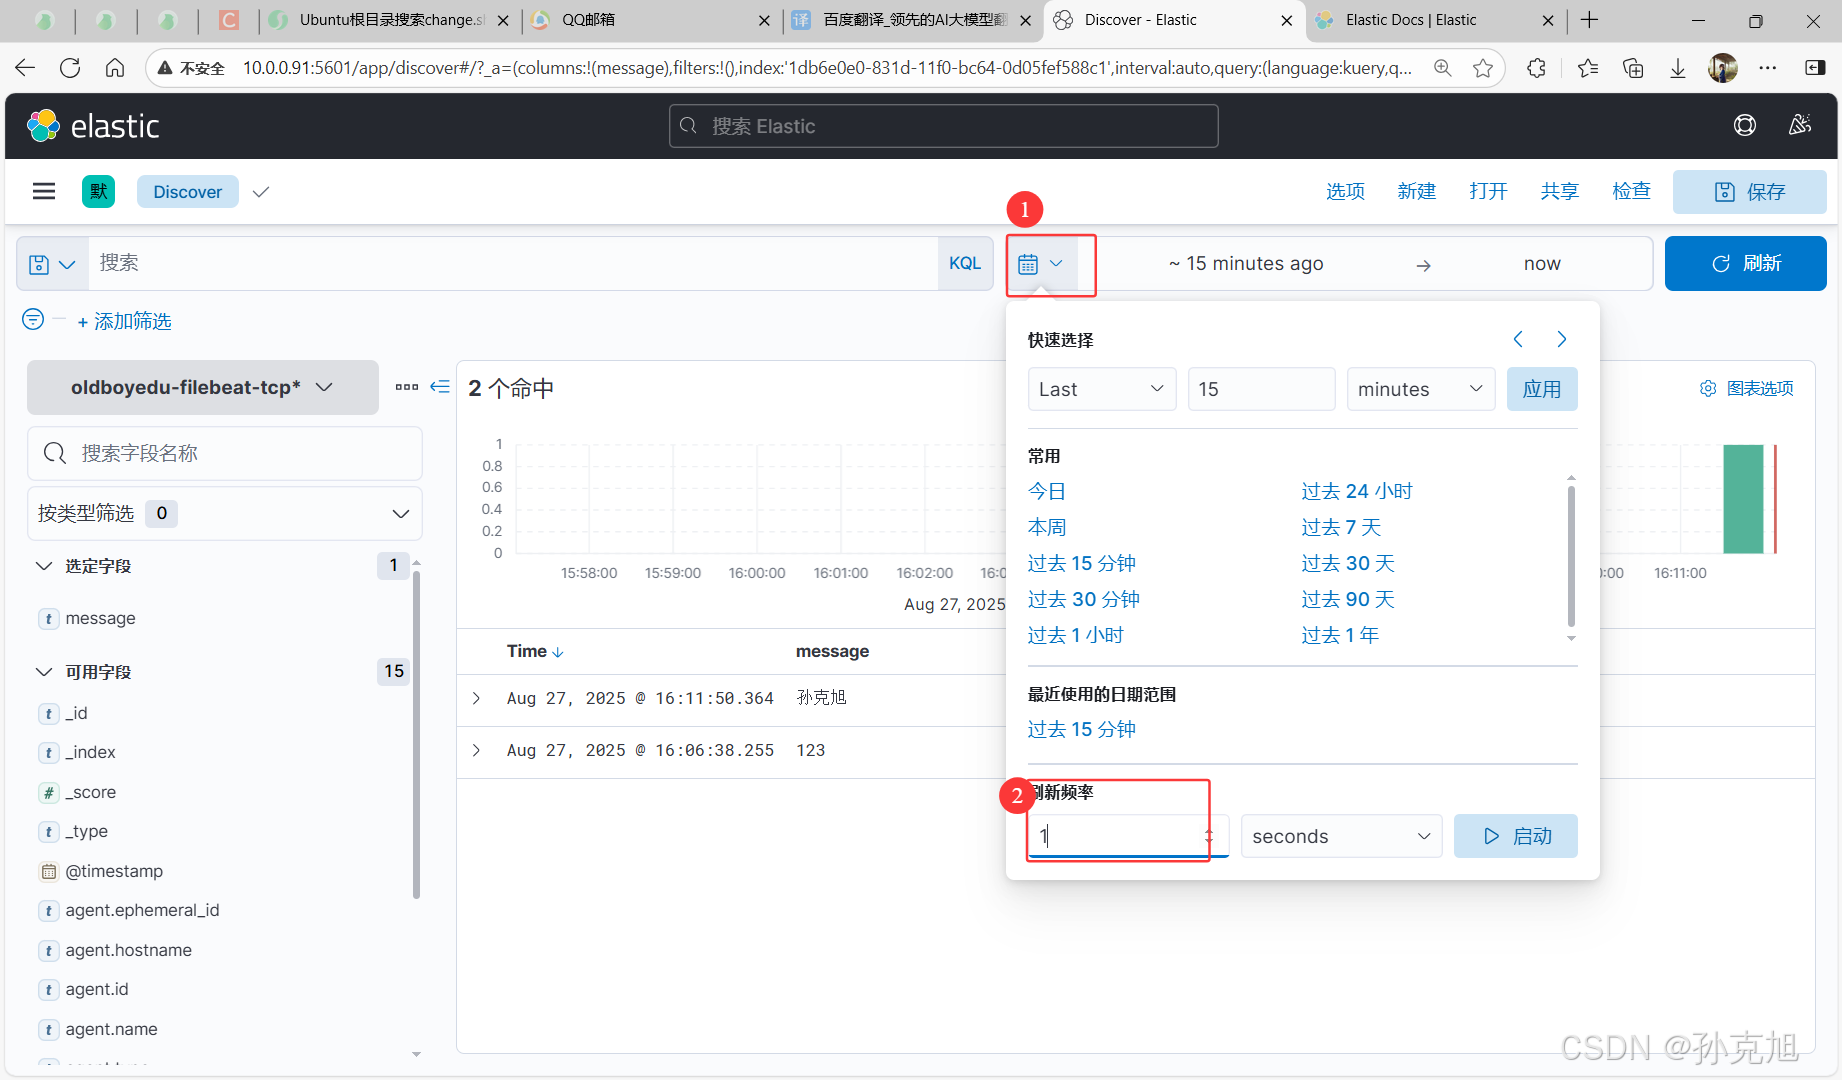
[root@elk93 ~]# echo 123 |nc 10.0.0.92 9000
[root@elk93 ~]# echo 孙克旭 |nc 10.0.0.92 9000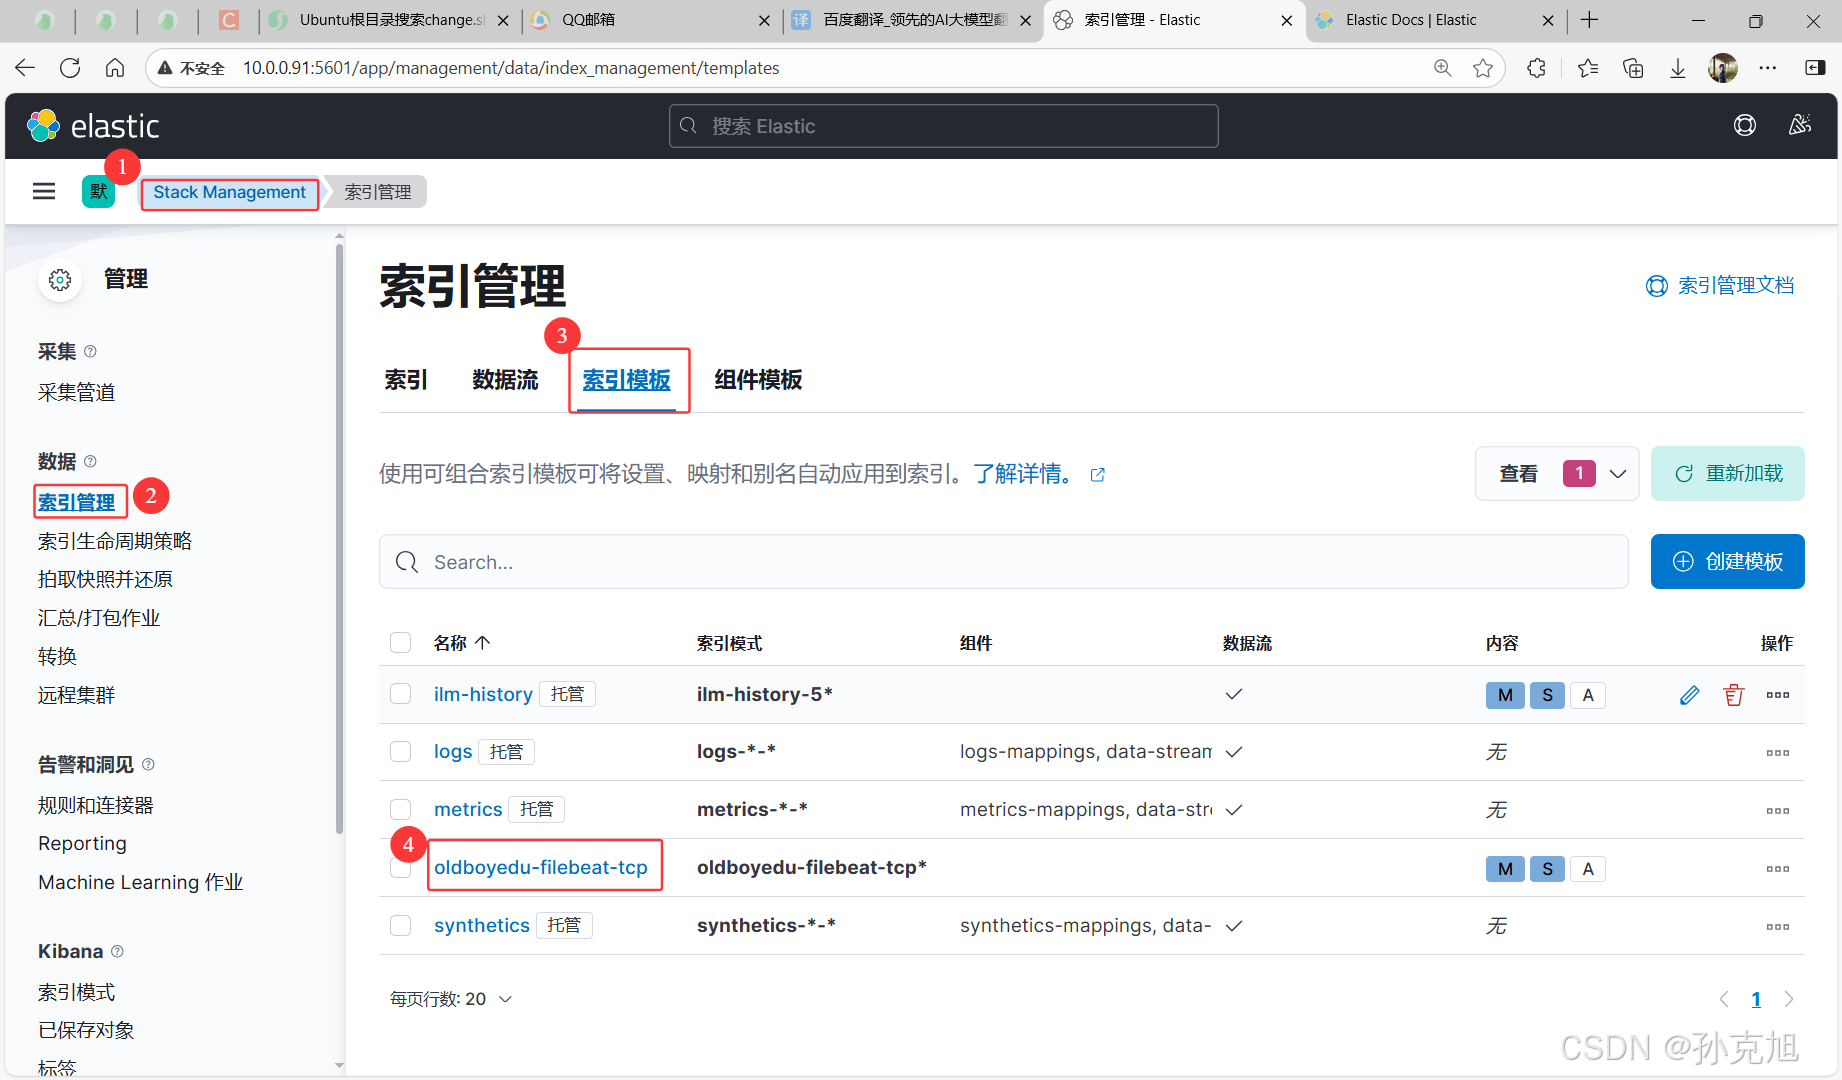
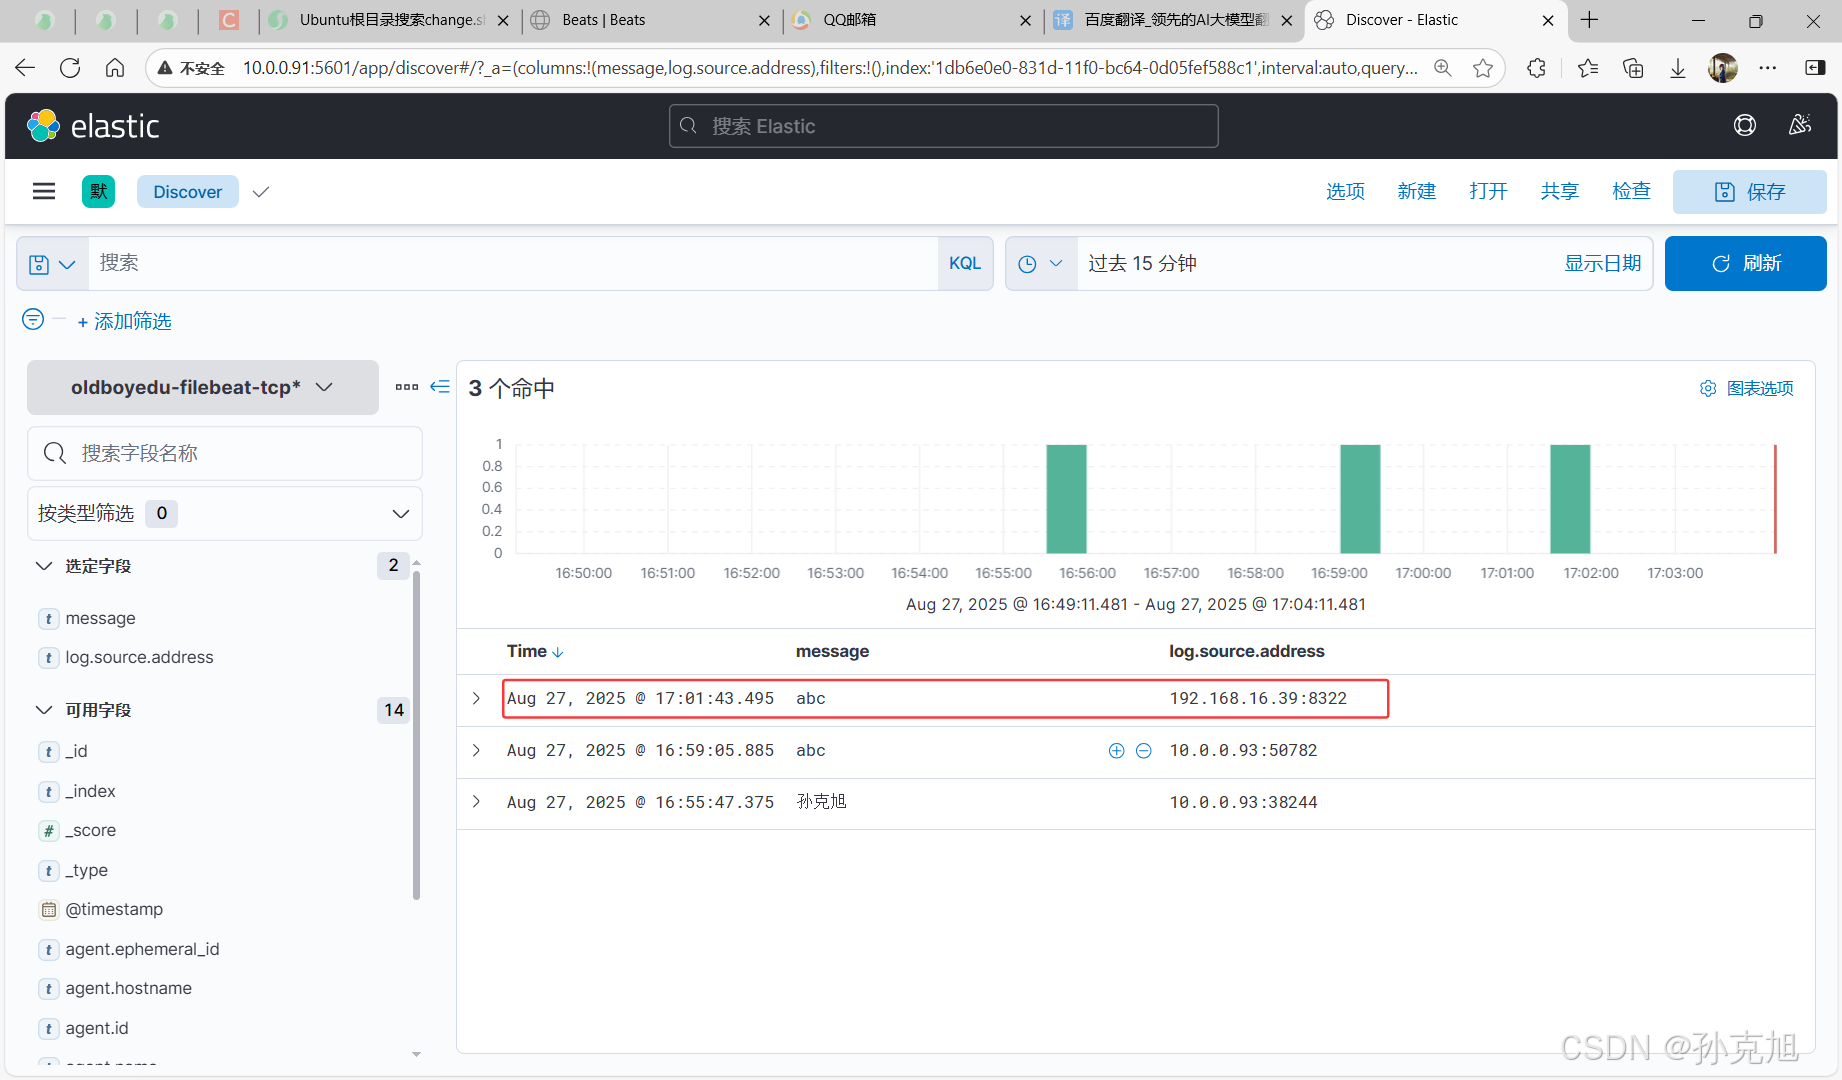
10.3 主机端口映射
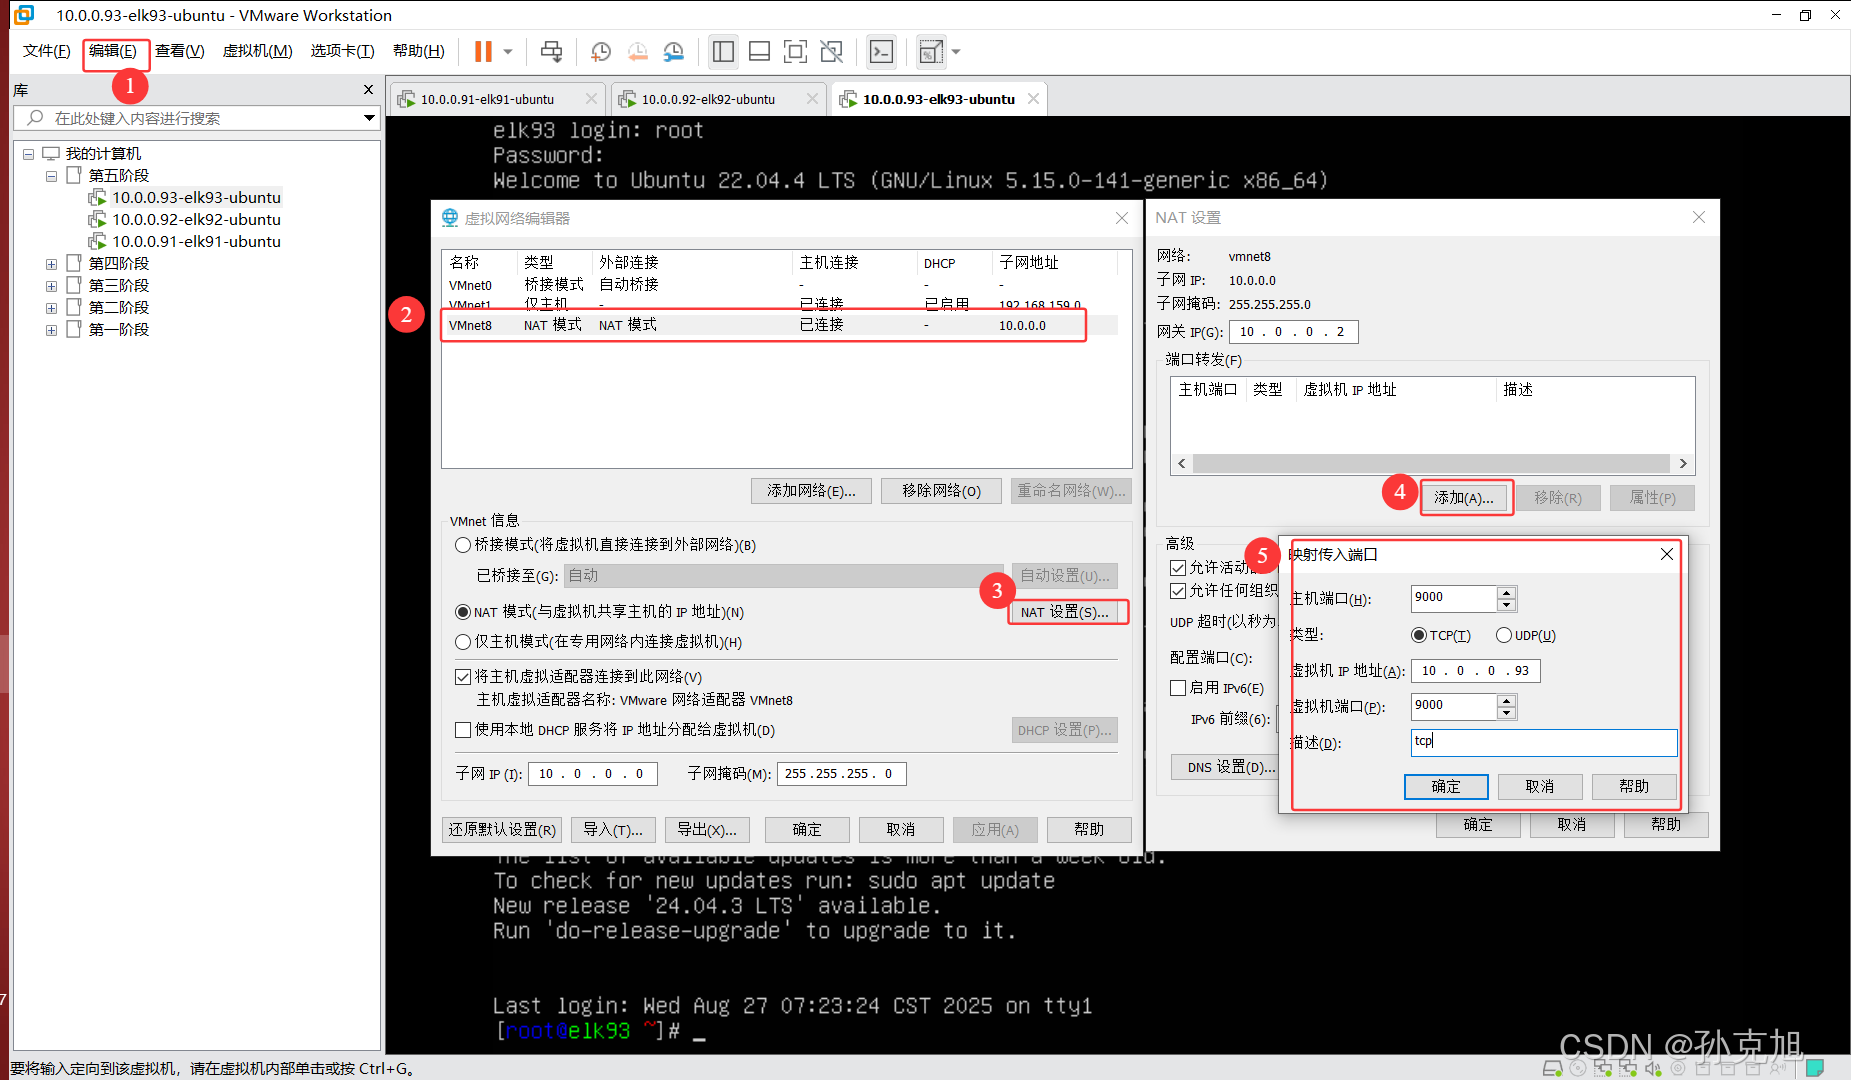
- 使用以太网ip发送:
echo abc |nc 192.168.16.39 9000
11. 思维导图
https://kdocs.cn/join/gpuxq6r?f=101\\r\\n邀请你加入共享群「老男孩教育Linux运维99期-孙克旭」一起进行文档协作
12. 麒麟系统部署EFK架构
12.1 ES
- 软件包:
elasticsearch-7.17.28-x86_64.rpm等2个文件 链接: https://pan.baidu.com/s/1EvnBMjQKG47uAhpTMiVE6w?pwd=5y1y 提取码: 5y1y
shell
rpm -ivh elasticsearch-7.17.28-x86_64.rpm
[root@db01 ~]# grep -vE '^#|^$' /etc/elasticsearch/elasticsearch.yml
cluster.name: oldboyedu-linux99-single
path.data: /var/lib/elasticsearch
path.logs: /var/log/elasticsearch
network.host: 0.0.0.0
http.port: 9200
discovery.type: single-node

systemctl enable --now elasticsearch
12.2 kibana
- 软件包:
kibana-7.17.28-x86_64.rpm等2个文件 链接: https://pan.baidu.com/s/1a_AgimuLBZXaCpynkXB_LQ?pwd=6e2d 提取码: 6e2d
shell
[root@db01 ~]# rpm -ivh kibana-7.17.28-x86_64.rpm
......
[root@db01 ~]# grep -Ev '^#|^$' /etc/kibana/kibana.yml
server.port: 5601
server.host: "0.0.0.0"
elasticsearch.hosts: ["http://localhost:9200"]
i18n.locale: "zh-CN"
[root@db01 ~]# systemctl enable --now kibana.service
13.3 filebeat
- 软件包:
filebeat-7.17.28-x86_64.rpm等2个文件 链接: https://pan.baidu.com/s/1BEsWCC5Zn0nU0HZDIeR1ag?pwd=fcd6 提取码: fcd6
shell
[root@db01 ~]# rpm -ivh filebeat-7.17.28-x86_64.rpm
警告:filebeat-7.17.28-x86_64.rpm: 头V4 RSA/SHA512 Signature, 密钥 ID d88e42b4: NOKEY
Verifying...                          ################################# [100%]
准备中...                          ################################# [100%]
正在升级/安装...
   1:filebeat-7.17.28-1               ################################# [100%]
[root@db01 ~]# mkdir /etc/filebeat/config
[root@db01 ~]# vim /etc/filebeat/config/02-tcp-to-es.yaml
[root@db01 ~]# cat /etc/filebeat/config/02-tcp-to-es.yaml
filebeat.inputs:
- type: tcp
  host: "0.0.0.0:9000"

#output.console:
#  pretty: true

# 将数据写入到ES集群
output.elasticsearch:
  # 指定ES集群地址
  hosts: ["http://10.0.0.20:9200"]
  # 指定ES的索引名称
  index: oldboyedu-filebeat-tcp-test

# 禁用索引的生命周期,否则自定义索引名称无效
setup.ilm.enabled: false
# 定义索引模板
setup.template.name: "oldboyedu-filebeat-tcp"
# 定义索引模板的匹配模式
setup.template.pattern: "oldboyedu-filebeat-tcp*"
# 如果索引模板已经存在是否覆盖
setup.template.overwrite: false
# 配置索引模板
setup.template.settings:
  # 指定分片数量
  index.number_of_shards: 3
  # 指定副本数量
  index.number_of_replicas: 0


[root@db01 ~]# filebeat -e -c /etc/filebeat/config/02-tcp-to-es.yaml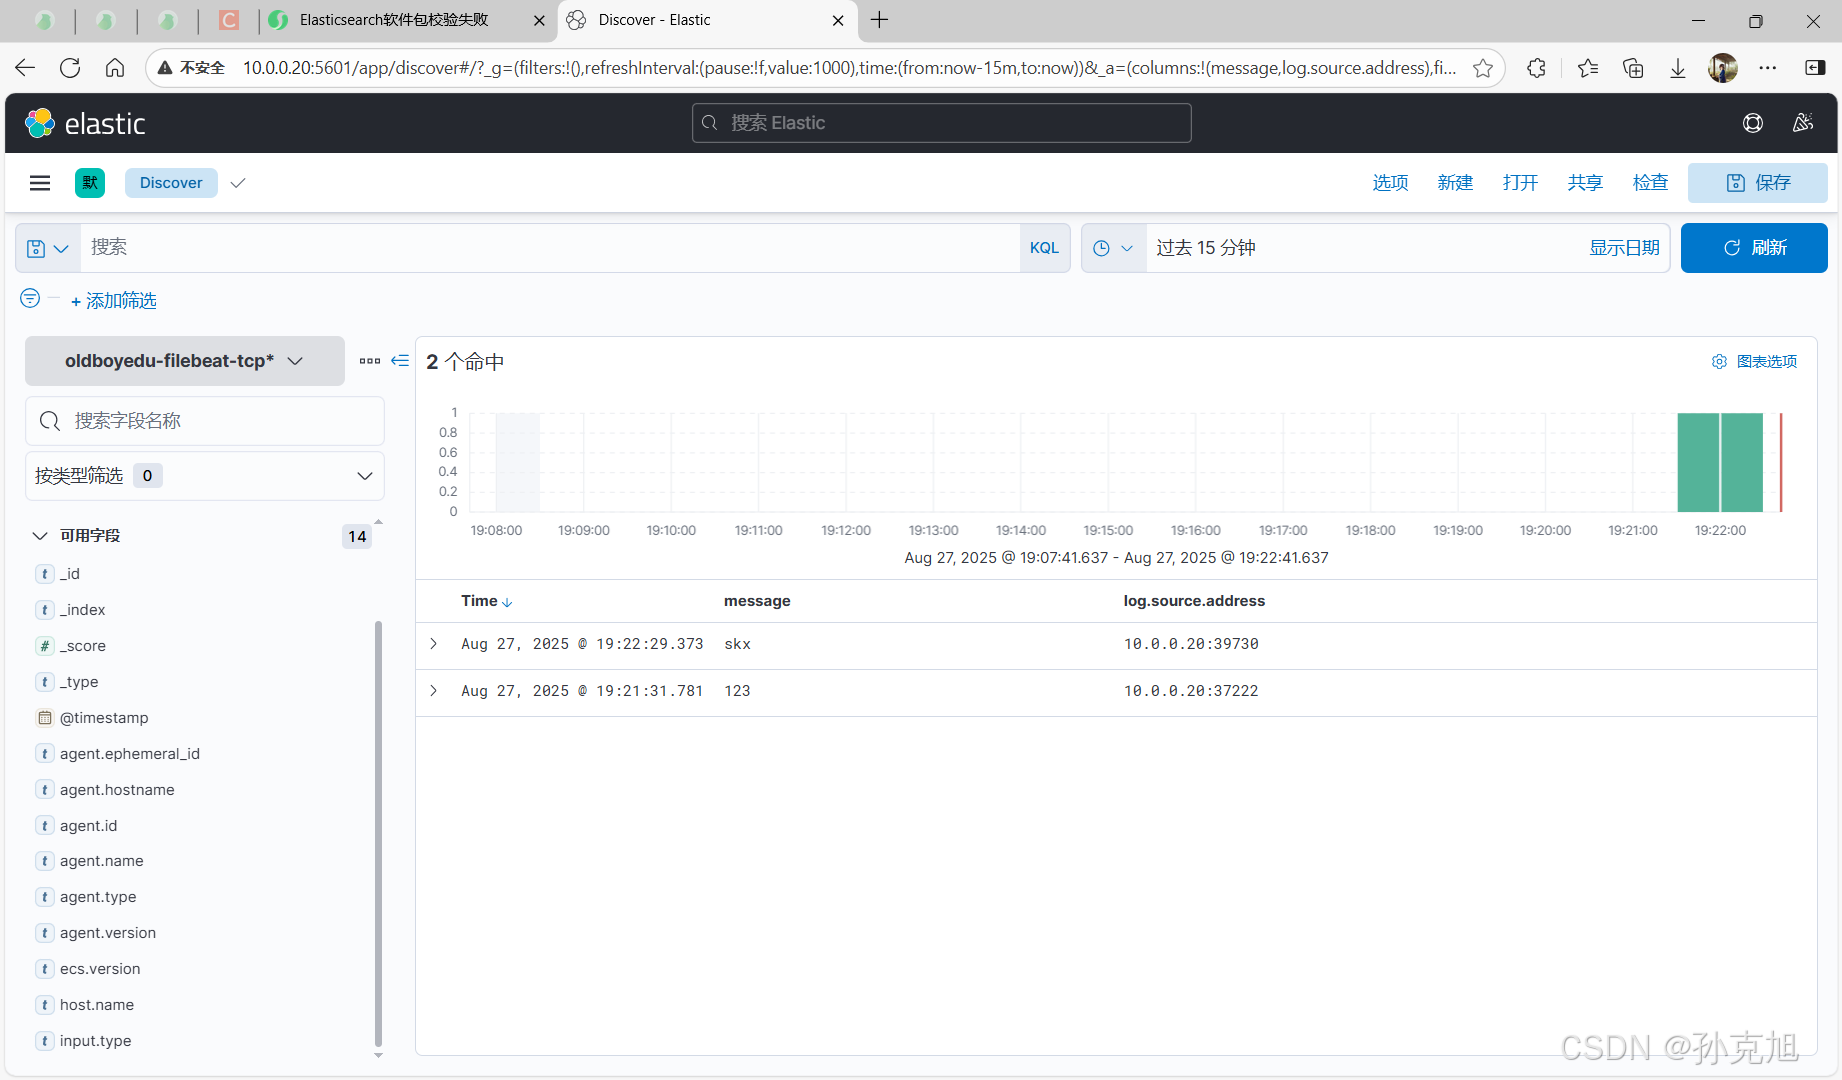
13. ansible一键部署EFK架构
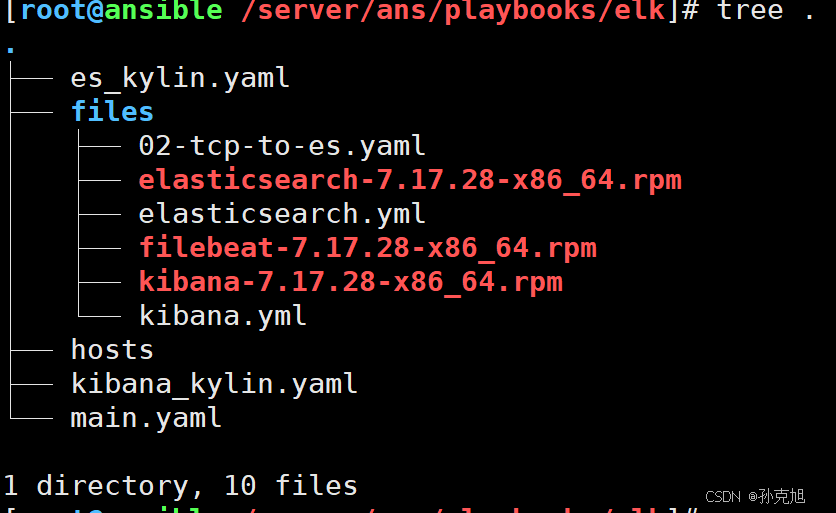
shell
[root@ansible /server/ans/playbooks/elk]# cat hosts
[es]
10.0.0.20
10.0.0.10
10.0.0.11
[kb]
10.0.0.20

[root@ansible /server/ans/playbooks/elk]# cat es_kylin.yaml
---
- name: 部署分布式es
  hosts: es
  vars:
    rpm_packages:
      - elasticsearch-7.17.28-x86_64.rpm
    # 添加明确的临时目录变量
    temp_dir: /tmp

  tasks:
    - name: 关闭 Elasticsearch 服务(如果正在运行)
      ansible.builtin.systemd:
        name: elasticsearch
        state: stopped
      become: yes
      # 只有在服务存在且运行时才执行
      ignore_errors: yes

    - name: 将 RPM 包复制到远程临时目录
      ansible.builtin.copy:
        src: "files/{{ item }}"
        dest: "{{ temp_dir }}/{{ item }}"
        mode: '0644'
      loop: "{{ rpm_packages }}"

    - name: 使用 rpm 命令安装软件包
      ansible.builtin.command:
        cmd: "rpm -ivh {{ temp_dir }}/{{ item }}"
      loop: "{{ rpm_packages }}"
      become: yes
      ignore_errors: yes
      tags: install_rpms

    - name: 清除原有日志数据
      ansible.builtin.file:
        path: "{{ item }}"
        state: absent
      loop:
        - /var/log/elasticsearch/
        - /var/lib/elasticsearch/
      become: yes
      # 只在目录存在时执行删除
      when: item.stat.exists | default(False)
      ignore_errors: yes

    - name: 创建 Elasticsearch 数据目录(如果被删除了)
      ansible.builtin.file:
        path: "{{ item }}"
        state: directory
        mode: '0755'
        owner: elasticsearch
        group: elasticsearch
      loop:
        - /var/log/elasticsearch
        - /var/lib/elasticsearch
      become: yes

    - name: 部署 Elasticsearch 配置文件
      ansible.builtin.copy:
        src: files/elasticsearch.yml
        dest: /etc/elasticsearch/elasticsearch.yml
        backup: yes
        mode: '0644'
        owner: elasticsearch
        group: elasticsearch
      become: yes

    - name: 启用并启动 Elasticsearch 服务
      ansible.builtin.systemd:
        name: elasticsearch
        state: started
        enabled: yes
        daemon_reload: yes
      become: yes

    - name: 清理临时 RPM 文件
      ansible.builtin.file:
        path: "{{ temp_dir }}/{{ item }}"
        state: absent
      loop: "{{ rpm_packages }}"
      tags: cleanup

[root@ansible /server/ans/playbooks/elk]# cat kibana_kylin.yaml
---
- name: 部署kibana和filebeat
  hosts: kb
  vars:
    rpm_packages:
      - kibana-7.17.28-x86_64.rpm
  tasks:
    # 首先安装 RPM 包
    - name: 将 Kibana RPM 包复制到远程临时目录
      ansible.builtin.copy:
        src: "files/{{ item }}"
        dest: "/tmp/{{ item }}"
        mode: '0644'
      loop: "{{ rpm_packages }}"

    - name: 安装 Kibana RPM 包
      ansible.builtin.yum:
        name: "/tmp/{{ item }}"
        state: present
      loop: "{{ rpm_packages }}"
      become: yes
      tags: install_kibana

    - name: 关闭 kibana 服务(如果正在运行)
      ansible.builtin.systemd:
        name: kibana
        state: stopped
      become: yes
      ignore_errors: yes  # 如果服务不存在或未运行,忽略错误

    - name: 部署 Kibana 配置文件
      ansible.builtin.copy:
        src: files/kibana.yml
        dest: /etc/kibana/kibana.yml  # 修正:移除末尾空格
        backup: yes
        mode: '0644'
        owner: kibana
        group: kibana
      become: yes

    - name: 启用并启动 Kibana 服务
      ansible.builtin.systemd:
        name: kibana
        state: started
        enabled: yes
        daemon_reload: yes
      become: yes

    # Filebeat 配置部分
    - name: 确保 Filebeat 配置目录存在
      ansible.builtin.file:
        path: /etc/filebeat/config
        state: directory
        mode: '0755'
        owner: root
        group: root
      become: yes

    - name: 复制 Filebeat TCP 配置文件
      ansible.builtin.copy:
        src: files/02-tcp-to-es.yaml
        dest: /etc/filebeat/config/02-tcp-to-es.yaml
        force: yes
        mode: '0644'
        owner: root
        group: root
      become: yes

    - name: 测试 Filebeat 配置文件
      ansible.builtin.shell:
        cmd: nohup filebeat -e -c /etc/filebeat/config/02-tcp-to-es.yaml > /tmp/filebeat_test.log 2>&1 &
      args:
        executable: /bin/bash
      async: 10  # 允许任务运行最多10秒
      poll: 0    # 不等待立即返回,让任务在后台运行
      register: filebeat_async_result


    - name: 清理临时 RPM 文件
      ansible.builtin.file:
        path: "/tmp/{{ item }}"
        state: absent
      loop: "{{ rpm_packages }}"
      tags: cleanup

[root@ansible /server/ans/playbooks/elk]# cat main.yaml
---
- import_playbook: es_kylin.yaml
- import_playbook: kibana_kylin.yaml
14. 完成Windows上网功能
- 测试站点:
https://www.google.com/https://hub.docker.com/
shell
 ~/.bashrc增加
 proxy() {
    case $1 in
        on | ON)
            export http_proxy="http://代理ip(填写自己的win主机IP):填写代理端口 "
            export https_proxy="http://代理ip(填写自己的win主机IP):填写代理端口"
            ;;
        off | OFF)
            unset http_proxy https_proxy
            ;;
        *)
            echo "Usage: proxy on|off"
            ;;
    esac
}