作者:来自 Elastic Eduard Martin 及 Alexander Dávila
通过一个实际示例学习如何在 Elasticsearch 中使用 UBI。我们将创建一个在搜索和点击结果时生成 UBI 事件的应用程序。
想要获得 Elastic 认证吗?看看下一次 Elasticsearch Engineer 培训什么时候开始!
Elasticsearch 拥有丰富的新功能,能帮助你为自己的用例构建最佳的搜索解决方案。深入了解我们的示例笔记本,开始免费云试用,或者现在就在本地机器上尝试 Elastic。
在本文中,我们将创建一个示例应用来收集用户行为数据,展示如何将 UBI 扩展集成到 search-ui 中。我们还将自定义收集的数据,以展示 UBI 标准的灵活性,以及它如何满足不同的需求。
这个示例应用是一个简单的图书搜索引擎,目标是能够捕捉用户的事件,并基于他们的行为(如搜索和点击)将其索引到 Elasticsearch 中。
需求
这个应用需要在 Elasticsearch 中安装 UBI 插件。你可以阅读我们的博客文章获取更多信息。
加载示例数据
我们需要先在 Elasticsearch 中准备一些数据。在 Kibana DevTools Console 中运行以下命令来加载一组产品列表,以便在我们的 UI 中展示。这将创建一个名为 "books" 的新索引,用于本示例。
bash
`
1. POST /_bulk
2. { "index" : { "_index" : "books" } }
3. {"name": "Snow Crash", "author": "Neal Stephenson", "release_date": "1992-06-01", "page_count": 470, "price": 14.99, "url": "https://www.amazon.com/Snow-Crash-Neal-Stephenson/dp/0553380958/", "image_url": "https://m.media-amazon.com/images/I/81p4Y+0HzbL._SY522_.jpg" }
4. { "index" : { "_index" : "books" } }
5. {"name": "Revelation Space", "author": "Alastair Reynolds", "release_date": "2000-03-15", "page_count": 585, "price": 16.99, "url": "https://www.amazon.com/Revelation-Space-Alastair-Reynolds/dp/0441009425/", "image_url": "https://m.media-amazon.com/images/I/61nC2ExeTvL._SY522_.jpg"}
6. { "index" : { "_index" : "books" } }
7. {"name": "1984", "author": "George Orwell", "release_date": "1985-06-01", "page_count": 328, "price": 12.99, "url": "https://www.amazon.com/1984-Signet-Classics-George-Orwell/dp/0451524934/", "image_url": "https://m.media-amazon.com/images/I/71rpa1-kyvL._SY522_.jpg"}
8. { "index" : { "_index" : "books" } }
9. {"name": "Fahrenheit 451", "author": "Ray Bradbury", "release_date": "1953-10-15", "page_count": 227, "price": 11.99, "url": "https://www.amazon.com/Fahrenheit-451-Ray-Bradbury/dp/1451673310/", "image_url": "https://m.media-amazon.com/images/I/61sKsbPb5GL._SY522_.jpg"}
10. { "index" : { "_index" : "books" } }
11. {"name": "Brave New World", "author": "Aldous Huxley", "release_date": "1932-06-01", "page_count": 268, "price": 12.99, "url": "https://www.amazon.com/Brave-New-World-Aldous-Huxley/dp/0060850523/", "image_url": "https://m.media-amazon.com/images/I/71GNqqXuN3L._SY522_.jpg"}
12. { "index" : { "_index" : "books" } }
13. {"name": "The Handmaid's Tale", "author": "Margaret Atwood", "release_date": "1985-06-01", "page_count": 311, "price": 13.99, "url": "https://www.amazon.com/Handmaids-Tale-Margaret-Atwood/dp/038549081X/", "image_url": "https://m.media-amazon.com/images/I/61su39k8NUL._SY522_.jpg"}
`AI写代码创建示例应用程序
我们将使用 search-ui 创建一个 UI 应用程序,将 UBI 事件发送到 Elasticsearch。search-ui 是 Elastic 的 JavaScript 库,用于使用内置的 React 组件创建 UI。
Search UI 是 Elastic 基于 React 的框架,用于构建搜索应用程序。它为搜索体验中的所有关键部分提供组件 ------ 例如搜索栏、分面、分页和自动建议。自定义其行为(包括添加 UBI)非常简单。
Elasticsearch 连接器
首先,我们需要安装 Elasticsearch 连接器,步骤参考连接器教程。
1)从 GitHub 下载 search-ui 启动应用:
arduino
`curl https://codeload.github.com/elastic/app-search-reference-ui-react/tar.gz/master | tar -xz`AI写代码2)进入新目录 app-search-reference-ui-react-main 并安装依赖项:
markdown
`

1.  cd app-search-reference-ui-react-main
2.  npm install

`AI写代码
3)通过 npm 包管理器安装 Elasticsearch 连接器:
sql
`npm install @elastic/search-ui-elasticsearch-connector`AI写代码后端服务器
为了遵循最佳实践并确保对 Elasticsearch 的调用通过中间层服务完成,我们来创建一个后端来调用我们的连接器:
1)我们先创建一个新目录和一个新的 JavaScript 文件:
bash
`

1.  mkdir server
2.  touch server/index.js

`AI写代码
2)在新的 index.js 文件中,写入:
javascript
``
1. import express from "express";
2. import ElasticsearchAPIConnector from "@elastic/search-ui-elasticsearch-connector";
3. import { Client } from "@elastic/elasticsearch";
4. import "dotenv/config";
6. const app = express();
7. app.use(express.json());
9. const connector = new ElasticsearchAPIConnector({
10. host: process.env.ELASTICSEARCH_HOST,
11. index: process.env.ELASTICSEARCH_INDEX,
12. apiKey: process.env.ELASTICSEARCH_API_KEY
13. });
15. const esClient = new Client({
16. node: process.env.ELASTICSEARCH_HOST,
17. auth: {
18. apiKey: process.env.ELASTICSEARCH_API_KEY,
19. },
20. });
22. app.post("/api/search", async (req, res) => {
23. const { state, queryConfig } = req.body;
24. const response = await connector.onSearch(state, queryConfig);
25. res.json(response);
26. });
28. app.post("/api/autocomplete", async (req, res) => {
29. const { state, queryConfig } = req.body;
30. const response = await connector.onAutocomplete(state, queryConfig);
31. res.json(response);
32. });
34. app.post("/api/analytics", async (req, res, next) => {
35. try {
36. console.log(`Sending analytics for query_id: ${req.body.query_id}`)
37. req.body.client_id = clientId;
38. await esClient.index({
39. index: "ubi_events",
40. body: req.body,
41. });
44. console.log(req.body);
45. res.status(200).json({ message: "Analytics event saved successfully" });
46. } catch (error) {
47. next(error);
48. }
49. });
53. app.listen(3001);
``AI写代码通过此更改,我们将默认行为(从浏览器调用 Elasticsearch)替换为调用我们的后端。这种方法更适合生产环境。
在文件末尾,将 export default function 替换为以下定义:
ini
`
1. export default function App() {
2. return (
3. <SearchProvider config={config}>
4. <Layout
5. header={<SearchBox autocompleteSuggestions={false} />}
6. bodyContent={
7. <Results
8. titleField={"author"}
9. urlField={"url"}
10. thumbnailField={"image_url"}
11. shouldTrackClickThrough={true}
12. />
13. }
14. />
15. </SearchProvider>
16. );
17. }
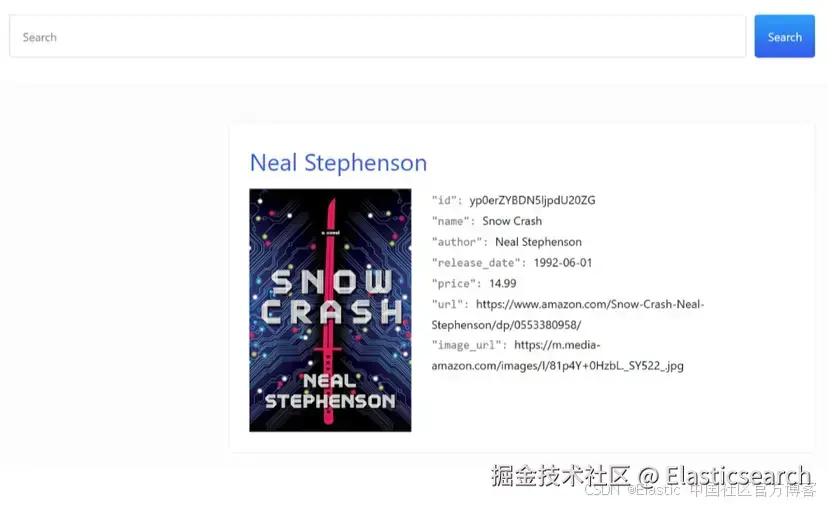
`AI写代码这将允许我们显示图书的图片,并提供可点击的链接。
要查看完整教程,请访问此文档。
按照步骤操作后,你将得到一个客户端的 index.js 文件和一个服务器端的 server/index.js 相关文件。
配置连接器
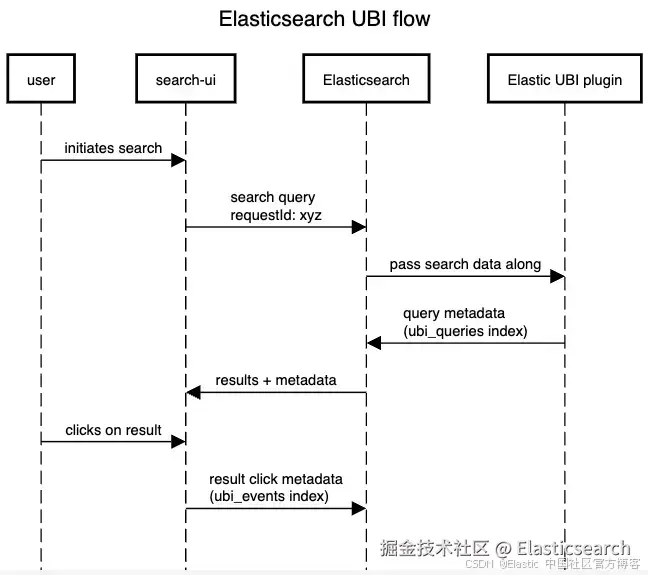
我们将配置 onSearch 和 onResultClick 处理程序来设置 UBI query_id。然后,在执行搜索和点击结果时发送 UBI 事件。
配置 onSearch:拦截搜索请求,为每个请求使用 UUID v4 分配一个唯一的 requestId,然后将请求传递给处理链中的下一个处理程序。我们将使用此 ID 作为 UBI query_id,用于将搜索和点击分组。
进入 server/index.js 文件,并扩展连接器以配置 onSearch 方法:
scala
`

1.  const clientId = uuidv4(); // to maintain a constant client id
2.  class UBIConnector extends ElasticsearchAPIConnector {
3.    async onSearch(requestState, queryConfig) {
4.      const result = await super.onSearch(requestState, queryConfig);
5.      result.requestId = uuidv4();
6.      result.clientId = clientId;
7.      return result;
8.    }
9.  }

`AI写代码
之后,声明连接器并自定义搜索请求,通过 ext.ubi 搜索参数将生成的 ID 发送到 UBI 插件。
markdown
`
1. const connector = new UBIConnector(
2. {
3. host: process.env.ELASTICSEARCH_HOST,
4. index: process.env.ELASTICSEARCH_INDEX,
5. apiKey: process.env.ELASTICSEARCH_API_KEY,
6. },
7. (requestBody, requestState, queryConfig) => {
8. requestBody.ext = {
9. ubi: {
10. query_id: requestState.requestId,
11. client_id: requestState.clientId || clientId,
12. user_query: requestState.searchTerm || "",
13. },
14. };
15. if (!requestState.searchTerm) return requestBody;
16. requestBody.query = {
17. multi_match: {
18. query: requestState.searchTerm,
19. fields: Object.keys(queryConfig.search_fields),
20. },
21. };
22. return requestBody;
23. }
24. );
`AI写代码别忘了添加新的导入。此外,由于我们的前端运行在 localhost:3000,而后端运行在 localhost:3001,它们被视为不同的源。'源' 由协议、域名和端口的组合定义,所以即使它们都在同一主机上并使用 HTTP 协议,不同的端口也会使它们成为不同的源,因此我们需要 CORS 。要了解更多关于 CORS 的信息,请访问本指南。
php
`

1.  import cors from "cors";
2.  import { v4 as uuidv4 } from "uuid";
3.  ...
4.  app.use(cors({
5.    origin: "http://localhost:3000", // Your React app URL
6.    credentials: true
7.  }));

`AI写代码
进入客户端的 client/App.js 文件(点击以打开完整的完成文件)。
在 config 对象声明中添加 onResultClick 事件处理程序,每当用户点击搜索结果时,将分析数据发送到后端,捕获的信息包括查询 ID、结果详情以及用户交互的具体信息,如点击的文档属性、文档位置和页码。在这里,你还可以添加用户同意共享的其他信息。确保遵守隐私法律(例如欧洲的 GDPR)。
javascript
``
1. const config = {
2. apiConnector: connector,
3. onResultClick: async (r) => {
4. const locationData = await getLocationData();
5. const payload = {
6. application: "search-ui",
7. action_name: "click",
8. query_id: r.requestId || "",
9. client_id: r.clientId || "",
10. timestamp: new Date().toISOString(),
11. message_type: "CLICK_THROUGH",
12. message: `Clicked ${r.result.name.raw}`,
13. user_query: r.query,
14. event_attributes: {
15. object: {
16. device: getDeviceType(),
17. object_id: r.result.id.raw,
18. description: `${r.result.name.raw}(${r.result.release_date.raw}) by ${r.result.author.raw}`,
19. position: {
20. ordinal: r.resultIndexOnPage,
21. page_depth: r.page,
22. },user: {
23. ip: locationData.ip,
24. city: locationData.city,
25. region: locationData.region,
26. country: locationData.country,
27. location: {
28. lat:locationData.latitude,
29. lon:locationData.longitude
30. }
31. }
32. },
33. },
34. };
35. fetch(`http://localhost:3001/api/analytics`, {
36. method: "POST",
37. headers: {
38. "Content-Type": "application/json",
39. },
40. body: JSON.stringify(payload),
41. })
42. .then((r) => console.log(r))
43. .catch((error) => {
44. console.error("Error:", error);
45. });
46. }
49. // other Search UI config options
50. };
``AI写代码SearchUI 参考中的完整事件钩子可以在这里找到。
接下来,修改 search_fields 和 result_fields 以与数据集对齐。我们将通过图书的名称和作者进行搜索,并返回名称、作者、image_url、url 和价格。
css
`
1. const config = {
2. ...
3. searchQuery: {
4. search_fields: {
5. name: {},
6. author: {},
7. },
8. result_fields: {
9. name: { raw: {} },
10. author: { raw: {} },
11. image_url: { raw: {} },
12. url: { raw: {} },
13. price: { raw: {} },
14. release_date: { raw: {} }
15. },
16. },
17. };
`AI写代码最后,我们将添加几个辅助函数来定义设备类型和用户数据:
kotlin
`
1. const getDeviceType = () => {
2. const userAgent = navigator.userAgent.toLowerCase();
4. if (/tablet|ipad|playbook|silk/.test(userAgent)) {
5. return 'tablet';
6. }
7. if (/mobile|iphone|ipod|android|blackberry|opera|mini|windows\sce|palm|smartphone|iemobile/.test(userAgent)) {
8. return 'mobile';
9. }
10. return 'desktop';
11. };
13. const getLocationData = async () => {
14. const response = await fetch('https://ipapi.co/json/');
15. const data = await response.json();
16. return {
17. ip: data.ip,
18. city: data.city,
19. region: data.region,
20. country: data.country_name,
21. latitude: data.latitude,
22. longitude: data.longitude
23. };
24. };
`AI写代码其余的 config 对象可以保持不变。
我们整理了一个仓库,你可以在这里找到。它包含了更完整的项目版本。可以通过以下命令克隆:
bash
`git clone https://github.com/llermaly/search-ui-ubi.git`AI写代码如果你使用 GitHub 仓库,需要为服务器提供以下环境变量:
ini
`

1.  ELASTICSEARCH_HOST=your_elasticsearch_url
2.  ELASTICSEARCH_API_KEY=your_api_key
3.  ELASTICSEARCH_INDEX=books

`AI写代码
运行应用程序
现在你可以启动服务器:
markdown
`

1.  cd server
2.  npm install && node index.js

`AI写代码
如果遇到与该库相关的错误,可能需要单独安装 CORS:
go
`npm install cors`AI写代码在另一个终端中:
markdown
`

1.  cd client
2.  npm install && npm start

`AI写代码
然后在浏览器中访问 http://localhost:3000。
最终效果将如下所示:
在 Elasticsearch 端,我们可以为 ubi_events 索引创建一个(相当简单的)映射,以便将用户位置作为位置处理:
bash
`
1. PUT ubi_events
2. {
3. "mappings": {
4. "properties": {
5. "event_attributes.object.user.location": {
6. "type": "geo_point"
7. }
8. }
9. }
10. }
`AI写代码每次搜索时,会生成一个 ubi_queries 事件,而在点击时,会生成一个类型为 click 的 ubi_events。
这就是一个 ubi_queries 事件的样子:
sql
`
1. {
2. "_index": "ubi_queries",
3. "_id": "aCXqW5gB87F1AivbVvHI",
4. "_score": null,
5. "_ignored": [
6. "query.keyword"
7. ],
8. "_source": {
9. "query_response_id": "a8aca3d9-1cbc-4800-8853-fd1889172b9b",
10. "user_query": "snow",
11. "query_id": "d198c517-7d3b-49dd-be11-f573728d578e",
12. "query_response_object_ids": [
13. "0",
14. "6"
15. ],
16. "query": """{"from":0,"size":20,"query":{"multi_match":{"query":"snow","fields":["author^1.0","name^1.0"]}},"_source":{"includes":["name","author","image_url","url","price","release_date"],"excludes":[]},"sort":[{"_score":{"order":"desc"}}],"ext":{"query_id":"d198c517-7d3b-49dd-be11-f573728d578e","user_query":"snow","client_id":"8a5de3a1-7a1b-47ed-b64f-5be0537829be","object_id_field":null,"query_attributes":{}}}""",
17. "query_attributes": {},
18. "client_id": "8a5de3a1-7a1b-47ed-b64f-5be0537829be",
19. "timestamp": 1753888741063
20. },
21. "sort": [
22. 1753888741063
23. ]
24. }
`AI写代码这是一个示例 ubi_events 文档:
bash
`
1. {
2. "_index": "ubi_events",
3. "_id": "fiDqW5gBftHcGY9PXtao",
4. "_score": null,
5. "_source": {
6. "application": "search-ui",
7. "action_name": "click",
8. "query_id": "3850340e-0e72-4f20-a06e-27a52d983b39",
9. "client_id": "8a5de3a1-7a1b-47ed-b64f-5be0537829be",
10. "timestamp": "2025-07-30T15:19:02.659Z",
11. "message_type": "CLICK_THROUGH",
12. "message": "Clicked Snow Crash",
13. "user_query": "snow",
14. "event_attributes": {
15. "object": {
16. "device": "desktop",
17. "object_id": "vrFBK5gBZjU2lCOmiNSX",
18. "description": "Snow Crash(1992-06-01) by Neal Stephenson",
19. "position": {
20. "ordinal": 0,
21. "page_depth": 1
22. },
23. "user": {
24. "ip": "2800:bf0:108:18:d5ca:fa84:416f:99e0",
25. "city": "Quito",
26. "region": "Pichincha",
27. "country": "Ecuador",
28. "location": {
29. "lat": -0.2309,
30. "lon": -78.5211
31. }
32. }
33. }
34. }
35. },
36. "sort": [
37. 1753888742659
38. ]
39. }
`AI写代码从这里,我们已经可以看到有用的信息,比如与特定查询相关的操作。
结论
将 search-ui 与 UBI 扩展集成是一个可以收集用户行为的宝贵见解的过程,并可以通过其他元数据扩展,例如用户位置和设备类型。这些信息会自动索引到两个独立的索引中,分别用于查询和操作,并可以通过唯一 ID 关联。这些信息使开发者能够更好地理解用户如何使用应用,并优先处理可能影响用户体验的问题。
原文:Using UBI in Elasticsearch: Creating an app with UBI and search-ui - Elasticsearch Labs