大模型学习文档+路线大纲已经导出整理打包,在 >gitcode ←←←←←←
LLM 的"结构化任务痛点"与 ReTool 的破局
大语言模型(LLM)擅长开放式对话,但面对数学推理、复杂逻辑计算等结构化任务时,往往会陷入两个困境:
- 靠文本推理 "拍脑袋",结果错误率高;
- 不会主动调用工具(比如代码沙箱),无法利用工具的精确计算能力。
字节跳动的 ReTool 框架,用 "冷启动 SFT+RL 策略学习" 的组合拳,让 LLM 学会 "思考 - 执行 - 反馈" 的闭环:先通过监督微调(SFT)掌握基础工具调用,再用强化学习(RL)优化策略,最终在 AIME2024 数学数据集上达到 67% 准确率(仅 400 步训练),远超文本基线 RL 的 40%(需 1080 步)。
我们基于火山引擎 veRL 强化学习框架,完整复现了 ReTool 的 SOTA 效果。今天就把从 "环境搭建" 到 "训练调优" 的全流程,拆成通俗易懂的步骤分享给大家。
ReTool 的核心逻辑:让 LLM 学会 "用工具解决问题"
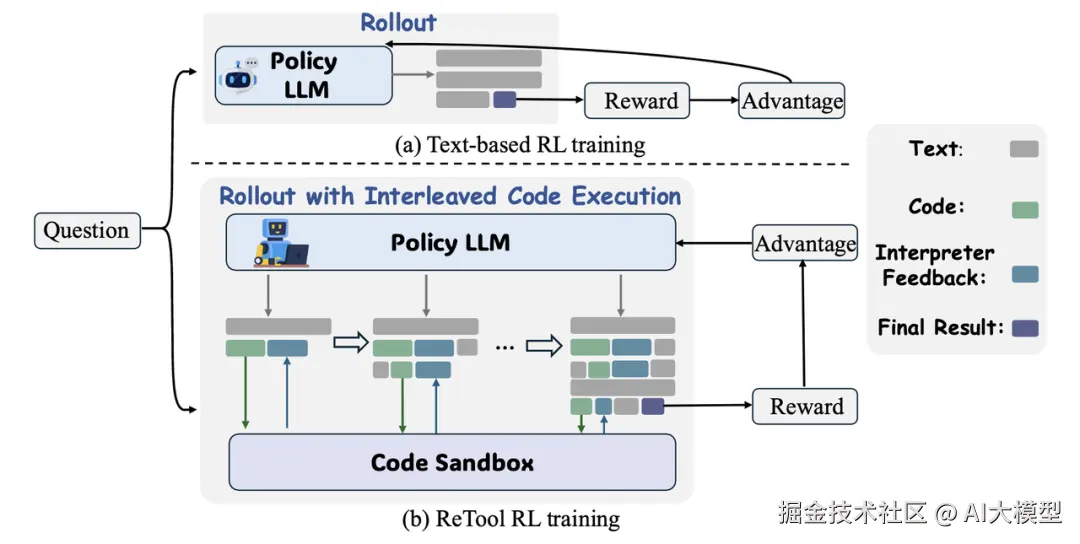
Retool 是一个专为大语言模型(LLM)设计的工具增强强化学习框架,核心在于通过动态交织的代码执行与强化学习策略优化,提升模型在结构化问题(如数学推理)中的解决能力。其工作分为两个关键阶段:
- 首先,通过冷启动数据生成流水线构建包含代码增强推理轨迹的高质量数据集,以监督微调方式让模型掌握基础的工具调用与执行结果分析能力。
- 随后进行工具调用策略学习。具体而言,Retool 在推理时会生成自然语言思考与代码片段的混合轨迹,当检测到代码终止标记时,将代码发送至异步沙盒执行,再将结果(含成功输出或错误信息)反馈给模型以指导后续推理,这种 "思考 - 执行 - 反馈" 的循环机制,配合基于最终答案准确性的奖励设计,使模型能自主发现最优工具调用模式,既提升推理效率又增强计算准确性。
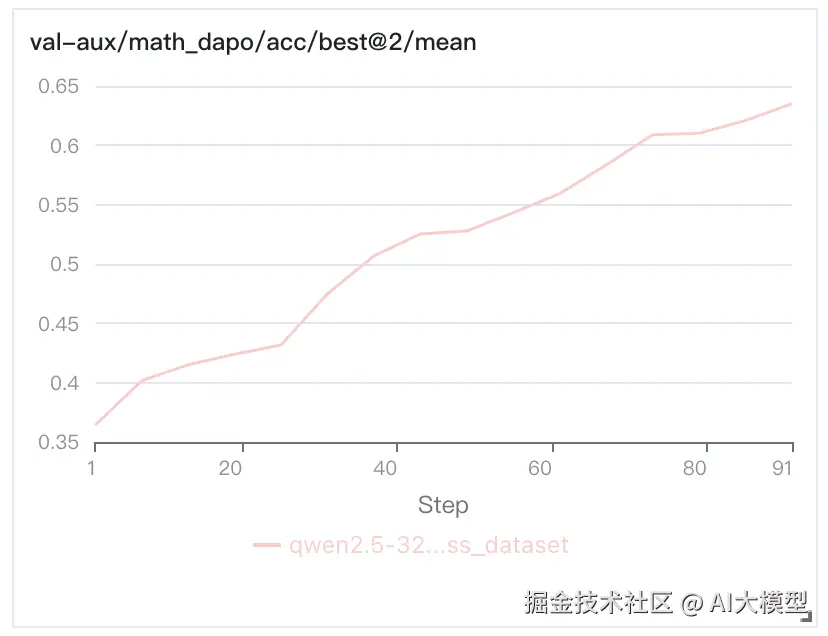
实验设置:论文在训练过程中采用了 VeRL 框架,并选用 PPO 作为强化学习方法,其余设置详见论文。
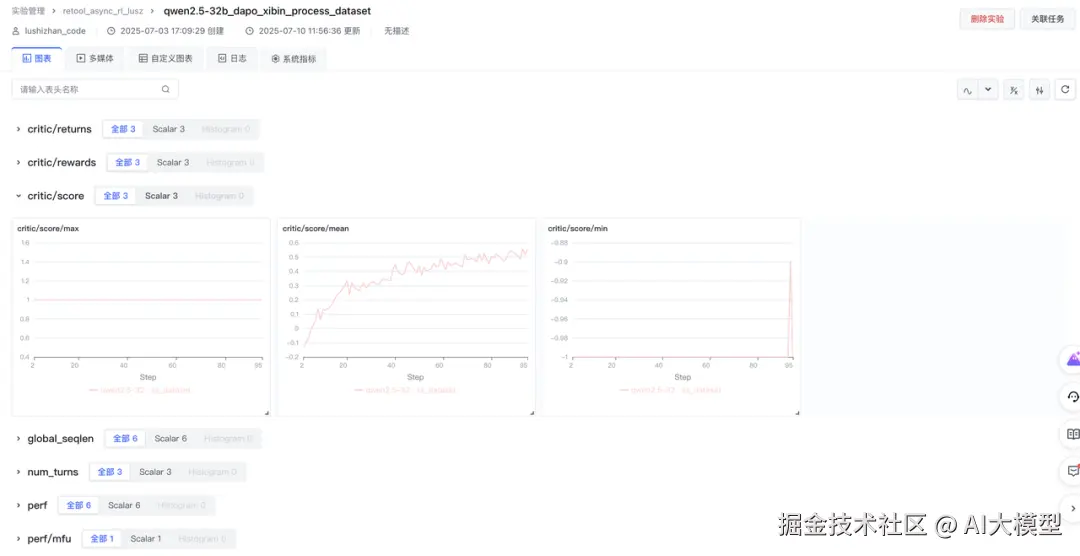
实验结果:论文中在数学场景(如 AIME2024 数据集)验证,准确率提升至 67.0%(仅需 400 步训练),远超文本基线 RL 的 40.0%(需 1080 步)。下为在机器学习平台上的复现效果,验证集为 AIME2024,实验结果可在机器学习平台的实验管理中查看。
veRL:支撑 ReTool 复现的 "RL 基建"
要复现 ReTool,得有一个灵活、高效、支持生产环境的 RL 框架,veRL 是火山引擎推出的用于大语言模型(LLM)的强化学习库,具有灵活性、高效性且适用于生产环境。借助 veRL 强化学习框架,可以使模型在推理过程中动态插入代码块并与沙盒环境实时交互,根据执行反馈(如正确 / 错误结果)迭代优化工具使用策略。veRL 具有以下特点:
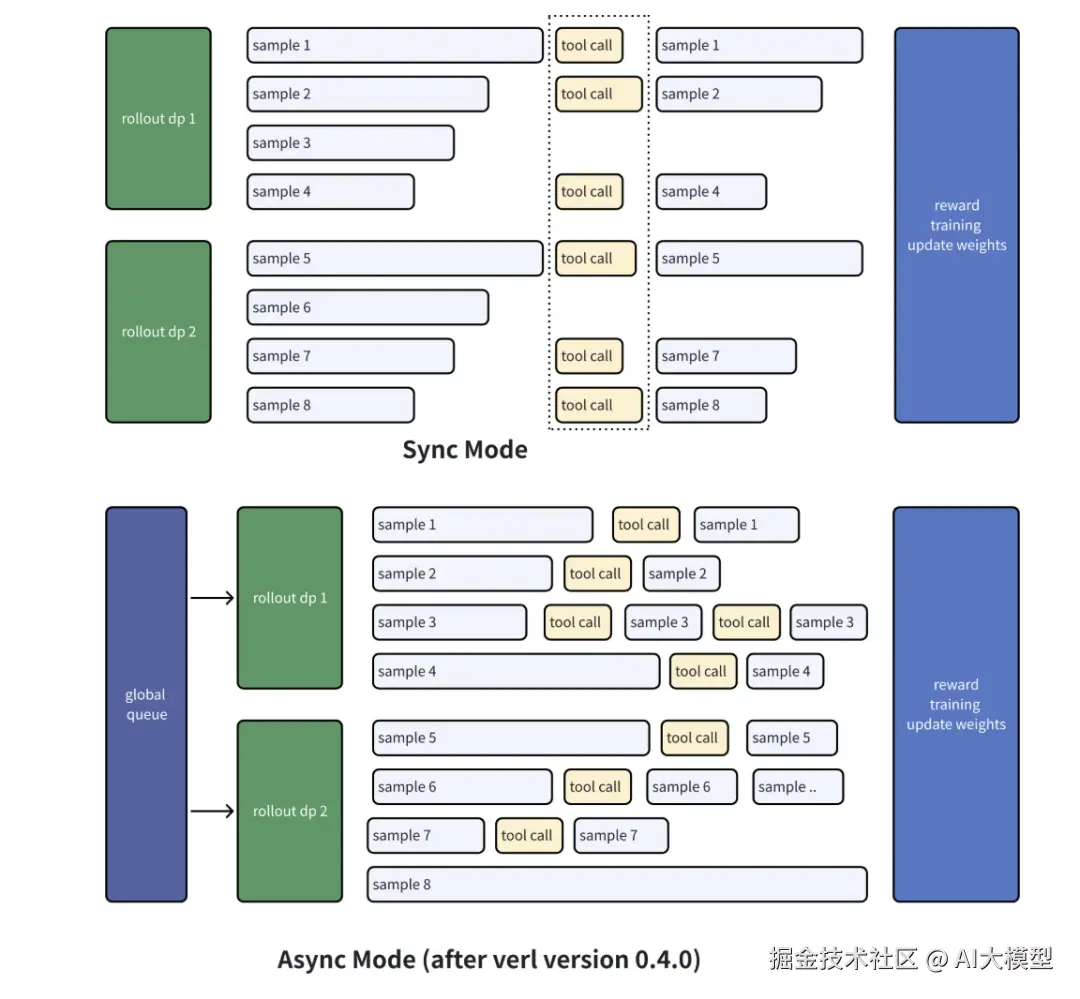
- 异步推理请求机制:veRL Agent loop 采用异步机制,主要通过 Python 的
asyncio库实现。在AgentLoopWorker的generate_sequences方法中,为每个输入消息创建异步任务_run_agent_loop,并使用asyncio.gather并发执行这些任务,让工具调用和GPU计算能够同时执行,提高处理效率。工作流程如下:
- 自定义工具:veRL 支持多种工具调用,并且可以让用户自定义工具。目前已经提供的工具包括 Search tool、代码沙箱、MCP 等,想接什么工具自己定;
- 扩展 Agent loop,支持 LangGraph 等 Agent 框架:veRL AgentLoop 具备良好扩展性,可支持各类 agent 框架。开发者能将这些框架的独特优势集成到 Agent loop 里,例如利用 LangGraph 在图处理和智能推理方面的长处,提升 Agent 处理复杂任务的能力。
从 0 到 1 复现 ReTool 的完整步骤
目标:复现 ReTool 论文效果,通过 Multi-turn 协作机制,提升模型在数据领域内的效果(如数学推理任务),同时确保训练效率和安全。
能力依赖
- Multi-turn 交互:支持模型与沙盒的异步反馈循环。
- Async-Rollout:实现非阻塞式执行,提升并发效率。
组件:
- 火山引擎机器学习平台
- veRL 强化学习训练框架
- vePFS
- veFaaS
Step1:环境准备:搭好 "工具调用的基建"
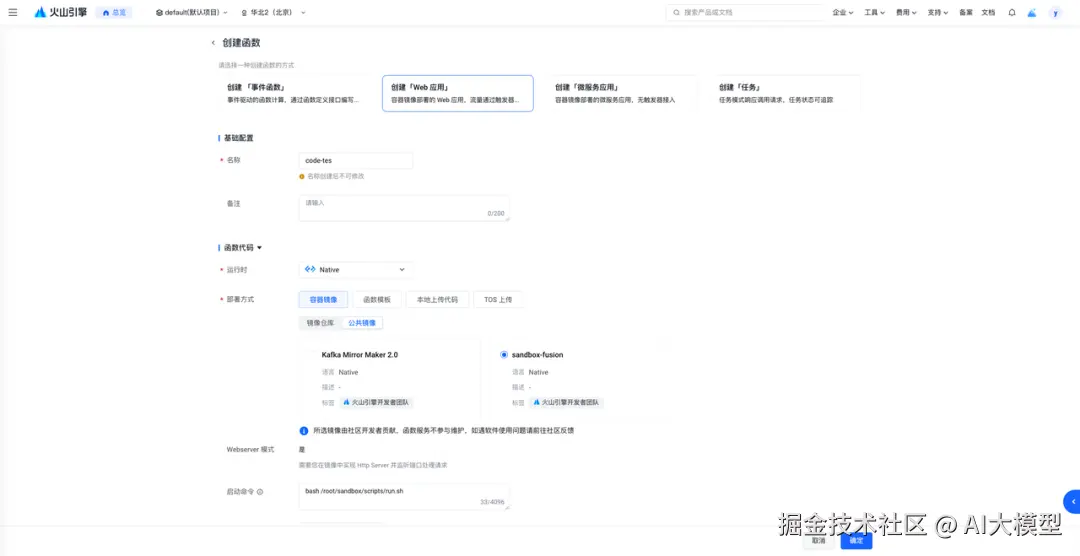
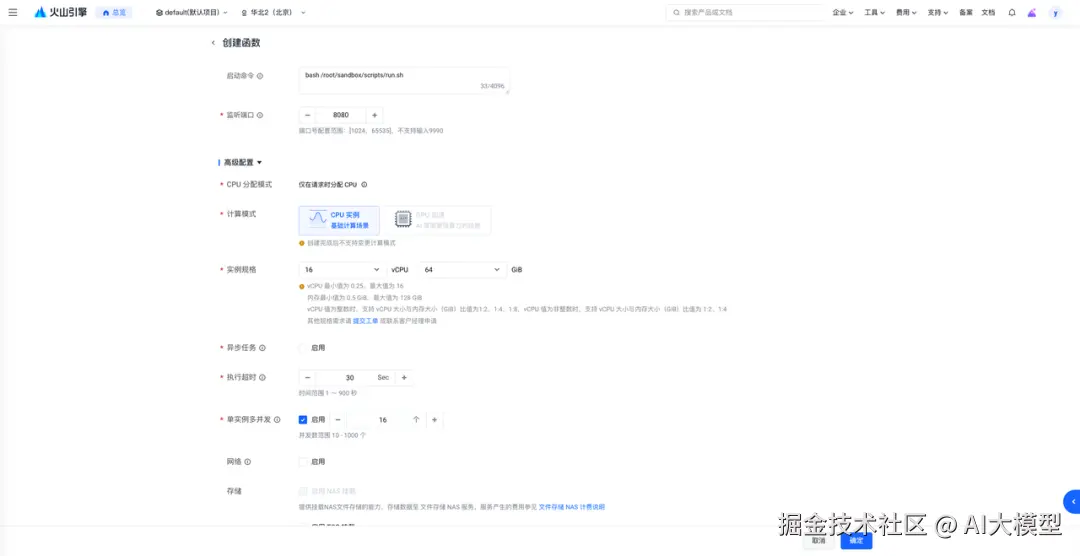
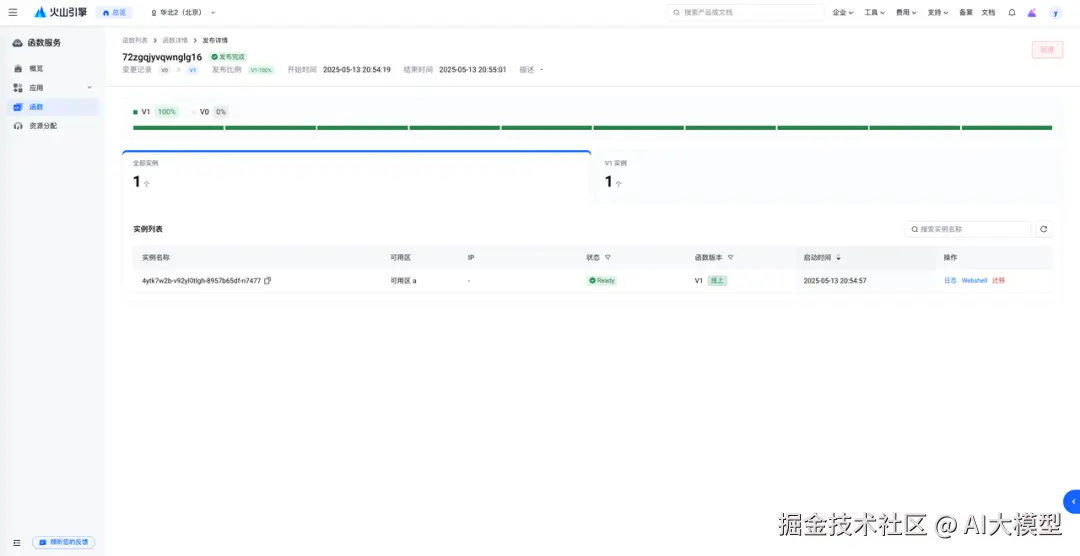
创建 veFaaS 服务
veFaaS 云沙箱管理--函数服务-
火山引擎:www.volcengine.com/docs/6662/1...
- Sandbox 实例规格:16c / 64G
- 并发设置:16/实例
- 实例数上限:需要根据 reward_model.sandbox_fusion.max_concurrent 进行设置,若 reward_model.sandbox_fusion.max_concurrent =256,则实例数上限为256/16(并发)=16
- 获取函数服务域名

准备代码
创建开发机,在 vePFS 对应目录克隆代码:
bash
cd /your_path
git clone https://github.com/volcengine/verl.git -b v0.5.0
pip install -e .["all"] --no-build-isolation
准备数据集、模型
创建开发机,在 vePFS 对应目录下载数据集
- sft 数据集 swordfaith/ReTool-SFT-multi-turn
- RL 数据集 BytedTsinghua-SIA/DAPO-Math-17k
- 评测数据集 BytedTsinghua-SIA/AIME-2024
typescript
export HF_ENDPOINT=https://hf-mirror.com
huggingface-cli download --repo-type dataset --resume-download {DATASET} --local-dir {YOUR_PATH} 预处理数据集,生成 ReTool 需要的 sft 及 RL 数据集。如果不能直连 huggingface,将脚本里的数据集改为下载好的数据集路径:``
bash
python3 examples/data_preprocess/dapo_multiturn_w_tool.py
python3 recipe/retool/retool_multi_turn_sft_preprocess.py - 火山引擎提供 TOS 对象存储预置模型权重文件,方便客户自助复制,加速试验。以 Qwen/Qwen2.5-32B-Instruct 模型为例。
arduino
import os
# cp 需要带-r 参数,否则不会下载目录;传输速度慢可以根据开发机的 CPU 数量调整 -j -p 并发参数
! tosutil cp tos://preset-models-{VOLC_REGION}/{model_name}/ {model_path}/{os.path.dirname(model_name)} -r -u -j=32
如果不使用预置模型,可以自行下载
arduino
export HF_ENDPOINT=https://hf-mirror.com
huggingface-cli download --resume-download {MODEL_NAME} --local-dir {YOUR_PATH}
编辑脚本
在 verl/recipe/retool 目录下插入 run_qwen2-32b_sft.sh,脚本内容如下。
可以根据存储空间大小调整 trainer.save_freq
ini
set -x

# ================= data/model/tool =================

dapo_math_17k=retool_dapo数据集路径
aime_2024=AIME-2024数据集路径
model_path=xxxx/retool-multiturn-sft-qwen2.5-32b-sp8/global_step_168/huggingface #计划将sft的checkpoint保存的路径
train_files="['$dapo_math_17k']"
test_files="['$aime_2024']"

# tool
tool_config_path=xxxxx/verl/recipe/retool/sandbox_fusion_tool_config.yaml

# wandb
project_name=retool_async_rl_lusz
experiment_name=qwen2.5-32b_dapo_xibin_process_dataset
default_local_dir=xxxxx/checkpoint/$experiment_name# checkpoint路径  # ================= algorithm =================
adv_estimator=grpo

use_kl_in_reward=False
kl_coef=0.0
use_kl_loss=False
kl_loss_coef=0.0

clip_ratio_low=0.2
clip_ratio_high=0.28

max_turns=8
max_prompt_length=2048
max_response_length=16384
actor_lr=1e-6

train_batch_size=512
ppo_mini_batch_size=64
n_resp_per_prompt=16
n_resp_per_prompt_val=1

# ================= perfomance =================
infer_tp=4 # vllm
train_sp=8 # train  offload=True

actor_max_token_len_per_gpu=$(( (max_prompt_length + max_response_length) * 1 ))
log_prob_max_token_len_per_gpu=$(( actor_max_token_len_per_gpu * 4 ))

python3 -m verl.trainer.main_ppo \
    algorithm.adv_estimator=$adv_estimator \
    algorithm.use_kl_in_reward=$use_kl_in_reward \
    algorithm.kl_ctrl.kl_coef=$kl_coef \
    data.train_files="$train_files" \
    data.val_files="$test_files" \
    data.return_raw_chat=True \
    data.train_batch_size=$train_batch_size \
    data.max_prompt_length=$max_prompt_length \
    data.max_response_length=$max_response_length \
    data.filter_overlong_prompts=True \
    data.truncation='error' \
    data.custom_cls.path=recipe/retool/retool.py \
    data.custom_cls.name=CustomRLHFDataset \
    custom_reward_function.path=recipe/retool/retool.py \
    custom_reward_function.name=compute_score \
    actor_rollout_ref.model.path=$model_path \
    actor_rollout_ref.model.use_remove_padding=True \
    actor_rollout_ref.model.enable_gradient_checkpointing=True \
    actor_rollout_ref.actor.use_kl_loss=$use_kl_loss \
    actor_rollout_ref.actor.kl_loss_coef=$kl_loss_coef \
    actor_rollout_ref.actor.clip_ratio_low=$clip_ratio_low \
    actor_rollout_ref.actor.clip_ratio_high=$clip_ratio_high \
    actor_rollout_ref.actor.clip_ratio_c=10.0 \
    actor_rollout_ref.actor.optim.lr=$actor_lr \
    actor_rollout_ref.actor.use_dynamic_bsz=True \
    actor_rollout_ref.actor.ppo_mini_batch_size=$ppo_mini_batch_size \
    actor_rollout_ref.actor.ppo_max_token_len_per_gpu=$actor_max_token_len_per_gpu \
    actor_rollout_ref.actor.ulysses_sequence_parallel_size=$train_sp \
    actor_rollout_ref.actor.fsdp_config.param_offload=$offload \
    actor_rollout_ref.actor.fsdp_config.optimizer_offload=$offload \
    actor_rollout_ref.ref.log_prob_max_token_len_per_gpu=$log_prob_max_token_len_per_gpu \
    actor_rollout_ref.rollout.name=vllm \
    actor_rollout_ref.rollout.mode=async \
    actor_rollout_ref.rollout.tensor_model_parallel_size=$infer_tp \
    actor_rollout_ref.rollout.multi_turn.enable=True \
    actor_rollout_ref.rollout.multi_turn.max_user_turns=$max_turns \
    actor_rollout_ref.rollout.multi_turn.max_assistant_turns=$max_turns \
    actor_rollout_ref.rollout.multi_turn.tool_config_path=$tool_config_path \
    actor_rollout_ref.rollout.multi_turn.format=hermes \
    actor_rollout_ref.rollout.gpu_memory_utilization=0.9 \
    actor_rollout_ref.rollout.n=$n_resp_per_prompt \
    actor_rollout_ref.rollout.val_kwargs.top_p=0.6 \
    actor_rollout_ref.rollout.val_kwargs.temperature=1.0 \
    actor_rollout_ref.rollout.val_kwargs.n=$n_resp_per_prompt_val \
    trainer.logger=['console','vemlp_wandb'] \
    trainer.project_name=$project_name \
    trainer.experiment_name=$experiment_name \
    trainer.n_gpus_per_node=8 \
    trainer.val_before_train=True \
    trainer.log_val_generations=100 \
    trainer.nnodes=4 \
    trainer.save_freq=30 \
    trainer.default_local_dir=$default_local_dir \
    trainer.test_freq=5 \
    trainer.total_epochs=1 $@ \
在 verl/recipe/retool 目录下插入 run_qwen2-32b_dapo.sh,脚本内容如下:
ini
set -x

# ================= data/model/tool =================

dapo_math_17k=retool_dapo数据集路径
aime_2024=AIME-2024数据集路径
model_path=xxxx/retool-multiturn-sft-qwen2.5-32b-sp8/global_step_168/huggingface #计划将sft的checkpoint保存的路径
train_files="['$dapo_math_17k']"
test_files="['$aime_2024']"

# tool
tool_config_path=xxxxx/verl/recipe/retool/sandbox_fusion_tool_config.yaml

# wandb
project_name=retool_async_rl_lusz
experiment_name=qwen2.5-32b_dapo_xibin_process_dataset
default_local_dir=xxxxx/checkpoint/$experiment_name# checkpoint路径  # ================= algorithm =================
adv_estimator=grpo

use_kl_in_reward=False
kl_coef=0.0
use_kl_loss=False
kl_loss_coef=0.0

clip_ratio_low=0.2
clip_ratio_high=0.28

max_turns=8
max_prompt_length=2048
max_response_length=16384
actor_lr=1e-6

train_batch_size=512
ppo_mini_batch_size=64
n_resp_per_prompt=16
n_resp_per_prompt_val=1

# ================= perfomance =================
infer_tp=4 # vllm
train_sp=8 # train  offload=True

actor_max_token_len_per_gpu=$(( (max_prompt_length + max_response_length) * 1 ))
log_prob_max_token_len_per_gpu=$(( actor_max_token_len_per_gpu * 4 ))

python3 -m verl.trainer.main_ppo \
    algorithm.adv_estimator=$adv_estimator \
    algorithm.use_kl_in_reward=$use_kl_in_reward \
    algorithm.kl_ctrl.kl_coef=$kl_coef \
    data.train_files="$train_files" \
    data.val_files="$test_files" \
    data.return_raw_chat=True \
    data.train_batch_size=$train_batch_size \
    data.max_prompt_length=$max_prompt_length \
    data.max_response_length=$max_response_length \
    data.filter_overlong_prompts=True \
    data.truncation='error' \
    data.custom_cls.path=recipe/retool/retool.py \
    data.custom_cls.name=CustomRLHFDataset \
    custom_reward_function.path=recipe/retool/retool.py \
    custom_reward_function.name=compute_score \
    actor_rollout_ref.model.path=$model_path \
    actor_rollout_ref.model.use_remove_padding=True \
    actor_rollout_ref.model.enable_gradient_checkpointing=True \
    actor_rollout_ref.actor.use_kl_loss=$use_kl_loss \
    actor_rollout_ref.actor.kl_loss_coef=$kl_loss_coef \
    actor_rollout_ref.actor.clip_ratio_low=$clip_ratio_low \
    actor_rollout_ref.actor.clip_ratio_high=$clip_ratio_high \
    actor_rollout_ref.actor.clip_ratio_c=10.0 \
    actor_rollout_ref.actor.optim.lr=$actor_lr \
    actor_rollout_ref.actor.use_dynamic_bsz=True \
    actor_rollout_ref.actor.ppo_mini_batch_size=$ppo_mini_batch_size \
    actor_rollout_ref.actor.ppo_max_token_len_per_gpu=$actor_max_token_len_per_gpu \
    actor_rollout_ref.actor.ulysses_sequence_parallel_size=$train_sp \
    actor_rollout_ref.actor.fsdp_config.param_offload=$offload \
    actor_rollout_ref.actor.fsdp_config.optimizer_offload=$offload \
    actor_rollout_ref.ref.log_prob_max_token_len_per_gpu=$log_prob_max_token_len_per_gpu \
    actor_rollout_ref.rollout.name=vllm \
    actor_rollout_ref.rollout.mode=async \
    actor_rollout_ref.rollout.tensor_model_parallel_size=$infer_tp \
    actor_rollout_ref.rollout.multi_turn.enable=True \
    actor_rollout_ref.rollout.multi_turn.max_user_turns=$max_turns \
    actor_rollout_ref.rollout.multi_turn.max_assistant_turns=$max_turns \
    actor_rollout_ref.rollout.multi_turn.tool_config_path=$tool_config_path \
    actor_rollout_ref.rollout.multi_turn.format=hermes \
    actor_rollout_ref.rollout.gpu_memory_utilization=0.9 \
    actor_rollout_ref.rollout.n=$n_resp_per_prompt \
    actor_rollout_ref.rollout.val_kwargs.top_p=0.6 \
    actor_rollout_ref.rollout.val_kwargs.temperature=1.0 \
    actor_rollout_ref.rollout.val_kwargs.n=$n_resp_per_prompt_val \
    trainer.logger=['console','vemlp_wandb'] \
    trainer.project_name=$project_name \
    trainer.experiment_name=$experiment_name \
    trainer.n_gpus_per_node=8 \
    trainer.val_before_train=True \
    trainer.log_val_generations=100 \
    trainer.nnodes=4 \
    trainer.save_freq=30 \
    trainer.default_local_dir=$default_local_dir \
    trainer.test_freq=5 \
    trainer.total_epochs=1 $@ \
修改 recipe/retool/sandbox_fusion_tool_config.yaml,将 sandbox_fusion_url 填写为 step1-1 中建立的 veFaaS 地址:
vbnet
sandbox_fusion_url: "https://***.apigateway-cn-beijing.volceapi.com/run_code" 设置训练参数
当前我们已经预置了一些调优后的参数,您还可以进一步自定义超参数。了解更多参数的含义和进行训练调优,可参考 veRL 官方调优指南 perf_tunning:
verl.readthedocs.io/en/latest/p...
提交自定义任务
环境变量配置
volc cli 配置
volc cli 为机器学习平台的命令行工具,可以以命令行的方式便捷的进行任务提交,任务管理等操作。预置镜像已经安装 volc 命令行工具,进行升级操作。
bash
# 升级volc cli
! volc upgrade
# 查看volc cli版本
! volc v
可通过以下操作配置好 volc cli 和 jupyter notebook 需要的的环境依赖。
如果您不知道您的 AK/SK,
可以通过 API 访问密钥(console.volcengine.com/iam/keymana...) 获得您当前身份的密钥对。
bash
# 火山引擎认证配置(替换为你的 AK/SK)
VOLC_ACCESS_KEY_ID = '**'
VOLC_SECRET_ACCESS_KEY = '=='# 默认使用开发机所在的 region
import os
VOLC_REGION=os.environ['MLP_REGION']
# 一次性设置所有环境变量(Jupyter魔法命令)
%set_env VOLC_ACCESS_KEY_ID={VOLC_ACCESS_KEY_ID}
%set_env VOLC_SECRET_ACCESS_KEY={VOLC_SECRET_ACCESS_KEY}
%set_env VOLC_REGION={VOLC_REGION}
# 配置火山命令行工具(自动读取已设置的环境变量)
! volc configure --ak $VOLC_ACCESS_KEY_ID --sk $VOLC_SECRET_ACCESS_KEY --region $VOLC_REGION
# 验证配置文件(可选)
! echo"volc config:" && cat ${HOME}/.volc/config
! echo"volc credentials:" && cat ${HOME}/.volc/credentials
镜像配置
这里配置该文档所提交的所有任务,所用到的镜像信息,会默认使用你开机机所在 region 的镜像,如有其他需求,请更换为您所在的区域,以获取更好的体验。
python
# 根据当前 region 生成镜像地址
image_url = f'vemlp-{VOLC_REGION}.cr.volces.com/preset-images/verl:v0.4.1'
print(f'image: {image_url}')
资源配置
您可通过以下方式获取相关运行配置:
- 访问文件存储 vePFS (console.volcengine.com/vepfs/regio...) 获取关于 vePFS 的配置信息。
- 访问队列管理 (console.volcengine.com/ml-platform...) 以获取队列 ID。
- 访问实例规格与定价 (www.volcengine.com/docs/6459/7...) 获取您希望使用的规格。
- 请确保本 notebook 挂载配置与下列文件系统配置完全一致。
ini
queue='q-xxxx'
# 队列 id   flavor='ml.xxxxxx'# 8*80G显存显卡的机器  replicas=4
# 文件系统配置
mount_path = "/file_system"# vepfs 挂载路径
storage_type = "Vepfs"
vepfs_id = "vepfs-xxx"# vepfs id experiment_name="qwen2_3b_function_rm" # wandb 实验名称
script_path = "/path/to/verl/recipe/retool"
ckpt_path = "path/to/ckpt/huggingface"
提交 sft 任务
在进行 RL 训练前,需要先执行 sft 任务,冷启动模型。
python
import yaml
def build_envs():
    envs = [
        {"Name": "VOLC_ACCESS_KEY_ID", "Value": VOLC_ACCESS_KEY_ID, "IsPrivate": True},
        {"Name": "VOLC_SECRET_ACCESS_KEY", "Value": VOLC_SECRET_ACCESS_KEY, "IsPrivate": True},
        {"Name": "VLLM_USE_V1", "Value": "1", "IsPrivate": False},
        {"Name": "MLP_TRACKING_REGION", "Value": "cn-beijing", "IsPrivate": False},
        {"Name": "PYTHONPATH", "Value": {verl_path}, "IsPrivate": False},
    ]
    return envs
# 定义配置内容
task_config = {
    "TaskName": "verl-retool-Qwen-32B",
    "Description": "Retool Qwen-32B",
    "Entrypoint": f'''cd {script_path}
                      bash run_qwen2-32b_sft.sh
                      python3 -m verl.model_merger merge --backend fsdp --local_dir {ckpt_path} --target_dir {ckpt_path}/huggingface''',
    "Tags": [],
    "Envs": build_envs(),
    "ResourceQueueID": queue,             #replace_with_your_ResourceQueueID  "Framework": "PyTorchDDP",
    "TaskRoleSpecs": [                           #replace_with_your_TaskRoleSpecs
        {
            "RoleName": "worker",
            "RoleReplicas": replicas,
            "Flavor": flavor,
        }
    ],
    "ActiveDeadlineSeconds": 864000,
    "EnableTensorBoard": False,
     #replace_with_your_Storages  "Storages": [
        {
          "MountPath": mount_path,
          "Type": storage_type,
          "VepfsId": vepfs_id,
        }
    ],
    "ImageUrl": image_url,                   #replace_with_you_image_url  "RetryOptions": {
        "EnableRetry": False,
        "MaxRetryTimes": 5,
        "IntervalSeconds": 120,
        "PolicySets": [],
    },
}

# 将配置写入到 yaml 文件中  import datetime
verl_retool_config_yaml = f'sft-verl-retool-{datetime.datetime.now().strftime("%Y%m%d_%H%M%S")}.yaml'
with open(verl_retool_config_yaml, "w") as file:
    yaml.dump(task_config, file, default_flow_style=False)

print(f"{verl_retool_config_yaml} 文件已生成")

! volc ml_task submit --conf {verl_retool_config_yaml}
通过 volc 命令行工具查询作业状态:
css
! volc ml_task get --id t-xxxxxxxxxxx --output json --format Status 提交 RL 任务
请注意:RL 任务需要在 sft 任务执行完成后再提交,否则没有相应的 checkpoint。
首先配置自定义任务的启动参数,并通过 volc cli 命令行工具提交自定义任务。使用 Ray 框架进行分布式训练,执行下面的命令新建一个 yaml 任务配置文件:
python
# 定义配置内容  import yaml
task_config = {
    "TaskName": "verl-retool-Qwen-32B",
    "Description": "Retool Qwen-32B",
    "Entrypoint": f'''cd {verl_path}
                      bash recipe/retool/run_qwen2-32b_dapo.sh''',
    "Tags": [],
    "Envs": build_envs(),
    "ResourceQueueID": queue,             #replace_with_your_ResourceQueueID  "Framework": "Ray",
    "TaskRoleSpecs": [                           #replace_with_your_TaskRoleSpecs
        {
            "RoleName": "head",
            "RoleReplicas": 1,
            "Flavor": flavor,
        },
        {
            "RoleName": "worker",
            "RoleReplicas": replicas - 1,
            "Flavor": flavor,
        }
    ],
    "ActiveDeadlineSeconds": 864000,
    "EnableTensorBoard": False,
     #replace_with_your_Storages  "Storages": [
        {
          "MountPath": mount_path,
          "Type": storage_type,
          "VepfsId": vepfs_id,
        }
    ],
    "ImageUrl": image_url,                   #replace_with_you_image_url  "RetryOptions": {
        "EnableRetry": False,
        "MaxRetryTimes": 5,
        "IntervalSeconds": 120,
        "PolicySets": [],
    },
}

# 将配置写入到 yaml 文件中  import datetime
verl_retool_config_yaml = f'rl-verl-retool-{datetime.datetime.now().strftime("%Y%m%d_%H%M%S")}.yaml'
with open(verl_retool_config_yaml, "w") as file:
    yaml.dump(task_config, file, default_flow_style=False)

print(f"{verl_retool_config_yaml} 文件已生成")

! volc ml_task submit --conf {verl_retool_config_yaml}
观察训练中任务日志/实验过程/资源利用率
使用实验管理记录训练过程
veRL 中参数设置为 trainer.logger='console','vemlp_wandb'
使用 Trace 工具分析训练过程
Agentic RL 在 rollout 过程中会有多轮对话、工具调用,以及用户交互的场景。在模型训练过程中,需要追踪函数调用、输入和输出,来了解数据在应用程序中的流动路径。Trace 功能通过记录函数的输入、输出和对应的时间戳,帮助在复杂的多轮对话中,查看数据在每次交互时的转换,最终得到输出的整个过程,有助于理解模型对数据的处理细节,来优化训练效果。
veRL Trace 功能集成了常用的 Agent trace 工具,已经支持的有 wandb weave 和 mlflow。用户可以根据自己的需求和习惯选择合适的 trace 工具。这里以 weave 为例,介绍下 trace 工具的使用方法。
基础配置
1.设置 WANDB_API_KEY 环境变量
2.veRL 配置参数
- trainer.rollout_trace.backend=weave
- trainer.logger='console','wandb' 。此项是可选项,trace 和 logger 是互相独立的功能,推荐使用 weave 时,也开启 wandb logger,在一个系统实现两项功能。
- trainer.project_name=$project_name
- trainer.experiment_name=$experiment_name
查看 Trace 日志
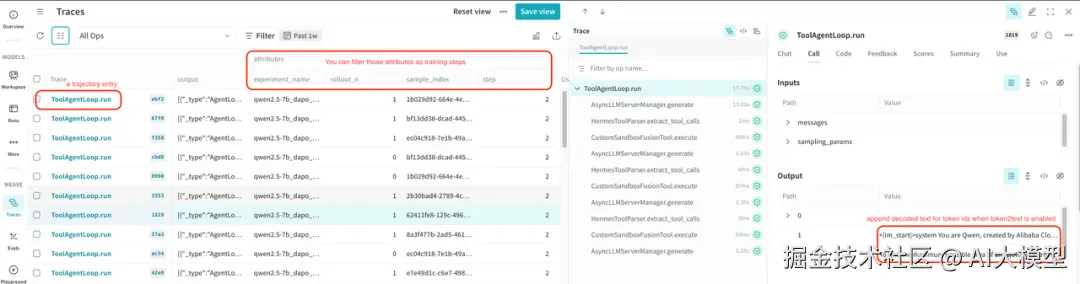
执行训练后,在项目页面中,可以看到 WEAVE 的侧边栏,点击 Traces 来查看。
每个 Trace 项目对应一个 trajectory。可以通过 step、sample_index、rollout_n、experiment_name 来过滤筛选需要查看的 trajectory。
开启 token2text 后,会自动在 ToolAgentLoop.run 的输出里面,增加 prompt_text 和 response_text,方便查看输入和输出的内容。
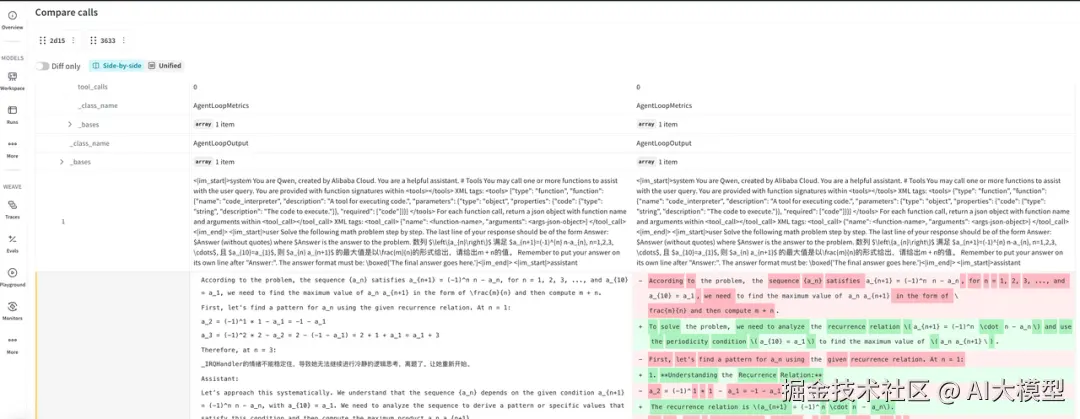
比较 Trace 日志
weave 可以选择多个 trace 项目,然后比较其中的差异。
复现 SOTA 的"关键经验"总结
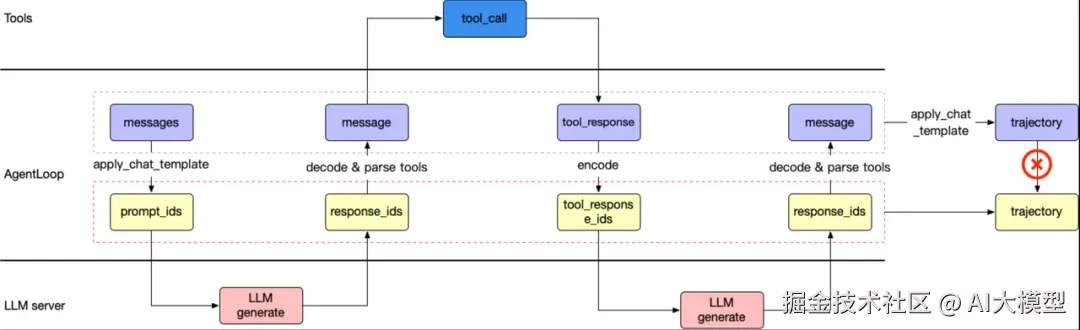
Agent 在 RL 训练中需要使用 token 作为输入和输出
我们发现 decode 消息得到的 token_ids 可能与每一轮中通过合并 prompt_ids 和 response_ids 得到的 token_ids 不一致。对训练的影响是训练到 100 步左右时,模型性能会突然下降,同时 actor/grad_norm 指标也会变成 NaN。
这种不一致发生在哪里呢?
因为解码-编码有很多情况不可逆,比如生成 "helloworld" 的 token 可能有几种组合情况,但是根据 "helloworld" 转成的 token 只有一种组合,可能跟原来的 token 不同。
所以 veRL 采用了 token in and token out 的方式,让 agent 调用 llm generate 方法时,输入和输出都使用 token,来避免 token 和明文消息互相转换不一致的问题。
使用 SGLang 和 FlashInfer 算子时,Qwen2.5 模型大概率不会调用工具
下面是该现象的一个例子:
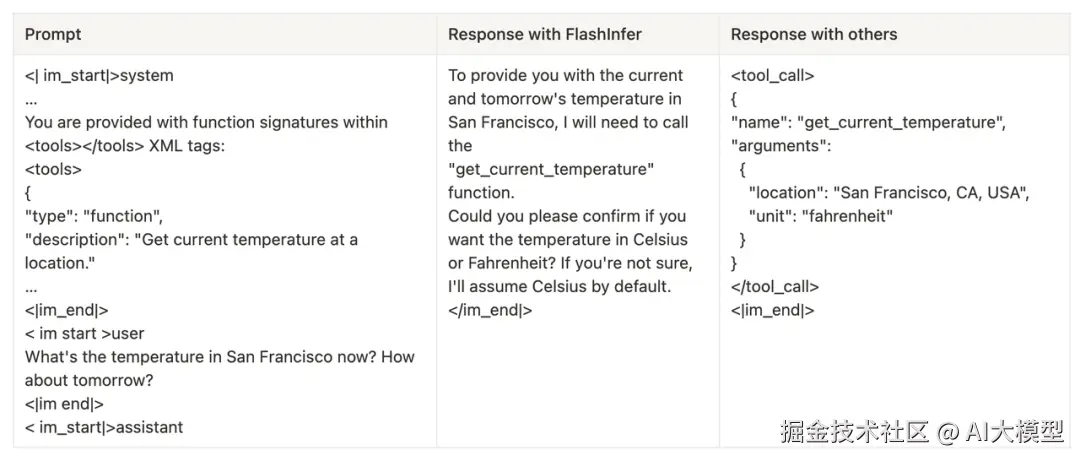
推测跟 FlashInfer 精度有关,SGLang 支持的其他算子并没有这个现象,已经通过在 veRL 中固定使用 FlashAttention 来避免这个问题。
对 SGLang 支持的算子做了测试,具体情况见下表,目前只发现 FlashInfer 有这个现象。

更多问题和解决方案参考
LLM
问题 1:qwen3 有深度思考模式,倾向于文本推理,很少输出代码,所以训练效果不佳。
解决方案:按 ReTool 论文用的 qwen2.5-32b 来复现。
问题 2:使用 SGLang + FlashInfer 算子时,模型不会调用工具。
解决方案:跟 FlashInfer 精度有关,SGLang 支持的其他算子并没有这个现象,已经通过在 veRL 中固定使用 Flashatten3 来避免这个问题。
sandbox
问题:因为 sft 后模型的行为是生成交互式代码,最后一行是变量名,不包含 print 函数,导致不会返回代码输出。
解决方案:在输入给 code sandbox 前对代码做处理,自动在最后一行添加 print。
模型性能
问题 1:训练 100 步之后模型能力下降。
解决方案:这是 veRL 早期实现问题,在最新版本已经解决。该问题是因为 LLM 输出的是 text 明文,训练时转换成 token 后,跟原始的 token 有差异,导致训练精度不佳。原因是 token 和 text 的转换不可逆,比如
转换成 token 之后,跟原始的 token 不一致。
问题 2:遇到性能提升不上去时,有哪些方法能帮助定位问题?
解决方案:
1.因为训练的数据只能包含 LLM 自己生成的内容,不应该包含 tool 生成的,所以需要把 tool 生成的部分 mask 遮住后再训练,并且保证 token 级别一致。
2.配置 trainer.log_val_generations=10 参数可以打印测试集的输入和输出,用于判断模型能力变化。
3.tool 本身也有可能出错,可以打印出 tool 输出内容,看是否有异常。在训练过程中识别到了多个 sandbox fusion 的 bug,均已解决。
规划了 trace 功能,用于分析训练过程,观测 LLM 和 tool 输出。可以关注改功能开发进展:github.com/volcengine/...
问题 3:如何提升 acc 的 tricks?
解决方案:修改写 Python 代码时候的提示词+对应修改答案提取方式,带来了可观的涨点。
修改前:
css
Execute Python code to perform calculations, data analysis, or other computational tasks. 修改后:
vbscript
A Python code execution environment that allows you to:
          - Run Python code for calculations, data analysis, and other computational tasks
          - Get results through the `print()` function output
          - Execute code in an isolated environment (each execution starts fresh)

          Important notes:
          - Results are captured from`print()` statements
          - Returnsemptystringifnooutputis printed
          - Each execution is independent (no state persistence between runs)
想试试?从 veRL 开始
复现 ReTool 不是终点,而是起点 ------ 用 ReTool+veRL,你可以让 LLM 在数据处理、逻辑推理、复杂计算等任务中更靠谱。
学习资料
我使用PlantUML绘制了一份技能树脑图,把学习路线分成L1到L4四个阶段,一步步带你从入门到进阶,从理论到实战。
这份学习路线大纲已经导出整理打包了,在 >gitcode ←←←←←←
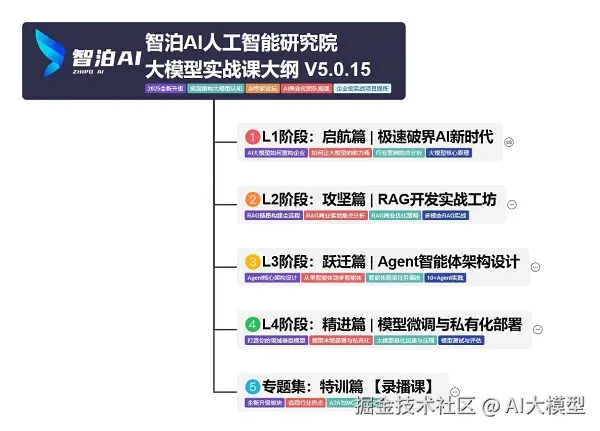
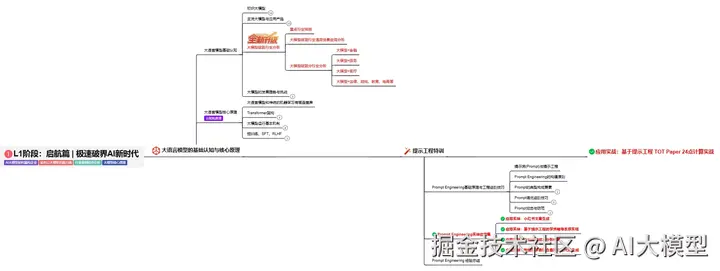
L1阶段:启航篇丨极速破界AI新时代
L1阶段:了解大模型的基础知识,以及大模型在各个行业的应用和分析,学习理解大模型的核心原理、关键技术以及大模型应用场景。
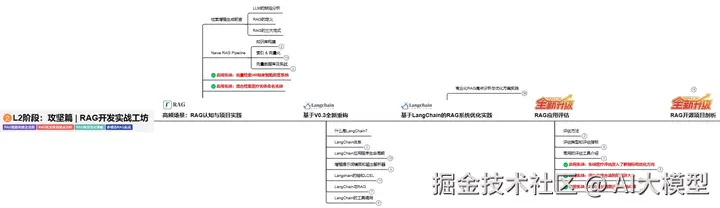
L2阶段:攻坚篇丨RAG开发实战工坊
L2阶段:AI大模型RAG应用开发工程,主要学习RAG检索增强生成:包括Naive RAG、Advanced-RAG以及RAG性能评估,还有GraphRAG在内的多个RAG热门项目的分析。
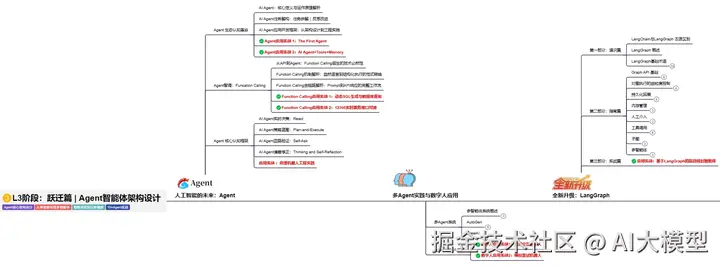
L3阶段:跃迁篇丨Agent智能体架构设计
L3阶段:大模型Agent应用架构进阶实现,主要学习LangChain、 LIamaIndex框架,也会学习到AutoGPT、 MetaGPT等多Agent系统,打造Agent智能体。
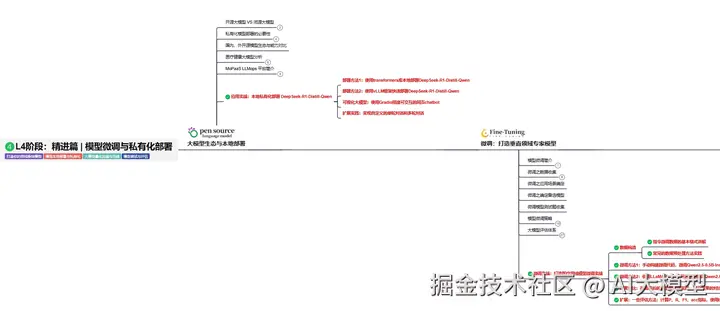
L4阶段:精进篇丨模型微调与私有化部署
L4阶段:大模型的微调和私有化部署,更加深入的探讨Transformer架构,学习大模型的微调技术,利用DeepSpeed、Lamam Factory等工具快速进行模型微调,并通过Ollama、vLLM等推理部署框架,实现模型的快速部署。
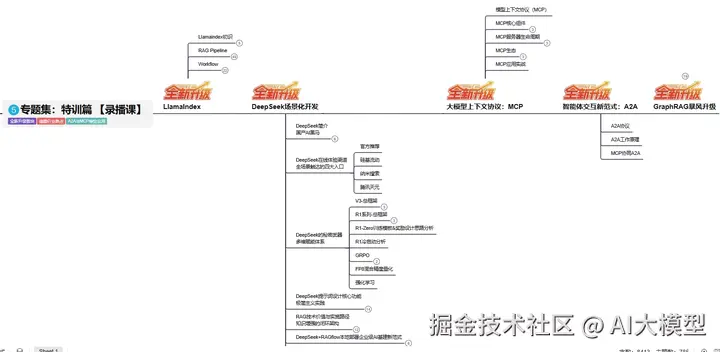
L5阶段:专题集丨特训篇 【录播课】
总结:学习路径建议从 理论 -> 编程 -> 算法 -> 工程 逐步深入。在实践中,这些板块的能力是相辅相成、缺一不可的。对于大模型时代,Transformer的理解和模型部署优化的工程能力尤为关键。
这份学习路线大纲已经导出整理打包了,在 >gitcode ←←←←←←