PyTorch实战------ResNet与DenseNet详解
-
- [0. 前言](#0. 前言)
- [1. ResNet](#1. ResNet)
- [2. DenseNet](#2. DenseNet)
- 相关链接
0. 前言
我们已经学习了Inception 模型,这些模型通过 1x1 卷积和全局平均池化减少了模型参数的数量,从而避免了随着层数的增加可能导致的参数爆炸问题。此外,还通过辅助分类器缓解了梯度消失问题。在本节中,我们将讨论 ResNet 和 DenseNet 模型。
1. ResNet
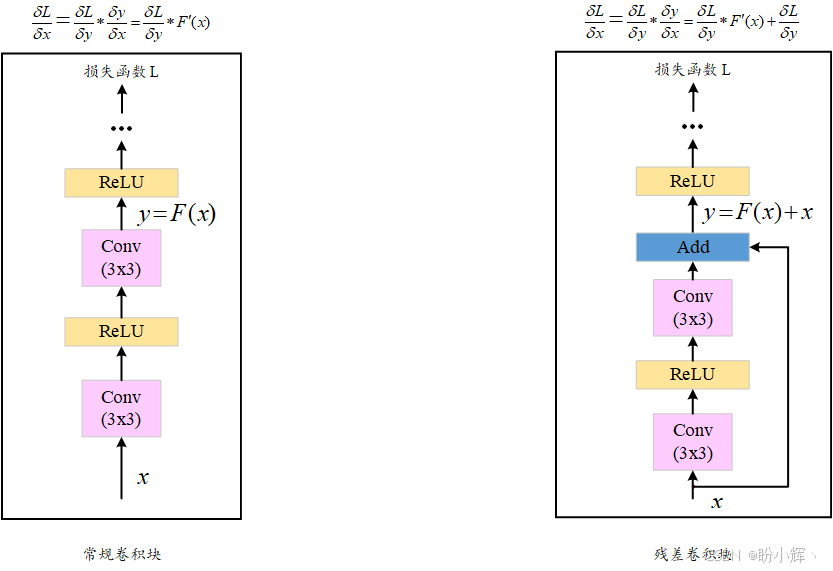
ResNet 引入了跳跃连接 (skip connections) 的概念。这种简单而有效的技巧克服了参数爆炸和梯度消失的问题。其基本思想如下图所示,输入首先经过非线性变换(卷积后跟非线性激活),然后将该变换的输出(称为残差)与原始输入相加。每个这样的计算块称为残差块,因此该模型称为残差网络 (Residual Network, ResNet):
通过使用跳跃连接(也称捷径连接),ResNet-50 (50 层)的参数数量为 2600 万。由于参数数量有限,即使层数增加到 152 层( ResNet-152),ResNet 也能很好地泛化而不会过拟合。下图展示了 ResNet-50 的架构:
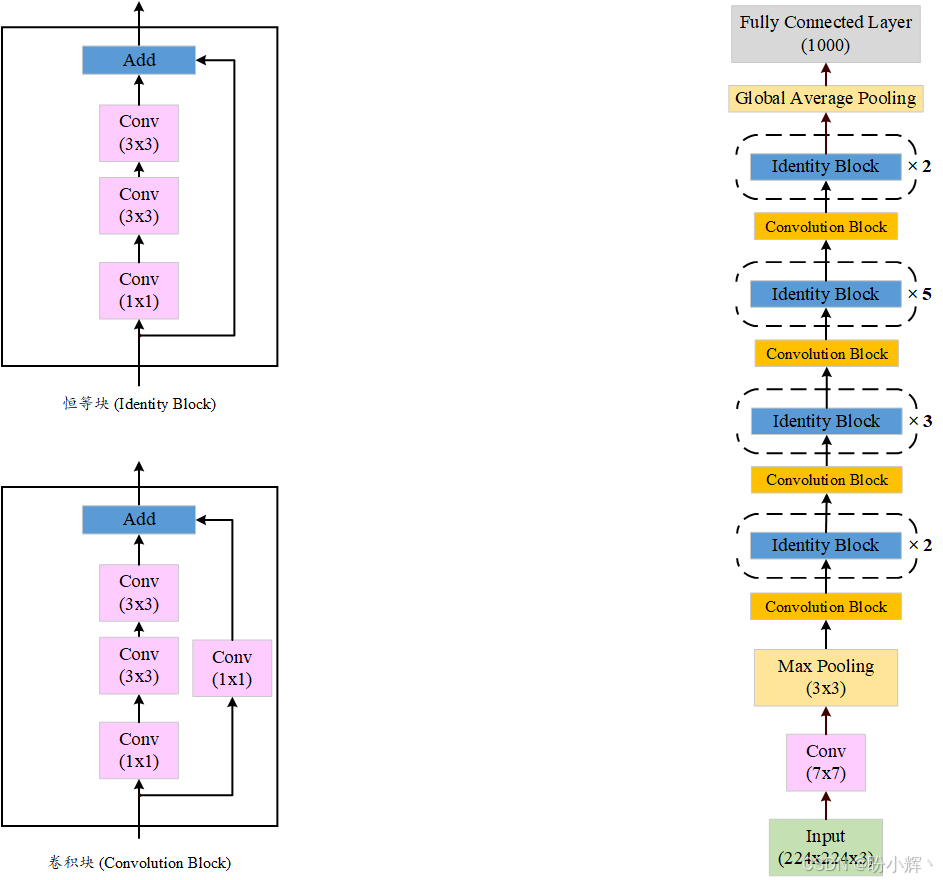
ResNet 中有两种残差块:卷积残差块和恒等残差块,两者都包含跳跃连接。对于卷积残差块,额外添加了一个 1x1 的卷积层,以进一步减少维度。使用 PyTorch 实现残差块:
python
class BasicBlock(nn.Module):
    multiplier=1
    def __init__(self, input_num_planes, num_planes, strd=1):
        super(BasicBlock, self).__init__()
        self.conv_layer1 = nn.Conv2d(in_channels=input_num_planes, out_channels=num_planes, kernel_size=3, stride=stride, padding=1, bias=False)
        self.batch_norm1 = nn.BatchNorm2d(num_planes)
        self.conv_layer2 = nn.Conv2d(in_channels=num_planes, out_channels=num_planes, kernel_size=3, stride=1, padding=1, bias=False)
        self.batch_norm2 = nn.BatchNorm2d(num_planes)

        self.res_connnection = nn.Sequential()
        if strd > 1 or input_num_planes != self.multiplier*num_planes:
            self.res_connnection = nn.Sequential(
                nn.Conv2d(in_channels=input_num_planes, out_channels=self.multiplier*num_planes, kernel_size=1, stride=strd, bias=False),
                nn.BatchNorm2d(self.multiplier*num_planes)
            )
    def forward(self, inp):
        op = F.relu(self.batch_norm1(self.conv_layer1(inp)))
        op = self.batch_norm2(self.conv_layer2(op))
        op += self.res_connnection(inp)
        op = F.relu(op)
        return op
要快速开始使用 ResNet,我们可以直接使用 PyTorch 提供的预训练模型:
python
import torchvision.models as models
model = models.resnet50(weights=models.ResNet50_Weights.DEFAULT)
ResNet 使用恒等函数(直接将输入连接到输出)在反向传播中保留梯度(因为梯度为 1)。然而,对于极深的网络,这一原则可能不足以将强梯度从输出层传递回输入层。接下来,将讨论的 CNN 模型 (DenseNet) 旨在确保强梯度流动,并进一步减少所需的参数数量。
2. DenseNet
ResNet 的跳跃连接将残差块的输入直接连接到其输出。然而,残差块之间的连接依然是顺序的;也就是说,残差块 3 与块 2 直接连接,但与块 1 没有直接连接。
DenseNet 通过密集连接进一步优化了梯度流动和参数效率。在稠密块内部,每个卷积层都与所有后续层直连;在整个网络中,每个稠密块也与其他所有稠密块相连。一个稠密块由两个 3x3 的密集连接卷积层组成。
这种密集连接确保网络中各层都能获取所有前置层的特征信息,从而形成从末层到首层的强梯度流。这种结构反而能减少参数量------由于每层都能接收前面所有层的特征图,所需通道数(深度)可以大幅降低。在传统模型中,增加深度是为了累积早期层的信息,而全网络的 DenseNet 连接不再需要这种方式,因为网络中的每一层都通过密集连接进行交互。
ResNet 和 DenseNet 的一个关键区别是,ResNet 采用跳跃连接将输入与输出相加,而 DenseNet 是在深度维度上将前面所有层的输出与当前层输出拼接。
这可能会引发,关于随着网络层数增加输出大小是否会爆炸增长的问题。为了应对这种积累效应,DenseNet 专门设计了过渡块结构。过渡块由一个 1x1 的卷积层和一个 2x2 的池化层组成,这个模块标准化或重置深度维度的大小,以便这个模块的输出可以传递到后续的稠密块。下图展示了 DenseNet 的架构:
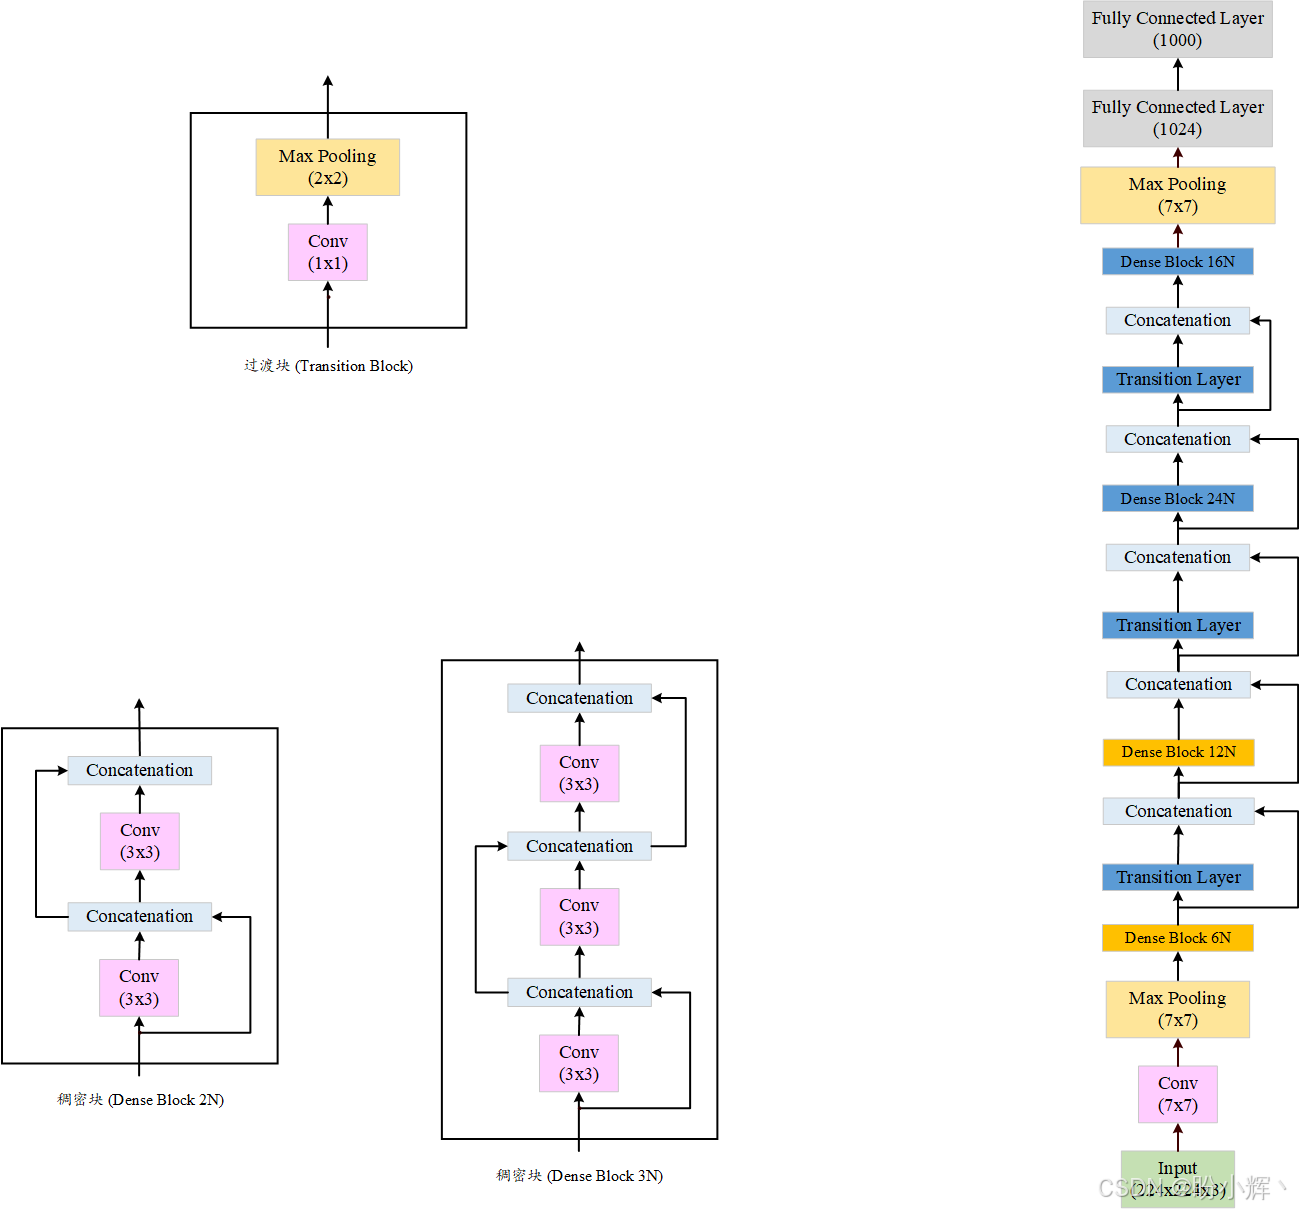
DenseNet 由两类模块构成:稠密块 (dense block) 和过渡块 (transition block)。使用 PyTorch 实现这两类模块:
python
class DenseBlock(nn.Module):
    def __init__(self, input_num_planes, rate_inc):
        super(DenseBlock, self).__init__()
        self.batch_norm1 = nn.BatchNorm2d(input_num_planes)
        self.conv_layer1 = nn.Conv2d(in_channels=input_num_planes, out_channels=4*rate_inc, kernel_size=1, bias=False)
        self.batch_norm2 = nn.BatchNorm2d(4*rate_inc)
        self.conv_layer2 = nn.Conv2d(in_channels=4*rate_inc, out_channels=rate_inc, kernel_size=3, padding=1, bias=False)
    def forward(self, inp):
        op = self.conv_layer1(F.relu(self.batch_norm1(inp)))
        op = self.conv_layer2(F.relu(self.batch_norm2(op)))
        op = torch.cat([op,inp], 1)
        return op

class TransBlock(nn.Module):
    def __init__(self, input_num_planes, output_num_planes):
        super(TransBlock, self).__init__()
        self.batch_norm = nn.BatchNorm2d(input_num_planes)
        self.conv_layer = nn.Conv2d(in_channels=input_num_planes, out_channels=output_num_planes, kernel_size=1, bias=False)
    def forward(self, inp):
        op = self.conv_layer(F.relu(self.batch_norm(inp)))
        op = F.avg_pool2d(op, 2)
        return op
通过交替堆叠稠密块与过渡块,并配合输入端的固定 7×7 卷积层和输出端的全连接层,可构建 DenseNet121/161/169/201 等不同深度的变体(数字代表总层数)。PyTorch 提供了所有变体的预训练模型:
python
import torchvision.models as models
densenet121 = models.densenet121(weights=models.DenseNet121_Weights.DEFAULT)
denseneti61 = models.densenet161(weights=models.DenseNet161_Weights.DEFAULT)
densenet169 = models.densenet169(weights=models.DenseNet159_Weights.DEFAULT)
densenet201 = models.densenet201(weights=models.DenseNet201_Weights.DEFAULT)
通过组合不同网络的创新点,还发展出 Inception-ResNet、ResNeXt 等混合架构。下面的图展示了 ResNeXt 架构:
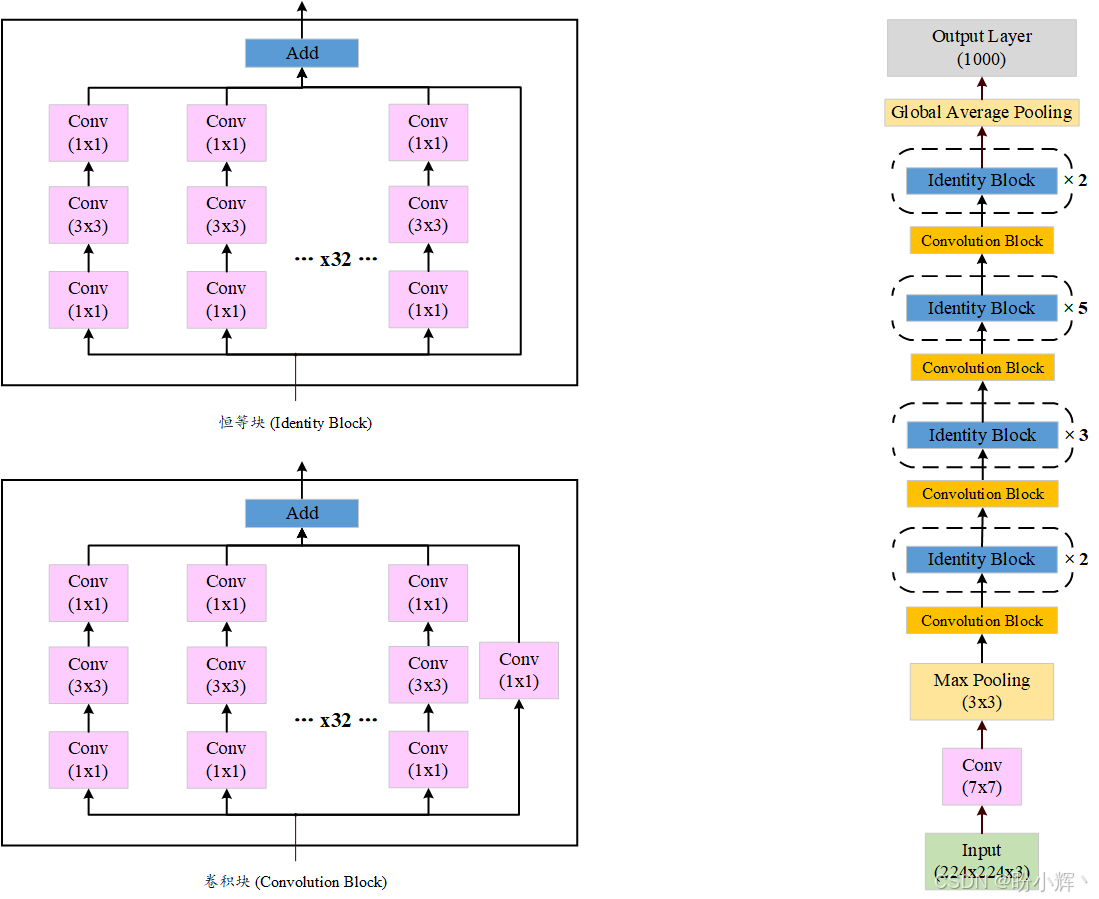
可以看到,ResNeXt 残差块中包含大量并行卷积分支,可视为 ResNet 与 Inception 的加宽混合体。
相关链接
PyTorch实战(1)------深度学习概述
PyTorch实战(2)------使用PyTorch构建神经网络
PyTorch实战(3)------PyTorch vs. TensorFlow详解
PyTorch实战(4)------卷积神经网络(Convolutional Neural Network,CNN)
PyTorch实战(5)------深度卷积神经网络
PyTorch实战(6)------模型微调详解
PyTorch实战------GoogLeNet与Inception详解