文章目录
注册阿里OSS
注册并登录阿里云账号
注册后使用支付宝登录
开通对象存储OSS
这个很便宜,我10块钱几个月才用1分钱。不用担心过期收费过高。
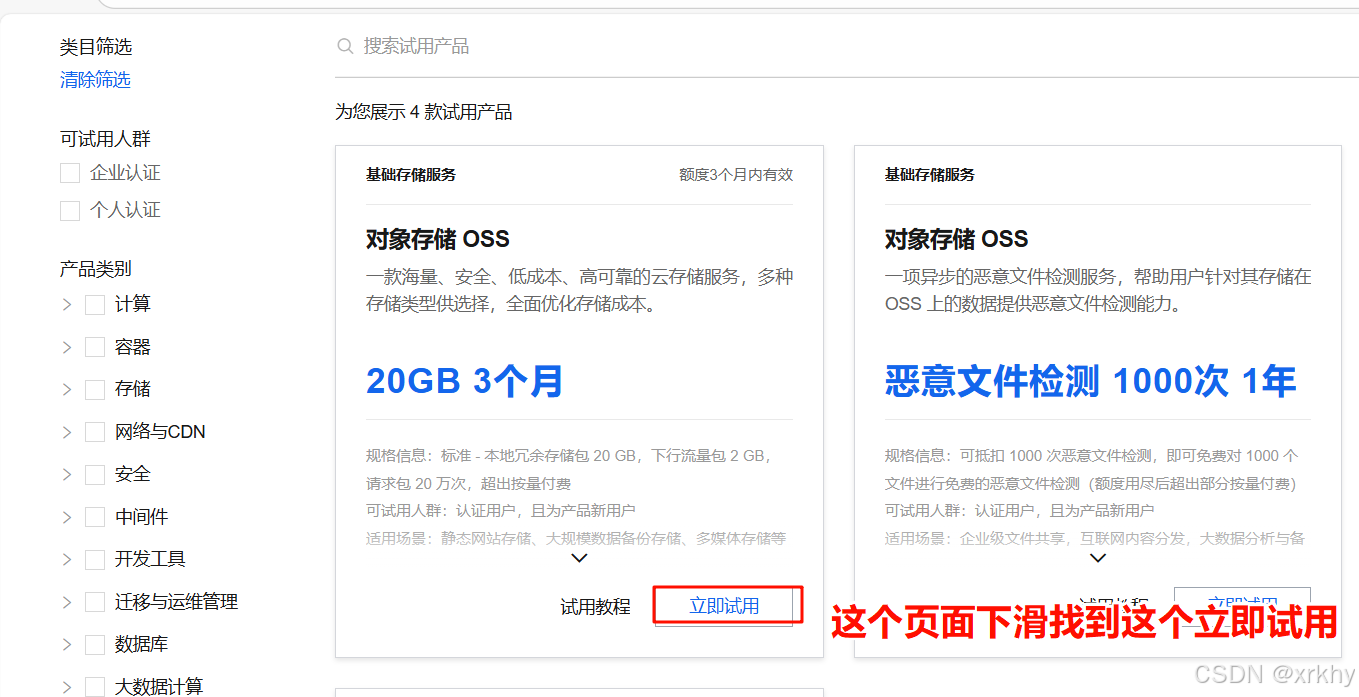
找到产品。

点击免费试用

这个页面往下滑动,找到下图的然后点击立即试用。
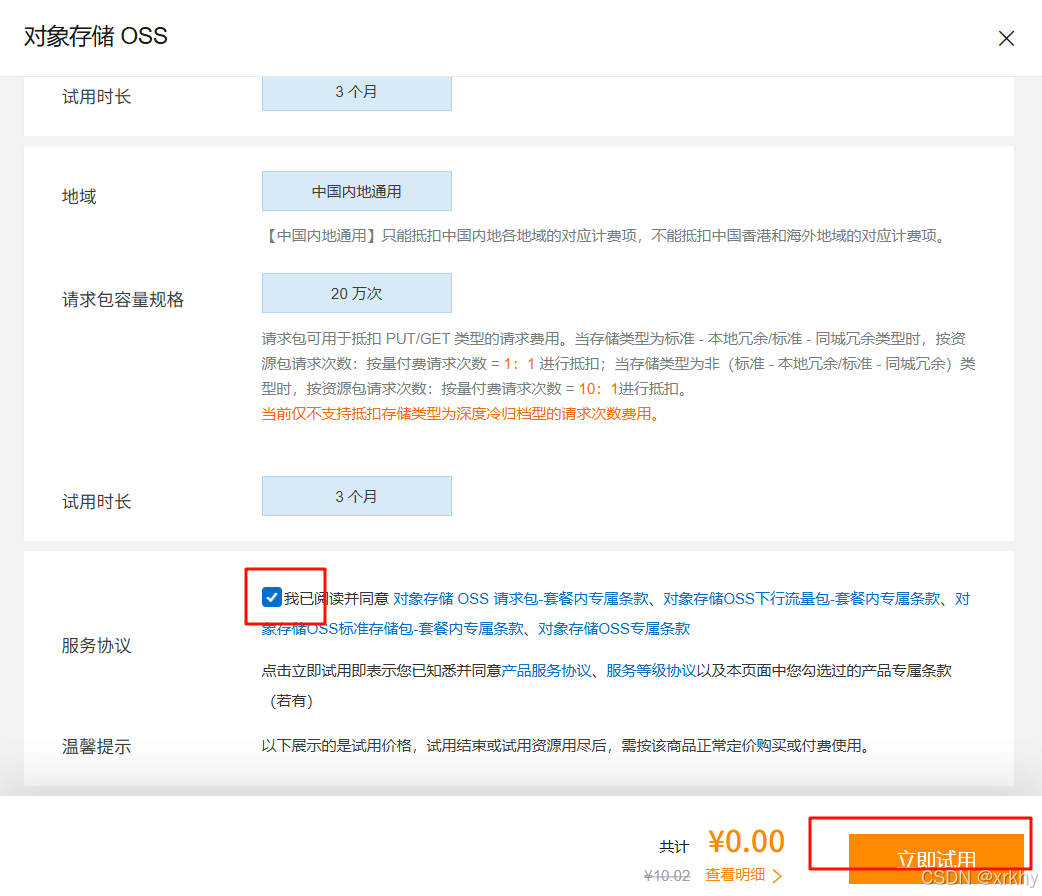
勾选协议,立即试用。
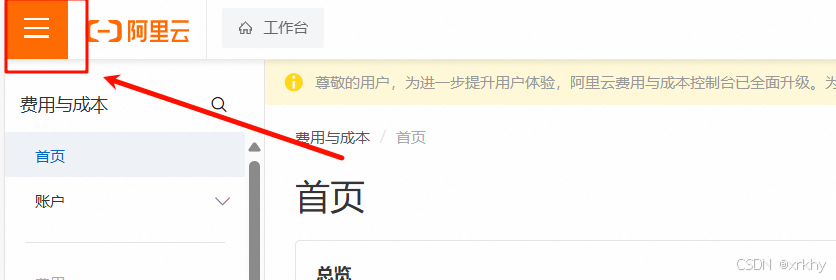
点击管理试用

创建Bucket
继续上面的操作
点击三个横杠
搜索对象存储oss

创建Bucket

写入项目名称,其他不用管。
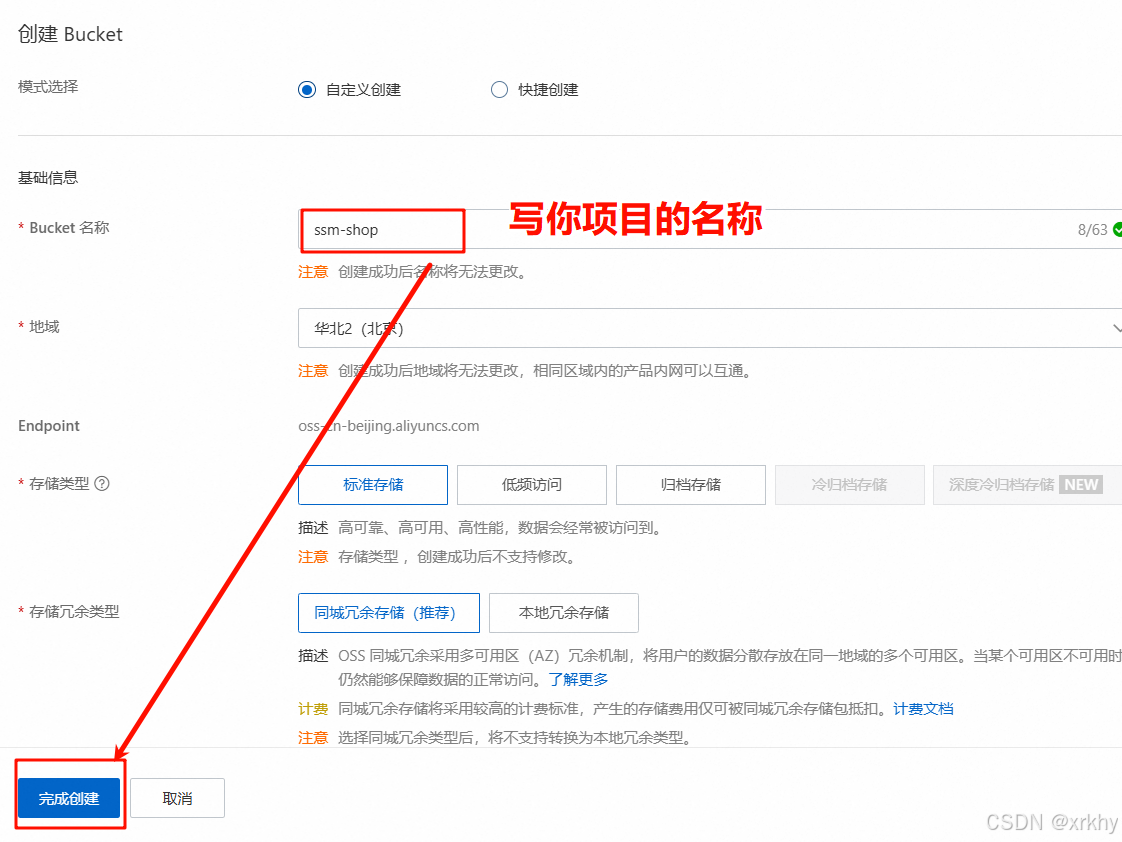
点击我知道了,确认创建

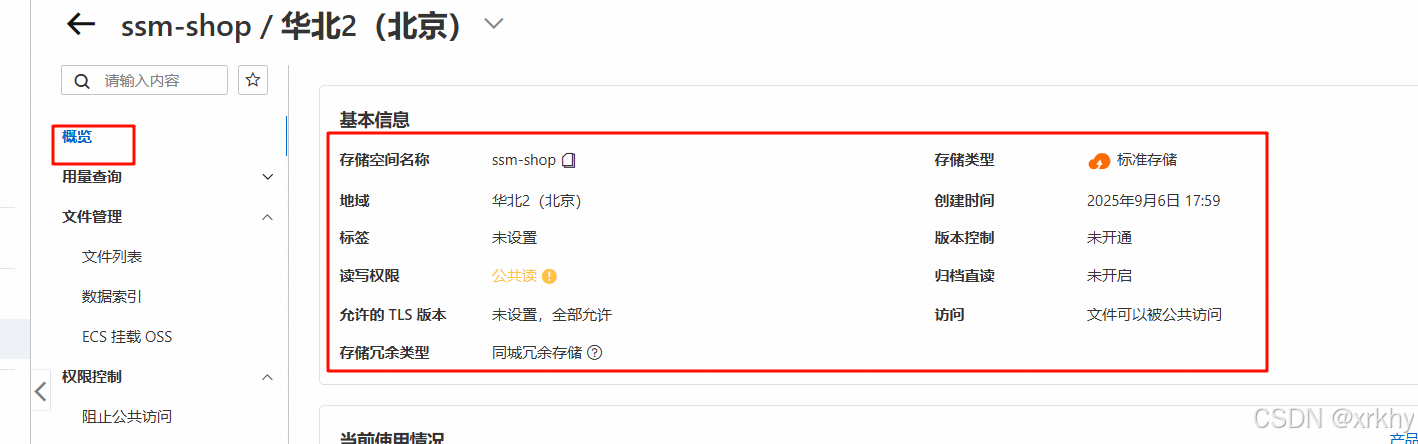
点击进入Bucket
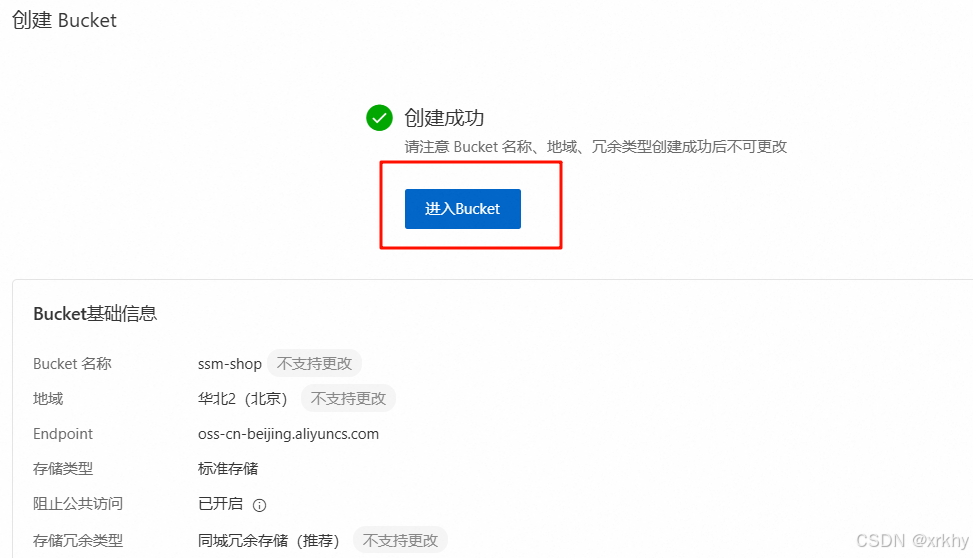
如下图
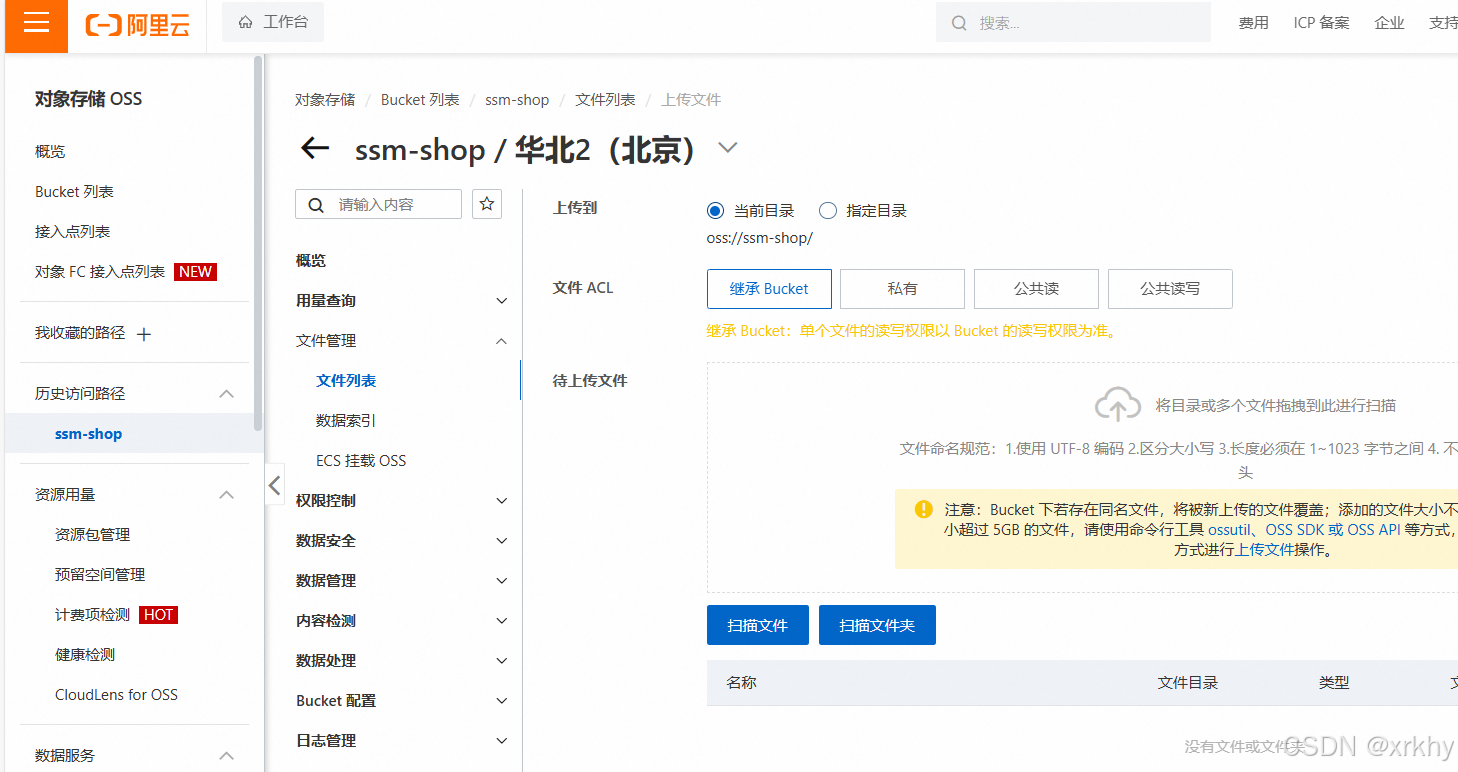
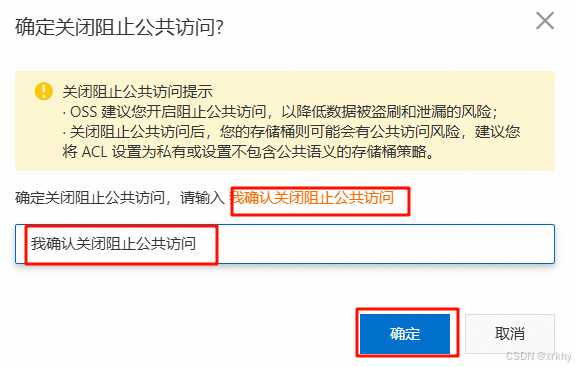
修改权限
点击权限控制

将上面的话复制到下面然后点击确定
点击设置
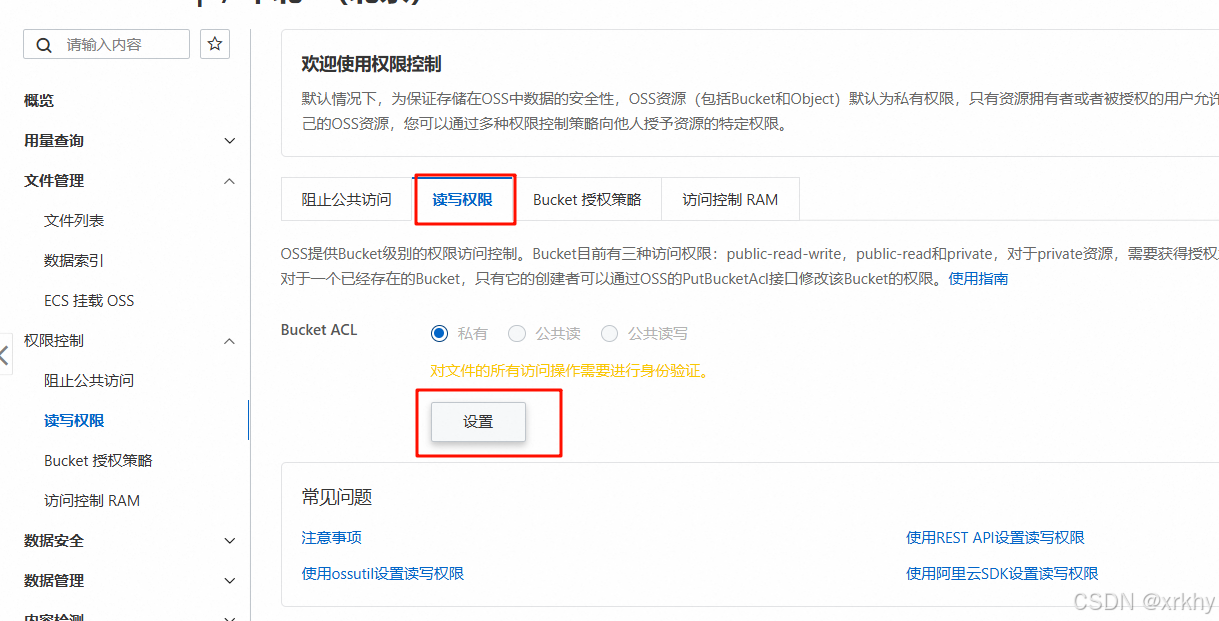
点击公共读

点击继续修改

保存

下面的权限变成公共读即可
创建AccessKey
右上角头像,点击AccessKey。
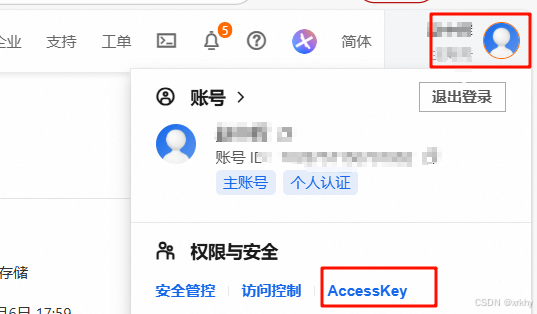
勾选并点击继续
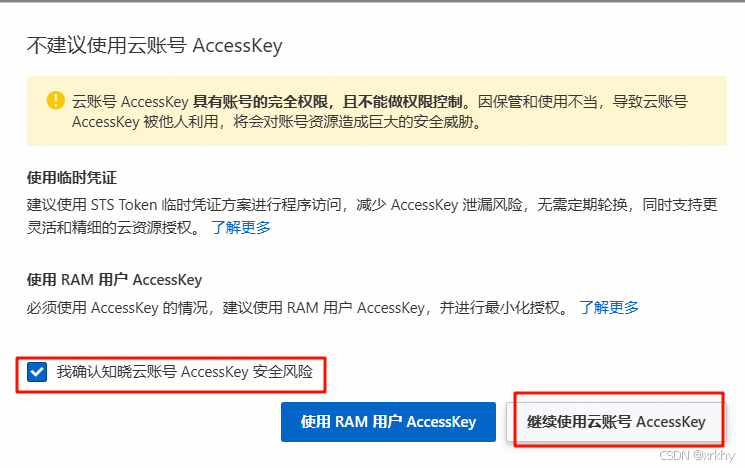
点击创建AccessKey,

选一种方式验证
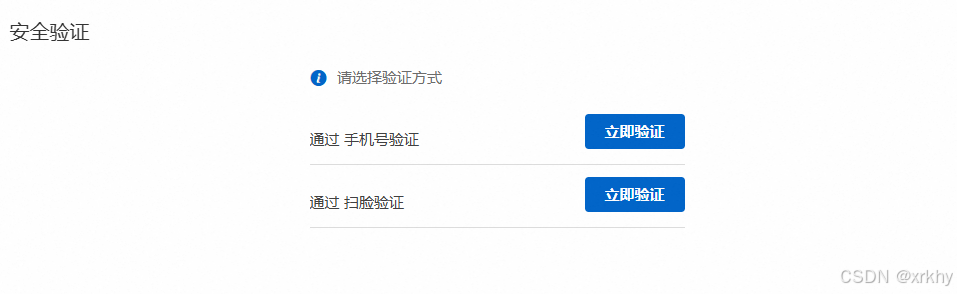
注意:一定一定要保存好,丢了只能重新创建无法找回。

全局存储到你的计算机(可以跳过)
如果你害怕丢失
以管理员身份打开CMD命令行,执行如下命令,配置系统的环境变量。
set OSS_ACCESS_KEY_ID=xxxxxxxxxxxxxxxxxxxxxxxxxxxxxxxxxxxxxxxxxxxx
set OSS_ACCESS_KEY_SECRET=xxxxxxxxxxxxxxxxxxxxxxxxxxxxxxxxxxxxxxxxxx
注意:将上述的ACCESS_KEY_ID 与 ACCESS_KEY_SECRET 的值一定一定一定一定一定一定要替换成自己的 。
执行如下命令,让更改生效。
bash
setx OSS_ACCESS_KEY_ID "%OSS_ACCESS_KEY_ID%"
setx OSS_ACCESS_KEY_SECRET "%OSS_ACCESS_KEY_SECRET%"
执行如下命令,验证环境变量是否生效。
bash
echo %OSS_ACCESS_KEY_ID%
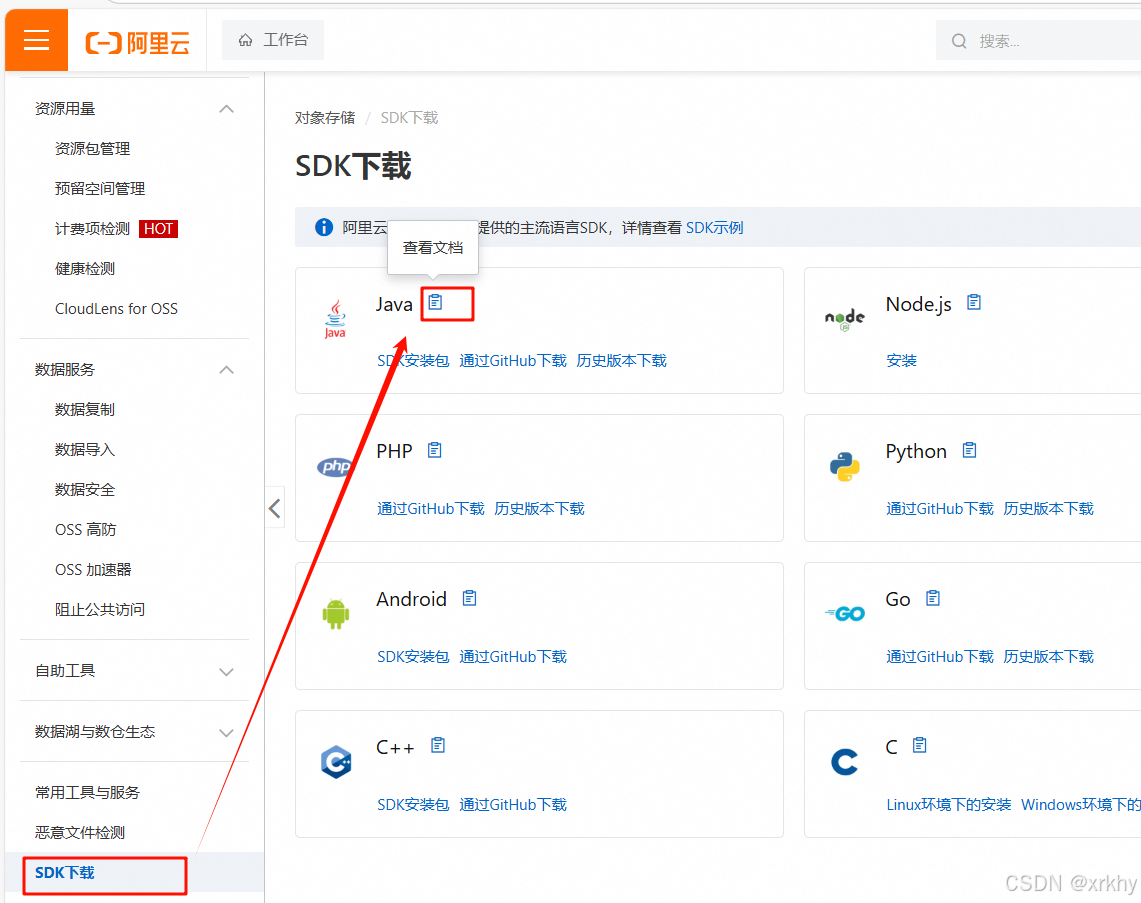
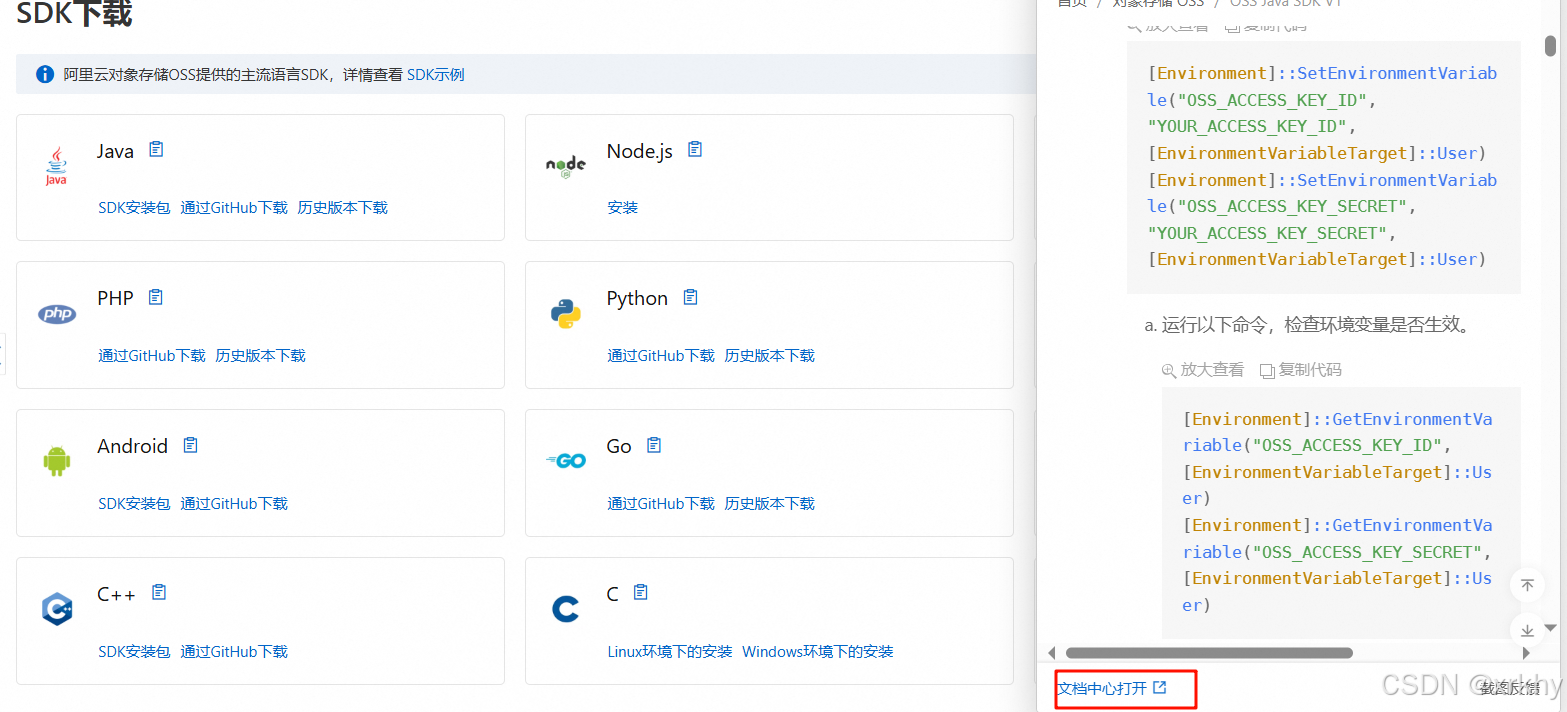
echo %OSS_ACCESS_KEY_SECRET%查看官方文档(可以跳过)
阿里云oss 对象存储服务的准备工作我们已经完成了,接下来我们就来完成第二步操作:参照官方所提供的sdk示例来编写入门程序。
首先我们需要来打开阿里云OSS的官方文档,在官方文档中找到 SDK 的示例代码:
SSM使用
引入依赖
xml
<!--阿里云OSS依赖-->
    <dependency>
      <groupId>com.aliyun.oss</groupId>
      <artifactId>aliyun-sdk-oss</artifactId>
      <version>3.17.4</version>
    </dependency>

    <dependency>
      <groupId>javax.xml.bind</groupId>
      <artifactId>jaxb-api</artifactId>
      <version>2.3.1</version>
    </dependency>
    <dependency>
      <groupId>javax.activation</groupId>
      <artifactId>activation</artifactId>
      <version>1.1.1</version>
    </dependency>
    <!-- no more than 2.3.3-->
    <dependency>
      <groupId>org.glassfish.jaxb</groupId>
      <artifactId>jaxb-runtime</artifactId>
      <version>2.3.3</version>
    </dependency>

    <dependency>
      <groupId>commons-fileupload</groupId>
      <artifactId>commons-fileupload</artifactId>
      <version>1.4</version>
    </dependency>

    <dependency>
      <groupId>commons-io</groupId>
      <artifactId>commons-io</artifactId>
      <version>2.11.0</version>
    </dependency>
在spring-mvc.xml中加入配置
xml
<!-- 配置 MultipartResolver 用于文件上传 -->
    <bean id="multipartResolver" class="org.springframework.web.multipart.commons.CommonsMultipartResolver">
        <!-- 设置最大上传文件大小 -->
        <property name="maxUploadSize" value="10485760"/> <!-- 10MB -->
        <property name="maxInMemorySize" value="4096"/>
        <property name="defaultEncoding" value="UTF-8"/>
    </bean>
创建上传工具类AliOssUtil
java
package com.Teenage_education_network.utils;

import com.aliyun.oss.ClientException;
import com.aliyun.oss.OSS;
import com.aliyun.oss.OSSClientBuilder;
import com.aliyun.oss.OSSException;

import java.io.InputStream;

public class AliOssUtil {
    private static final String ENDPOINT = "https://oss-cn-beijing.aliyuncs.com";
    private static final String ACCESS_KEY_ID = "你的id";
    private static final String SECRET_ACCESS_KEY = "你的秘钥";
    private static final String BUCKET_NAME = "项目名";

    /*
    * uploadFile方法
    * objectName:文件名称比如 "YEjdihp893bif1.jpg"
    * inputStream:文件流,用于读取文件比如,D:\Users\Administrator\Desktop\YEjdihp893bif1.jpg
    * */
    //上传文件,返回文件的公网访问地址
    public static String uploadFile(String objectName, InputStream inputStream){
        // 创建OSSClient实例。
        OSS ossClient = new OSSClientBuilder().build(ENDPOINT,ACCESS_KEY_ID,SECRET_ACCESS_KEY);
        //公文访问地址
        String url = "";
        try {
            // 创建存储空间。
            ossClient.createBucket(BUCKET_NAME);
            ossClient.putObject(BUCKET_NAME, objectName, inputStream);

            // 这里是返回阿里云的url地址
            url = "https://"+BUCKET_NAME+"."+ENDPOINT.substring(ENDPOINT.lastIndexOf("/")+1)+"/"+objectName;
        } catch (OSSException oe) {
            System.out.println("Caught an OSSException, which means your request made it to OSS, "
                    + "but was rejected with an error response for some reason.");
            System.out.println("Error Message:" + oe.getErrorMessage());
            System.out.println("Error Code:" + oe.getErrorCode());
            System.out.println("Request ID:" + oe.getRequestId());
            System.out.println("Host ID:" + oe.getHostId());
        } catch (ClientException ce) {
            System.out.println("Caught an ClientException, which means the client encountered "
                    + "a serious internal problem while trying to communicate with OSS, "
                    + "such as not being able to access the network.");
            System.out.println("Error Message:" + ce.getMessage());
        } finally {
            if (ossClient != null) {
                ossClient.shutdown();
            }
        }
        return url;
    }
}
响应工具类ResultJSON
java
package com.hsh.pojo.tdo;

import java.io.Serializable;

/**
 * @Author: wzy
 * @Date: 2024/11/13 11:03
 * @Description: 返回结果类
 */
public class ResultJSON<T> implements Serializable {
    private Integer code;
    private String msg;
    private T data;
    public ResultJSON(Integer code, String msg, T data) {
        this.code = code;
        this.msg = msg;
        this.data = data;

    }

    /**
     * 操作成功或者失败
     * @param c 受影响行数
     * @return 当前传入的受影响行数>0则返回成功,否则返回失败
     */
    public static  ResultJSON successORerror(int c){
        return c>0?new ResultJSON(200,"操作成功",c)
                :new ResultJSON(400,"操作失败",c);
    }

    public static ResultJSON success(){
        return new ResultJSON(200,"操作成功",null);
    }
    public static ResultJSON success(String msg){
        return new ResultJSON(200,msg,null);
    }
    public static <T> ResultJSON success(T data){
        return new ResultJSON(200,"操作成功",data);
    }
    public static ResultJSON success(Integer code,String msg){
        return new ResultJSON(code,msg,null);
    }
    public static <T> ResultJSON success(String msg,T data){
        return new ResultJSON(200,msg,data);
    }
    public static <T> ResultJSON success(Integer code,String msg,T data){
        return new ResultJSON(code,msg,data);
    }

    public static ResultJSON error(){
        return new ResultJSON(500,"操作失败",null);
    }
    public static ResultJSON error(String msg){
        return new ResultJSON(500,msg,null);
    }
    public static ResultJSON error(Integer code,String msg){
        return new ResultJSON(code,msg,null);
    }

    public T getData() {
        return data;
    }

    public void setData(T data) {
        this.data = data;
    }

    public Integer getCode() {
        return code;
    }

    public void setCode(Integer code) {
        this.code = code;
    }

    public String getMsg() {
        return msg;
    }

    public void setMsg(String msg) {
        this.msg = msg;
    }
}
编写controller
java
package com.hsh.controller;

import com.hsh.pojo.tdo.ResultJSON;
import com.hsh.utils.AliOssUtil;
import org.springframework.web.bind.annotation.PostMapping;
import org.springframework.web.bind.annotation.RequestMapping;
import org.springframework.web.bind.annotation.RequestParam;
import org.springframework.web.bind.annotation.RestController;
import org.springframework.web.multipart.MultipartFile;

import java.io.IOException;
import java.util.UUID;

/**
 * @author xrkhy
 * @date 2025/9/6 19:05
 * @description
 */

@RestController
@RequestMapping("/upload")
public class UploadController {
    // 本次请求通过elementPlus的el-upload组件上传图片,通过el-upload组件的属性发起请求
    // 前端上传路径action="/api/upload/imgUpload" 要和后端一致 这里的/api是前端的反向代理的标识
    // 前端的name="img" 是这里的形参名
    // 前端的请求头添加token  :headers="{'Authorization':tokenStore.token}"
    @PostMapping("/imgUpload")
    public ResultJSON<String> imgUpload(@RequestParam("img") MultipartFile img) throws IOException {
        System.out.println(img);
        if (img == null || img.isEmpty()) {
            // 处理文件为空的情况
            return ResultJSON.error("文件不能为空");
        }
        String originalFilename = img.getOriginalFilename();
        // 生成新的唯一的文件名
        String fileNmae = UUID.randomUUID().toString() + originalFilename.substring(originalFilename.lastIndexOf("."));
        String url = AliOssUtil.uploadFile(fileNmae, img.getInputStream());
        System.out.println(url);
        return ResultJSON.success("添加成功",url);
    }
}
编写前端代码使用ElmentUI
自动上传
代码编写
html
<template>
  <el-form
      :model="productForm"
      label-width="120px"
      label-position="right"
    >
      <!-- 用户基础信息 -->
      <el-form-item label="商品名称" prop="productName">
        <el-input v-model="productForm.productName"></el-input>
      </el-form-item>

      <el-form-item label="封面图片">
        <!-- :auto-upload 设置是否自动上传 true自动上传 -->
        <!-- action为你的请求路径:你要替换为你的上传API地址 -->
        <!--
              name: 上传的文件字段名 (也就是后端的参数 我这里是img)
              后端的接收参数如下就是我上面写的UploadController
              public ResultJSON<String>
              imgUpload(@RequestParam("img") MultipartFile img){}
         -->
        <!-- :on-success="handleAvatarSuccess" 上传成功回调 -->
        <!-- :before-upload="beforeAvatarUpload"上传前校验 -->
        <!--
          list-type="picture-card" 文件列表的类型 这里不需要
          因为已经有<i class="el-icon-plus" v-if="!productForm.imageUrl"></i>代替了
        -->
        <!-- :show-file-list="false" 是否显示已上传文件列表 -->

        <!--
              除了上面还可以设置响应头,配置如下
              :headers="{'Authorization':tokenStore.token}"
        -->

        <el-upload
          :auto-upload="true"
          action="http://localhost:8080/upload/imgUpload"
          name="img"
          :on-success="handleAvatarSuccess"
          :before-upload="beforeAvatarUpload"
          :show-file-list="false"
        >
          <!--
              v-if="!productForm.imageUrl" 是如果上传成功这个
              +图标(<i class="el-icon-plus"></i>)上传的提示就不显示了
          -->
          <i
            style="font-size: 20px; border: 1px solid #ccc; padding: 20px"
            class="el-icon-plus"
            v-if="!productForm.imageUrl"
          ></i>
          <img style="width: 100px" v-else :src="productForm.imageUrl" />
        </el-upload>
      </el-form-item>

      <el-form-item label="商品价格" prop="productPrice">
        <el-input-number
          v-model="productForm.productPrice"
          :precision="2"
          :step="0.01"
        ></el-input-number>
      </el-form-item>

      <el-form-item label="商品库存" prop="productStock">
        <el-input-number
          v-model="productForm.productStock"
          label="描述文字"
        ></el-input-number>
      </el-form-item>

      <!-- 操作按钮 -->
      <el-form-item>
        <el-button type="primary" @click="submitForm">提交</el-button>
        <el-button @click="resetForm">重置</el-button>
      </el-form-item>
    </el-form>
</template>


<script>
export default {
  data() {
    return {
      productForm: {
        productId: null,
        productName: "",
        imageUrl: "",
        productPrice: "",
        productStock: ""
      },
    }
  }
  methods: {
  	// 上传成功后的回调
    handleAvatarSuccess(res, file) {
      this.productForm.imageUrl = res.data;
    },
    // 上传前的校验
    beforeAvatarUpload(file) {
      const isJPG = file.type === "image/jpeg" || file.type === "image/png";
      const isLt2M = file.size / 1024 / 1024 < 2;
      if (!isJPG) {
        this.$message.error("上传头像图片只能是 JPG 或 PNG 格式!");
      }
      if (!isLt2M) {
        this.$message.error("上传头像图片大小不能超过 2MB!");
      }
      return isJPG && isLt2M;
    },
    submitForm() {
      console.log("提交的数据:", this.formData);
      // 这里在发起请求
    },
  }
}
</script>
结果如下演示
上面数据确实是拿到了,此时在点击提交发送。

手动上传
前端代码编写
html
<template>
  <div>
    <h1>图片手动提交</h1>
    <el-form
      :model="productForm"
      style="width: 500px"
      label-width="120px"
      label-position="right"
    >
      <!-- 用户基础信息 -->
      <el-form-item label="商品名称" prop="productName">
        <el-input v-model="productForm.productName"></el-input>
      </el-form-item>

      <el-form-item label="封面图片">
        <!-- :auto-upload 设置是否自动上传 true自动上传 -->
        <!-- action为你的请求路径:你要替换为你的上传API地址 -->
        <!--
              list-type="picture-card" 文件列表的类型 这里不需要
              因为已经有<i class="el-icon-plus" v-if="!productForm.imageUrl"></i>代替了
         -->
        <!-- :show-file-list="false" 是否显示已上传文件列表 这里关闭 -->
        <!--
                  v-if="!productForm.imageUrl" 是如果上传成功这个
                  +图标(<i class="el-icon-plus"></i>)上传的提示就不显示了
        -->
        <el-upload
          :auto-upload="false"
          action="#"
          :show-file-list="false"
          :on-change="handleImgChange"
        >
          <i
            style="font-size: 20px; border: 1px solid #ccc; padding: 20px"
            class="el-icon-plus"
            v-if="!productForm.imageUrl"
          ></i>
          <img style="width: 100px" v-else :src="productForm.imageUrl" />
        </el-upload>
        <!-- v-if="productForm.imageUrl" 如果图片不存在 img不显示 -->
        <!-- <img v-if="imgURL" :src="imgURL" /> -->
      </el-form-item>

      <el-form-item label="商品价格" prop="productPrice">
        <el-input-number
          v-model="productForm.productPrice"
          :precision="2"
          :step="0.01"
        ></el-input-number>
      </el-form-item>

      <el-form-item label="商品库存" prop="productStock">
        <el-input-number
          v-model="productForm.productStock"
          label="描述文字"
        ></el-input-number>
      </el-form-item>

      <!-- 操作按钮 -->
      <el-form-item>
        <el-button type="primary" @click="submitForm">提交</el-button>
      </el-form-item>
    </el-form>
  </div>
</template>

<script>
import axios from "axios";

export default {
  name: "ImageUpload",
  data() {
    return {
      // 表单数据
      // 注意这里表单不能有字段为null,否则会报错
      // 比如productId: null, 发送给后端报错
      productForm: {
        productId: "",
        productName: "",
        imageUrl: "",
        productPrice: "",
        productStock: "",
        imgUrlFile: ""
      }
    };
  },
  methods: {
    // handleFileChange(file, fileList) {
    //   this.fileList = fileList;
    // },
    // 提交前实现封面图片预览
    handleImgChange(uploadFile) {
      // 预览图片
      // this.imgUrl = URL.createObjectURL(uploadFile.raw);
      this.productForm.imageUrl = URL.createObjectURL(uploadFile.raw);
      console.log(this.productForm.imageUrl);
      this.productForm.imgUrlFile = uploadFile.raw;
      // this.productForm.imageUrl = uploadFile.raw;
    },
    async submitForm() {
      const formData = new FormData();
      // 追加其他表单字段
      // 遍历 productForm 对象的属性
      for (const key in this.productForm) {
        // 将每个属性和值添加到 FormData 中
        formData.append(key, this.productForm[key]);
      }

      // 追加文件字段
      formData.append("file", this.imgUrlFile);

      this.clgFromData(formData);

      const res = await axios.post(
        "http://localhost:8080/product/addProductWithImg",
        formData
        // 下面的headers可以不,会自动识别是json还是formdata
        // {
        //   headers: {
        //     "Content-Type": "multipart/form-data"
        //   }
        // }
      );
      console.log(res);
    },
    clgFromData(formData) {
      for (let pair of formData.entries()) {
        console.log(pair[0] + ", " + pair[1]);
      }
    }
  }
};
</script>

<style scoped></style>
后端代码编写
java
package com.hsh.controller;

import com.hsh.pojo.Product;
import com.hsh.pojo.tdo.ResultJSON;
import com.hsh.service.ProductService;
import com.hsh.utils.AliOssUtil;
import org.springframework.beans.factory.annotation.Autowired;
import org.springframework.web.bind.annotation.*;
import org.springframework.web.multipart.MultipartFile;

import java.io.IOException;
import java.util.List;
import java.util.UUID;

@RestController
@RequestMapping("/product")
@CrossOrigin(origins = "http://localhost:8081")
public class ProductController {
    @Autowired
    ProductService productService;

    @PostMapping("/addProduct")
    public ResultJSON addProduct(@RequestBody Product product){
        System.out.println("product = " + product);
        return productService.addProduct(product);
    }

    // 注意 传入的product对象的属性不能是 null 也不能是 MultipartFile,否则报400的错误
    // 注意:java的product对象中,没有imgUrlFile属性。
    // 前端传入的product对象中,imgUrlFile属性是MultipartFile类型。
    @PostMapping("/addProductWithImg")
    public ResultJSON<Product> findProductById(@ModelAttribute Product product,
                                               @RequestParam(value = "imgUrlFile",required = false) MultipartFile imgUrlFile) throws IOException {
        System.out.println("product = " + product);
        System.out.println("imgFile = " + imgUrlFile);
        if (imgUrlFile == null || imgUrlFile.isEmpty()) {
            // 处理文件为空的情况
            return ResultJSON.error("文件不能为空");
        }
        String originalFilename = imgUrlFile.getOriginalFilename();
        // 生成新的唯一的文件名
        String fileNmae = UUID.randomUUID().toString() + originalFilename.substring(originalFilename.lastIndexOf("."));
        String url = AliOssUtil.uploadFile(fileNmae, imgUrlFile.getInputStream());
        System.out.println(url);
        product.setImageUrl(url);
        return productService.addProduct(product);
    }

}
结果演示如下