看了一些AI的课程,还是觉得Azure的和华为的最好,链接如下
想了解深一点,比如算法类的,华为认证
想了解概念,通过实际的操作的,Azure-mslearn-ai-agents
所有的学习课程 Azure AI
Agent
通过Agent client连接到 Azure AI Foundry 服务
python
import os
import json
import uuid
from pathlib import Path
from typing import Set, Callable, Any
from azure.identity import DefaultAzureCredential
from azure.ai.agents import AgentsClient
from azure.ai.agents.models import FunctionTool, ToolSet, ListSortOrder, MessageRole

# Add references
from user_functions import user_functions

# Load configuration settings
project_endpoint = os.getenv("PROJECT_ENDPOINT", "your_project_endpoint")
model_deployment = os.getenv("MODEL_DEPLOYMENT_NAME", "your_model_deployment_name")

# Print configuration settings to verify
print(f"Project Endpoint: {project_endpoint}")
print(f"Model Deployment: {model_deployment}")

# Connect to the Agent client
agent_client = AgentsClient(
    endpoint=project_endpoint,
    credential=DefaultAzureCredential(
        exclude_environment_credential=True,
        exclude_managed_identity_credential=True
    )
)

# Define an agent that can use the custom functions
with agent_client:
    functions = FunctionTool(user_functions)
    toolset = ToolSet()
    toolset.add(functions)
    agent_client.enable_auto_function_calls(toolset)

    agent = agent_client.create_agent(
        model=model_deployment,
        name="support-agent",
        instructions="""You are a technical support agent.
                        When a user has a technical issue, you get their email address and a description of the issue.
                        Then you use those values to submit a support ticket using the function available to you.
                        If a file is saved, tell the user the file name.
                     """,
        toolset=toolset
    )

    thread = agent_client.threads.create()
    print(f"You're chatting with: {agent.name} ({agent.id})")

    while True:
        user_prompt = input("You: ")
        if user_prompt.lower() == "quit":
            break

        # Send a prompt to the agent
        message = agent_client.messages.create(
            thread_id=thread.id,
            role="user",
            content=user_prompt
        )
        run = agent_client.runs.create_and_process(thread_id=thread.id, agent_id=agent.id)

        # Check the run status for failures
        if run.status == "failed":
            print(f"Run failed: {run.last_error}")

        # Show the latest response from the agent
        last_msg = agent_client.messages.get_last_message_text_by_role(
            thread_id=thread.id,
            role=MessageRole.AGENT,
        )
        if last_msg:
            print(f"Agent: {last_msg.text.value}")

        # Get the conversation history
        print("\nConversation Log:\n")
        messages = agent_client.messages.list(thread_id=thread.id, order=ListSortOrder.ASCENDING)
        for message in messages:
            if message.text_messages:
                last_msg = message.text_messages[-1]
                print(f"{message.role}: {last_msg.text.value}\n")

    # Clean up
    agent_client.delete_agent(agent.id)
    print("Deleted agent")
Multi-Agent
这个多智能体解决方案的目标是处理一个支持工单,具体任务包括:
-
优先级评估:评估工单的紧急程度。
-
团队分配:决定哪个团队应该处理这个工单。
-
工作量估计:估计完成这个工单所需的工作量。
核心代码
python
# 为每个智能体创建 ConnectedAgentTool 对象,以便它们可以被其他智能体调用

# 创建连接的智能体工具
priority_agent_tool = ConnectedAgentTool(
    id=priority_agent.id,
    name="priority_agent",
    description="Assess the priority of a ticket"
)

team_agent_tool = ConnectedAgentTool(
    id=team_agent.id,
    name="team_agent",
    description="Determines which team should take the ticket"
)

effort_agent_tool = ConnectedAgentTool(
    id=effort_agent.id,
    name="effort_agent",
    description="Determines the effort required to complete the ticket"
)

# 创建一个主智能体,用于协调整个工单分类流程,调用其他智能体完成任务。
# 创建主智能体
triage_agent = agents_client.create_agent(
    model=model_deployment,
    name="triage-agent",
    instructions="""
    Triage the given ticket. Use the connected tools to determine the ticket's priority,
    which team it should be assigned to, and how much effort it may take.
    """,
    tools=[
        priority_agent_tool.definitions[0],
        team_agent_tool.definitions[0],
        effort_agent_tool.definitions[0]
    ]
)

# 创建对话线程
thread = agents_client.threads.create()

# 获取用户输入的工单描述
prompt = input("What's the support problem you need to resolve?: ")

# 将工单描述发送给主智能体
message = agents_client.messages.create(
    thread_id=thread.id,
    role=MessageRole.USER,
    content=prompt,
)

# 使用主智能体处理工单
run = agents_client.runs.create_and_process(thread_id=thread.id, agent_id=triage_agent.id)

# 检查处理结果
if run.status == "failed":
    print(f"Run failed: {run.last_error}")

# 显示处理结果
messages = agents_client.messages.list(thread_id=thread.id, order=ListSortOrder.ASCENDING)
for message in messages:
    if message.text_messages:
        last_msg = message.text_messages[-1]
        print(f"{message.role}:\n{last_msg.text.value}\n")
MCP
Azure AI Agent 到一个远程的 Model Context Protocol (MCP) 服务器。这个示例将展示如何使用 AI 代理(agent)通过 MCP 工具从 Microsoft 官方文档中获取实时答案,核心代码MCP加入toolset,然后Agent使用这个toolset
常见用途
技术支持:
AI 代理可以通过 MCP 调用文档搜索工具,帮助用户快速找到技术问题的答案。
开发辅助:
AI 代理可以通过 MCP 调用代码生成工具,帮助开发者快速生成代码片段。
数据处理:
AI 代理可以通过 MCP 调用数据处理工具,帮助用户分析和处理数据。
业务流程自动化:
AI 代理可以通过 MCP 调用业务流程工具,帮助用户自动化复杂的业务流程。
python
import os
from azure.identity import DefaultAzureCredential
from azure.ai.agents import AgentsClient
from azure.ai.agents.models import McpTool, ToolSet, ListSortOrder

# Load configuration settings
project_endpoint = os.getenv("PROJECT_ENDPOINT")
model_deployment = os.getenv("MODEL_DEPLOYMENT_NAME")
mcp_server_label = "mslearn"
mcp_server_url = "https://learn.microsoft.com/api/mcp"

# Connect to the agents client
agents_client = AgentsClient(
    endpoint=project_endpoint,
    credential=DefaultAzureCredential(
        exclude_environment_credential=True,
        exclude_managed_identity_credential=True
    )
)

# Initialize agent MCP tool
mcp_tool = McpTool(
    server_label=mcp_server_label,
    server_url=mcp_server_url,
)
mcp_tool.set_approval_mode("never")

toolset = ToolSet()
toolset.add(mcp_tool)

# Create a new agent
agent = agents_client.create_agent(
    model=model_deployment,
    name="my-mcp-agent",
    instructions="""
    You have access to an MCP server called `microsoft.docs.mcp` - this tool allows you to
    search through Microsoft's latest official documentation. Use the available MCP tools
    to answer questions and perform tasks.
    """
)

# Create thread for communication
thread = agents_client.threads.create()
print(f"Created thread, ID: {thread.id}")

# Create a message on the thread
prompt = input("\nHow can I help?: ")
message = agents_client.messages.create(
    thread_id=thread.id,
    role="user",
    content=prompt,
)
print(f"Created message, ID: {message.id}")

# Create and process agent run in thread with MCP tools
run = agents_client.runs.create_and_process(thread_id=thread.id, agent_id=agent.id, toolset=toolset)
print(f"Created run, ID: {run.id}")

# Display run steps and tool calls
print(f"Run completed with status: {run.status}")
for step in run.steps:
    print(f"Step {step.id} status: {step.status}")
    for tool_call in step.tool_calls:
        print(f"MCP Tool calls:")
        print(f"    Tool Call ID: {tool_call.id}")
        print(f"    Type: {tool_call.type}")
        print(f"    Tool: {tool_call.tool}")

# Fetch and display messages
messages = agents_client.messages.list(thread_id=thread.id, order=ListSortOrder.ASCENDING)
print("\nConversation:")
print("--------------------------------------------------")
for message in messages:
    if message.text_messages:
        last_msg = message.text_messages[-1]
        print(f"{message.role}: {last_msg.text.value}")
print("--------------------------------------------------")

# Clean up
agents_client.delete_agent(agent.id)
print("Deleted agent")
示例运行结果
假设你输入了以下问题:
Give me the Azure CLI commands to create an Azure Container App with a managed identity.
运行脚本后,你将看到类似以下的输出:
python
Created thread, ID: <<thread-id>>
Created message, ID: <<message-id>>
Created run, ID: <<run-id>>
Run completed with status: RunStatus.COMPLETED
Step <<step1-id>> status: completed

Step <<step2-id>> status: completed
MCP Tool calls:
    Tool Call ID: <<tool-call-id>>
    Type: mcp
    Type: microsoft_docs_search

Conversation:
--------------------------------------------------
ASSISTANT: You can use Azure CLI to create an Azure Container App with a managed identity (either system-assigned or user-assigned). Below are the relevant commands and workflow:

---

### **1. Create a Resource Group**
```azurecli
az group create --name myResourceGroup --location eastus
使用Semantic Kernel SDK开发MCP
作用:代理根据用户输入的费用报销数据,调用插件函数发送电子邮件
定义一个插件类 EmailPlugin,包含一个 send_email 函数,用于模拟发送电子邮件的功能。
创建一个 AI 代理定义,指定模型、名称和指令。
python
# Define an Azure AI agent that sends an expense claim email
expenses_agent_def = await project_client.agents.create_agent(
     model=ai_agent_settings.model_deployment_name,
     name="expenses_agent",
     instructions="""You are an AI assistant for expense claim submission.
                     When a user submits expenses data and requests an expense claim, use the plug-in function to send an email to expenses@contoso.com with the subject 'Expense Claim' and a body that contains itemized expenses with a total.
                     Then confirm to the user that you've done so."""
)
创建一个 Semantic Kernel 代理对象,并添加 EmailPlugin 插件。
python
# Create a semantic kernel agent
expenses_agent = AzureAIAgent(
     client=project_client,
     definition=expenses_agent_def,
     plugins=[EmailPlugin()]
)
创建一个线程,让代理在该线程上运行,并处理用户输入的费用报销数据。
python
# Use the agent to process the expenses data
thread: AzureAIAgentThread | None = None
try:
     # Add the input prompt to a list of messages to be submitted
     prompt_messages = [f"{prompt}: {expenses_data}"]
     # Invoke the agent for the specified thread with the messages
     response = await expenses_agent.get_response(prompt_messages, thread=thread)
     # Display the response
     print(f"\n# {response.name}:\n{response}")
except Exception as e:
     # Something went wrong
     print(e)
finally:
     # Cleanup: Delete the thread and agent
     await thread.delete() if thread else None
     await project_client.agents.delete_agent(expenses_agent.id)
视觉类
图像识别
完整代码如下
python
from dotenv import load_dotenv
import os
from PIL import Image, ImageDraw
import sys
from matplotlib import pyplot as plt
from azure.core.exceptions import HttpResponseError
import requests
# Import namespaces
from azure.ai.vision.imageanalysis import ImageAnalysisClient
from azure.ai.vision.imageanalysis.models import VisualFeatures
from azure.core.credentials import AzureKeyCredential
def main():
# Clear the console
os.system('cls' if os.name == 'nt' else 'clear')
try:
# Get Configuration Settings
load_dotenv()
ai_endpoint = os.getenv('AI_SERVICE_ENDPOINT')
ai_key = os.getenv('AI_SERVICE_KEY')
# Get image
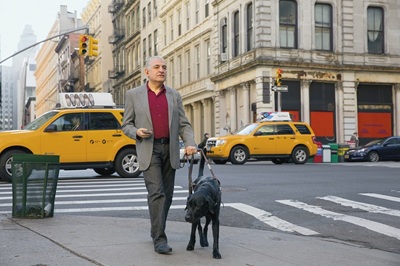
image_file = 'images/street.jpg'
if len(sys.argv) > 1:
image_file = sys.argv[1]
# Authenticate Azure AI Vision client
cv_client = ImageAnalysisClient(
endpoint=ai_endpoint,
credential=AzureKeyCredential(ai_key)
)
# Analyze image
with open(image_file, "rb") as f:
image_data = f.read()
print(f'\nAnalyzing {image_file}\n')
result = cv_client.analyze(
image_data=image_data,
visual_features=[
VisualFeatures.CAPTION,
VisualFeatures.DENSE_CAPTIONS,
VisualFeatures.TAGS,
VisualFeatures.OBJECTS,
VisualFeatures.PEOPLE
]
)
# Get image captions
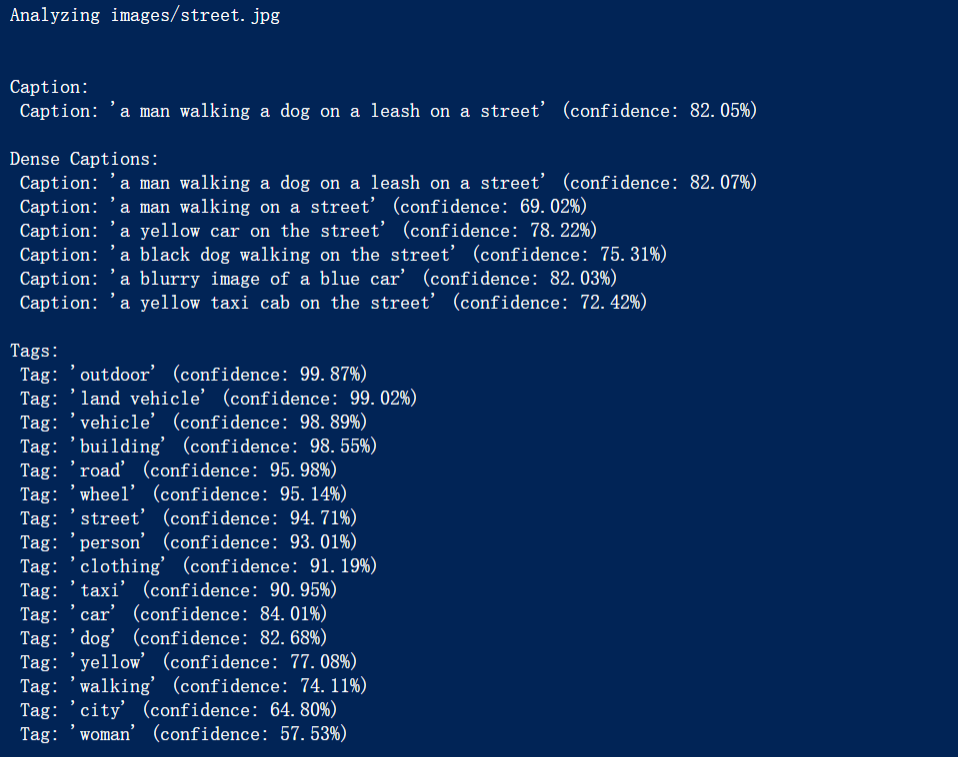
if result.caption is not None:
print("\nCaption:")
print(" Caption: '{}' (confidence: {:.2f}%)".format(result.caption.text, result.caption.confidence * 100))
if result.dense_captions is not None:
print("\nDense Captions:")
for caption in result.dense_captions.list:
print(" Caption: '{}' (confidence: {:.2f}%)".format(caption.text, caption.confidence * 100))
# Get image tags
# TODO: Add code to handle image tags
if result.tags is not None:
print("\nTags:")
for tag in result.tags.list:
print(" Tag: '{}' (confidence: {:.2f}%)".format(tag.name, tag.confidence * 100))
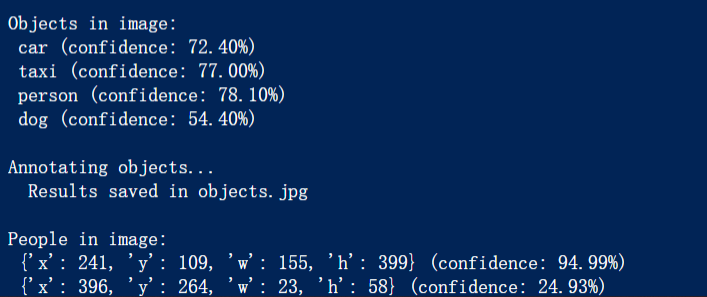
# Get objects in the image
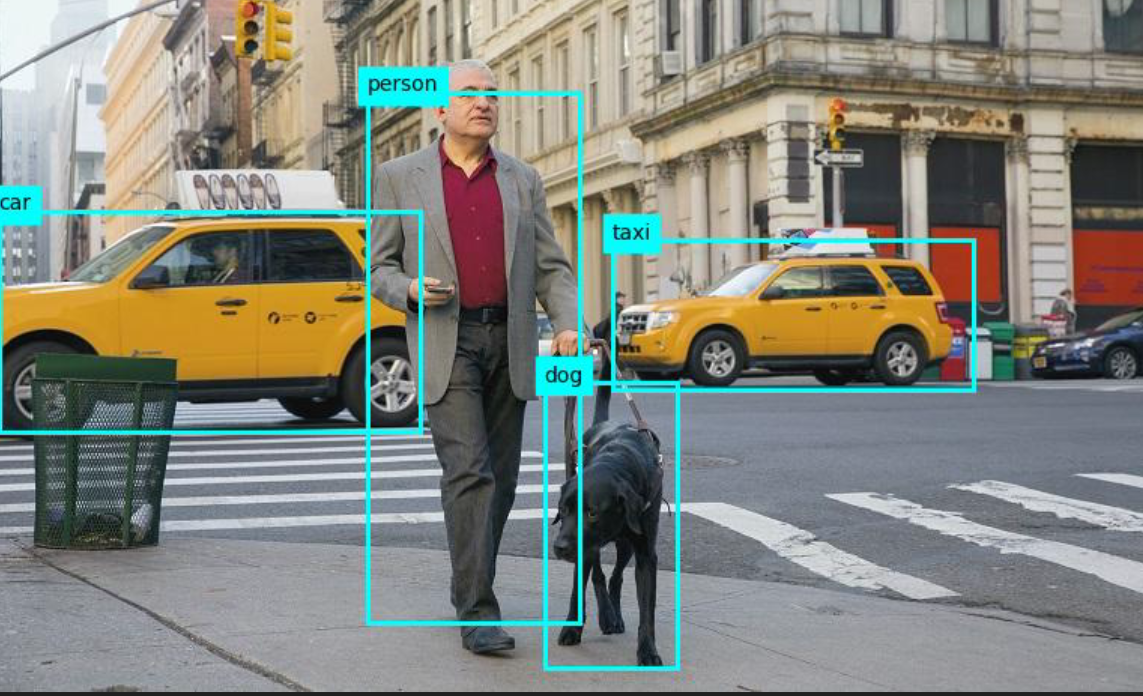
# TODO: Add code to handle detected objects
if result.objects is not None:
print("\nObjects in image:")
for detected_object in result.objects.list:
# Print object tag and confidence
print(" {} (confidence: {:.2f}%)".format(detected_object.tags[0].name, detected_object.tags[0].confidence * 100))
# Annotate objects in the image
show_objects(image_file, result.objects.list)
# Get people in the image
if result.people is not None:
print("\nPeople in image:")
for detected_person in result.people.list:
if detected_person.confidence > 0.2:
# Print location and confidence of each person detected
print(" {} (confidence: {:.2f}%)".format(detected_person.bounding_box, detected_person.confidence * 100))
# Annotate people in the image
show_people(image_file, result.people.list)
# TODO: Add code to handle detected people
except Exception as ex:
print(ex)
def show_objects(image_filename, detected_objects):
print("\nAnnotating objects...")
# Prepare image for drawing
image = Image.open(image_filename)
fig = plt.figure(figsize=(image.width / 100, image.height / 100))
plt.axis('off')
draw = ImageDraw.Draw(image)
color = 'cyan'
for detected_object in detected_objects:
# Draw object bounding box
r = detected_object.bounding_box
bounding_box = ((r.x, r.y), (r.x + r.width, r.y + r.height))
draw.rectangle(bounding_box, outline=color, width=3)
plt.annotate(detected_object.tags[0].name, (r.x, r.y), backgroundcolor=color)
# Save annotated image
plt.imshow(image)
plt.tight_layout(pad=0)
objectfile = 'objects.jpg'
fig.savefig(objectfile)
print(' Results saved in', objectfile)
def show_people(image_filename, detected_people):
print("\nAnnotating people...")
# Prepare image for drawing
image = Image.open(image_filename)
fig = plt.figure(figsize=(image.width / 100, image.height / 100))
plt.axis('off')
draw = ImageDraw.Draw(image)
color = 'cyan'
for detected_person in detected_people:
if detected_person.confidence > 0.2:
# Draw person bounding box
r = detected_person.bounding_box
bounding_box = ((r.x, r.y), (r.x + r.width, r.y + r.height))
draw.rectangle(bounding_box, outline=color, width=3)
# Save annotated image
plt.imshow(image)
plt.tight_layout(pad=0)
peoplefile = 'people.jpg'
fig.savefig(peoplefile)
print(' Results saved in', peoplefile)
if __name__ == "__main__":
main()分析结果
最后的结果输出
-
描述(Caption):自然语言描述,概括图像的内容。
-
标签(Tag):图像中识别出的关键概念或对象。
-
类别(Category):图像的高级分类。
-
品牌(Brand):图像中识别出的品牌标志。
-
对象(Object):图像中识别出的具体对象。
-
成人内容评级(Adult Content Rating):图像是否包含成人内容的评级。
人物识别
练习 - 读取图像中的文本 - Training | Microsoft Learn
python
from dotenv import load_dotenv
import os
import time
import sys
from PIL import Image, ImageDraw
from matplotlib import pyplot as plt
# import namespaces
from azure.ai.vision.imageanalysis import ImageAnalysisClient
from azure.ai.vision.imageanalysis.models import VisualFeatures
from azure.core.credentials import AzureKeyCredential
from dotenv import load_dotenv
import os
import sys
def main():
# Load configuration settings from .env file
load_dotenv()
ai_endpoint = os.getenv('AI_SERVICE_ENDPOINT')
ai_key = os.getenv('AI_SERVICE_KEY')
# Get image file path from command line argument or use a default image
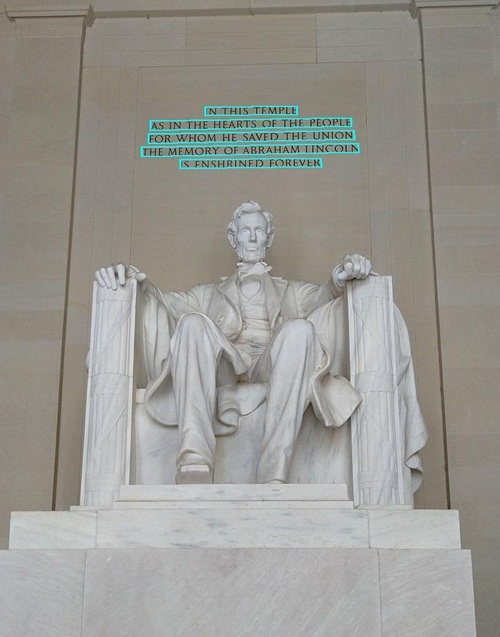
image_file = sys.argv[1] if len(sys.argv) > 1 else 'images/Lincoln.jpg'
# Authenticate Azure AI Vision client
cv_client = ImageAnalysisClient(
endpoint=ai_endpoint,
credential=AzureKeyCredential(ai_key)
)
# Read text in image
with open(image_file, "rb") as f:
image_data = f.read()
print(f"\nReading text in {image_file}")
result = cv_client.analyze(
image_data=image_data,
visual_features=[VisualFeatures.READ]
)
# Print the text
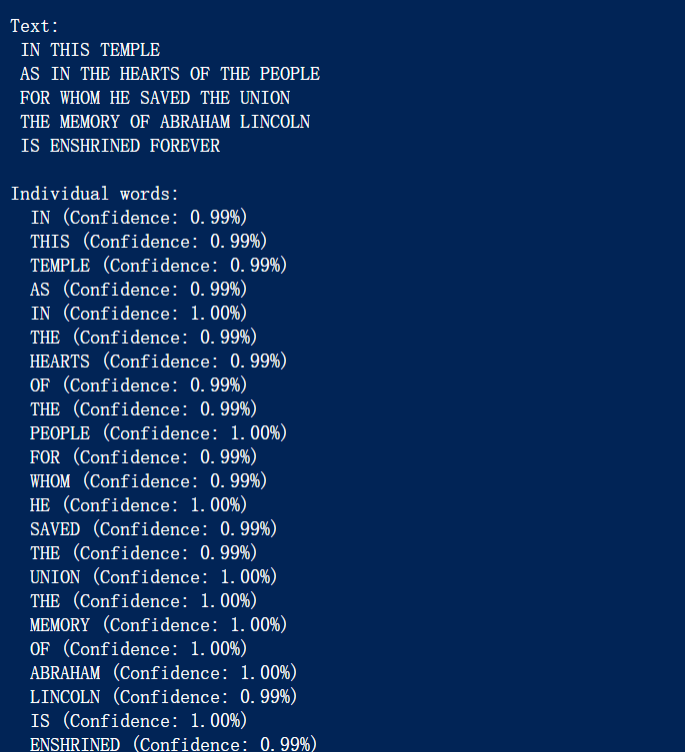
if result.read is not None:
print("\nText:")
for line in result.read.blocks[0].lines:
print(f" {line.text}")
# Annotate the text in the image
annotate_lines(image_file, result.read)
# Find individual words in each line
print("\nIndividual words:")
for line in result.read.blocks[0].lines:
for word in line.words:
print(f" {word.text} (Confidence: {word.confidence:.2f}%)")
# Annotate the words in the image
annotate_words(image_file, result.read)
def annotate_lines(image_file, read_result):
# This function should be implemented to annotate lines in the image
pass
def annotate_words(image_file, read_result):
# This function should be implemented to annotate words in the image
pass
if __name__ == "__main__":
main()结果
下载的图片
读取图像中的文本
还可返回每个单词的位置
检测识别人脸
Detect and analyze faces | Develop computer vision solutions in Azure

图像分类及检索
需要训练、发布和测试自定义视觉模型,可以得到模型的位置
Classify images | Develop computer vision solutions in Azure
Detect objects in images | Develop computer vision solutions in Azure
一些概念
-
精确率(Precision):衡量模型预测正类的准确性。
-
例如,一个垃圾邮件检测系统,精确率高意味着它很少将非垃圾邮件误判为垃圾邮件。
-
召回率(Recall):衡量模型对正类的覆盖能力。
-
例如,一个疾病检测系统,召回率高意味着它很少漏掉实际患病的患者。
-
平均精确率(AP):综合考虑精确率和召回率,是一个更全面的性能指标。
-
F1 分数(F1 Score):精确率和召回率的调和平均值,用于平衡两者。
当然这几个值都是越高越好。。。
这些指标在不同的应用场景中有不同的重要性。例如,在医疗诊断中,召回率可能更重要,因为漏掉一个患者可能会有严重后果;而在推荐系统中,精确率可能更重要,因为推荐不相关的项目会影响用户体验。
分析视频
视频中提取见解的服务,包括人脸识别、文本识别、对象标签、场景分段
Azure AI Video Indexer 是一个强大的工具,可以自动分析和索引视频内容
文本类 Language service
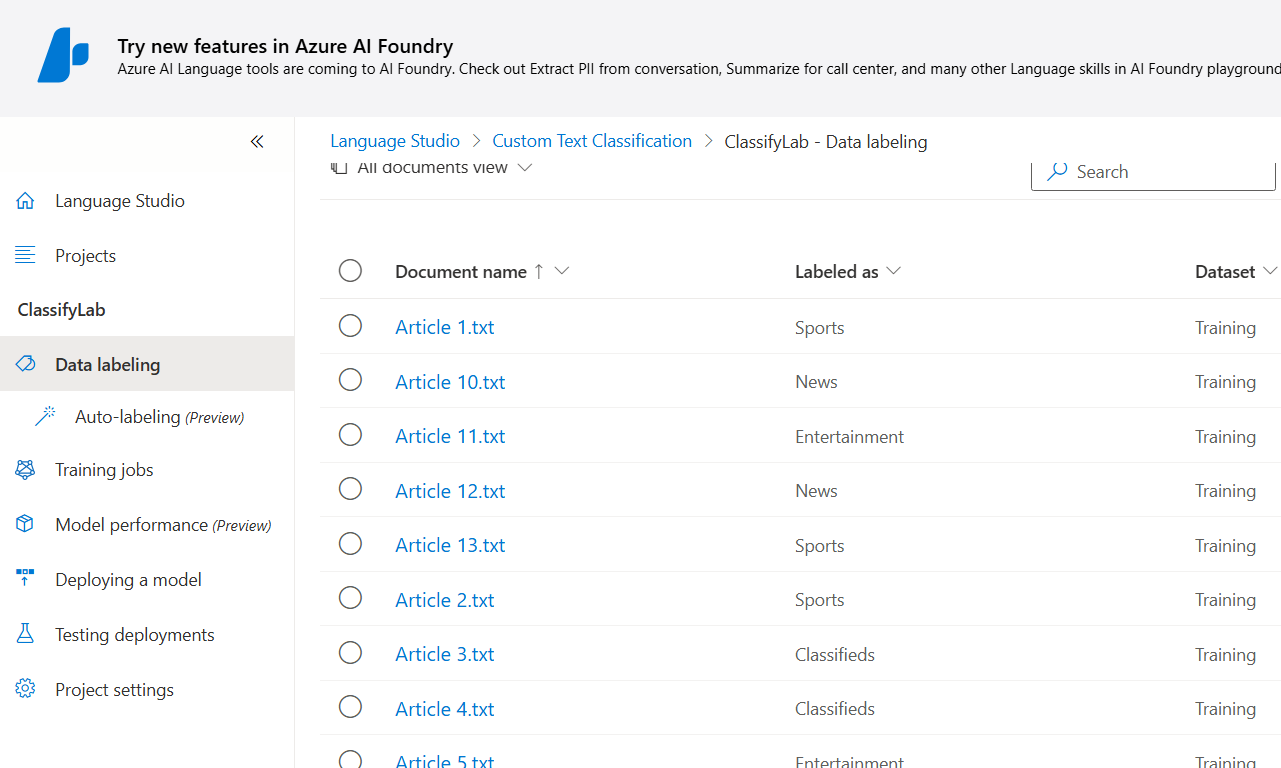
文本分类
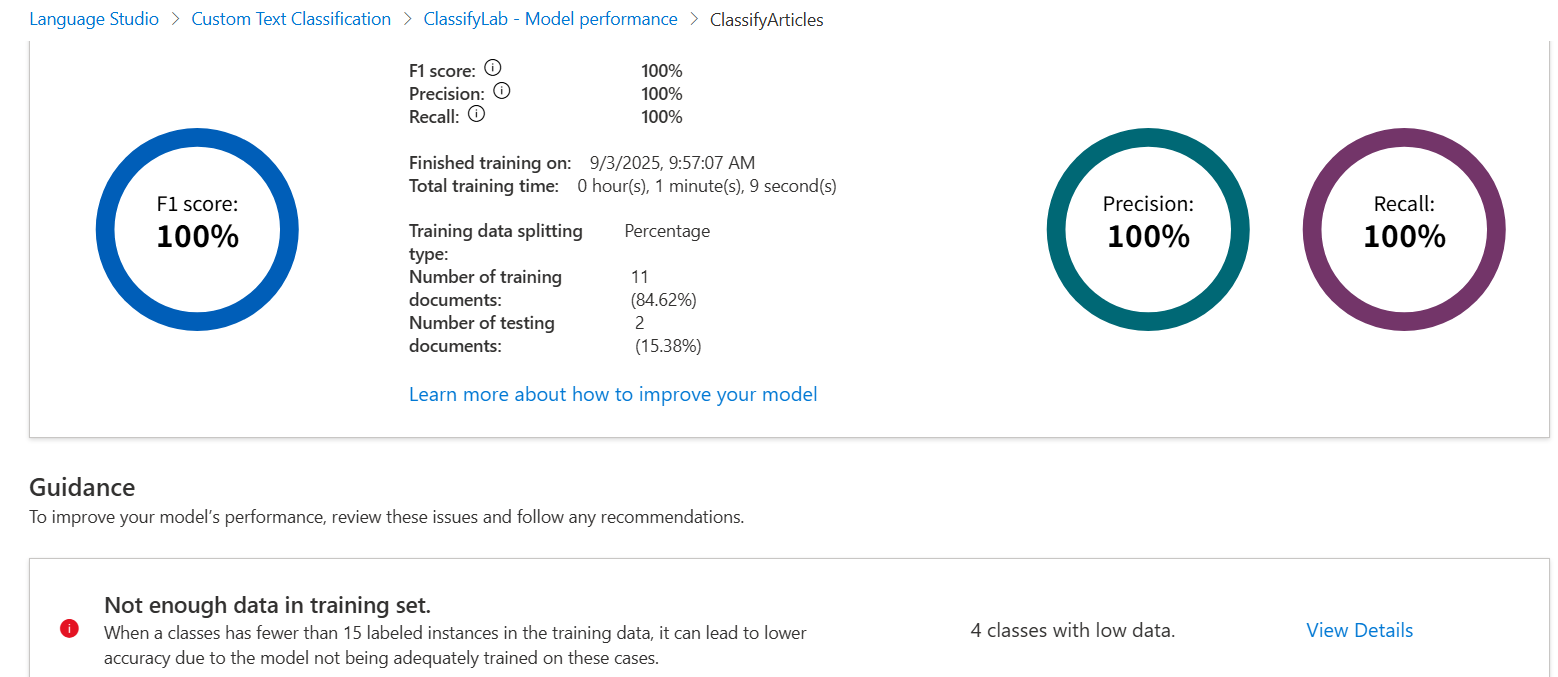
Custom text classification | Azure AI Language Exercises
按照步骤训练模型,可以看到训练结果,还有提示哪些不足,而后发布模型,利用发布的模型给用例分类
python
from dotenv import load_dotenv
import os

# Import namespaces
from azure.core.credentials import AzureKeyCredential
from azure.ai.textanalytics import TextAnalyticsClient

def main():
    try:
        # Get Configuration Settings
        load_dotenv()
        ai_endpoint = os.getenv('AI_SERVICE_ENDPOINT')
        ai_key = os.getenv('AI_SERVICE_KEY')
        project_name = os.getenv('PROJECT')
        deployment_name = os.getenv('DEPLOYMENT')

        # Create client using endpoint and key
        credential = AzureKeyCredential(ai_key)
        ai_client = TextAnalyticsClient(endpoint=ai_endpoint, credential=credential)

        # Read each text file in the articles folder
        batchedDocuments = []
        articles_folder = 'articles'
        files = os.listdir(articles_folder)
        for file_name in files:
            # Read the file contents
            text = open(os.path.join(articles_folder, file_name), encoding='utf8').read()
            batchedDocuments.append(text)

        # Get Classifications
        operation = ai_client.begin_single_label_classify(
            batchedDocuments,
            project_name=project_name,
            deployment_name=deployment_name
        )

        document_results = operation.result()

        for doc, classification_result in zip(files, document_results):
            if classification_result.kind == "CustomDocumentClassification":
                classification = classification_result.classifications[0]
                print("{} was classified as '{}' with confidence score {}.".format(
                    doc, classification.category, classification.confidence_score)
                )
            elif classification_result.is_error is True:
                print("{} has an error with code '{}' and message '{}'".format(
                    doc, classification_result.error.code, classification_result.error.message)
                )

    except Exception as ex:
        print(ex)


if __name__ == "__main__":
    main()
结果

test1的文章如下
python
Celebrities come out for the big awards ceremony

The stars of television and cinema were out in force on Thursday night for the first awards event of the season.

The Contoso Awards celebrate artistic achievements in TV and file, and highlight the emerging stars we love to watch!
生成对话语言理解模型
虚拟聊天助手
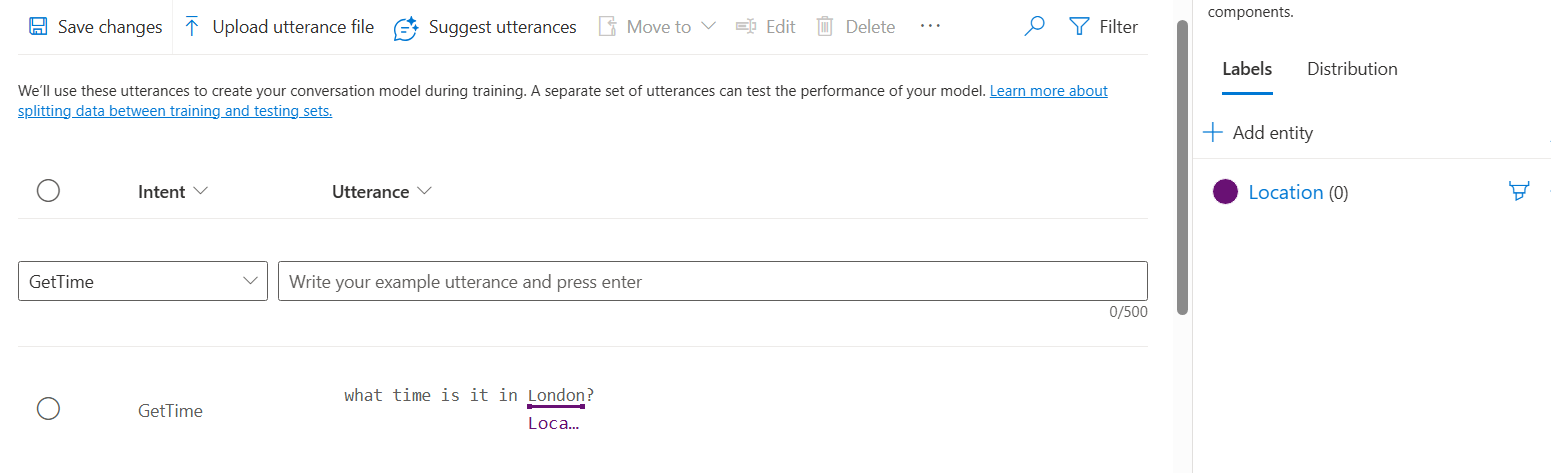
Create a language understanding model with the Language service | Azure AI Language Exercises
步骤类似,训练,发布
一些常见词
utterances 言语 intent 意图 entity 实体(如下的London)
用下图比较好记忆
利用发布好的模型测试,可以看到返回的intent

可以看到entity中prebuild有一些现成的选项,后面也有正则和list的选项目
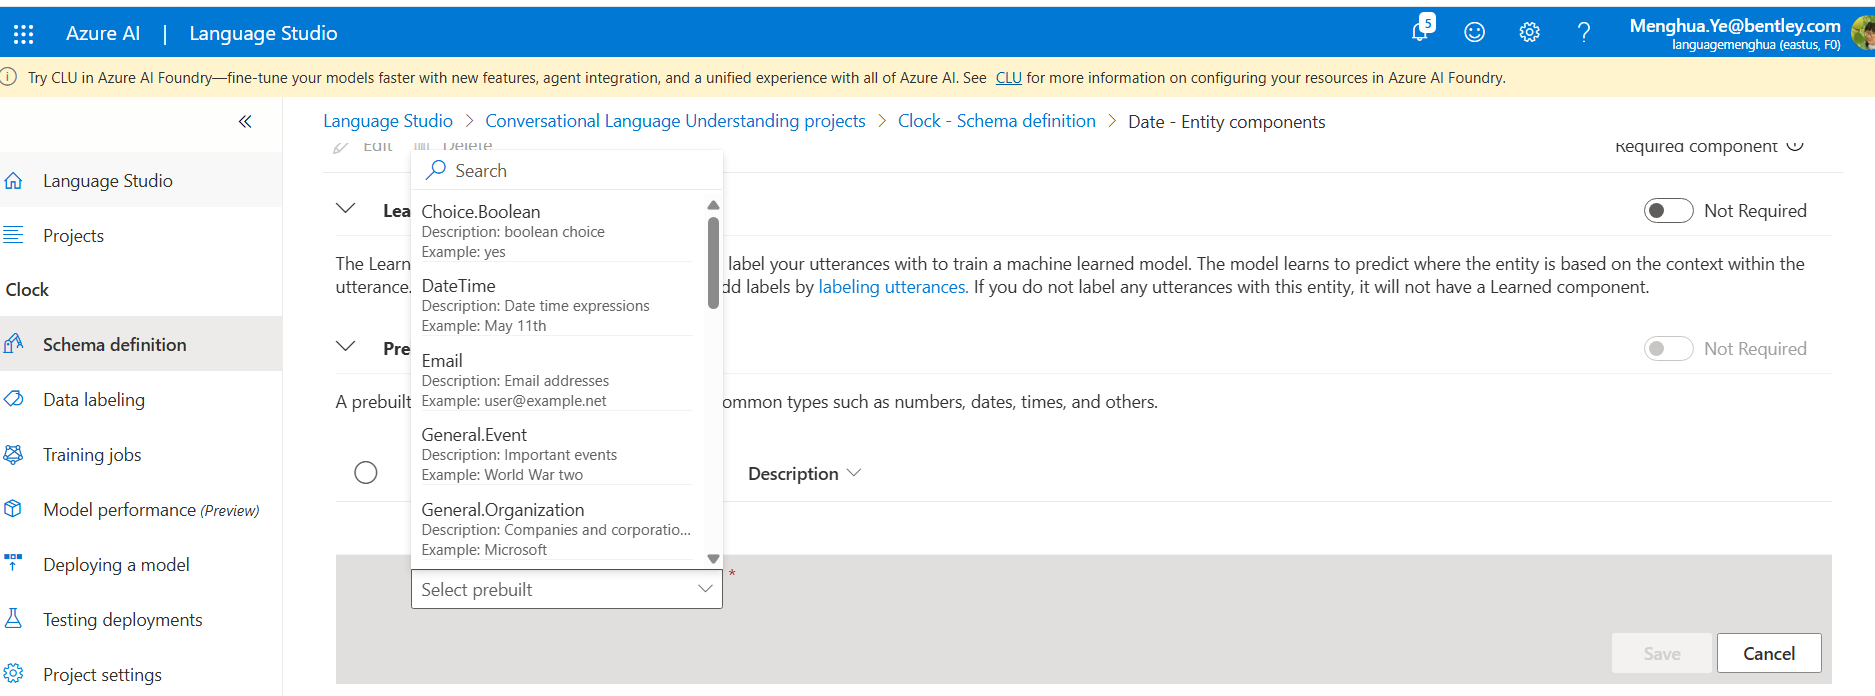
这里解释下Prebuild和list
-
Prebuild:指的是预生成模型,这些模型已经针对常见的任务和数据类型进行了优化,可以直接使用,减少开发工作量。
-
List:指的是短语列表,这是一种机器学习功能,用于提高特定单词或短语的识别率,适用于语音识别和文本分析。
后面利用这个模型,取出entity和intent GetTime , GetDate , 以及GetDay Location weekend date,还是需要通过编码返回正确的时间
自定义命名实体识别 NER
Extract custom entities | Azure AI Language Exercises
标注文档,训练模型
列出文章中的物品 位置 价格
Azure AI 翻译服务来翻译文本
Translate Text | Azure AI Language Exercises
核心代码
client.translate(body=input_text_elements, to_language=targetLanguage)
创建语音的应用 Speech Service
语言文本互转
可以通过一段录音,或者mic实时的来进行
Recognize and synthesize speech | Azure AI Language Exercises
语音翻译
Translate Speech | Azure AI Language Exercises
试验了下这个居然没成功。。。
文档类
知识库
首先要创建AI search,可上传文档,编辑条目及发布为一个机器人
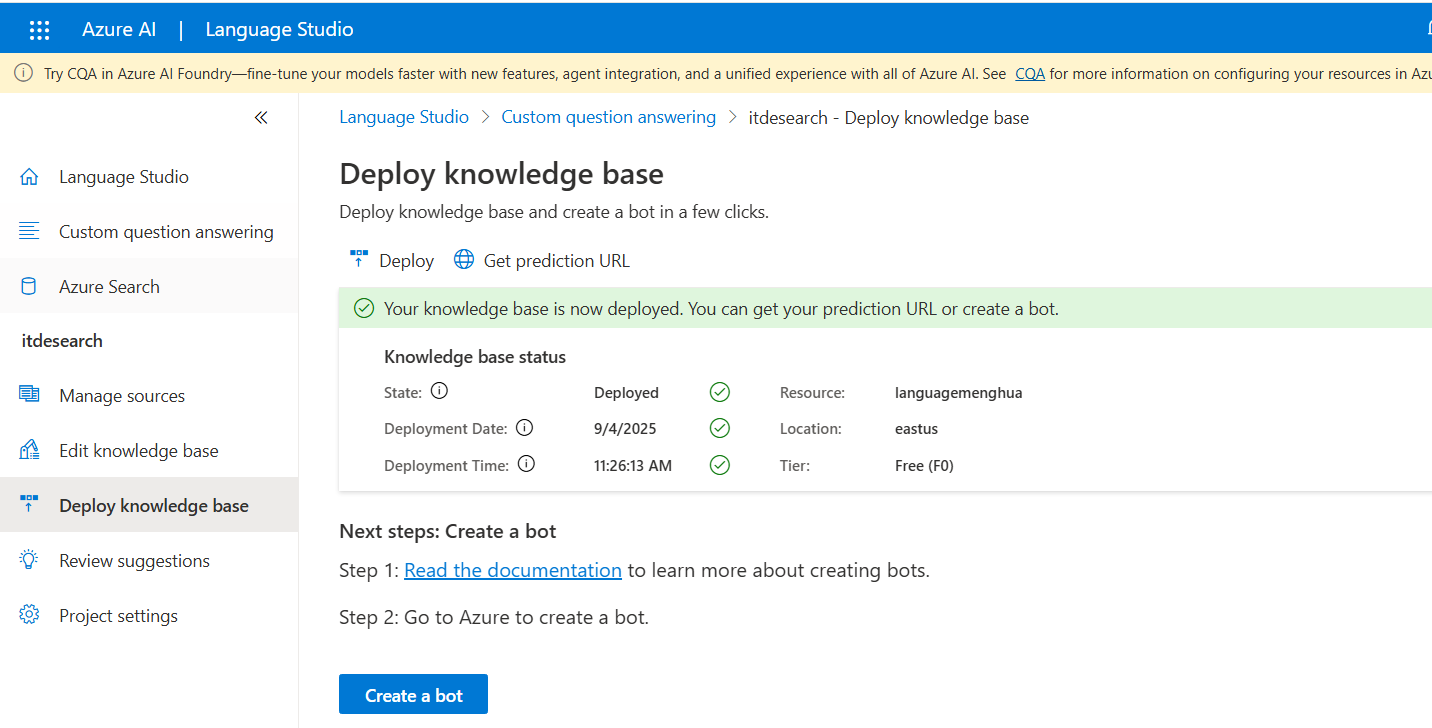
机器人可以集成到很多平台

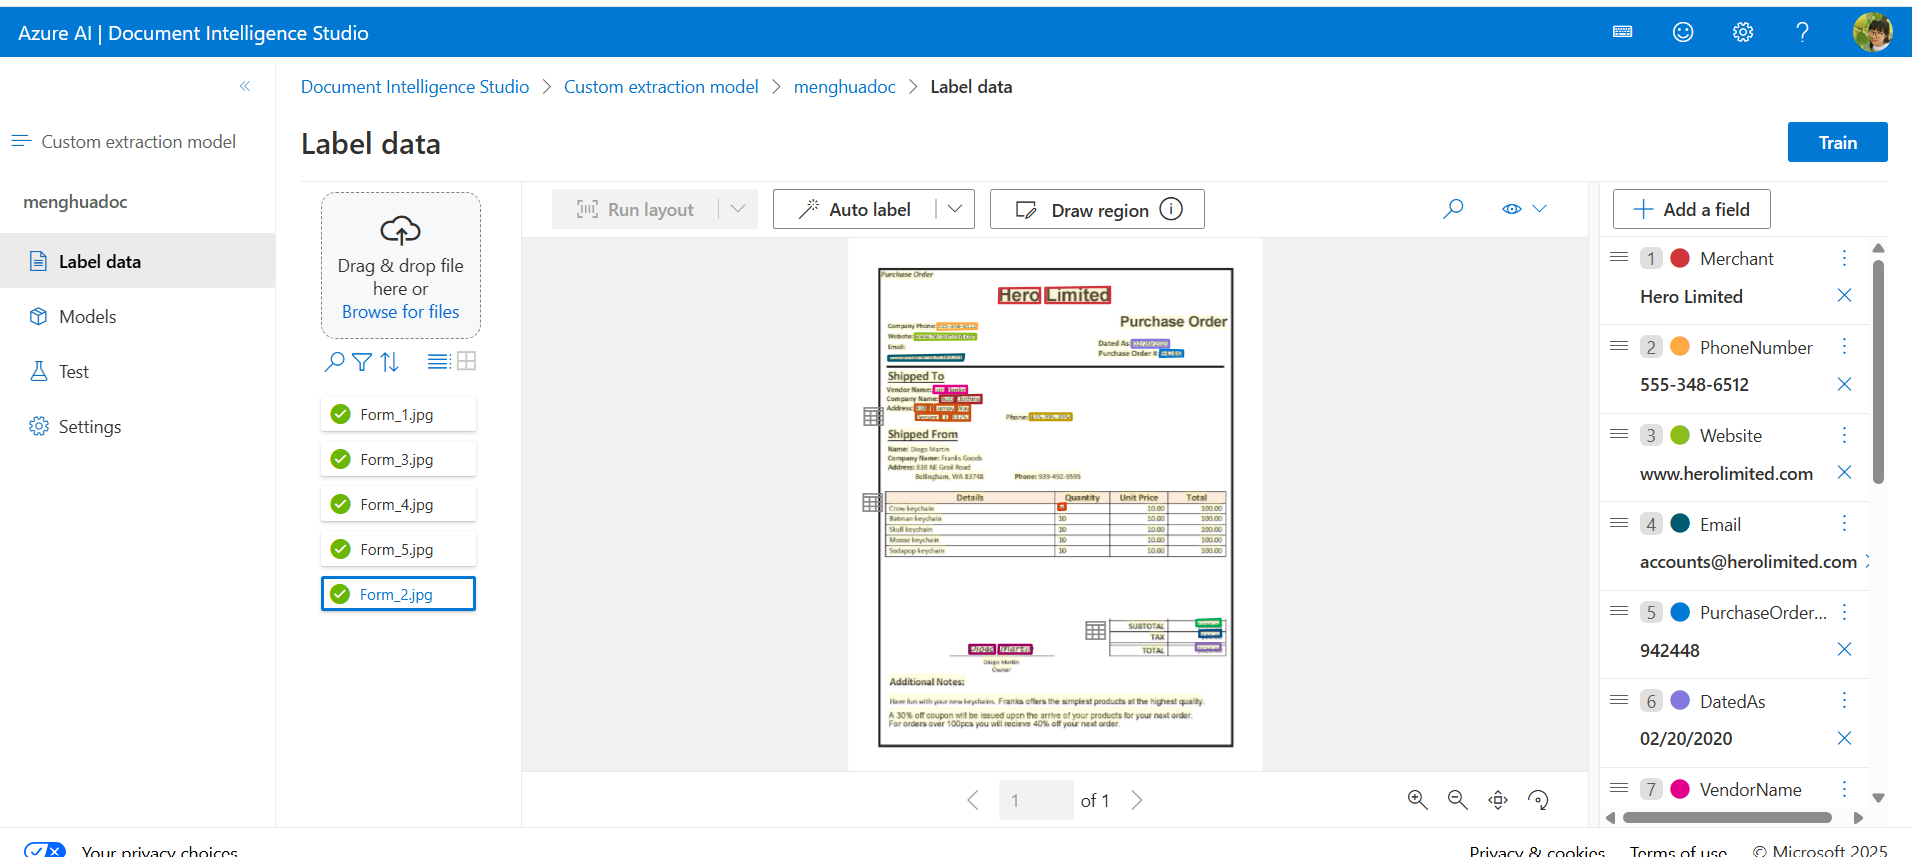
文档智能分析
提取文字信息,如发票中提取关键数据值
还是得先训练模型
比如已知了form的图片和label,label如下,就是位置选择和内容,提前训练好了
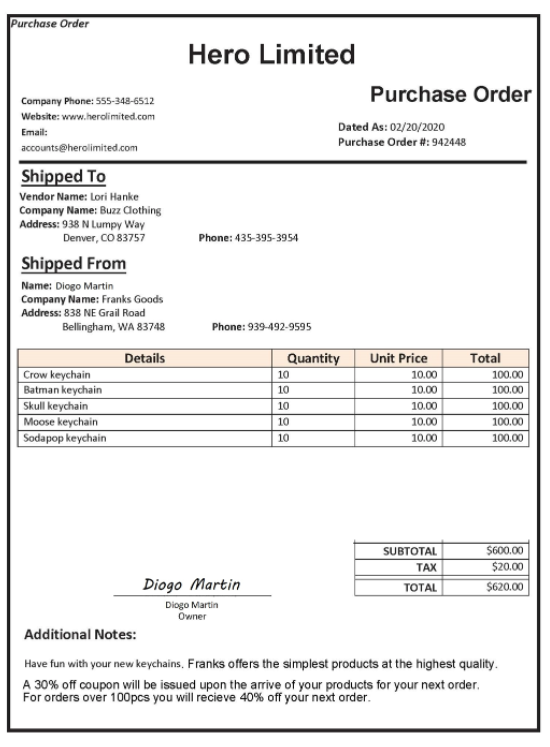
{
"document": "Form_2.jpg",
"labels": [
{
"label": "Merchant",
"key": null,
"value": [
{
"page": 1,
"text": "Hero",
"boundingBoxes": [
[
0.3658823529411765,
0.09409090909090909,
0.46352941176470586,
0.09272727272727273,
0.46294117647058824,
0.12090909090909091,
0.3652941176470588,
0.12090909090909091
]
]
},
{
"page": 1,
"text": "Limited",
"boundingBoxes": [
[
0.47705882352941176,
0.09272727272727273,
0.6323529411764706,
0.09181818181818181,
0.6323529411764706,
0.12090909090909091,
0.47705882352941176,
0.12090909090909091
]
]
}
]
},
{
"label": "PhoneNumber",
"key": null,
"value": [
{
"page": 1,
"text": "555-348-6512",
"boundingBoxes": [
[
0.2164705882352941,
0.15954545454545455,
0.31176470588235294,
0.16,
0.31176470588235294,
0.17,
0.2164705882352941,
0.17181818181818181
]
]
}
]
},
{
"label": "Website",
"key": null,
"value": [
{
"page": 1,
"text": "www.herolimited.com",
"boundingBoxes": [
[
0.1623529411764706,
0.17863636363636365,
0.3088235294117647,
0.17909090909090908,
0.3088235294117647,
0.19,
0.16176470588235295,
0.19045454545454546
]
]
}
]
},
{
"label": "DatedAs",
"key": null,
"value": [
{
"page": 1,
"text": "02/20/2020",
"boundingBoxes": [
[
0.6858823529411765,
0.19090909090909092,
0.7752941176470588,
0.19090909090909092,
0.7752941176470588,
0.20454545454545456,
0.6858823529411765,
0.20454545454545456
]
]
}
]
},
{
"label": "Email",
"key": null,
"value": [
{
"page": 1,
"text": "accounts@herolimited.com",
"boundingBoxes": [
[
0.0976470588235294,
0.22,
0.27941176470588236,
0.21818181818181817,
0.2782352941176471,
0.22863636363636364,
0.0976470588235294,
0.22863636363636364
]
]
}
]
},
{
"label": "PurchaseOrderNumber",
"key": null,
"value": [
{
"page": 1,
"text": "942448",
"boundingBoxes": [
[
0.7547058823529412,
0.20954545454545453,
0.8088235294117647,
0.21,
0.808235294117647,
0.22181818181818183,
0.7541176470588236,
0.22227272727272726
]
]
}
]
},
{
"label": "VendorName",
"key": null,
"value": [
{
"page": 1,
"text": "Lori",
"boundingBoxes": [
[
0.2076470588235294,
0.2772727272727273,
0.23647058823529413,
0.2772727272727273,
0.23588235294117646,
0.29,
0.20705882352941177,
0.29
]
]
},
{
"page": 1,
"text": "Hanke",
"boundingBoxes": [
[
0.23941176470588235,
0.2772727272727273,
0.2876470588235294,
0.2768181818181818,
0.2876470588235294,
0.29,
0.23941176470588235,
0.29
]
]
}
]
},
{
"label": "CompanyName",
"key": null,
"value": [
{
"page": 1,
"text": "Buzz",
"boundingBoxes": [
[
0.22294117647058823,
0.29454545454545455,
0.2576470588235294,
0.29454545454545455,
0.2570588235294118,
0.30863636363636365,
0.22294117647058823,
0.30863636363636365
]
]
},
{
"page": 1,
"text": "Clothing",
"boundingBoxes": [
[
0.2611764705882353,
0.29454545454545455,
0.32294117647058823,
0.29409090909090907,
0.32235294117647056,
0.30863636363636365,
0.2605882352941176,
0.30863636363636365
]
]
}
]
},
{
"label": "CompanyAddress",
"key": null,
"value": [
{
"page": 1,
"text": "938",
"boundingBoxes": [
[
0.1623529411764706,
0.31136363636363634,
0.19176470588235295,
0.31136363636363634,
0.19117647058823528,
0.325,
0.1623529411764706,
0.3245454545454545
]
]
},
{
"page": 1,
"text": "N",
"boundingBoxes": [
[
0.19470588235294117,
0.31136363636363634,
0.20470588235294118,
0.31136363636363634,
0.20470588235294118,
0.325,
0.19411764705882353,
0.325
]
]
},
{
"page": 1,
"text": "Lumpy",
"boundingBoxes": [
[
0.21,
0.31136363636363634,
0.25941176470588234,
0.3118181818181818,
0.25941176470588234,
0.32636363636363636,
0.21,
0.32545454545454544
]
]
},
{
"page": 1,
"text": "Way",
"boundingBoxes": [
[
0.26294117647058823,
0.3118181818181818,
0.2952941176470588,
0.31227272727272726,
0.29470588235294115,
0.32727272727272727,
0.26235294117647057,
0.32636363636363636
]
]
},
{
"page": 1,
"text": "Denver,",
"boundingBoxes": [
[
0.16470588235294117,
0.3286363636363636,
0.2223529411764706,
0.3281818181818182,
0.22176470588235295,
0.34136363636363637,
0.16411764705882353,
0.34045454545454545
]
]
},
{
"page": 1,
"text": "CO",
"boundingBoxes": [
[
0.2252941176470588,
0.3281818181818182,
0.24529411764705883,
0.3281818181818182,
0.2447058823529412,
0.34136363636363637,
0.22470588235294117,
0.34136363636363637
]
]
},
{
"page": 1,
"text": "83757",
"boundingBoxes": [
[
0.25,
0.3281818181818182,
0.2952941176470588,
0.3281818181818182,
0.29470588235294115,
0.34136363636363637,
0.24941176470588236,
0.34136363636363637
]
]
}
]
},
{
"label": "CompanyPhoneNumber",
"key": null,
"value": [
{
"page": 1,
"text": "435-395-3954",
"boundingBoxes": [
[
0.43941176470588234,
0.3281818181818182,
0.54,
0.3281818181818182,
0.5394117647058824,
0.34045454545454545,
0.43941176470588234,
0.3409090909090909
]
]
}
]
},
{
"label": "Quantity",
"key": null,
"value": [
{
"page": 1,
"text": "10",
"boundingBoxes": [
[
0.508235294117647,
0.49772727272727274,
0.5252941176470588,
0.49727272727272726,
0.5258823529411765,
0.5081818181818182,
0.508235294117647,
0.5086363636363637
]
]
}
]
},
{
"label": "Subtotal",
"key": null,
"value": [
{
"page": 1,
"text": "$600.00",
"boundingBoxes": [
[
0.8411764705882353,
0.7145454545454546,
0.9,
0.7136363636363636,
0.8994117647058824,
0.7263636363636363,
0.8411764705882353,
0.7268181818181818
]
]
}
]
},
{
"label": "Tax",
"key": null,
"value": [
{
"page": 1,
"text": "$20.00",
"boundingBoxes": [
[
0.8494117647058823,
0.735,
0.9005882352941177,
0.7336363636363636,
0.9005882352941177,
0.7463636363636363,
0.8494117647058823,
0.7472727272727273
]
]
}
]
},
{
"label": "Signature",
"key": null,
"value": [
{
"page": 1,
"text": "Diogo",
"boundingBoxes": [
[
0.29352941176470587,
0.7622727272727273,
0.3558823529411765,
0.7618181818181818,
0.3558823529411765,
0.7781818181818182,
0.29294117647058826,
0.7781818181818182
]
]
},
{
"page": 1,
"text": "Martin",
"boundingBoxes": [
[
0.36411764705882355,
0.7618181818181818,
0.4435294117647059,
0.7622727272727273,
0.4435294117647059,
0.7781818181818182,
0.3635294117647059,
0.7781818181818182
]
]
}
]
},
{
"label": "Total",
"key": null,
"value": [
{
"page": 1,
"text": "$620.00",
"boundingBoxes": [
[
0.84,
0.7595454545454545,
0.9,
0.759090909090909,
0.9,
0.7709090909090909,
0.84,
0.7722727272727272
]
]
}
]
}
]
}这俩加起来其实就是为了训练