1. 日志管理(关键:避免磁盘爆满 & 快速故障定位)
1.核心路径
| 日志类型 | Debian路径 | RHEL路径 | 生产建议 |
|---|---|---|---|
| 访问日志 | /var/log/apache2/access.log |
/var/log/httpd/access_log |
必须轮转:避免单文件 >10GB |
| 错误日志 | /var/log/apache2/error.log |
/var/log/httpd/error_log |
错误级别设为 warn :LogLevel warn(避免debug淹没生产环境) |
| 虚拟主机日志 | /var/log/apache2/<vhost>.log |
/var/log/httpd/<vhost>.log |
按业务线隔离,命名规范:<service>-prod-access.log |
- 日志保留策略 :
- 访问日志保留 7 天(GDPR 合规),错误日志保留 30 天(满足 审计要求)。
- 使用
logrotate配置压缩:compress+delaycompress(避免服务暂停)。- 生产红线 : ✘ 禁止直接
rm -rf日志文件(导致 inode 泄漏)✔ 必须用
logrotate或systemctl kill --signal=USR1 apache2触发轮转
2.安装命令
#安装命令
yum -y install httpd #RHEL
apt -y install apache2 #Debian
2. 服务启动/停止/重启(核心:零停机变更)
服务控制命令(基于 systemd)
| 操作 | 命令 | 生产首选 |
|---|---|---|
| 安全重载配置 | sudo systemctl reload apache2 sudo systemctl reload httpd |
首选 :配置变更(如.htaccess修改),不中断现有连接 |
| 优雅重启 | sudo systemctl restart apache2 sudo systemctl restart httpd |
⚠ 仅限必要场景(如模块更新),连接中断约 0.5s(SLA <1s 可接受) |
| 服务停止 | sudo systemctl stop apache2 sudo systemctl stop httpd |
仅限紧急维护(需提前 drain 流量) |
| 状态深度检查 | sudo systemctl status apache2 --no-pager sudo systemctl status httpd --no-pager |
每日巡检必用,关注Active:和Main PID状态 |
| 连接池诊断 | sudo apache2ctl status |
需启用mod_status(配置见下文),查看BusyWorkers/IdleWorkers |
关键诊断命令
bash
# 1. 检查服务是否存活(自动化脚本基础)
sudo systemctl is-active apache2 || echo "CRITICAL: Apache down!" >&2

# 2. 深度状态分析(需先配置 mod_status)
# 在 apache2.conf 添加:
#   <Location "/server-status">
#     SetHandler server-status
#     Require local
#   </Location>
curl -s http://localhost/server-status?auto | grep 'BusyWorkers\|IdleWorkers'
# 输出示例: BusyWorkers: 5 IdleWorkers: 15 → 若 BusyWorkers 持续 >80%,需扩容

# 3. 端口冲突排查(启动失败常见原因)
sudo ss -tulpn | grep ':80\b'  # 检查 80 端口占用(输出格式:LISTEN 0 128 *:80 *:* users:(("apache2",pid=123,fd=4)))
- 变更流程 :
- 在预发环境
reload验证- 生产环境使用 滚动重启 (K8s 环境)或 蓝绿部署(传统环境)
- 监控关键指标 5 分钟(请求成功率、延迟 P99)
- 生产红线 : ✘ 禁止在业务高峰执行
restart(仅限 UTC 00:00-04:00 维护窗口)✔ 所有操作必须记录到审计日志:
echo "[$(date)] $USER reloaded apache" | sudo tee -a /var/log/audit/sre_ops.log
3. 配置文件检测(核心:预防配置错误)
验证命令(变更前必执行)
bash
# 1. 语法检查(黄金命令)
sudo apache2ctl configtest
# 成功输出: "Syntax OK" →  可部署
# 失败输出: "AH00526: Syntax error on line 42..." →  立即终止变更

# 2. 深度配置审计
sudo apache2ctl -t -D DUMP_VHOSTS      # 检查虚拟主机冲突
sudo apache2ctl -t -D DUMP_RUN_CFG     # 输出完整生效配置(调试重写规则必备)
sudo apache2ctl -M                      # 列出已加载模块(确认安全模块是否启用)

# 3. 配置路径验证
sudo apache2ctl -V | grep "SERVER_CONFIG_FILE" # 输出: -D SERVER_CONFIG_FILE="/etc/apache2/apache2.conf"配置管理流程:
- 所有配置存入 Git 仓库(如
infra-configs/apache/) - 变更通过 CI 流水线:
configtest→ 预发环境测试 → 生产部署 - 使用
diff对比变更:
bash
sudo apache2ctl -t -D DUMP_RUN_CFG > /tmp/after.conf
diff /tmp/before.conf /tmp/after.conf  # before.conf 为变更前快照
- 生产红线 : ✘ 禁止直接编辑生产配置文件(Google 规定:所有修改必须通过自动化管道)
✔ 配置文件权限必须为
644,属主root:root(防意外修改)
二、LAMP 搭建详细步骤(生产级)
标准:安全、可监控、可扩展。耗时约 15 分钟(自动化后)
环境:
- OS: Ubuntu 24.04 LTS( 内部生产环境首选)
- 硬件:4 vCPU, 8GB RAM(满足中小业务需求)
- 网络:已配置安全组(仅开放 80/443/22 端口)
步骤 1:系统初始化( 安全基线)
bash
# 1.1 更新系统 & 安装基础工具
sudo apt update && sudo apt upgrade -y
sudo apt install -y curl wget git net-tools software-properties-common

# 1.2 设置时区 & 语言(避免日志时间混乱)
sudo timedatectl set-timezone  Asia/Shanghai  #  中国统一时区
echo $LANG #查看系统语言
 grep -v '^#' /etc/locale.gen #查看当前支持语言
root@D-3PGMZJ3-0948:~# grep -nv '^#' /etc/locale.gen
5:
6:
505:zh_CN.UTF-8 UTF-8
root@D-3PGMZJ3-0948:~# echo "en_US.UTF-8 UTF-8" >> /etc/locale.gen
root@D-3PGMZJ3-0948:~# grep -nv '^#' /etc/locale.gen
5:
6:
505:zh_CN.UTF-8 UTF-8
516:en_US.UTF-8 UTF-8
#原系统只支持中文,现在添加了英文环境
sudo locale-gen  #生成 locale

sudo update-locale LANG=en_US.UTF-8
 locale-gen
Generating locales (this might take a while)...
  en_US.UTF-8... done
  zh_CN.UTF-8... done
  zh_SG.UTF-8... done
Generation complete.
source /etc/default/locale
步骤 2:LAMP 集成
bash
#安装软件
apt install php-fpm php-cli php-mysqlnd php-json php-gd php-xml
php-mbstring php-zip apache2 mysql-server


#设置PHP-FPM代理(需要额外的fcgi的加载)
a2enmod proxy proxy_fcgi setenvif


cat > proxy.conf <<-eof
 <FilesMatch ".+\.ph(ar|p|tml)$">
    SetHandler "proxy:unix:/run/php/php8.3-fpm.sock|fcgi://localhost"
 </FilesMatch>
eof
配置解析:
    因为fpm默认启动的监听机制是 /run/php/php8.3-fpm.sock
    当然,该选项可以可以直接在一个特定的虚拟主机上进行配置
    当php-fpm的监听地址是 127.0.0.1:9000 的时候,SetHandler属性可以写成如下配置
        SetHandler "proxy:fcgi://127.0.0.1:9000"

systemctl restart apache2

#准备数据库文件 vim /root/mysql_test.sql

-- 创建数据库
DROP DATABASE IF EXISTS test_db;
 CREATE DATABASE IF NOT EXISTS test_db;-- 使用数据库
USE test_db;-- 创建表:指定存储引擎(InnoDB 支持事务、外键,适合业务表)-- 字段注释按需补充,增强可读性
CREATE TABLE IF NOT EXISTS users (
    id INT UNSIGNED PRIMARY KEY AUTO_INCREMENT COMMENT '用户唯一ID,自增',
    username VARCHAR(50) NOT NULL COMMENT '用户名,最长50字符',
    email VARCHAR(100) NOT NULL UNIQUE COMMENT '用户邮箱,唯一约束',
    password VARCHAR(255) NOT NULL COMMENT '密码,建议哈希存储',
    created_at TIMESTAMP NOT NULL DEFAULT CURRENT_TIMESTAMP COMMENT '注册时间'
 );-- 插入数据:显式指定字段(单行格式 + 字符串转义)
INSERT INTO users (username, email, password) VALUES ('user1',
'user1@example.com', 'pass1');
 INSERT INTO users (username, email, password) VALUES ('user2',
'user2@example.com', 'pass2');
 INSERT INTO users (username, email, password) VALUES ('user3',
'user3@example.com', 'pass3');

 mysql -e "source /root/mysql_test.sql;"

 cat /var/www/html/test_mysql.php
 <?php
 // 数据库配置
$host = 'localhost';
 $dbname = 'test_db';
 $username = 'root';
 $password = '';
 // 创建连接
// $mysqli = new mysqli($host, $username, $password, $dbname);
 $mysqli = mysqli_connect($host, $username, $password, $dbname);
 // 检查连接
if ($mysqli->connect_error) {
测试效果

1.7.3.2.4.2 测试样式2
定制测试文件
    die("连接失败: " . $mysqli->connect_error);
 }
 echo "恭喜!数据库连接成功!";
 // 关闭连接
$mysqli->close();
 ?>
curl http://10.0.0.11/test_mysql.php
恭喜!数据库连接成功!


设置apache2 中的虚拟主机配置
mkdir  /var/www/html/blog.com/
echo '<?php echo "hello world"; ?>' > /var/www/html/blog.com/test.php

删除默认配置
rm -rf /etc/apache2/sites-enabled/000-default.conf
定制网站关联php的配置
cat > /etc/apache2/sites-enabled/blog.com.conf <<-eof
 <virtualhost *:80>
 DocumentRoot /var/www/html/blog.com/
 ServerName blog.zz.com
 <FilesMatch \.php$>
   SetHandler "proxy:unix:/run/php/php8.3-fpm.sock|fcgi://localhost"
 </FilesMatch>
 <Directory /var/www/html/blog.com/>
   Require all granted
 </Directory>
 </virtualhost>
eof
systemctl restart apache2.service
curl 10.0.0.11/test.php

sed -i '/^bind-address/s#127.0.0.1#10.0.0.11#' /etc/mysql/mysql.conf.d/mysqld.cnf

 grep bind-address /etc/mysql/mysql.conf.d/mysqld.cnf
 bind-address            = 10.0.0.11
重启数据库配置
 systemctl restart mysql.service
ss -ntulp |grep 3306
 tcp        0      0 10.0.0.11:3306       0.0.0.0:*    LISTEN      16277/mysqld

定制数据库,允许应用访问
 mysql
 mysql> create database wordpress;
 mysql> create user 'wordpresser'@'10.0.0.%' identified with mysql_native_password
by '123456';
 mysql> grant all on wordpress.* to 'wordpresser'@'10.0.0.%';
 mysql> exit

mysql -u'wordpresser' -h 10.0.0.11 -p'123456' -e "select
version();"
 mysql: [Warning] Using a password on the command line interface can be insecure.
 +-------------------------+
 | version()               |
 +-------------------------+
 | 8.0.39-0ubuntu0.24.04.2 |
 +-------------------------+
安装wordpress

 mkdir /data/softs -p

cd /data/softs/
 wget https://cn.wordpress.org/latest-zh_CN.zip
 unzip latest-zh_CN.zip
 mv wordpress/* /var/www/html/blog.com/
访问  10.0.0.11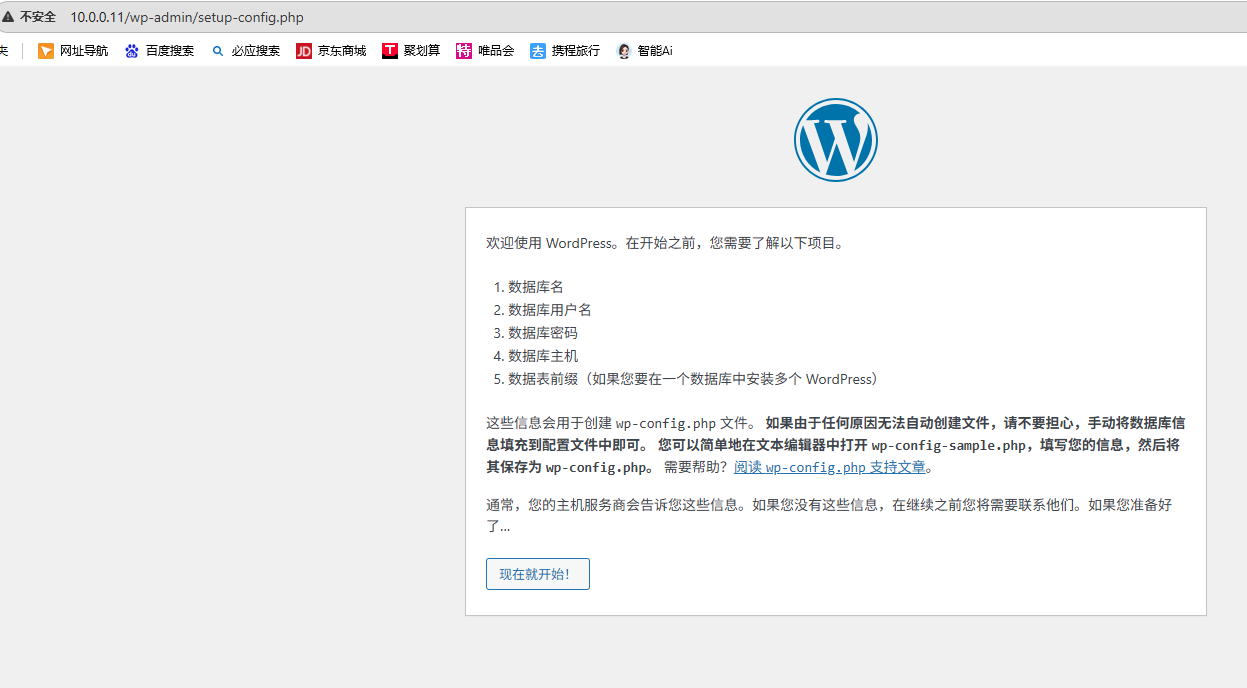
然后下一步下一步的点击操作即可。【注意,连接mysql的地址为 10.0.0.11】