Vue3边学边做系列(3)
前端开发系列(1)-开发环境安装
前端开发系列(2)-项目框架搭建
前端开发系列在此期变更为**Vue3边学边做系列**
每一期和上一次或许有较大的出入, 不知道自学的同行有没有同感, 在细挖功能需求时,对当初的一些文件夹 公共类的布局,封装 不是很理想, 所以就边做边改掉了, 以至于上一期完成的功能, 在下一期会出现较大的变更.在实际项目中,推到重来的可能性比较小, 如果一个产品当做一个交付项目做, 不经历较大的重构, 可能最后就变成了成史诗(shan)级作品了.
本系列会记录真实的改造过程, 对每一期文档尽量保持学习和改造的过程.
文章目录
- Vue3边学边做系列(3)
- 本期效果图
- 本期实现的功能:
- [1. 登录请求(axios)](#1. 登录请求(axios))
-
- [1.1 http封装](#1.1 http封装)
- [1.2 API接口](#1.2 API接口)
- [2. 路由封装(router)](#2. 路由封装(router))
-
- [2.1 静态路由](#2.1 静态路由)
- [2.2 动态路由(后端菜单处理)](#2.2 动态路由(后端菜单处理))
-
- [2.2.1 后端菜单](#2.2.1 后端菜单)
- [2.2.2 前端页面](#2.2.2 前端页面)
- [2.2.3 组装动态路由](#2.2.3 组装动态路由)
- [2.2.4 动态路由调用](#2.2.4 动态路由调用)
- [2.3 路由守卫](#2.3 路由守卫)
-
- [2.3.1 白名单](#2.3.1 白名单)
- [2.3.2 规则定义](#2.3.2 规则定义)
- [2.3.3 路由守卫使用](#2.3.3 路由守卫使用)
- [3. 状态存储(store)](#3. 状态存储(store))
-
- [3.1 用户状态存储(userStore)](#3.1 用户状态存储(userStore))
- [3.2 加密存储的封装](#3.2 加密存储的封装)
- [3.3 存储工具类封装](#3.3 存储工具类封装)
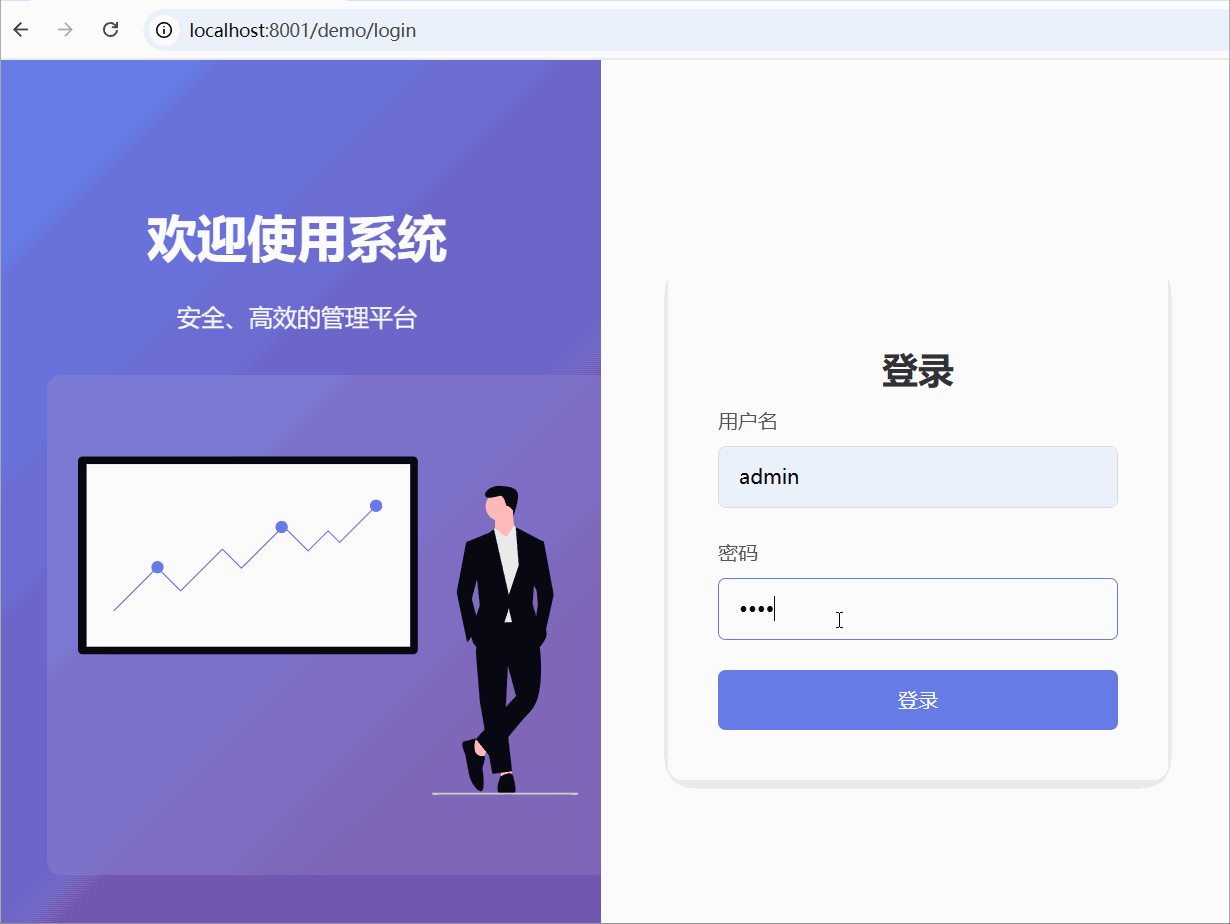
本期效果图
本期实现的功能:
- 网络请求\路由\状态存储的封装优化
- 前端页面开发
- 登录接口
- 后端菜单转前端路由的处理
1. 登录请求(axios)
1.1 http封装
这里是在上一个系列版本中的优化:
- 添加了请求头
- 添加了请求加载的动画效果
- 引入了系统环境变量
- 添加了响应状态的详细的回执信息
- 封装了通用的请求
通过这些完善, 简化了使用过程.
typescript
const axiosInstance: AxiosInstance = axios.create({
    baseURL: import.meta.env.VITE_BASE_API, //请求的基础路径设置
    timeout: 10000,
    headers: {
        Accept: "application/json, text/plain, */*",
        "Content-Type": "application/json",
        "X-Requested-With": "XMLHttpRequest"
    }
})

const showLoading = () => {
    if (requestCount === 0 && !loadingInstance) {
        loadingInstance = ElLoading.service({lock: true, text: '加载中', background: 'rgba(0, 0, 0, 0.7)',});
    }
    requestCount++;
}

const hideLoading = () => {
    requestCount--;
    if (requestCount === 0 && loadingInstance) {
        loadingInstance.close();
        loadingInstance = null;
    }
}
在请求拦截器中设置了通用的Bearer请求头
typescript
//请求拦截器
axiosInstance.interceptors.request.use((config) => {

    const authStore = useUserStore()
    if (authStore.token) {
        config.headers = config.headers || {}
        config.headers[TokenHeaderField.TOKEN_NAME] = `Bearer ${authStore.token}`; // 注意 Bearer 后面有个空格
    }
    //添加跨域凭证
    config.withCredentials = true

    if(isShowLoading){
        showLoading()
    }

    return config
}, (error) => {
    // 隐藏加载状态
    hideLoading();
    return Promise.reject(error)
})
在响应拦截器中, 添加了不同的状态回执信息
typescript
//响应拦截器
axiosInstance.interceptors.response.use((response) => {
    hideLoading()

    const respCode = response.data.code
    if (respCode !== RespCode.SUCCESS) {
        ElMessage.error(response.data.msg || '请求失败');
        return Promise.reject(new Error(response.data.msg))
    }
    return response.data[RespField.DATA]

}, (error) => {
    hideLoading();

    if (error.response) {
        const status: number = error.response.status
        let errorMessage: string = '';

        switch (status) {
            case 400:
                errorMessage = '请求参数错误';
                break;
            case 401:
                errorMessage = '未授权,请重新登录';
                break;
            case 403:
                errorMessage = '拒绝访问';
                break;
            case 404:
                errorMessage = '请求地址出错';
                break;
            case 500:
                errorMessage = '服务器内部错误';
                break;
            default:
                errorMessage = error.response.data?.msg || `请求失败`;
        }

        ElMessage.error(errorMessage);

    } else if (error.request) {
        ElMessage.error(`请求超时,请检查网络或者接口`);
    } else {
        //请求配置出错
        ElMessage.error(error.message)
    }

    return Promise.reject(new Error(error.message || `请求失败`))
})
并且封装了通用的http的请求方法get,post,put,del
typescript
// 导出 axios 实例
export const http = {
    get<T = any>(url: string, params?: any, config?: any): Promise<T>{
        return axiosInstance.get(url, {
            params,
            ...config
        })
    },
    post<T = any>(url: string, data?: any, config?: any): Promise<T>{
        return axiosInstance.post(url, data, config)
    },
    put<T = any>(url: string, data?: any, config?: any): Promise<T>{
        return axiosInstance.put(url, data, config)
    },
    del<T = any>(url: string, params?: any, config?: any): Promise<T>{
        return axiosInstance.delete(url, {
            params,
            ...config
        })
    }
}
1.2 API接口
根据封装好的http工具类,提供用户登录的api如下
typescript
// 用户 API
import {http} from "@/utils/http.ts";
import type {LoginData} from "@/types/global/auth";

//用户登录
export const loginApi = async (username: string, password: string): Promise<LoginData> => http.post("auth/login", {username, password})

//用户登出
export const logoutApi = () => http.post("auth/logout");
这样使用起来简洁方便
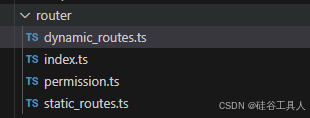
2. 路由封装(router)
路由是非常重要的一个环节, 用于页面跳转和权限的控制.
如果之前从事后端开发, 那么可以理解为Controller层中映射的URL地址的跳转管理
路由这里分为静态路由和动态路由, 除了路由以外,还有个路由守卫.
路由守卫用来根据用户获得的权限来决定下一个地址链接是否有权限访问.
(我们这里所讲的路由控制以后端路由为案例, 在后台菜单表里面设置路由地址)
整个路由模块如下:
2.1 静态路由
静态路由配置如下,
这里包含了首页的跳转, 登录, 异常页面,这些通常都是系统性的,跟业务无关的.
typescript
export const staticRoutes: RouteRecordRaw[] = [
    {
        path: '/',
        redirect: '/main',
    },
    {
        path: '/main',
        name: 'main',
        component: () => import('@/components/layout/Main.vue'),
        meta: {
            title:'首页',
        },
        children: [] // 动态路由将添加到这里
    },
    {
        path: '/login',
        name: 'Login',
        component: () => import('@/components/login/index.vue'),
        meta: {
            title: '登录',
        }
    },
    {
        path: '/403',
        name: 'Forbidden',
        component: () => import('@/components/error/403.vue'),
        meta: {
            title: '禁止访问',
        }
    },
    {
        path: '/404',
        name: 'NotFound',
        component: () => import('@/components/error/404.vue'),
        meta: {
            title: '页面不存在',
        }
    },
    {
        path: '/500',
        name: 'Error',
        component: () => import('@/components/error/500.vue'),
        meta: {
            title: '服务器错误',
        }
    }
];
2.2 动态路由(后端菜单处理)
2.2.1 后端菜单
当用户登录成功后,请求到该用户的菜单列表, 并且转为树结构输出到前端.
他们在数据库中存储的是下面这样的, 这样是为了方便维护:
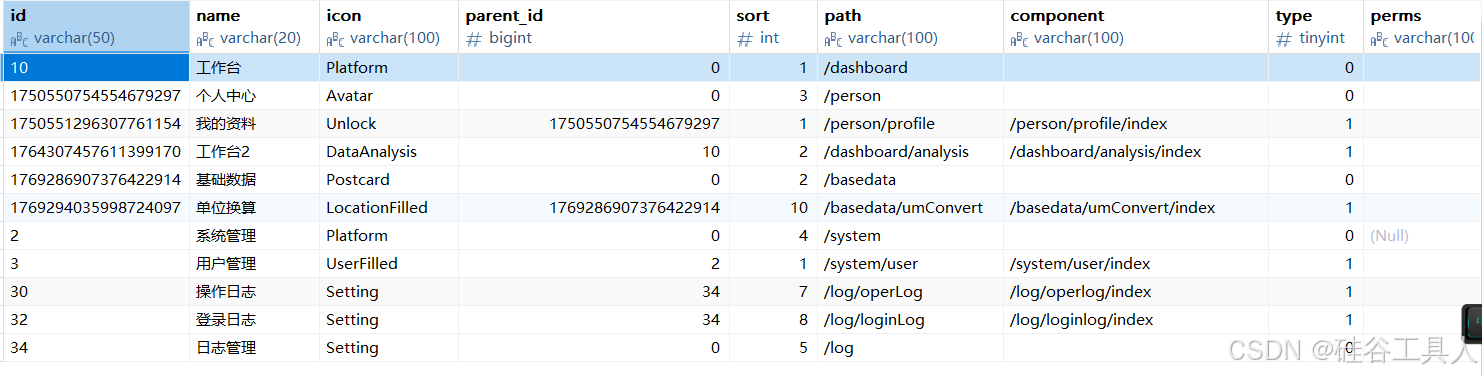
经过后端转换变成下面的树结构:
json
[
    {
        "id": "10",
        "name": "工作台",
        "sort": 1,
        "parentId": "0",
        "icon": "Platform",
        "path": "/dashboard",
        "component": "",
        "type": 0,
        "perms": "",
        "status": 0,
        "children": [
            {
                "id": "1764307457611399170",
                "name": "工作台2",
                "sort": 2,
                "parentId": "10",
                "icon": "DataAnalysis",
                "path": "/dashboard/analysis",
                "component": "/dashboard/analysis/index",
                "type": 1,
                "perms": "",
                "status": 0
            }
        ]
    },
    {
        "id": "1769286907376422914",
        "name": "基础数据",
        "sort": 2,
        "parentId": "0",
        "icon": "Postcard",
        "path": "/basedata",
        "component": "",
        "type": 0,
        "perms": "",
        "status": 0,
        "children": [
            {
                "id": "1769294035998724097",
                "name": "单位换算",
                "sort": 10,
                "parentId": "1769286907376422914",
                "icon": "LocationFilled",
                "path": "/basedata/umConvert",
                "component": "/basedata/umConvert/index",
                "type": 1,
                "perms": "",
                "status": 0
            }
        ]
    },
    {
        "id": "1750550754554679297",
        "name": "个人中心",
        "sort": 3,
        "parentId": "0",
        "icon": "Avatar",
        "path": "/person",
        "component": "",
        "type": 0,
        "perms": "",
        "status": 0,
        "children": [
            {
                "id": "1750551296307761154",
                "name": "我的资料",
                "sort": 1,
                "parentId": "1750550754554679297",
                "icon": "Unlock",
                "path": "/person/profile",
                "component": "/person/profile/index",
                "type": 1,
                "perms": "",
                "status": 0
            }
        ]
    },
    {
        "id": "2",
        "name": "系统管理",
        "sort": 4,
        "parentId": "0",
        "icon": "Platform",
        "path": "/system",
        "component": "",
        "type": 0,
        "perms": null,
        "status": 0,
        "children": [
            {
                "id": "3",
                "name": "用户管理",
                "sort": 1,
                "parentId": "2",
                "icon": "UserFilled",
                "path": "/system/user",
                "component": "/system/user/index",
                "type": 1,
                "perms": "",
                "status": 0
            }
        ]
    },
    {
        "id": "34",
        "name": "日志管理",
        "sort": 5,
        "parentId": "0",
        "icon": "Setting",
        "path": "/log",
        "component": "",
        "type": 0,
        "perms": "",
        "status": 0,
        "children": [
            {
                "id": "30",
                "name": "操作日志",
                "sort": 7,
                "parentId": "34",
                "icon": "Setting",
                "path": "/log/operLog",
                "component": "/log/operlog/index",
                "type": 1,
                "perms": "",
                "status": 0
            },
            {
                "id": "32",
                "name": "登录日志",
                "sort": 8,
                "parentId": "34",
                "icon": "Setting",
                "path": "/log/loginLog",
                "component": "/log/loginlog/index",
                "type": 1,
                "perms": "",
                "status": 0
            }
        ]
    }
]
2.2.2 前端页面
在前面页面中,各个菜单对应的页面如下:
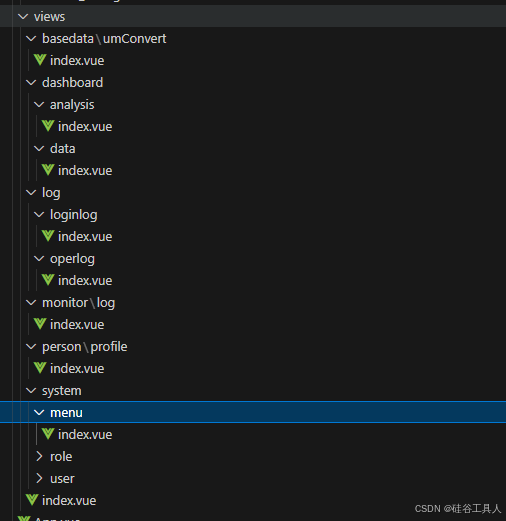
这里我自己指定的规则: 在views文件夹中只存放和动态路由相关的页面, 静态路由相关的页面全部放到components文件夹下面了.
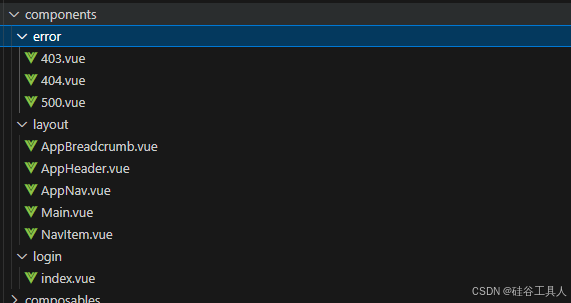
以下是静态路由对应的页面文件夹结构:
在有了页面文件(views文件夹)和树形菜单之后, 我们需要在动态路由中配置关系, 生成动态路由,
2.2.3 组装动态路由
组装三步骤:
(1) 引入views文件夹里面的所有页面
typescript
/**
 * 创建一个映射,键为标准化后的视图路径,值为返回该视图组件的异步函数。
 * 通过泛型强化返回的 Promise 结果类型。
 */
export function createComponentMap<T = DefineComponent>(): Record<string, () => Promise<T>> {

    const modules = import.meta.glob('@/views/**/*.{vue,tsx}');
    const componentMap: Record<string, () => Promise<T>> = {};

    for (const path in modules) {
        let key = path
            .replace(viewsRootPath, '')
            .replace('.vue', '')
            .replace('.tsx', '');
        componentMap[key] = modules[path] as () => Promise<T>;
    }
    return componentMap;
}
(2) 根据树形菜单, 查找对应的组件(页面)
(3) 创建路由
具体逻辑如下:
(1)中生成的是map结构, map的key即为菜单的组件地址, value即为引入页面的一个异步函数
类似于() => import('@/components/login/index.vue') 这样的,可以当做组件使用
在(2)中遍历菜单树,根据菜单中的组件地址 查找(1)中的map, 获得一个组件引入的异步函数
然后创建路由, 填写基本信息, 这里面就包含了component属性指定到这个异步函数.
然后判断当前菜单有没有children子菜单,如果有,则递归调用, 直到所有的树形菜单都遍历完.
最后得到动态路由 frontendRoutes, 并且在创建的过程中, 也将路由加入了路由表router中.
2-3步骤在一起如下:
typescript
/**
 * 从后端菜单转换为前端路由数组
 */
export const transformRoutes = (menus: BackendMenu[],
                                componentMap: Record<string, () => Promise<DefineComponent>>)
    : AppRouteRecordRaw[] => {

    //定义最终的前端路由数组
    const frontendRoutes: AppRouteRecordRaw[] = [];


    menus.forEach(menu => {
            // 校验菜单路径和组件
            if (!menu.path || typeof menu.path !== 'string') {
                console.warn(`无效的路由路径: ${menu.name} - ${menu.path}`);
                return;
            }

            // 查找对应的组件
            let componentLoader: null | (() => Promise<DefineComponent>) = null;
            if (menu.component && menu.component in componentMap) {
                console.debug('找到组件:', menu.component);
                componentLoader = componentMap[menu.component];
            } else if (!menu.component && menu.children && menu.children.length > 0) {
                const firstChildKey = menu.children[0].component;
                if (firstChildKey && firstChildKey in componentMap) {
                    componentLoader = componentMap[firstChildKey];
                }
            }

            // 如果未找到组件,跳过该路由
            if (!componentLoader) {
                console.warn(`未找到组件: ${menu.component}`);
                return;
            }

            // 构建前端路由配置
            const route:AppRouteRecordRaw = {
                path: menu.path,
                component: componentLoader,
                meta: {
                    sort: menu.sort,
                    type: menu.type,
                    status: menu.status,
                    parentId: menu.parentId,
                    title: menu.name,
                    icon: menu.icon,
                    hidden: menu.type === 0,
                    perms: menu.perms, //按钮,超链接的访问权限(对应后端返回的buttons)
                    requiresAuth: menu.perms ? true: false,
                },
                // 递归处理子路由
                children: menu.children && menu.children.length > 0 ? transformRoutes(menu.children, componentMap) : []
            };

            // 添加到路由表中(0-目录,1-页面,2-按钮)
            if (!router.hasRoute(route.path) && route.meta.type < 2) {
                router.addRoute(dynamicRouteRoot, route as RouteRecordRaw);
            }

            // 添加到前端路由数组
            frontendRoutes.push(route);
        }
    );

    return frontendRoutes;
}
2.2.4 动态路由调用
动态路由的生成都是以函数形式导出的,在哪里调用呢?
(1) 路由的缓存
在状态存储中定义了一个函数, 将上面3个步骤集成在一起,
这样在生成动态路由后, 就保存在缓存中.
/**
 * 生成并添加动态路由
 * (根据后端的菜单生成动态路由)
 */
const generateAndAddRoutes = ()=> {
    try {
        //获取前端拥有的组件映射
        const componentMap = createComponentMap()
        //转换路由(根据后端菜单匹配前端组件生成路由)
        dynamicRoutes.value = transformRoutes(menus.value, componentMap)
        //路由加载完毕标识
        isLoaded.value = true
        localCache.setCache('isLoaded', true);
    } catch (error) {
        console.error('[路由初始化失败]:', error);
        isLoaded.value = false;
        localCache.setCache('isLoaded', false);
        throw error;
    }

}
(2) 路由的使用
在登录事件处理中, 当成功获取到菜单\权限数据以后, 会直接调用状态存储中的generateAndAddRoutes函数用来添加动态路由.
vue
const handleLogin = async () => {
  try {

    //登录请求
    const respData = await loginApi(username.value, password.value);
    userStore.setLoginData(respData)
    // 登录成功后立即加载路由
    await userStore.generateAndAddRoutes();
    // 重定向到目标页面或首页
    const redirect = router.currentRoute.value.query.redirect;
    console.log('redirect',redirect)
    await router.push(redirect ? redirect.toString() : '/');
  } catch (error) {
    errorMessage.value = (error as Error).message || '登录失败,请重试';
  }
};
到此, 整个动态路由的生成流程总结为:
- 用户登录,获取菜单树信息
- 获取views文件夹页面map
- 根据菜单中component组件地址从map中匹配获取页面组件
- 拼接动态路由信息,并递归处理所有菜单
2.3 路由守卫
路由守卫, 顾名思义, 就是一个守护者, 守护所有地址请求是否有权限放行.
2.3.1 白名单
白名单机制, 当请求的地址是白名单中存在的,则直接放行, 常见的地址如下:
typescript
// 路由白名单(无需认证即可访问)
export const ROUTE_WHITE_LIST = ['/login','/logout','/404','/403','/500','Logout', 'Forbidden', 'NotFound','Error'];
2.3.2 规则定义
这里我大概梳理下目前定义的规则如下:
text
//请求登录
如果是请求登录页, 如果token已经存在, 则跳转到首页
如果是请求登录页, 如果token不存在,则通过

//是否登录
如果token不存在, 调转登录

//路由是否加载
如果路由未加载, 先加载路由
如果路由加载失败,则清空用户信息, 跳转登录页

//检查路由权限
如果请求的路由中 to.meta.perms, 不包含在后端返回的 buttons列表中, 则提示无权限, 并跳转到Forbidden页面

//最后
所有检查都通过, 放行
对应的逻辑代码如下:
typescript
    try {
        // 仅在非白名单路由时启动进度条
        NProgress.start();

        // 处理登录页路由
        if (to.path === '/login') {
            // 如果已经登录但访问登录页,重定向到首页
            if (userStore.token) {
                next('/');
                return;
            }
            // 未登录访问登录页,直接放行
            next();
            return;
        }

        //检查是否已登录
        if (!userStore.token) {
            console.debug('[未登录] 跳转到登录页');
            next('/login');
            return;
        }

        //路由未加载
        if (!userStore.isLoaded) {
            console.debug('[未加载] 初始化路由');
            try {
                await userStore.generateAndAddRoutes();
                next({...to, replace: true});

            } catch (error) {
                ElMessage.error('路由初始化失败,请稍后重试');
                userStore.clearUserData();
                next('/login');
            }
            return;
        }

        //检查路由权限
        const perms = to.meta.perms as string;
        const userButtons = userStore.buttons;
        if (perms) {
            const hasPermission =  userButtons.includes(perms);
            if (!hasPermission) {
                console.debug('[权限检查] 无权限访问该路由:', to.path);
                next({name: 'Forbidden', replace: true});
                return;
            }
        }

        next();

    } finally {
        // 完成导航进度条
        NProgress.done();
    }
2.3.3 路由守卫使用
在路由的主入口中使用.
typescript
import {createRouter, createWebHistory} from "vue-router"
import {staticRoutes} from "@/router/static_routes.ts";
import {permissionGuard} from "@/router/permission.ts";

//创建路由实例
const router = createRouter({
    history: createWebHistory(import.meta.env.BASE_URL),
    routes: staticRoutes,
    scrollBehavior: () => ({left: 0, top: 0})
})

//全局前置守卫
router.beforeEach(permissionGuard);

export default router
3. 状态存储(store)
3.1 用户状态存储(userStore)
用户状态存储主要包含以下这些:
- token
- tokenExpire 有效期
- userInfo 用户信息
- menus 后端菜单
- buttons 当前用户所拥有的后端按钮权限列表
- roles 角色(暂未使用)
- sysConfig 系统配置信息
- isLoad 路由是否加载
- dynamicRouters 动态路由
当一个用户登录成功后,将会获得上面这些信息.
这里直接通过后端一次性返回并赋值的, 在单体应用中比较方便, 避免多次请求,可以根据实际需求调整
typescript
    //Actions
    const setLoginData = (data: LoginData) => {
        token.value = data.token
        tokenExpire.value = data.tokenExpire
        userInfo.value = data.userInfo
        menus.value = data.menus
        buttons.value = data.buttons
        roles.value = data.roles
        sysConfig.value = data.config

        // 同时持久化到sessionStorage
        localCache.setCache('token', data.token)
        localCache.setCache('tokenExpire', data.tokenExpire)
        localCache.setCache('userInfo', data.userInfo)
        localCache.setCache('menus', data.menus)
        localCache.setCache('buttons', data.buttons)
        localCache.setCache('roles', data.roles)
        localCache.setCache("sysConfig", data.config)
    }
3.2 加密存储的封装
shell
//引入加密包
pnpm i secure-ls
封装secureStorage
typescript
import SecureLS from "secure-ls";

const ls = new SecureLS({
    encodingType: "aes",
    isCompression: true,
    encryptionSecret: import.meta.env.VITE_STORAGE_SECRET
});

// 实现 Storage 接口
const secureStorage: Storage = {
    getItem: (key: string): string | null => {
        try {
            const value = ls.get(key);
            // 确保返回 string | null
            if (value === null || value === undefined) {
                return null;
            }
            return typeof value === 'string' ? value : JSON.stringify(value);
        } catch (error) {
            console.error('failed to decrypt data for key:', key, error);
            return null;
        }
    },
    setItem: (key: string, value: string): void => {
        try {
            ls.set(key, value);
        } catch (error) {
            console.error('failed to encrypt data for key:', key, error);
        }
    },
    removeItem: (key: string): void => {
        try {
            ls.remove(key);
        } catch (error) {
            console.error('failed to remove data for key:', key, error);
        }
    },
    clear: (): void => {
        try {
            ls.clear();
        } catch (error) {
            console.error('failed to clear cache:', error);
        }
    },
    // 以下属性在实际使用中可能不需要,但为了完整实现 Storage 接口
    get length(): number {
        try {
            // 获取所有键并返回数量
            const allKeys = Object.keys(localStorage); // 这里简化处理,实际应该从 secure-ls 获取
            return allKeys.length;
        } catch {
            return 0;
        }
    },
    key: (index: number): string | null => {
        try {
            // 这里简化处理,实际应该从 secure-ls 获取
            const allKeys = Object.keys(localStorage);
            return allKeys[index] || null;
        } catch {
            return null;
        }
    }
};

export default secureStorage
secureStorage 主要用来对缓存状态的数据存储进行加密和解密, 可以看情况使用.
3.3 存储工具类封装
typescript
import secureStorage from "@/utils/secure_storage.ts";

enum CacheType {
    Local,
    Session,
    Secure
}

class Cache {
    private storage: Storage;

    constructor(type: CacheType) {
        switch (type) {
            case CacheType.Secure:
                this.storage = secureStorage;
                break;
            case CacheType.Local:
                this.storage = localStorage;
                break;
            case CacheType.Session:
                this.storage = sessionStorage;
                break;
        }
    }

    setCache(key: string, value: any): void {
        if (!key) {
            throw new Error("Key cannot be empty");
        }
        if (value === null || value === undefined) {
            this.storage.removeItem(key);
            return;
        }
        this.storage.setItem(key, JSON.stringify(value));
    }

    getCache(key: string): any {
        if (!key) {
            throw new Error("Key cannot be empty");
        }
        const value = this.storage.getItem(key);
        if (value) {
            try {
                return JSON.parse(value);
            } catch (error) {
                console.error("Failed to parse stored value:", error);
                return null;
            }
        }
        return null;
    }

    deleteCache(key: string): void {
        if (!key) {
            throw new Error("Key cannot be empty");
        }
        this.storage.removeItem(key);
    }

    clearCache(): void {
        this.storage.clear();
    }
}

const localCache = new Cache(CacheType.Local);
const sessionCache = new Cache(CacheType.Session);
const secureCache = new Cache(CacheType.Secure);

export { localCache, sessionCache, secureCache, CacheType };
这样在实际使用时,可以根据需要选择不同的存储方式.