一,Spring框架的缺点
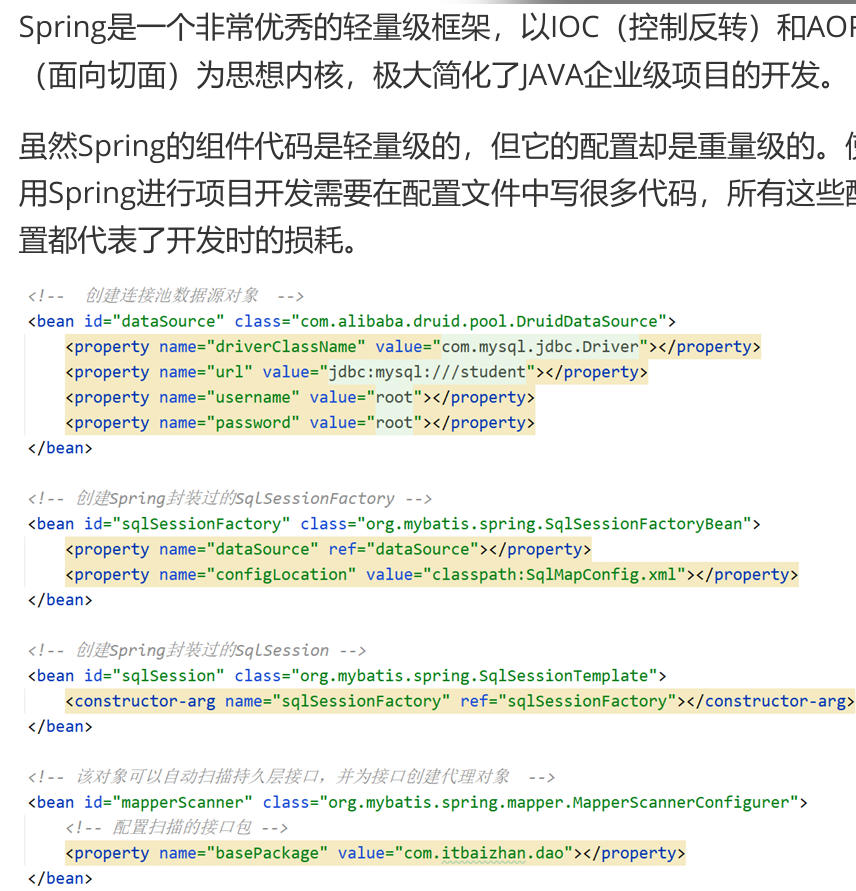
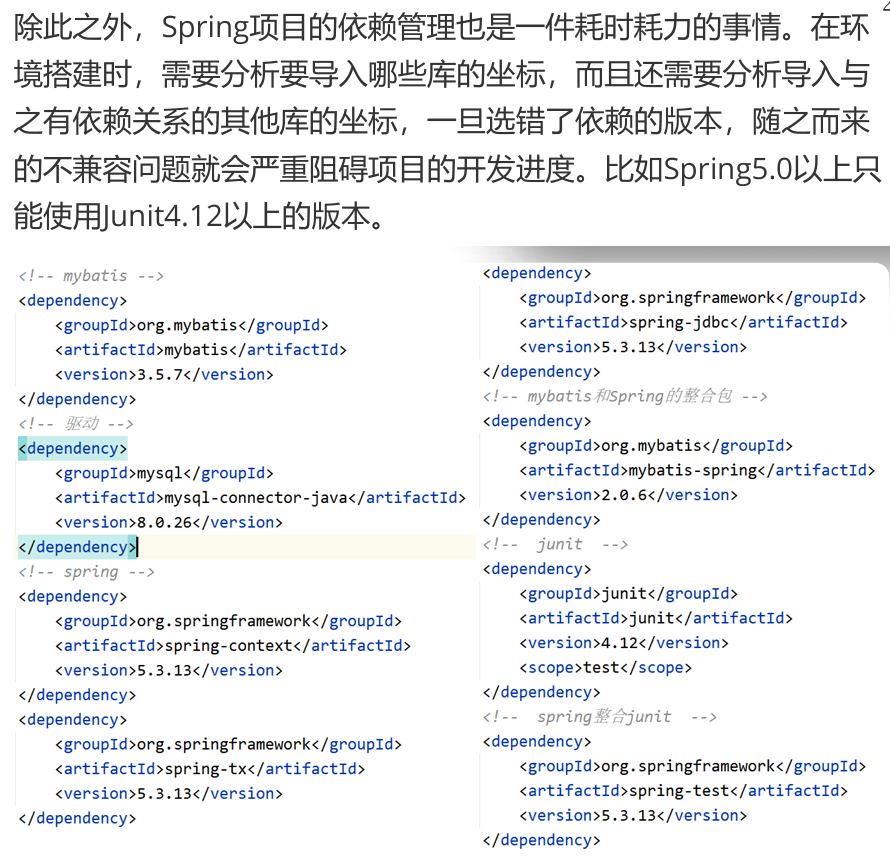
总结起来,Spring的缺点就是:
置过于繁琐。
引入的依赖过多,版本控制复杂。
二,什么是SpringBoot
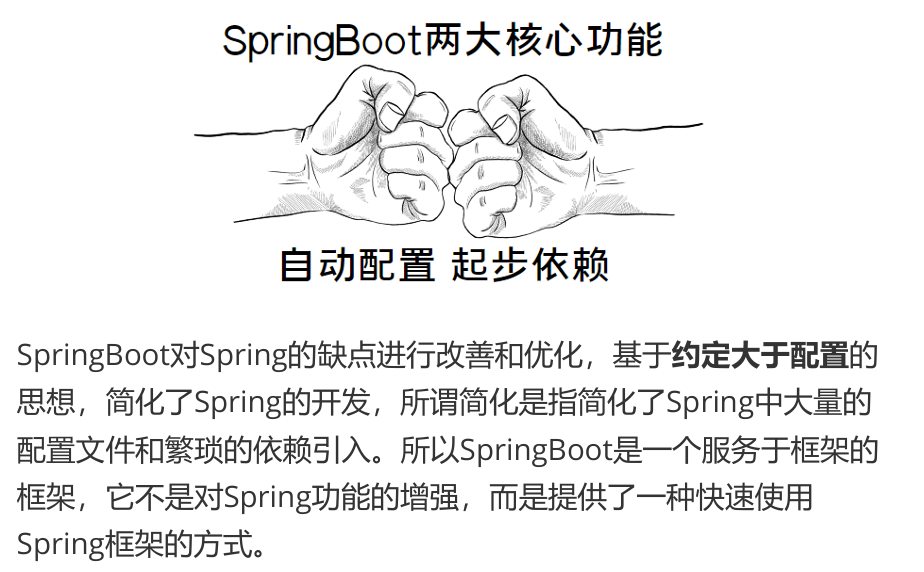
SpringBoot的优点:
配置简单
依赖引入简单
提供了一些大型项目的非功能特性,如嵌入式服务器,安全指标,健康监测等。
自动配置
SpringBoot项目自动提供最优配置,同时可以修改默认值满足特定的要求。
起步依赖
SpringBoot的依赖是基于功能的,而不是普通项目的依赖是基于JAR包的。SpringBoot将完成一个功能所需要的所有坐标打包到一起,并完成了版本适配,我们在使用某功能时只需要引入一个依赖 即可。
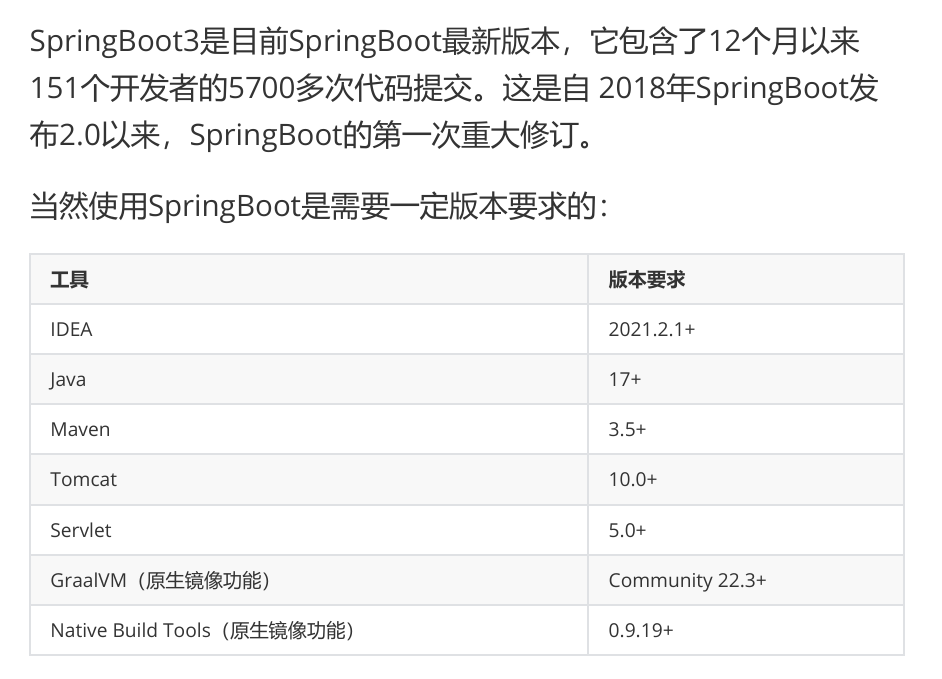
三,SpringBoot3
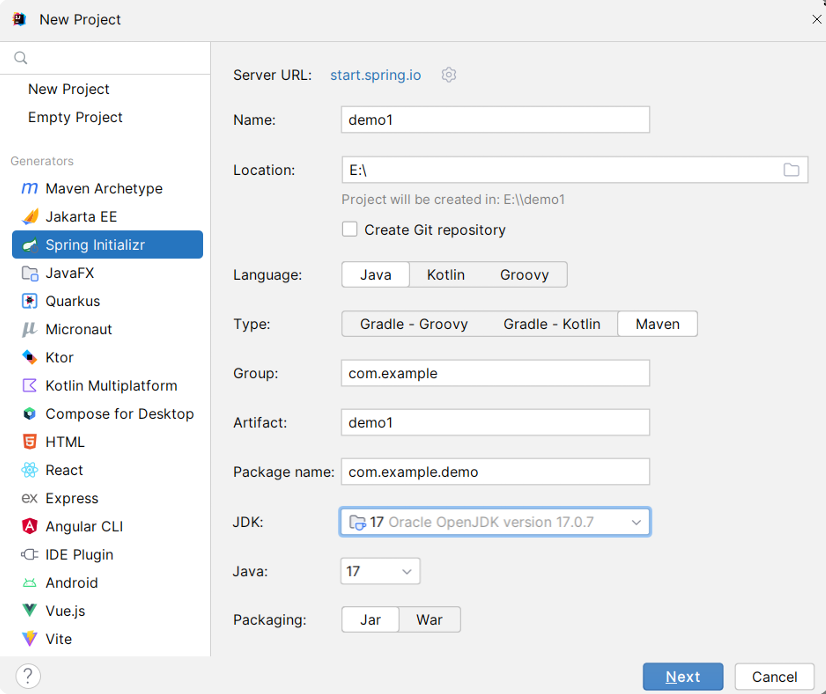
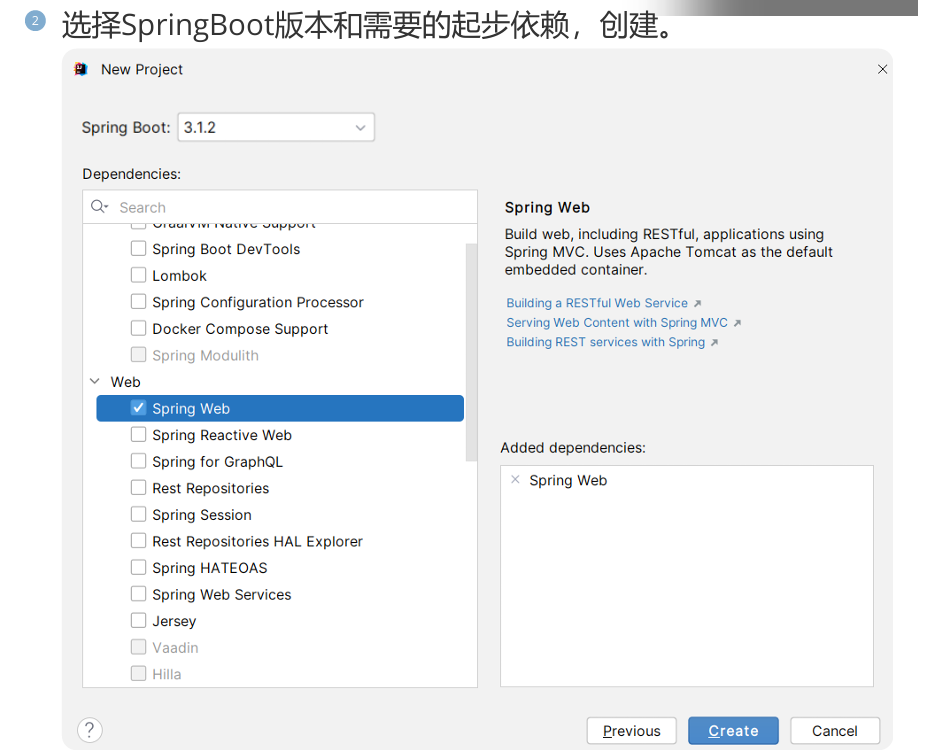
四,通过IDEA脚手架搭建项目

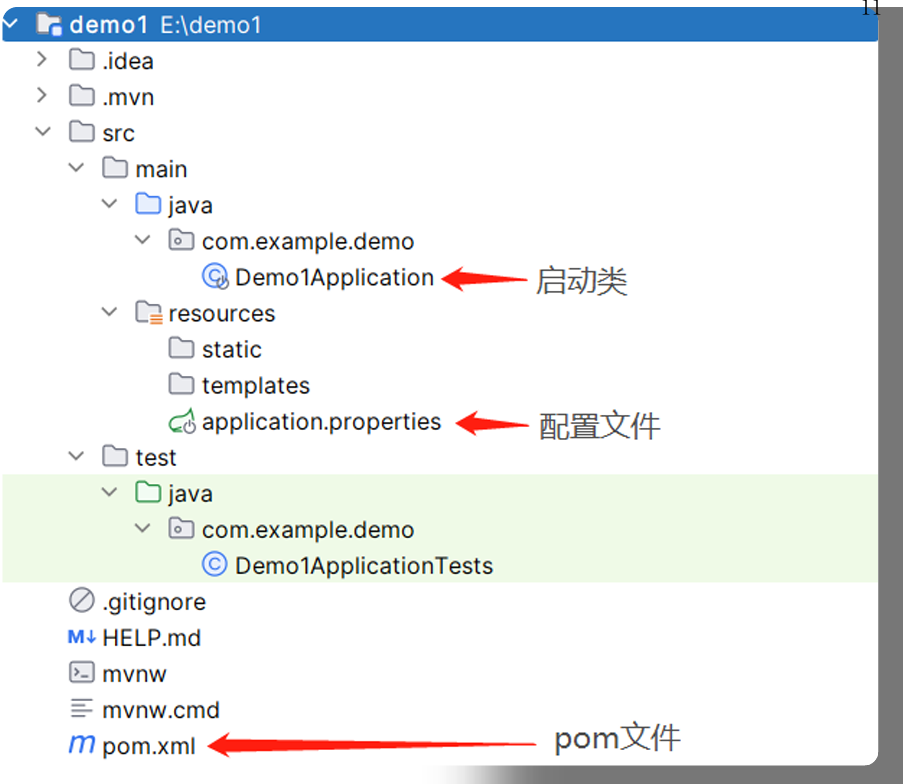
五,SpringBoot项目结构


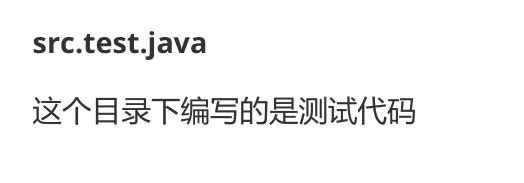
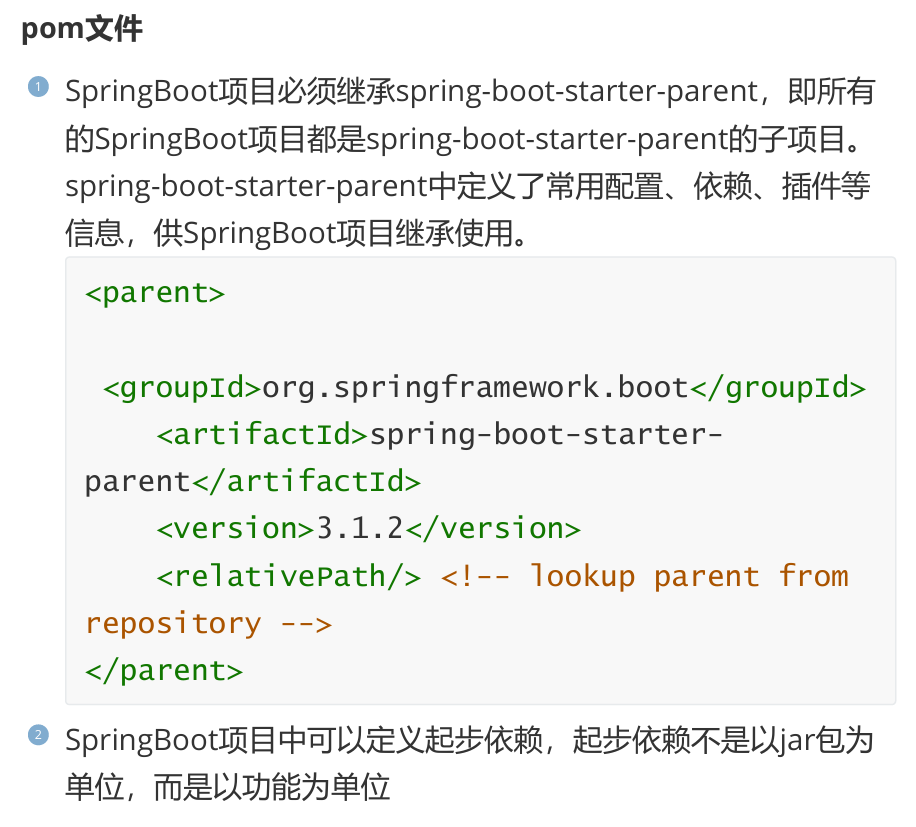
html
<dependencies>
    <dependency>

 <groupId>org.springframework.boot</groupId>
        <artifactId>spring-boot-starter-web</artifactId>
    </dependency>
    <dependency>

 <groupId>org.springframework.boot</groupId>
        <artifactId>spring-boot-starter-test</artifactId>
        <scope>test</scope>
    </dependency>
 </dependencies>
六,通过Maven搭建项目
1 创建新项目
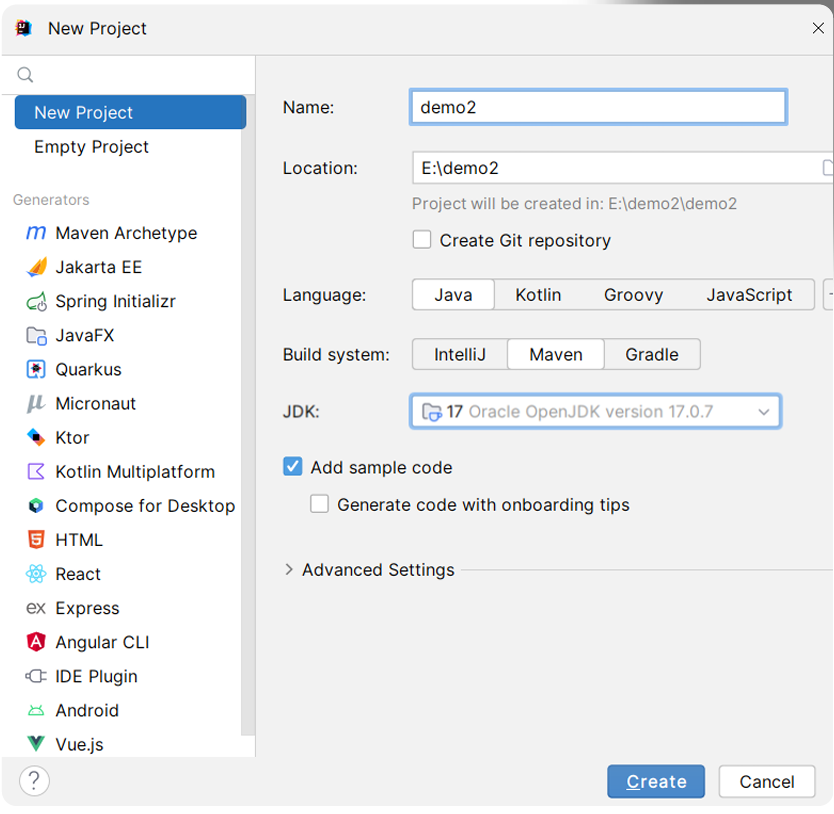
2 在pom中添加项目的父工程、起步依赖、插件、依赖和插件的下载地址
Go
<!-- 父工程 -->
 <parent>
 <groupId>org.springframework.boot</groupId>
 <artifactId>spring-boot-starter-parent</artifactId>
 <version>3.1.2</version>
 </parent>
 <!-- 起步依赖 -->
 <dependencies>
 <dependency>
 <groupId>org.springframework.boot</groupId>
 <artifactId>spring-boot-starter-web</artifactId>
 </dependency>
 <dependency>
 <groupId>org.springframework.boot</groupId>
 <artifactId>spring-boot-starter
test</artifactId>
 <scope>test</scope>
 </dependency>
 </dependencies>
 <!-- 插件 -->
 <build>
 <plugins>
 <plugin>
 <groupId>org.springframework.boot</groupId>
 <artifactId>spring-boot-maven-plugin</artifactId>
 </plugin>
 </plugins>
 </build>
3 编写启动类
java
 @SpringBootApplication
 public class SpringBootApp {
 public static void main(String[] args) {
 SpringApplication.run(SpringBootApp.class, args);
    }
 }
4 编写配置文件application.properties
java
#日志格式
logging.pattern.console=%d{MM/dd
HH:mm:ss.SSS} %clr(%-5level) ---
[%-15thread] %cyan(%-50logger{50}):%msg%n
 #端口号
server.port=8889
5 运行启动类主方法,启动项目
七,编写java代码

八,YAML文件
1.配置文件介绍

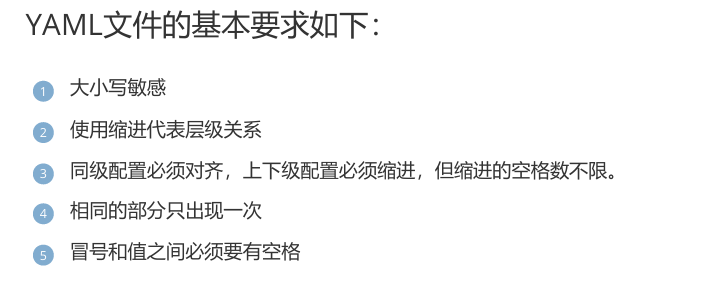
比如使用properties文件配置tomcat端口以及项目路径:
java
server.port=8888
 server.servlet.context-path=/itbaizhan
而使用YAML文件配置tomcat端口:
java
server:
  servlet:
    context-path: /itbaizhan
  port: 8888
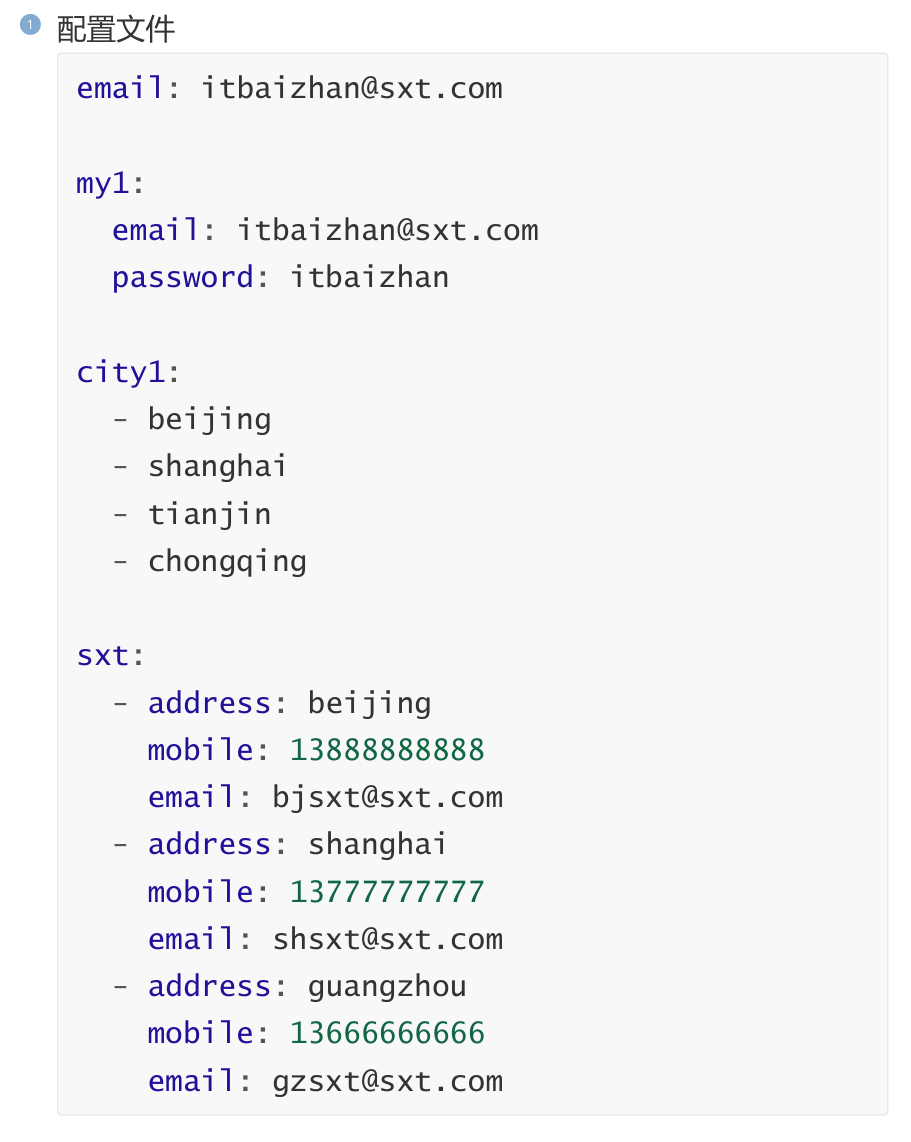
2,自定义配置数据

除了覆盖默认配置,我们还可以在YAML文件中进行自定义配置,以便我们在项目中读取使用。
配置简单数据
语法:
java
数据名: 值示例代码:
java
email: itbaizhan@sxt.com配置对象数据
语法:
java
对象:
属性名1: 属性值
属性名2: 属性值
# 或者
对象: {属性名1: 属性值,属性名2: 属性值}
示例代码:
java
# 邮箱1
 my1:
  email: itbaizhan@sxt.com
  password: itbaizhan
 # 邮箱2
 my2: {email: itbaizhan1@sxt.com,password:
itbaizhan}
配置集合数据
语法
java
集合:- 值1- 值2
 # 或者
集合: [值1,值2]
示例代码
java
# 城市
city1:
   -beijing
   -shanghai
   -tianjin
   -chongqing
 city2: [beijing,tianjin,shanghai,chongqing]
 # 集合中的元素是对象
sxt:
   -address: beijing
    mobile: 13888888888
    email: bjsxt@sxt.com
   -address: shanghai
    mobile: 13777777777
    email: shsxt@sxt.com
   -address: guangzhou
    mobile: 13666666666
    email: gzsxt@sxt.com
注意:值与之前的 - 之间存在一个空格
3,@Vaule读取配置文件

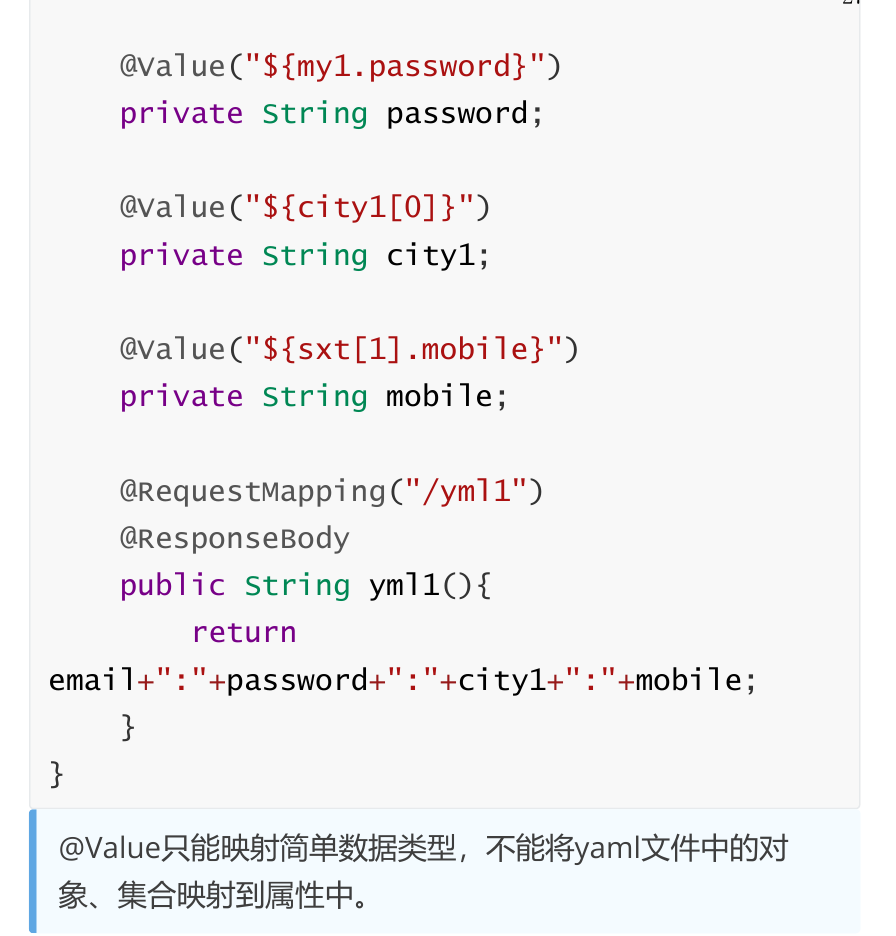
读取自定义配置时,我们可以通过@Value注解将配置文件中的值映射到一个Spring管理的Bean的字段上,用法如下:

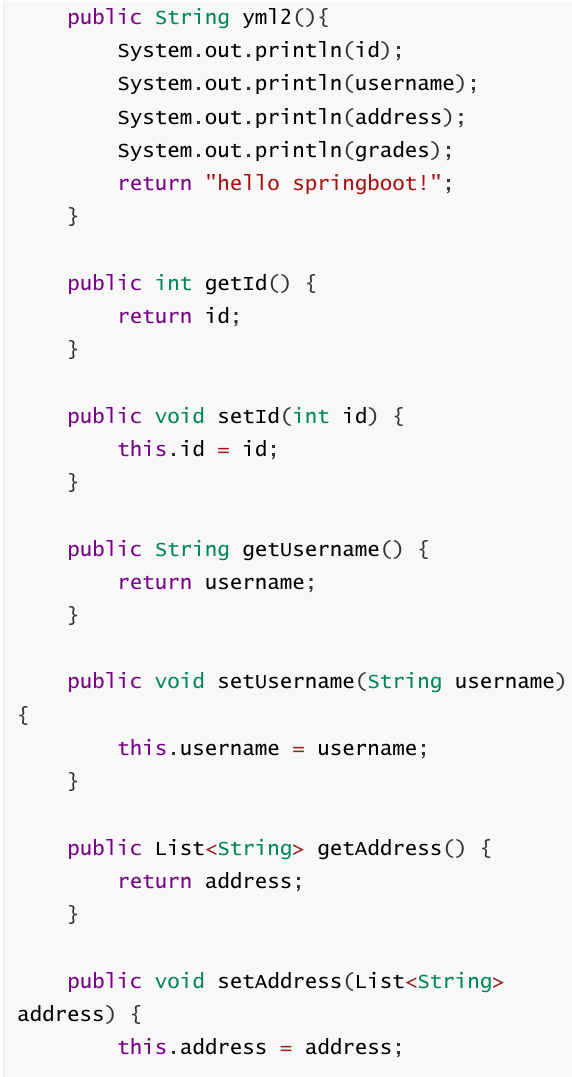
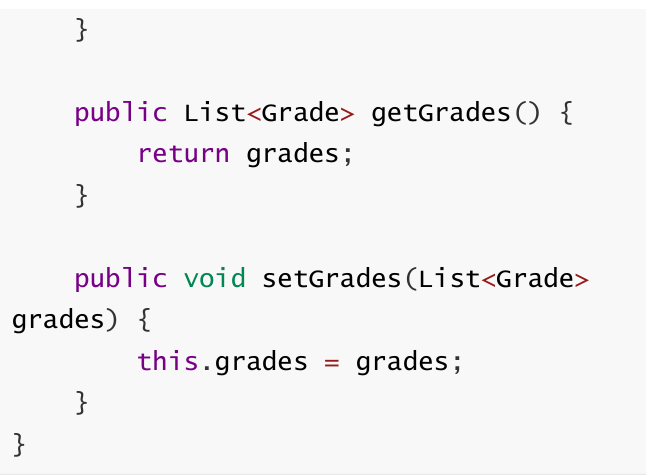
4,@ConfigurationProperties读取配置文件


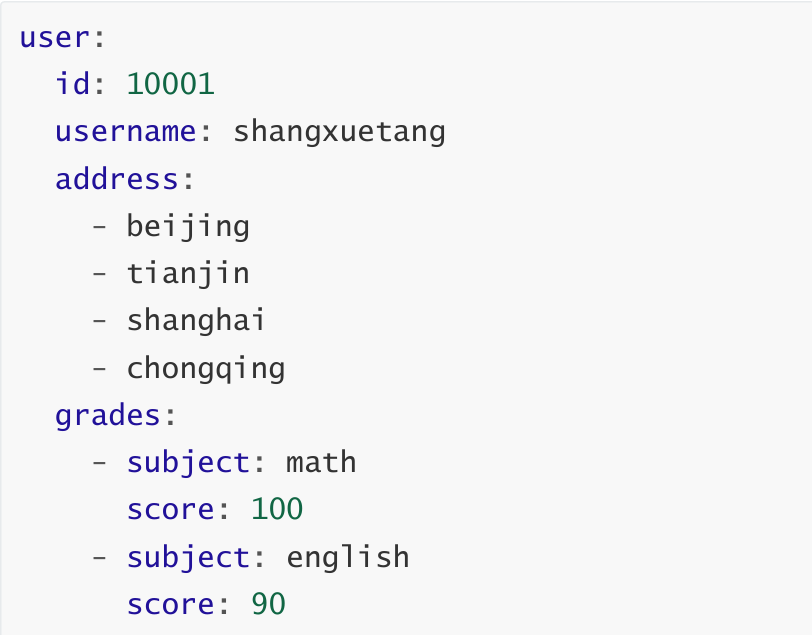
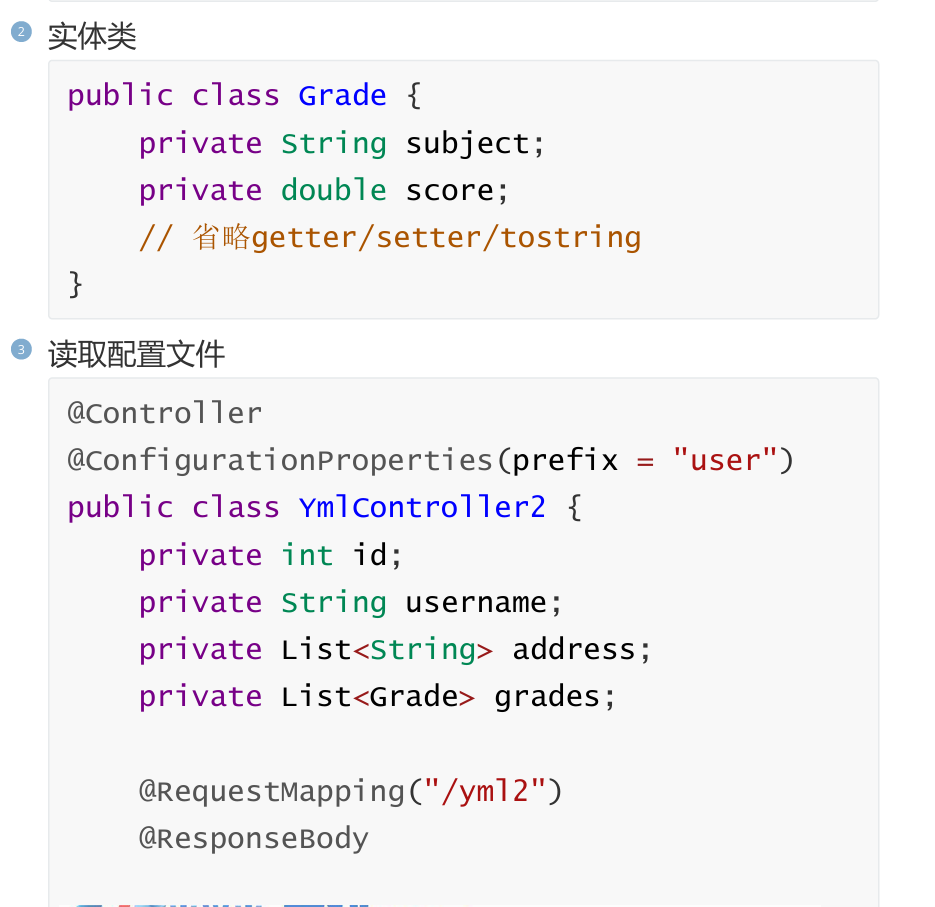
5,占位符

使用配置文件中的值
编写配置文件
java
server:
  port: 8888
 myconfig:
  myport: ${server.port}
读取配置文件
java
 @Controller
 public class YmlController3 {
     @Value("${myconfig.myport}")
     private int port;

     @RequestMapping("/yml3")
     @ResponseBody
     public String yml3(){
     System.out.println(port);
     return "hello springboot!";
        }
}
使用框架提供的方法
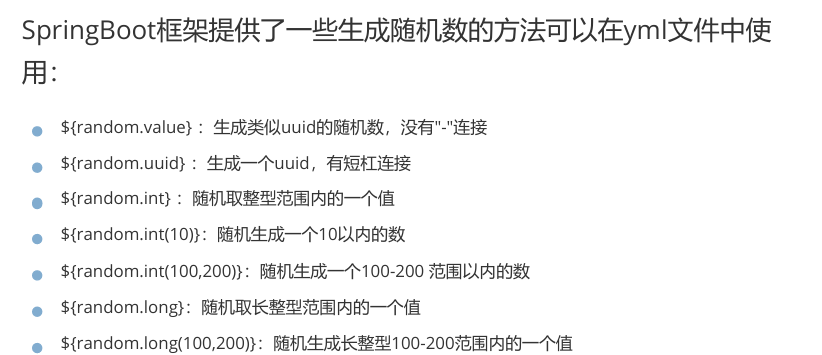
用法如下:
java
# 随机生成tomcat端口
server:
  port: ${random.int(1024,9999)}
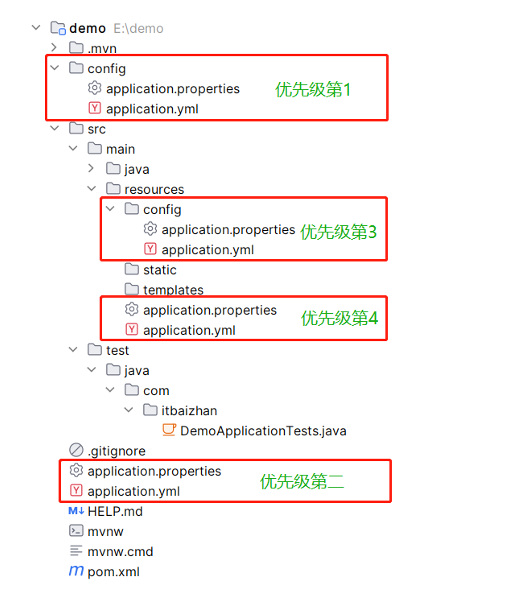
6,配置文件存放位置及优先级
7,bootstrap配置文件

SpringBoot中有两种容器对象,分别是bootstrap和application,bootstrap是应用程序的父容器,bootstrap加载优先于applicaton。bootstrap配置文件主要对bootstrap容器进行配置,application配置文件是对applicaton容器进行配置。
bootstrap配置文件也同样支持properties和yml两种格式,主要用于从外部引入Spring应用程序的配置。
bootstrap配置文件特征

bootstrap与application的应用场景
application配置文件主要用于SpringBoot项目的自动化配置。
使用Spring Cloud Config配置中心时,需要在bootstrap配置文件中添加连接到配置中心的配置属性来加载外部配置中心的配置信息。
一些固定的不能被覆盖的属性。
一些加密/解密的场景
九,SpringBoot整合Web开发
1,Servlet

注册方式一:
1,编写servlet
java
@WebServlet("/first")
 public class FirstServlet extends HttpServlet {
 public void doGet(HttpServletRequest request, HttpServletResponse response){
 System.out.println("First Servlet........");
    }
 }
2,启动类扫描web组件
java
 @SpringBootApplication
 //SpringBoot启动时扫描注册注解标注的Web组件
@ServletComponentScan
 public class Springbootdemo2Application {
    public static void main(String[] args) {
       SpringApplication.run(Springbootdemo2Application.class, args);
    }
 }
注册方式二:
1,编写servlet
java
 public class SecondServlet extends HttpServlet {
    public void doGet(HttpServletRequest request, HttpServletResponse response){
        System.out.println("Second Servlet........");
    }
 }
2,使用配置类注册servlet
java
@Configuration
 public class ServletConfig {
 //ServletRegistrationBean可以注册Servlet组件,将其放入Spring容器中即可注册Servlet
 @Bean
 public ServletRegistrationBean getServletRegistrationBean(){
 // 注册Servlet组件
ServletRegistrationBean bean = new ServletRegistrationBean(new SecondServlet());
 // 添加Servlet组件访问路径
bean.addUrlMappings("/second");
 return bean;
    }
 }
2,Filter
注册方式一:
1,编写filter
java
 @WebFilter(urlPatterns = "/first")
 public class FirstFilter implements Filter {
 @Override
 public void init(FilterConfig filterConfig) throws ServletException { }
 @Override
 public void doFilter(ServletRequest servletRequest, ServletResponse servletResponse,FilterChain filterChain)
throws IOException, ServletException {
 System.out.println("进入First Filter");
 filterChain.doFilter(servletRequest,servlet Response);
 System.out.println("离开First Filter");
    }
 @Override
 public void destroy() { }
 }
2,启动类扫描web组件
java
 @SpringBootApplication
 //SpringBoot启动时扫描注册注解标注的Web组件
@ServletComponentScan
 public class Springbootdemo2Application {
    public static void main(String[] args) {
 SpringApplication.run(Springbootdemo2Applic ation.class, args);
    }
 }
注册方式二:
1,编写filter
java
 public class SecondFilter implements Filter
{
    @Override
    public void init(FilterConfig filterConfig) throws ServletException { }
    @Override
    public void doFilter(ServletRequest servletRequest, ServletResponse
servletResponse, FilterChain filterChain)
throws IOException, ServletException {
System.out.println("进入Second Filter");
 filterChain.doFilter(servletRequest,servletResponse);
 System.out.println("离开Second Filter");
    }
 @Override
 public void destroy() { }
 }
2,使用配置类注册filter
java
 @Configuration
 public class FilterConfig {
 @Bean
 public FilterRegistrationBean getFilterRegistrationBean(){
 // 注册filter组件
FilterRegistrationBean bean =  new FilterRegistrationBean(new SecondFilter());
 // 添加过滤路径
bean.addUrlPatterns("/second");
 return bean;
    }
 }
3,Listener

注册方式一:
1,编写Listener
java
 @WebListener
 public class FirstListener implements ServletContextListener {
 @Override
 public void contextInitialized(ServletContextEvent sce) {
 System.out.println("First Listener Init......");
    }
 @Override
 public void contextDestroyed(ServletContextEvent sce) {
    }
 }
2,启动类扫描web组件
java
@SpringBootApplication
 //SpringBoot启动时扫描注册注解标注的Web组件
@ServletComponentScan
 public class Springbootdemo2Application {
 public static void main(String[] args) {
SpringApplication.run(Springbootdemo2Application.class, args);
    }
 }
注册方式二:
1,编写Listener
java
 @WebListener
 public class FirstListener implements ServletContextListener {
 @Override
 public void contextInitialized(ServletContextEvent sce) {
 System.out.println("First Listener Init......");
    }
 @Override
 public void contextDestroyed(ServletContextEvent sce) {
    }
 }
2,使用配置类注册Listener
java
 @Configuration
 public class ListenerConfig {
 @Bean
 public ServletListenerRegistrationBean getServletListenerRegistrationBean(){
 ServletListenerRegistrationBean bean = new ServletListenerRegistrationBean(new
SecondListener());
 return bean;
    }
 }
4,静态资源
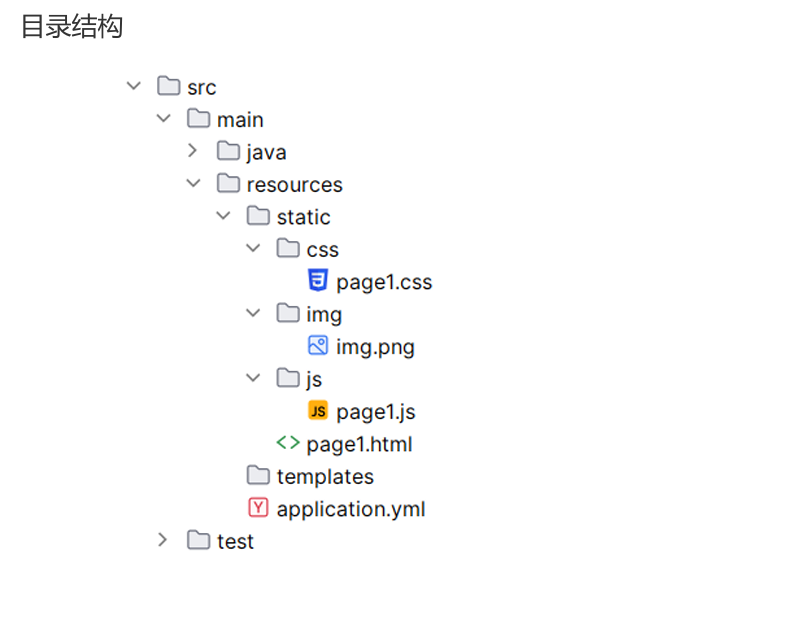
SpringBoot项目中没有WebApp目录,只有src目录。在 src/main/resources 下面有 static 和 templates两个文件夹。SpringBoot默认在static目录中存放静态资源,而在 templates 中放动态页面。

接下来我们在 resources/static 中编写html静态页面:
html
 <!DOCTYPE html>
 <html lang="en">
 <head>
 <meta charset="UTF-8">
 <title>测试HTML</title>
 <script src="/js/page1.js"></script>
 <link rel="stylesheet"
href="/css/page1.css" />
 </head>
 <body>
 <p>我的HTML</p>
 <img src="/img/img.png">
 </body>
 </html>
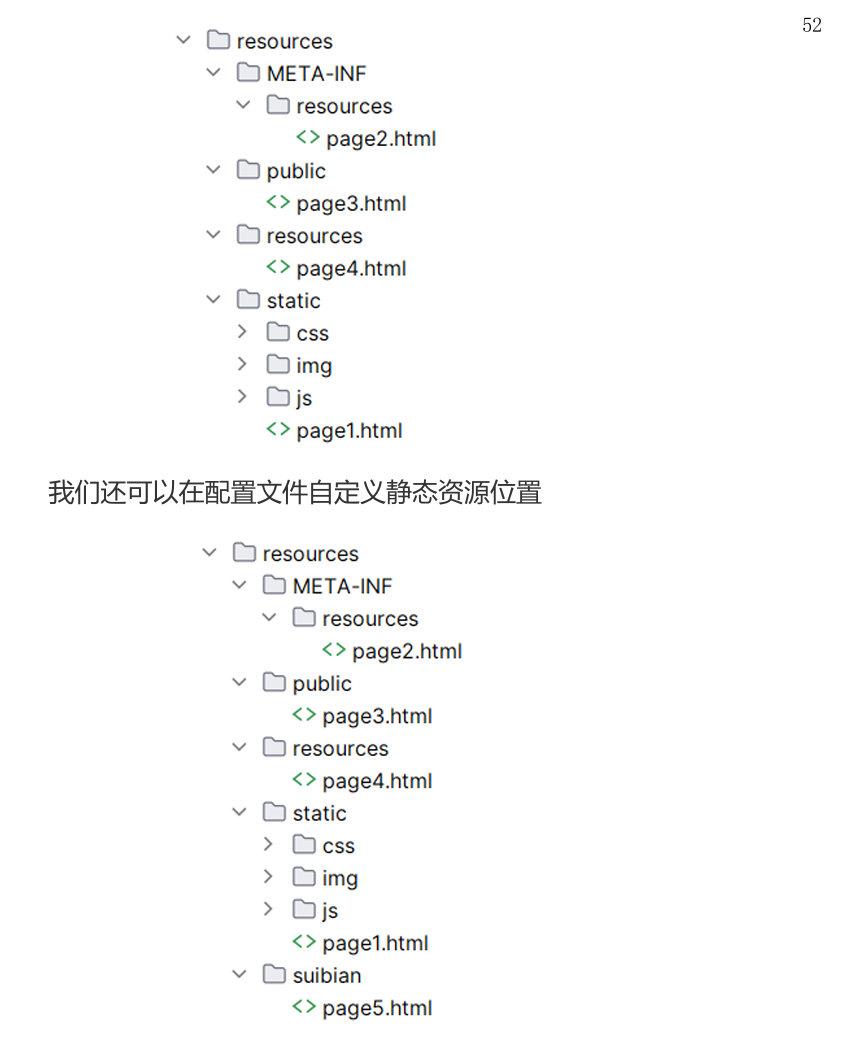
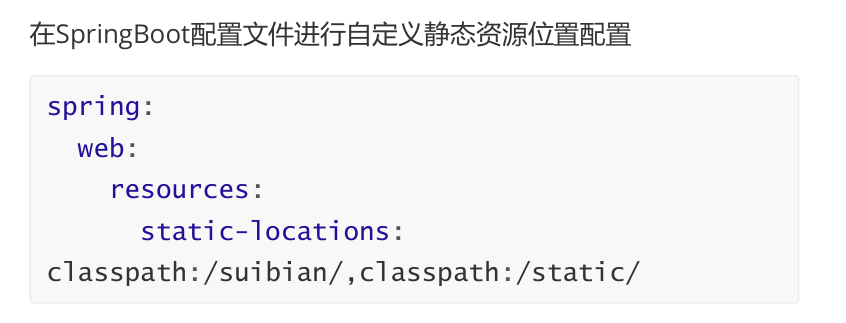
5,静态资源其他存放位置


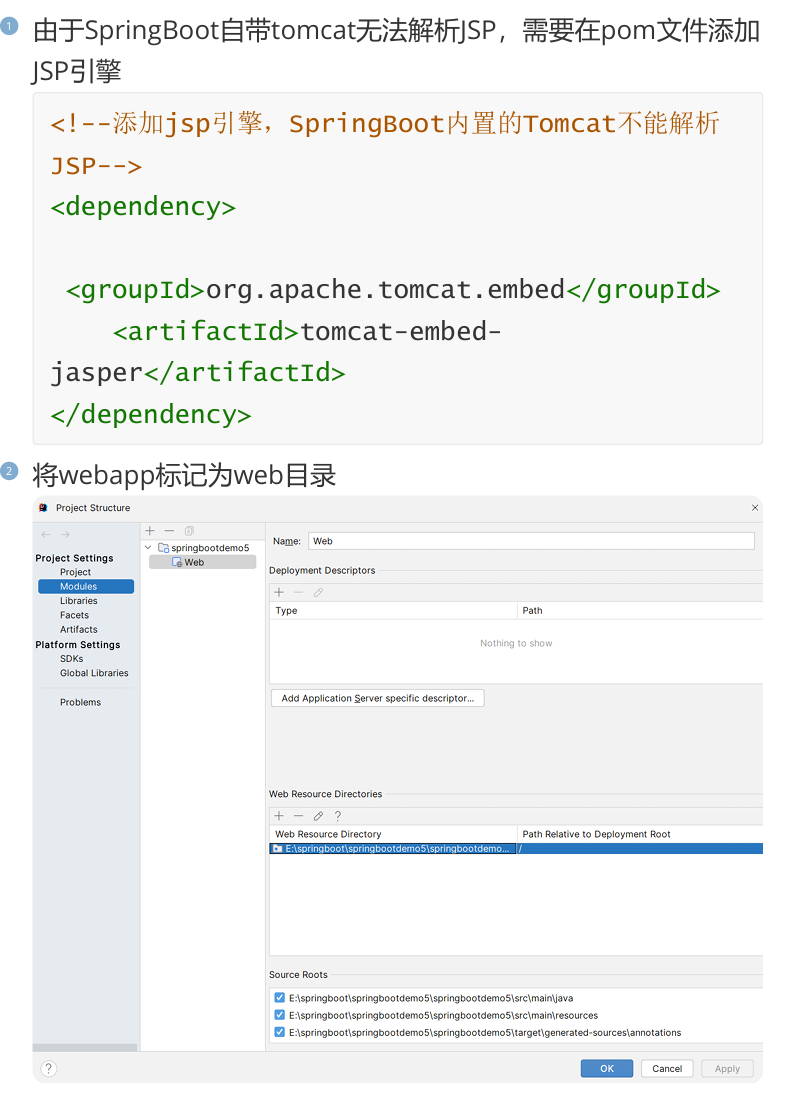
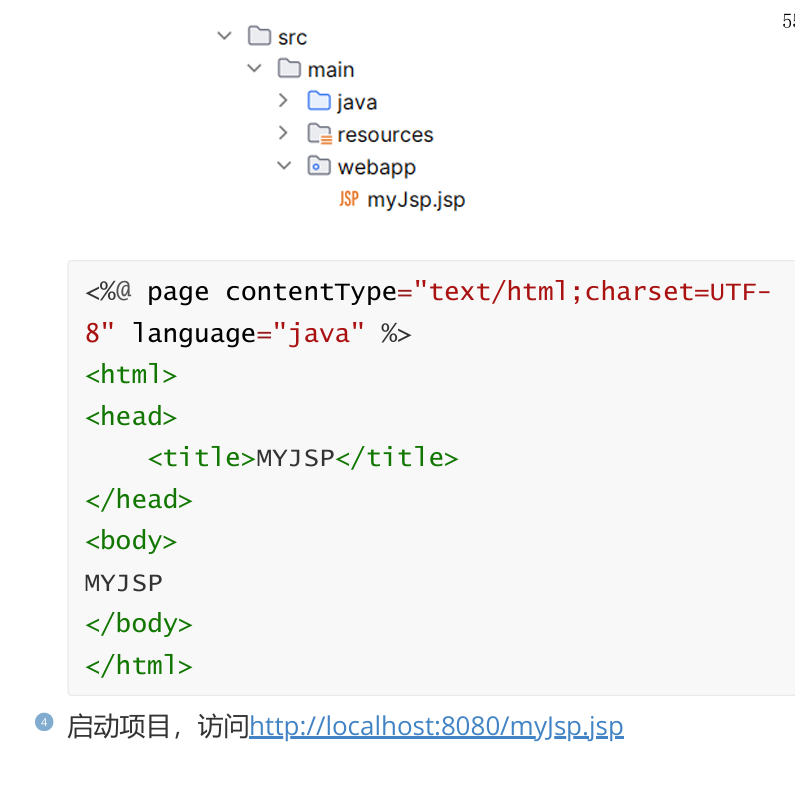
6,JSP
在SpringBoot中不推荐使用JSP作为动态页面,如果我们要想使用JSP编写动态页面,需要手动添加webapp目录。

十,Thymeleaf
1,入门

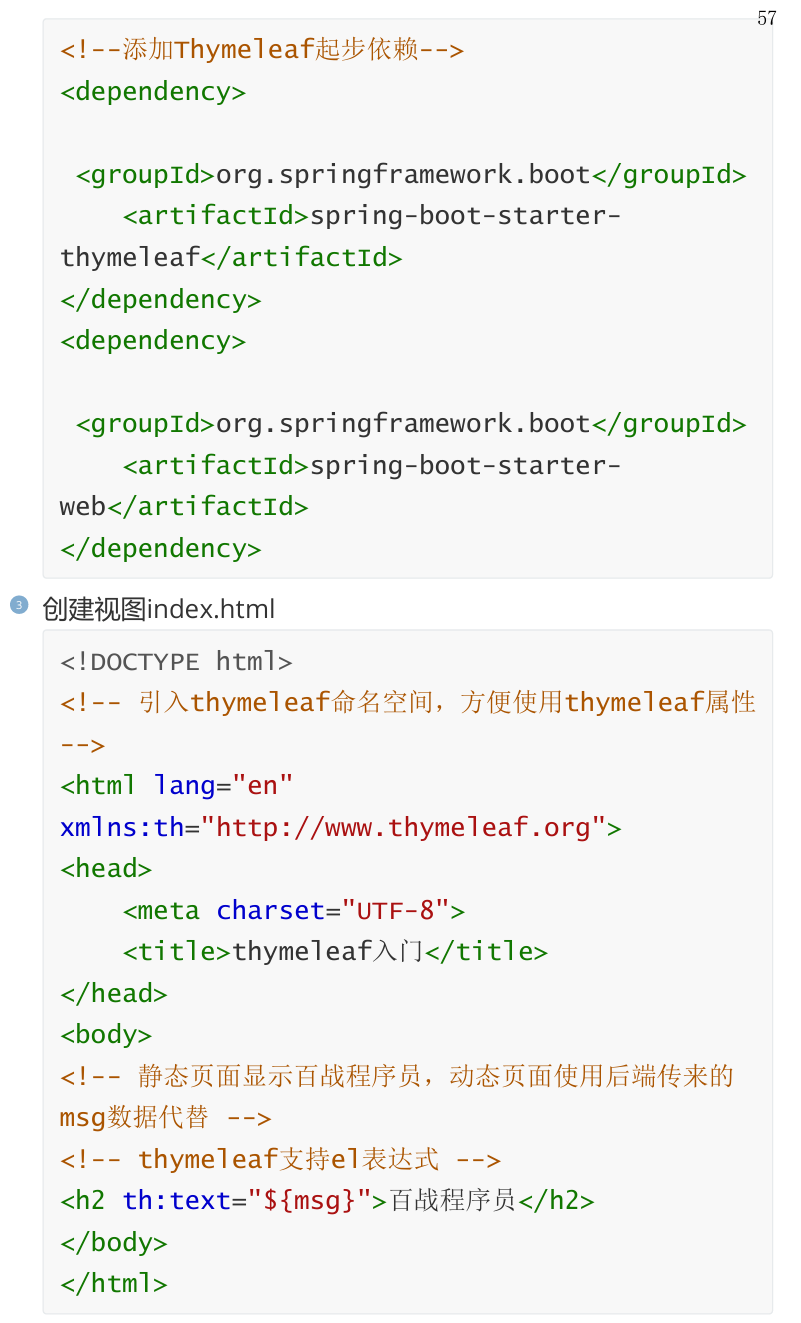
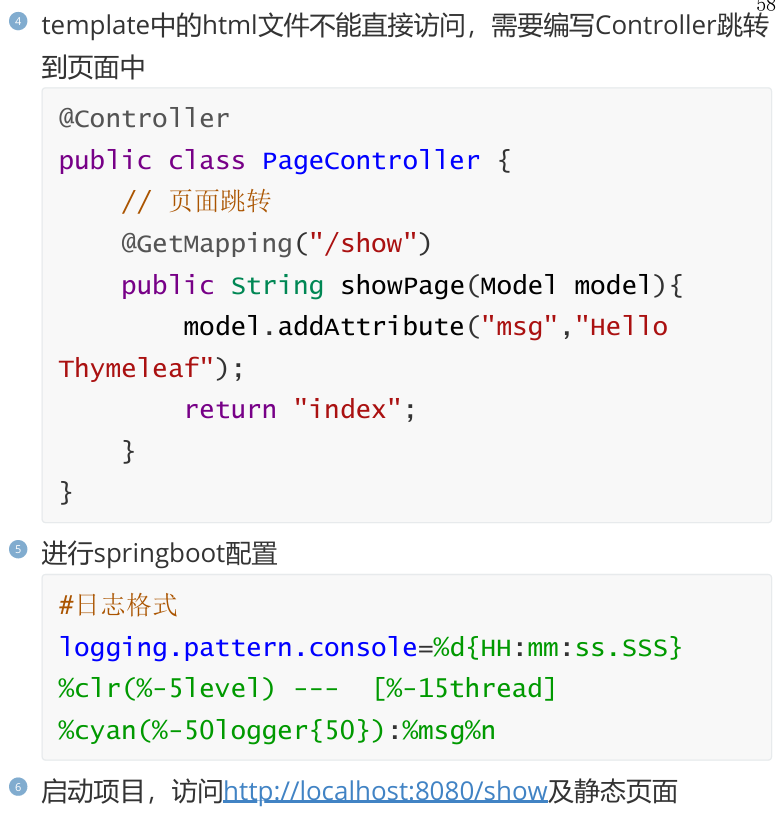
Thymeleaf是一款用于渲染XML/HTML5内容的模板引擎,类似JSP。它可以轻易的与SpringMVC等Web框架进行集成作为Web应用的模板引擎。SpringBoot推荐使用Thymeleaf编写动态页面。
Thymeleaf最大的特点是能够直接在浏览器中打开并正确显示模板页面,而不需要启动整个Web应用。
Thymeleaf在有服务和无服务的环境下皆可运行,它即可以让美工在浏览器查看页面的静态效果,也可以让程序员在服务器查看带数据的动态页面效果


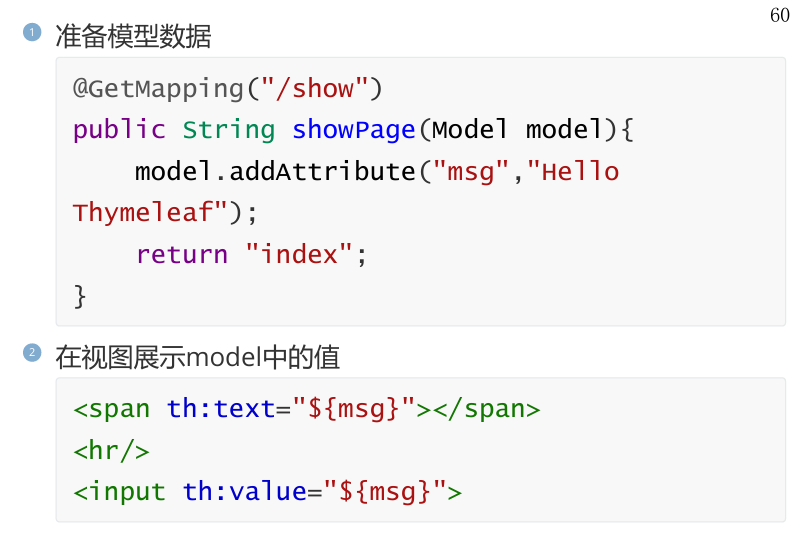
2,变量输出

3,操作字符串&时间

Thymeleaf提供了一些内置对象可以操作数据,内置对象可直接在模板中使用,这些对象是以#引用的。
操作字符串
操作字符串的内置对象为strings。
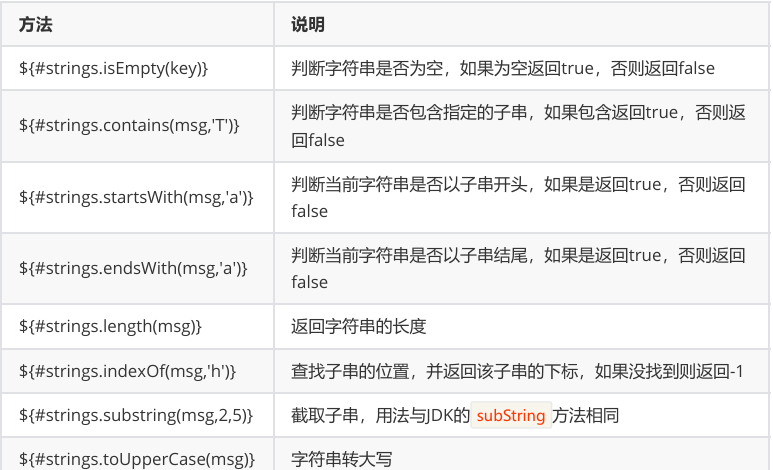
使用方式:
html
<span th:text="${#strings.isEmpty(msg)}">
 </span>
 <hr/>
 <span th:text="${#strings.contains(msg,'s')}">
 </span>
 <hr/>
 <span th:text="${#strings.length(msg)}"></span>
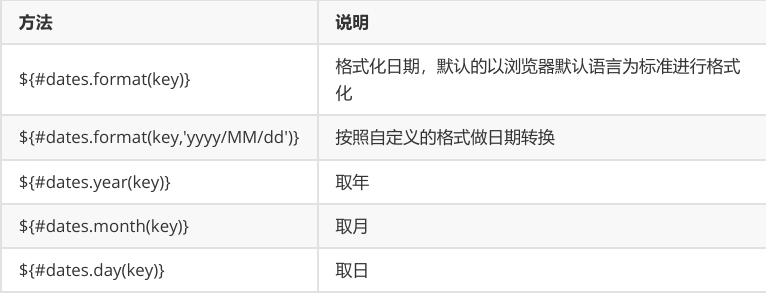
操作时间
操作时间的内置对象为dates
1.准备数据
html
model.addAttribute("date",new
Date(130,0,1));
2.使用内置对象操作时间
html
<span th:text="${#dates.format(date)}">
 </span>
 <hr/>
 <span
th:text="${#dates.format(date,'yyyy/MM/dd')}
 "></span>
 <hr/>
 <span th:text="${#dates.year(date)}"></span>
 <span th:text="${#dates.month(date)}">
 </span>
 <span th:text="${#dates.day(date)}"></span>
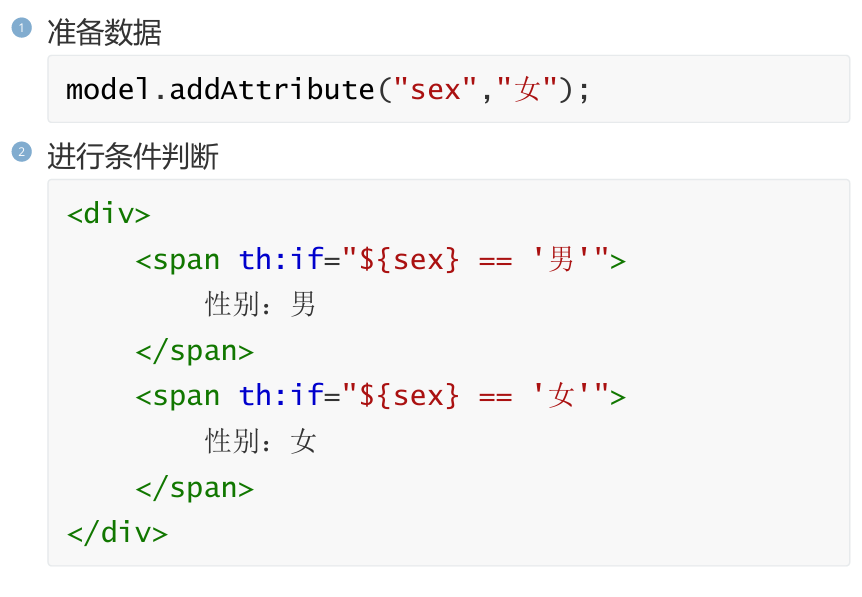
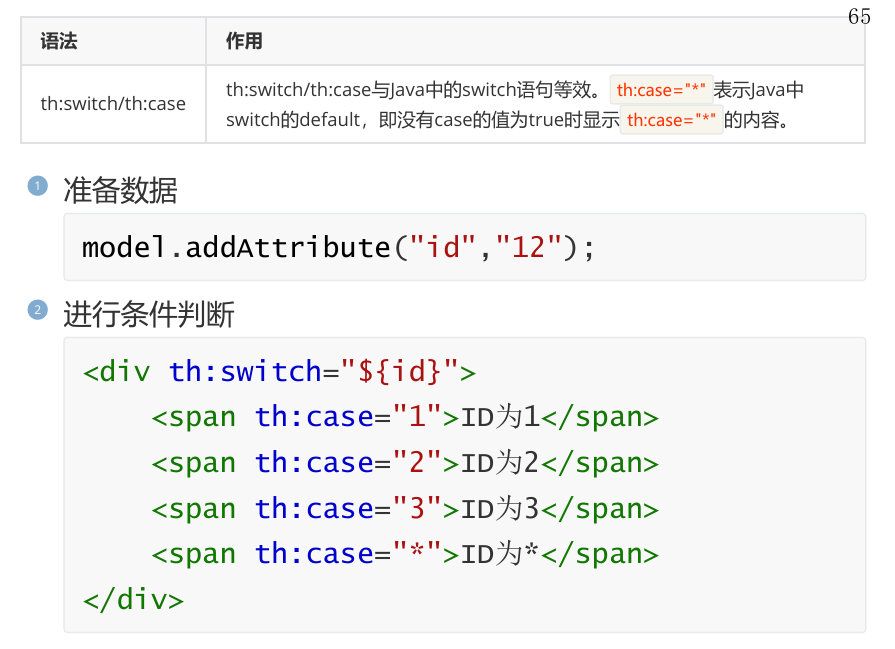
4,条件判断

5,迭代遍历

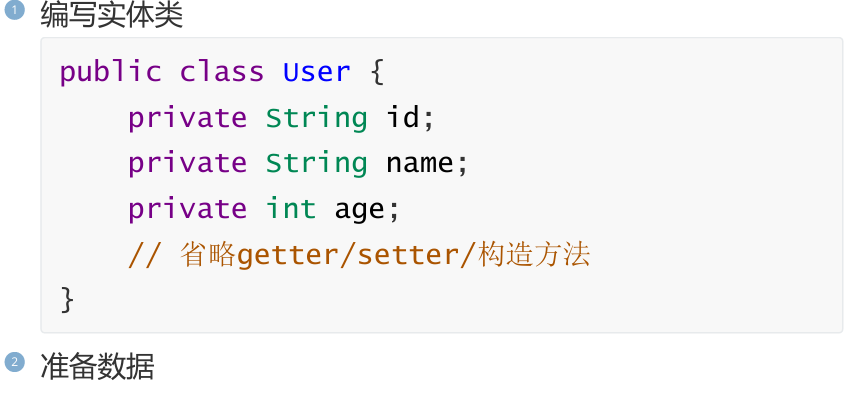
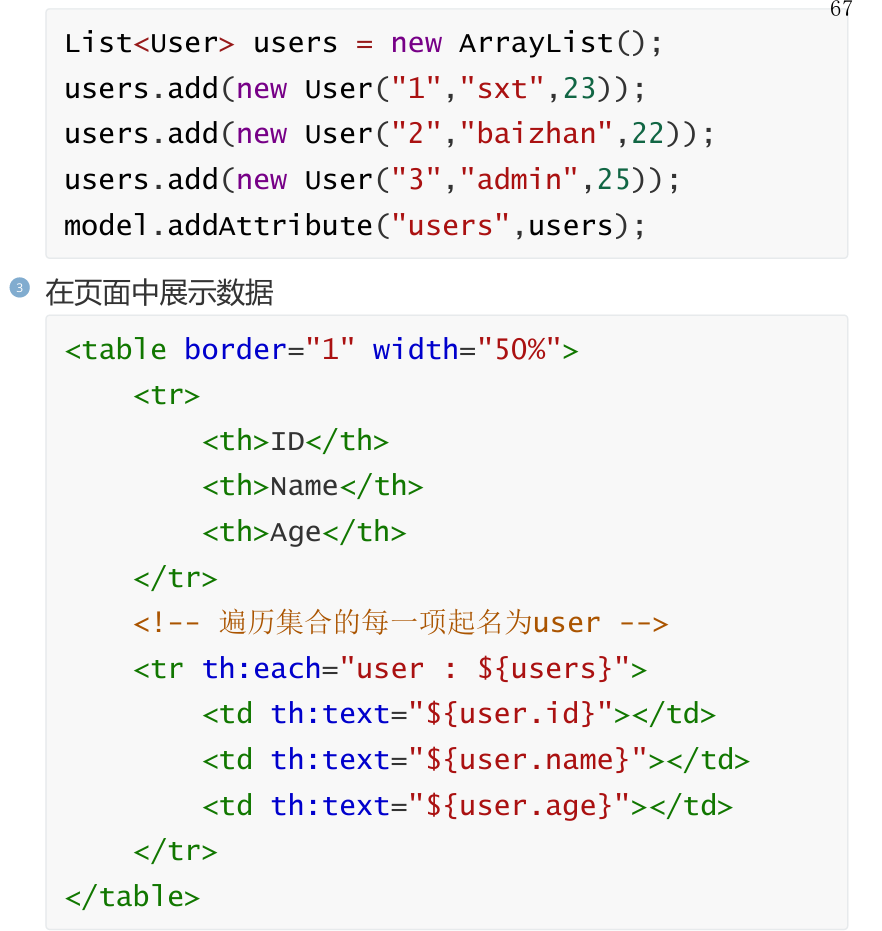
遍历集合
遍历Map

1,准备数据
java
Map<String,User> map = new HashMap();
 map.put("user1",new User("1","sxt",23));
 map.put("user2",new User("2","baizhan",22));
 map.put("user3",new User("3","admin",25));
 model.addAttribute("map",map);
2,遍历map
html
 <table border="1" width="50%">
 <tr>
 <th>ID</th>
 <th>Name</th>
 <th>Age</th>
 <th>Key</th>
 </tr>
 <!-- 遍历出的是一个键值对对象,key获取键,value获取值 -->
 <tr th:each="m : ${map}">
 <td th:text="${m.value.id}"></td>
 <td th:text="${m.value.name}"></td>
 <td th:text="${m.value.age}"></td>
 <td th:text="${m.key}"></td>
    </tr>
 </table>
使用状态变量

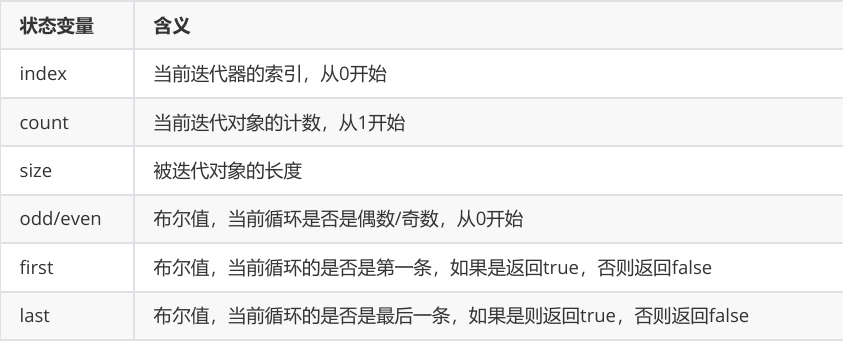
使用状态变量
html
 <!--冒号前的第一个对象是遍历出的对象,第二个对象是封装状
态变量的对象-->
 <tr th:each="user,status : ${users}">
 <td th:text="${user.id}"></td>
 <td th:text="${user.name}"></td>
 <td th:text="${user.age}"></td>
 <td th:text="${status.index}"></td>
 <td th:text="${status.count}"></td>
 <td th:text="${status.size}"></td>
 <td th:text="${status.odd}"></td>
 <td th:text="${status.even}"></td>
 <td th:text="${status.first}"></td>
 <td th:text="${status.last}"></td>
 </tr>
6,获取域中的数据

thymeleaf也可以获取request,session,application域中的数据,方法如下:
1,准备数据
html
request.setAttribute("req","HttpServletRequest");
 session.setAttribute("ses","HttpSession");
 session.getServletContext().setAttribute("app","application");
2,获取域数据
html
request:<span th:text="${req}">
</span>
<hr/>
 session: <span th:text="${session.ses}"/>
 <hr/>
 application: <span th:text="${application.app}"/>
7,URL写法

html
<a th:href="@{http://www.baidu.com}">百度</a>
 <a th:href="@{http://www.baidu.com? id=1&name=sxt}">静态参数一</a>
 <a th:href="@{http://www.baidu.com(id=2,name=bz)}">静态参数二</a>
添加动态参数
1,准备数据
java
model.addAttribute("id","100");
 model.addAttribute("name","bzcxy");
2,在URL中添加参数
html
<a th:href="@{'http://www.baidu.com? id='+${id}+'&name='+${name}}">动态参数一</a>
 <a th:href="@{http://www.baidu.com(id=${id},name=${name})}">动态参数二</a>
添加RESTful风格的参数
html
<a th:href="@{http://www.baidu.com/{id}/{name}
(id=${id},name=${name})}">restful格式传递参数方式
</a>
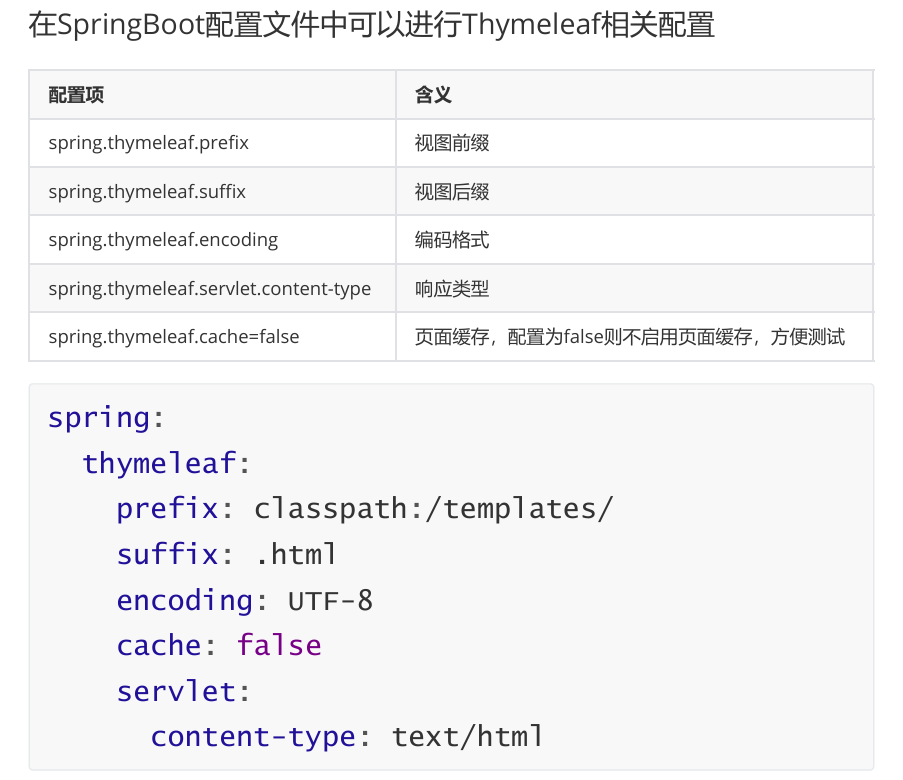
8,相关配置
十一,SpringBoot整合Mybatis

1,准备数据库数据
sql
CREATE DATABASE `student`;
 USE `student`;
 DROP TABLE IF EXISTS `student`;
 CREATE TABLE `student` (
 `id` int(11) NOT NULL AUTO_INCREMENT,
 `name` varchar(255) DEFAULT NULL,
 `sex` varchar(10) DEFAULT NULL,
 `address` varchar(255) DEFAULT NULL,
 PRIMARY KEY (`id`)
 ) ENGINE=InnoDB AUTO_INCREMENT=3 DEFAULT
CHARSET=utf8;
 insert  into
`student`(`id`,`name`,`sex`,`address`)
values (1,'百战程序员','男','北京'),(2,'北京尚学堂','女','北京');
2,在pom中添加MyBatis起步依赖和Mysql驱动依赖
java
<dependencies>
 <dependency>
 <groupId>org.springframework.boot</groupId>
 <artifactId>spring-boot-starter
web</artifactId>
 </dependency>
 <!-- mybatis起步依赖 -->
 <dependency>
 <groupId>org.mybatis.spring.boot</groupId>
 <artifactId>mybatis-spring-boot
starter</artifactId>
 <version>3.0.2</version>
 </dependency>
 <!-- mysql依赖 -->
 <dependency>
 <groupId>com.mysql</groupId>
 <artifactId>mysql-connector
j</artifactId>
 <scope>runtime</scope>
 </dependency>
 <dependency>
 <groupId>org.springframework.boot</groupId>
 <artifactId>spring-boot-starter
test</artifactId>
 <scope>test</scope>
 </dependency>
 <!-- mybatis测试起步依赖 -->
 <dependency>
 <groupId>org.mybatis.spring.boot</groupId>
 <artifactId>mybatis-spring-boot
starter-test</artifactId>
 <version>3.0.2</version>
 <scope>test</scope>
 </dependency>
 </dependencies>
3,编写实体类
java
 public class Student {
 private int id;
 private String name;
 private String sex;
 private String address;
 // 省略构造方法/getter/setter/tostring
 }
4,编写Mapper接口
java
@Mapper
 public interface StudentMapper {
 List<Student> findAll();
 5
 @Select("select * from student where id
= #{id}")
 Student findById(int id);
 }
5,编写Mapper映射文件
XML
 <?xml version="1.0" encoding="UTF-8"?>
 <!DOCTYPE mapper
 PUBLIC "-//mybatis.org//DTD Mapper
3.0//EN"
 "http://mybatis.org/dtd/mybatis-3
mapper.dtd">
 <mapper
namespace="com.itbaizhan.springbootmybatis.m
 apper.StudentMapper">
 <select id="findAll"
resultType="student">
        select * from student
 </select>
 </mapper>
6,编写配置文件
java
# 配置数据源
spring:
  datasource:
    driver-class-name:
com.mysql.cj.jdbc.Driver
    url: jdbc:mysql:///student?
 serverTimezone=UTC
    username: root
    password: root
 #mybatis配置
mybatis:
 # 映射文件位置
  mapper-locations:
com/itbaizhan/springbootdemo7/mapper/*Mapper.xml
 # 别名
  type-aliases-package:
com.itbaizhan.springbootdemo7.pojo
 logging:
  pattern:
    console: '%d{HH:mm:ss.SSS}
%clr(%-5level) ---  [%-15thread]
%cyan(%-50logger{50}):%msg%n'
十二,SpringBoot单元测试
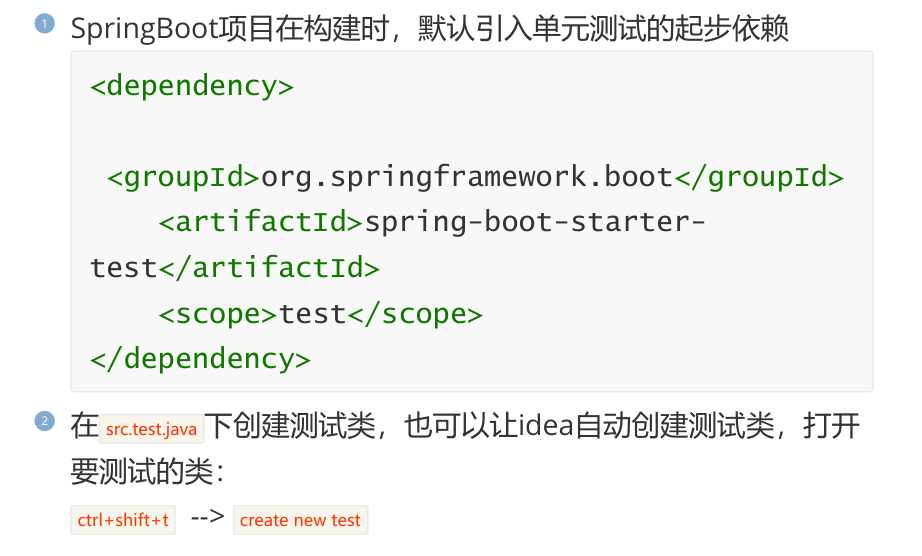
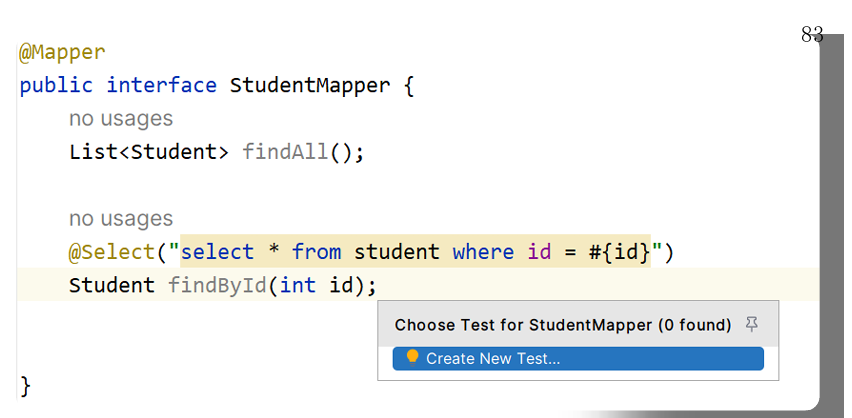
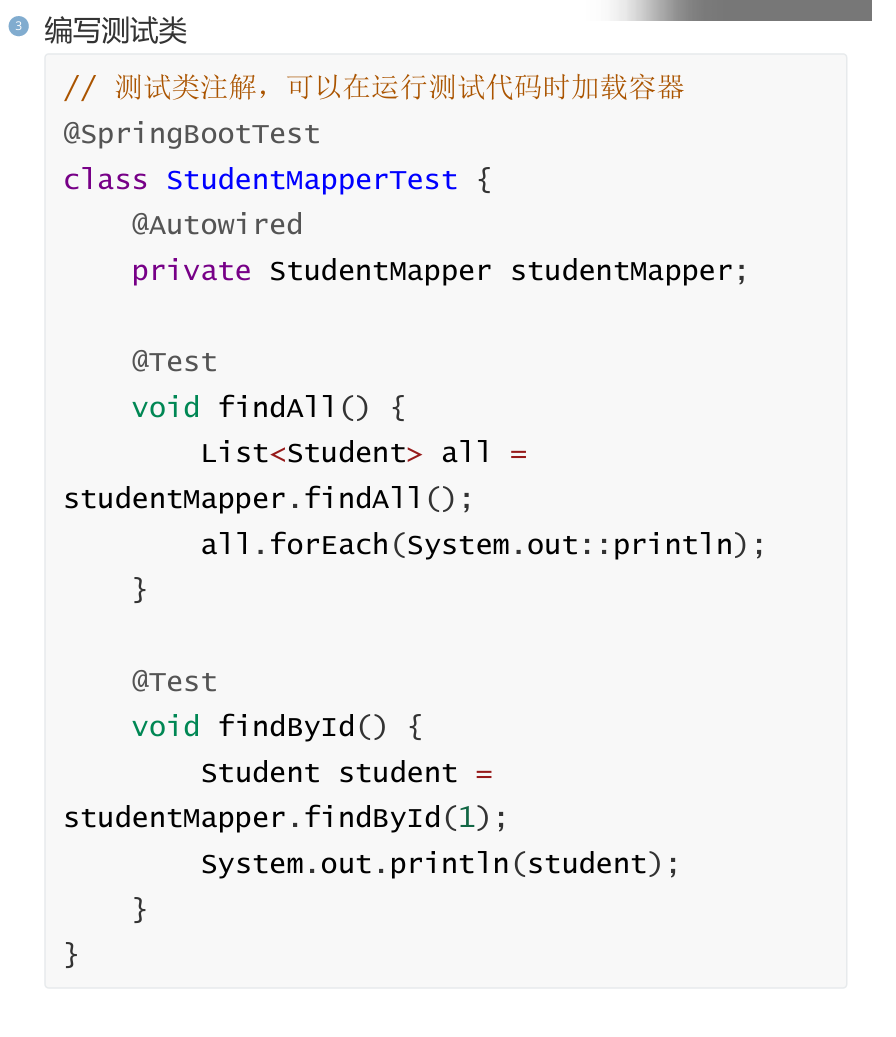
写了MyBatis相关代码后,我们要测试MyBatis代码是否正确。需要进行单元测试。SpringBoot单元测试要比Spring更简单。
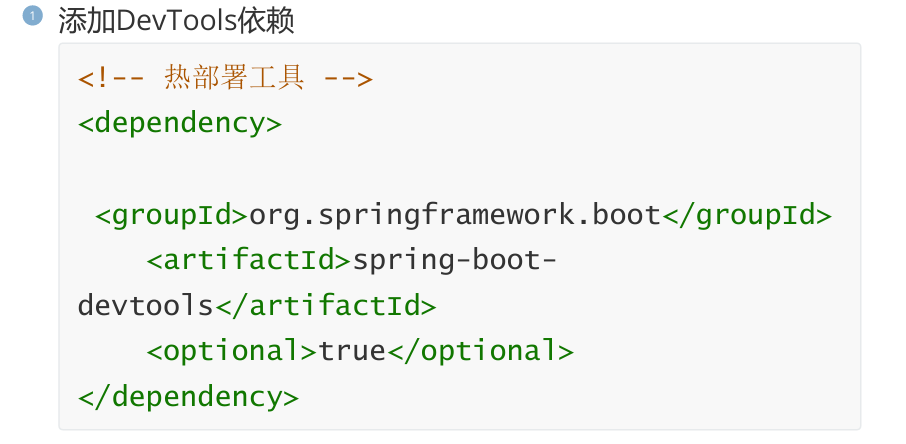
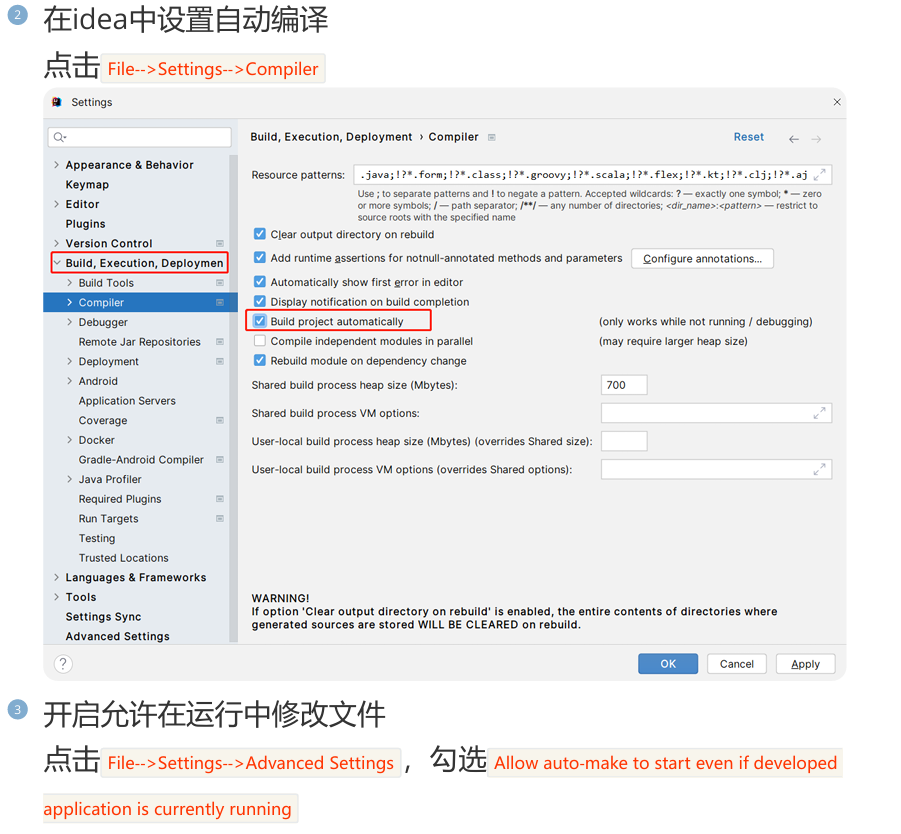
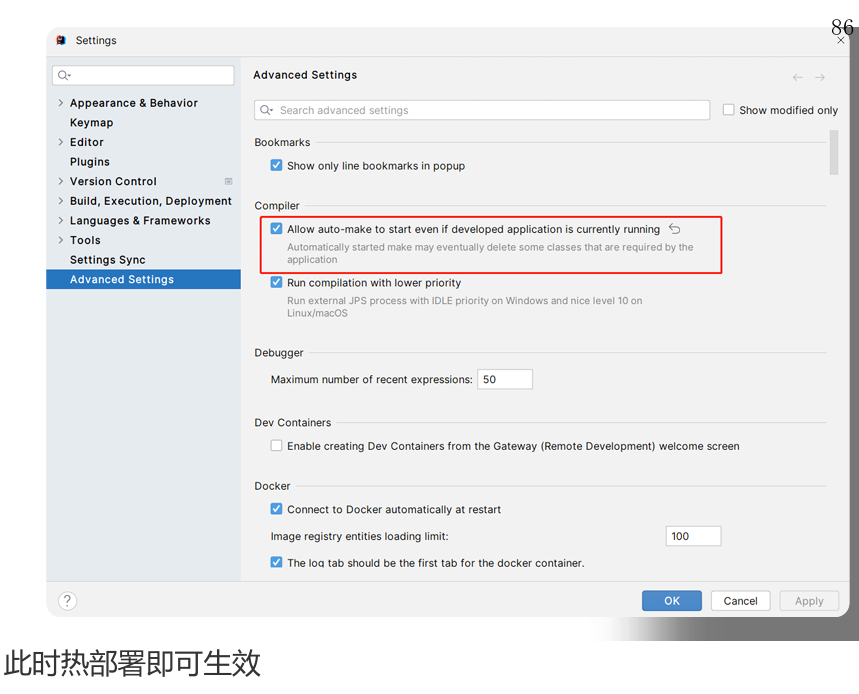
十三,SpringBoot热部署

热部署,就是在应用正在运行的时候升级软件,却不需要重新启动应用。即修改完代码后不需要重启项目即可生效。在SpringBoot 中,可以使用DevTools工具实现热部署
十四,SpringBoot定时任务
定时任务即系统在特定时间执行一段代码。Spring Boot默认已经整合了Spring Task定时任务,只需要添加相应的注解即可完成。
1,在启动类中加入 @EnableScheduling 注解即可开启定时任务
java
@SpringBootApplication
 @EnableScheduling
 public class Demo1Application {
 public static void main(String[] args) {
 SpringApplication.run(Demo1Application.class, args);
    }
 }
2,编写定时任务
java
 @Component
 public class MyTask {
 // 定时任务方法,每秒执行一次
@Scheduled(cron="* * * * * *")
 public void task1() {
 SimpleDateFormat sdf = new SimpleDateFormat("HH:mm:ss");
 System.out.println(sdf.format(new Date()));
    }
 }
3,启动项目,定时任务方法按照配置定时执行。
十五,SpringBoot内容协商机制
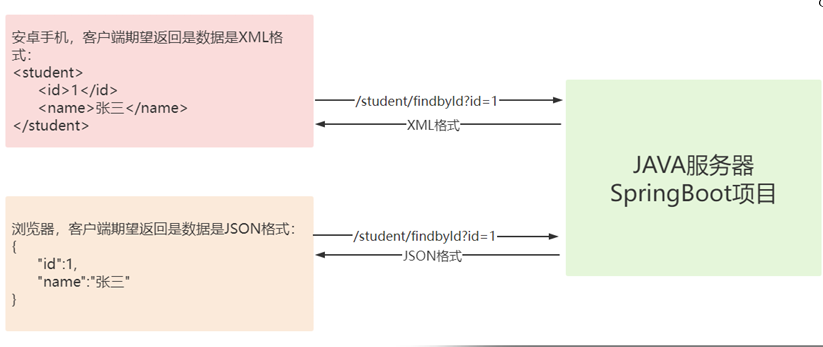
如果我们的Java服务为浏览器和安卓手机同时提供服务,浏览器期望接受的请求是JSON格式,安卓客户端期望接收的请求是XML格式,这个时候是否需要写两个方法?
不需要!SpringBoot的内容协商机制可以解决这个问题。
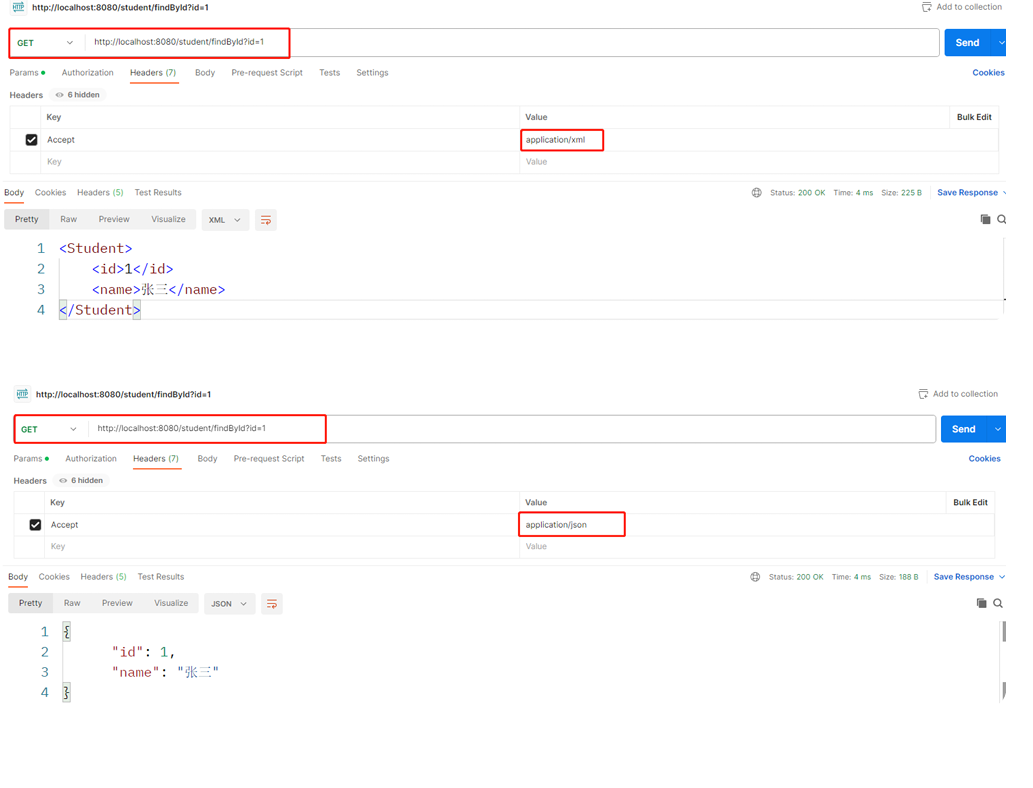
内容协商机制:根据客户端接收能力不同,SpringBoot 返回不同媒体类型的数据。
Spring默认支持内容协商机制,但SpringBoot默认只支持返回Json 数据,所以需要导入 jackson-dataformat-xml 让SpringBoot支持返回xml数据
1,引入依赖
html
<!-- 引入支持返回 xml 数据格式 -->
 <dependency>
 <groupId>com.fasterxml.jackson.dataformat</groupId>
 <artifactId>jackson-dataformat-xml</artifactId>
 </dependency>
2,编写控制器
java
@Controller
 public class ConsultController {
 @Autowired
 private StudentMapper studentMapper;
 @RequestMapping("/student/findById")
 @ResponseBody
 public Student findById(Integer id){
 Student student = studentMapper.findById(id);
 return student;
    }
 }
3,进行测试,SpringBoot的内容协商机制是根据请求头不同,返回不同格式的数据,所以需要我们能够修改请求头,我们使用 postman进行测试:
基于请求参数
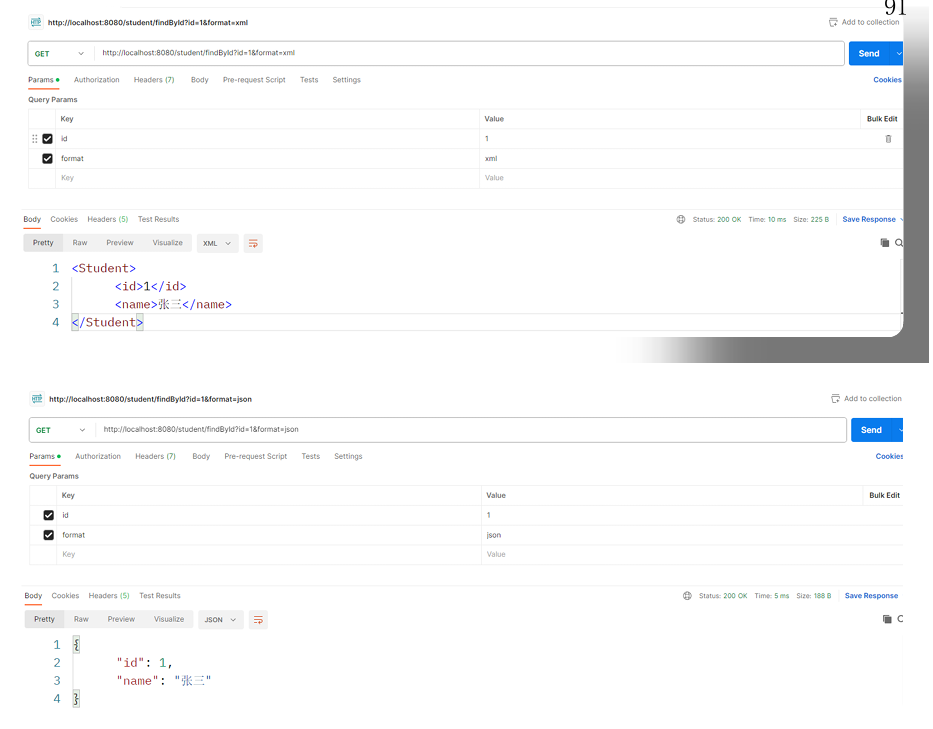
SpringBoot默认根据请求头不同,返回不同的数据格式。我们还可以配置基于请求参数的内容协商,也就是请求参数值不同,返回不同的数据:
1,配置SpringBoot基于请求参数的内容协商
java
#开启请求参数内容协商模式
spring.mvc.contentnegotiation.favor-parameter=true
 #请求参数内容协商模式的参数名
spring.mvc.contentnegotiation.parameter-name=format
2,在postman进行测试
十六,SpringBoot国际化
国际化:(Internationalization 简称 I18n,其中"I"和"n"分别为首末字符,18 则为中间的字符数)。是指软件能同时应对不同国家和 地区的用户访问,并根据用户地区和语言习惯,提供相应的、符合用具阅读习惯的页面和数据,例如,为中国用户提供汉语界面显 示,为美国用户提供英语界面显示。接下来我们来说一下在 SpringBoot项目中,如何进行国际化配置:
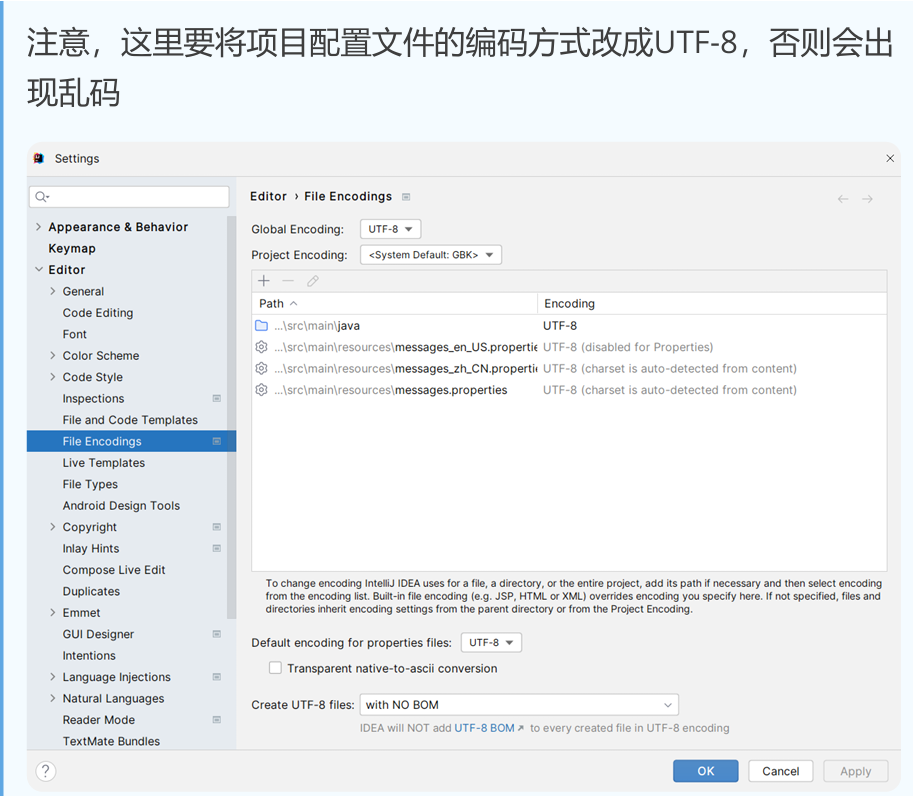
1,编写国际化资源文件
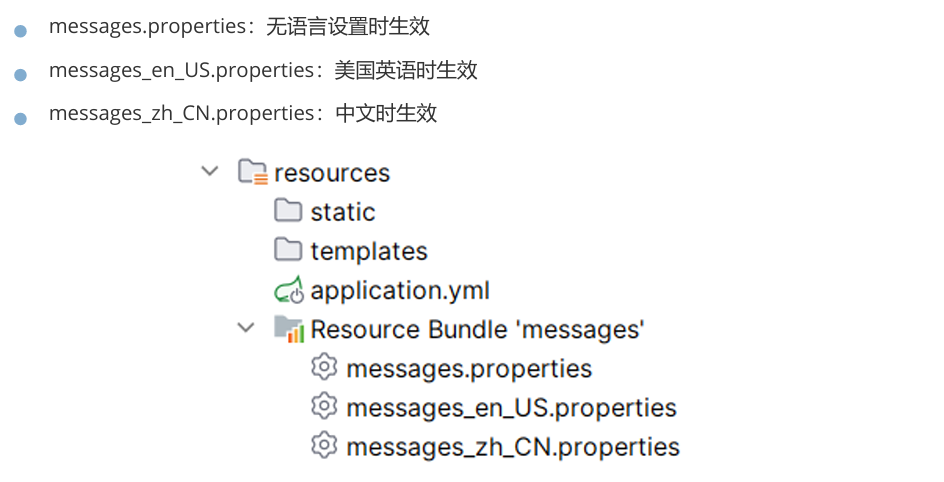
SpringBoot国际化资源文件的文件名规范为:基本名_语言代码_国家或地区代码。例如:

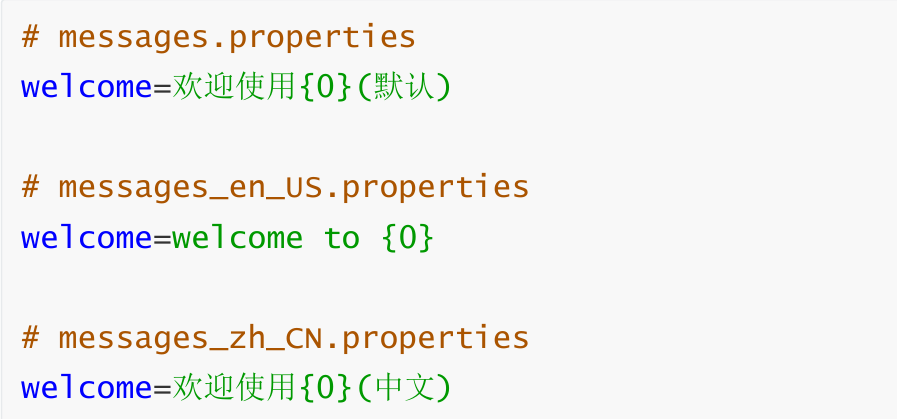
我们在 src/main/resources中,按照国际化资源文件命名格式分别创建以下三个文件:
编写三个文件:
2,在配置文件指定国际资源文件的基本名

3,编写控制器
java
@Controller
 public class I18nController {
 @Autowired
 private MessageSource messageSource;
 @RequestMapping("/welcome")
 @ResponseBody
 public String welcome(HttpServletRequest request) {
 // 获取请求来源的地区
Locale locale = request.getLocale();
 /**
 * 使用国际化
* 第一个参数是国际化文件的key,
* 第二个参数value中的占位符数据
* 第三个是区域
*/
 String welcome = messageSource.getMessage("welcome", new Object[]{"springboot"}, locale);
 return welcome;
    }
 }
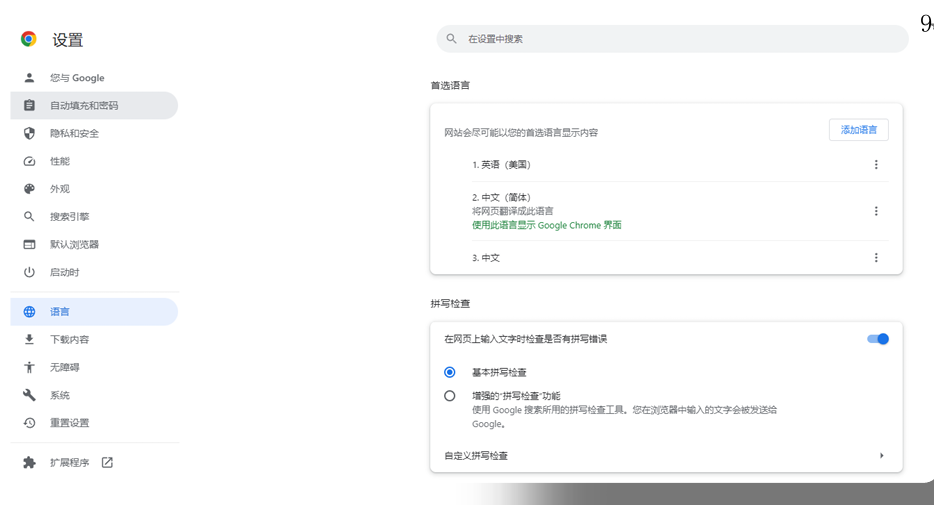
4,在浏览器测试国际化
先在默认情况下访问 /welcome ,之后切换浏览器环境,再次访问/welcome
在Thymeleaf中进行国家化
html
 <!DOCTYPE html>
 <html xmlns:th="http://www.thymeleaf.org">
 <head>
 <meta charset="UTF-8"/>
 <title>Title</title>
 </head>
 <body>
 <h1 th:text="#{welcome('springboot')}">欢迎</h1>
 <h1>[[#{welcome('springboot')}]]</h1>
 </body>
 </html>
十七,SpringBoot参数就校验
1,简单数据类型

1,引入vaildation起步依赖
html
 <!-- 参数校验 -->
 <dependency>
 <groupId>org.springframework.boot</groupId>
 <artifactId>spring-boot-starter-validation</artifactId>
 </dependency>
2,编写Controller
java
 // 该控制器开启参数校验
@Validated
 @Controller
 public class TestController {
 @RequestMapping("/t1")
 @ResponseBody
 // 在参数前加校验注解,该注解的意思是字符串参数不能为null
 public String t1(@NotBlank String username){
 System.out.println(username);
 return "请求成功!";
    }
 }
3,访问 http://localhost:8080/t1,发现当没有传来参数时,会抛 出ConstraintViolationException 异常。
4,在校验参数的注解中添加 message 属性,可以替换异常信息。
java
 // 该控制器开启参数校验
@Validated
 @Controller
 public class TestController {
 @RequestMapping("/t1")
 @ResponseBody
 // 在参数前加校验注解,该注解的意思是字符串参数不能为null
 public String t1(@NotBlank(message = "用户名不能为空") String username){
 System.out.println(username);
 return "请求成功!";
    }
 }
2,异常处理

当抛出 ConstraintViolationException 异常后,我们可以使用SpringMVC的异常处理器,也可以使用SpringBoot自带的异常处理机制。
当程序出现了异常,SpringBoot会使用自带的 BasicErrorController 对象处 理异常。该处理器会默认跳转到/resources/templates/error.html 页面。
编写异常页面:
html
<!DOCTYPE html>
 <html lang="en">
 <head>
 <meta charset="UTF-8">
 <title>错误页面</title>
 </head>
 <body>
 <h1>服务器开小差了!</h1>
 </body>
 </html>
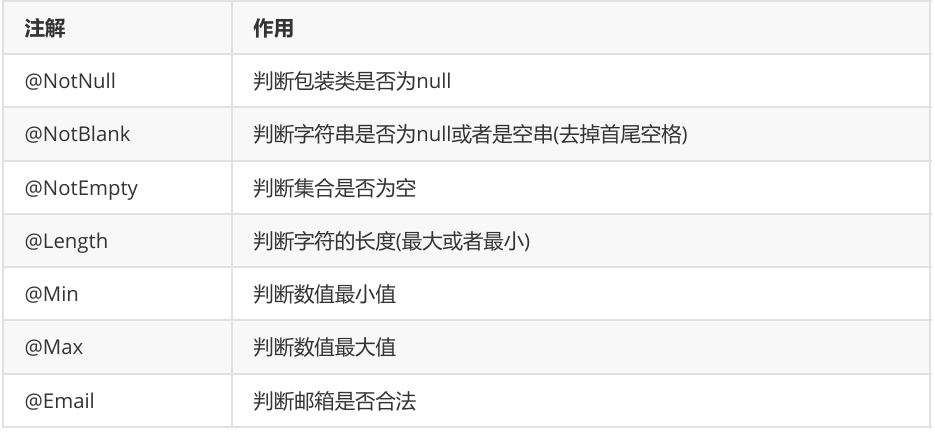
3,校验相关注解
java
 @RequestMapping("/t2")
 @ResponseBody
 public String t2(
 @NotBlank @Length(min = 1, max = 5)
String username,
 @NotNull @Min(0) @Max(150) Integer age,
 @NotEmpty @RequestParam List<String> address,
 @NotBlank @Email String email) {
 System.out.println(username);
 System.out.println(age);
 System.out.println(address);
 System.out.println(email);
 return "请求成功!";
 }
4,对象类型

1,添加实体类
java
public class Student {
 @NotNull(message = "id不能为空")
 private Integer id;
 @NotBlank(message = "姓名不能为空")
 private String name;
 // 省略getter/setter/tostring
 }
2,编写控制器
java
@Controller
 public class TestController2 {
 @RequestMapping("/t3")
 @ResponseBody
 // 校验的对象参数前添加@Validated,并将异常信息封装到BindingResult对象中
public String t3(@Validated Student student,BindingResult result) {
 // 判断是否有参数异常
if (result.hasErrors()) {
 // 所有参数异常
List<ObjectError> list = result.getAllErrors();
 // 遍历参数异常,输出异常信息
for (ObjectError err : list) {
 FieldError fieldError = (FieldError) err;
 System.out.println(fieldError.getDefaultMessage());
            }
 return "参数异常";
        }
 System.out.println(student);
 return "请求成功!";
    }
 }
十八,SpringBoot指标监控
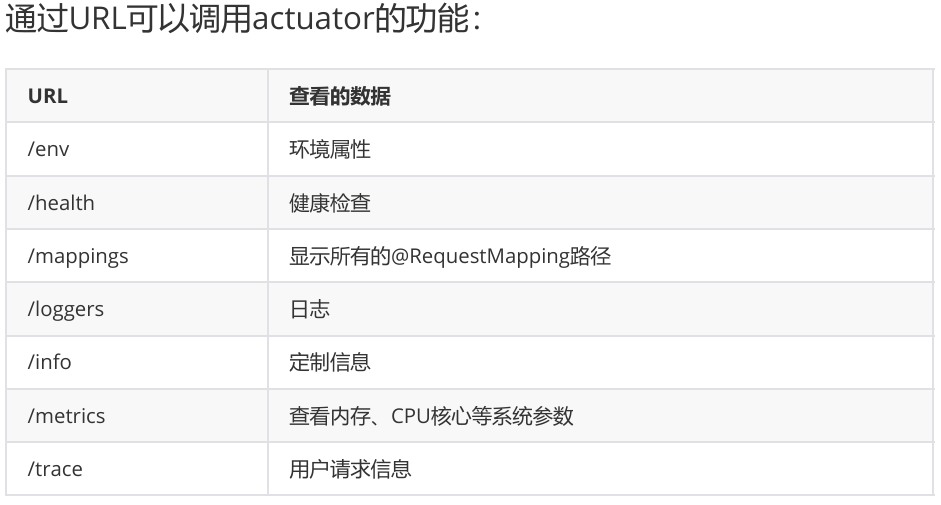
1,添加Actuator功能

Spring Boot Actuator可以帮助程序员监控和管理SpringBoot应用,比如健康检查、内存使用情况统计、线程使用情况统计等。我们在SpringBoot项目中添加Actuator功能,即可使用Actuator监控项目,用法如下:
1,在被监控和的项目中添加Actuator起步依赖
html
<dependency>
 <groupId>org.springframework.boot</groupId>
 <artifactId>spring-boot-starter
actuator</artifactId>
 </dependency>
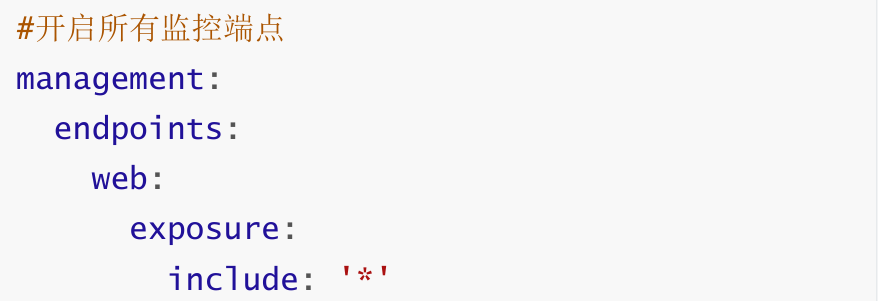
2,编写配置文件
3,访问项目

2,Spring Boot Admin
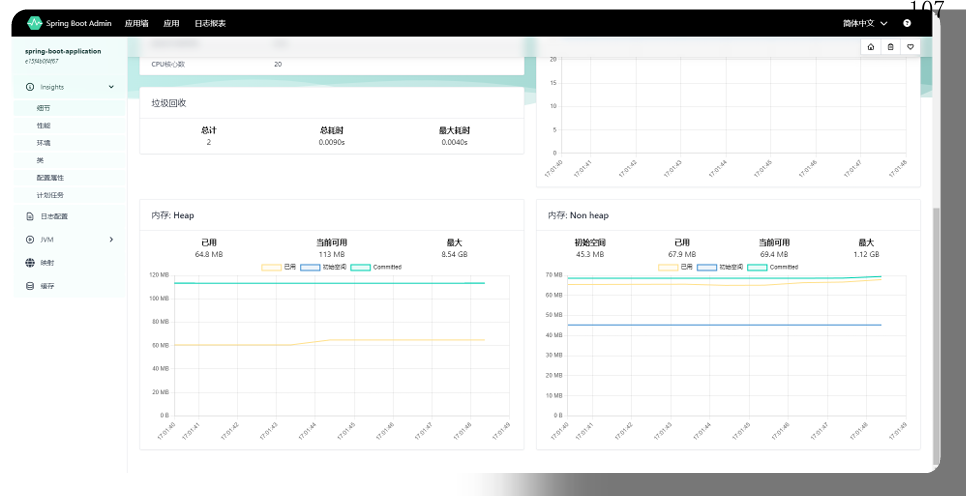
Actuator使用JSON格式展示了大量指标数据,不利于我们查看,我们可以使用可视化工具Spring Boot Admin查看actuator生成指标数据。Spring Boot Admin是一个独立的项目,我们需要创建并运 行该项目。
创建Spring Boot Admin服务端项目
1,创建SpringBoot项目,添加SpringMVC和Spring Boot Admin服务端起步依赖
html
<dependency>
 <groupId>org.springframework.boot</groupId>
 <artifactId>spring-boot-starter
web</artifactId>
 </dependency>
 <dependency>
 <groupId>de.codecentric</groupId>
 <artifactId>spring-boot-admin-starter
server</artifactId>
 <version>3.1.3</version>
 </dependency>
2,修改配置文件
html
# 端口号
server.port=9090
 # 日志格式
logging.pattern.console=%d{HH:mm:ss.SSS}
%clr(%-5level) ---  [%-15thread]
%cyan(%-50logger{50}):%msg%n
3,修改启动类
java
@SpringBootApplication
 @EnableAdminServer //开启Spring Boot Admin服务端
public class MyadminApplication {
 public static void main(String[] args) {
 SpringApplication.run(MyadminApplication.class, args);
    }
 }
连接Spring Boot Admin项目
在被监控的项目中连接Spring Boot Admin项目,才能使用SpringBoot Admin查看指标数据。
1,被监控项目添加Spring Boot Admin客户端起步依赖
html
<dependency>
 <groupId>de.codecentric</groupId>
 <artifactId>spring-boot-admin-starter-client</artifactId>
 <version>3.1.3</version>
 </dependency>
2,修改配置文件
html
 #Spring boot admin访问地址
spring.boot.admin.client.url=http://localhost:9090
3,此时Spring Boot Admin即可连接被监控的项目
十九,SpringBoot日志管理
1,Logback
SpringBoot默认使用Logback组件作为日志管理。Logback是log4j 创始人设计的一个开源日志组件。在SpringBoot中已经整合了 Logback的依赖,所以我们不需要额外的添加其他依赖:
Logback配置用法如下:
1,在 /resources 下添加Logback配置文件logback.xml
XML
 <?xml version="1.0" encoding="UTF-8" ?>
 <configuration>
 <!--定义日志文件的存储地址-->
 <property name="LOG_HOME"
value="${catalina.base}/logs/"/>
 <!-- 控制台输出 -->
 <appender name="Stdout"
class="ch.qos.logback.core.ConsoleAppender">
 <!-- 日志输出编码 -->
 <layout
class="ch.qos.logback.classic.PatternLayout">
 <!--格式化输出:%d表示日期,%thread表示
线程名,%-5level:级别从左显示5个字符宽度%msg:日志消
息,%n是换行符-->
 <pattern>%d{MM-dd HH:mm:ss.SSS}
[%thread] %-5level %logger{50} - %msg%n
 </pattern>
 </layout>
 </appender>
 <!-- 按照每天生成日志文件 -->
 <appender name="RollingFile"
class="ch.qos.logback.core.rolling.RollingFileA
 ppender">
 <rollingPolicy
class="ch.qos.logback.core.rolling.TimeBasedRollingPolicy">
 <!--日志文件输出的文件名-->
 <FileNamePattern>${LOG_HOME}/server.%d{yy99
MM-dd}.log</FileNamePattern>
 <MaxHistory>30</MaxHistory>
 </rollingPolicy>
 <layout
class="ch.qos.logback.classic.PatternLayout">
 <!--格式化输出:%d表示时间,%thread表示
线程名,%-5level:级别从左显示5个字符宽度%msg:日志消
息,%n是换行符-->
 <pattern>%d{HH:mm:ss.SSS} [%thread] %-5level %logger{50} - %msg%n
 </pattern>
 </layout>
 <!--日志文件最大的大小-->
 <triggeringPolicy
class="ch.qos.logback.core.rolling.SizeBasedTriggeringPolicy">
 <MaxFileSize>10MB</MaxFileSize>
 </triggeringPolicy>
 </appender>
 <!-- 日志输出级别 -->
 <root level="info">
 <appender-ref ref="Stdout"/>
 <appender-ref ref="RollingFile"/>
 </root>
 </configuration>
2,打印自定义日志
如果想在运行时打印自定义日志,只需要引入Logger对象即可:
java
@Controller
 public class LogbackController {
 private final static Logger logger = LoggerFactory.getLogger(LogbackController.class);
 @RequestMapping("/printLog")
 @ResponseBody
 public String showInfo(){
 logger.info("记录日志");
 return "Hello Logback";
    }
}
如果日志过多,可以屏蔽一些包的日志,在配置文件中配置
java
#屏蔽org包中的日志输出
logging.level.org=off
3,Log4j2安全漏洞
二十,SpringBoot项目部署
1,项目打包
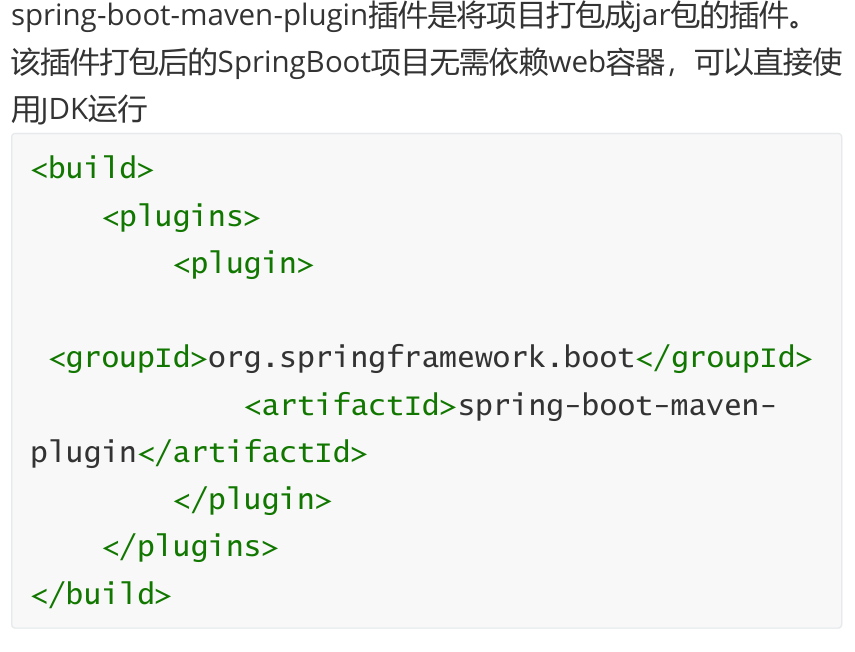
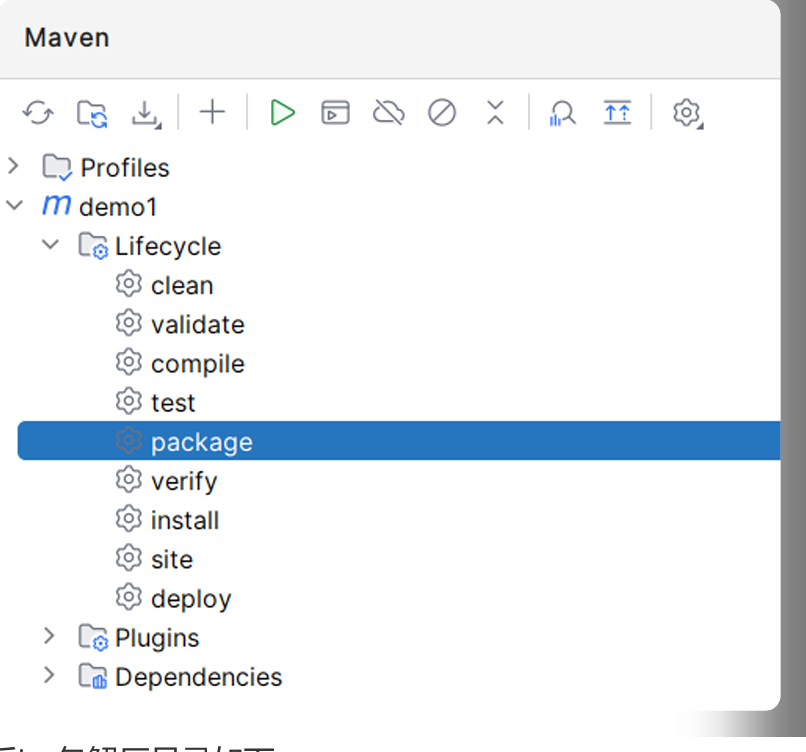
SpringBoot项目是依赖于Maven构建的,但打包时如果只依赖 Maven打包工具则会打包不完整,我们还需要在SpringBoot项目中引入SpringBoot打包插件 :
html
<build>
 <plugins>
 <plugin>
 <groupId>org.springframework.boot</groupId>
 <artifactId>spring-boot-maven-plugin</artifactId>
 </plugin>
 </plugins>
 </build>
此时再使用Maven插件打包:
打包后jar包解压目录如下:

如果不添加SpringBoot打包插件,打包后jar包解压目录如下:

可以看到该目录少了BOOT-INF,打包是不完整的,也无法运行jar包

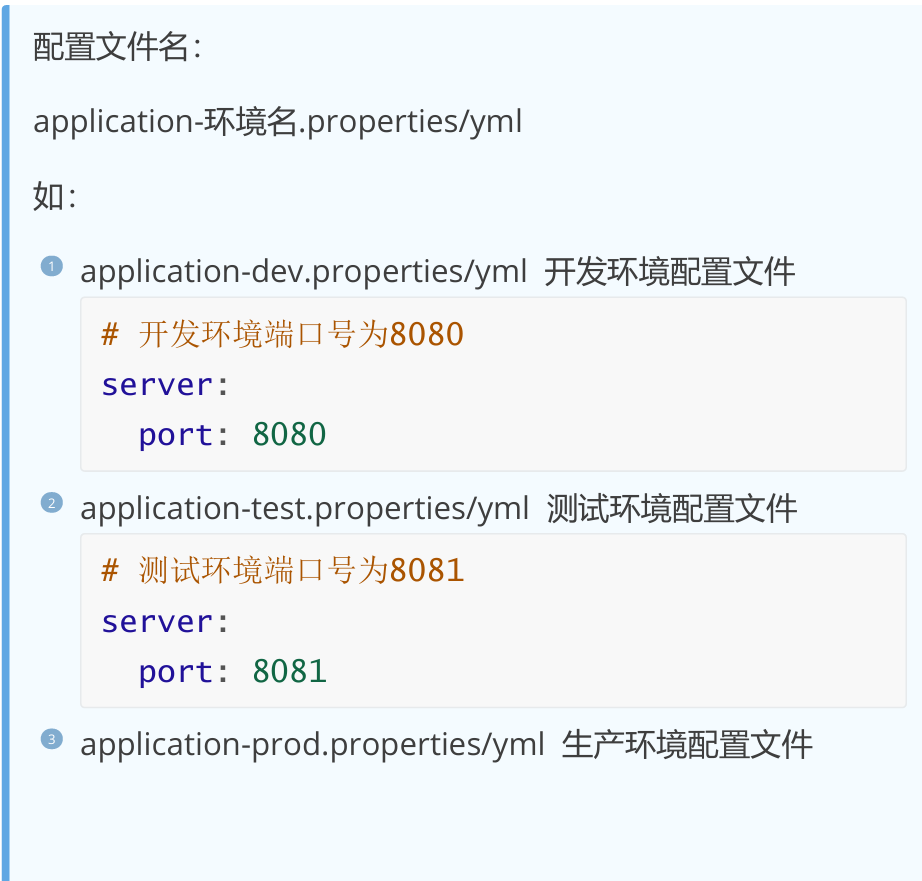
2,多环境配置



3,Dockerfile制作镜像
1,准备一台centos7系统的虚拟机,连接虚拟机。
2,关闭虚拟机防火墙

3,安装Docker

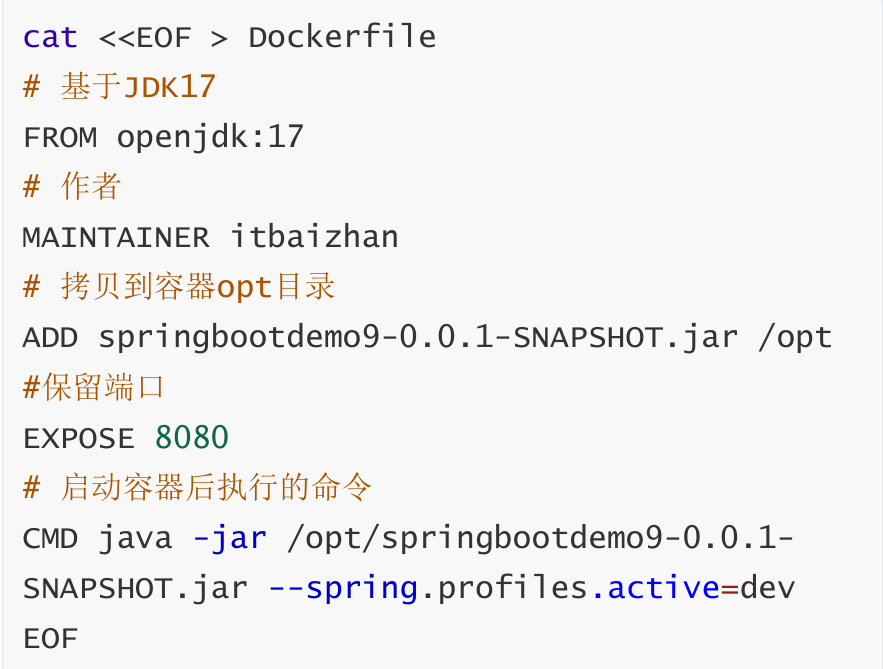
4,由于SpringBoot中嵌入了Web容器,所以在制作SpringBoot项目的镜像时无需依赖Web容器,基于JDK制作镜像即可,接下来我们使用Dockerfile制作镜像:
5,进入opt目录

6,使用rz命令将项目jar包上传到虚拟机
7,编写DockerFile
8,构建镜像

9,查看所有的镜像,出现springbootdocker代表镜像构建成功

10,使用镜像启动容器

11,访问项目
4,Maven插件制作镜像
1,开启远程docker服务
XML
# 修改docker配置文件
vim /lib/systemd/system/docker.service
 # 在ExecStart=后添加配置,远程访问docker的端口为
2375
 ExecStart=/usr/bin/dockerd-current -H
tcp://0.0.0.0:2375 -H
unix://var/run/docker.sock \--add-runtime docker
runc=/usr/libexec/docker/docker-runc-current \
--default-runtime=docker-runc \--exec-opt
native.cgroupdriver=systemd \--userland-proxy
path=/usr/libexec/docker/docker-proxy
current \--init
path=/usr/libexec/docker/docker-init-current \--seccomp-profile=/etc/docker/seccomp.json \
 $OPTIONS \
 $DOCKER_STORAGE_OPTIONS \
 $DOCKER_NETWORK_OPTIONS \
 $ADD_REGISTRY \
 $BLOCK_REGISTRY \
 $INSECURE_REGISTRY \
 $REGISTRIES
 # 重启docker
 systemctl daemon-reload
 systemctl restart docker
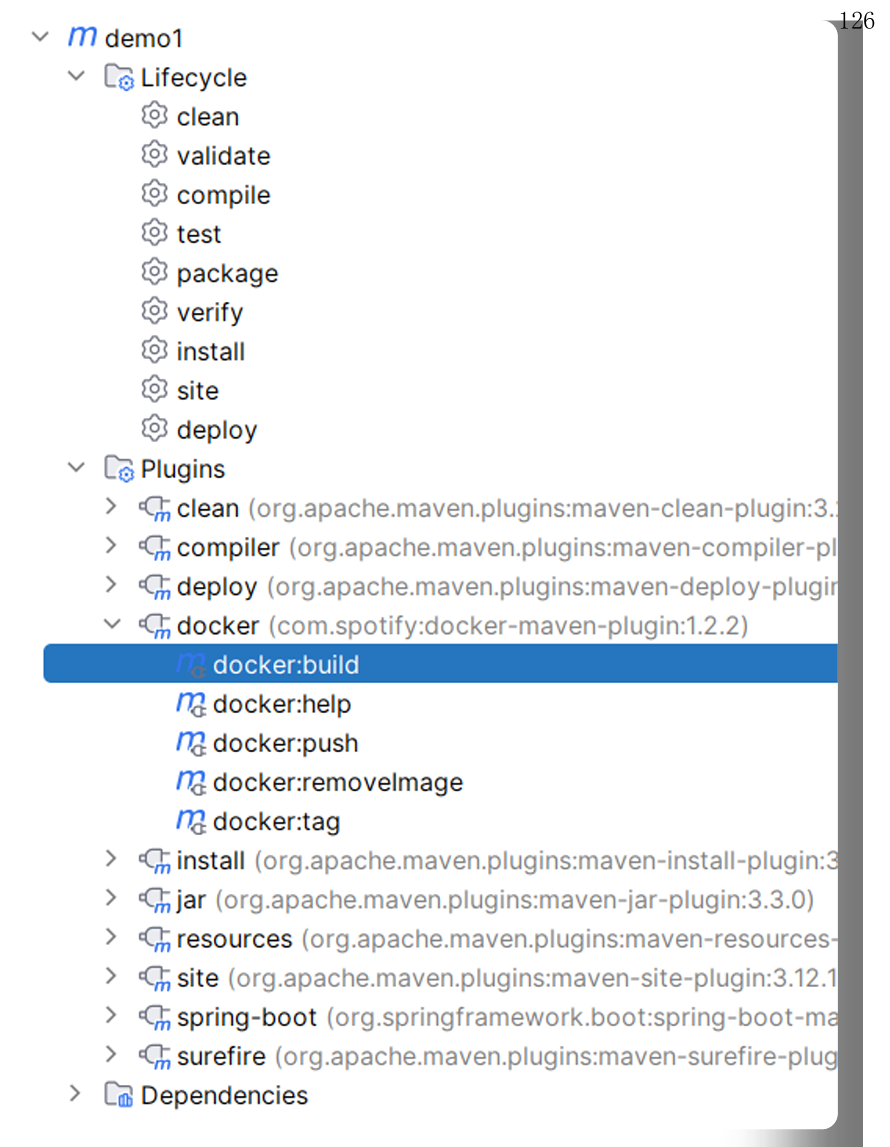
2,在项目的pom文件中添加docker-maven-plugin插件
html
<!-- docker-maven-plugin-->
 <plugin>
 <groupId>com.spotify</groupId>
 <artifactId>docker-maven
plugin</artifactId>
 <version>1.2.2</version>
 <configuration>
 <!-- Docker路径 -->
 <dockerHost>http://192.168.1.25:2375</docke
 rHost>
 <!-- Dockerfile定义 -->
 <baseImage>openjdk:17</baseImage>
 <!-- 作者 -->
 <maintainer>itbaizhan</maintainer>
 <resources>
 <resource>
 <!-- 复制jar包到docker容器指定
目录 -->-->
 <targetPath>/</targetPath>
 <!-- 从哪个包拷贝文件,target包
<directory>${project.build.directory}
 </directory>
 <!-- 拷贝哪个文件 -->
 <include>${project.build.finalName}.jar</in
 clude>
 </resource>
 </resources>
 <workdir>/</workdir>
 <entryPoint>["java", "-jar",
"${project.build.finalName}.jar","-
spring.profiles.active=dev"]</entryPoint>
 <forceTags>true</forceTags>
 <!-- 镜像名 -->
 <imageName>${project.artifactId}
 </imageName>
 <!-- 镜像版本 -->
 <imageTags>
 <imageTag>${project.version}
 </imageTag>
 </imageTags>
 </configuration>
 </plugin>
3,使用maven的package命令给项目打包
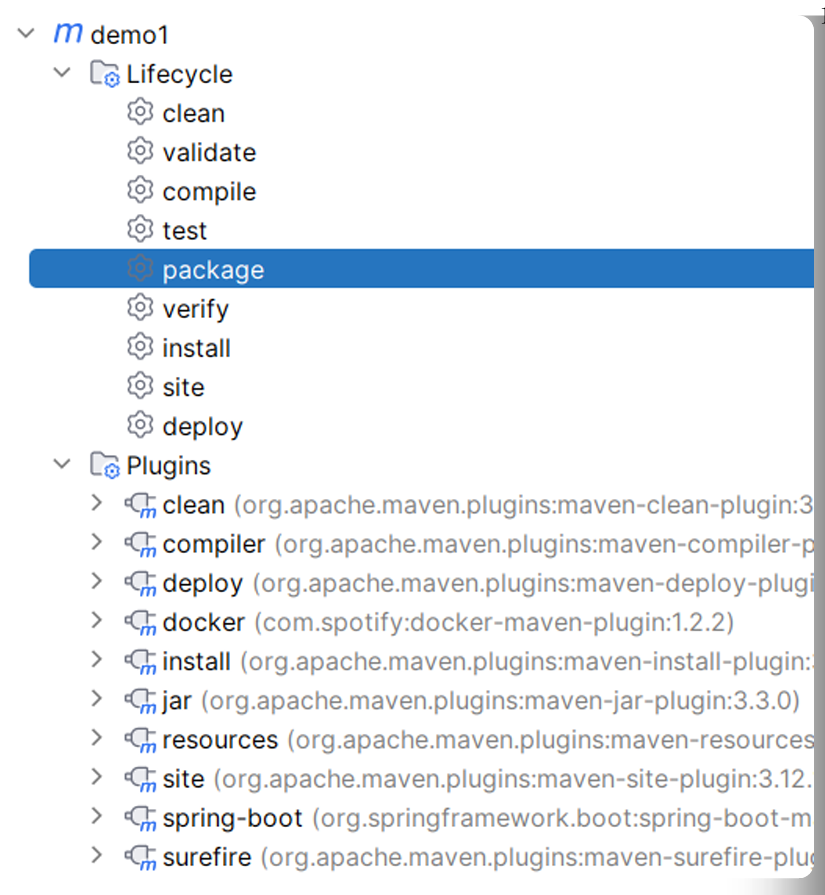
4,使用maven的docker插件制作镜像
5,查看镜像是否构建成功

6,使用镜像启动容器

7,访问项目
二十一,SpringBoot原理分析
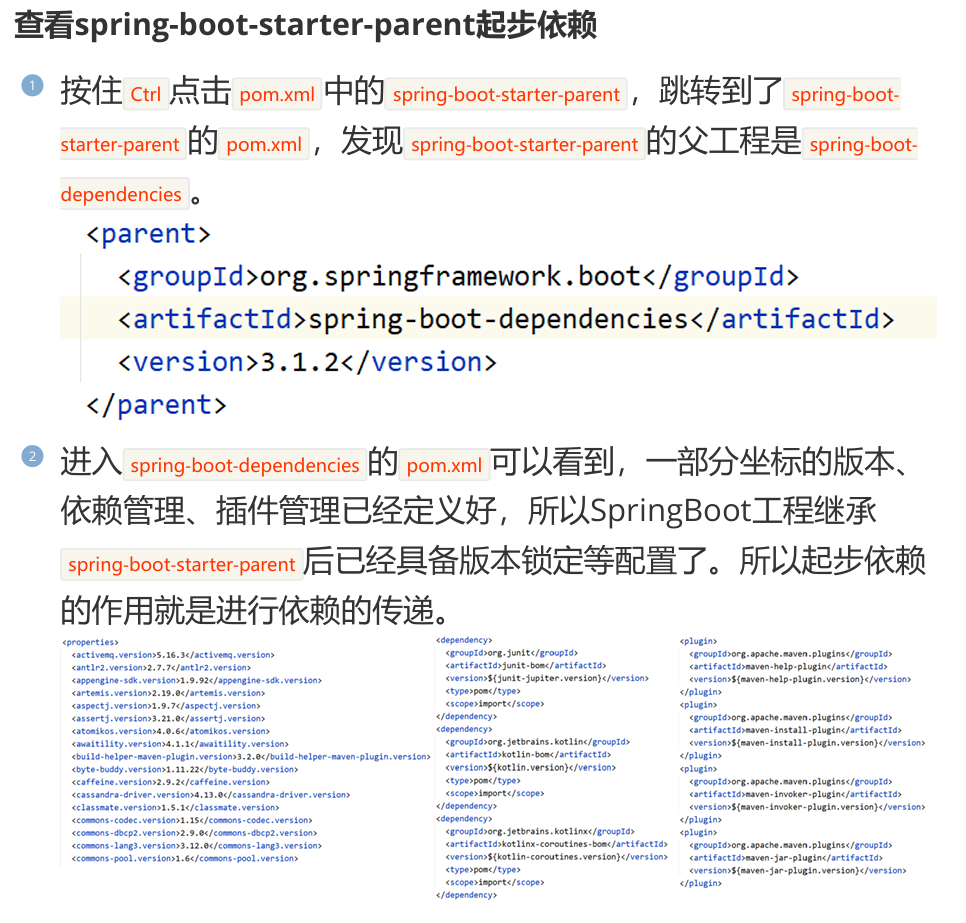
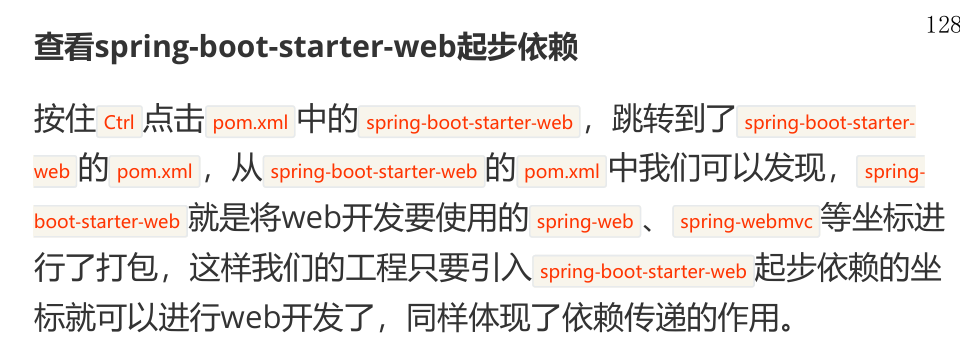
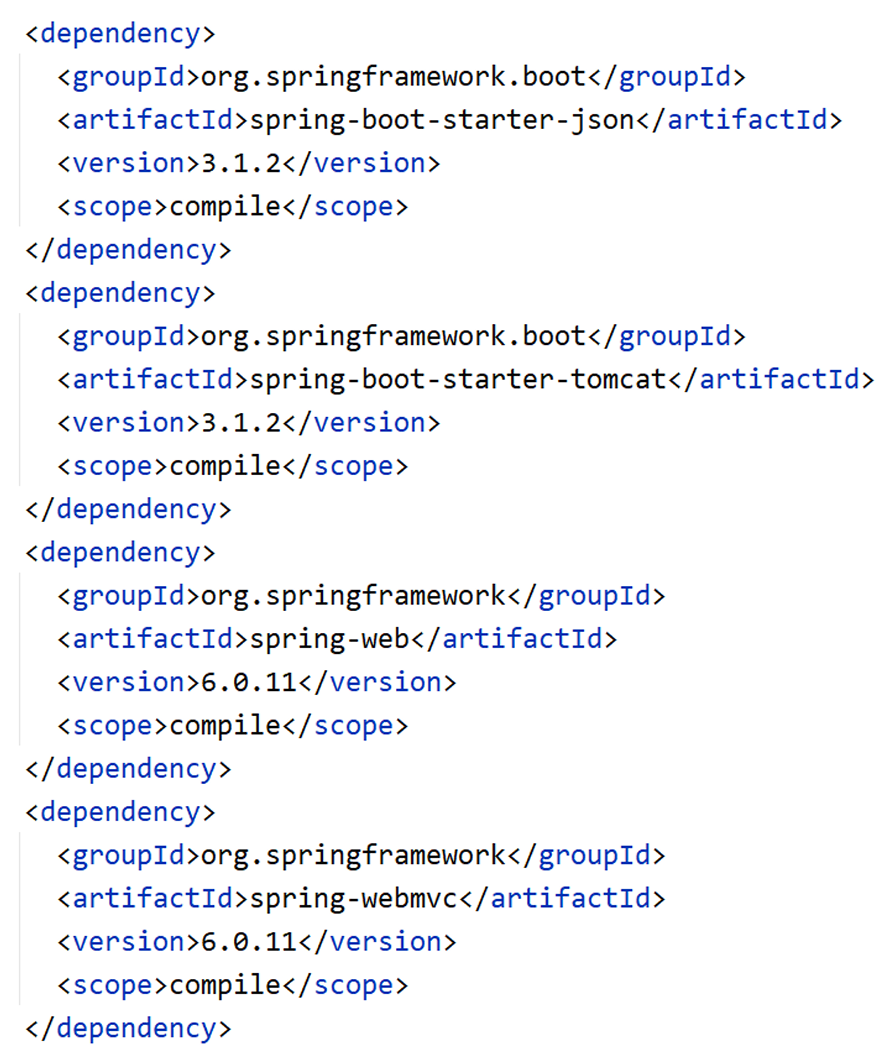
1,,起步依赖
2,自动配置

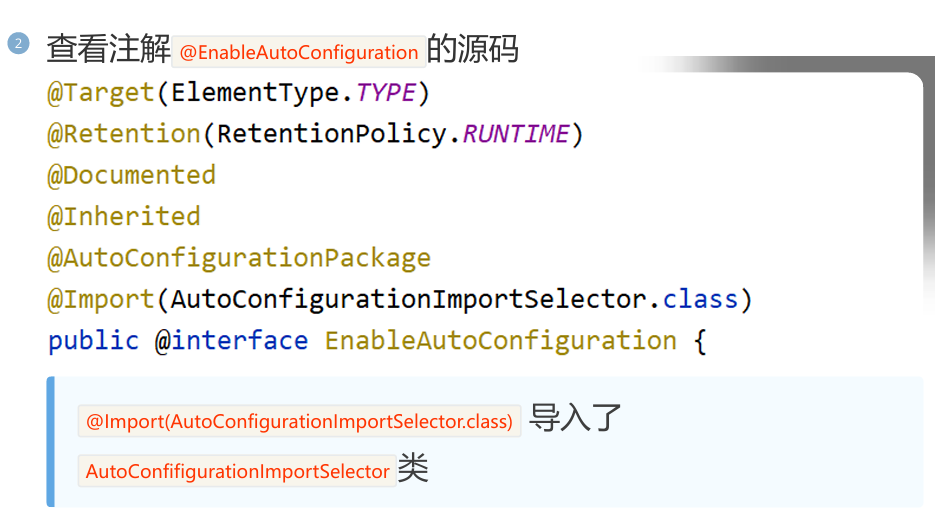
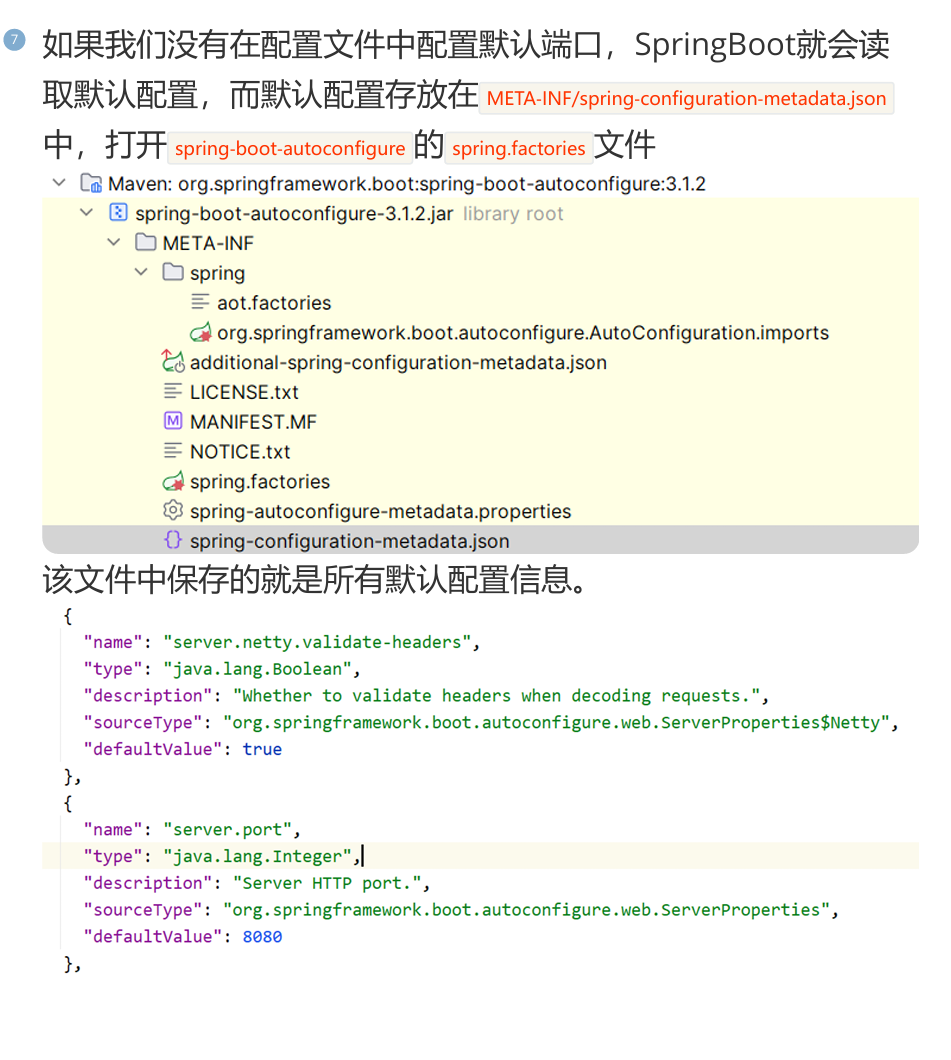
@EnableAutoConfiguration:SpringBoot自动配置功能开启

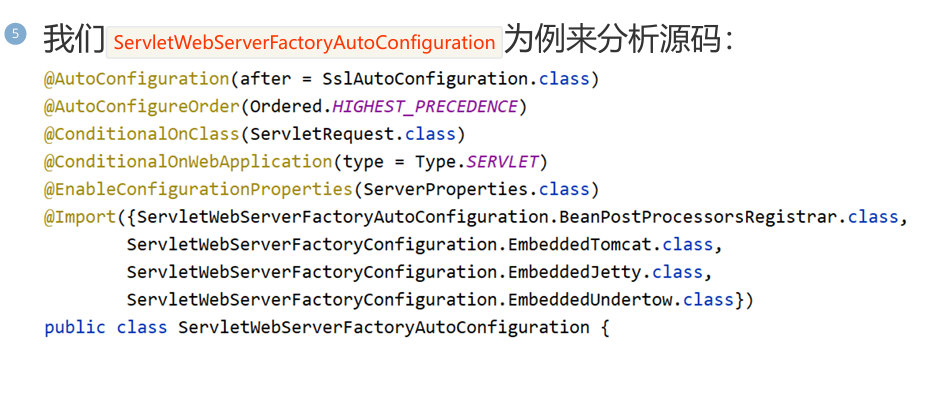
@EnableConfigurationProperties(ServerProperties.class)代表加载ServerProperties服务器配置属性类。

3,核心注解
@SpringBootApplication
标注是SpringBoot的启动类。
此注解等同于 @SpringBootConfiguration + @EnableAutoConfiguration +@ComponentScan
@SpringBootConfiguration
@SpringBootConfiguration 是 @Configuration 的派生注解,跟@Configuration 一致,标注这个类是一个配置类,只不过 @SpringBootConfiguration 是 Springboot的注解,而 @Configuration 是Spring的注解
@EnableAutoConfiguration
SpringBoot自动配置注解。
等同于 @AutoConfigurationPackage + @Import(AutoConfigurationImportSelector.class)
@AutoConfigurationPackage
自动扫描包的注解,它会自动扫描启动类所在包下所有加了注解的 类(@Controller,@Service等),以及配置类(@Configuration)。
@Import({AutoConfigurationImportSelector.class})
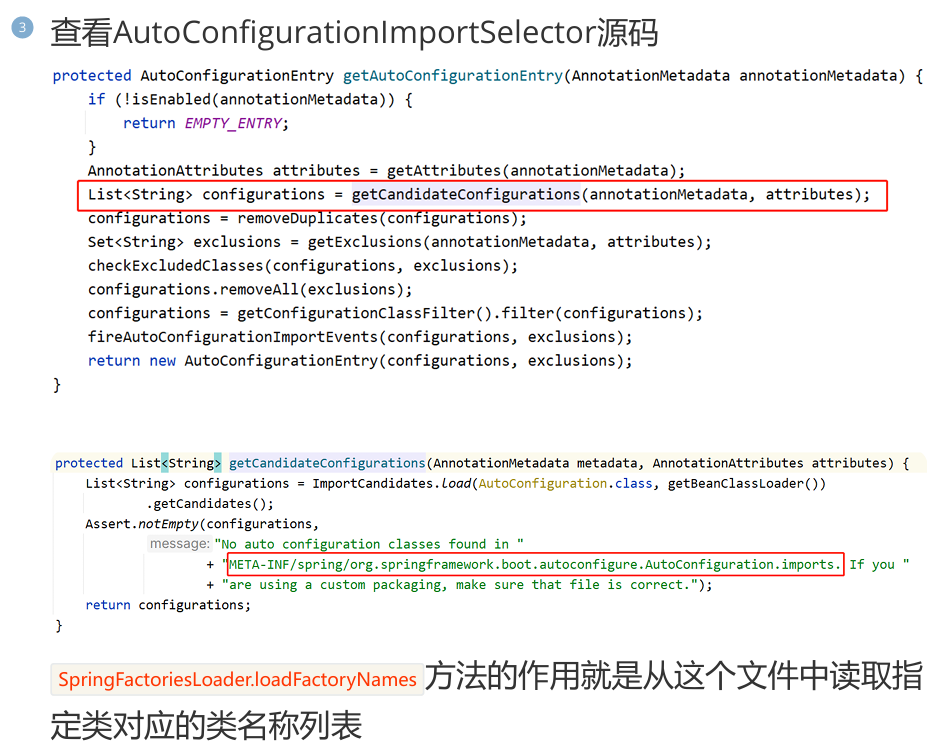
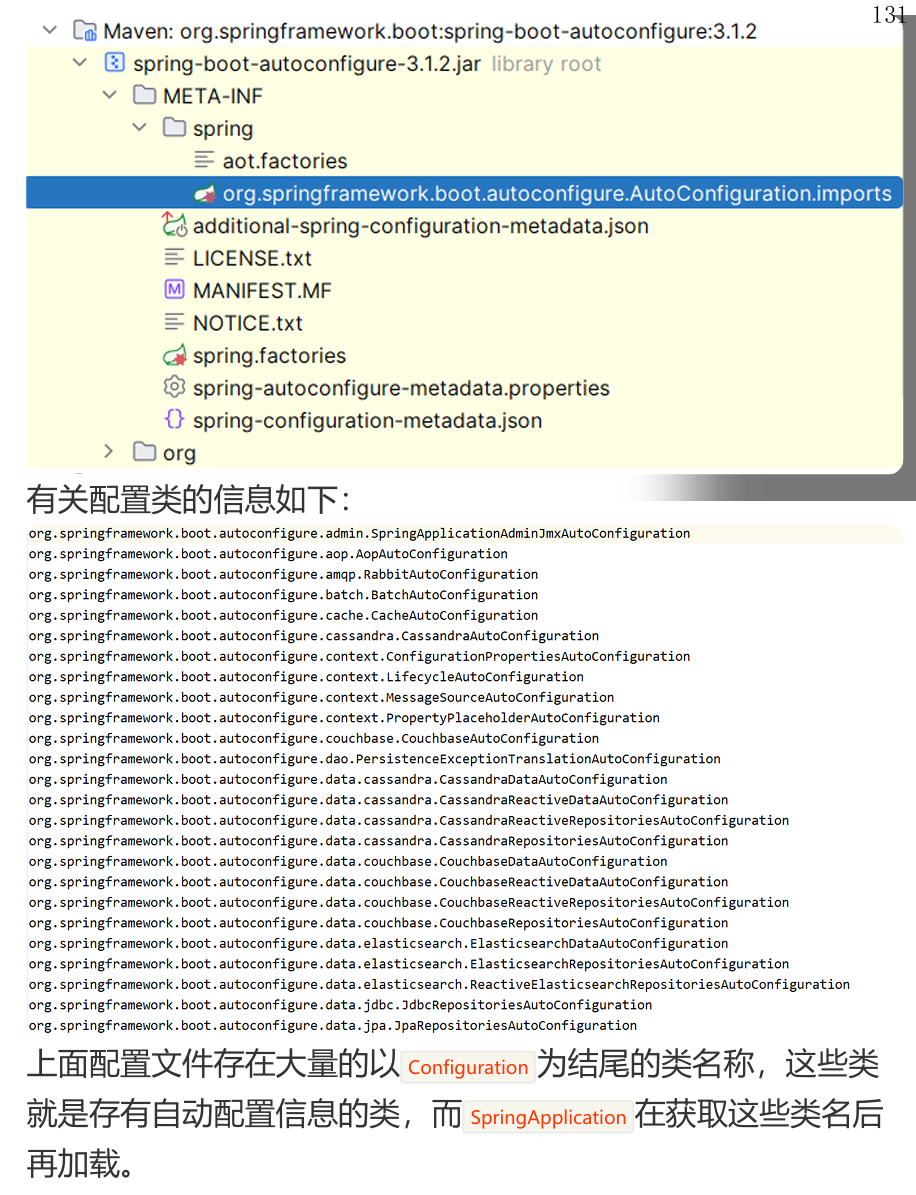
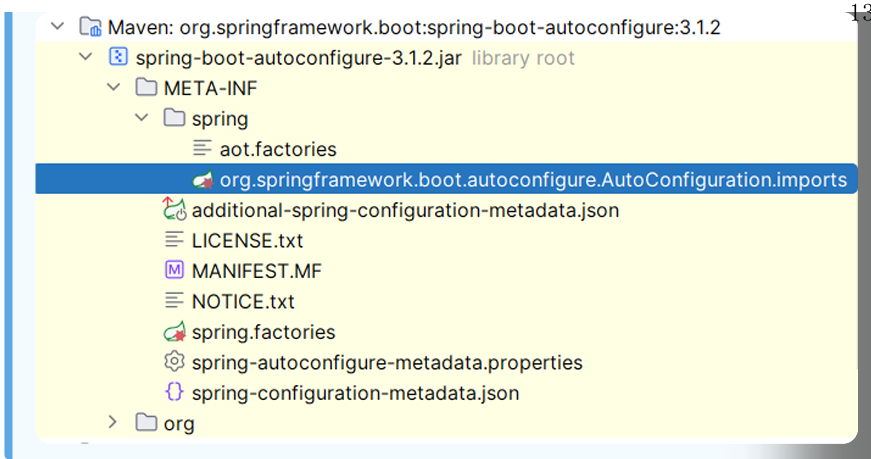
该注解会导入 AutoConfifigurationImportSelector 类对象,该对象会从 META-INF/spring/org.springframework.boot.autoconfigure.AutoConfiguration.imports 文件中读取配置类的名称列表。
@ComponentScan
该注解会扫描项目,自动装配一些项目启动需要的Bean。
二十二,SpringBoot3新特性
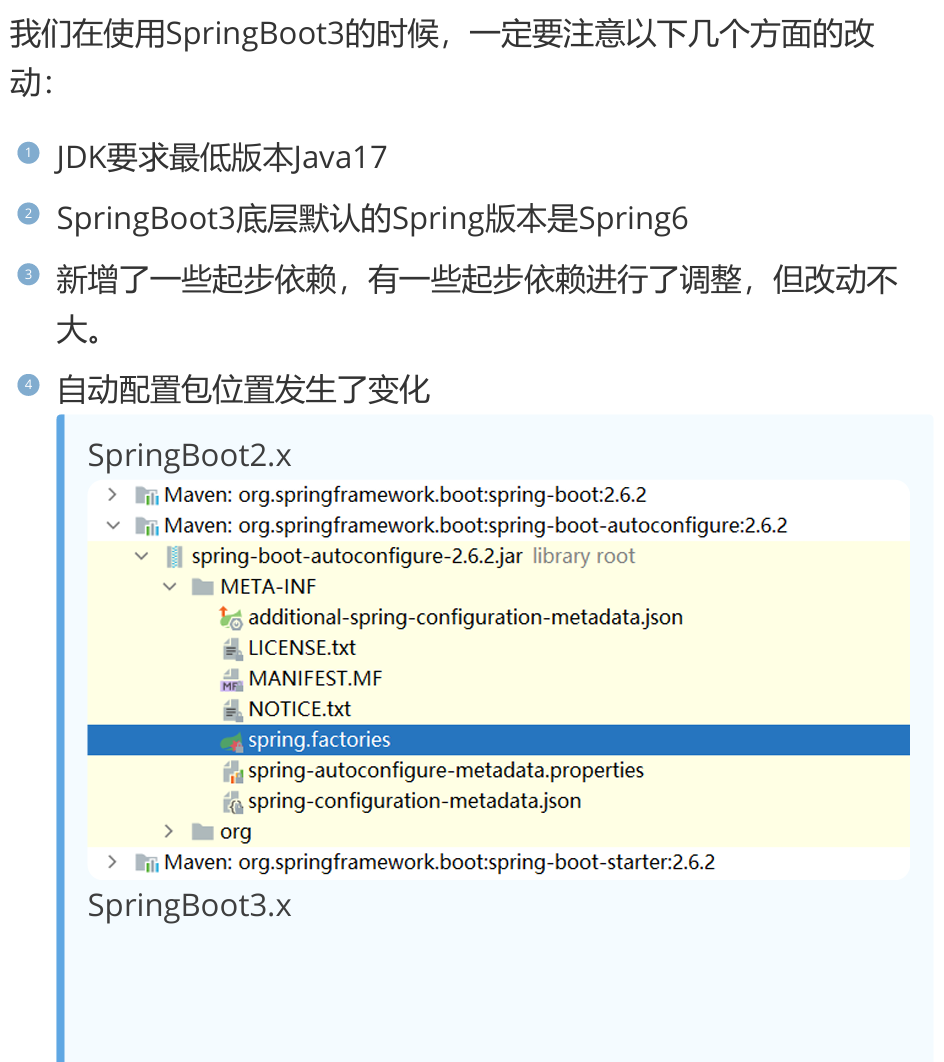
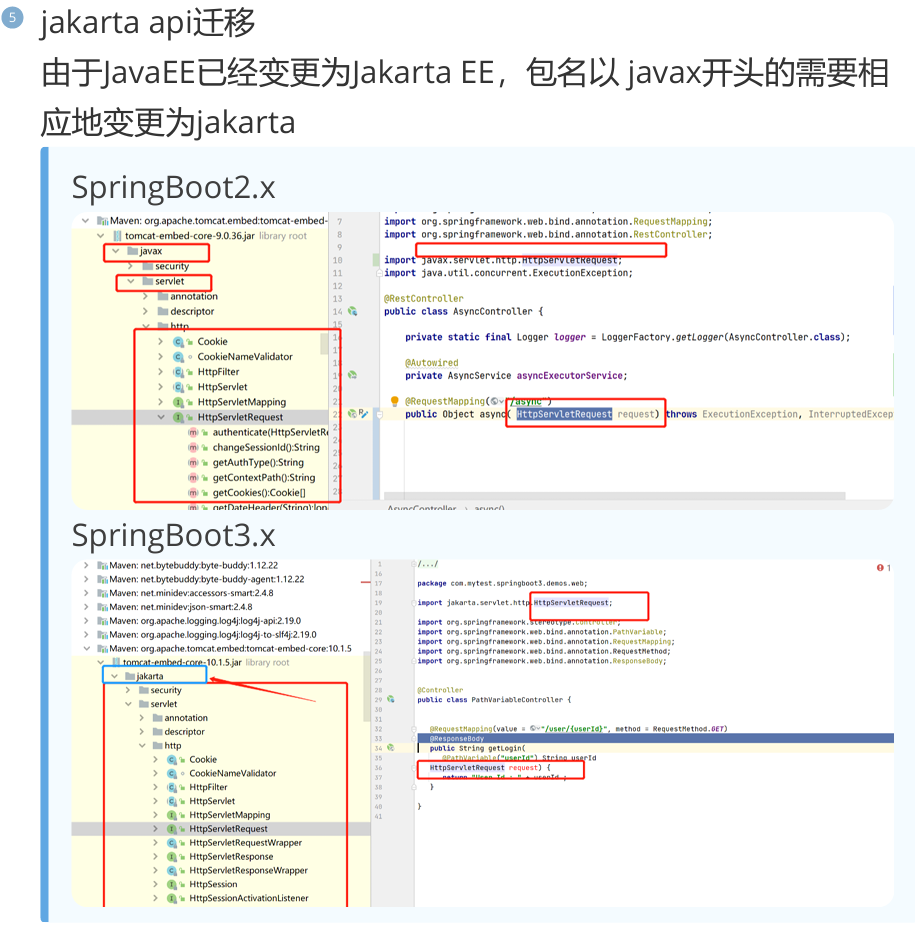
1,与之前版本的改动
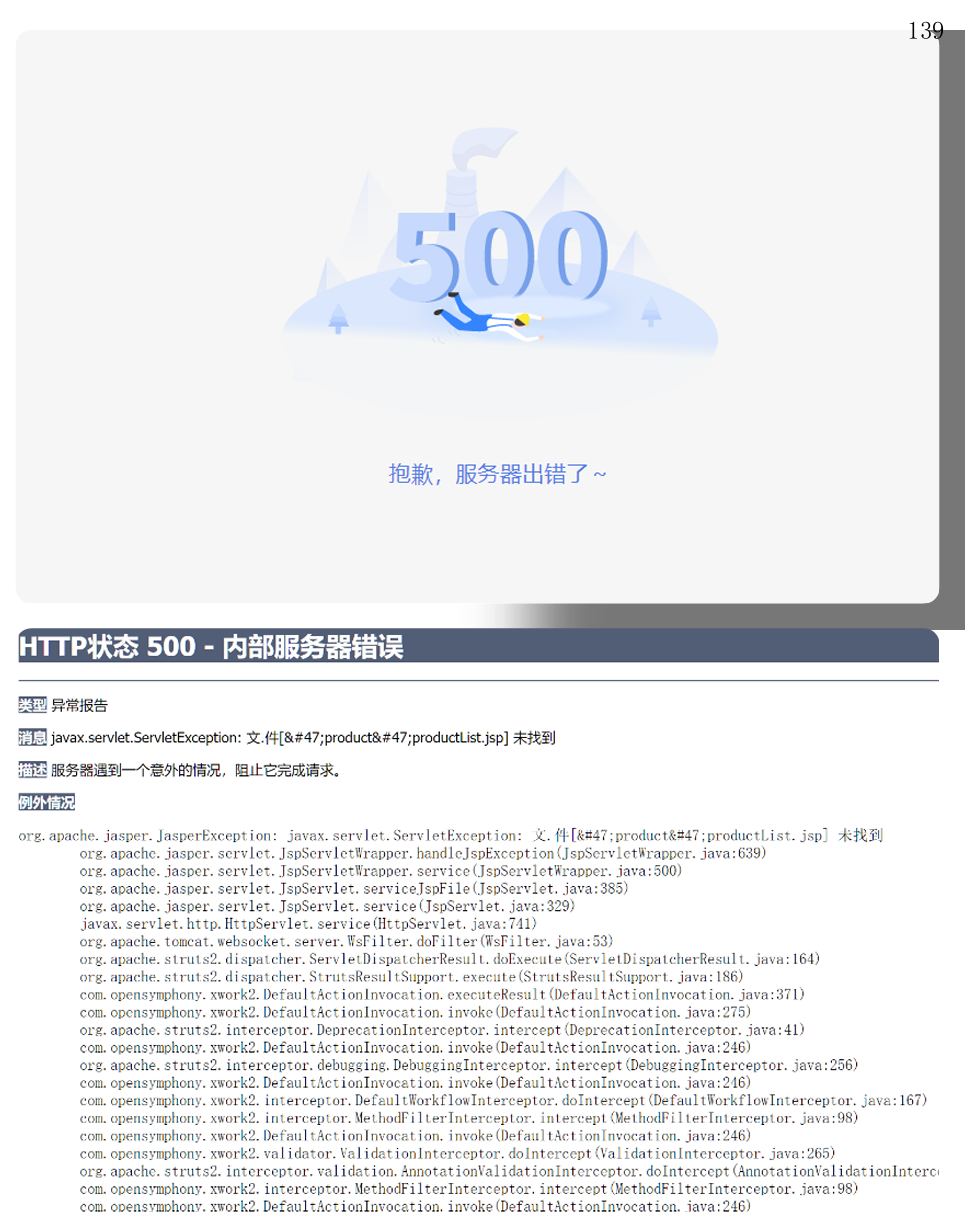
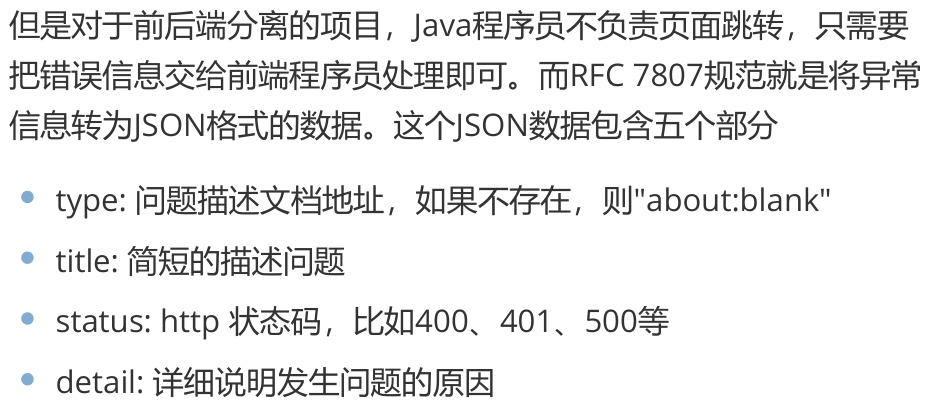
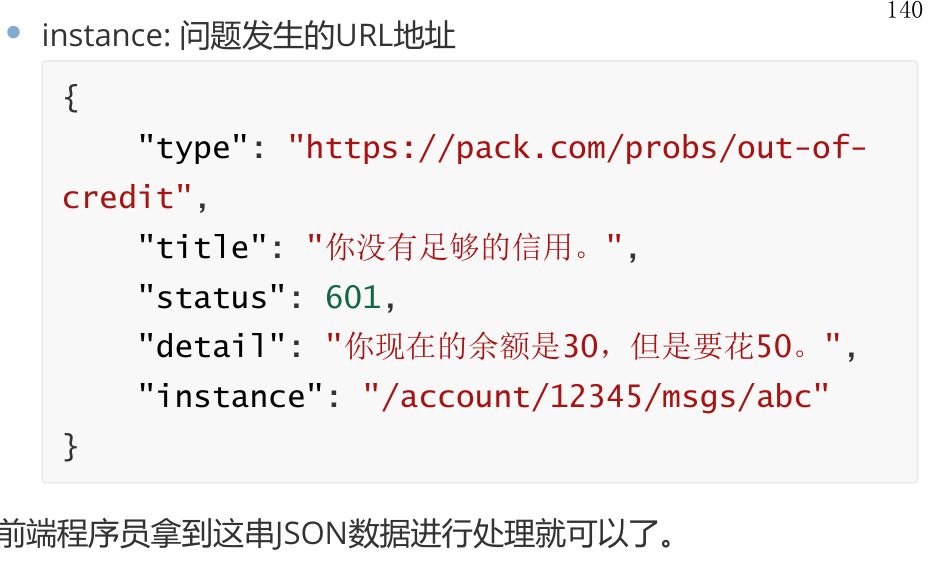
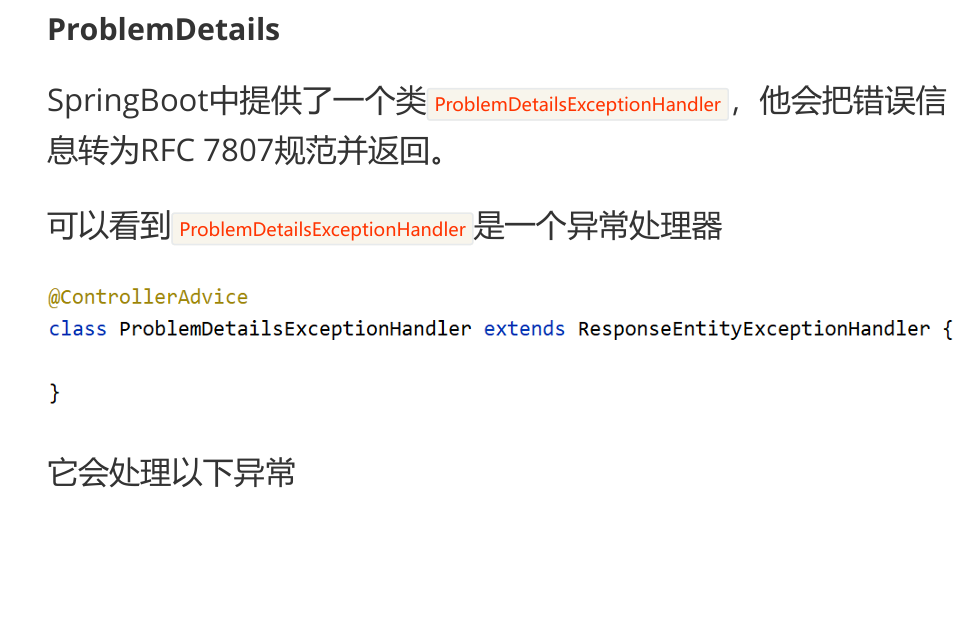
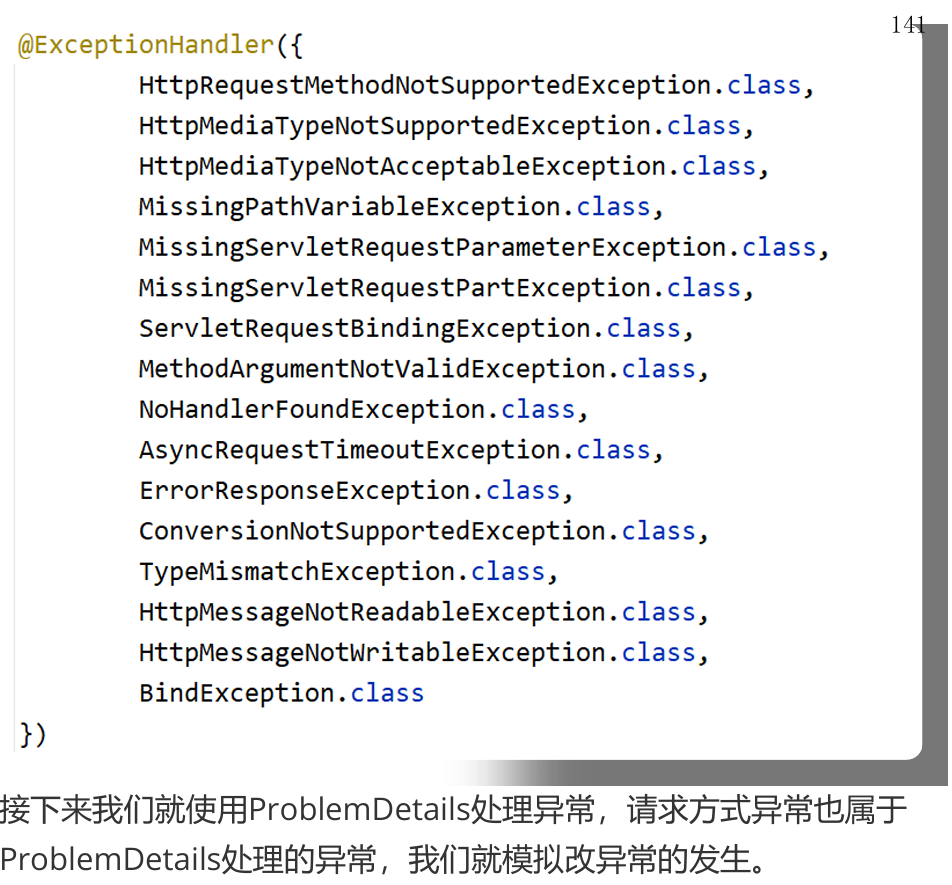
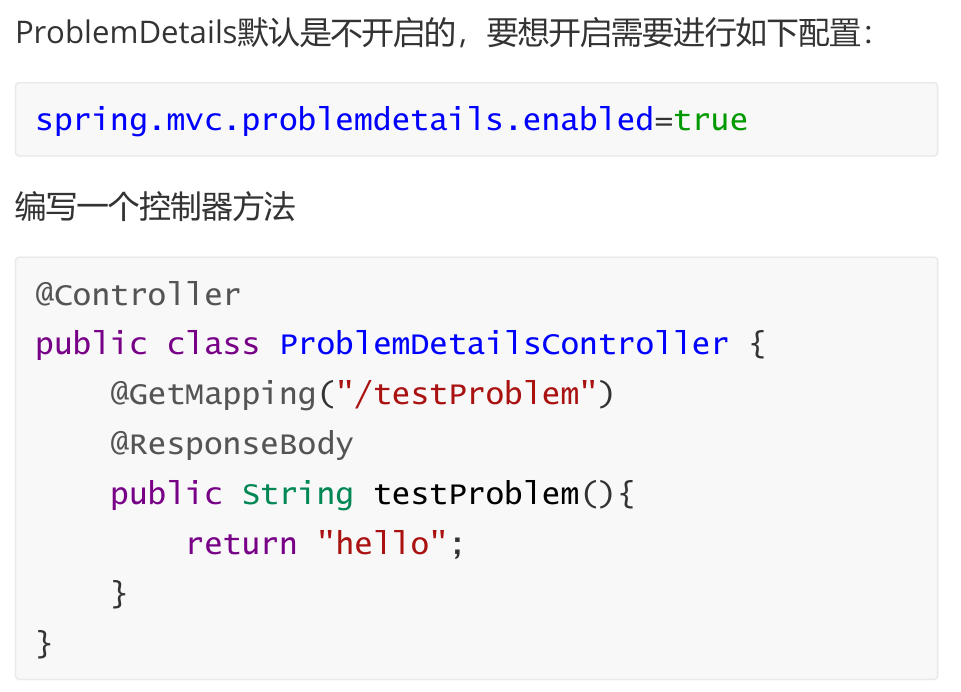
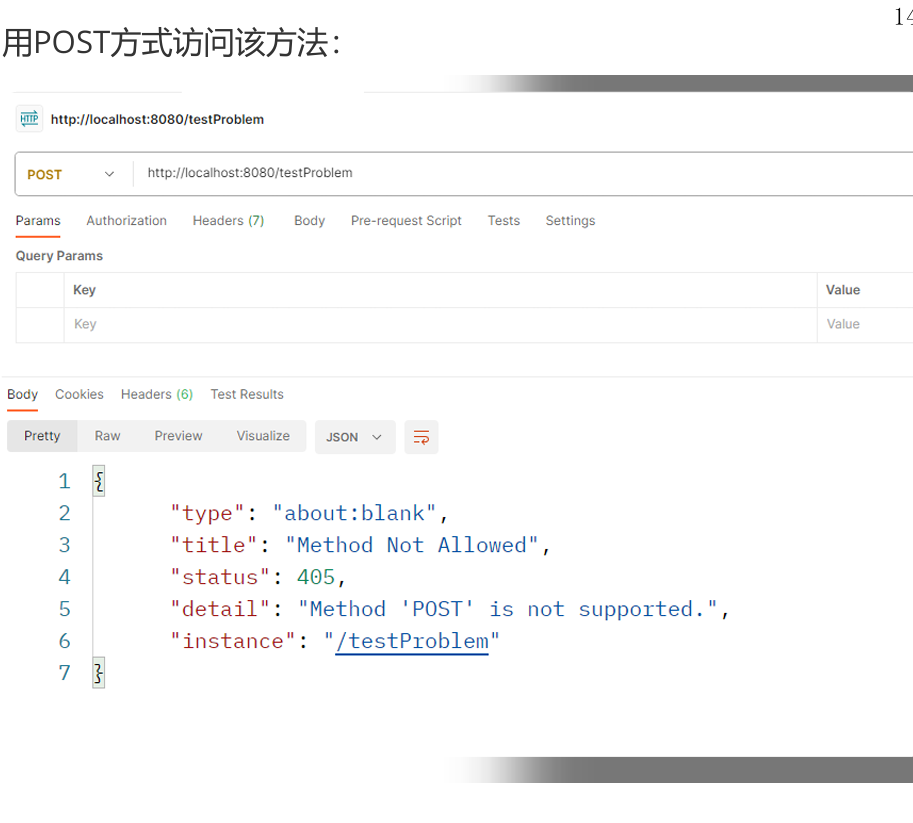
2,ProblemDetails

3,原生镜像
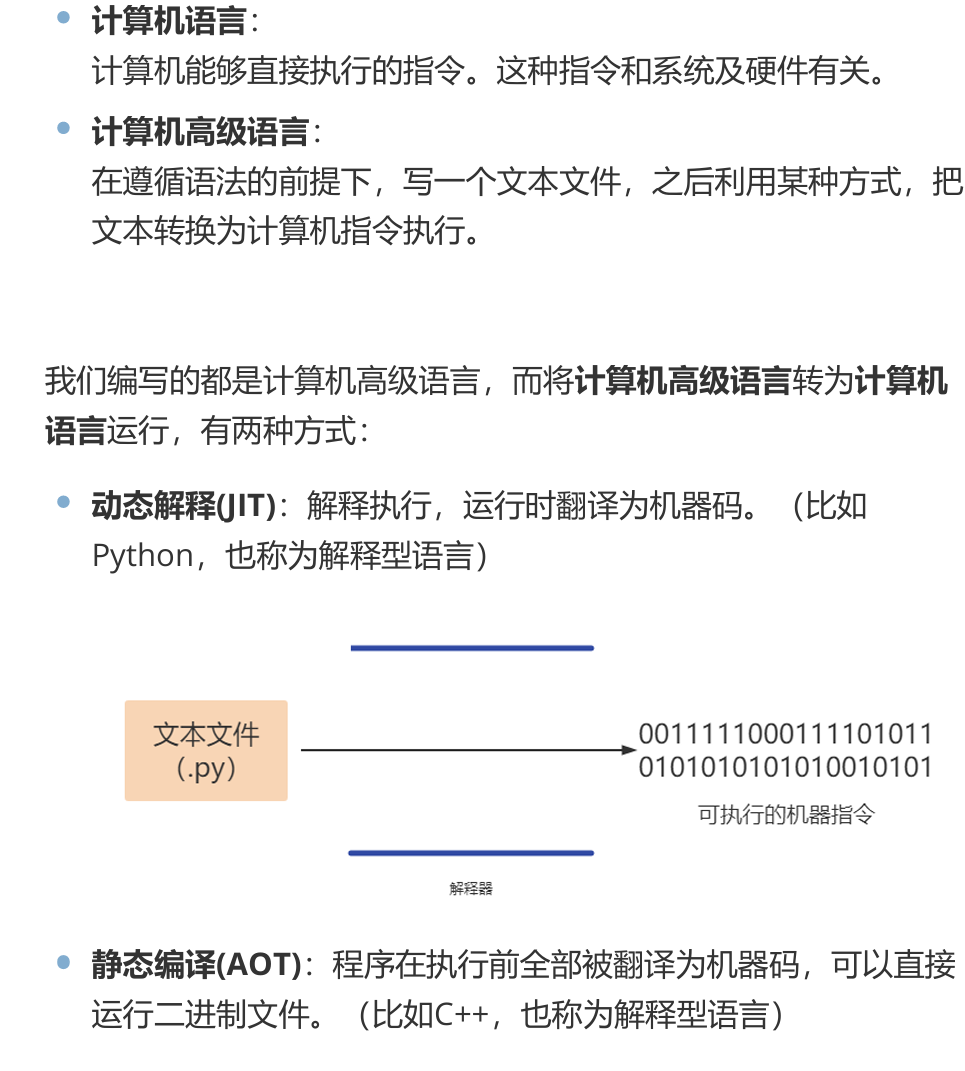
1,java计算机执行原理
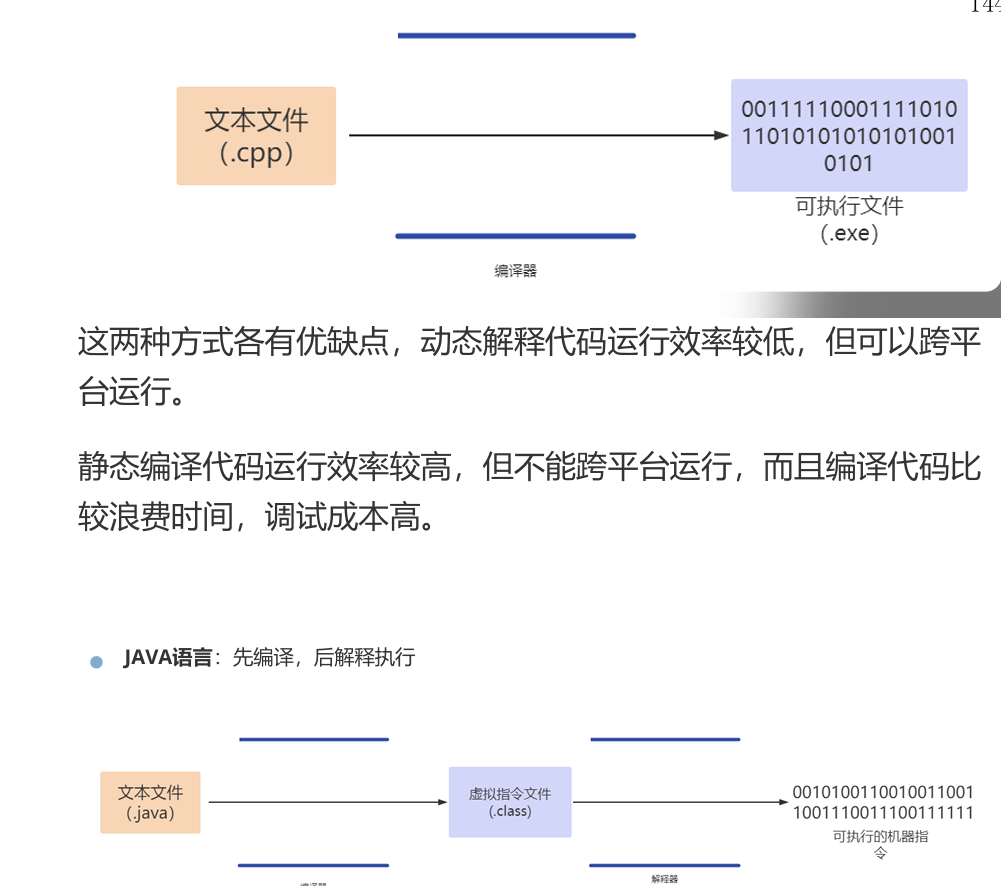
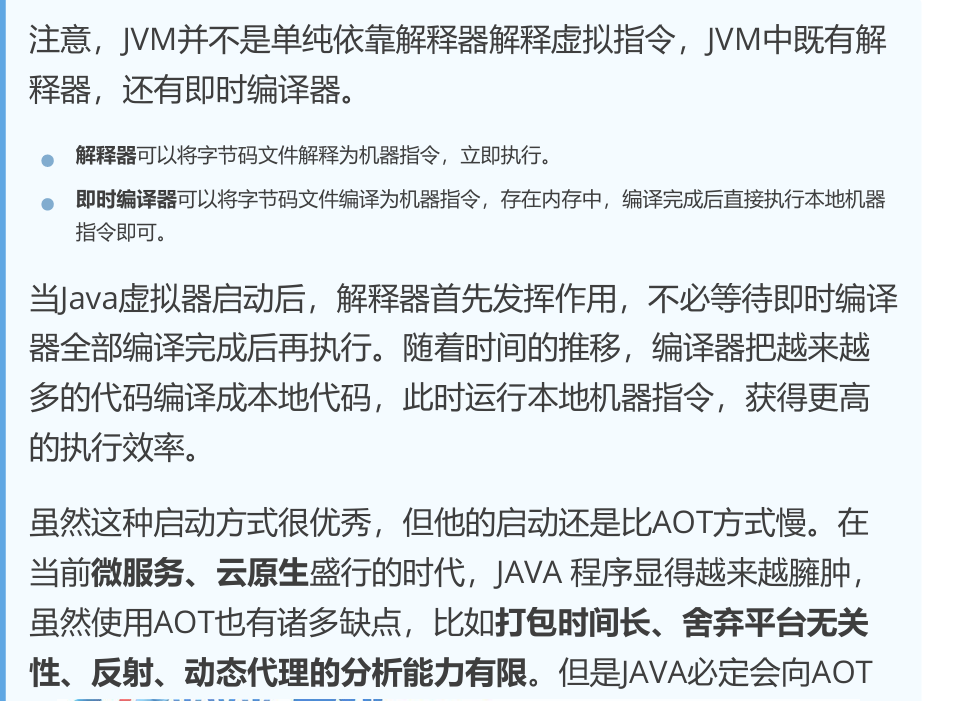

2,Native Image
Native Image(原生镜像)是一种将Java代码提前编译为二进制文件的技术,即本机可执行文件。在Windows中就是.exe文件,它脱离了Java程序员运行时对JVM的依赖,运行时效率极高。
Spring推荐使用 SpringBoot3 + GraalVM 官方构建工具实现原生镜像构建。
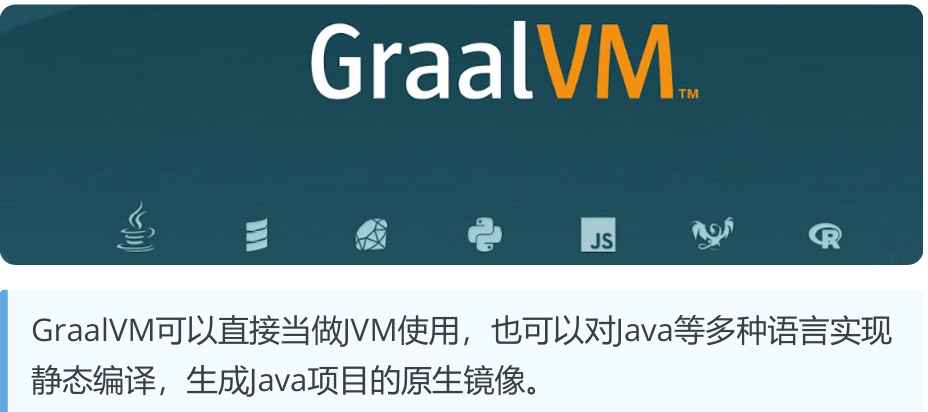
3,GraalVM
GraalVM是一个高性能跨语言虚拟机,其目的是提升Java和其他使用JVM语言编写程序的执行速度,同时也为JavaScript、Python和许多其他流行语言提供运行时环境。起始于2011年Oracle实验室的一 个研究项目。
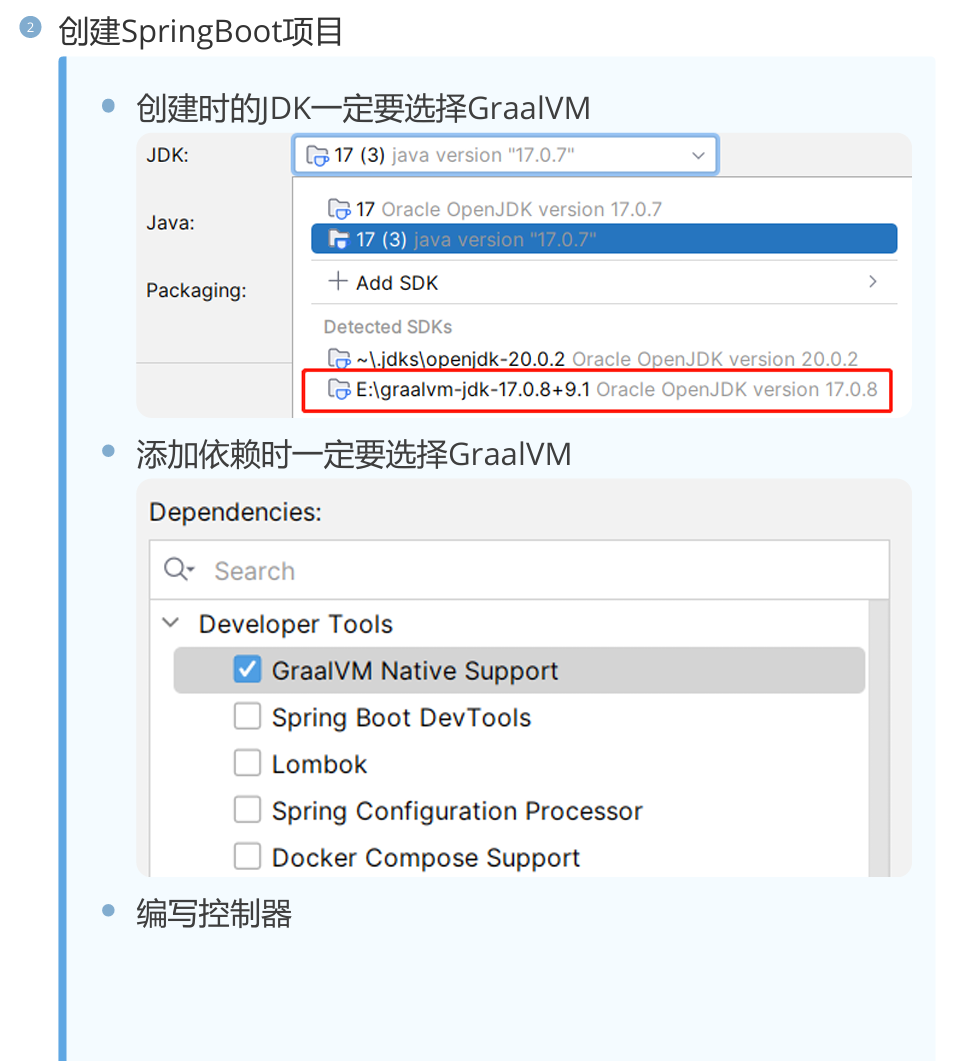
4,生成原生镜像
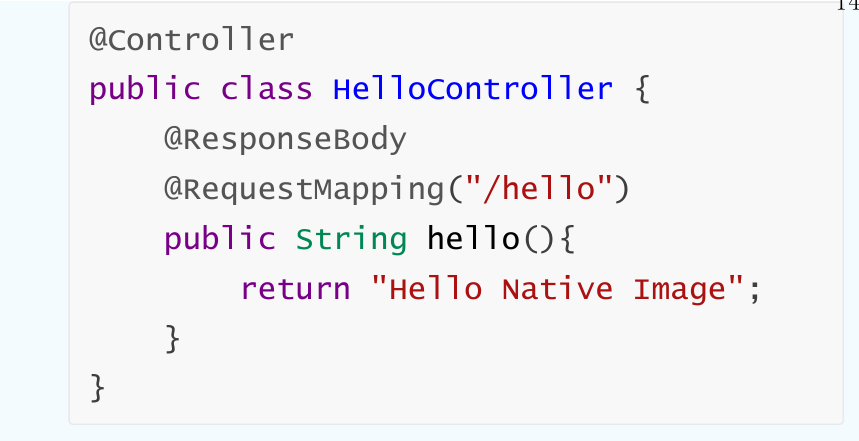
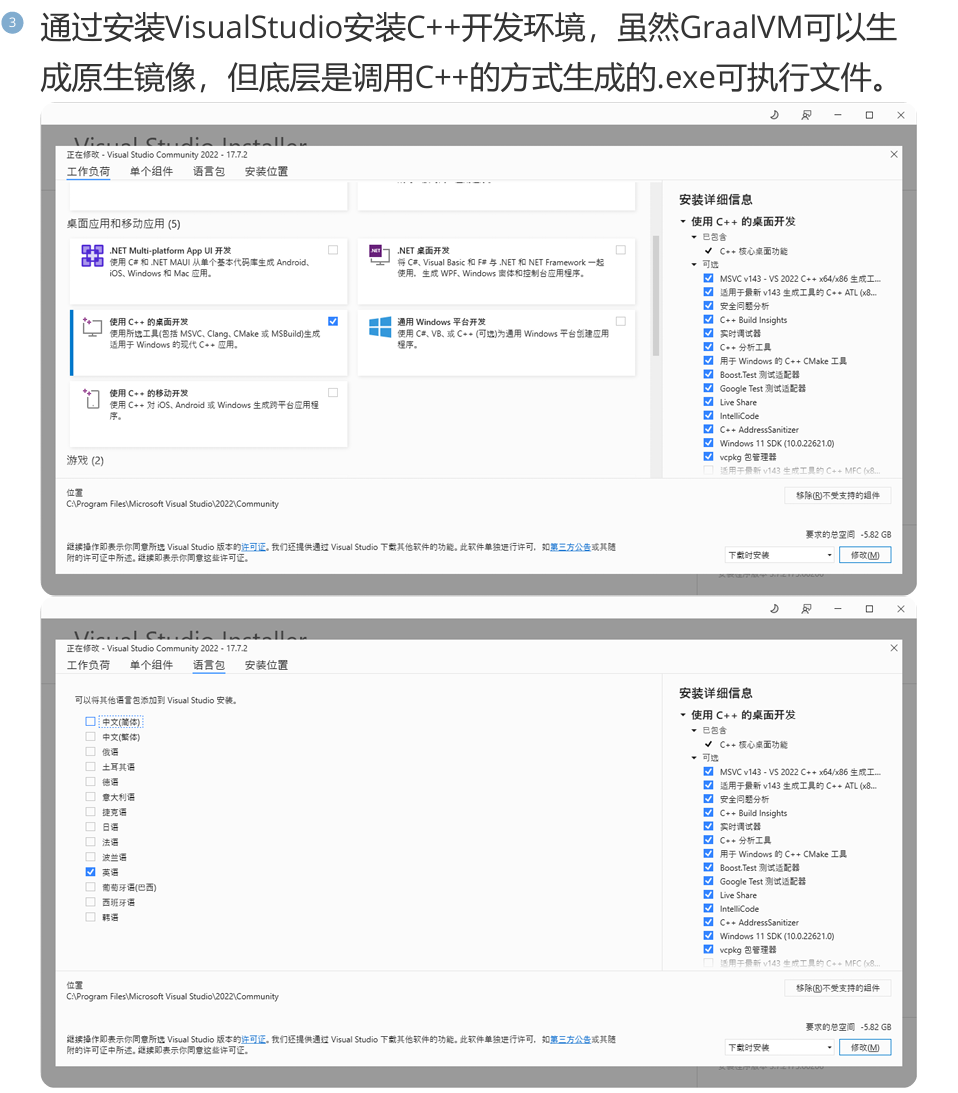
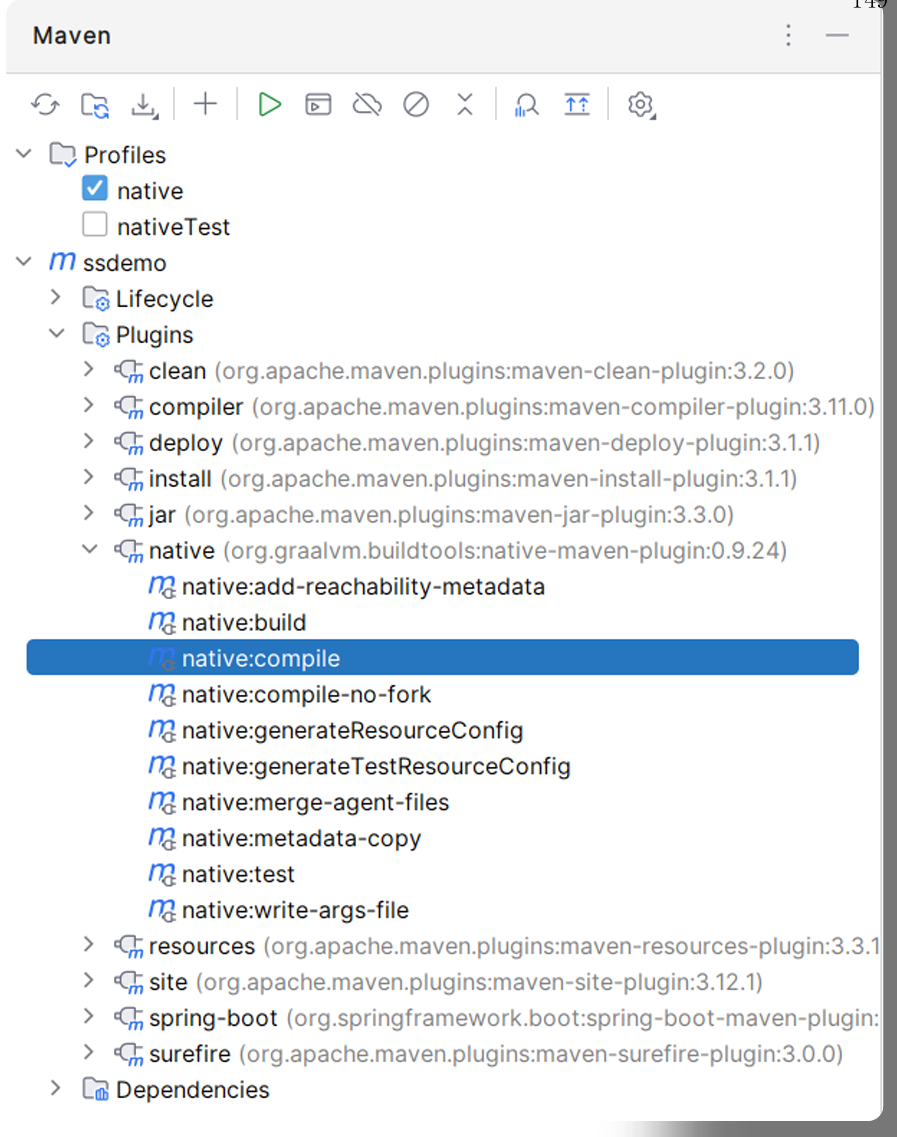
接下来我们就生成SpringBoot3项目的原生镜像:


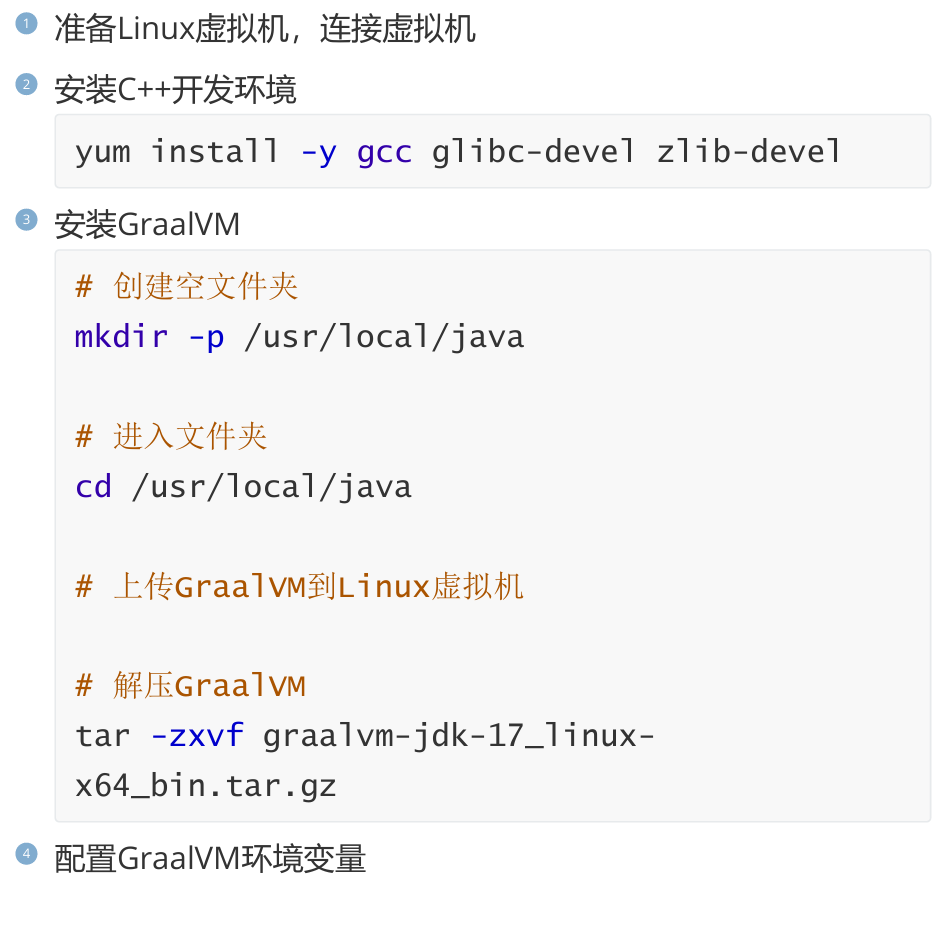
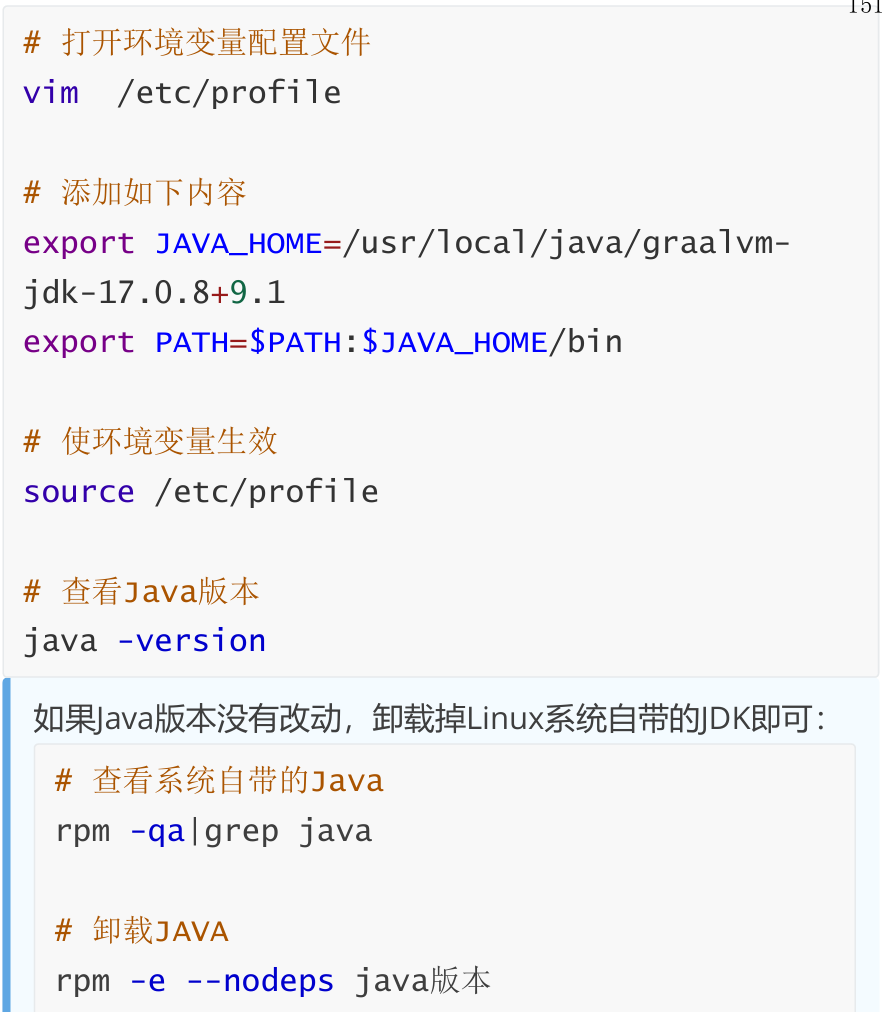
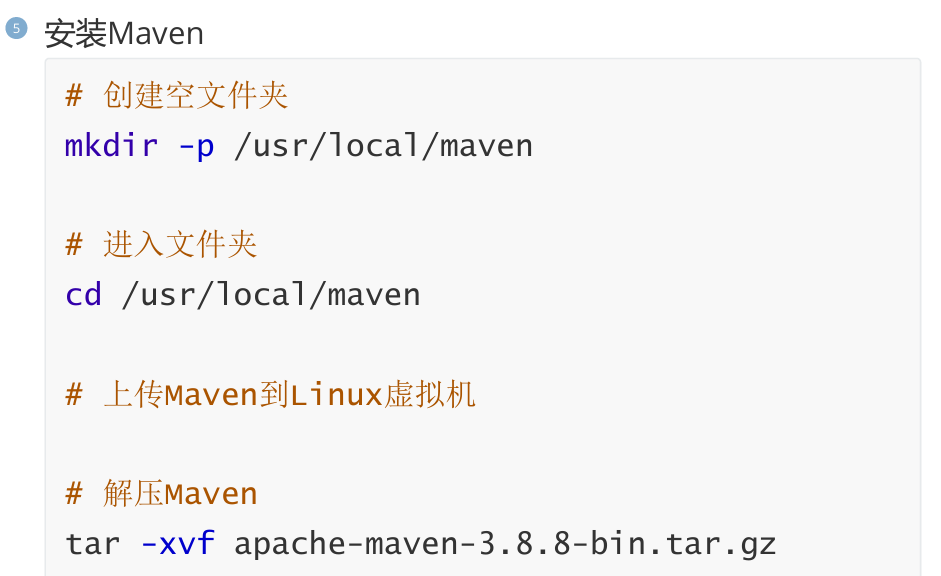
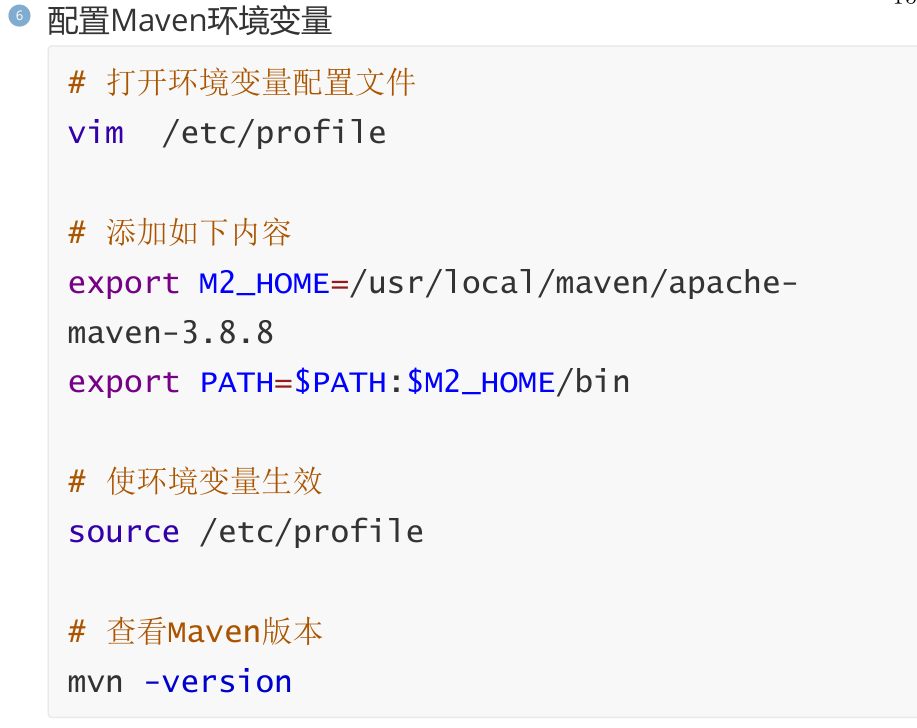
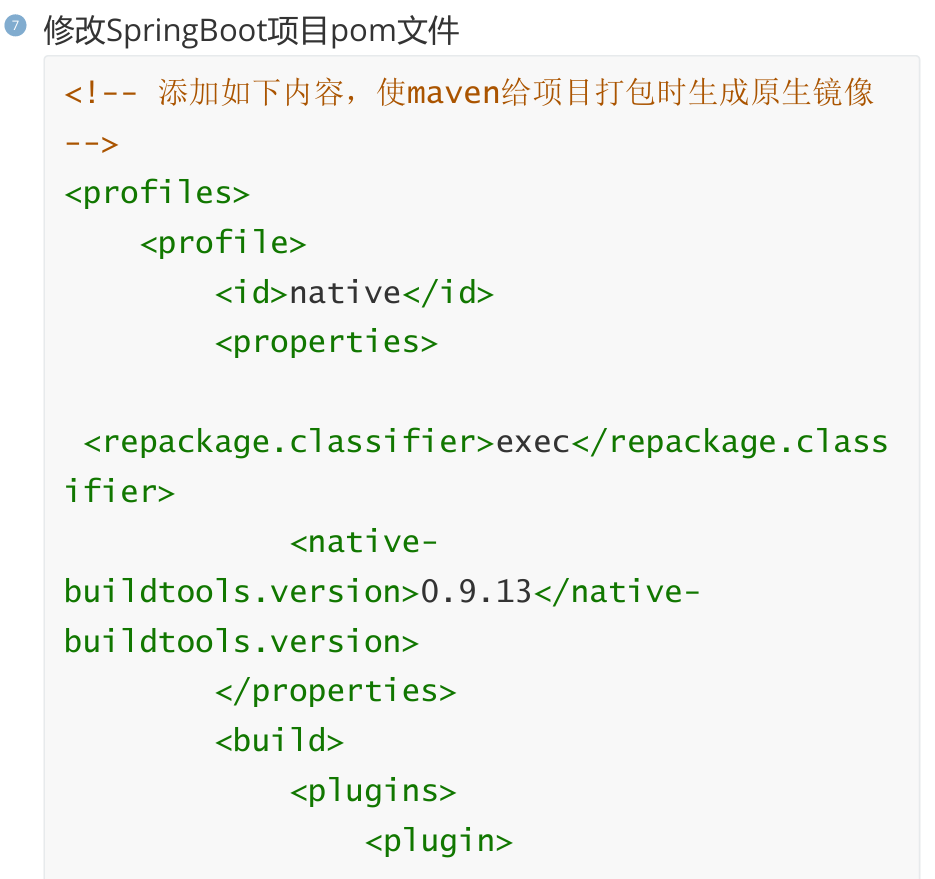
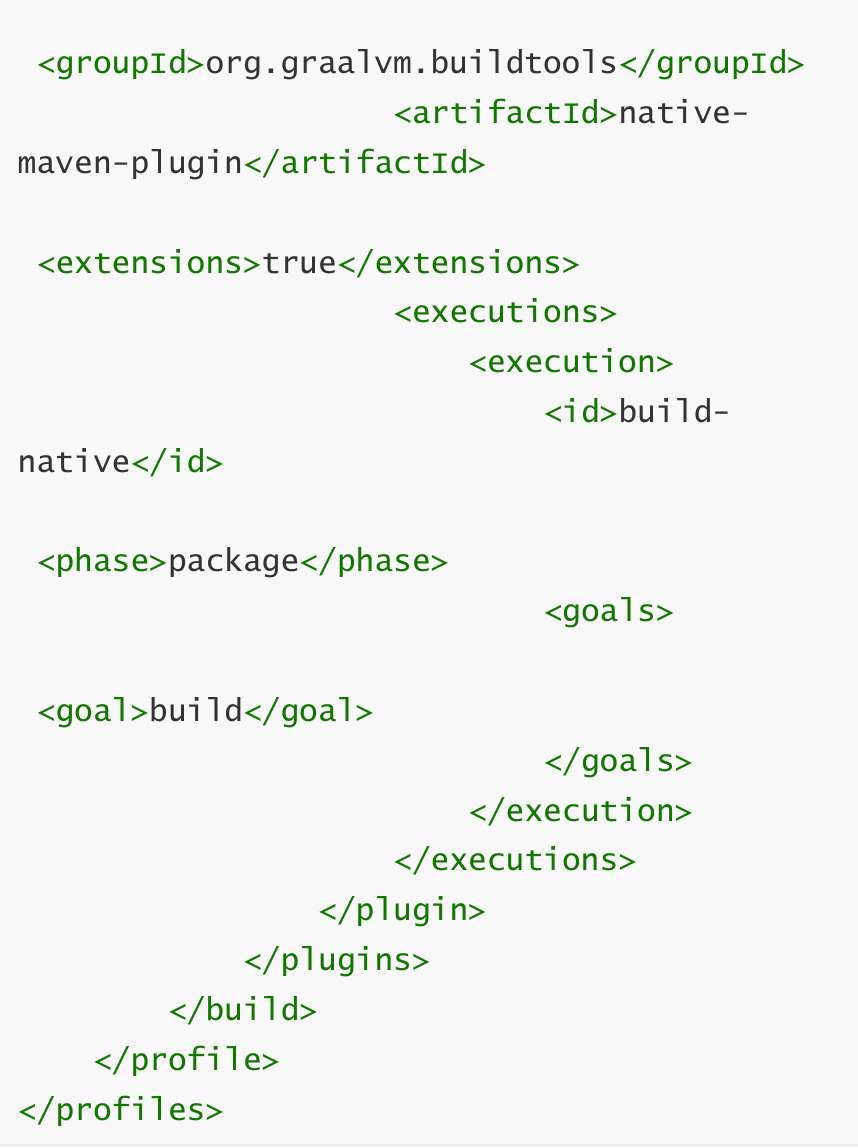
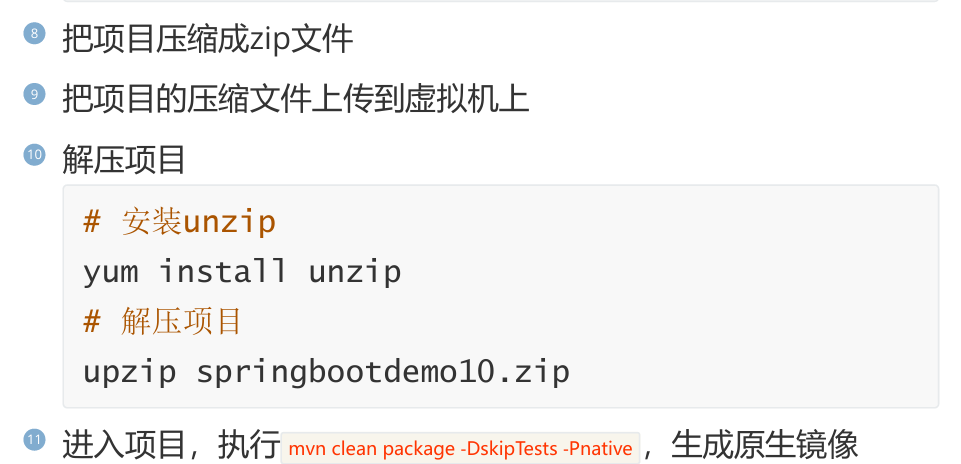
5,生成Linux原生镜像
