python flask框架 +Html+Css开发一个实用的奖状生成器:从想法到实现
在日常工作和学习中,我们经常需要制作各种奖状、证书。手动PS不仅效率低下,而且对于非设计专业的人来说也有一定门槛。今天,我将教大家如何开发一个简单实用的奖状生成器,让你分分钟生成专业的奖状图片!
代码下载地址
完整代码下点击这里
一、功能需求分析
一个完整的奖状生成器应该具备以下功能:
- 提供友好的用户界面,让用户输入必要信息
- 支持自定义获奖者姓名
- 支持设置颁发日期
- 自动添加电子印章
- 生成并导出完整的奖状图片
二、技术栈选择
对于这样一个Web应用,我选择了以下技术栈:
- 前端:HTML5 + CSS3 + JavaScript
- 后端:Python + Flask框架
- 图像处理:PIL (Pillow) 库
这种组合的优势在于开发迅速、易于部署,而且Python的PIL库在图像处理方面非常强大。
三、前端页面设计
首先,我们需要创建一个美观且用户友好的前端页面。这个页面将包含表单让用户输入信息,并提供生成按钮。
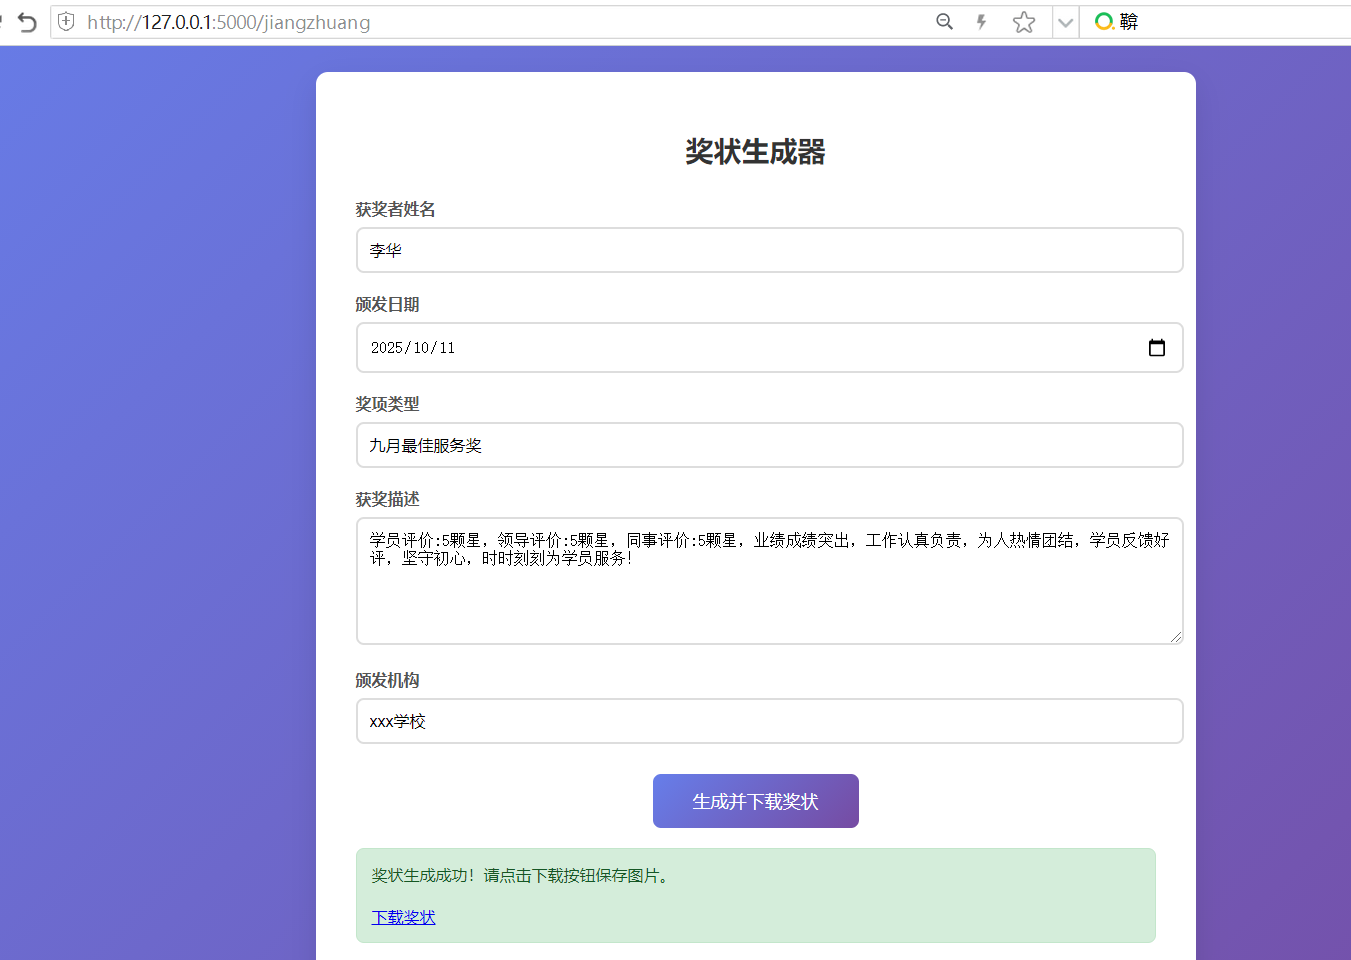
在线输入奖状信息:
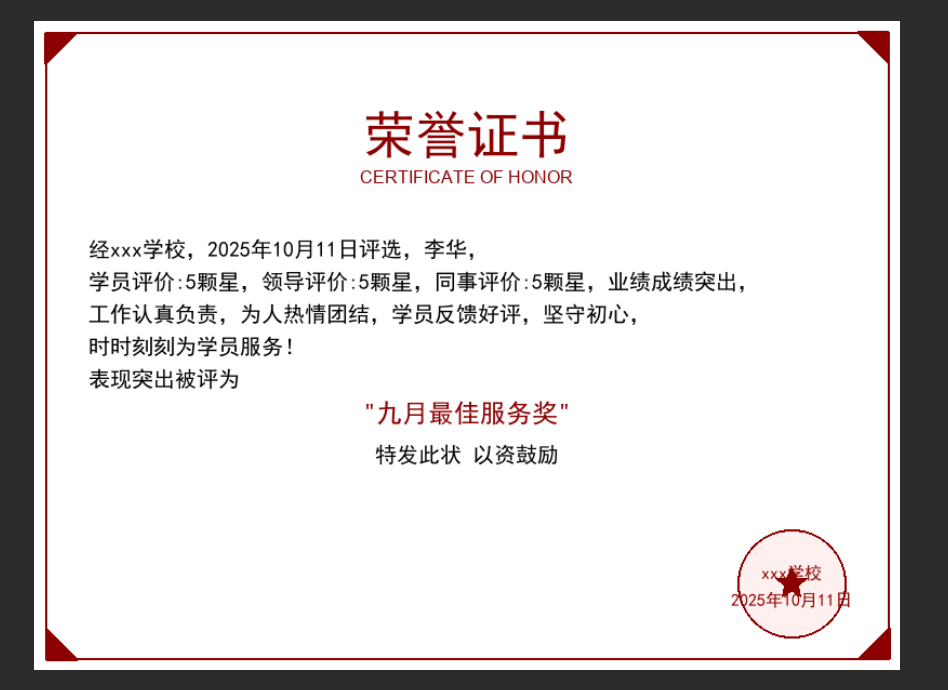
预览效果图
页面结构
html
<!DOCTYPE html>
<html lang="zh-CN">
<head>
    <meta charset="UTF-8">
    <meta name="viewport" content="width=device-width, initial-scale=1.0">
    <title>奖状生成器</title>
    <style>
        /* 样式代码 */
    </style>
</head>
<body>
    <div class="container">
        <h1>奖状生成器</h1>

        <form id="certificate-form" enctype="multipart/form-data">
            <!-- 表单字段 -->
        </form>

        <!-- 消息提示区域 -->
    </div>

    <div id="loading" class="loading-overlay">
        <div class="loading-spinner"></div>
    </div>

    <script>
        // JavaScript代码
    </script>
</body>
</html>
表单设计
表单需要包含以下字段:
- 获奖者姓名(必填)
- 颁发日期(必填)
- 奖项类型(例如:优秀员工奖、最佳表现奖等)
- 获奖描述(详细说明获奖原因)
- 颁发机构(盖章单位)
交互逻辑
前端的JavaScript代码需要处理以下逻辑:
- 设置默认日期为当天
- 监听表单提交事件
- 显示加载状态
- 使用Fetch API向后端发送请求
- 处理返回的图片并触发下载
- 显示成功或错误消息
四、后端功能实现
Flask应用设置
首先,我们需要初始化Flask应用并设置必要的配置:
python
import os
import io
from flask import Flask, render_template, request, send_file, jsonify
from PIL import Image, ImageDraw, ImageFont
from datetime import datetime

app = Flask(__name__)

# 确保临时文件夹存在
temp_dir = os.path.join(os.path.dirname(__file__), 'temp')
os.makedirs(temp_dir, exist_ok=True)
路由配置
我们需要设置两个主要路由:
- 用于渲染奖状生成页面的路由
- 用于处理奖状生成请求的路由
python
@app.route('/jiangzhuang')
def jiangzhuang():
    return render_template('jiangzhuang.html')

@app.route('/generate_certificate', methods=['POST'])
def generate_certificate():
    # 奖状生成逻辑
奖状模板创建
我们需要一个函数来创建奖状的基本模板,包括边框、标题等:
python
def create_certificate_template(width=800, height=600):
    """创建奖状模板"""
    # 创建白色背景图片
    img = Image.new('RGB', (width, height), color='white')
    draw = ImageDraw.Draw(img)

    # 绘制红色边框
    border_width = 10
    border_color = (139, 0, 0)  # 深红色
    draw.rectangle([(0, 0), (width-1, height-1)], outline=border_color, width=border_width)

    # 添加角落装饰
    corner_size = 30
    for i in range(4):
        x = 0 if i % 2 == 0 else width - 1
        y = 0 if i < 2 else height - 1

        for j in range(corner_size):
            draw.line([(x, y + j if i < 2 else y - j),
                      (x + j if i % 2 == 0 else x - j, y)],
                     fill=border_color, width=2)

    # 添加标题
    try:
        title_font = ImageFont.truetype("simhei.ttf", 48)
    except:
        # 如果没有中文字体,使用默认字体
        title_font = ImageFont.load_default()

    title = "荣誉证书"
    title_bbox = draw.textbbox((0, 0), title, font=title_font)
    title_width = title_bbox[2] - title_bbox[0]
    title_height = title_bbox[3] - title_bbox[1]
    title_x = (width - title_width) // 2
    title_y = 80
    draw.text((title_x, title_y), title, fill=border_color, font=title_font)

    # 添加英文标题
    try:
        subtitle_font = ImageFont.truetype("arial.ttf", 16)
    except:
        subtitle_font = ImageFont.load_default()

    subtitle = "CERTIFICATE OF HONOR"
    subtitle_bbox = draw.textbbox((0, 0), subtitle, font=subtitle_font)
    subtitle_width = subtitle_bbox[2] - subtitle_bbox[0]
    subtitle_x = (width - subtitle_width) // 2
    subtitle_y = title_y + title_height + 10
    draw.text((subtitle_x, subtitle_y), subtitle, fill=border_color, font=subtitle_font)

    return img
奖状内容生成
现在,让我们实现核心的奖状生成逻辑:
- 获取并验证表单数据
- 解析日期格式
- 创建并绘制奖状内容
- 添加电子印章
- 返回生成的图片
python
@app.route('/generate_certificate', methods=['POST'])
def generate_certificate():
    try:
        # 获取表单数据
        name = request.form.get('name', '').strip()
        date_str = request.form.get('date', '')
        award_type = request.form.get('award_type', '优秀表现奖')
        description = request.form.get('description', '表现优异,特发此状')
        organization = request.form.get('organization', '颁奖单位')

        # 验证必要字段
        if not name:
            return jsonify({'error': '请输入获奖者姓名'}), 400

        if not date_str:
            return jsonify({'error': '请选择颁发日期'}), 400

        # 解析日期
        try:
            date_obj = datetime.strptime(date_str, '%Y-%m-%d')
            formatted_date = date_obj.strftime('%Y年%m月%d日')
        except ValueError:
            return jsonify({'error': '日期格式错误'}), 400

        # 创建奖状图片
        img = create_certificate_template(800, 600)
        draw = ImageDraw.Draw(img)

        # 设置字体
        try:
            regular_font = ImageFont.truetype("simhei.ttf", 20)
            highlight_font = ImageFont.truetype("simhei.ttf", 24)
            seal_font = ImageFont.truetype("simhei.ttf", 16)
        except:
            # 如果没有中文字体,使用默认字体
            regular_font = ImageFont.load_default()
            highlight_font = ImageFont.load_default()
            seal_font = ImageFont.load_default()

        # 添加正文内容
        # ... 内容绘制代码 ...

        # 添加电子章
        # ... 印章绘制代码 ...

        # 保存到内存并返回
        img_io = io.BytesIO()
        img.save(img_io, format='PNG')
        img_io.seek(0)

        return send_file(img_io, mimetype='image/png',
                        as_attachment=True,
                        download_name=f'certificate_{name}.png')

    except Exception as e:
        return jsonify({'error': f'生成失败: {str(e)}'}), 500
电子印章绘制
电子印章是奖状的重要组成部分,我们需要在右下角绘制一个红色的印章:
python
# 在右下角绘制印章
seal_center_x = img.width - 100
seal_center_y = img.height - 80
seal_radius = 50

# 绘制红色圆圈
draw.ellipse([
    (seal_center_x - seal_radius, seal_center_y - seal_radius),
    (seal_center_x + seal_radius, seal_center_y + seal_radius)
], outline=(139, 0, 0), width=2, fill=(255, 240, 240, 128))  # 浅红色填充

# 印章文字
seal_text = organization
seal_text_bbox = draw.textbbox((0, 0), seal_text, font=seal_font)
seal_text_width = seal_text_bbox[2] - seal_text_bbox[0]
seal_text_height = seal_text_bbox[3] - seal_text_bbox[1]
seal_text_x = seal_center_x - seal_text_width // 2
seal_text_y = seal_center_y - seal_text_height // 2 - 10
draw.text((seal_text_x, seal_text_y), seal_text, fill=(139, 0, 0), font=seal_font)

# 添加日期到印章下方
date_text_bbox = draw.textbbox((0, 0), formatted_date, font=seal_font)
date_text_width = date_text_bbox[2] - date_text_bbox[0]
date_text_x = seal_center_x - date_text_width // 2
date_text_y = seal_text_y + 25
draw.text((date_text_x, date_text_y), formatted_date, fill=(139, 0, 0), font=seal_font)
五、完整流程演示
让我们来看一下完整的使用流程:
- 用户访问
/jiangzhuang页面 - 在表单中填写获奖者姓名、日期等信息
- 点击"生成并下载奖状"按钮
- 前端发送请求到
/generate_certificate路由 - 后端生成奖状图片并返回
- 前端自动下载生成的图片文件
建议:建议实现制作一个透明的签章,制作好图片模板,这样尽可能的保证奖状的美观性。
六、优化与扩展建议
这个奖状生成器已经具备了基本功能,但还有很多可以优化的地方:
1. 模板多样化
可以提供多种奖状模板供用户选择,而不是固定的一种样式。
2. 字体自定义
允许用户选择不同的字体风格,以适应不同类型的奖状需求。
3. 背景图片上传
支持用户上传自定义的背景图片作为奖状底图。
4. 预览功能
在生成前提供实时预览,让用户可以看到最终效果。
5. 批量生成
添加批量生成功能,一次导入多个姓名,生成多张奖状。
七、完整代码
后端代码python+flask
python
import os
import io
import zipfile
from flask import Flask, render_template, request, send_file, jsonify
from PIL import Image, ImageDraw, ImageFont
import tempfile
import shutil
import logging
from datetime import datetime

# 配置日志
logging.basicConfig(level=logging.DEBUG, format='%(asctime)s - %(name)s - %(levelname)s - %(message)s')
logger = logging.getLogger(__name__)

app = Flask(__name__)

# 确保临时文件夹存在
temp_dir = os.path.join(os.path.dirname(__file__), 'temp')
os.makedirs(temp_dir, exist_ok=True)

# 支持的图片尺寸比例
image_aspect_ratios = {
    '16:9': {'width': 1920, 'height': 1080, 'name': '16:9宽屏'},  # 常见宽屏比例
    '16:10': {'width': 1920, 'height': 1200, 'name': '16:10宽屏'},  # 部分笔记本屏幕
    '9:16': {'width': 1080, 'height': 1920, 'name': '9:16手机竖屏'},  # 手机竖屏
    '10:16': {'width': 1200, 'height': 1920, 'name': '10:16长竖屏'},  # 长竖屏
    '4:3': {'width': 1280, 'height': 960, 'name': '4:3传统屏'},  # 传统屏幕比例
    '2:1': {'width': 1920, 'height': 960, 'name': '2:1超宽屏'},  # 超宽屏
    'taobao_square': {'width': 800, 'height': 800, 'name': '淘宝1:1主图'},  # 淘宝方形主图
    'taobao_portrait': {'width': 600, 'height': 800, 'name': '淘宝3:4主图'},  # 淘宝竖版主图
}

# 创建奖状模板函数(根据提供的图片样式)
def create_certificate_template(width=800, height=600):
    """创建奖状模板"""
    # 创建白色背景图片
    img = Image.new('RGB', (width, height), color='white')
    draw = ImageDraw.Draw(img)

    # 绘制红色边框(双层边框效果)
    outer_border_color = (139, 0, 0)  # 深红色
    inner_border_color = (139, 0, 0)  # 深红色

    # 外边框
    draw.rectangle([(10, 10), (width-10, height-10)], outline=outer_border_color, width=2)

    # 绘制角落装饰图案
    corner_size = 30
    corner_width = 2

    # 左上角
    for i in range(corner_size):
        draw.line([(10, 10 + i), (10 + i, 10)], fill=outer_border_color, width=corner_width)

    # 右上角
    for i in range(corner_size):
        draw.line([(width-10, 10 + i), (width-10 - i, 10)], fill=outer_border_color, width=corner_width)

    # 左下角
    for i in range(corner_size):
        draw.line([(10, height-10 - i), (10 + i, height-10)], fill=outer_border_color, width=corner_width)

    # 右下角
    for i in range(corner_size):
        draw.line([(width-10, height-10 - i), (width-10 - i, height-10)], fill=outer_border_color, width=corner_width)

    # 添加标题
    try:
        title_font = ImageFont.truetype("simhei.ttf", 48)
    except:
        # 如果没有中文字体,使用默认字体
        title_font = ImageFont.load_default()

    title = "荣誉证书"
    # 计算文本尺寸
    title_bbox = draw.textbbox((0, 0), title, font=title_font)
    title_width = title_bbox[2] - title_bbox[0]
    title_height = title_bbox[3] - title_bbox[1]
    title_x = (width - title_width) // 2
    title_y = 80
    draw.text((title_x, title_y), title, fill=outer_border_color, font=title_font)

    # 添加英文标题
    try:
        subtitle_font = ImageFont.truetype("arial.ttf", 16)
    except:
        subtitle_font = ImageFont.load_default()

    subtitle = "CERTIFICATE OF HONOR"
    subtitle_bbox = draw.textbbox((0, 0), subtitle, font=subtitle_font)
    subtitle_width = subtitle_bbox[2] - subtitle_bbox[0]
    subtitle_x = (width - subtitle_width) // 2
    subtitle_y = title_y + title_height + 10
    draw.text((subtitle_x, subtitle_y), subtitle, fill=outer_border_color, font=subtitle_font)

    return img

@app.route('/')
def index():
    return render_template('index.html', ratios=image_aspect_ratios)

@app.route('/jiangzhuang')
def jiangzhuang():
    return render_template('jiangzhuang.html')

@app.route('/generate_certificate', methods=['POST'])
def generate_certificate():
    try:
        # 获取表单数据
        name = request.form.get('name', '').strip()
        date_str = request.form.get('date', '')
        award_type = request.form.get('award_type', '优秀表现奖')
        description = request.form.get('description', '学员评价:5颗星,领导评价:5颗星,同事评价:5颗星,业绩成绩突出,工作认真负责,为人热情团结,学员反馈好评,坚守初心,时时刻刻为学员服务!')
        organization = request.form.get('organization', '奕鼎通.Net学院')

        # 验证必要字段
        if not name:
            return jsonify({'error': '请输入获奖者姓名'}), 400

        if not date_str:
            return jsonify({'error': '请选择颁发日期'}), 400

        # 解析日期
        try:
            date_obj = datetime.strptime(date_str, '%Y-%m-%d')
            formatted_date = date_obj.strftime('%Y年%m月%d日')
        except ValueError:
            return jsonify({'error': '日期格式错误'}), 400

        # 创建奖状图片
        img = create_certificate_template(800, 600)
        draw = ImageDraw.Draw(img)

        # 设置字体
        try:
            regular_font = ImageFont.truetype("simhei.ttf", 20)
            highlight_font = ImageFont.truetype("simhei.ttf", 24)
            small_font = ImageFont.truetype("simhei.ttf", 18)
        except:
            # 如果没有中文字体,使用默认字体
            regular_font = ImageFont.load_default()
            highlight_font = ImageFont.load_default()
            small_font = ImageFont.load_default()

        # 添加正文内容
        content_y = 200
        line_spacing = 30
        left_margin = 50

        # 颁发机构和日期行
        org_line = f"经{organization},{formatted_date}评选,{name},"
        draw.text((left_margin, content_y), org_line, fill=(0, 0, 0), font=regular_font)
        content_y += line_spacing

        # 描述内容(可能需要多行)
        # 简单的文本换行处理
        words = description.split(',')
        current_line = ''
        for word in words:
            if not word:  # 跳过空字符串
                continue

            # 检查是否需要添加逗号
            word_with_comma = word + ',' if word != words[-1] else word

            test_line = current_line + word_with_comma
            test_bbox = draw.textbbox((left_margin, content_y), test_line, font=regular_font)
            if test_bbox[2] - test_bbox[0] < 700:  # 留出边距
                current_line = test_line
            else:
                draw.text((left_margin, content_y), current_line, fill=(0, 0, 0), font=regular_font)
                content_y += line_spacing
                current_line = word_with_comma

        if current_line:
            draw.text((left_margin, content_y), current_line, fill=(0, 0, 0), font=regular_font)
            content_y += line_spacing

        # 奖项部分
        award_text = f"表现突出被评为"
        draw.text((left_margin, content_y), award_text, fill=(0, 0, 0), font=regular_font)
        content_y += line_spacing

        # 突出显示奖项名称(根据图片,使用红色字体)
        award_text = f'"{award_type}"'
        award_bbox = draw.textbbox((0, 0), award_text, font=highlight_font)
        award_width = award_bbox[2] - award_bbox[0]
        award_x = (img.width - award_width) // 2
        draw.text((award_x, content_y), award_text, fill=(139, 0, 0), font=highlight_font)  # 红色字体
        content_y += line_spacing + 10

        # 结尾语
        ending_text = "特发此状 以资鼓励"
        ending_bbox = draw.textbbox((0, 0), ending_text, font=regular_font)
        ending_width = ending_bbox[2] - ending_bbox[0]
        ending_x = (img.width - ending_width) // 2
        draw.text((ending_x, content_y), ending_text, fill=(0, 0, 0), font=regular_font)

        # 添加电子章(根据图片,使用红色圆形印章)
        # 在右下角绘制印章
        seal_center_x = img.width - 100
        seal_center_y = img.height - 80
        seal_radius = 50

        # 绘制红色圆圈印章(带填充)
        draw.ellipse([
            (seal_center_x - seal_radius, seal_center_y - seal_radius),
            (seal_center_x + seal_radius, seal_center_y + seal_radius)
        ], outline=(139, 0, 0), width=2, fill=(255, 240, 240, 128))  # 浅红色填充

        # 印章文字
        try:
            seal_font = ImageFont.truetype("simhei.ttf", 16)
        except:
            seal_font = ImageFont.load_default()

        seal_text = organization
        seal_text_bbox = draw.textbbox((0, 0), seal_text, font=seal_font)
        seal_text_width = seal_text_bbox[2] - seal_text_bbox[0]
        seal_text_height = seal_text_bbox[3] - seal_text_bbox[1]
        seal_text_x = seal_center_x - seal_text_width // 2
        seal_text_y = seal_center_y - seal_text_height // 2 - 10
        draw.text((seal_text_x, seal_text_y), seal_text, fill=(139, 0, 0), font=seal_font)

        # 添加日期到印章下方
        date_text_bbox = draw.textbbox((0, 0), formatted_date, font=seal_font)
        date_text_width = date_text_bbox[2] - date_text_bbox[0]
        date_text_x = seal_center_x - date_text_width // 2
        date_text_y = seal_text_y + 25
        draw.text((date_text_x, date_text_y), formatted_date, fill=(139, 0, 0), font=seal_font)

        # 添加红色五角星(印章中间)
        # 定义五角星的坐标
        star_points = []
        for i in range(10):
            angle = math.pi / 2 + i * math.pi / 5
            r = 15 if i % 2 == 0 else 7  # 外点和内点的半径
            x = seal_center_x + r * math.cos(angle)
            y = seal_center_y - r * math.sin(angle)
            star_points.append((x, y))

        # 绘制五角星
        draw.polygon(star_points, fill=(139, 0, 0))

        # 保存到内存
        img_io = io.BytesIO()
        img.save(img_io, format='PNG')
        img_io.seek(0)

        # 返回图片
        return send_file(img_io, mimetype='image/png', as_attachment=True, download_name=f'certificate_{name}.png')

    except Exception as e:
        logger.error(f"生成奖状时发生错误: {str(e)}")
        return jsonify({'error': f'生成失败: {str(e)}'}), 500

@app.route('/process_image', methods=['POST'])
def process_image():
    try:
        # 检查是否有文件上传
        if 'image' not in request.files:
            return jsonify({'error': '请选择要上传的图片'}), 400

        file = request.files['image']
        if file.filename == '':
            return jsonify({'error': '请选择要上传的图片'}), 400

        # 检查是否选择了尺寸
        selected_ratios = request.form.getlist('ratios')
        if not selected_ratios:
            return jsonify({'error': '请至少选择一个图片尺寸'}), 400

        # 检查文件类型
        if not allowed_file(file.filename):
            return jsonify({'error': '只支持JPG、JPEG、PNG和GIF格式的图片'}), 400

        # 创建内存中的图片对象
        img = Image.open(io.BytesIO(file.read()))

        # 创建一个字节流用于存储ZIP文件
        zip_buffer = io.BytesIO()

        # 创建ZIP文件
        with zipfile.ZipFile(zip_buffer, 'w', zipfile.ZIP_DEFLATED) as zip_file:
            # 处理每个选择的尺寸
            for ratio_key in selected_ratios:
                if ratio_key in image_aspect_ratios:
                    target_width = image_aspect_ratios[ratio_key]['width']
                    target_height = image_aspect_ratios[ratio_key]['height']

                    # 调整图片尺寸并裁剪
                    resized_img = resize_and_crop(img, target_width, target_height)

                    # 将调整后的图片保存到内存
                    img_buffer = io.BytesIO()
                    resized_img.save(img_buffer, format='PNG')
                    img_buffer.seek(0)

                    # 将图片添加到ZIP文件
                    zip_file.writestr(f'{ratio_key}_image.png', img_buffer.read())

        # 重置ZIP文件指针到开头
        zip_buffer.seek(0)

        # 返回ZIP文件供下载
        return send_file(zip_buffer, as_attachment=True, download_name='resized_images.zip', mimetype='application/zip')

    except Exception as e:
        logger.error(f"处理图片时发生错误: {str(e)}")
        return jsonify({'error': f'处理失败: {str(e)}'}), 500

def allowed_file(filename):
    """检查文件扩展名是否允许"""
    ALLOWED_EXTENSIONS = {'png', 'jpg', 'jpeg', 'gif'}
    return '.' in filename and filename.rsplit('.', 1)[1].lower() in ALLOWED_EXTENSIONS

def resize_and_crop(img, target_width, target_height):
    """调整图片尺寸并裁剪到目标比例"""
    # 获取原始尺寸
    img_width, img_height = img.size

    # 计算调整后的尺寸,保持原始比例
    img_ratio = img_width / img_height
    target_ratio = target_width / target_height

    if img_ratio > target_ratio:
        # 原始图片更宽,按高度调整,然后裁剪宽度
        new_height = target_height
        new_width = int(new_height * img_ratio)
        img = img.resize((new_width, new_height), Image.LANCZOS)
        # 计算裁剪区域
        left = (new_width - target_width) // 2
        right = left + target_width
        img = img.crop((left, 0, right, target_height))
    else:
        # 原始图片更高,按宽度调整,然后裁剪高度
        new_width = target_width
        new_height = int(new_width / img_ratio)
        img = img.resize((new_width, new_height), Image.LANCZOS)
        # 计算裁剪区域
        top = (new_height - target_height) // 2
        bottom = top + target_height
        img = img.crop((0, top, target_width, bottom))

    return img

# 清理临时文件(可选,可根据需要添加定时任务)
def cleanup_temp_files():
    for file in os.listdir(temp_dir):
        file_path = os.path.join(temp_dir, file)
        try:
            if os.path.isfile(file_path):
                os.unlink(file_path)
        except Exception as e:
            print(f'清理临时文件时出错: {e}')

if __name__ == '__main__':
    import math  # 导入math模块用于绘制五角星
    app.run(debug=True, host='0.0.0.0', port=5000)
前端代码html
html
<!DOCTYPE html>
<html lang="zh-CN">
<head>
    <meta charset="UTF-8">
    <meta name="viewport" content="width=device-width, initial-scale=1.0">
    <title>奖状生成器</title>
    <style>
        body {
            font-family: 'Microsoft YaHei', Arial, sans-serif;
            background: linear-gradient(135deg, #667eea 0%, #764ba2 100%);
            margin: 0;
            padding: 20px;
            display: flex;
            justify-content: center;
            align-items: center;
            min-height: 100vh;
        }
        .container {
            background: white;
            border-radius: 12px;
            box-shadow: 0 10px 30px rgba(0,0,0,0.1);
            padding: 40px;
            max-width: 800px;
            width: 100%;
        }
        h1 {
            text-align: center;
            color: #333;
            margin-bottom: 30px;
            font-size: 28px;
        }
        .form-group {
            margin-bottom: 20px;
        }
        label {
            display: block;
            margin-bottom: 8px;
            font-weight: 600;
            color: #555;
        }
        input[type="text"], input[type="date"], textarea {
            width: 100%;
            padding: 12px;
            border: 2px solid #ddd;
            border-radius: 8px;
            font-size: 16px;
            transition: border-color 0.3s;
        }
        input[type="text"]:focus, input[type="date"]:focus, textarea:focus {
            border-color: #667eea;
            outline: none;
        }
        textarea {
            resize: vertical;
            min-height: 100px;
        }
        .button-group {
            text-align: center;
            margin-top: 30px;
        }
        button {
            background: linear-gradient(135deg, #667eea 0%, #764ba2 100%);
            color: white;
            border: none;
            padding: 15px 40px;
            font-size: 18px;
            border-radius: 8px;
            cursor: pointer;
            transition: transform 0.3s, box-shadow 0.3s;
        }
        button:hover {
            transform: translateY(-2px);
            box-shadow: 0 5px 15px rgba(102, 126, 234, 0.4);
        }
        .preview-container {
            margin-top: 30px;
            text-align: center;
        }
        .preview-image {
            max-width: 100%;
            border: 1px solid #ddd;
            border-radius: 8px;
            box-shadow: 0 5px 15px rgba(0,0,0,0.1);
        }
        .loading-overlay {
            display: none;
            position: fixed;
            top: 0;
            left: 0;
            width: 100%;
            height: 100%;
            background: rgba(255, 255, 255, 0.8);
            justify-content: center;
            align-items: center;
            z-index: 1000;
        }
        .loading-spinner {
            width: 50px;
            height: 50px;
            border: 5px solid #f3f3f3;
            border-top: 5px solid #667eea;
            border-radius: 50%;
            animation: spin 1s linear infinite;
        }
        @keyframes spin {
            0% { transform: rotate(0deg); }
            100% { transform: rotate(360deg); }
        }
        .message {
            margin-top: 20px;
            padding: 15px;
            border-radius: 8px;
            display: none;
        }
        .message.success {
            background-color: #d4edda;
            color: #155724;
            border: 1px solid #c3e6cb;
        }
        .message.error {
            background-color: #f8d7da;
            color: #721c24;
            border: 1px solid #f5c6cb;
        }
    </style>
</head>
<body>
    <div class="container">
        <h1>奖状生成器</h1>

        <form id="certificate-form" enctype="multipart/form-data">
            <div class="form-group">
                <label for="name">获奖者姓名</label>
                <input type="text" id="name" name="name" required placeholder="请输入获奖者姓名">
            </div>

            <div class="form-group">
                <label for="date">颁发日期</label>
                <input type="date" id="date" name="date" required>
            </div>

            <div class="form-group">
                <label for="award_type">奖项类型</label>
                <input type="text" id="award_type" name="award_type" value="九月最佳服务奖" placeholder="请输入奖项类型">
            </div>

            <div class="form-group">
                <label for="description">获奖描述</label>
                <textarea id="description" name="description" placeholder="请输入获奖描述">学员评价:5颗星,领导评价:5颗星,同事评价:5颗星,业绩成绩突出,工作认真负责,为人热情团结,学员反馈好评,坚守初心,时时刻刻为学员服务!</textarea>
            </div>

            <div class="form-group">
                <label for="organization">颁发机构</label>
                <input type="text" id="organization" name="organization" value="奕鼎通.Net学院" placeholder="请输入颁发机构名称">
            </div>

            <div class="button-group">
                <button type="submit">生成并下载奖状</button>
            </div>
        </form>

        <div id="success-message" class="message success">
            奖状生成成功!请点击下载按钮保存图片。
            <br><br>
            <a id="download-link" href="#" style="display: none;" download="certificate.png">下载奖状</a>
        </div>

        <div id="error-message" class="message error"></div>
    </div>

    <div id="loading" class="loading-overlay">
        <div class="loading-spinner"></div>
    </div>

    <script>
        document.addEventListener('DOMContentLoaded', function() {
            // 设置默认日期为今天
            const today = new Date();
            const formattedDate = today.toISOString().split('T')[0];
            document.getElementById('date').value = formattedDate;

            const form = document.getElementById('certificate-form');
            const loading = document.getElementById('loading');
            const successMessage = document.getElementById('success-message');
            const errorMessage = document.getElementById('error-message');
            const downloadLink = document.getElementById('download-link');

            form.addEventListener('submit', function(e) {
                e.preventDefault();

                // 显示加载状态
                loading.style.display = 'flex';
                successMessage.style.display = 'none';
                errorMessage.style.display = 'none';

                const formData = new FormData(form);

                fetch('/generate_certificate', {
                    method: 'POST',
                    body: formData
                })
                .then(response => {
                    if (!response.ok) {
                        throw new Error('网络请求失败');
                    }
                    return response.blob();
                })
                .then(blob => {
                    loading.style.display = 'none';

                    // 创建下载链接
                    const url = URL.createObjectURL(blob);
                    downloadLink.href = url;
                    downloadLink.style.display = 'inline-block';
                    downloadLink.click();

                    // 显示成功消息
                    successMessage.style.display = 'block';

                    // 清理URL对象
                    setTimeout(() => {
                        URL.revokeObjectURL(url);
                    }, 10000);
                })
                .catch(error => {
                    loading.style.display = 'none';
                    errorMessage.textContent = '生成失败: ' + error.message;
                    errorMessage.style.display = 'block';
                });
            });
        });
    </script>
</body>
</html>
八、总结
通过本文的介绍,我们学习了如何使用Flask和PIL库开发一个简单实用的奖状生成器。这个工具可以大大提高制作奖状的效率,适用于学校、企业等各种场景。
核心技术点回顾:
- 使用Flask框架构建Web应用
- 利用PIL库进行图像处理和文字绘制
- 设计友好的用户界面
- 实现表单数据处理和图片生成
希望这篇文章对你有所帮助!如果你有任何问题或建议,欢迎在评论区留言讨论。
代码下载地址
完整代码下点击这里