
🔥个人主页:Cx330🌸
❄️个人专栏:《C语言》《LeetCode刷题集》《数据结构-初阶》《C++知识分享》
《优选算法指南-必刷经典100题》《Linux操作系统》:从入门到入魔
🌟心向往之行必能至
🎥Cx330🌸的简介:

前言:
基于上篇博客的学习,我们已经掌握了pwd、ls、cd、mkdir、touch、rm六个基础入门指令,这篇博客将详细拆解 which、alias、man、echo、cp、mv 6 个指令及重定向用法,带你入门

目录
[一. 前置知识:Linux的底层逻辑](#一. 前置知识:Linux的底层逻辑)
[1.1 Linux指令本质:](#1.1 Linux指令本质:)
[1.2 ls vs ls-l vs ll:](#1.2 ls vs ls-l vs ll:)
[1.3 "一切皆文件":从 /dev 设备说起](#1.3 “一切皆文件”:从 /dev 设备说起)
[1.4 重定向:控制文件数据流](#1.4 重定向:控制文件数据流)
[二. 7 个高频基础指令(附含案例)](#二. 7 个高频基础指令(附含案例))
[2.1 which:定位命令路径](#2.1 which:定位命令路径)
[2.2 alias:自定义命令别名](#2.2 alias:自定义命令别名)
[2.3 man:查看联机手册](#2.3 man:查看联机手册)
[2.4 echo:输出内容与文件操作](#2.4 echo:输出内容与文件操作)
[2.5 重定向深度用法](#2.5 重定向深度用法)
[2.6 cp:复制文件 / 目录](#2.6 cp:复制文件 / 目录)
[2.7 mv:移动 / 重命名文件](#2.7 mv:移动 / 重命名文件)
[三. Linux 本篇高频指令速查表](#三. Linux 本篇高频指令速查表)
一. 前置知识:Linux的底层逻辑
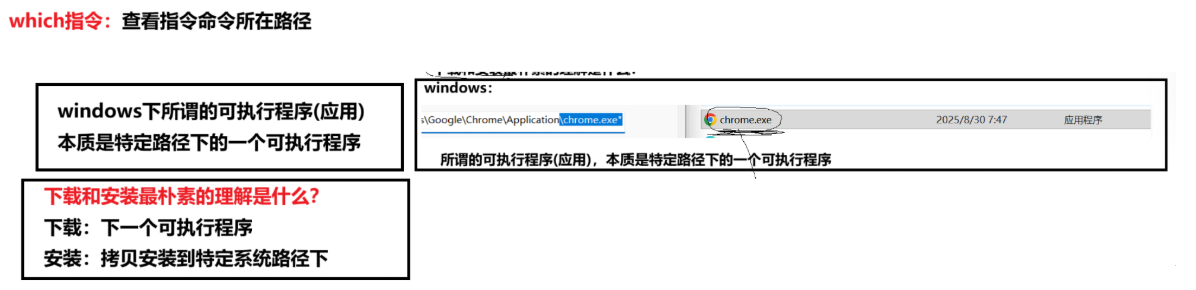
1.1 Linux指令本质:
终端输入的 ls,cp等指令,本质是系统中预先编译好的可执行程序(可执行文件)罢了,分两类:
- 内置指令:如 cd、alias,是 xShell 自带程序,无独立路径(which cd 查不到)
- 外部指令:如 ls、cp,是
/usr/bin等目录下的独立文件(which ls 可定位),终端可直接调用
补充说明: 指令,可执行程序,二进制文件,可执行文件其实是一回事
1.2 ls vs ls-l vs ll:
|-------|------------|------------------|------------|
| 命令 | 本质 | 显示内容 | 特点 |
| ls | 基础命令 | 仅文件名(多列) | 简洁、快速 |
| ls -l | 带选项的命令 | 详细信息(权限、所有者、大小等) | 功能强大,信息全面 |
| ll | ls -l的别名 | 与 ls -l 完全相同 | 快捷方式,输入更方便 |
-
ls:只显示文件名(最基础)。
-
ls -l:显示文件详细权限、大小、时间等信息。
-
ll:是 ls -l 的快捷方式(一个命令别名),两者输出完全一样
1.3 "一切皆文件":从 /dev 设备说起
Linux 中所有对象抽象为文件,包括硬件设备(存于 /dev 目录)
核心案例 :终端窗口对应 /dev/pts/N 设备文件(N 为编号),向其写入内容会直接在终端显示:
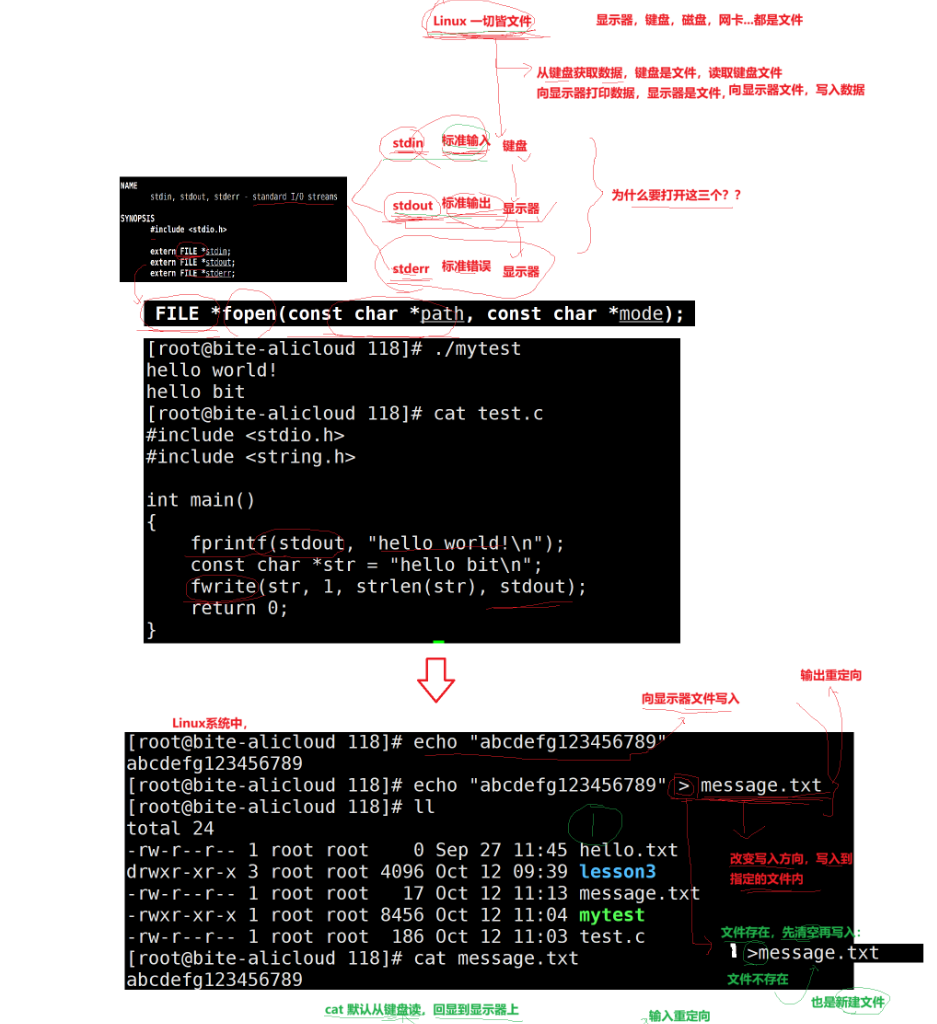
1.4 重定向:控制文件数据流
基于 "一切皆文件",重定向改变数据流向:
-
:覆盖写入文件(如 echo "a" > file)
-
:追加写入文件(如 echo "b" >> file)
- <:从文件读取输入(如 wc -l < file)
二. 7 个高频基础指令(附含案例)
2.1 which:定位命令路径
功能:搜索指定系统目录,显示指令对应的可执行文件路径
案例:
bash
# 查找ls(含别名)
[root@VM-4-4-centos ~]$ which ls
alias ls='ls --color=auto'
/usr/bin/ls

# 检查pwd(-s仅返回状态)
[root@VM-4-4-centos ~]$ which pwd
/usr/bin/pwd
2.2 alias:自定义命令别名
功能:为长命令设置简短别名,提升操作效率
语法说明:
- 设置:alias 别名='命令 选项'(等号前后无空格)
- 查看:alias(列出所有别名)
- 删除:unalias 别名
- 取消所有别名:unalias -a
案例:
bash
# 设置别名:ls -alh → ll(显示隐藏文件+详细列表+人性化大小)
[root@VM-4-4-centos ~]$ alias ll='ls -alh'
[root@VM-4-4-centos ~]$ ll  # 直接使用
total 40K
drwx------ 5 whb whb 4.0K Oct 12 15:30 .  # 隐藏的当前目录

# 设置路径别名:cd /home/whb/projects → cdp
[root@VM-4-4-centos ~]$ alias cdp='cd /home/whb/projects'
[root@VM-4-4-centos ~]$ cdp  # 快速跳转

# 删除别名
[root@VM-4-4-centos ~]$ unalias ll
[root@VM-4-4-centos ~]$ ll  # 失效
bash: ll: command not found
2.3 man:查看联机手册
功能 :查阅命令、函数、配置文件的详细说明(用法、选项、示例等)
语法 :man [选项] 命令
搭配:
- -k 根据关键字搜索联机帮助
- num 只在第num章节查找
- -a 将所有章节的都显示出来,比如 man printf 它会从第一章节开始搜索,搜到了就停止,用a选项的话,当按下q结束后,它还会继续往后面搜索,直到所有章节都搜索完毕
解释一下:man手册分为9个章节,其中前3个比较常用
- 是普通的命令
- 是系统调用,如open,write之类的(通过这个,至少可以很方便的查到调用这个函数,需要加什么头文件)
- 是库函数,如printf,fread是特殊文件,也就是/dev下的各种设备文件
案例:
bash
[root@VM-4-4-centos ~]$ man printf # 查看printf指令(没错,printf也是⼀个指 1
令)
[root@VM-4-4-centos ~]$ man fork # 查看系统调⽤,默认没有这个指令,man就⾃动
去2号⼿册查找
[root@VM-4-4-centos ~]$ man 2 frok # 查看系统调⽤
[root@VM-4-4-centos ~]$ man 3 printf # 查看C库函数
[root@VM-4-4-centos ~]$ man 7 signal # 查看变量
[root@VM-4-4-centos ~]$ man 7 environ
[root@VM-4-4-centos ~]$ man man # 查看man⼿册⾃⼰
2.4 echo:输出内容与文件操作
功能:打印文本 / 变量,配合重定向创建 / 追加文件(含设备文件)
案例:
bash
# 输出文本(默认换行)
[root@VM-4-4-centos ~]$ echo "Hello"
Hello

# 创建文件(>覆盖)和追加(>>)
[root@VM-4-4-centos ~]$ echo "First" > test.txt
[root@VM-4-4-centos ~]$ echo "Second" >> test.txt
2.5 重定向深度用法
核心场景:控制不同文件(普通文件 / 设备文件)的数据流
案例:
bash
# 1. 合并多个文件到新文件
[root@VM-4-4-centos ~]$ cat a.txt b.txt > c.txt  # a和b内容合并到c

# 2. 输入重定向(<):从文件读入,替代键盘
[root@VM-4-4-centos ~]$ cat < untestd.txt > tested.txt

# 3. 删除文件内容
[root@VM-4-4-centos lesson3]# cat mytest.txt
hello Lotso tech
[root@VM-4-4-centos lesson3]# >mytest.txt
[root@VM-4-4-centos lesson3]# cat mytest.txt
[root@VM-4-4-centos lesson3]#
2.6 cp:复制文件 / 目录
功能 :复制文件或目录,源文件保留(相当于"复制粘贴")
语法 :cp [选项] 源代码或目录 目标文件或目录
说明:
- cp指令用于复制文件或目录
- 如同时指定两个以上的文件或目录,且最后的目的地是一个已经存在的目录,则它会把前面指定的所有文件或目录复制到此目录中
搭配:
- -f 强行复制文件或目录,不论文件或者目录是否已经存在
- i 覆盖文件之前先询问用户
- -r 递归处理,将指定目录文件与子目录一并处理。若源文件或目录的形态,不属于目录或符号链接,则一律按普通文件处理
案例:
bash
# cp普通文件
[root@VM-4-4-centos lesson3]# echo "你好Lotso">mytest.txt
[root@VM-4-4-centos lesson3]# ls
1.txt  a.txt  b.txt  c.txt  mytest.txt
[root@VM-4-4-centos lesson3]# cat mytest.txt
你好Lotso
[root@VM-4-4-centos lesson3]# ll
total 8
-rw-r--r-- 1 root root 18 Oct 12 12:38 1.txt
-rw-r--r-- 1 root root  0 Oct 12 20:17 a.txt
-rw-r--r-- 1 root root  0 Oct 12 20:17 b.txt
-rw-r--r-- 1 root root  0 Oct 12 20:20 c.txt
-rw-r--r-- 1 root root 12 Oct 12 20:31 mytest.txt
[root@VM-4-4-centos lesson3]# cp mytest.txt mytest.txt-backup.txt
[root@VM-4-4-centos lesson3]# ll
total 12
-rw-r--r-- 1 root root 18 Oct 12 12:38 1.txt
-rw-r--r-- 1 root root  0 Oct 12 20:17 a.txt
-rw-r--r-- 1 root root  0 Oct 12 20:17 b.txt
-rw-r--r-- 1 root root  0 Oct 12 20:20 c.txt
-rw-r--r-- 1 root root 12 Oct 12 20:31 mytest.txt
-rw-r--r-- 1 root root 12 Oct 12 20:33 mytest.txt-backup.txt
[root@VM-4-4-centos lesson3]# cat mytest.txt-backup.txt
你好Lotso

# 将多个文件拷贝到指定路径下
[root@VM-4-4-centos lesson3]# mkdir dir
[root@VM-4-4-centos lesson3]# ll
total 16
-rw-r--r-- 1 root root   18 Oct 12 12:38 1.txt
-rw-r--r-- 1 root root    0 Oct 12 20:17 a.txt
-rw-r--r-- 1 root root    0 Oct 12 20:17 b.txt
-rw-r--r-- 1 root root    0 Oct 12 20:20 c.txt
drwxr-xr-x 2 root root 4096 Oct 12 20:35 dir
-rw-r--r-- 1 root root   12 Oct 12 20:31 mytest.txt
-rw-r--r-- 1 root root   12 Oct 12 20:33 mytest.txt-backup.txt
[root@VM-4-4-centos lesson3]# cp *txt dir
[root@VM-4-4-centos lesson3]# ll
total 16
-rw-r--r-- 1 root root   18 Oct 12 12:38 1.txt
-rw-r--r-- 1 root root    0 Oct 12 20:17 a.txt
-rw-r--r-- 1 root root    0 Oct 12 20:17 b.txt
-rw-r--r-- 1 root root    0 Oct 12 20:20 c.txt
drwxr-xr-x 2 root root 4096 Oct 12 20:35 dir
-rw-r--r-- 1 root root   12 Oct 12 20:31 mytest.txt
-rw-r--r-- 1 root root   12 Oct 12 20:33 mytest.txt-backup.txt
[root@VM-4-4-centos lesson3]# tree dir
dir
|-- 1.txt
|-- a.txt
|-- b.txt
|-- c.txt
|-- mytest.txt
`-- mytest.txt-backup.txt

0 directories, 6 files

# cp如果目标文件存在,就覆盖 && 拷贝前询问(可以加-i)
[root@VM-4-4-centos lesson3]# echo "hello Lotso tech">mytest.txt
[root@VM-4-4-centos lesson3]# cat mytest.txt
hello Lotso tech
[root@VM-4-4-centos lesson3]# cp mytest.txt mytest.txt-backup.txt
cp: overwrite 'mytest.txt-backup.txt'? y
[root@VM-4-4-centos lesson3]# cat mytest.txt-backup.txt
hello Lotso tech

#递归强制拷贝整个目录
[root@VM-4-4-centos lesson3]# tree test
test
`-- dir
    |-- 1.txt
    |-- a.txt
    |-- b.txt
    |-- c.txt
    |-- mytest.txt
    `-- mytest.txt-backup.txt

1 directory, 6 files
[root@VM-4-4-centos lesson3]# cp -rf test test-backup
[root@VM-4-4-centos lesson3]# tree test-backup
test-backup
`-- dir
    |-- 1.txt
    |-- a.txt
    |-- b.txt
    |-- c.txt
    |-- mytest.txt
    `-- mytest.txt-backup.txt

1 directory, 6 files
2.7 mv:移动 / 重命名文件
功能 :移动文件 / 目录或重命名(同一目录下的移动),源文件删除(类似 "剪切粘贴")。
语法 :mv [选项] 源文件或目录 目标文件或目录
功能:
- 视mv命令中第二个参数类型的不同(是目标文件还是目录),mv指令将文件重命名或将其移至一个新的目录中
- 当第二个参数类型是文件时,mv命令完成文件重命名,此时源文件只能有一个(也可以是源目录名),它将所给的源文件或目录重命名为给定的目标文件名
- 当第二个参数是已经存在的目录名称时,源文件或目录参数可以有多个,mv命令将各参数指定的源文件均移至目录中
搭配:
- -f:如果目标文件已存在,不会询问直接覆盖
- -i:若目标文件已经存在时,就会询问是否覆盖
案例:
bash
# 更改名称
[root@VM-4-4-centos test-mv]# touch myfile.txt
[root@VM-4-4-centos test-mv]# ll
total 0
-rw-r--r-- 1 root root 0 Oct 12 20:58 myfile.txt
[root@VM-4-4-centos test-mv]# mv myfile.txt yourfile.txt
[root@VM-4-4-centos test-mv]# ll
total 0
-rw-r--r-- 1 root root 0 Oct 12 20:58 yourfile.txt

# 如果当前路径存在同名文件,改名即覆盖。这个普通用户用-i 会在覆盖前询问
[root@VM-4-4-centos test-mv]# touch myfile.txt
[root@VM-4-4-centos test-mv]# ll
total 0
-rw-r--r-- 1 root root 0 Oct 12 20:59 myfile.txt
-rw-r--r-- 1 root root 0 Oct 12 20:58 yourfile.txt
[root@VM-4-4-centos test-mv]# mv yourfile.txt myfile.txt
mv: overwrite 'myfile.txt'? y
[root@VM-4-4-centos test-mv]# ll
total 0
-rw-r--r-- 1 root root 0 Oct 12 20:58 myfile.txt

# mv整个目录
[root@VM-4-4-centos test-mv]# touch myfile.txt
[root@VM-4-4-centos test-mv]# mkdir temp
[root@VM-4-4-centos test-mv]# ll
total 4
-rw-r--r-- 1 root root    0 Oct 12 21:10 myfile.txt
drwxr-xr-x 2 root root 4096 Oct 12 21:10 temp
[root@VM-4-4-centos test-mv]# mv myfile.txt temp
[root@VM-4-4-centos test-mv]# ls
temp
[root@VM-4-4-centos test-mv]# mv temp ../
[root@VM-4-4-centos test-mv]# ls
[root@VM-4-4-centos test-mv]# ls -d ../temp
../temp
三. Linux 本篇高频指令速查表
|-----------|----------------------------------|-----------------------------------------------------------------------------------------------------------------------------------------------------------------------------------------------------------------|------------------------------------------------------------------------------------------------------------------------------------------------------------------|
| 指令/功能 | 核心功能 | 必学选项/用法 | 典型场景 |
| which | 定位命令对应的可执行文件路径 | -a:显示所有匹配路径(适合同名多版本程序,如 which -a python) | 1. 检查命令是否安装(无结果则未安装) 2. 区分系统自带与手动安装版本(如 python 和 python3) |
| alias | 为长命令设置简短别名,减少重复输入 | 1. 设置:alias 别名='完整命令'(如 alias ll='ls -alh') 2. 查看:直接输入 alias(列出所有别名) 3. 删除:unalias 别名(如 unalias ll) | 简化高频长命令: 1. 将 ls -a -l -h 简化为 ll 2. 将 cd /home/user/projects 简化为 cdp |
| man | 查看命令、系统调用、库函数的详细手册 | 1. -k 关键词:按关键词搜索相关命令(如 man -k copy 找复制相关命令) 2. 章节号:1=普通命令(如 man 1 ls)、2=系统调用(如 man 2 open)、3=库函数(如 man 3 printf) | 1. 查指令选项含义(如 man ls 了解 -a 显示隐藏文件的作用) 2. 查系统调用/库函数用法(如程序员查 man 2 fork 了解进程创建函数) |
| echo | 输出文本、变量值到终端,或配合重定向操作文件 | 1. -e:支持转义符(\n 换行、\t 制表符,如 echo -e "Name\tAge") 2. -n:输出后不换行(如 echo -n "Hello " && echo "World") 3. 重定向:echo 内容 > 文件(覆盖)、echo 内容 >> 文件(追加) | 1. 快速创建测试文件(echo "Test content" > test.txt) 2. 向终端设备写消息(echo "Warning" > /dev/pts/1,目标终端可见) 3. 打印变量值(name="Alice" && echo "My name is $name") |
| 重定向 | 改变程序的输入/输出流向(从默认设备转向文件) | 1. >:覆盖写入文件(如 cat a.txt > b.txt,清空 b.txt 后写入 a.txt 内容) 2. >>:追加写入文件(如 echo "New line" >> b.txt,在 b.txt 末尾加内容) 3. 2>:捕获错误信息(如 ls nofile.txt 2> error.log,错误不显示在终端) 4. <:从文件读输入(如 wc -l < b.txt,等价于 `cat b.txt | wc -l`) |
| cp | 复制文件或目录,源文件保留(类似"复制粘贴") | 1. -r/-R:递归复制目录(必须加,否则无法复制目录,如 cp -r docs/ backup/) 2. -i:覆盖前提示确认(默认行为,如 cp -i old.txt new.txt) 3. -v:显示复制过程(如 cp -v *.txt dir,输出每个文件的复制路径) 4. -f:强制覆盖,不提示(优先级高于 -i) | 1. 数据备份(cp -r /home/docs /backup 备份文档目录) 2. 批量同步文件(cp -v .txt /data 将所有 txt 文件复制到 data 目录) 3. 复制并改名(cp config.ini config_bak.ini 创建配置文件备份) |
| mv | 移动文件/目录到新位置,或重命名(源文件删除,类似"剪切粘贴") | 1. -i:覆盖前提示确认(如 mv -i file.txt dir/) 2. -v:显示移动/重命名过程(如 mv -v old.txt new.txt) 3. -n:不覆盖已存在的目标文件(如 mv -n file.txt dir/,若 dir 有 file.txt 则不执行) | 1. 整理文件(mv .log /var/logs 将所有日志文件移到 logs 目录) 2. 批量重命名(mv old_.txt new_.txt 将 old_1.txt 改为 new_1.txt 等) 3. 移动并改名(mv photo.jpg /pics/trip.jpg 将照片移到 pics 目录并改名) |
结尾:
往期回顾:
总结:掌握这些指令的选项和用法,结合 "一切皆文件" 的思想,你会发现 Linux 操作的逻辑一致性 ------ 无论是操作普通文件、终端设备(/dev/pts),还是硬件(/dev/sda),都能通过统一的指令和重定向实现