1.配置文件
1.1 概述
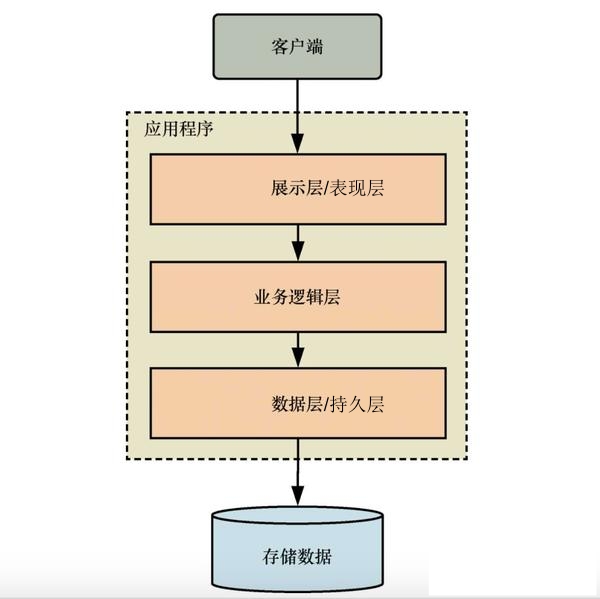
计算机配置文件:用于存储系统、应用程序的设置信息,通常以文本或结构化数据格式(如JSON、XML、INI等)保存。其核心功能包括但不限于:
- 参数定制:允许用户或管理员调整软件或硬件的运行参数
- 环境适配:根据不同设备或场景加载特定配置(如开发/生产环境)
- 持久化存储:确保重启后设置仍生效
SpringBoot配置文件:SpringBoot支持多种类型的配置文件,常见的格式包括properties、yaml和yml,主要用于集中管理应用程序的各种配置参数,简化部署和开发过程中的环境切换
- YAML和YML本质上是相同的文件格式,只是文件扩展名的不同,两者在功能和使用上没有区别
1.2 properties
- properties配置文件是最早期的配置⽂件格式,也是创建SpringBoot项⽬默认的配置⽂件
- 采用常见的键值对格式(key=value)
- 支持
#开头的注释
properties
#应用程序名称
spring.application.name=configuration
#应用程序端口号
server.port=8080
#数据库连接信息
spring.datasource.url=jdbc:mysql://127.0.0.1:3306/database_name?characterEncoding=utf8&useSSL=false
spring.datasource.username=root
spring.datasource.password=root
1.3 yml
- 采用键值对格式(key: value),冒号后必须有空格
- 数据序列化格式,通过缩进表示层级关系
- 支持
#开头的注释
yaml
spring:
  application:
    #应用程序名称
    name: configuration
  #数据库连接信息
  datasource:
    url: jdbc:mysql://127.0.0.1:3306/database_name?characterEncoding=utf8&useSSL=false
    username: root
    password: root
#应用程序端口号
server:
  port: 8080
1.4 优缺点对比
properties
优点:
- 语法简单直观,采用key=value形式,适合初学者快速上手
- 与Java生态兼容性极强
缺点:
- 缺乏层次结构,复杂配置时容易冗余。上述配置数据库连接信息时spring.datasource前缀冗余
- 不支持数据类型定义,所有值均为字符串,需手动转换
yml
优点:
- 层次化结构清晰,通过缩进表示层级,适合复杂配置场景
- 支持数据类型(如布尔值、数字),减少手动类型转换
缺点:
- 格式错误易导致解析失败(容易忽略冒号后空格)
- 部分旧版工具链兼容性较差,需额外依赖解析库
注:SpringBoot同时支持两种格式,混合使用时若key重复,properties优先级高于yml
1.5 @Value注解
作用:是Spring框架提供了一个@Value注解(org.springframework.beans.factory.annotation.Value),用于将外部配置文件中的值注入到Spring管理的Bean中
示例:(properties和yml的读取方式相同)
java
package org.example.configuration.config;
import org.springframework.beans.factory.annotation.Value;
import org.springframework.context.annotation.Configuration;
@Configuration
public class Config {
    @Value("${spring.application.name}")
    private String applicationName;
    @Value("${server.port}")
    private Integer port;
    @Value("${spring.datasource.url}")
    private String url;
    @Value("${spring.datasource.username}")
    private String username;
    @Value("${spring.datasource.password}")
    private String password;

    public void print() {
        System.out.println("applicationName=" + applicationName);
        System.out.println("port=" + port);
        System.out.println("url=" + url);
        System.out.println("username=" + username);
        System.out.println("password=" + password);
    }
}

package org.example.configuration;
import org.example.configuration.config.Config;
import org.springframework.boot.SpringApplication;
import org.springframework.boot.autoconfigure.SpringBootApplication;
import org.springframework.context.ApplicationContext;
@SpringBootApplication
public class ConfigurationApplication {
    public static void main(String[] args) {
        ApplicationContext context = SpringApplication.run(ConfigurationApplication.class, args);
        Config config = context.getBean(Config.class);
        config.print();
    }
}
运行结果 :
applicationName=configuration
port=8080
url=jdbc:mysql://127.0.0.1:3306/database_name?characterEncoding=utf8&useSSL=false
username=root
password=root
2.mybatis
2.1 概述
MyBatis是一款优秀的持久层框架 ,支持自定义 SQL、存储过程、高级映射以及多种配置方式。它消除了几乎所有的JDBC代码和参数的手动设置以及结果集的检索
- 支持存储过程:指的是数据库管理系统(DBMS)允许用户创建、存储和执行存储过程的能力。存储过程是一组预编译的SQL语句,存储在数据库中,可以被应用程序调用执行
- 支持高级映射:指通过配置或注解实现复杂SQL查询结果与Java对象之间的灵活转换。其核心目标是简化数据库关联操作,提升开发效率
- 支持多种配置方式 :mybatis支持注解和xml两种配置方式
2.2 前置操作
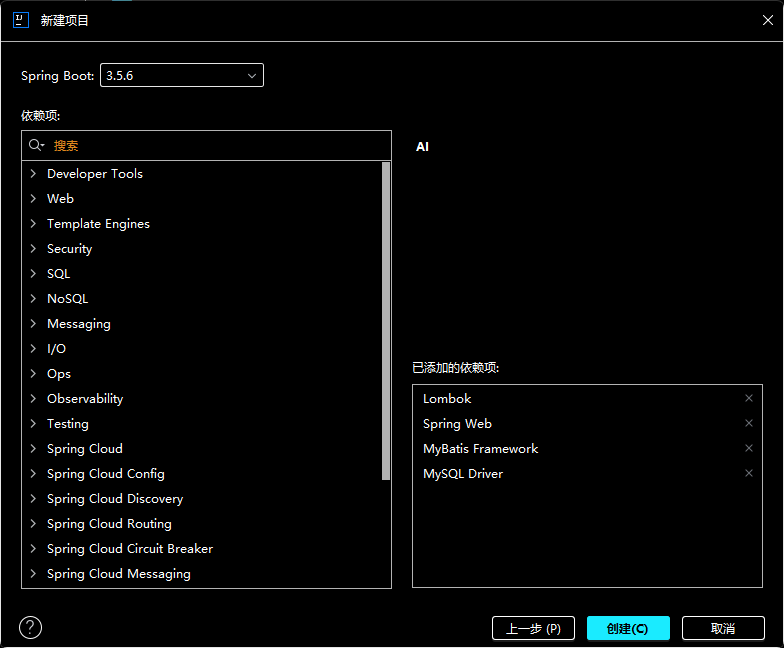
引入依赖 :Spring Web,Mybatis Framework,MySQL Driver,Lombok
在application.properties/yml中添加数据库连接信息:
properties
#应用程序名称
spring.application.name=configuration
#应用程序端口号
server.port=8080
#数据库连接信息
spring.datasource.url=jdbc:mysql://127.0.0.1:3306/database_name?characterEncoding=utf8&useSSL=false
spring.datasource.username=root
spring.datasource.password=root
#自动驼峰转换
mybatis.configuration.map-underscore-to-camel-case=true
yaml
spring:
  application:
    #应用程序名称
    name: configuration
  #数据库连接信息
  datasource:
    url: jdbc:mysql://127.0.0.1:3306/database_name?characterEncoding=utf8&useSSL=false
    username: root
    password: root
#应用程序端口号
server:
  port: 8080
mybatis:
  configuration:
    map-underscore-to-camel-case: true #自动驼峰转换
SQL命名规范:采用下划线分隔单词(如order_detail)
Java命名规范:大驼峰/小驼峰
2.3 注解
2.3.1 配置
- 1.创建一个接口,并使用 @Mapper注解 修饰
java
import org.apache.ibatis.annotations.Mapper;
@Mapper
public interface BlogMapper {
    //其他代码
}@Mapper注解:允许开发者直接在接口方法上通过注解配置SQL语句,无需编写XML映射文件。适用于简单SQL场景,能显著减少配置量
- 2.初始化数据
sql
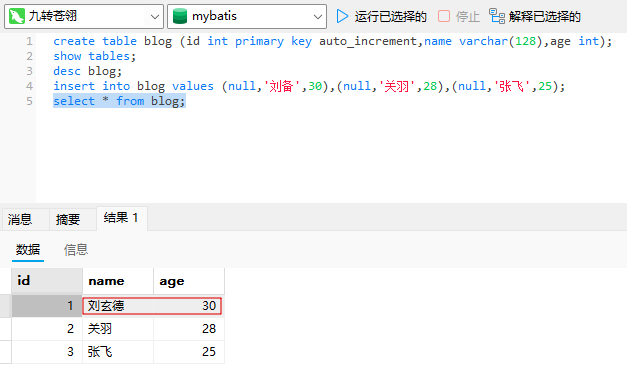
create table blog (id int primary key auto_increment,name varchar(128),age int);

insert into blog values (null,'刘备',30),(null,'关羽',28),(null,'张飞',25);- 3.创建对应实体类
sql
import lombok.Data;

@Data
public class PersonInfo {
    private Integer id;
    private String name;
    private Integer age;

    public PersonInfo(Integer id, String name, Integer age) {
        this.id = id;
        this.name = name;
        this.age = age;
    }

    public PersonInfo() {
    }
}
2.3.2 CRUD
sql
import com.example.spring_mybatis.model.PersonInfo;
import org.apache.ibatis.annotations.*;

@Mapper
public interface BlogMapper {

    @Select("select * from blog")
    List<PersonInfo> getPersonInfoAll();

    @Insert("insert into blog values (#{id},#{name},#{age})")
    Integer addPerson(PersonInfo person);

    @Update("update blog set name = #{name},age = #{age} where id = #{id}")
    Integer updatePerson(PersonInfo personInfo);

    @Delete("delete from blog where id = #{id}")
    Integer deletePerson(Integer id);
}按住alt+insert,可在test目录下生成以上方法的测试方法
sql
import com.example.spring_mybatis.model.PersonInfo;
import lombok.extern.slf4j.Slf4j;
import org.junit.jupiter.api.Test;
import org.springframework.beans.factory.annotation.Autowired;
import org.springframework.boot.test.context.SpringBootTest;

import java.util.List;

@SpringBootTest
@Slf4j
class BlogMapperTest {
    private final BlogMapper blogMapper;

    @Autowired
    public BlogMapperTest(BlogMapper blogMapper) {
        this.blogMapper = blogMapper;
    }

    @Test
    void getPersonInfoAll() {
        List<PersonInfo> personInfoAll = blogMapper.getPersonInfoAll();
        log.info("查询成功,personInfoAll:{}",personInfoAll.toString());
        //查询成功,personInfoAll:[PersonInfo(id=1, name=刘备, age=30),
        //PersonInfo(id=2, name=关羽, age=28),
        //PersonInfo(id=3, name=张飞, age=25)]
    }

    @Test
    void addPerson() {
        Integer ret = blogMapper.addPerson(new PersonInfo(null, "赵云", 25));
        log.info("添加成功,影响行数:{}",ret.toString());//添加成功,影响行数:1
    }

    @Test
    void updatePerson() {
        Integer ret = blogMapper.updatePerson(new PersonInfo(1, "刘备", 35));
        log.info("更新成功,影响行数:{}",ret.toString());//更新成功,影响行数:1
    }

    @Test
    void deletePerson() {
        Integer ret = blogMapper.deletePerson(4);
        log.info("删除成功,影响行数:{}",ret.toString());//删除成功,影响行数:1
    }
}
2.3.3 @Param
作用:用于在Mapper接口方法中为形式参数指定名称。当方法有多个参数时,通过该注解明确SQL中引用的参数名,避免依赖参数顺序
java
@Mapper
public interface BlogMapper {
    //@Param
    @Update("update blog set name = #{name},age = #{age} where id = #{id}")
    Integer updatePersonInfo(@Param("id") Integer userId,@Param("name") String userName,@Param("age") Integer userAge);
}
java
@SpringBootTest
@Slf4j
class BlogMapperTest {
    private final BlogMapper blogMapper;

    @Autowired
    public BlogMapperTest(BlogMapper blogMapper) {
        this.blogMapper = blogMapper;
    }

    @Test
    void updatePersonInfo() {
        Integer ret = blogMapper.updatePersonInfo(1, "刘玄德", 30);
        log.info("更新成功,影响行数:{}",ret.toString());//更新成功,影响行数:1
    }
}
2.4 xml
2.4.1 配置
- 1.创建一个接口,并使用 @Mapper注解 修饰
java
import org.apache.ibatis.annotations.Mapper;
@Mapper
public interface BlogXMLMapper {
    //其他代码
}- 2.配置mybatis的xml文件路径
xml
mybatis:
  mapper-locations: classpath:mybatis/**Mapper.xml #配置mybatis的xml文件路径
  #标识位于resources/mybatis路径下任何以Mapper结尾的xml文件为mybatis的配置文件
- 3.在resources/mybatis路径下创建以Mapper结尾的xml文件,并添加如下代码
xml
<?xml version="1.0" encoding="UTF-8"?>
<!DOCTYPE mapper PUBLIC "-//mybatis.org//DTD Mapper 3.0//EN" "http://mybatis.org/dtd/mybatis-3-mapper.dtd">
<!--namespace:用于指定该XML文件对应的Java接口或类的全限定名-->
<mapper namespace="com.example.spring_mybatis.mapper_blog.BlogXMLMapper">

</mapper>
2.4.2 示例
在接口中声明方法
java
import com.example.spring_mybatis.model_blog.PersonInfo;
import org.apache.ibatis.annotations.Mapper;

import java.util.List;

@Mapper
public interface BlogXMLMapper {
    List<PersonInfo> getPersonInfoAll();
}
在对应xml文件中实现接口方法
- id:是MyBatis映射文件中SQL语句的唯一标识符。需与Mapper接口中的方法名一致,保证映射正确
- resultType:指定SQL查询结果映射的Java对象类型,需为全限定类名
xml
<mapper namespace="com.example.spring_mybatis.mapper_blog.BlogXMLMapper">
    <select id="getPersonInfoAll" resultType="com.example.spring_mybatis.model_blog.PersonInfo">
        select * from blog
    </select>
</mapper>按住alt+insert,可在test目录下生成以上方法的测试方法
java
import com.example.spring_mybatis.model_blog.PersonInfo;
import lombok.extern.slf4j.Slf4j;
import org.junit.jupiter.api.Test;
import org.springframework.beans.factory.annotation.Autowired;
import org.springframework.boot.test.context.SpringBootTest;

import java.util.List;

@SpringBootTest
@Slf4j
class BlogXMLMapperTest {
    private final BlogXMLMapper blogXMLMapper;

    @Autowired
    public BlogXMLMapperTest(BlogXMLMapper blogXMLMapper) {
        this.blogXMLMapper = blogXMLMapper;
    }

    @Test
    void getPersonInfoAll() {
        List<PersonInfo> personInfoAll = blogXMLMapper.getPersonInfoAll();
        log.info("查询成功,personInfoAll:{}",personInfoAll.toString());
    }
}
运行结果 :
2.5 动态SQL
动态SQL:指在程序运行时根据条件或参数动态生成的SQL语句。与静态SQL相比,动态SQL更具灵活性,适用于需要根据不同条件构建查询的场景。例如,在某些web/app进行账号注册时会出现非必填选项
- mybatis的注解和xml两种方式都能实现动态SQL,但xml较为方便,所以下文使用xml来实现动态SQL
2.5.1 trim标签
作用:用于自定义字符串截取规则。包含四个属性:
- prefix:最终结果添加前缀
- suffix:最终结果添加后缀
- prefixOverrides:去除首部指定内容
- suffixOverrides:去除尾部指定内容
2.5.2 if标签
作用:用于条件判断,通常在where或set语句中使用。当test表达式的值为true时,包含标签内的SQL片段
xml
    <insert id="addPersonInfo">
        insert into blog
        <trim prefix="(" suffix=")" suffixOverrides=",">
            <if test="id != null">
                id,
            </if>
            <if test="name != null">
                name,
            </if>
            <if test="age != null">
                age,
            </if>
        </trim>
        values
        <trim prefix="(" suffix=")" suffixOverrides=",">
            <if test="id != null">
                #{id},
            </if>
            <if test="name != null">
                #{name},
            </if>
            <if test="age != null">
                #{age},
            </if>
        </trim>
    </insert>
2.5.3 where标签
作用:替代SQL中的where关键字。当if条件成立时才会加入SQL片段,并自动去除第一个子句的and/or
xml
    <select id="getPersonInfoByNameAndAge">
        select * from blog
        <where>
            <if test="name != null">
                and name = #{name}
            </if>
            <if test="age != null">
                and age = #{age}
            </if>
        </where>
    </select>
2.5.4 set标签
作用:用于update语句。当if条件成立时才会加入SQL片段,并自动去除最后一个子句的逗号、
xml
    <update id="updatePersonInfo">
        update blog
        <set>
            <if test="name != null">
                name = #{name},
            </if>
            <if test="age != null">
                age = #{age},
            </if>
        </set>
        <where>
            and id = #{id}
        </where>
    </update>
2.5.5 foreach标签
作用:用于集合遍历。主要属性:
- collection:集合参数名
- item:当前元素变量名
- open/close:包围符号
- separator:分隔符
java
    @Test
    void getPersonInfoById() {
        ArrayList<Integer> ids = new ArrayList<>();
        ids.add(1);
        ids.add(2);
        ids.add(3);
        List<PersonInfo> personInfoById = blogXMLMapper.getPersonInfoById(ids);
        System.out.println(personInfoById);
    }
xml
    <select id="getPersonInfoById" resultType="com.example.spring_mybatis.model_blog.PersonInfo">
        select * from blog
        where id in
        <foreach collection="ids" item="id" open="(" close=")" separator=",">
            #{id}
        </foreach>
    </select>
2.5.6 include标签
作用:用于引用SQL片段,通过refid指定要引用的片段id。需配合sql标签使用,实现代码复用
xml
    <sql id="collection">
        id,name,age
    </sql>
    <select id="getPersonInfoAll" resultType="com.example.spring_mybatis.model_blog.PersonInfo">
        select
        <include refid="collection">

        </include>
        from blog
    </select>
2.6 主键返回
主键返回:指在数据库插入操作后,自动获取刚插入记录的主键值。在mybatis中使用注解和xml都能获取到返回的主键
1.注解实现
java
@Mapper
public interface BlogMapper {
@Options(useGeneratedKeys = true,keyProperty = "id")
@Insert("insert into blog values (#{id},#{name},#{age})")
Integer addPerson(PersonInfo person);
}
@SpringBootTest
@Slf4j
class BlogMapperTest {
private final BlogMapper blogMapper;
@Autowired
public BlogMapperTest(BlogMapper blogMapper) {
this.blogMapper = blogMapper;
}
@Test
void addPerson() {
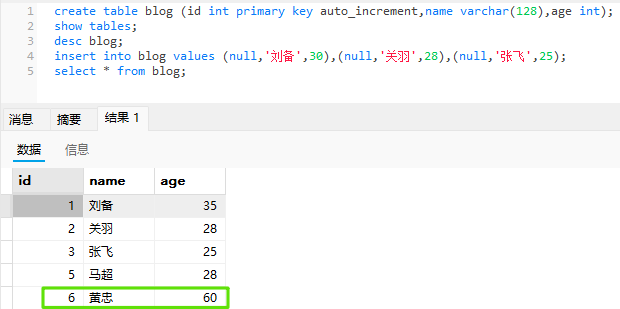
PersonInfo personInfo = new PersonInfo(null, "黄忠", 60);
Integer ret = blogMapper.addPerson(personInfo);
log.info("添加成功,影响行数:{},返回的主键值:{}",ret.toString(),personInfo.getId());//添加成功,影响行数:1,返回的主键值:6
}
}
2.通过xml实现
java
@SpringBootTest
@Slf4j
class BlogXMLMapperTest {
    private final BlogXMLMapper blogXMLMapper;

    @Autowired
    public BlogXMLMapperTest(BlogXMLMapper blogXMLMapper) {
        this.blogXMLMapper = blogXMLMapper;
    }

    @Test
    void addPersonInfo() {
        PersonInfo personInfo = new PersonInfo();
        personInfo.setAge(40);
        personInfo.setName("曹操");
        Integer ret = blogXMLMapper.addPersonInfo(personInfo);
        log.info("添加成功,影响行数:{},返回的主键值:{}",ret.toString(),personInfo.getId());//添加成功,影响行数:1,返回的主键值:7
    }
}
xml
    <insert id="addPersonInfo" useGeneratedKeys="true" keyProperty="id">
        insert into blog
        <trim prefix="(" suffix=")" suffixOverrides=",">
            <if test="id != null">
                id,
            </if>
            <if test="name != null">
                name,
            </if>
            <if test="age != null">
                age,
            </if>
        </trim>
        values
        <trim prefix="(" suffix=")" suffixOverrides=",">
            <if test="id != null">
                #{id},
            </if>
            <if test="name != null">
                #{name},
            </if>
            <if test="age != null">
                #{age},
            </if>
        </trim>
    </insert>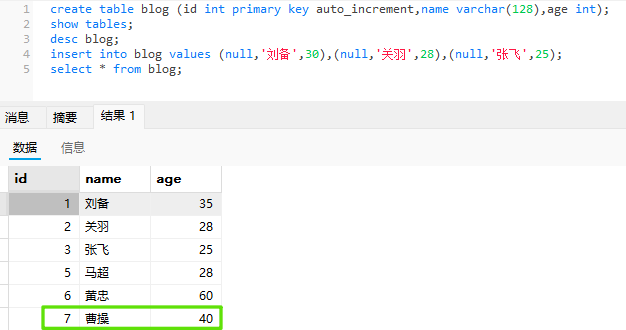
2.7 预编译/即时SQL
预编译SQL(Prepared Statements):SQL语句在程序运行前被预先编译并存储在数据库中。执行时只需传递参数,无需重新编译SQL语句
- 安全性高:通过参数化查询避免SQL注入攻击。参数化查询是一种将SQL语句与用户输入数据分离的数据库操作方式,查询语句中使用占位符(如?、@param等)代替直接拼接用户输入,执行时通过预编译机制将参数动态绑定到占位符位置
- 性能优化:编译一次,多次执行,减少数据库开销
即时SQL(Dynamic SQL):在程序运行时动态生成并立即编译执行,每次执行都可能涉及完整的SQL解析和编译过程
- 灵活性高:可根据运行时条件动态拼接SQL语句
- 潜在风险:直接拼接用户输入可能导致SQL注入
- 性能开销:每次执行需重新编译
#占位符会使用预编译机制,将参数值安全地绑定到SQL语句中,防止SQL注入攻击。MyBatis会将#替换为?,然后通过JDBC的预编译功能设置参数值
$占位符直接进行字符串替换,将参数值拼接到SQL语句中,不会进行预编译或转义处理
SQL注入攻击:当恶意输入" 'or 1 = '1 "时
1.预编译SQL
java
@Select("select * from blog where name= #{name}")
List<UserInfo> queryByName(String name)预编译SQL会根据参数的类型判断是否需要加引号,上述name参数是String类型,需要加引号,这就是参数化查询的作用。最终SQL:
sql
select * from blog where name = " 'or 1='1 "; # 整个 'or 1='1 会作为name的值2.即时SQL
java
@Select("select * from blog where name= '${name}'")
List<UserInfo> queryByName(String name)
即时SQL不会判断参数类型从而是否添加引号,所以需要手动加上单引号。最终SQL:
sql
select * from blog where name = ''or 1 = '1'; # 因为1=1是恒等式,所以该表的数据会被全部查询出来,这就是SQL注入