PIM-DM介绍
PIM-DM(Protocol Independent Multicast-Dense Mode,协议无关组播-密集模式)可以有效解决小型网络且用户数量密集的场景中,"点到多点"的数据传输问题。
PIM-DM主要采用扩散-剪枝的方式转发组播数据流。由于对组播组成员稀疏的网络会产生大量Prune消息,而对规模较大的网络扩散-剪枝周期会很长,所以PIM-DM适合规模较小、组播组成员相对比较密集的网络。
PIM-DM构建的组播分发树称为SPT(Source Specific Shortest Path Tree)。PIM-DM会假设网络中的组成员分布非常密集,每个网段都可能存在组成员。其设计思路是:首先将数据报文扩散到各个网段,然后再裁剪掉不存在组成员的网段。通过周期性的"扩散---剪枝",构建并维护一棵连接组播源和组成员的单向无环SPT。
实验拓扑
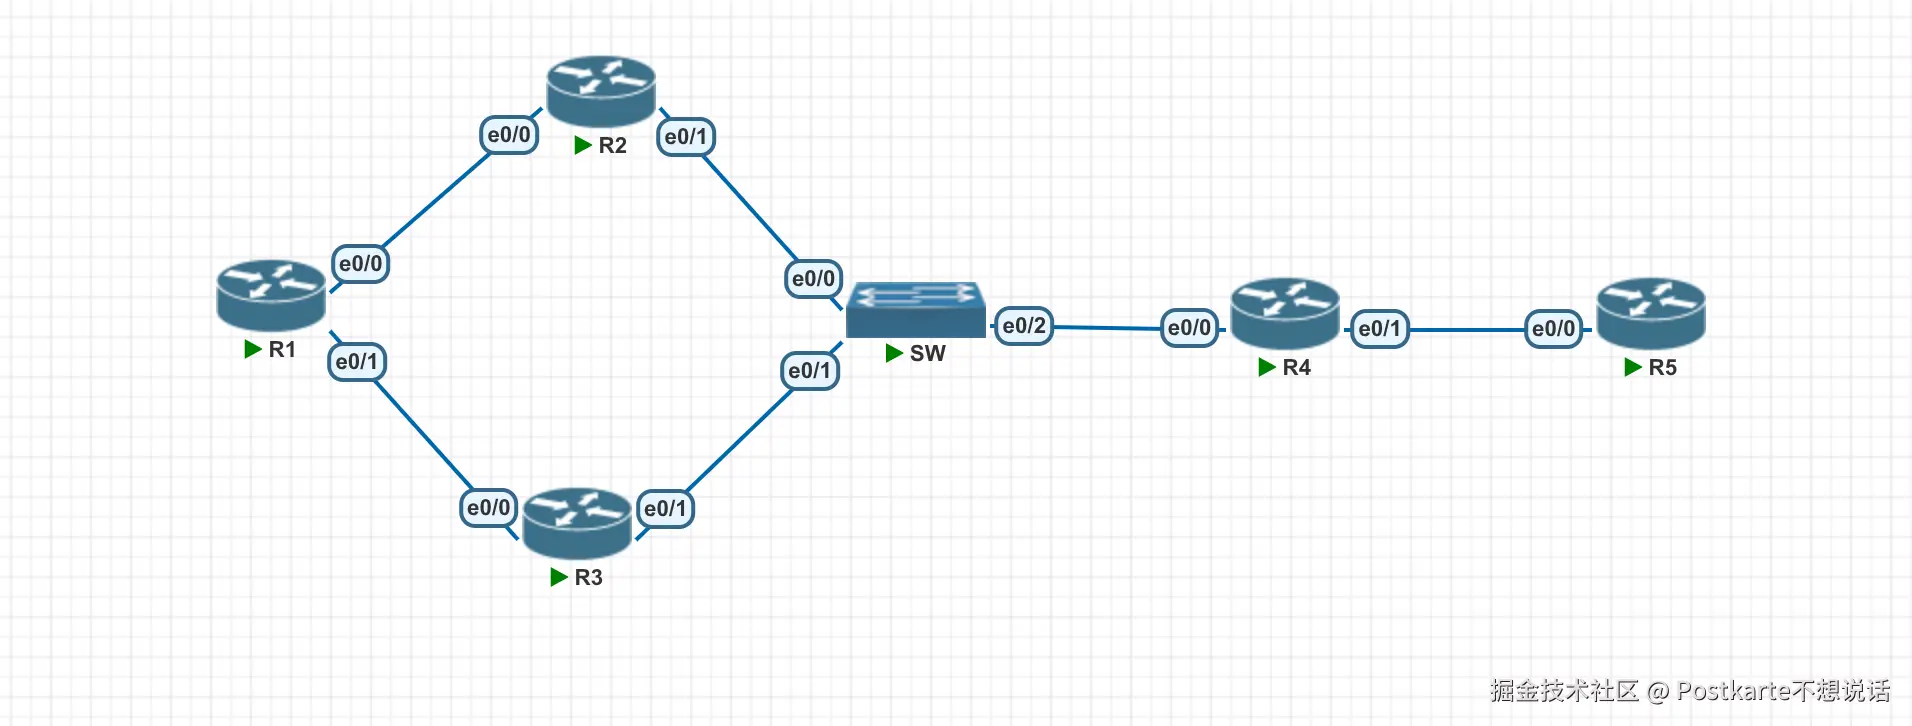
- R1的环回接口模拟组播源
- R5模拟一台主机加组238.1.1.10
基础配置
R1
sh
R1#configure terminal
R1(config)#interface lo0
R1(config-if)#ip address 11.1.1.1 255.255.255.0
R1(config-if)#no shutdown

R1(config-if)#interface eth0/0
R1(config-if)#ip address 12.1.1.1 255.255.255.0
R1(config-if)#no shutdown

R1(config-if)#interface eth 0/1
R1(config-if)#ip address 13.1.1.1 255.255.255.0
R1(config-if)#no shutdown
R2
sh
R2#configure terminal
R2(config)#interface eth 0/0
R2(config-if)#ip address 12.1.1.2 255.255.255.0
R2(config-if)#no shutdown

R2(config-if)#interface eth 0/1
R2(config-if)#ip address 100.1.1.2 255.255.255.0
R2(config-if)#no shutdown
R3
sh
R3#configure terminal
R3(config)#interface eth0/0
R3(config-if)#ip address 13.1.1.3 255.255.255.0
R3(config-if)#no shutdown

R3(config-if)#interface eth0/1
R3(config-if)#ip address 100.1.1.3 255.255.255.0
R3(config-if)#no shutdown
R4
sh
R4#configure terminal
R4(config)#interface eth 0/0
R4(config-if)#ip address 100.1.1.4 255.255.255.0
R4(config-if)#no shutdown

R4(config-if)#interface eth0/1
R4(config-if)#ip address 45.1.1.4 255.255.255.0
R4(config-if)#ip address 45.1.1.4 255.255.255.0
R4(config-if)#no shutdown
R5
sh
R5#configure terminal
R5(config)#interface eth0/0
R5(config-if)#ip address 45.1.1.5 255.255.255.0
R5(config-if)#no shutdown
配置IGP
组播要能正常通需要先配置单播。我们配置OSPF
R1
R1的环回接口一定要宣告,因为该接口是组播源,后面要对其进行RPF校验
sh
R1(config)#router ospf 1
R1(config-router)#network 11.1.1.0 0.0.0.255 area 0
R1(config-router)#network 12.1.1.0 0.0.0.255 area 0
R1(config-router)#network 13.1.1.0 0.0.0.255 area 0
R2
network 0.0.0.0 0.0.0.0:这里的 IP 地址和反掩码都是 0.0.0.0,表示匹配所有接口,也就是说将所有接口都启用 OSPF
sh
R2(config)#router ospf 1
R2(config-router)#network 0.0.0.0 0.0.0.0 area 0
R3
sh
R3(config)#router ospf 1
R3(config-router)#network 0.0.0.0 0.0.0.0 area 0
R4
sh
R4(config)#router ospf 1
R4(config-router)#network 0.0.0.0 0.0.0.0 area 0
R5
R5模拟一台主机,这里我们配置一个默认路由
sh
R5(config)#ip route 0.0.0.0 0.0.0.0 45.1.1.4组播配置
启用组播路由功能
在所有路由器(R1, R2, R3, R4)上执行如下命令
sh
(config)#ip multicast-routing 运行PIM-DM
R1 配置
运行ip pim dense-mode 在接口上开启组播路由协议
sh
R1(config)#interface eth 0/0
R1(config-if)#ip pim dense-mode

R1(config-if)#interface eth 0/1
R1(config-if)#ip pim dense-mode

R1(config-if)#interface lo0
R1(config-if)#ip pim dense-mode
R2配置
sh
R2(config)#interface range eth0/0-1
R2(config-if-range)#ip pim dense-mode
R3配置
sh
R3(config)#interface range eth0/0-1
R3(config-if-range)#ip pim dense-mode
R4配置
sh
R4(config)#interface range eth0/0-1
R4(config-if-range)#ip pim dense-mode
让R5模拟加组
加入到238.1.1.10组播组。
sh
R5(config)#interface eth0/0
R5(config-if)#ip igmp join-group 238.1.1.10
加组操作后在R4上查看下面有哪些组。
sh
R4#show ip igmp group
IGMP Connected Group Membership
Group Address    Interface                Uptime    Expires   Last Reporter   Group Accounted
238.1.1.10       Ethernet0/1              00:01:21  00:02:09  45.1.1.5
224.0.1.40       Ethernet0/0              00:03:58  00:02:21  100.1.1.4
查看路由
我们查看下R1,R2, R3的组播路由表, 发现此时没有关于238.1.1.10的组播路由
sh
R3#show ip mroute
IP Multicast Routing Table
Flags: D - Dense, S - Sparse, B - Bidir Group, s - SSM Group, C - Connected,
       L - Local, P - Pruned, R - RP-bit set, F - Register flag,
       T - SPT-bit set, J - Join SPT, M - MSDP created entry, E - Extranet,
       X - Proxy Join Timer Running, A - Candidate for MSDP Advertisement,
       U - URD, I - Received Source Specific Host Report,
       Z - Multicast Tunnel, z - MDT-data group sender,
       Y - Joined MDT-data group, y - Sending to MDT-data group,
       G - Received BGP C-Mroute, g - Sent BGP C-Mroute,
       N - Received BGP Shared-Tree Prune, n - BGP C-Mroute suppressed,
       Q - Received BGP S-A Route, q - Sent BGP S-A Route,
       V - RD & Vector, v - Vector, p - PIM Joins on route,
       x - VxLAN group
Outgoing interface flags: H - Hardware switched, A - Assert winner, p - PIM Join
 Timers: Uptime/Expires
 Interface state: Interface, Next-Hop or VCD, State/Mode

(*, 224.0.1.40), 00:07:14/00:02:39, RP 0.0.0.0, flags: DCL
  Incoming interface: Null, RPF nbr 0.0.0.0
  Outgoing interface list:
    Ethernet0/1, Forward/Dense, 00:07:14/stopped
    Ethernet0/0, Forward/Dense, 00:07:14/stopped
只有R4的组播路由表里面有
sh
R4#show ip mroute
IP Multicast Routing Table
Flags: D - Dense, S - Sparse, B - Bidir Group, s - SSM Group, C - Connected,
       L - Local, P - Pruned, R - RP-bit set, F - Register flag,
       T - SPT-bit set, J - Join SPT, M - MSDP created entry, E - Extranet,
       X - Proxy Join Timer Running, A - Candidate for MSDP Advertisement,
       U - URD, I - Received Source Specific Host Report,
       Z - Multicast Tunnel, z - MDT-data group sender,
       Y - Joined MDT-data group, y - Sending to MDT-data group,
       G - Received BGP C-Mroute, g - Sent BGP C-Mroute,
       N - Received BGP Shared-Tree Prune, n - BGP C-Mroute suppressed,
       Q - Received BGP S-A Route, q - Sent BGP S-A Route,
       V - RD & Vector, v - Vector, p - PIM Joins on route,
       x - VxLAN group
Outgoing interface flags: H - Hardware switched, A - Assert winner, p - PIM Join
 Timers: Uptime/Expires
 Interface state: Interface, Next-Hop or VCD, State/Mode

(*, 238.1.1.10), 00:03:33/00:02:53, RP 0.0.0.0, flags: DC
  Incoming interface: Null, RPF nbr 0.0.0.0
  Outgoing interface list:
    Ethernet0/1, Forward/Dense, 00:03:33/stopped
    Ethernet0/0, Forward/Dense, 00:03:33/stopped

(*, 224.0.1.40), 00:06:11/00:02:04, RP 0.0.0.0, flags: DCL
  Incoming interface: Null, RPF nbr 0.0.0.0
  Outgoing interface list:
Ethernet0/0, Forward/Dense, 00:06:11/stopped如果此时我们在R1上ping238.1.1.10后路由表会发生变化,产生该组播的相关路由。
sh
# ping指定源为lo0

R1#ping 238.1.1.10 source loopback 0
Type escape sequence to abort.
Sending 1, 100-byte ICMP Echos to 238.1.1.10, timeout is 2 seconds:
Packet sent with a source address of 11.1.1.1

Reply to request 0 from 45.1.1.5, 3 ms
Reply to request 0 from 45.1.1.5, 5 ms再查看下组播路由表,发现此时出现了(S, G)路由。(注: (11.1.1.1, 238.1.1.10)为(S, G)路由。)
sh
R1#show ip mroute
IP Multicast Routing Table
Flags: D - Dense, S - Sparse, B - Bidir Group, s - SSM Group, C - Connected,
       L - Local, P - Pruned, R - RP-bit set, F - Register flag,
       T - SPT-bit set, J - Join SPT, M - MSDP created entry, E - Extranet,
       X - Proxy Join Timer Running, A - Candidate for MSDP Advertisement,
       U - URD, I - Received Source Specific Host Report,
       Z - Multicast Tunnel, z - MDT-data group sender,
       Y - Joined MDT-data group, y - Sending to MDT-data group,
       G - Received BGP C-Mroute, g - Sent BGP C-Mroute,
       N - Received BGP Shared-Tree Prune, n - BGP C-Mroute suppressed,
       Q - Received BGP S-A Route, q - Sent BGP S-A Route,
       V - RD & Vector, v - Vector, p - PIM Joins on route,
       x - VxLAN group
Outgoing interface flags: H - Hardware switched, A - Assert winner, p - PIM Join
 Timers: Uptime/Expires
 Interface state: Interface, Next-Hop or VCD, State/Mode

(*, 238.1.1.10), 00:00:41/stopped, RP 0.0.0.0, flags: D
  Incoming interface: Null, RPF nbr 0.0.0.0
  Outgoing interface list:
    Ethernet0/1, Forward/Dense, 00:00:41/stopped
    Ethernet0/0, Forward/Dense, 00:00:41/stopped

(11.1.1.1, 238.1.1.10), 00:00:41/00:02:42, flags: T
  Incoming interface: Loopback0, RPF nbr 0.0.0.0
  Outgoing interface list:
    Ethernet0/0, Prune/Dense, 00:00:41/00:02:18
    Ethernet0/1, Forward/Dense, 00:00:41/stopped

(*, 224.0.1.40), 00:16:53/00:02:18, RP 0.0.0.0, flags: DCL
  Incoming interface: Null, RPF nbr 0.0.0.0
  Outgoing interface list:
    Ethernet0/1, Forward/Dense, 00:10:30/stopped
    Ethernet0/0, Forward/Dense, 00:16:53/stopped
所以在PIM-DM中是先有组播流量然后才有组播路由表项。原因是第一个包先往下推(除了收到包的其他接口都会往外发数据)然后拉上来形成了路由表。后面的流量再发的话就会利用路由表