目录
一、初识Nginx
Nginx是什么?
Nginx也是一个web服务器,能够支持正向代理(代理用户去访问服务器)、反向代理(代理服务器来让用户访问)、负载均衡(将用户的访问分发给服务器集群)。
conf的作用及读取过程
Nginx的系统配置conf文件有什么作用?
用于定义 Nginx 的全局和特定站点的行为。
- 有master进程监听到有用户连接请求后,worker进程通过原子操作抢占连接,加入epoll监听,其中worker进程的数量在conf中确定。
- http块下多个的server块,每个server块代表一个虚拟主机,定义虚拟主机的设置,如监听端口、路由规则。
- 在server块中定义分发的服务器ip地址,实现负载均衡。
cpp
worker_processes 4;


events {
	worker_connections 1024;
}

http {

	upstream backend {
		server 192.168.159.130:9002 weight=2;//可以是任意的服务器地址  不一定是本机的
		server 192.168.159.130:9003 weight=2;
	}

	server {
		listen 9000;
		location / {//路由规则
            #root /home/king/share/nginx/html9000/;
			proxy_pass http://backend;   # ...转发给 backend 服务器池处理
		}
	}
	server {
		listen 9001;
		location / {
                        root /home/king/share/nginx/html9001/;# ...由本机文件系统处理
                }
	}
	server {
		listen 9002;
		location / {
                        root /home/king/share/nginx/html9002/;
                }
	}
	server {
		listen 9003;
		location / {
                        root /home/king/share/nginx/html9003/;
                }
	}

}
Nginx在代码中对conf文件的处理是怎么样的?
Nginx 主进程启动,readline逐行读取conf内容。
例如:当读取并解析到
cpp
worker_processes 1024;这行配置时,在内存中会发生以下事情:
- 创建一块内存,并且并将其初始化为一个
ngx_core_conf_t结构体,用一个conf指针指向 - 将conf指针传入
ngx_set_worker_processes函数,这是读到worker_processes后触发的回调函数 - 在函数内部根据"1024",修改
ngx_core_conf_t结构体中worker_processes 字段的值
HTTP状态机
Nginx的状态机是什么?
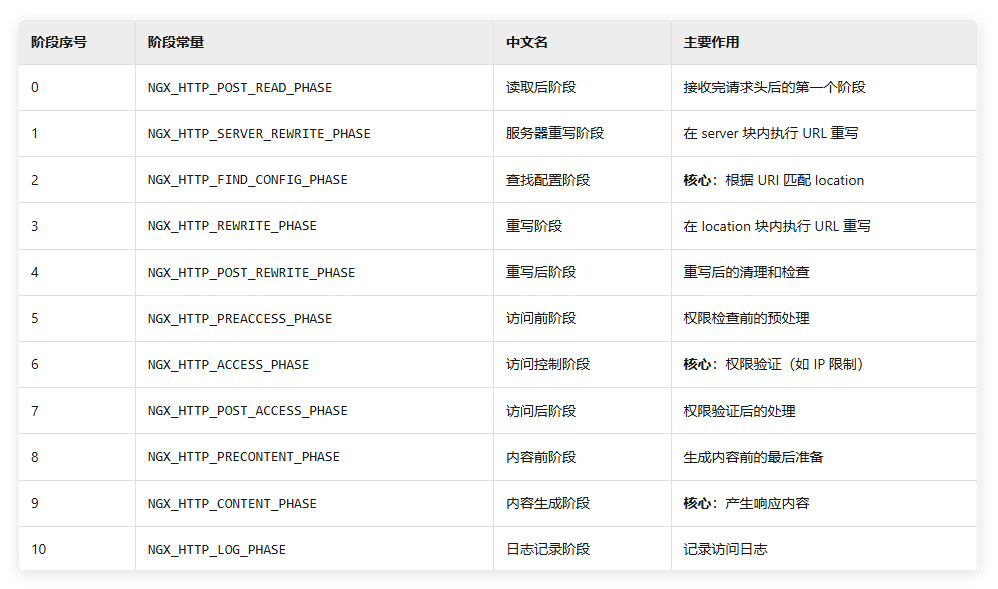
在Nginx源码里有作者自定义的11个http状态,也有一份黑白名单,里面限制了某些ip、限制了某些资源的访问、限制了某些用户的访问,这些限制也是存在于特定状态下的。通过明确的阶段划分,Nginx 实现了处理流程的标准化和模块化。
Nginx惊群
Nginx的惊群现象及应对方法是什么?
Nginx 的"惊群现象"是指:
在多进程(worker)模式下,多个进程同时等待某个事件(如新连接),当事件发生时,所有进程都被唤醒,但只有一个能成功 accept,其他进程再次休眠,造成资源浪费和性能下降。
应对方法:
在 worker 进程间引入 accept_mutex(接受互斥锁)。只有获得锁的进程才会去 accept 新连接,其他进程等待,避免所有进程一起被唤醒。通过配置 conf中events模块的accept_mutex on实现
二、Nginx组件拆出来使用
Nginx内部实现了很多组件,在链接对应头文件的基础上,可以直接编写代码,调用其特定的组件比如:内存池、线程池、原子操作、日志、数据结构(ngx_str_t ;ngx_array_t ;ngx_list_t ;ngx_rbtree_t)
下面是内存池、string、日志模块的拆分使用
cpp
#include "ngx_config.h"
#include "ngx_conf_file.h"
#include "nginx.h"
#include "ngx_core.h"
#include "ngx_string.h"
#include "ngx_palloc.h"
#include "ngx_array.h"
#include "ngx_hash.h"

#define unused(x)  x=x


volatile ngx_cycle_t  *ngx_cycle;

void ngx_log_error_core(ngx_uint_t level, ngx_log_t *log, ngx_err_t err,
    const char *fmt, ...) {    //日志模块调用

	unused(level);
	unused(log);
	unused(err);
	unused(fmt);

}


void print_pool(ngx_pool_t *pool) {

	printf("\nlast: %p, end: %p\n", pool->d.last, pool->d.end);

}


int main() {
#if 0

	ngx_str_t name = ngx_string("King");    //string数据结构使用

	printf("name --> len: %ld, data: %s\n", name.len, name.data);

#elif 0

	ngx_pool_t *pool = ngx_create_pool(4096, NULL);    //ngx_pool_t   内存池使用

	print_pool(pool);

	int *p1 = ngx_palloc(pool, sizeof(int));

	print_pool(pool);

	void *p2 = ngx_palloc(pool, 0x10);

	print_pool(pool);

	void *p3 = ngx_palloc(pool, 0x15);

	print_pool(pool);


	ngx_destroy_pool(pool);

#else


#endif

}
三、Nginx模块开发
过滤器模块
接收到后端的response,返回response给浏览器客户端
任务 :开发一个在 HTTP 响应的 HTML 内容前插入一段固定的文本(如作者信息和链接)的Nginx HTTP Filter 模块,ngx_http_prefix_filter_module.c。
流程 :在读取到conf的"add_prefix"后,会执行对应的set函数,将对应的值保存到读取到location模块初始化创建的配置结构体里面。当conf文件读取结束,会触发prefix过滤器初始化,将我们的prefix_filter加入到Nginx的Filter链表里面。当后端传来了HTTP响应,就会触发我们的header_top和body_top过滤器函数,在header函数中里面检查和标记请求,在body函数中加入对应的文本,然后传入下一个过滤器。
cpp
#include <ngx_config.h>
#include <ngx_core.h>
#include <ngx_http.h>
typedef struct {
ngx_flag_t enable; # 是否启用模块(0/1)
} ngx_http_prefix_filter_conf_t;
typedef struct {
ngx_int_t add_prefix; #标记是否需要插入前缀(0=不插入,1=需要插入,2=已插入)
} ngx_http_prefix_filter_ctx_t;
三个核心处理函数
static ngx_int_t ngx_http_prefix_filter_init(ngx_conf_t *cf);
static ngx_int_t ngx_http_prefix_filter_header_filter(ngx_http_request_t *r);
static ngx_int_t ngx_http_prefix_filter_body_filter(ngx_http_request_t *r, ngx_chain_t *in);
static ngx_str_t filter_prefix = ngx_string("<h2>Author : King</h2><p><a href=\"http://www.0voice.com\">0voice</a></p>");
static void *ngx_http_prefix_filter_create_conf(ngx_conf_t *cf) {
#创建一个独立的配置结构体,并初始化默认值。
ngx_http_prefix_filter_conf_t *conf = ngx_pcalloc(cf->pool, sizeof(ngx_http_prefix_filter_conf_t));
if (conf == NULL) {
return NULL;
}
conf->enable = NGX_CONF_UNSET;
return conf;
}
static char *ngx_http_prefix_filter_merge_conf(ngx_conf_t *cf, void *parent, void *child) {#继承配置
ngx_http_prefix_filter_conf_t *prev = (ngx_http_prefix_filter_conf_t*)parent;// 父配置(如 server 块)
ngx_http_prefix_filter_conf_t *conf = (ngx_http_prefix_filter_conf_t*)child;// 子配置(如 location 块)
// 合并规则:如果子配置未设置,则继承父配置的值
ngx_conf_merge_value(conf->enable, prev->enable, 0);
return NGX_CONF_OK;
}
static ngx_command_t ngx_http_prefix_filter_commands[] = {
#conf中可用的指令
{
ngx_string("add_prefix"), # 指令名
NGX_HTTP_MAIN_CONF|NGX_HTTP_SRV_CONF|NGX_HTTP_LOC_CONF|NGX_HTTP_LMT_CONF|NGX_CONF_FLAG,#指令可能出现的在conf中的部分
ngx_conf_set_flag_slot, #遇到命令的时候执行这个set函数
NGX_HTTP_LOC_CONF_OFFSET, #读取到conf中add_prefix值后,存储的位置(location 级别)
offsetof(ngx_http_prefix_filter_conf_t, enable), #具体存储在结构体的哪个位置
NULL
},
ngx_null_command //结尾标识
};
static ngx_http_module_t ngx_http_prefix_filter_module_ctx = {
NULL,
ngx_http_prefix_filter_init, #读完最后一行conf时执行此回调函数
NULL, #解析到主模块 执行此回调函数
NULL, // 初始化主配置
NULL, #解析到server块 执行此回调函数
NULL, // server配置继承
ngx_http_prefix_filter_create_conf, #解析到location块 执行此回调函数 会创建一个独立的配置结构体,并初始化默认值
ngx_http_prefix_filter_merge_conf //location配置继承
};
ngx_module_t ngx_http_prefix_filter_module = { #模块属性
NGX_MODULE_V1,
&ngx_http_prefix_filter_module_ctx, #模块上下文
ngx_http_prefix_filter_commands, #模块的命令
NGX_HTTP_MODULE, #模块的类型
NULL,
NULL,
NULL,
NULL,
NULL,
NULL,
NULL,
NGX_MODULE_V1_PADDING
};
static ngx_http_output_header_filter_pt ngx_http_next_header_filter;
static ngx_http_output_body_filter_pt ngx_http_next_body_filter;
Nginx 处理 HTTP 响应时,会依次调用两类 Filter:Header Filter:处理响应头;Body Filter:处理响应体(如修改 HTML 内容)。这些 Filter 以链表形式组织,下面是头插法插入我们的Header Filter与Body Filter。
static ngx_int_t ngx_http_prefix_filter_init(ngx_conf_t *cf) {
ngx_http_next_header_filter = ngx_http_top_header_filter;
ngx_http_top_header_filter = ngx_http_prefix_filter_header_filter;
ngx_http_next_body_filter = ngx_http_top_body_filter;
ngx_http_top_body_filter = ngx_http_prefix_filter_body_filter;
return NGX_OK;
}
static ngx_int_t ngx_http_prefix_filter_header_filter(ngx_http_request_t *r) {
#检查并标记请求
ngx_http_prefix_filter_ctx_t *ctx;
ngx_http_prefix_filter_conf_t *conf;
if (r->headers_out.status != NGX_HTTP_OK) {
return ngx_http_next_header_filter(r);
}
// 获取模块配置
ctx = ngx_http_get_module_ctx(r, ngx_http_prefix_filter_module);
if (ctx) {
return ngx_http_next_header_filter(r);
}
// 检查是否已处理过(防止重复处理)
conf = ngx_http_get_module_loc_conf(r, ngx_http_prefix_filter_module);
if (conf == NULL) {
return ngx_http_next_header_filter(r);
}
if (conf->enable == 0) {
return ngx_http_next_header_filter(r);
}
// 为需要加入的前缀 分配空间,随后把这个指针和当前的HTTP请求绑定
ctx = ngx_pcalloc(r->pool, sizeof(ngx_http_prefix_filter_ctx_t));
if (ctx == NULL) {
return NGX_ERROR;
}
ctx->add_prefix = 0;
ngx_http_set_ctx(r, ctx, ngx_http_prefix_filter_module);
// 仅对 text/html 响应插入前缀
if (r->headers_out.content_type.len >= sizeof("text/html") - 1
&& ngx_strncasecmp(r->headers_out.content_type.data, (u_char*)"text/html", sizeof("text/html")-1) == 0) {
ctx->add_prefix = 1;// 标记需要插入前缀
if (r->headers_out.content_length_n > 0) {
r->headers_out.content_length_n += filter_prefix.len;// 修正 Content-Length
}
}
return ngx_http_prefix_filter_header_filter(r);
}
static ngx_int_t ngx_http_prefix_filter_body_filter(ngx_http_request_t *r, ngx_chain_t *in) {
#插入前缀内容
ngx_http_prefix_filter_ctx_t *ctx = ngx_http_get_module_ctx(r, ngx_http_prefix_filter_module);
if (ctx == NULL || ctx->add_prefix != 1) {
return ngx_http_next_body_filter(r, in);
}
#标记已处理
ctx->add_prefix = 2;
# 创建包含前缀内容的缓冲区,存放预设的前缀文本(filter_prefix)
ngx_buf_t *b = ngx_create_temp_buf(r->pool, filter_prefix.len);
b->start = b->pos = filter_prefix.data;
b->last = b->pos + filter_prefix.len;
# 将前缀缓冲区插入到响应体链表的头部
ngx_chain_t *cl = ngx_alloc_chain_link(r->pool);
cl->buf = b;
cl->next = in;
return ngx_http_next_body_filter(r, cl);
}编写ngx_http_prefix_filter_module.c后,还需要在同一目录下编写config文件,让Nginx识别到这个模块。
cpp
#模块的名字
ngx_addon_name=ngx_http_prefix_filter_module

#Makefile中的关键字  在其后面加上我们的库
HTTP_FILTER_MODULES="$HTTP_FILTER_MODULES ngx_http_prefix_filter_module"

#源文件的路径
NGX_ADDON_SRCS="$NGX_ADDON_SRCS $ngx_addon_dir/ngx_http_prefix_filter_module.c"
handler模块
接收浏览器客户端请求,直接返回请求给浏览器客户端
任务:统计页面访问次数,可以直接在Nginx上通过handler模块计数,因为所有的数据都会经过Nginx,可以统计后直接返回给客户端。
流程 :在conf文件中读取到关键词"count",执行对应的set函数 ,每执行一次,都会设置一个handler函数,还会创建一个共享内存区,并且指定对应的回调init函数。回调init函数会在Nginx启动和reload的时候执行。handler函数的执行时机是当客户端请求发送来的时候,每来一个请求,都会执行handler函数。在handler函数里面,就能拿到请求方的ip地址,根据ip的最后一位1-255,search查找ngx_rbtree是否有相同节点,决定是否插入。通过encode_page函数组织html网页,遍历ngx_rbtree获取总访问次数,将内容都写入。最后组织一个header和body,返回给客户端。
亮点 :采用ngx_rbtree增强健壮性,增加slab共享内存,解决多进程间通信的问题。所有 worker 进程都能访问同一份计数数据,通过slab自带的锁依次通过lookup函数遍历红黑树
代码
cpp
#include <ngx_http.h>
#include <ngx_config.h>
#include <ngx_core.h>

/*
#include <arpa/inet.h>
#include <netinet/in.h>
*/
#define ENABLE_RBTREE	1


#读到关键字的时候调用 用于指定handler函数 和 创建共享内存区并指定其初始化回调函数
static char *ngx_http_pagecount_set(ngx_conf_t *cf, ngx_command_t *cmd, void *conf);

#有请求的时候调用,加锁统计当前客户端 IP 的访问次数,并生成统计页面返回给用户
static ngx_int_t ngx_http_pagecount_handler(ngx_http_request_t *r);

#读到location模块调用,为每个 location 创建并初始化配置结构体
static void  *ngx_http_pagecount_create_location_conf(ngx_conf_t *cf);

#开启/reload Nginx时候调用,初始化共享内存区的回调函数
static ngx_int_t ngx_http_pagecount_shm_init (ngx_shm_zone_t *zone, void *data);

#在handler中的lookup函数中调用,自定义红黑树的插入规则
static void ngx_http_pagecount_rbtree_insert_value(ngx_rbtree_node_t *temp,
        ngx_rbtree_node_t *node, ngx_rbtree_node_t *sentinel);

#在handler中调用,遍历红黑树统计数量
static int ngx_encode_http_page_rb(ngx_http_pagecount_conf_t *conf, char *html);

#在handler中调用,对于一个新key(ip)的处理
static ngx_int_t ngx_http_pagecount_lookup(ngx_http_request_t *r, ngx_http_pagecount_conf_t *conf, ngx_uint_t key);

static ngx_command_t count_commands[] = {
	{//告诉Nginx  conf中的count是关键字,并且指定其处理函数set
		ngx_string("count"),
		NGX_HTTP_LOC_CONF | NGX_CONF_NOARGS,    //指令可以出现的位置
		ngx_http_pagecount_set,         //读到conf中的count指令时调用
		NGX_HTTP_LOC_CONF_OFFSET,
		0, NULL
	},
	ngx_null_command
};

static ngx_http_module_t count_ctx = {
	NULL,
	NULL,
    //没用上了 因为handler和共享内存池(包括红黑树)都在set函数里创建并且绑定回调了,Nginx启动的时候会自动调用回调

	NULL,
	NULL,

	NULL,
	NULL,

	ngx_http_pagecount_create_location_conf,	//读到location配置时调用,确保每个 location 都有独立的配置空间
	NULL,
};

//ngx_http_count_module   最先编写的内容
ngx_module_t ngx_http_pagecount_module = {
	NGX_MODULE_V1,
	&count_ctx,
	count_commands,
	NGX_HTTP_MODULE,
	NULL,
	NULL,
	NULL,
	NULL,
	NULL,
	NULL,
	NULL,
	NGX_MODULE_V1_PADDING
};

typedef struct {
	int count;
} ngx_http_pagecount_node_t;

typedef struct {	//共享内存中的 "数据区"红黑树

	ngx_rbtree_t rbtree;
	ngx_rbtree_node_t sentinel;
} ngx_http_pagecount_shm_t;

typedef struct	//location 级别的配置结构体
{
    ssize_t shmsize;

    ngx_slab_pool_t *shpool;

    ngx_http_pagecount_shm_t *sh;
} ngx_http_pagecount_conf_t;


ngx_int_t ngx_http_pagecount_shm_init (ngx_shm_zone_t *zone, void *data) {
//zone:Nginx 共享内存区对象,包含分配好的内存地址等信息。
//data:上一次初始化时的配置数据
	ngx_http_pagecount_conf_t *conf;
	ngx_http_pagecount_conf_t *oconf = data;

	conf = (ngx_http_pagecount_conf_t*)zone->data;
	if (oconf) {//已经初始化过了  复用红黑树和 slab 内存池指针
		conf->sh = oconf->sh;
		conf->shpool = oconf->shpool;
		return NGX_OK;
	}


	//没初始化过  新建红黑树和 slab 内存池
	conf->shpool = (ngx_slab_pool_t*)zone->shm.addr;
	conf->sh = ngx_slab_alloc(conf->shpool, sizeof(ngx_http_pagecount_shm_t));
	if (conf->sh == NULL) {
		return NGX_ERROR;
	}
    //绑定红黑树  到Nginx内置new slab 内存池
	conf->shpool->data = conf->sh;


	//初始化红黑树
	ngx_rbtree_init(&conf->sh->rbtree, &conf->sh->sentinel,
		ngx_http_pagecount_rbtree_insert_value);


	return NGX_OK;

}


static char *ngx_http_pagecount_set(ngx_conf_t *cf, ngx_command_t *cmd, void *conf) {

	ngx_shm_zone_t *shm_zone;
	ngx_str_t name = ngx_string("pagecount_slab_shm");

	ngx_http_pagecount_conf_t *mconf = (ngx_http_pagecount_conf_t*)conf;

    //创建Nginx内置的配置结构体corecf
	ngx_http_core_loc_conf_t *corecf;


	mconf->shmsize = 1024*1024;

    //创建一个名为 pagecount_slab_shm 的共享内存区(通过ngx内置的共享内存管理函数  )
	shm_zone = ngx_shared_memory_add(cf, &name, mconf->shmsize, &ngx_http_pagecount_module);
	if (NULL == shm_zone) {
		return NGX_CONF_ERROR;
	}

	//把创建的共享内存区初始化
	shm_zone->init = ngx_http_pagecount_shm_init;
	shm_zone->data = mconf;

    //获取Nginx内置的配置空间,在里面设置handler,让Nginx知道遇到HTTP请求时调用我们写的处理函数
	corecf = ngx_http_conf_get_module_loc_conf(cf, ngx_http_core_module);
	corecf->handler = ngx_http_pagecount_handler;

	return NGX_CONF_OK;
}


void  *ngx_http_pagecount_create_location_conf(ngx_conf_t *cf) {
//为每个 location 创建并初始化配置结构体
	ngx_http_pagecount_conf_t *conf;

	conf = ngx_palloc(cf->pool, sizeof(ngx_http_pagecount_conf_t));
	if (NULL == conf) {
		return NULL;
	}
	conf->shmsize = 0;

	return conf;

}


static void
ngx_http_pagecount_rbtree_insert_value(ngx_rbtree_node_t *temp,
        ngx_rbtree_node_t *node, ngx_rbtree_node_t *sentinel)
{
//自定义红黑树的插入规则,据节点的 key(IP 地址的数值)决定插入到树的哪个位
   ngx_rbtree_node_t **p;

    for (;;)
    {
        if (node->key < temp->key)
        {
            p = &temp->left;
        }
        else if (node->key > temp->key) {
           	p = &temp->right;
        }
        else
        {
          	return ;
        }

        if (*p == sentinel)
        {
            break;
        }

        temp = *p;
    }

    *p = node;

    node->parent = temp;
    node->left = sentinel;
    node->right = sentinel;
    ngx_rbt_red(node);
}

static ngx_int_t ngx_http_pagecount_lookup(ngx_http_request_t *r, ngx_http_pagecount_conf_t *conf, ngx_uint_t key) {
//在红黑树中查找指定 key(IP),如果找到则计数加一;如果没找到则插入新节点并初始化计数为 1
	ngx_rbtree_node_t *node, *sentinel;

	node = conf->sh->rbtree.root;
	sentinel = conf->sh->rbtree.sentinel;

	ngx_log_error(NGX_LOG_EMERG, r->connection->log, ngx_errno, " ngx_http_pagecount_lookup 111 --> %x\n", key);

	while (node != sentinel) {

		if (key < node->key) {
			node = node->left;
			continue;
		} else if (key > node->key) {
			node = node->right;
			continue;
		} else { // key == node
			node->data ++;
			return NGX_OK;
		}
	}

	ngx_log_error(NGX_LOG_EMERG, r->connection->log, ngx_errno, " ngx_http_pagecount_lookup 222 --> %x\n", key);

	// insert rbtree


	node = ngx_slab_alloc_locked(conf->shpool, sizeof(ngx_rbtree_node_t));
	if (NULL == node) {
		return NGX_ERROR;
	}

	node->key = key;
	node->data = 1;

	ngx_rbtree_insert(&conf->sh->rbtree, node);

	ngx_log_error(NGX_LOG_EMERG, r->connection->log, ngx_errno, " insert success\n");


	return NGX_OK;
}


static int ngx_encode_http_page_rb(ngx_http_pagecount_conf_t *conf, char *html) {
//遍历红黑树,将所有 IP 及其访问次数以 HTML 格式输出到字符串 html,用于页面展示
	sprintf(html, "<h1>67777 </h1>");
	strcat(html, "<h2>");

	ngx_rbtree_node_t *node = ngx_rbtree_min(conf->sh->rbtree.root, conf->sh->rbtree.sentinel);

	do {//遍历红黑树节点

		char str[INET_ADDRSTRLEN] = {0};
		char buffer[128] = {0};

		sprintf(buffer, "req from : %s, count: %d <br/>",
		inet_ntop(AF_INET, &node->key, str, sizeof(str)), node->data);

		strcat(html, buffer);

		node = ngx_rbtree_next(&conf->sh->rbtree, node);

	} while (node);


	strcat(html, "</h2>");

	return NGX_OK;
}


static ngx_int_t ngx_http_pagecount_handler(ngx_http_request_t *r) {
	// HTTP 请求的处理函数,统计当前客户端 IP 的访问次数,并生成统计页面返回给用户

	u_char html[1024] = {0};
	int len = sizeof(html);

	ngx_rbtree_key_t key = 0;


	struct sockaddr_in *client_addr =  (struct sockaddr_in*)r->connection->sockaddr;


	ngx_http_pagecount_conf_t *conf = ngx_http_get_module_loc_conf(r, ngx_http_pagecount_module);
	key = (ngx_rbtree_key_t)client_addr->sin_addr.s_addr;

	ngx_log_error(NGX_LOG_EMERG, r->connection->log, ngx_errno, " ngx_http_pagecount_handler --> %x\n", key);

    //先对共享内存池加锁,保证多进程/多线程安全(共享内存池自带的锁)
	ngx_shmtx_lock(&conf->shpool->mutex);
	ngx_http_pagecount_lookup(r, conf, key);
	ngx_shmtx_unlock(&conf->shpool->mutex);

	ngx_encode_http_page_rb(conf, (char*)html);

	//header
	r->headers_out.status = 200;
	ngx_str_set(&r->headers_out.content_type, "text/html");
	ngx_http_send_header(r);

	//body
	ngx_buf_t *b = ngx_pcalloc(r->pool,  sizeof(ngx_buf_t));

	ngx_chain_t out;
	out.buf = b;
	out.next = NULL;

	b->pos = html;
	b->last = html+len;
	b->memory = 1;
	b->last_buf = 1;

	return ngx_http_output_filter(r, &out);


}
upstream模块
ginx 的 upstream 模块用于实现反向代理和负载均衡。可以通过配置 upstream 块,将请求分发到多个后端服务器。对于upstream模块,直接用 Nginx conf配置实现 自己的upstream,比如:
cpp
http {
    //定义了一个后端服务器组,包含两个服务器
	upstream backend {
		server 192.168.159.130:9002 weight=2;//可以是任意的服务器地址  不一定是本机的
		server 192.168.159.130:9003 weight=2;
	}

	server {
		listen 9000;
		location / {//路由规则
            #root /home/king/share/nginx/html9000/;
			proxy_pass http://backend;   # ...转发给 backend 服务器池处理
	}

}