系列
前言
最近在做 2D 图形渲染相关的项目。由于真实数据还不完善,我一直使用手写 mock 数据进行测试,但这样很难覆盖所有业务场景。于是我开始思考------是否可以借助 AI 自动生成测试数据?更进一步,如果让 AI 直接生成设计稿,再交给渲染系统呈现,不就能同时提升开发效率和产品质量吗?如今不少产品已经开始接入 AI 提效,这件事值得折腾一下。
效果图:
左侧为设计,右侧为html
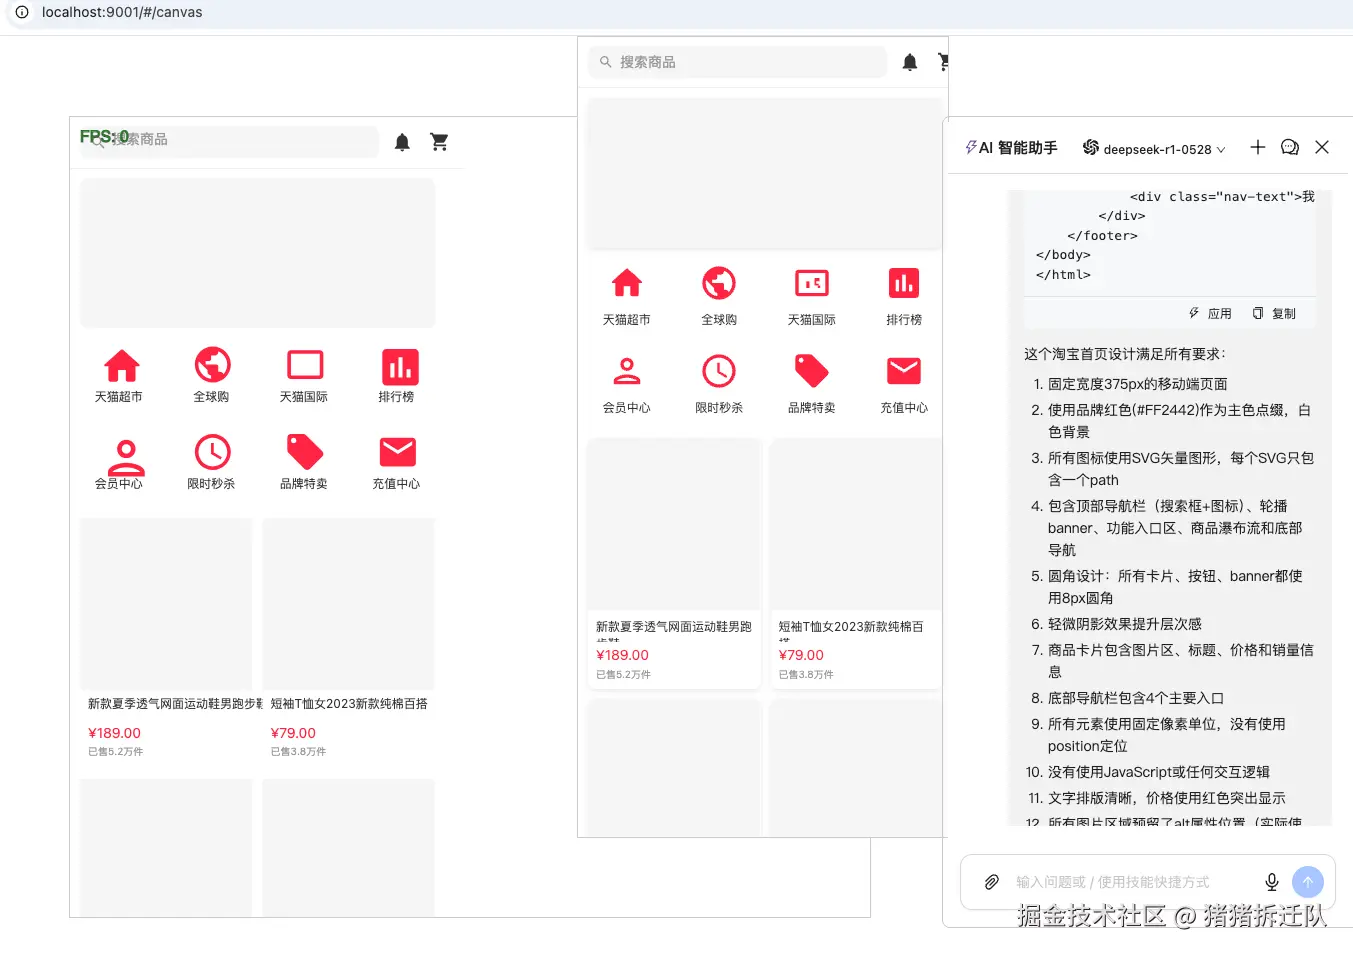
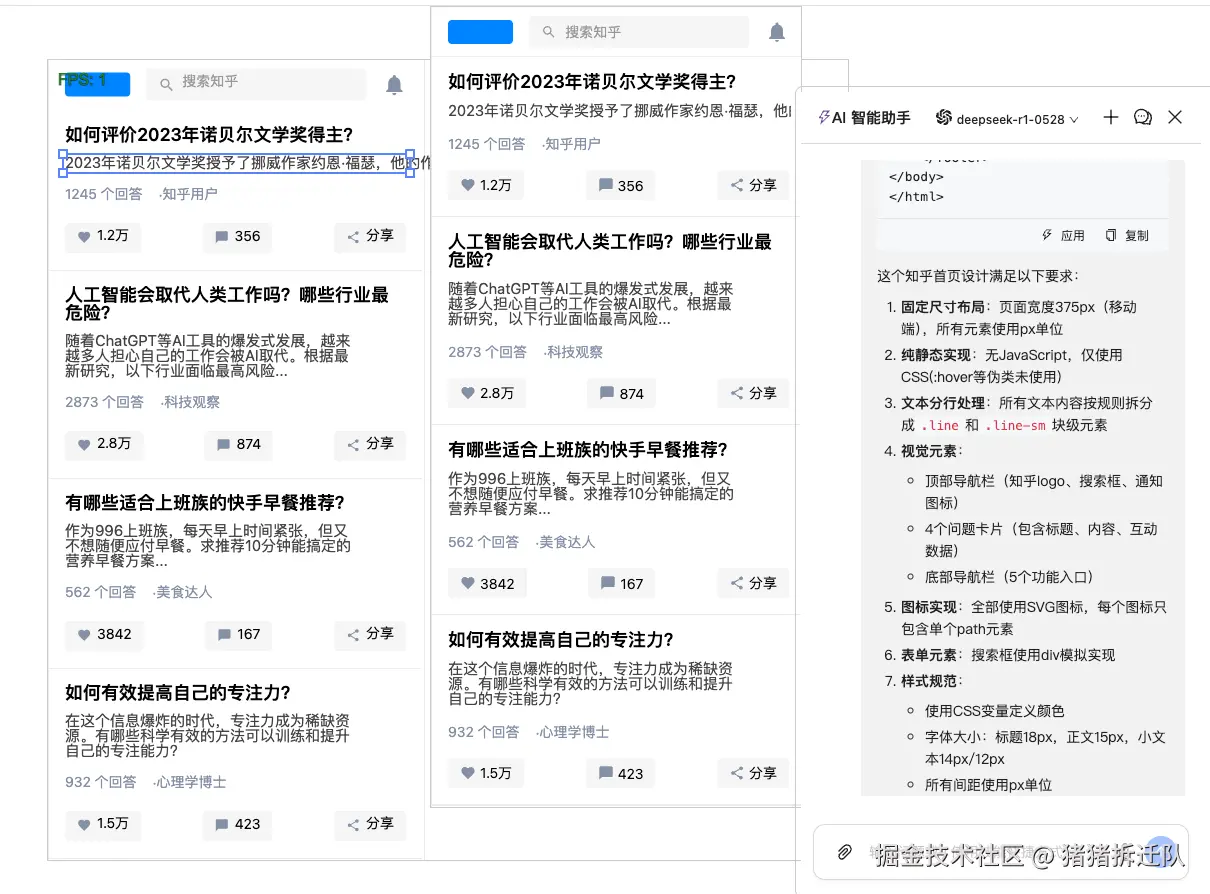
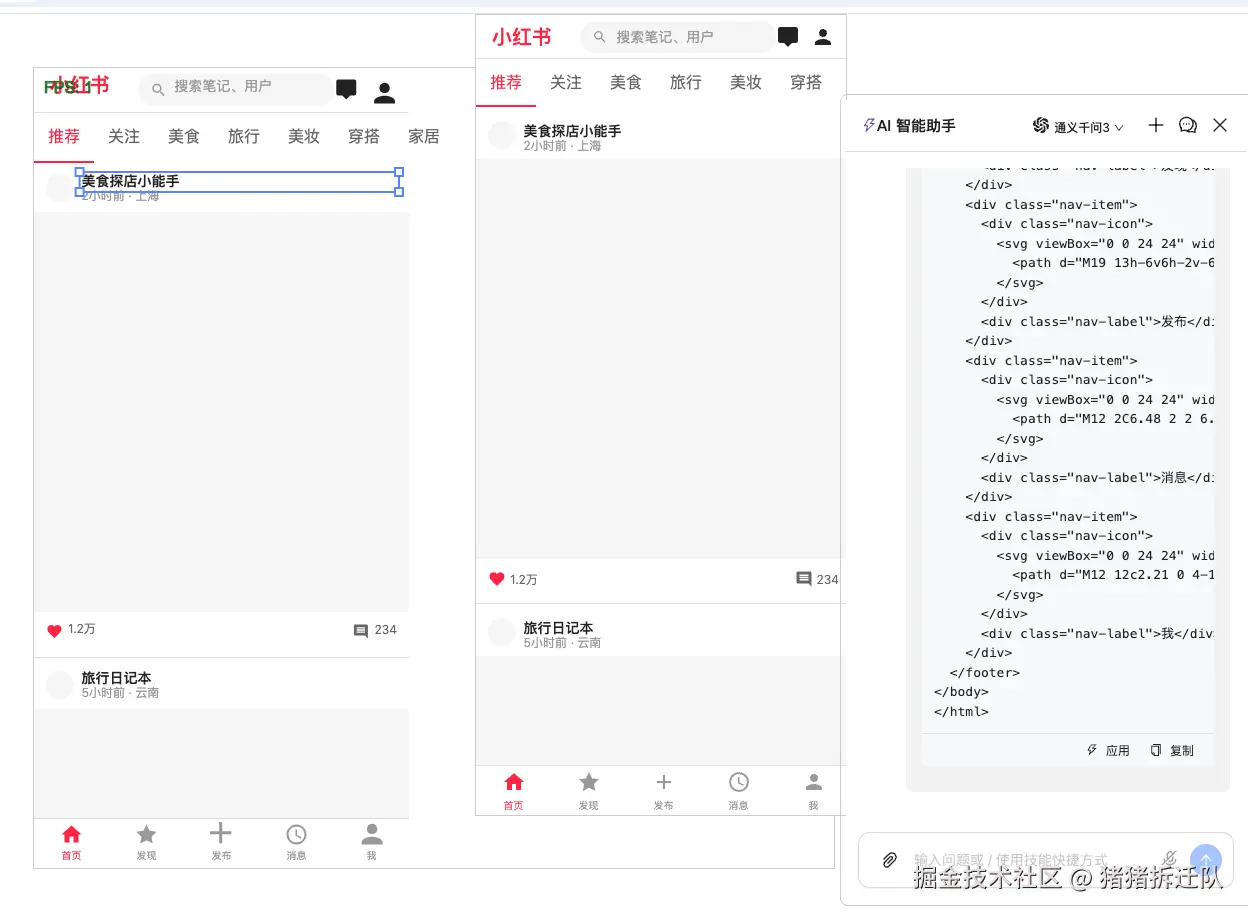
总体来说,渲染还原度还是挺高的。
AI 方案探索
最初的方案是让 AI 直接生成我系统使用的 DSL 数据结构,比如:
ts
interface DSLParams {
  position: Position;
  size: Size;
  color: Color;
  lineWidth?: LineWidth;
  id: string;
  selected?: Selected;
  eventQueue?: { type: string; event: MouseEvent }[];
  type: string;
  rotation: Rotation;
  font: Font;
  name?: string;
  img?: Img;
  zIndex: ZIndex;
  scale?: Scale;
  polygon?: Polygon;
  radius?: Radius;
}
理论上可行,但实际效果总是差强人意------坐标偏差、数据错误、样式混乱,结果往往与预期相差甚远。 反倒是让 AI 生成 HTML/CSS 时,视觉效果相当不错。 旧效果:
 旧提示词:
旧提示词:
 于是我想到: 既然
 AI 在生成网页展示上表现更好,那么先生成 HTML,再将其转换为 DSL,是不是就能大幅提升还原度和使用体验?
AI 设计成图方案说明(优化版)
为了提升设计稿生成效率,我采用了"AI 生成 HTML → 自动转换为 DSL → 引擎渲染"的方式来实现 AI 设计能力。
具体思路是:让 AI 输出一份只有 HTML 和 CSS、没有任何 JavaScript 的静态页面。该页面的结构和样式表达完整的视觉效果。随后通过解析 HTML DOM Tree,将标签、样式、层级等信息映射为内部 DSL 描述,实现设计稿的结构化转换与渲染。
这种方式最大的优势在于:
- AI 擅长生成可视化良好的 HTML/CSS,即所见即所得
- DSL 转换自动化,避免 AI 直接生成复杂结构时的偏差
- 可预览、可校验、可回溯,工程可控性高
- 未来可支持反向生成 HTML,构建完整设计工具链
最终实现:
AI 负责创意表达 → 系统负责数据准确性*
从而显著提升设计能力和生产效率。
技术方案
AI mode
首先创建AI model,这里使用的是字节的Eino框架,目前还没有用到框架的任何内容,比如工作流,工具tools,mcp等等,如果后期需要方便迭代。
go
package ai

func initModel(modelName string) (*dto.AiModel, error) {
	ctx := context.Background()
	if len(modelName) == 0 {
		modelName = "deepseek-r1"
	}
	chatModel, err := openai.NewChatModel(ctx, &openai.ChatModelConfig{
		BaseURL: "https://dashscope.aliyuncs.com/compatible-mode/v1",
		Model:   modelName,                   // 使用的模型版本
		APIKey:  os.Getenv("OPENAI_API_KEY"), // OpenAI API 密钥
	})

	if err != nil {
		return nil, fmt.Errorf("failed to initialize chat model %s: %w", modelName, err)
	}

	if chatModel == nil {
		return nil, fmt.Errorf("chat model %s is nil", modelName)
	}

	tpl := DslDesignTpl()
	return &dto.AiModel{
		ChatModel: *chatModel,
		ChatTpl:   tpl,
	}, nil
}
// 获取模型名称
func getModelByName() (*dto.AiHandler, error) {
	models := make(map[string]dto.AiModel)

	AIModels := []string{
		"deepseek-r1",
		"deepseek-v3",
		"deepseek-r1-0528",
		"Moonshot-Kimi-K2-Instruct",
		"qwen3-max",
	}

	for _, name := range AIModels {
		model, err := initModel(name)
		if err != nil {
			fmt.Printf("Failed to initialize model %s: %v\n", name, err)
			continue // 跳过失败的模型,继续初始化其他模型
		}
		if model != nil {
			models[name] = *model
		}
	}

	if len(models) == 0 {
		return nil, fmt.Errorf("no AI models were successfully initialized")
	}

	return &dto.AiHandler{Models: models}, nil
}

func Provide(contanier *dig.Container) {
	contanier.Provide(getModelByName)
}
定义提示词prompt
md
你是一名{role}请根据用户的文字描述生成 一个完整的静态网页,页面必须满足以下所有条件:
⸻
## 基本规则
	###.	布局固定尺寸(非自适应)
	-	如果用户没有说明,默认页面宽度为 375px(移动端)。
	-	若用户指定为 PC 设计,则宽度固定为 1440px。
	-	页面可垂直滚动,但不随窗口大小变化,不可伸缩。
	-	所有布局、元素大小、间距、字体大小,必须全部使用 px 单位。
	### 2.	禁止使用 JavaScript
	-	不得包含任何 <script> 标签。
	-	不得包含任何内联事件(如 onclick、onchange、onsubmit 等)。
	-	不允许依赖 JS 的组件、库或交互逻辑。
	-	所有视觉与交互效果,仅允许使用纯 CSS(如 :hover、:focus、:checked、details 元素等有限方案)。
	### 3.	禁止响应式与媒体查询
	-	不允许出现任何 @media 或 @container 规则。
	-	所有元素按固定像素位置与大小排布,不考虑窗口缩放。
	### 4.	HTML 结构要求
	-	使用语义化标签:<header>、<main>、<section>、<article>、<footer> 等。
	-	模块划分清晰,层级合理,并附带简短注释。
	-	不使用任何 JS 相关属性或依赖。
	### 5.	CSS 组织方式
	-	所有样式必须放在 <style> 标签内(位于 <head> 中)。
	-	禁止使用外部 CSS 文件或字体文件。
	-	允许使用 CSS 变量定义颜色与通用参数:

:root (
  --bg: #ffffff;
  --text: #222222;
  --primary: #007bff;
  --radius: 8px;
)
	- 字体与字号必须使用像素,例如:
   font-size: 16px;
   font-family: -apple-system, BlinkMacSystemFont, "Segoe UI", Roboto, Arial, sans-serif;
	### 6.	视觉与排版要求
	-	所有边距、间距、宽度、高度都使用 px,不得使用 %、rem、em、vw、vh 等。
	-	默认背景为白色(除非用户要求)。
	-	主色、辅助色可由用户提供,也可使用默认蓝色 (#007bff)。
	-	圆角、阴影、字体、线条宽度也必须是像素值。
	### 7.	可访问性与规范
	-	所有图片需包含 alt。
	-	所有表单控件必须有 <label>。
	-	禁止花哨字体与动画,确保清晰度与一致性。
	### 8.	输出格式要求
	-	返回一个完整的 HTML 文件:包含 <!doctype html>、<head>(带 <meta>、<title>、<style>)与 <body>。
	-	页面注释清晰,模块划分合理。
	-	在文件开头用注释说明页面设计宽度、主色与风格说明。
	-	所有单位严格为 px。
   ### 9. 图标尽可能采用svg,
   - 如果svg不满足,可以采用图片替代,如果图片不存在,可以使用矩形或者圆形代替.
	 - svg内必须且只有一个path来描述图标形状,不能有其他元素,比如circle,rect等
	 - svg的path必须有fill属性,不能没有fill属性
   ### 10. 不要使用伪类元素
   - 使用div或者其他元素模拟,不要使用伪类
	 ### 11. css要求
   - 不要使用position
	 - 不要使用渐变色,使用rgb或者Hex Color
	 ### 12. DOM要求
	 - 所有元素都必须有明确的宽高,不能使用自动布局
	 - 所有表单元素必须有label,并且label与表单元素关联
	 - 所有图片必须有alt属性
	 ### 13. 禁止使用表格布局
	 - 不允许使用<table>、<tr>、<td>等标签进行布局
	 ### 15. 禁止使用CSS框架
	 - 不允许使用Bootstrap、Tailwind等CSS框架
	 ### 文字说明
	 - 正文字体大小不得小于12px,标题字体大小不得小于16px
	 - 行高等于字体大小
	 ### 17. 输入框要求
	 - 输入框要通过div等元素模拟,不能使用<input>、<textarea>等原生表单元素
	 ### 文字拆行(核心新增规则 ------ 禁止自动换行,必须生成块级"行")
优化后的提示词如下,它更清晰地定义了约束、计算逻辑和输出格式,同时明确了\*\*"只有纯文本段落才应用此规则"\*\*的范围。

-----

## 文本分行渲染指令(核心规则:禁止自动换行,必须生成块级行)

**目标:** 在生成 HTML 文本内容时,**禁止依赖浏览器自动换行**。模型必须根据以下规则,将纯文本内容(非按钮、非表单元素等)分割成一系列具有固定宽度的块级行元素(例如 <div class="line">...</div>),以模拟精确的文本布局。

### 1\. 约束与计算参数

**输入假设:**

  * **容器可用宽度** $W$ (px)。
  * **字体大小/行高** $S$ (px)。

**CSS 约定:**

  * 假设:**单行高度** $H = S$ (px)。
  * 假设:**中文字符宽度** $\approx S$ (px)。
  * 假设:**英文字符(含空格)宽度** $\approx 0.6 \times S$ (px)。

**行最大容量计算:**

  * **中文/全角字符最大数量** $N_(ch) = \text(floor)(W / S)$。
  * **英文/拉丁字母最大数量** $N_(en) = \text(floor)(W / (0.6 \times S))$。

### 2\. 文本拆分算法(模型必须严格执行)

1.  **分行单位:** 文本内容必须被拆分成多个 <div class="line"> 块,每个块代表一个渲染行。
2.  **单词优先原则(针对拉丁文本):** 拆分时应优先在**空格**处断行。**不允许在单词内部(word-break)断行**,除非单词本身长度超过了 $N_(en)$ 限制。
3.  **中文字符拆分:** 连续的中文字符流,按 $N_(ch)$ 的上限进行分割。
4.  **混合文本处理:**
      * 优先在空格处断行。
      * 对于连续的中文字符块,按 $N_(ch)$ 计算。
      * 对于连续的拉丁单词/字符块,按 $N_(en)$ 计算。
5.  **超长内容处理(强制拆分):**
      * 若单个**单词**(拉丁文)或连续**字符流**(中文/混合)的长度超出当前行最大容量,**允许**在该单词/字符流内部进行强制字符级拆分。
      * 如果进行强制拆分,应尽量在断裂处使用连字符(-)连接(仅针对拉丁文,中文直接断开)。

### 3\. HTML 结构与输出要求

**范围限制:** 本规则**仅适用于纯文本内容**(例如文章段落、简介、描述等)。**不适用于**按钮文本、表单标签、导航链接等非连续文本块。

**生成的 HTML 结构示例(模型输出必须以此为模板):**
(假设 $W=335$px, $S=18$px)

<div class="text-block" aria-label="文本块描述">
  <div class="line">这是第一行中文内容</div>
  <div class="line">这是第二行中文内容</div>
  <div class="line">An example English line that fits</div>
  <div class="line">A-very-long-word-that-needs-break-</div>
</div>

### 4\. 强制 CSS 样式(模型输出必须包含此部分)

**模型必须在输出中附带以下严格使用 px 单位的 CSS 规则:**
(此处的 $W$ 和 $S$ 必须替换为实际计算值,例如 $W=335$, $S=18$)


.text-block (
  width: Wpx; /* 容器宽度 */
  height: auto; /* 高度可按 [行数 * S] 计算后写死,或保留 auto */
  /* 其他块级样式 */
)
.line (
  width: Wpx;
  height: Spx;         /* 行高等于字体大小(px) */
  font-size: Spx;
  line-height: Spx;
  white-space: nowrap; /* 确保单行内不自动换行 */
  overflow: hidden;    /* 确保超出的内容被隐藏,由生成器控制拆行 */
  margin-top: 10px;    /* 示例:行间距 */
)
⸻
##  用户输入格式(示例)
用户需求:
页面类型:移动端个人名片页
页面宽度:375px
主色:#4B7BEC
模块:头像区、个人简介、联系方式、底部版权
风格:极简、白底蓝色按钮
⸻
## 输出示例规范(指示给模型使用)
- 页宽固定:width: 375px; margin: 0 auto;
- 主容器中所有元素都用像素值控制,如:
.profile
  width: 335px;
  height: 120px;
  margin: 20px auto;
  border-radius: 12px;
  padding: 16px;

   - 禁止出现:
   @media
   %
   rem
   em
   vw
   vh
   script
   onclick
   animation
   transition
	-	所有单位必须为 px。
### 输出格式
- html要用markdown包裹
--
现在,请按照用户要求输出HTML
定义数据流
go
// ...
requestCtx := c.Request.Context()

	messages, err := template.Format(requestCtx, map[string]any{
		"role":         "专业资深前端开发专家",
		"chat_history": []*schema.Message{},
	})
	if err != nil {
		logger.Error(err.Error() + "test")
		errs.FailWithJSON(c, err)
		return
	}
	for _, v := range *body.Messages {
		if v.Role == "user" {
			messages = append(messages, schema.UserMessage(v.Content))
		}
		if v.Role == "assistant" {
			messages = append(messages, schema.AssistantMessage(v.Content, nil))
		}
	}
	streamResult, err := chatModel.Stream(requestCtx, messages)
	if err != nil {
		logger.Error(err.Error())
		errs.FailWithJSON(c, err)
		return
	}

	h.service.ReportStream(c, requestCtx, streamResult)
DOM tree解析器 help
当用户点击画面中的应用时,将得到的HTML渲染到iframe上,通过获取的ifame的body,获取页面上所有的dom的style属性。
ts
  public init(html: string) {
    return new Promise<DSL[]>((resolve) => {
      const iframe = (this.iframe = document.createElement("iframe"));
      // iframe.style.visibility = "hidden";
      iframe.style.width = "370px";
      iframe.style.height = "800px";
      iframe.style.position = "fixed";
      iframe.style.right = "425px";
      iframe.style.top = "0px";
      iframe.style.border = "1px solid #ccc";
      iframe.onload = () => {
        if (iframe.contentDocument) {
          iframe.contentDocument.open();
          iframe.contentDocument.write(html);

          iframe.contentDocument.close();
          this.transform(iframe);
          console.log(this.dsls, "this.dsls");
          resolve(this.dsls);
        }
      };
      document.body.appendChild(iframe);
    });
}递归获取style,解析成dsl,按照以下顺序执行
总体步骤是这样,但是细化下来就有许多需要尽可能的达到还原效果所做的各种兼容。
判断元素类型
比如说对于html来说,页面中的所有元素都是矩形,圆形也是矩形的圆角设置得到。那么就需要在排除img、文字、svg等等内容外,其他都属于矩形,设置个默认rect。
ts
 const rect = style.dom.getBoundingClientRect();
      const dom = style.dom as HTMLElement;
      this.id += 1;
      let type = "rect";
      let src = "";
      let path = "";
      let fillColor = style.backgroundColor;
      let strokeColor = "";
      switch (dom.nodeType) {
        case Node.ELEMENT_NODE: {
          const tagName = dom.tagName.toLowerCase();
          type = this.isCircle(style, rect) ? "ellipse" : type;
          type = dom.children.length === 0 && dom.childNodes[0] ? "rect" : type;
          type = style.domChildType === "text" ? "text" : type;
          if (tagName === "img") {
            type = "img";
            src = (dom as HTMLImageElement).src;
          }
          if (tagName === "svg") {
            type = "img";
            const svgData = this.getSvgData(dom, style);
            fillColor = svgData.fill;
            strokeColor = svgData.stroke;
            path = svgData.path;
          }
          break;
        }
      }
圆形
需要根据元素的圆角程度来判断,当前圆角是否满足圆形还是部分圆角。
ts
/**
   * 判断元素是否为圆形
   * @param style 元素的样式
   * @param rect 元素的边界矩形
   * @returns 如果是圆形返回true,否则返回false
   */
  isCircle(style: Style, rect: DOMRect): boolean {
    // 判断dom是否是圆形
    const width = rect.width;
    const height = rect.height;
    let type = "rect";
    let borderRadius = 0;
    const borderRadiusValue = style.borderTopLeftRadius;

    if (borderRadiusValue.includes("%")) {
      const percentage = parseFloat(borderRadiusValue) / 100;
      borderRadius = Math.min(width, height) * percentage;
    } else {
      borderRadius = parseFloat(borderRadiusValue) || 0;
    }

    if (borderRadius > 0 && Math.abs(width - height) < 1) {
      const minSize = Math.min(width, height);
      if (Math.abs(borderRadius - minSize / 2) < 2) {
        type = "ellipse";
      }
    }
    return type === "ellipse";
}当然在画布渲染方面也需要更改,比如原来渲染矩形是通过ctx.strokeRect来渲染一个完整的矩形,但是由于画圆角的api对浏览器支持不好,所以需要手动去画矩形,也就是多边形,判断不同的边,确定圆角的大小来画圆角。

ts
    // 上边
    if (lw.top > 0 && sc.top !== "transparent") {
      const offset = this.getPixelOffset(lw.top);
      ctx.beginPath();
      ctx.lineWidth = lw.top;
      ctx.strokeStyle = sc.top;
      ctx.moveTo(r.lt, offset);
      ctx.lineTo(width - r.rt, offset);
      ctx.stroke();
    }
    // 右边
    if (lw.right > 0 && sc.right !== "transparent") {
      const offset = this.getPixelOffset(lw.right);
      ctx.beginPath();
      ctx.lineWidth = lw.right;
      ctx.strokeStyle = sc.right;
      ctx.moveTo(width - offset, r.rt);
      ctx.lineTo(width - offset, height - r.rb);
      ctx.stroke();
    }
    // 下边
    if (lw.bottom > 0 && sc.bottom !== "transparent") {
      const offset = this.getPixelOffset(lw.bottom);
      ctx.beginPath();
      ctx.lineWidth = lw.bottom;
      ctx.strokeStyle = sc.bottom;
      ctx.moveTo(width - r.rb, height - offset);
      ctx.lineTo(r.lb, height - offset);
      ctx.stroke();
    }
    // 左边
    if (lw.left > 0 && sc.left !== "transparent") {
      const offset = this.getPixelOffset(lw.left);
      ctx.beginPath();
      ctx.lineWidth = lw.left;
      ctx.strokeStyle = sc.left;
      ctx.moveTo(offset, height - r.lb);
      ctx.lineTo(offset, r.lt);
      ctx.stroke();
    }

    // 四个圆角
    const drawCorner = (
      cx: number,
      cy: number,
      rad: number,
      startAngle: number,
      endAngle: number,
      color: string,
      lw: number
    ) => {
      if (rad > 0 && lw > 0 && color !== "transparent") {
        ctx.beginPath();
        ctx.lineWidth = lw;
        ctx.strokeStyle = color;
        ctx.arc(cx, cy, rad, startAngle, endAngle);
        ctx.stroke();
      }
    };

    drawCorner(r.lt, r.lt, r.lt, Math.PI, -Math.PI / 2, sc.top, lw.top); // 左上
    drawCorner(width - r.rt, r.rt, r.rt, -Math.PI / 2, 0, sc.right, lw.right); // 右上
    drawCorner(
      width - r.rb,
      height - r.rb,
      r.rb,
      0,
      Math.PI / 2,
      sc.bottom,
      lw.bottom
    ); // 右下
    drawCorner(
      r.lb,
      height - r.lb,
      r.lb,
      Math.PI / 2,
      Math.PI,
      sc.left,
      lw.left
    ); // 左下
  }
坐标Position和大小
ts
  // 不需要计算margin,因为getBoundingClientRect已经包含margin了
    const position = {
      x: rect.left + window.scrollX,
      y: rect.top + window.scrollY,
    };
    // paddingtop和paddingleft不能计算进去,因为宽高不包括padding
    const size = {
      width:
        rect.width +
        (parseFloat(style.borderLeftWidth) || 0) +
        (parseFloat(style.borderRightWidth) || 0),
      height:
        rect.height +
        (parseFloat(style.borderTopWidth) || 0) +
        (parseFloat(style.borderBottomWidth) || 0),
};需要注意的是,因为使用getBoundingClientRect,所以margin和padding不需要计算。
边框颜色
yaml
    // 根据css,判断文字的垂直对齐方式
    const color = {
      fillColor,
      strokeColor: this.getBorderColor(style, strokeColor),
      strokeTColor: style.borderTopColor,
      strokeBColor: style.borderBottomColor,
      strokeLColor: style.borderLeftColor,
      strokeRColor: style.borderRightColor,
    };
需要分别设置边框颜色,如果取到的颜色只有一个,则设置默认颜色。
边框宽度
ts
      const lineWidth = {
      value: defaultBorderWidth,
      top: hasBorder ? parseFloat(style["borderTopWidth"]) || 0 : 0,
      bottom: hasBorder ? parseFloat(style["borderBottomWidth"]) || 0 : 0,
      left: hasBorder ? parseFloat(style["borderLeftWidth"]) || 0 : 0,
      right: hasBorder ? parseFloat(style["borderRightWidth"]) || 0 : 0,
};分别获取样式style中,边框的颜色。
svg的渲染
svg中有很多属性,对于一个图标来说,可能由不同的图标组成的,但是目前只取一个svg的path读取。 将path转换成对应的canvas画布数据。
ts
/**
   * 获取svg的path,fill,stroke
   * @param dom
   * @param style
   * @returns
   */
  getSvgData(
    dom: HTMLElement,
    style: Style
  ): { path: string; fill: string; stroke: string } {
    let path = "";
    let fillColor = "";
    let strokeColor = "";
    const pathElement = dom.querySelector("path");

    if (pathElement) {
      path = pathElement.getAttribute("d") || "";

      const pathElementFill = pathElement.getAttribute("fill") || "";
      const pathElementStroke = pathElement.getAttribute("stroke") || "";
      const pathStyle = window.getComputedStyle(pathElement);

      fillColor = this.getValidColor(pathElementFill, pathStyle.fill);
      strokeColor = this.getValidColor(pathElementStroke, pathStyle.stroke);
    } else {
      fillColor = style.fill || "transparent";
      strokeColor = this.getValidColor("", style.stroke);
    }
    return { path, fill: fillColor, stroke: strokeColor };
}svg中的颜色fill和stroke可能来自于css和属性,比如说path上的属性fill权重要大于css的样式权重,所以读取的时候,需要注意按照权重读取样式,并统一处理返回到dsl中。
文字
由于文字也涉及的点比较多,比如说居中,垂直居中,靠左,靠右,上对齐,下对齐等等,需要统一处理。 需要考虑css的布局样式,是弹性盒还是文本布局等。
ts
/**
   * 获取文本对齐方式
   * @param style 元素的样式
   * @returns 文本对齐方式
   */
  getTextAlignment(style: CSSStyleDeclaration) {
    const display = style.display;
    const alignItems = style.alignItems;
    const justifyContent = style.justifyContent;
    const textAlign = style.textAlign;

    const height = parseFloat(style.height);
    const lineHeight = parseFloat(style.lineHeight);
    let vertical;
    if (display.includes("flex")) {
      if (alignItems === "center") vertical = "middle";
      else if (alignItems === "flex-start" || alignItems === "start")
        vertical = "top";
      else if (alignItems === "flex-end" || alignItems === "end")
        vertical = "bottom";
    } else if (!isNaN(height) && !isNaN(lineHeight)) {
      if (Math.abs(height - lineHeight) < 0.5) vertical = "middle";
      else if (lineHeight < height / 2) vertical = "top";
      else vertical = "bottom";
    }

    let horizontal;
    if (display.includes("flex")) {
      if (justifyContent === "center") horizontal = "center";
      else if (justifyContent === "flex-start" || justifyContent === "start")
        horizontal = "left";
      else if (justifyContent === "flex-end" || justifyContent === "end")
        horizontal = "right";
    } else {
      if (textAlign === "center") horizontal = "center";
      else if (textAlign === "right" || textAlign === "end")
        horizontal = "right";
      else horizontal = "left"; // 默认 left
    }

    return {
      vertical,
      horizontal,
      isVerticallyCentered: vertical === "middle",
      isHorizontallyCentered: horizontal === "center",
    };
}canvas画布对齐有一些不一样,左对齐center,并不是按照size大小居中对齐,而是按照x轴的点进行中心对齐,y轴也是一样,所以在渲染文字时,需要特殊处理。
ts
// TextRender.ts
// ...
   // 计算 y 偏移:当 textBaseline 为 middle 时,需要将文字向下偏移半个容器高度
  // 因为 translate 已经移动到了元素的左上角,而 middle 会让文字中心对齐到 y=0
  let offsetY = 0;
  if (textBaseline === "middle" && size) {
    offsetY = size.height / 2;
  }

  // 计算 x 偏移:当 textAlign 为 center 或 right 时,需要调整 x 轴位置
  // 因为 translate 已经移动到了元素的左上角
  let offsetX = 0;
  if (size) {
    if (textAlign === "center") {
      offsetX = size.width / 2;
    } else if (textAlign === "right" || textAlign === "end") {
      offsetX = size.width;
    }
  }
  ```
#### 渲染到画布
```ts
//...
  const dsl = {
      position,
      size,
      font: type === "text" ? this.getFontByStyle(style) : {},
      color,
      selected: { value: false, hovered: false },
      radius,
      img: src || path ? { src, path } : null,
      id: this.id.toString(),
      rotation: { value: 0 },
      zIndex: 30,
      lineWidth,
      eventQueue: [],
      type,
    };

    this.dsls.push(dsl as unknown as DSL);
    if (style.children && style.children.length > 0) {
      this.transformToDSL(style.children);
    }
最后将得到的dsl一次性渲染到画布中。
ts
const handlerApplyCode = (data: any[]) => {
  engineRef.current?.core.initComponents(data);
  engineRef.current?.update();
};
渲染引擎
目前采用的canvas api进行绘制,有考虑大数据量的时候,会导致页面卡顿,有打算将渲染引擎给替换成WebGL进行绘制,当然只需要更新Render即可,抽象统一的api进行替换。 WebGL方面目前打算采用PixiJs框架来绘制,总体需要的api跟canvas相似,替换成本比较低。当然具体方案还没确定,也许会把整体页面布局搞完再做也说不准,比较目前只有渲染和拖拽移动等功能,由于ECS架构的特性,想来加一些页面功能还是比较快的。