Vue3小兔鲜-(二)
- 整体认识和路由配置
-
- [1. 准备组件模版](#1. 准备组件模版)
- [2. 配置路由](#2. 配置路由)
- [3. 绑定模版测试跳转](#3. 绑定模版测试跳转)
- 渲染基础数据
-
- [1. 封装接口](#1. 封装接口)
- [2. 获取数据渲染模版](#2. 获取数据渲染模版)
- 热榜区域
-
- [1. 渲染基础热榜数据](#1. 渲染基础热榜数据)
- [2. 适配热榜类型](#2. 适配热榜类型)
- [3. 适配热榜title](#3. 适配热榜title)
- 图片预览组件封装
-
- [1. 小图切换大图显示](#1. 小图切换大图显示)
- [2. 放大镜效果实现](#2. 放大镜效果实现)
- SKU组件熟悉
- 全局组件统一插件化
-
- [1. 插件化开发](#1. 插件化开发)
- [2. 插件注册](#2. 插件注册)
- 整体认识和路由配置
-
- [1. 准备模版](#1. 准备模版)
- [2. 配置路由跳转](#2. 配置路由跳转)
- 表单校验实现
-
- [1. 校验要求](#1. 校验要求)
- [2. 代码实现](#2. 代码实现)
- 登录基础业务实现
- Pinia管理用户数据
- 请求拦截器携带token
- 退出登录实现
- 本地购物车
-
- [1. 添加购物车](#1. 添加购物车)
- [2. 头部购物车](#2. 头部购物车)
-
- [2.1. 头部购物车组件模版](#2.1. 头部购物车组件模版)
- [2.2 渲染头部购物车数据](#2.2 渲染头部购物车数据)
- [2.3 删除功能实现](#2.3 删除功能实现)
- [3. 列表购物车-基础内容渲染](#3. 列表购物车-基础内容渲染)
-
- [3.1. 准备模版](#3.1. 准备模版)
- [3.2. 绑定路由](#3.2. 绑定路由)
- [3.3. 渲染列表](#3.3. 渲染列表)
- [4. 列表购物车-单选功能实现](#4. 列表购物车-单选功能实现)
- [5. 列表购物车-全选功能实现](#5. 列表购物车-全选功能实现)
- [6. 列表购物车-统计数据功能实现](#6. 列表购物车-统计数据功能实现)
- 接口购物车
-
- [1. 加入购物车](#1. 加入购物车)
- [2. 删除购物车](#2. 删除购物车)
- 路由配置和基础数据渲染
-
- [1. 准备组件模版](#1. 准备组件模版)
- [2. 配置路由](#2. 配置路由)
- [3. 封装接口](#3. 封装接口)
- [4. 渲染数据](#4. 渲染数据)
- 切换地址-打开弹框交互
-
- [1. 准备弹框模版](#1. 准备弹框模版)
- [2. 控制弹框打开](#2. 控制弹框打开)
- 切换地址-地址切换交互
- 创建订单生成订单ID
-
- [1. 准备支付页组件并绑定路由](#1. 准备支付页组件并绑定路由)
- [2. 准备生成订单接口](#2. 准备生成订单接口)
- [3. 调用接口携带id跳转路由](#3. 调用接口携带id跳转路由)
- image.png
- 基础数据渲染
-
- [1. 准备接口](#1. 准备接口)
- [2. 获取数据渲染内容](#2. 获取数据渲染内容)
- 支付功能实现
-
- [1. 支付携带参数](#1. 支付携带参数)
- [2. 支付宝沙箱账号信息](#2. 支付宝沙箱账号信息)
- 支付结果页展示
-
- [1. 准备模版](#1. 准备模版)
- [2. 绑定路由](#2. 绑定路由)
- [3. 渲染数据](#3. 渲染数据)
- 倒计时逻辑函数封装
- image.png
- 路由配置
-
- [1. 准备路由模版](#1. 准备路由模版)
- [2. 配置路由](#2. 配置路由)
- [3. 准备个人信息和我的订单路由组件](#3. 准备个人信息和我的订单路由组件)
- [4. 配置三级路由](#4. 配置三级路由)
- 个人中心信息渲染
-
- [1. 使用Pinia数据渲染个人信息](#1. 使用Pinia数据渲染个人信息)
- [2. 封装猜你喜欢接口](#2. 封装猜你喜欢接口)
- [3. 渲染猜你喜欢数据](#3. 渲染猜你喜欢数据)
- 我的订单
-
- [1. 基础列表渲染](#1. 基础列表渲染)
- [2. tab切换实现](#2. tab切换实现)
- [3. 分页逻实现](#3. 分页逻实现)
- 细节优化
-
- [1. 默认三级路由设置](#1. 默认三级路由设置)
- [2. 订单状态显示适配](#2. 订单状态显示适配)
- Sku组件封装
-
- [1. 准备模版渲染规格数据](#1. 准备模版渲染规格数据)
- [2. 选中和取消选中实现](#2. 选中和取消选中实现)
- [3. 规格禁用功能实现](#3. 规格禁用功能实现)
- [4. 产出Prop数据](#4. 产出Prop数据)
整体认识和路由配置
1. 准备组件模版
ts
<script setup>


</script>

<template>
  <div class="xtx-goods-page">
    <div class="container">
      <div class="bread-container">
        <el-breadcrumb separator=">">
          <el-breadcrumb-item :to="{ path: '/' }">首页</el-breadcrumb-item>
          <el-breadcrumb-item :to="{ path: '/' }">母婴
          </el-breadcrumb-item>
          <el-breadcrumb-item :to="{ path: '/' }">跑步鞋
          </el-breadcrumb-item>
          <el-breadcrumb-item>抓绒保暖,毛毛虫子儿童运动鞋</el-breadcrumb-item>
        </el-breadcrumb>
      </div>
      <!-- 商品信息 -->
      <div class="info-container">
        <div>
          <div class="goods-info">
            <div class="media">
              <!-- 图片预览区 -->

              <!-- 统计数量 -->
              <ul class="goods-sales">
                <li>
                  <p>销量人气</p>
                  <p> 100+ </p>
                  <p><i class="iconfont icon-task-filling"></i>销量人气</p>
                </li>
                <li>
                  <p>商品评价</p>
                  <p>200+</p>
                  <p><i class="iconfont icon-comment-filling"></i>查看评价</p>
                </li>
                <li>
                  <p>收藏人气</p>
                  <p>300+</p>
                  <p><i class="iconfont icon-favorite-filling"></i>收藏商品</p>
                </li>
                <li>
                  <p>品牌信息</p>
                  <p>400+</p>
                  <p><i class="iconfont icon-dynamic-filling"></i>品牌主页</p>
                </li>
              </ul>
            </div>
            <div class="spec">
              <!-- 商品信息区 -->
              <p class="g-name"> 抓绒保暖,毛毛虫儿童鞋 </p>
              <p class="g-desc">好穿 </p>
              <p class="g-price">
                <span>200</span>
                <span> 100</span>
              </p>
              <div class="g-service">
                <dl>
                  <dt>促销</dt>
                  <dd>12月好物放送,App领券购买直降120元</dd>
                </dl>
                <dl>
                  <dt>服务</dt>
                  <dd>
                    <span>无忧退货</span>
                    <span>快速退款</span>
                    <span>免费包邮</span>
                    <a href="javascript:;">了解详情</a>
                  </dd>
                </dl>
              </div>
              <!-- sku组件 -->

              <!-- 数据组件 -->

              <!-- 按钮组件 -->
              <div>
                <el-button size="large" class="btn">
                  加入购物车
                </el-button>
              </div>

            </div>
          </div>
          <div class="goods-footer">
            <div class="goods-article">
              <!-- 商品详情 -->
              <div class="goods-tabs">
                <nav>
                  <a>商品详情</a>
                </nav>
                <div class="goods-detail">
                  <!-- 属性 -->
                  <ul class="attrs">
                    <li v-for="item in 3" :key="item.value">
                      <span class="dt">白色</span>
                      <span class="dd">纯棉</span>
                    </li>
                  </ul>
                  <!-- 图片 -->

                </div>
              </div>
            </div>
            <!-- 24热榜+专题推荐 -->
            <div class="goods-aside">

            </div>
          </div>
        </div>
      </div>
    </div>
  </div>
</template>


<style scoped lang='scss'>
.xtx-goods-page {
  .goods-info {
    min-height: 600px;
    background: #fff;
    display: flex;

    .media {
      width: 580px;
      height: 600px;
      padding: 30px 50px;
    }

    .spec {
      flex: 1;
      padding: 30px 30px 30px 0;
    }
  }

  .goods-footer {
    display: flex;
    margin-top: 20px;

    .goods-article {
      width: 940px;
      margin-right: 20px;
    }

    .goods-aside {
      width: 280px;
      min-height: 1000px;
    }
  }

  .goods-tabs {
    min-height: 600px;
    background: #fff;
  }

  .goods-warn {
    min-height: 600px;
    background: #fff;
    margin-top: 20px;
  }

  .number-box {
    display: flex;
    align-items: center;

    .label {
      width: 60px;
      color: #999;
      padding-left: 10px;
    }
  }

  .g-name {
    font-size: 22px;
  }

  .g-desc {
    color: #999;
    margin-top: 10px;
  }

  .g-price {
    margin-top: 10px;

    span {
      &::before {
        content: "¥";
        font-size: 14px;
      }

      &:first-child {
        color: $priceColor;
        margin-right: 10px;
        font-size: 22px;
      }

      &:last-child {
        color: #999;
        text-decoration: line-through;
        font-size: 16px;
      }
    }
  }

  .g-service {
    background: #f5f5f5;
    width: 500px;
    padding: 20px 10px 0 10px;
    margin-top: 10px;

    dl {
      padding-bottom: 20px;
      display: flex;
      align-items: center;

      dt {
        width: 50px;
        color: #999;
      }

      dd {
        color: #666;

        &:last-child {
          span {
            margin-right: 10px;

            &::before {
              content: "•";
              color: $xtxColor;
              margin-right: 2px;
            }
          }

          a {
            color: $xtxColor;
          }
        }
      }
    }
  }

  .goods-sales {
    display: flex;
    width: 400px;
    align-items: center;
    text-align: center;
    height: 140px;

    li {
      flex: 1;
      position: relative;

      ~li::after {
        position: absolute;
        top: 10px;
        left: 0;
        height: 60px;
        border-left: 1px solid #e4e4e4;
        content: "";
      }

      p {
        &:first-child {
          color: #999;
        }

        &:nth-child(2) {
          color: $priceColor;
          margin-top: 10px;
        }

        &:last-child {
          color: #666;
          margin-top: 10px;

          i {
            color: $xtxColor;
            font-size: 14px;
            margin-right: 2px;
          }

          &:hover {
            color: $xtxColor;
            cursor: pointer;
          }
        }
      }
    }
  }
}

.goods-tabs {
  min-height: 600px;
  background: #fff;

  nav {
    height: 70px;
    line-height: 70px;
    display: flex;
    border-bottom: 1px solid #f5f5f5;

    a {
      padding: 0 40px;
      font-size: 18px;
      position: relative;

      >span {
        color: $priceColor;
        font-size: 16px;
        margin-left: 10px;
      }
    }
  }
}

.goods-detail {
  padding: 40px;

  .attrs {
    display: flex;
    flex-wrap: wrap;
    margin-bottom: 30px;

    li {
      display: flex;
      margin-bottom: 10px;
      width: 50%;

      .dt {
        width: 100px;
        color: #999;
      }

      .dd {
        flex: 1;
        color: #666;
      }
    }
  }

  >img {
    width: 100%;
  }
}

.btn {
  margin-top: 20px;

}

.bread-container {
  padding: 25px 0;
}
</style>
2. 配置路由
javascript
const router = createRouter({
  history: createWebHistory(import.meta.env.BASE_URL),
  // path和component对应关系的位置
  routes: [
    {
      path: '/',
      component: Layout,
      children: [
        {
          path: '',
          component: Home
        },
        {
          path: 'category/:id',
          component: Category
        },
        {
          path: 'category/sub/:id',
          component: SubCategory
        },
        {
          path: 'detail/:id',
          component: Detail
        }
      ]
    },
    {
      path: '/login',
      component: Login
    }
  ],
  // 路由滚动行为定制
  scrollBehavior () {
    return {
      top: 0
    }
  }
})
3. 绑定模版测试跳转
html
<RouterLink :to="`/detail/${item.id}`">
<img :src="item.picture" alt="" />
<p class="name">{{ item.name }}</p>
<p class="price">¥{{ item.price }}</p>
</RouterLink>渲染基础数据
1. 封装接口
javascript
import request from '@/utils/http'


export const getDetail = (id) => {
  return request({
    url: '/goods',
    params: {
      id
    }
  })
}
2. 获取数据渲染模版
ts
<script setup>
import { getDetail } from '@/apis/detail'
import { onMounted, ref } from 'vue'
import { useRoute } from 'vue-router'
const goods = ref({})
const route = useRoute()
const getGoods = async () => {
  const res = await getDetail(route.params.id)
  goods.value = res.result
}
onMounted(() => getGoods())
</script>

<template>
  <div class="xtx-goods-page">
    <div class="container" v-if="goods.details">
      <div class="bread-container">
        <el-breadcrumb separator=">">
          <el-breadcrumb-item :to="{ path: '/' }">首页</el-breadcrumb-item>
          <!--
            错误原因:goods一开始{}  {}.categories -> undefined  -> undefined[1]
            1. 可选链的语法?.
            2. v-if手动控制渲染时机 保证只有数据存在才渲染
           -->
          <el-breadcrumb-item :to="{ path: `/category/${goods.categories[1].id}` }">{{ goods.categories[1].name }}
          </el-breadcrumb-item>
          <el-breadcrumb-item :to="{ path: `/category/sub/${goods.categories[0].id}` }">{{
            goods.categories[0].name
          }}
          </el-breadcrumb-item>
          <el-breadcrumb-item>抓绒保暖,毛毛虫子儿童运动鞋</el-breadcrumb-item>
        </el-breadcrumb>
      </div>
      <!-- 商品信息 -->
      <div class="info-container">
        <div>
          <div class="goods-info">
            <div class="media">
              <!-- 图片预览区 -->

              <!-- 统计数量 -->
              <ul class="goods-sales">
                <li>
                  <p>销量人气</p>
                  <p> {{ goods.salesCount }}+ </p>
                  <p><i class="iconfont icon-task-filling"></i>销量人气</p>
                </li>
                <li>
                  <p>商品评价</p>
                  <p>{{ goods.commentCount }}+</p>
                  <p><i class="iconfont icon-comment-filling"></i>查看评价</p>
                </li>
                <li>
                  <p>收藏人气</p>
                  <p>{{ goods.collectCount }}+</p>
                  <p><i class="iconfont icon-favorite-filling"></i>收藏商品</p>
                </li>
                <li>
                  <p>品牌信息</p>
                  <p>{{ goods.brand.name }}</p>
                  <p><i class="iconfont icon-dynamic-filling"></i>品牌主页</p>
                </li>
              </ul>
            </div>
            <div class="spec">
              <!-- 商品信息区 -->
              <p class="g-name"> {{ goods.name }} </p>
              <p class="g-desc">{{ goods.desc }} </p>
              <p class="g-price">
                <span>{{ goods.oldPrice }}</span>
                <span> {{ goods.price }}</span>
              </p>
              <div class="g-service">
                <dl>
                  <dt>促销</dt>
                  <dd>12月好物放送,App领券购买直降120元</dd>
                </dl>
                <dl>
                  <dt>服务</dt>
                  <dd>
                    <span>无忧退货</span>
                    <span>快速退款</span>
                    <span>免费包邮</span>
                    <a href="javascript:;">了解详情</a>
                  </dd>
                </dl>
              </div>
              <!-- sku组件 -->

              <!-- 数据组件 -->

              <!-- 按钮组件 -->
              <div>
                <el-button size="large" class="btn">
                  加入购物车
                </el-button>
              </div>

            </div>
          </div>
          <div class="goods-footer">
            <div class="goods-article">
              <!-- 商品详情 -->
              <div class="goods-tabs">
                <nav>
                  <a>商品详情</a>
                </nav>
                <div class="goods-detail">
                  <!-- 属性 -->
                  <ul class="attrs">
                    <li v-for="item in goods.details.properties" :key="item.value">
                      <span class="dt">{{ item.name }}</span>
                      <span class="dd">{{ item.value }}</span>
                    </li>
                  </ul>
                  <!-- 图片 -->
                  <img v-for="img in goods.details.pictures" :src="img" :key="img" alt="">
                </div>
              </div>
            </div>
            <!-- 24热榜+专题推荐 -->
            <div class="goods-aside">

            </div>
          </div>
        </div>
      </div>
    </div>
  </div>
</template>
热榜区域
1. 渲染基础热榜数据
1- 准备模版
ts
<script setup>
</script>
<template>
<div class="goods-hot">
<h3>周日榜单</h3>
<!-- 商品区块 -->
<RouterLink to="/" class="goods-item" v-for="item in 3" :key="item.id">
<img :src="item.picture" alt="" />
<p class="name ellipsis">一双男鞋</p>
<p class="desc ellipsis">一双好穿的男鞋</p>
<p class="price">¥200.00</p>
</RouterLink>
</div>
</template>
<style scoped lang="scss">
.goods-hot {
h3 {
height: 70px;
background: $helpColor;
color: #fff;
font-size: 18px;
line-height: 70px;
padding-left: 25px;
margin-bottom: 10px;
font-weight: normal;
}
.goods-item {
display: block;
padding: 20px 30px;
text-align: center;
background: #fff;
img {
width: 160px;
height: 160px;
}
p {
padding-top: 10px;
}
.name {
font-size: 16px;
}
.desc {
color: #999;
height: 29px;
}
.price {
color: $priceColor;
font-size: 20px;
}
}
}
</style>2- 封装接口
javascript
/**
 * 获取热榜商品
 * @param {Number} id - 商品id
 * @param {Number} type - 1代表24小时热销榜 2代表周热销榜
 * @param {Number} limit - 获取个数
 */
export const fetchHotGoodsAPI = ({ id, type, limit = 3 }) => {
  return request({
    url:'/goods/hot',
    params:{
      id,
      type,
      limit
    }
  })
}
3- 获取基础数据渲染模版
ts
<script setup>
import { ref } from 'vue'
import { getHotGoodsAPI } from '@/apis/detail'
import { useRoute } from 'vue-router'
const goodList = ref([])
const route = useRoute()
const getHotList = async () => {
const res = await getHotGoodsAPI({
id: route.params.id,
type: 1
})
goodList.value = res.result
}
getHotList()
</script>
<template>
<div class="goods-hot">
<h3> 24小时热榜 </h3>
<!-- 商品区块 -->
<RouterLink :to="`/detail/${item.id}`" class="goods-item" v-for="item in goodList" :key="item.id">
<img :src="item.picture" alt="" />
<p class="name ellipsis">{{ item.name }}</p>
<p class="desc ellipsis">{{ item.desc }}</p>
<p class="price">¥{{ item.price }}</p>
</RouterLink>
</div>
</template>2. 适配热榜类型
1- 设计props参数type
jsx
// type适配不同类型热榜数据
const props = defineProps({
  type: {
    type: Number, // 1代表24小时热销榜 2代表周热销榜 3代表总热销榜 可以使用type去适配title和数据列表
    default: 1
  }
})


 const res = await fetchHotGoodsAPI({
    id: route.params.id,
    type: props.type
})
2- 使用组件传入不同的type
ts
<!-- 24小时热榜 -->
<GoodHot :type="1" />
<!-- 周热榜 -->
<GoodHot :type="2" />
3. 适配热榜title
jsx
const TITLEMAP = {
  1: '24小时热榜',
  2: '周热榜',
}
const title = computed(() => TITLEMAP[props.type])

<h3>{{ title }}</h3>
图片预览组件封装
1. 小图切换大图显示
1- 准备模版
ts
<script setup>
// 图片列表
const imageList = [
  "https://yanxuan-item.nosdn.127.net/d917c92e663c5ed0bb577c7ded73e4ec.png",
  "https://yanxuan-item.nosdn.127.net/e801b9572f0b0c02a52952b01adab967.jpg",
  "https://yanxuan-item.nosdn.127.net/b52c447ad472d51adbdde1a83f550ac2.jpg",
  "https://yanxuan-item.nosdn.127.net/f93243224dc37674dfca5874fe089c60.jpg",
  "https://yanxuan-item.nosdn.127.net/f881cfe7de9a576aaeea6ee0d1d24823.jpg"
]
</script>


<template>
  <div class="goods-image">
    <!-- 左侧大图-->
    <div class="middle" ref="target">
      <img :src="imageList[0]" alt="" />
      <!-- 蒙层小滑块 -->
      <div class="layer" :style="{ left: `0px`, top: `0px` }"></div>
    </div>
    <!-- 小图列表 -->
    <ul class="small">
      <li v-for="(img, i) in imageList" :key="i">
        <img :src="img" alt="" />
      </li>
    </ul>
    <!-- 放大镜大图 -->
    <div class="large" :style="[
      {
        backgroundImage: `url(${imageList[0]})`,
        backgroundPositionX: `0px`,
        backgroundPositionY: `0px`,
      },
    ]" v-show="false"></div>
  </div>
</template>

<style scoped lang="scss">
.goods-image {
  width: 480px;
  height: 400px;
  position: relative;
  display: flex;

  .middle {
    width: 400px;
    height: 400px;
    background: #f5f5f5;
  }

  .large {
    position: absolute;
    top: 0;
    left: 412px;
    width: 400px;
    height: 400px;
    z-index: 500;
    box-shadow: 0 0 10px rgba(0, 0, 0, 0.1);
    background-repeat: no-repeat;
    // 背景图:盒子的大小 = 2:1  将来控制背景图的移动来实现放大的效果查看 background-position
    background-size: 800px 800px;
    background-color: #f8f8f8;
  }

  .layer {
    width: 200px;
    height: 200px;
    background: rgba(0, 0, 0, 0.2);
    // 绝对定位 然后跟随咱们鼠标控制left和top属性就可以让滑块移动起来
    left: 0;
    top: 0;
    position: absolute;
  }

  .small {
    width: 80px;

    li {
      width: 68px;
      height: 68px;
      margin-left: 12px;
      margin-bottom: 15px;
      cursor: pointer;

      &:hover,
      &.active {
        border: 2px solid $xtxColor;
      }
    }
  }
}
</style>
2- 实现逻辑
ts
<script setup>
import { ref } from 'vue'

// 实现鼠标移入交互
const curIndex = ref(0)
const mouseEnterFn = (i) => curIndex.value = i


</script>


<template>
  <div class="goods-image">
    <!-- 小图列表 -->
    <ul class="small">
      <li v-for="(img, i) in imageList"
        :key="i"
        @mouseenter="mouseEnterFn(i)"
        :class="{ active: i === curIndex }">
        <img :src="img" alt="" />
      </li>
    </ul>
  </div>
</template>
2. 放大镜效果实现
ts
<script setup>
import { ref, watch } from 'vue'
import { useMouseInElement } from '@vueuse/core'

// 图片列表
const imageList = [
  "https://yanxuan-item.nosdn.127.net/d917c92e663c5ed0bb577c7ded73e4ec.png",
  "https://yanxuan-item.nosdn.127.net/e801b9572f0b0c02a52952b01adab967.jpg",
  "https://yanxuan-item.nosdn.127.net/b52c447ad472d51adbdde1a83f550ac2.jpg",
  "https://yanxuan-item.nosdn.127.net/f93243224dc37674dfca5874fe089c60.jpg",
  "https://yanxuan-item.nosdn.127.net/f881cfe7de9a576aaeea6ee0d1d24823.jpg"
]

// 1.小图切换大图显示
const activeIndex = ref(0)

const enterhandler = (i) => {
  activeIndex.value = i
}

// 2. 获取鼠标相对位置
const target = ref(null)
const { elementX, elementY, isOutside } = useMouseInElement(target)

// 3. 控制滑块跟随鼠标移动(监听elementX/Y变化,一旦变化 重新设置left/top)
const left = ref(0)
const top = ref(0)

const positionX = ref(0)
const positionY = ref(0)
watch([elementX, elementY, isOutside], () => {
  console.log('xy变化了')
  // 如果鼠标没有移入到盒子里面 直接不执行后面的逻辑
  if (isOutside.value) return
  console.log('后续逻辑执行了')
  // 有效范围内控制滑块距离
  // 横向
  if (elementX.value > 100 && elementX.value < 300) {
    left.value = elementX.value - 100
  }
  // 纵向
  if (elementY.value > 100 && elementY.value < 300) {
    top.value = elementY.value - 100
  }

  // 处理边界
  if (elementX.value > 300) { left.value = 200 }
  if (elementX.value < 100) { left.value = 0 }

  if (elementY.value > 300) { top.value = 200 }
  if (elementY.value < 100) { top.value = 0 }

  // 控制大图的显示
  positionX.value = -left.value * 2
  positionY.value = -top.value * 2

})

</script>


<template>
  <div class="goods-image">

    <!-- 左侧大图-->
    <div class="middle" ref="target">
      <img :src="imageList[activeIndex]" alt="" />
      <!-- 蒙层小滑块 -->
      <div class="layer" v-show="!isOutside" :style="{ left: `${left}px`, top: `${top}px` }"></div>
    </div>
    <!-- 小图列表 -->
    <ul class="small">
      <li v-for="(img, i) in imageList" :key="i" @mouseenter="enterhandler(i)" :class="{ active: i === activeIndex }">
        <img :src="img" alt="" />
      </li>
    </ul>
    <!-- 放大镜大图 -->
    <div class="large" :style="[
      {
        backgroundImage: `url(${imageList[0]})`,
        backgroundPositionX: `${positionX}px`,
        backgroundPositionY: `${positionY}px`,
      },
    ]" v-show="!isOutside"></div>
  </div>
</template>

<style scoped lang="scss">
.goods-image {
  width: 480px;
  height: 400px;
  position: relative;
  display: flex;

  .middle {
    width: 400px;
    height: 400px;
    background: #f5f5f5;
  }

  .large {
    position: absolute;
    top: 0;
    left: 412px;
    width: 400px;
    height: 400px;
    z-index: 500;
    box-shadow: 0 0 10px rgba(0, 0, 0, 0.1);
    background-repeat: no-repeat;
    // 背景图:盒子的大小 = 2:1  将来控制背景图的移动来实现放大的效果查看 background-position
    background-size: 800px 800px;
    background-color: #f8f8f8;
  }

  .layer {
    width: 200px;
    height: 200px;
    background: rgba(0, 0, 0, 0.2);
    // 绝对定位 然后跟随咱们鼠标控制left和top属性就可以让滑块移动起来
    left: 0;
    top: 0;
    position: absolute;
  }

  .small {
    width: 80px;

    li {
      width: 68px;
      height: 68px;
      margin-left: 12px;
      margin-bottom: 15px;
      cursor: pointer;

      &:hover,
      &.active {
        border: 2px solid $xtxColor;
      }
    }
  }
}
</style>
SKU组件熟悉
全局组件统一插件化
1. 插件化开发
javascript
// 把components中的所组件都进行全局化注册
// 通过插件的方式
import ImageView from './ImageView/index.vue'
import Sku from './XtxSku/index.vue'
export const componentPlugin = {
  install (app) {
    // app.component('组件名字',组件配置对象)
    app.component('XtxImageView', ImageView)
    app.component('XtxSku', Sku)
  }
}
2. 插件注册
ts
// 引入全局组件插件
import { componentPlugin } from '@/components'

app.use(componentPlugin)
整体认识和路由配置
1. 准备模版
ts
<script setup>
</script>
<template>
<div>
<header class="login-header">
<div class="container m-top-20">
<h1 class="logo">
<RouterLink to="/">小兔鲜</RouterLink>
</h1>
<RouterLink class="entry" to="/">
进入网站首页
<i class="iconfont icon-angle-right"></i>
<i class="iconfont icon-angle-right"></i>
</RouterLink>
</div>
</header>
<section class="login-section">
<div class="wrapper">
<nav>
<a href="javascript:;">账户登录</a>
</nav>
<div class="account-box">
<div class="form">
<el-form label-position="right" label-width="60px"
status-icon>
<el-form-item label="账户">
<el-input/>
</el-form-item>
<el-form-item label="密码">
<el-input/>
</el-form-item>
<el-form-item label-width="22px">
<el-checkbox size="large">
我已同意隐私条款和服务条款
</el-checkbox>
</el-form-item>
<el-button size="large" class="subBtn">点击登录</el-button>
</el-form>
</div>
</div>
</div>
</section>
<footer class="login-footer">
<div class="container">
<p>
<a href="javascript:;">关于我们</a>
<a href="javascript:;">帮助中心</a>
<a href="javascript:;">售后服务</a>
<a href="javascript:;">配送与验收</a>
<a href="javascript:;">商务合作</a>
<a href="javascript:;">搜索推荐</a>
<a href="javascript:;">友情链接</a>
</p>
<p>CopyRight © 小兔鲜儿</p>
</div>
</footer>
</div>
</template>
<style scoped lang='scss'>
.login-header {
background: #fff;
border-bottom: 1px solid #e4e4e4;
.container {
display: flex;
align-items: flex-end;
justify-content: space-between;
}
.logo {
width: 200px;
a {
display: block;
height: 132px;
width: 100%;
text-indent: -9999px;
background: url("@/assets/images/logo.png") no-repeat center 18px / contain;
}
}
.sub {
flex: 1;
font-size: 24px;
font-weight: normal;
margin-bottom: 38px;
margin-left: 20px;
color: #666;
}
.entry {
width: 120px;
margin-bottom: 38px;
font-size: 16px;
i {
font-size: 14px;
color: $xtxColor;
letter-spacing: -5px;
}
}
}
.login-section {
background: url('@/assets/images/login-bg.png') no-repeat center / cover;
height: 488px;
position: relative;
.wrapper {
width: 380px;
background: #fff;
position: absolute;
left: 50%;
top: 54px;
transform: translate3d(100px, 0, 0);
box-shadow: 0 0 10px rgba(0, 0, 0, 0.15);
nav {
font-size: 14px;
height: 55px;
margin-bottom: 20px;
border-bottom: 1px solid #f5f5f5;
display: flex;
padding: 0 40px;
text-align: right;
align-items: center;
a {
flex: 1;
line-height: 1;
display: inline-block;
font-size: 18px;
position: relative;
text-align: center;
}
}
}
}
.login-footer {
padding: 30px 0 50px;
background: #fff;
p {
text-align: center;
color: #999;
padding-top: 20px;
a {
line-height: 1;
padding: 0 10px;
color: #999;
display: inline-block;
~a {
border-left: 1px solid #ccc;
}
}
}
}
.account-box {
.toggle {
padding: 15px 40px;
text-align: right;
a {
color: $xtxColor;
i {
font-size: 14px;
}
}
}
.form {
padding: 0 20px 20px 20px;
&-item {
margin-bottom: 28px;
.input {
position: relative;
height: 36px;
>i {
width: 34px;
height: 34px;
background: #cfcdcd;
color: #fff;
position: absolute;
left: 1px;
top: 1px;
text-align: center;
line-height: 34px;
font-size: 18px;
}
input {
padding-left: 44px;
border: 1px solid #cfcdcd;
height: 36px;
line-height: 36px;
width: 100%;
&.error {
border-color: $priceColor;
}
&.active,
&:focus {
border-color: $xtxColor;
}
}
.code {
position: absolute;
right: 1px;
top: 1px;
text-align: center;
line-height: 34px;
font-size: 14px;
background: #f5f5f5;
color: #666;
width: 90px;
height: 34px;
cursor: pointer;
}
}
>.error {
position: absolute;
font-size: 12px;
line-height: 28px;
color: $priceColor;
i {
font-size: 14px;
margin-right: 2px;
}
}
}
.agree {
a {
color: #069;
}
}
.btn {
display: block;
width: 100%;
height: 40px;
color: #fff;
text-align: center;
line-height: 40px;
background: $xtxColor;
&.disabled {
background: #cfcdcd;
}
}
}
.action {
padding: 20px 40px;
display: flex;
justify-content: space-between;
align-items: center;
.url {
a {
color: #999;
margin-left: 10px;
}
}
}
}
.subBtn {
background: $xtxColor;
width: 100%;
color: #fff;
}
</style>2. 配置路由跳转
ts
<li><a href="javascript:;" @click="router.push('/login')">请先登录</a></li>表单校验实现
1. 校验要求
用户名:不能为空,字段名为 account
密码:不能为空且为6-14个字符,字段名为 password
同意协议:必选,字段名为 agree
2. 代码实现
ts
<script setup>
import { ref } from 'vue'
// 表单数据对象
const userInfo = ref({
  account: '1311111111',
  password: '123456',
  agree: true
})

// 规则数据对象
const rules = {
  account: [
    { required: true, message: '用户名不能为空' }
  ],
  password: [
    { required: true, message: '密码不能为空' },
    { min: 6, max: 24, message: '密码长度要求6-14个字符' }
  ],
  agree: [
    {
      validator: (rule, val, callback) => {
        return val ? callback() : new Error('请先同意协议')
      }
    }
  ]
}


</script>


<template>
    <div class="form">
      <el-form ref="formRef" :model="userInfo" :rules="rules" status-icon>
        <el-form-item prop="account" label="账户">
          <el-input v-model="userInfo.account" />
        </el-form-item>
        <el-form-item prop="password" label="密码">
          <el-input v-model="userInfo.password" />
        </el-form-item>
        <el-form-item prop="agree" label-width="22px">
          <el-checkbox v-model="userInfo.agree" size="large">
            我已同意隐私条款和服务条款
          </el-checkbox>
        </el-form-item>
        <el-button size="large" class="subBtn" >点击登录</el-button>
      </el-form>
    </div>
</template>
登录基础业务实现
基础思想
- 调用登录接口获取用户信息
- 提示用户当前是否成功
- 跳转到首页
jsx
import { ElMessage } from 'element-plus'
import 'element-plus/theme-chalk/el-message.css'


const doLogin = () => {
  const { account, password } = form.value
  // 调用实例方法
  formRef.value.validate(async (valid) => {
    // valid: 所有表单都通过校验  才为true
    console.log(valid)
    // 以valid做为判断条件 如果通过校验才执行登录逻辑
    if (valid) {
      // TODO LOGIN
      await loginAPI({ account, password })
      // 1. 提示用户
      ElMessage({ type: 'success', message: '登录成功' })
      // 2. 跳转首页
      router.replace({ path: '/' })
    }
  })
}
Pinia管理用户数据
基本思想:Pinia负责用户数据相关的state和action,组件中只负责触发action函数并传递参数
javascript
// 管理用户数据相关

import { defineStore } from 'pinia'
import { ref } from 'vue'
import { loginAPI } from '@/apis/user'

export const useUserStore = defineStore('user', () => {
  // 1. 定义管理用户数据的state
  const userInfo = ref({})
  // 2. 定义获取接口数据的action函数
  const getUserInfo = async ({ account, password }) => {
    const res = await loginAPI({ account, password })
    userInfo.value = res.result
  }
  // 3. 以对象的格式把state和action return
  return {
    getUserInfo
  }
}, {
  persist: true,
})
请求拦截器携带token
基础思想:很多接口如果想要获取数据必须要带着有效的Token信息才可以,拦截器中做一次,用到axios实例的其他都可以拿到
javascript
// axios请求拦截器
httpInstance.interceptors.request.use(config => {
  // 1. 从pinia获取token数据
  const userStore = useUserStore()
  // 2. 按照后端的要求拼接token数据
  const token = userStore.userInfo.token
  if (token) {
    config.headers.Authorization = `Bearer ${token}`
  }
  return config
}, e => Promise.reject(e))
退出登录实现
基础思想:
- 清除用户信息
- 跳转到登录页
1- 新增清除用户信息action
javascript
 // 退出时清除用户信息
  const clearUserInfo = () => {
    userInfo.value = {}
  }
2- 组件中执行业务逻辑
ts
<script setup>
import { useUserStore } from '@/stores/userStore'
import { useRouter } from 'vue-router'
const userStore = useUserStore()
const router = useRouter()
const confirm = () => {
  console.log('用户要退出登录了')
  // 退出登录业务逻辑实现
  // 1.清除用户信息 触发action
  userStore.clearUserInfo()
  // 2.跳转到登录页
  router.push('/login')
}
</script>
本地购物车
1. 添加购物车
基础思想:如果已经添加过相同的商品,就在其数量count上加一,如果没有添加过,就直接push到购物车列表中
javascript
// 封装购物车模块

import { defineStore } from 'pinia'
import { ref } from 'vue'


export const useCartStore = defineStore('cart', () => {
  // 1. 定义state - cartList
  const cartList = ref([])
  // 2. 定义action - addCart
  const addCart = (goods) => {
    console.log('添加', goods)
    // 添加购物车操作
    // 已添加过 - count + 1
    // 没有添加过 - 直接push
    // 思路:通过匹配传递过来的商品对象中的skuId能不能在cartList中找到,找到了就是添加过
    const item = cartList.value.find((item) => goods.skuId === item.skuId)
    if (item) {
      // 找到了
      item.count++
    } else {
      // 没找到
      cartList.value.push(goods)
    }
  }
  return {
    cartList,
    addCart
  }
}, {
  persist: true,
})
2. 头部购物车
2.1. 头部购物车组件模版
ts
<script setup>
</script>
<template>
<div class="cart">
<a class="curr" href="javascript:;">
<i class="iconfont icon-cart"></i><em>2</em>
</a>
<div class="layer">
<div class="list">
<!--
<div class="item" v-for="i in cartList" :key="i">
<RouterLink to="">
<img :src="i.picture" alt="" />
<div class="center">
<p class="name ellipsis-2">
{{ i.name }}
</p>
<p class="attr ellipsis">{{ i.attrsText }}</p>
</div>
<div class="right">
<p class="price">¥{{ i.price }}</p>
<p class="count">x{{ i.count }}</p>
</div>
</RouterLink>
<i class="iconfont icon-close-new" @click="store.delCart(i.skuId)"></i>
</div>
-->
</div>
<div class="foot">
<div class="total">
<p>共 10 件商品</p>
<p>¥ 100.00 </p>
</div>
<el-button size="large" type="primary" >去购物车结算</el-button>
</div>
</div>
</div>
</template>
<style scoped lang="scss">
.cart {
width: 50px;
position: relative;
z-index: 600;
.curr {
height: 32px;
line-height: 32px;
text-align: center;
position: relative;
display: block;
.icon-cart {
font-size: 22px;
}
em {
font-style: normal;
position: absolute;
right: 0;
top: 0;
padding: 1px 6px;
line-height: 1;
background: $helpColor;
color: #fff;
font-size: 12px;
border-radius: 10px;
font-family: Arial;
}
}
&:hover {
.layer {
opacity: 1;
transform: none;
}
}
.layer {
opacity: 0;
transition: all 0.4s 0.2s;
transform: translateY(-200px) scale(1, 0);
width: 400px;
height: 400px;
position: absolute;
top: 50px;
right: 0;
box-shadow: 0 0 10px rgba(0, 0, 0, 0.2);
background: #fff;
border-radius: 4px;
padding-top: 10px;
&::before {
content: "";
position: absolute;
right: 14px;
top: -10px;
width: 20px;
height: 20px;
background: #fff;
transform: scale(0.6, 1) rotate(45deg);
box-shadow: -3px -3px 5px rgba(0, 0, 0, 0.1);
}
.foot {
position: absolute;
left: 0;
bottom: 0;
height: 70px;
width: 100%;
padding: 10px;
display: flex;
justify-content: space-between;
background: #f8f8f8;
align-items: center;
.total {
padding-left: 10px;
color: #999;
p {
&:last-child {
font-size: 18px;
color: $priceColor;
}
}
}
}
}
.list {
height: 310px;
overflow: auto;
padding: 0 10px;
&::-webkit-scrollbar {
width: 10px;
height: 10px;
}
&::-webkit-scrollbar-track {
background: #f8f8f8;
border-radius: 2px;
}
&::-webkit-scrollbar-thumb {
background: #eee;
border-radius: 10px;
}
&::-webkit-scrollbar-thumb:hover {
background: #ccc;
}
.item {
border-bottom: 1px solid #f5f5f5;
padding: 10px 0;
position: relative;
i {
position: absolute;
bottom: 38px;
right: 0;
opacity: 0;
color: #666;
transition: all 0.5s;
}
&:hover {
i {
opacity: 1;
cursor: pointer;
}
}
a {
display: flex;
align-items: center;
img {
height: 80px;
width: 80px;
}
.center {
padding: 0 10px;
width: 200px;
.name {
font-size: 16px;
}
.attr {
color: #999;
padding-top: 5px;
}
}
.right {
width: 100px;
padding-right: 20px;
text-align: center;
.price {
font-size: 16px;
color: $priceColor;
}
.count {
color: #999;
margin-top: 5px;
font-size: 16px;
}
}
}
}
}
}
</style>2.2 渲染头部购物车数据
ts
<script setup>
import { useCartStore } from '@/stores/cartStore'
const cartStore = useCartStore()
</script>
<template>
<div class="cart">
<a class="curr" href="javascript:;">
<i class="iconfont icon-cart"></i><em>{{ cartStore.cartList.length }}</em>
</a>
<div class="layer">
<div class="list">
<div class="item" v-for="i in cartStore.cartList" :key="i">
<RouterLink to="">
<img :src="i.picture" alt="" />
<div class="center">
<p class="name ellipsis-2">
{{ i.name }}
</p>
<p class="attr ellipsis">{{ i.attrsText }}</p>
</div>
<div class="right">
<p class="price">¥{{ i.price }}</p>
<p class="count">x{{ i.count }}</p>
</div>
</RouterLink>
<i class="iconfont icon-close-new" @click="cartStore.delCart(i.skuId)"></i>
</div>
</div>
<div class="foot">
<div class="total">
<p>共 {{ cartStore.allCount }} 件商品</p>
<p>¥ {{ cartStore.allPrice.toFixed(2) }} </p>
</div>
<el-button size="large" type="primary" @click="$router.push('/cartlist')">去购物车结算</el-button>
</div>
</div>
</div>
</template>2.3 删除功能实现
1- 添加删除action函数
javascript
  // 删除购物车
  const delCart = async (skuId) => {
      // 思路:
      // 1. 找到要删除项的下标值 - splice
      // 2. 使用数组的过滤方法 - filter
      const idx = cartList.value.findIndex((item) => skuId === item.skuId)
      cartList.value.splice(idx, 1)
  }
2- 组件触发action函数并传递参数
ts
<i class="iconfont icon-close-new" @click="cartStore.delCart(i.skuId)"></i>3. 列表购物车-基础内容渲染
3.1. 准备模版
ts
<script setup>
const cartList = []
</script>
<template>
<div class="xtx-cart-page">
<div class="container m-top-20">
<div class="cart">
<table>
<thead>
<tr>
<th width="120">
<el-checkbox/>
</th>
<th width="400">商品信息</th>
<th width="220">单价</th>
<th width="180">数量</th>
<th width="180">小计</th>
<th width="140">操作</th>
</tr>
</thead>
<!-- 商品列表 -->
<tbody>
<tr v-for="i in cartList" :key="i.id">
<td>
<el-checkbox />
</td>
<td>
<div class="goods">
<RouterLink to="/"><img :src="i.picture" alt="" /></RouterLink>
<div>
<p class="name ellipsis">
{{ i.name }}
</p>
</div>
</div>
</td>
<td class="tc">
<p>¥{{ i.price }}</p>
</td>
<td class="tc">
<el-input-number v-model="i.count" />
</td>
<td class="tc">
<p class="f16 red">¥{{ (i.price * i.count).toFixed(2) }}</p>
</td>
<td class="tc">
<p>
<el-popconfirm title="确认删除吗?" confirm-button-text="确认" cancel-button-text="取消" @confirm="delCart(i)">
<template #reference>
<a href="javascript:;">删除</a>
</template>
</el-popconfirm>
</p>
</td>
</tr>
<tr v-if="cartList.length === 0">
<td colspan="6">
<div class="cart-none">
<el-empty description="购物车列表为空">
<el-button type="primary">随便逛逛</el-button>
</el-empty>
</div>
</td>
</tr>
</tbody>
</table>
</div>
<!-- 操作栏 -->
<div class="action">
<div class="batch">
共 10 件商品,已选择 2 件,商品合计:
<span class="red">¥ 200.00 </span>
</div>
<div class="total">
<el-button size="large" type="primary" >下单结算</el-button>
</div>
</div>
</div>
</div>
</template>
<style scoped lang="scss">
.xtx-cart-page {
margin-top: 20px;
.cart {
background: #fff;
color: #666;
table {
border-spacing: 0;
border-collapse: collapse;
line-height: 24px;
th,
td {
padding: 10px;
border-bottom: 1px solid #f5f5f5;
&:first-child {
text-align: left;
padding-left: 30px;
color: #999;
}
}
th {
font-size: 16px;
font-weight: normal;
line-height: 50px;
}
}
}
.cart-none {
text-align: center;
padding: 120px 0;
background: #fff;
p {
color: #999;
padding: 20px 0;
}
}
.tc {
text-align: center;
a {
color: $xtxColor;
}
.xtx-numbox {
margin: 0 auto;
width: 120px;
}
}
.red {
color: $priceColor;
}
.green {
color: $xtxColor;
}
.f16 {
font-size: 16px;
}
.goods {
display: flex;
align-items: center;
img {
width: 100px;
height: 100px;
}
>div {
width: 280px;
font-size: 16px;
padding-left: 10px;
.attr {
font-size: 14px;
color: #999;
}
}
}
.action {
display: flex;
background: #fff;
margin-top: 20px;
height: 80px;
align-items: center;
font-size: 16px;
justify-content: space-between;
padding: 0 30px;
.xtx-checkbox {
color: #999;
}
.batch {
a {
margin-left: 20px;
}
}
.red {
font-size: 18px;
margin-right: 20px;
font-weight: bold;
}
}
.tit {
color: #666;
font-size: 16px;
font-weight: normal;
line-height: 50px;
}
}
</style>3.2. 绑定路由
javascript
import CartList from '@/views/CartList/index.vue'

{
  path: 'cartlist',
  component: CartList
}
3.3. 渲染列表
ts
<script setup>
import { useCartStore } from '@/stores/cartStore'
const cartStore = useCartStore()
</script>
<template>
<div class="xtx-cart-page">
<div class="container m-top-20">
<div class="cart">
<table>
<thead>
<tr>
<th width="120">
<el-checkbox />
</th>
<th width="400">商品信息</th>
<th width="220">单价</th>
<th width="180">数量</th>
<th width="180">小计</th>
<th width="140">操作</th>
</tr>
</thead>
<!-- 商品列表 -->
<tbody>
<tr v-for="i in cartStore.cartList" :key="i.id">
<td>
<!-- 单选框 -->
<el-checkbox/>
</td>
<td>
<div class="goods">
<RouterLink to="/"><img :src="i.picture" alt="" /></RouterLink>
<div>
<p class="name ellipsis">
{{ i.name }}
</p>
</div>
</div>
</td>
<td class="tc">
<p>¥{{ i.price }}</p>
</td>
<td class="tc">
<el-input-number v-model="i.count" />
</td>
<td class="tc">
<p class="f16 red">¥{{ (i.price * i.count).toFixed(2) }}</p>
</td>
<td class="tc">
<p>
<el-popconfirm title="确认删除吗?" confirm-button-text="确认" cancel-button-text="取消" @confirm="delCart(i)">
<template #reference>
<a href="javascript:;">删除</a>
</template>
</el-popconfirm>
</p>
</td>
</tr>
<tr v-if="cartStore.cartList.length === 0">
<td colspan="6">
<div class="cart-none">
<el-empty description="购物车列表为空">
<el-button type="primary">随便逛逛</el-button>
</el-empty>
</div>
</td>
</tr>
</tbody>
</table>
</div>
<!-- 操作栏 -->
<div class="action">
<div class="batch">
共 10 件商品,已选择 2 件,商品合计:
<span class="red">¥ 200.00 </span>
</div>
<div class="total">
<el-button size="large" type="primary" >下单结算</el-button>
</div>
</div>
</div>
</div>
</template>4. 列表购物车-单选功能实现
基本思想:通过skuId找到要进行单选操作的商品,把控制是否选中的selected字段修改为当前单选框的状态
1- 添加单选action
javascript
// 单选功能
const singleCheck = (skuId, selected) => {
  // 通过skuId找到要修改的那一项 然后把它的selected修改为传过来的selected
  const item = cartList.value.find((item) => item.skuId === skuId)
  item.selected = selected
}
2- 触发action函数
ts
<script setup>
// 单选回调
const singleCheck = (i, selected) => {
  console.log(i, selected)
  // store cartList 数组 无法知道要修改谁的选中状态?
  // 除了selected补充一个用来筛选的参数 - skuId
  cartStore.singleCheck(i.skuId, selected)
}
</script>


<template>
  <td>
    <!-- 单选框 -->
    <el-checkbox :model-value="i.selected" @change="(selected) => singleCheck(i, selected)" />
  </td>
</template>
5. 列表购物车-全选功能实现
基础思想:
- 全选状态决定单选框状态 - 遍历cartList把每一项的selected都设置为何全选框状态一致
- 单选框状态决定全选状态 - 只有所有单选框的selected都为true, 全选框才为true
1- store中定义action和计算属性
javascript
// 全选功能action
const allCheck = (selected) => {
  // 把cartList中的每一项的selected都设置为当前的全选框状态
  cartList.value.forEach(item => item.selected = selected)
}


// 是否全选计算属性
const isAll = computed(() => cartList.value.every((item) => item.selected))
2- 组件中触发aciton和使用计算属性
ts
<script setup>
const allCheck = (selected) => {
  cartStore.allCheck(selected)
}

</script>


<template>
  <!-- 全选框 -->
  <el-checkbox :model-value="cartStore.isAll" @change="allCheck" />
</template>
6. 列表购物车-统计数据功能实现
javascript
// 3. 已选择数量
const selectedCount = computed(() => cartList.value.filter(item => item.selected).reduce((a, c) => a + c.count, 0))
// 4. 已选择商品价钱合计
const selectedPrice = computed(() => cartList.value.filter(item => item.selected).reduce((a, c) => a + c.count * c.price, 0))
接口购物车
1. 加入购物车
1-接口封装
javascript
// 加入购物车
export const insertCartAPI = ({ skuId, count }) => {
  return request({
    url: '/member/cart',
    method: 'POST',
    data: {
      skuId,
      count
    }
  })
}
2- action中适配登录和非登录
javascript
import { defineStore } from 'pinia'
import { useUserStore } from './userStore'
import { insertCartAPI } from '@/apis/cart'
export const useCartStore = defineStore('cart', () => {
  const userStore = useUserStore()
  const isLogin = computed(() => userStore.userInfo.token)

  const addCart = async (goods) => {
    const { skuId, count } = goods
    // 登录
    if (isLogin.value) {
      // 登录之后的加入购车逻辑
      await insertCartAPI({ skuId, count })
      updateNewList()
    } else {
      // 未登录
      const item = cartList.value.find((item) => goods.skuId === item.skuId)
      if (item) {
        // 找到了
        item.count++
      } else {
        // 没找到
        cartList.value.push(goods)
      }
    }
  }
}, {
  persist: true,
})
2. 删除购物车
1- 封装接口
javascript
// 删除购物车
export const delCartAPI = (ids) => {
  return request({
    url: '/member/cart',
    method: 'DELETE',
    data: {
      ids
    }
  })
}
2- action中适配登录和非登录
javascript
  // 删除购物车
  const delCart = async (skuId) => {
    if (isLogin.value) {
      // 调用接口实现接口购物车中的删除功能
      await delCartAPI([skuId])
      updateNewList()
    } else {
      // 思路:
      // 1. 找到要删除项的下标值 - splice
      // 2. 使用数组的过滤方法 - filter
      const idx = cartList.value.findIndex((item) => skuId === item.skuId)
      cartList.value.splice(idx, 1)
    }
  }
路由配置和基础数据渲染
1. 准备组件模版
ts
<script setup>
const checkInfo = {} // 订单对象
const curAddress = {} // 地址对象
</script>
<template>
<div class="xtx-pay-checkout-page">
<div class="container">
<div class="wrapper">
<!-- 收货地址 -->
<h3 class="box-title">收货地址</h3>
<div class="box-body">
<div class="address">
<div class="text">
<div class="none" v-if="!curAddress">您需要先添加收货地址才可提交订单。</div>
<ul v-else>
<li><span>收<i />货<i />人:</span>{{ curAddress.receiver }}</li>
<li><span>联系方式:</span>{{ curAddress.contact }}</li>
<li><span>收货地址:</span>{{ curAddress.fullLocation }} {{ curAddress.address }}</li>
</ul>
</div>
<div class="action">
<el-button size="large" @click="toggleFlag = true">切换地址</el-button>
<el-button size="large" @click="addFlag = true">添加地址</el-button>
</div>
</div>
</div>
<!-- 商品信息 -->
<h3 class="box-title">商品信息</h3>
<div class="box-body">
<table class="goods">
<thead>
<tr>
<th width="520">商品信息</th>
<th width="170">单价</th>
<th width="170">数量</th>
<th width="170">小计</th>
<th width="170">实付</th>
</tr>
</thead>
<tbody>
<tr v-for="i in checkInfo.goods" :key="i.id">
<td>
<a href="javascript:;" class="info">
<img :src="i.picture" alt="">
<div class="right">
<p>{{ i.name }}</p>
<p>{{ i.attrsText }}</p>
</div>
</a>
</td>
<td>¥{{ i.price }}</td>
<td>{{ i.price }}</td>
<td>¥{{ i.totalPrice }}</td>
<td>¥{{ i.totalPayPrice }}</td>
</tr>
</tbody>
</table>
</div>
<!-- 配送时间 -->
<h3 class="box-title">配送时间</h3>
<div class="box-body">
<a class="my-btn active" href="javascript:;">不限送货时间:周一至周日</a>
<a class="my-btn" href="javascript:;">工作日送货:周一至周五</a>
<a class="my-btn" href="javascript:;">双休日、假日送货:周六至周日</a>
</div>
<!-- 支付方式 -->
<h3 class="box-title">支付方式</h3>
<div class="box-body">
<a class="my-btn active" href="javascript:;">在线支付</a>
<a class="my-btn" href="javascript:;">货到付款</a>
<span style="color:#999">货到付款需付5元手续费</span>
</div>
<!-- 金额明细 -->
<h3 class="box-title">金额明细</h3>
<div class="box-body">
<div class="total">
<dl>
<dt>商品件数:</dt>
<dd>{{ checkInfo.summary?.goodsCount }}件</dd>
</dl>
<dl>
<dt>商品总价:</dt>
<dd>¥{{ checkInfo.summary?.totalPrice.toFixed(2) }}</dd>
</dl>
<dl>
<dt>运<i></i>费:</dt>
<dd>¥{{ checkInfo.summary?.postFee.toFixed(2) }}</dd>
</dl>
<dl>
<dt>应付总额:</dt>
<dd class="price">{{ checkInfo.summary?.totalPayPrice.toFixed(2) }}</dd>
</dl>
</div>
</div>
<!-- 提交订单 -->
<div class="submit">
<el-button type="primary" size="large" >提交订单</el-button>
</div>
</div>
</div>
</div>
<!-- 切换地址 -->
<!-- 添加地址 -->
</template>
<style scoped lang="scss">
.xtx-pay-checkout-page {
margin-top: 20px;
.wrapper {
background: #fff;
padding: 0 20px;
.box-title {
font-size: 16px;
font-weight: normal;
padding-left: 10px;
line-height: 70px;
border-bottom: 1px solid #f5f5f5;
}
.box-body {
padding: 20px 0;
}
}
}
.address {
border: 1px solid #f5f5f5;
display: flex;
align-items: center;
.text {
flex: 1;
min-height: 90px;
display: flex;
align-items: center;
.none {
line-height: 90px;
color: #999;
text-align: center;
width: 100%;
}
>ul {
flex: 1;
padding: 20px;
li {
line-height: 30px;
span {
color: #999;
margin-right: 5px;
>i {
width: 0.5em;
display: inline-block;
}
}
}
}
>a {
color: $xtxColor;
width: 160px;
text-align: center;
height: 90px;
line-height: 90px;
border-right: 1px solid #f5f5f5;
}
}
.action {
width: 420px;
text-align: center;
.btn {
width: 140px;
height: 46px;
line-height: 44px;
font-size: 14px;
&:first-child {
margin-right: 10px;
}
}
}
}
.goods {
width: 100%;
border-collapse: collapse;
border-spacing: 0;
.info {
display: flex;
text-align: left;
img {
width: 70px;
height: 70px;
margin-right: 20px;
}
.right {
line-height: 24px;
p {
&:last-child {
color: #999;
}
}
}
}
tr {
th {
background: #f5f5f5;
font-weight: normal;
}
td,
th {
text-align: center;
padding: 20px;
border-bottom: 1px solid #f5f5f5;
&:first-child {
border-left: 1px solid #f5f5f5;
}
&:last-child {
border-right: 1px solid #f5f5f5;
}
}
}
}
.my-btn {
width: 228px;
height: 50px;
border: 1px solid #e4e4e4;
text-align: center;
line-height: 48px;
margin-right: 25px;
color: #666666;
display: inline-block;
&.active,
&:hover {
border-color: $xtxColor;
}
}
.total {
dl {
display: flex;
justify-content: flex-end;
line-height: 50px;
dt {
i {
display: inline-block;
width: 2em;
}
}
dd {
width: 240px;
text-align: right;
padding-right: 70px;
&.price {
font-size: 20px;
color: $priceColor;
}
}
}
}
.submit {
text-align: right;
padding: 60px;
border-top: 1px solid #f5f5f5;
}
.addressWrapper {
max-height: 500px;
overflow-y: auto;
}
.text {
flex: 1;
min-height: 90px;
display: flex;
align-items: center;
&.item {
border: 1px solid #f5f5f5;
margin-bottom: 10px;
cursor: pointer;
&.active,
&:hover {
border-color: $xtxColor;
background: lighten($xtxColor, 50%);
}
>ul {
padding: 10px;
font-size: 14px;
line-height: 30px;
}
}
}
</style>2. 配置路由
3. 封装接口
javascript
import request from '@/utils/request'
/**
 * 获取结算信息
 */
export const getCheckoutInfoAPI = () => {
  return request({
    url:'/member/order/pre'
  })
}
4. 渲染数据
切换地址-打开弹框交互
1. 准备弹框模版
html
<el-dialog title="切换收货地址" width="30%" center>
  <div class="addressWrapper">
    <div class="text item" v-for="item in checkInfo.userAddresses"  :key="item.id">
      <ul>
      <li><span>收<i />货<i />人:</span>{{ item.receiver }} </li>
      <li><span>联系方式:</span>{{ item.contact }}</li>
      <li><span>收货地址:</span>{{ item.fullLocation + item.address }}</li>
      </ul>
    </div>
  </div>
  <template #footer>
    <span class="dialog-footer">
      <el-button>取消</el-button>
      <el-button type="primary">确定</el-button>
    </span>
  </template>
</el-dialog>
2. 控制弹框打开
ts
const showDialog = ref(false)

<el-button size="large" @click="showDialog = true">切换地址</el-button>

<el-dialog v-model="showDialog" title="切换收货地址" width="30%" center>
    <!-- 省略 -->
</el-dialog>
切换地址-地址切换交互
基础思想:记录当前点击项,通过动态class判断当前div是否有激活类名
ts
<script setup>
// 切换地址
const activeAddress = ref({})
const switchAddress = (item) => {
  activeAddress.value = item
}
</script>

<template>
<div class="text item"
  :class="{ active: activeAddress.id === item.id }"
  @click="switchAddress(item)"
  :key="item.id">
  <!-- 省略... -->
</div>
</template>
创建订单生成订单ID
1. 准备支付页组件并绑定路由
ts
<script setup>
const payInfo = {}
</script>


<template>
  <div class="xtx-pay-page">
    <div class="container">
      <!-- 付款信息 -->
      <div class="pay-info">
        <span class="icon iconfont icon-queren2"></span>
        <div class="tip">
          <p>订单提交成功!请尽快完成支付。</p>
          <p>支付还剩 <span>24分30秒</span>, 超时后将取消订单</p>
        </div>
        <div class="amount">
          <span>应付总额:</span>
          <span>¥{{ payInfo.payMoney?.toFixed(2) }}</span>
        </div>
      </div>
      <!-- 付款方式 -->
      <div class="pay-type">
        <p class="head">选择以下支付方式付款</p>
        <div class="item">
          <p>支付平台</p>
          <a class="btn wx" href="javascript:;"></a>
          <a class="btn alipay" :href="payUrl"></a>
        </div>
        <div class="item">
          <p>支付方式</p>
          <a class="btn" href="javascript:;">招商银行</a>
          <a class="btn" href="javascript:;">工商银行</a>
          <a class="btn" href="javascript:;">建设银行</a>
          <a class="btn" href="javascript:;">农业银行</a>
          <a class="btn" href="javascript:;">交通银行</a>
        </div>
      </div>
    </div>
  </div>
</template>

<style scoped lang="scss">
.xtx-pay-page {
  margin-top: 20px;
}

.pay-info {

  background: #fff;
  display: flex;
  align-items: center;
  height: 240px;
  padding: 0 80px;

  .icon {
    font-size: 80px;
    color: #1dc779;
  }

  .tip {
    padding-left: 10px;
    flex: 1;

    p {
      &:first-child {
        font-size: 20px;
        margin-bottom: 5px;
      }

      &:last-child {
        color: #999;
        font-size: 16px;
      }
    }
  }

  .amount {
    span {
      &:first-child {
        font-size: 16px;
        color: #999;
      }

      &:last-child {
        color: $priceColor;
        font-size: 20px;
      }
    }
  }
}

.pay-type {
  margin-top: 20px;
  background-color: #fff;
  padding-bottom: 70px;

  p {
    line-height: 70px;
    height: 70px;
    padding-left: 30px;
    font-size: 16px;

    &.head {
      border-bottom: 1px solid #f5f5f5;
    }
  }

  .btn {
    width: 150px;
    height: 50px;
    border: 1px solid #e4e4e4;
    text-align: center;
    line-height: 48px;
    margin-left: 30px;
    color: #666666;
    display: inline-block;

    &.active,
    &:hover {
      border-color: $xtxColor;
    }

    &.alipay {
      background: url(https://cdn.cnbj1.fds.api.mi-img.com/mi-mall/7b6b02396368c9314528c0bbd85a2e06.png) no-repeat center / contain;
    }

    &.wx {
      background: url(https://cdn.cnbj1.fds.api.mi-img.com/mi-mall/c66f98cff8649bd5ba722c2e8067c6ca.jpg) no-repeat center / contain;
    }
  }
}
</style>
2. 准备生成订单接口
javascript
// 创建订单
export const createOrderAPI = (data) => {
  return request({
    url: '/member/order',
    method: 'POST',
    data
  })
}
3. 调用接口携带id跳转路由
ts
<script setup>
import { createOrderAPI } from '@/apis/checkout'

// 创建订单
const createOrder = async () => {
  const res = await createOrderAPI({
    deliveryTimeType: 1,
    payType: 1,
    payChannel: 1,
    buyerMessage: '',
    goods: checkInfo.value.goods.map(item => {
      return {
        skuId: item.skuId,
        count: item.count
      }
    }),
    addressId: curAddress.value.id
  })
  const orderId = res.result.id
  router.push({
    path: '/pay',
    query: {
      id: orderId
    }
  })
}

</script>

<template>
    <!-- 提交订单 -->
    <div class="submit">
      <el-button @click="createOrder" type="primary" size="large">提交订单</el-button>
    </div>
</template>
基础数据渲染
1. 准备接口
javascript
import request from '@/utils/http'

export const getOrderAPI = (id) => {
  return request({
    url: `/member/order/${id}`
  })
}
2. 获取数据渲染内容
ts
<script setup>
import { getOrderAPI } from '@/apis/pay'
import { onMounted, ref } from 'vue'
import { useRoute } from 'vue-router'
// 获取订单数据
const route = useRoute()
const payInfo = ref({})
const getPayInfo = async () => {
  const res = await getOrderAPI(route.query.id)
  payInfo.value = res.result
}
onMounted(() => getPayInfo())

</script>


<template>
  <div class="xtx-pay-page">
    <div class="container">
      <!-- 付款信息 -->
      <div class="pay-info">
        <span class="icon iconfont icon-queren2"></span>
        <div class="tip">
          <p>订单提交成功!请尽快完成支付。</p>
          <p>支付还剩 <span>{{ formatTime }}</span>, 超时后将取消订单</p>
        </div>
        <div class="amount">
          <span>应付总额:</span>
          <span>¥{{ payInfo.payMoney?.toFixed(2) }}</span>
        </div>
      </div>
      <!-- 付款方式 -->
      <div class="pay-type">
        <p class="head">选择以下支付方式付款</p>
        <div class="item">
          <p>支付平台</p>
          <a class="btn wx" href="javascript:;"></a>
          <a class="btn alipay" :href="payUrl"></a>
        </div>
        <div class="item">
          <p>支付方式</p>
          <a class="btn" href="javascript:;">招商银行</a>
          <a class="btn" href="javascript:;">工商银行</a>
          <a class="btn" href="javascript:;">建设银行</a>
          <a class="btn" href="javascript:;">农业银行</a>
          <a class="btn" href="javascript:;">交通银行</a>
        </div>
      </div>
    </div>
  </div>
</template>
支付功能实现
1. 支付携带参数
javascript
// 支付地址
const baseURL = 'http://pcapi-xiaotuxian-front-devtest.itheima.net/'
const backURL = 'http://127.0.0.1:5173/paycallback'
const redirectUrl = encodeURIComponent(backURL)
const payUrl = `${baseURL}pay/aliPay?orderId=${route.query.id}&redirect=${redirectUrl}`
2. 支付宝沙箱账号信息
| 账号 | jfjbwb4477@sandbox.com |
|---|---|
| 登录密码 | 111111 |
| 支付密码 | 111111 |
支付结果页展示
1. 准备模版
ts
<script setup>

</script>


<template>
  <div class="xtx-pay-page">
    <div class="container">
      <!-- 支付结果 -->
      <div class="pay-result">
        <span class="iconfont icon-queren2 green"></span>
        <span class="iconfont icon-shanchu red"></span>
        <p class="tit">支付成功</p>
        <p class="tip">我们将尽快为您发货,收货期间请保持手机畅通</p>
        <p>支付方式:<span>支付宝</span></p>
        <p>支付金额:<span>¥200.00</span></p>
        <div class="btn">
          <el-button type="primary" style="margin-right:20px">查看订单</el-button>
          <el-button>进入首页</el-button>
        </div>
        <p class="alert">
          <span class="iconfont icon-tip"></span>
          温馨提示:小兔鲜儿不会以订单异常、系统升级为由要求您点击任何网址链接进行退款操作,保护资产、谨慎操作。
        </p>
      </div>
    </div>
  </div>
</template>

<style scoped lang="scss">
.pay-result {
  padding: 100px 0;
  background: #fff;
  text-align: center;
  margin-top: 20px;

  >.iconfont {
    font-size: 100px;
  }

  .green {
    color: #1dc779;
  }

  .red {
    color: $priceColor;
  }

  .tit {
    font-size: 24px;
  }

  .tip {
    color: #999;
  }

  p {
    line-height: 40px;
    font-size: 16px;
  }

  .btn {
    margin-top: 50px;
  }

  .alert {
    font-size: 12px;
    color: #999;
    margin-top: 50px;
  }
}
</style>
2. 绑定路由
javascript
{
  path: 'paycallback', // 注意路径,必须是paycallback
  component: PayBack
},
3. 渲染数据
ts
<script setup>
import { getOrderAPI } from '@/apis/pay'
import { onMounted, ref } from 'vue'
import { useRoute } from 'vue-router'
const route = useRoute()
const orderInfo = ref({})

const getOrderInfo = async () => {
  const res = await getOrderAPI(route.query.orderId)
  orderInfo.value = res.result
}

onMounted(() => getOrderInfo())

</script>


<template>
  <div class="xtx-pay-page">
    <div class="container">
      <!-- 支付结果 -->
      <div class="pay-result">
        <!-- 路由参数获取到的是字符串而不是布尔值 -->
        <span class="iconfont icon-queren2 green" v-if="$route.query.payResult === 'true'"></span>
        <span class="iconfont icon-shanchu red" v-else></span>
        <p class="tit">支付{{ $route.query.payResult === 'true' ? '成功' : '失败' }}</p>
        <p class="tip">我们将尽快为您发货,收货期间请保持手机畅通</p>
        <p>支付方式:<span>支付宝</span></p>
        <p>支付金额:<span>¥{{ orderInfo.payMoney?.toFixed(2) }}</span></p>
        <div class="btn">
          <el-button type="primary" style="margin-right:20px">查看订单</el-button>
          <el-button>进入首页</el-button>
        </div>
        <p class="alert">
          <span class="iconfont icon-tip"></span>
          温馨提示:小兔鲜儿不会以订单异常、系统升级为由要求您点击任何网址链接进行退款操作,保护资产、谨慎操作。
        </p>
      </div>
    </div>
  </div>
</template>
倒计时逻辑函数封装
javascript
// 封装倒计时逻辑函数
import { computed, onUnmounted, ref } from 'vue'
import dayjs from 'dayjs'
export const useCountDown = () => {
  // 1. 响应式的数据
  let timer = null
  const time = ref(0)
  // 格式化时间 为 xx分xx秒
  const formatTime = computed(() => dayjs.unix(time.value).format('mm分ss秒'))
  // 2. 开启倒计时的函数
  const start = (currentTime) => {
    // 开始倒计时的逻辑
    // 核心逻辑的编写:每隔1s就减一
    time.value = currentTime
    timer = setInterval(() => {
      time.value--
    }, 1000)
  }
  // 组件销毁时清除定时器
  onUnmounted(() => {
    timer && clearInterval(timer)
  })
  return {
    formatTime,
    start
  }
}
路由配置
1. 准备路由模版
ts
<script setup> </script>

<template>
  <div class="container">
    <div class="xtx-member-aside">
      <div class="user-manage">
        <h4>我的账户</h4>
        <div class="links">
          <RouterLink to="/member/user">个人中心</RouterLink>
        </div>
        <h4>交易管理</h4>
        <div class="links">
          <RouterLink to="/member/order">我的订单</RouterLink>
        </div>
      </div>
    </div>
    <div class="article">
      <!-- 三级路由的挂载点 -->
      <!-- <RouterView /> -->
    </div>
  </div>
</template>

<style scoped lang="scss">
.container {
  display: flex;
  padding-top: 20px;

  .xtx-member-aside {
    width: 220px;
    margin-right: 20px;
    border-radius: 2px;
    background-color: #fff;

    .user-manage {
      background-color: #fff;

      h4 {
        font-size: 18px;
        font-weight: 400;
        padding: 20px 52px 5px;
        border-top: 1px solid #f6f6f6;
      }

      .links {
        padding: 0 52px 10px;
      }

      a {
        display: block;
        line-height: 1;
        padding: 15px 0;
        font-size: 14px;
        color: #666;
        position: relative;

        &:hover {
          color: $xtxColor;
        }

        &.active,
        &.router-link-exact-active {
          color: $xtxColor;

          &:before {
            display: block;
          }
        }

        &:before {
          content: '';
          display: none;
          width: 6px;
          height: 6px;
          border-radius: 50%;
          position: absolute;
          top: 19px;
          left: -16px;
          background-color: $xtxColor;
        }
      }
    }
  }

  .article {
    width: 1000px;
    background-color: #fff;
  }
}
</style>
2. 配置路由
javascript
import Member from '@/views/Member/index.vue'
{
path: '/member',
component: Member,
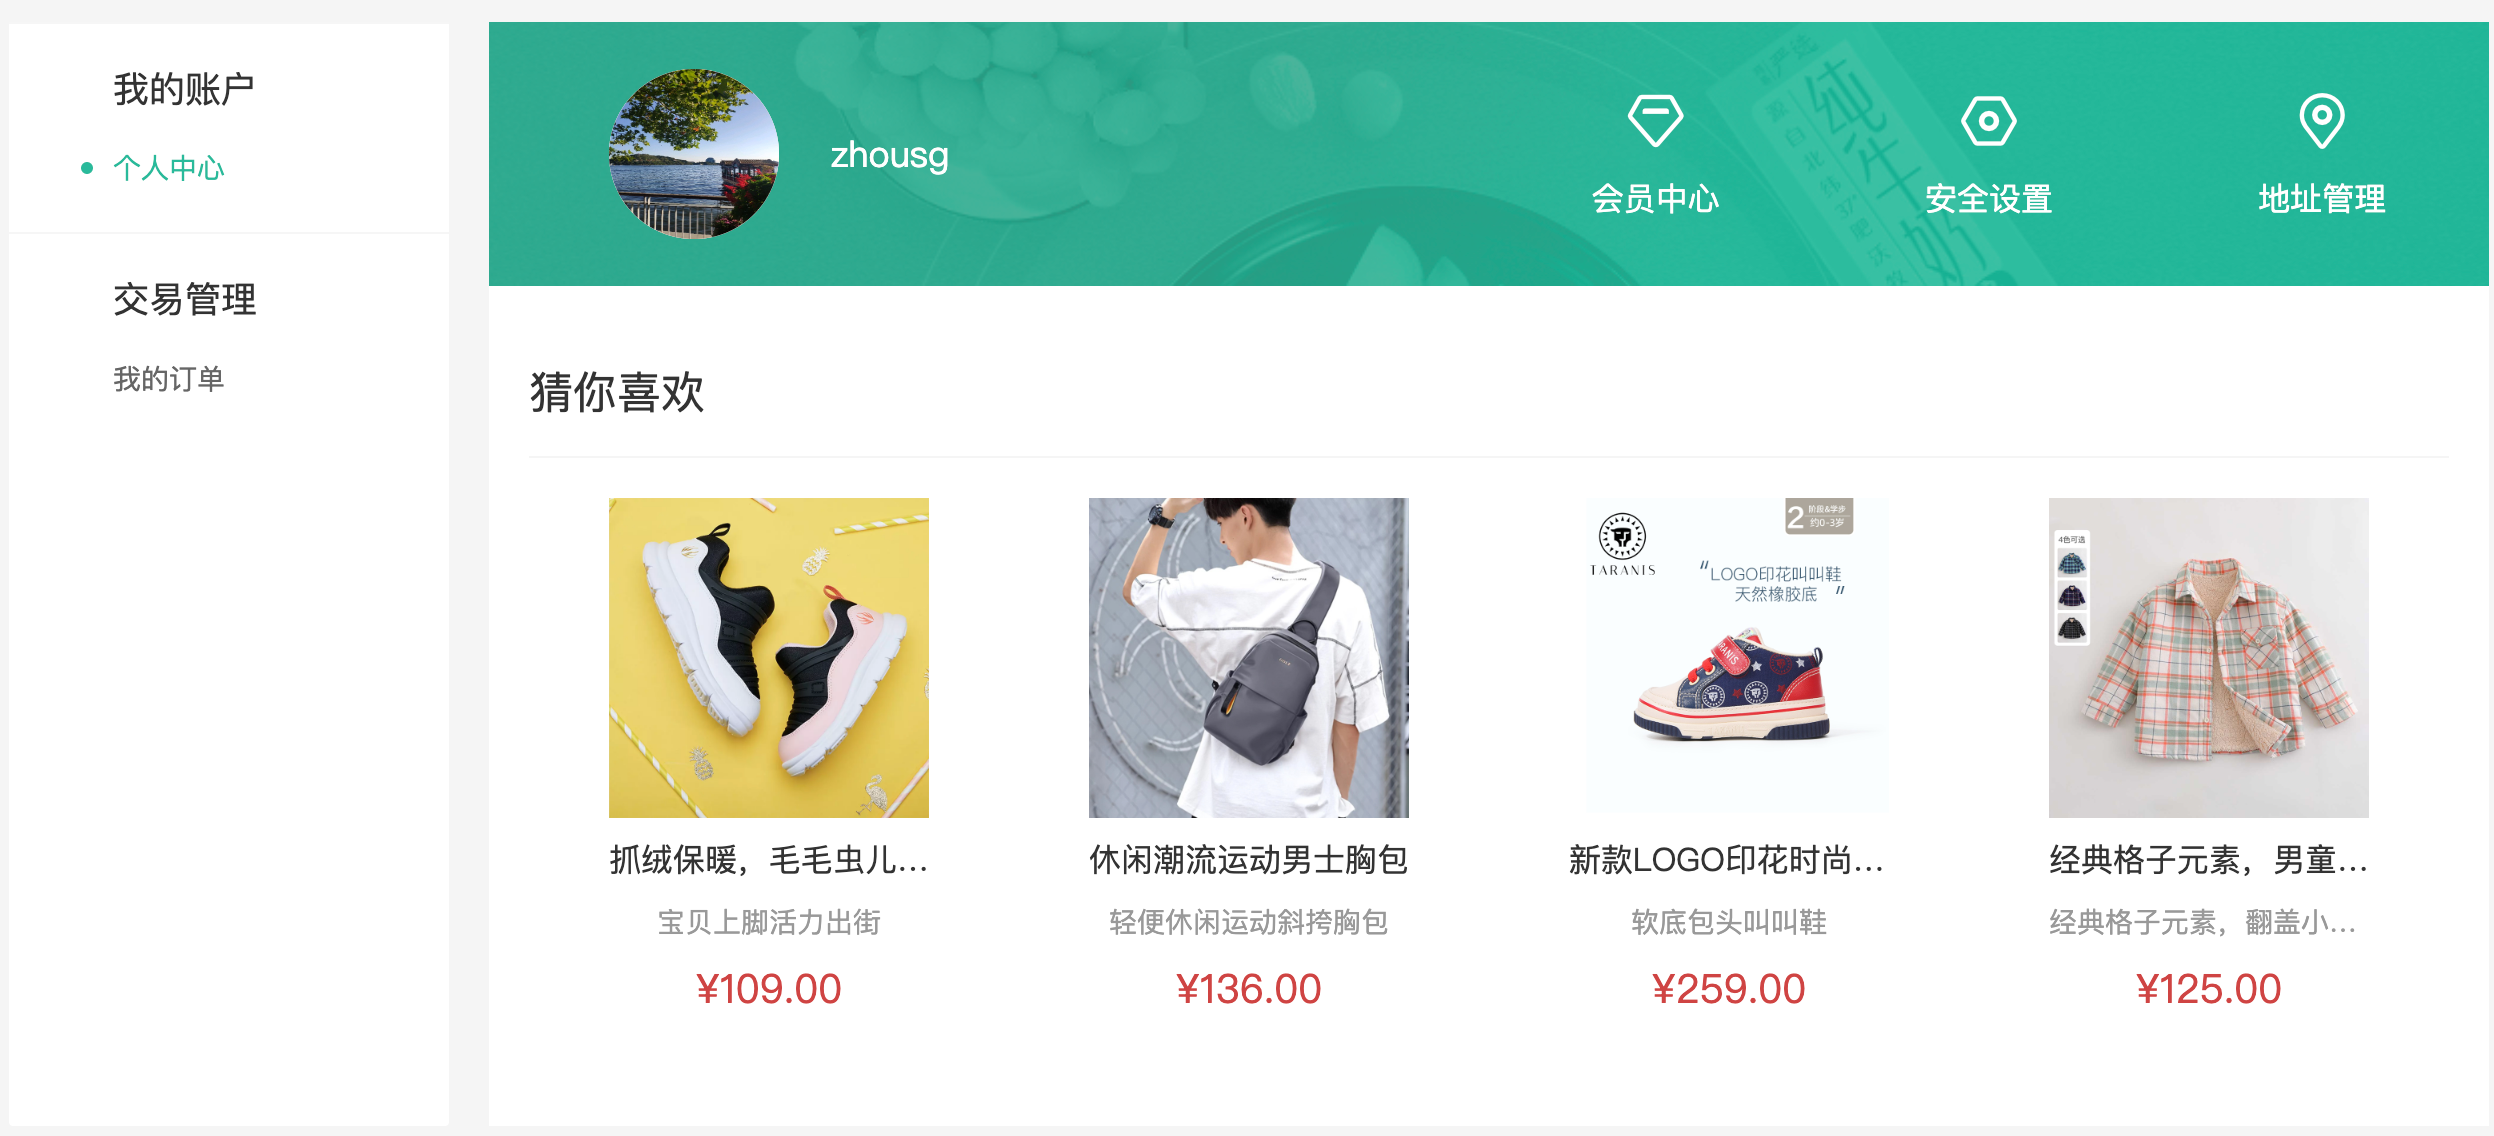
}3. 准备个人信息和我的订单路由组件
ts
<script setup>
const userStore = {}
</script>

<template>
  <div class="home-overview">
    <!-- 用户信息 -->
    <div class="user-meta">
      <div class="avatar">
        <img :src="userStore.userInfo?.avatar" />
      </div>
      <h4>{{ userStore.userInfo?.account }}</h4>
    </div>
    <div class="item">
      <a href="javascript:;">
        <span class="iconfont icon-hy"></span>
        <p>会员中心</p>
      </a>
      <a href="javascript:;">
        <span class="iconfont icon-aq"></span>
        <p>安全设置</p>
      </a>
      <a href="javascript:;">
        <span class="iconfont icon-dw"></span>
        <p>地址管理</p>
      </a>
    </div>
  </div>
  <div class="like-container">
    <div class="home-panel">
      <div class="header">
        <h4 data-v-bcb266e0="">猜你喜欢</h4>
      </div>
      <div class="goods-list">
        <!-- <GoodsItem v-for="good in likeList" :key="good.id" :good="good" /> -->
      </div>
    </div>
  </div>
</template>

<style scoped lang="scss">
.home-overview {
  height: 132px;
  background: url(@/assets/images/center-bg.png) no-repeat center / cover;
  display: flex;

  .user-meta {
    flex: 1;
    display: flex;
    align-items: center;

    .avatar {
      width: 85px;
      height: 85px;
      border-radius: 50%;
      overflow: hidden;
      margin-left: 60px;

      img {
        width: 100%;
        height: 100%;
      }
    }

    h4 {
      padding-left: 26px;
      font-size: 18px;
      font-weight: normal;
      color: white;
    }
  }

  .item {
    flex: 1;
    display: flex;
    align-items: center;
    justify-content: space-around;

    &:first-child {
      border-right: 1px solid #f4f4f4;
    }

    a {
      color: white;
      font-size: 16px;
      text-align: center;

      .iconfont {
        font-size: 32px;
      }

      p {
        line-height: 32px;
      }
    }
  }
}

.like-container {
  margin-top: 20px;
  border-radius: 4px;
  background-color: #fff;
}

.home-panel {
  background-color: #fff;
  padding: 0 20px;
  margin-top: 20px;
  height: 400px;

  .header {
    height: 66px;
    border-bottom: 1px solid #f5f5f5;
    padding: 18px 0;
    display: flex;
    justify-content: space-between;
    align-items: baseline;

    h4 {
      font-size: 22px;
      font-weight: 400;
    }

  }

  .goods-list {
    display: flex;
    justify-content: space-around;
  }
}
</style>
ts
<script setup>
// tab列表
const tabTypes = [
  { name: "all", label: "全部订单" },
  { name: "unpay", label: "待付款" },
  { name: "deliver", label: "待发货" },
  { name: "receive", label: "待收货" },
  { name: "comment", label: "待评价" },
  { name: "complete", label: "已完成" },
  { name: "cancel", label: "已取消" }
]
// 订单列表
const orderList = []

</script>

<template>
  <div class="order-container">
    <el-tabs>
      <!-- tab切换 -->
      <el-tab-pane v-for="item in tabTypes" :key="item.name" :label="item.label" />

      <div class="main-container">
        <div class="holder-container" v-if="orderList.length === 0">
          <el-empty description="暂无订单数据" />
        </div>
        <div v-else>
          <!-- 订单列表 -->
          <div class="order-item" v-for="order in orderList" :key="order.id">
            <div class="head">
              <span>下单时间:{{ order.createTime }}</span>
              <span>订单编号:{{ order.id }}</span>
              <!-- 未付款,倒计时时间还有 -->
              <span class="down-time" v-if="order.orderState === 1">
                <i class="iconfont icon-down-time"></i>
                <b>付款截止: {{order.countdown}}</b>
              </span>
            </div>
            <div class="body">
              <div class="column goods">
                <ul>
                  <li v-for="item in order.skus" :key="item.id">
                    <a class="image" href="javascript:;">
                      <img :src="item.image" alt="" />
                    </a>
                    <div class="info">
                      <p class="name ellipsis-2">
                        {{ item.name }}
                      </p>
                      <p class="attr ellipsis">
                        <span>{{ item.attrsText }}</span>
                      </p>
                    </div>
                    <div class="price">¥{{ item.realPay?.toFixed(2) }}</div>
                    <div class="count">x{{ item.quantity }}</div>
                  </li>
                </ul>
              </div>
              <div class="column state">
                <p>{{ order.orderState }}</p>
                <p v-if="order.orderState === 3">
                  <a href="javascript:;" class="green">查看物流</a>
                </p>
                <p v-if="order.orderState === 4">
                  <a href="javascript:;" class="green">评价商品</a>
                </p>
                <p v-if="order.orderState === 5">
                  <a href="javascript:;" class="green">查看评价</a>
                </p>
              </div>
              <div class="column amount">
                <p class="red">¥{{ order.payMoney?.toFixed(2) }}</p>
                <p>(含运费:¥{{ order.postFee?.toFixed(2) }})</p>
                <p>在线支付</p>
              </div>
              <div class="column action">
                <el-button  v-if="order.orderState === 1" type="primary"
                  size="small">
                  立即付款
                </el-button>
                <el-button v-if="order.orderState === 3" type="primary" size="small">
                  确认收货
                </el-button>
                <p><a href="javascript:;">查看详情</a></p>
                <p v-if="[2, 3, 4, 5].includes(order.orderState)">
                  <a href="javascript:;">再次购买</a>
                </p>
                <p v-if="[4, 5].includes(order.orderState)">
                  <a href="javascript:;">申请售后</a>
                </p>
                <p v-if="order.orderState === 1"><a href="javascript:;">取消订单</a></p>
              </div>
            </div>
          </div>
          <!-- 分页 -->
          <div class="pagination-container">
            <el-pagination background layout="prev, pager, next" />
          </div>
        </div>
      </div>

    </el-tabs>
  </div>

</template>

<style scoped lang="scss">
.order-container {
  padding: 10px 20px;

  .pagination-container {
    display: flex;
    justify-content: center;
  }

  .main-container {
    min-height: 500px;

    .holder-container {
      min-height: 500px;
      display: flex;
      justify-content: center;
      align-items: center;
    }
  }
}

.order-item {
  margin-bottom: 20px;
  border: 1px solid #f5f5f5;

  .head {
    height: 50px;
    line-height: 50px;
    background: #f5f5f5;
    padding: 0 20px;
    overflow: hidden;

    span {
      margin-right: 20px;

      &.down-time {
        margin-right: 0;
        float: right;

        i {
          vertical-align: middle;
          margin-right: 3px;
        }

        b {
          vertical-align: middle;
          font-weight: normal;
        }
      }
    }

    .del {
      margin-right: 0;
      float: right;
      color: #999;
    }
  }

  .body {
    display: flex;
    align-items: stretch;

    .column {
      border-left: 1px solid #f5f5f5;
      text-align: center;
      padding: 20px;

      >p {
        padding-top: 10px;
      }

      &:first-child {
        border-left: none;
      }

      &.goods {
        flex: 1;
        padding: 0;
        align-self: center;

        ul {
          li {
            border-bottom: 1px solid #f5f5f5;
            padding: 10px;
            display: flex;

            &:last-child {
              border-bottom: none;
            }

            .image {
              width: 70px;
              height: 70px;
              border: 1px solid #f5f5f5;
            }

            .info {
              width: 220px;
              text-align: left;
              padding: 0 10px;

              p {
                margin-bottom: 5px;

                &.name {
                  height: 38px;
                }

                &.attr {
                  color: #999;
                  font-size: 12px;

                  span {
                    margin-right: 5px;
                  }
                }
              }
            }

            .price {
              width: 100px;
            }

            .count {
              width: 80px;
            }
          }
        }
      }

      &.state {
        width: 120px;

        .green {
          color: $xtxColor;
        }
      }

      &.amount {
        width: 200px;

        .red {
          color: $priceColor;
        }
      }

      &.action {
        width: 140px;

        a {
          display: block;

          &:hover {
            color: $xtxColor;
          }
        }
      }
    }
  }
}
</style>
4. 配置三级路由
javascript
import MemberInfo from '@/views/Member/components/UserInfo.vue'
import MemberOrder from '@/views/Member/components/UserOrder.vue'


{
  path: '/member',
  component: Member,
  children: [
    {
      path: '',
      component: MemberInfo
    },
    {
      path: 'order',
      component: MemberOrder
    }
  ]
}
个人中心信息渲染
1. 使用Pinia数据渲染个人信息
ts
<script setup>
// 导入userStore
import { useUserStore } from '@/stores/userStore'
const userStore = useUserStore()
</script>

<template>
  <!-- 用户信息 -->
  <div class="user-meta">
    <div class="avatar">
      <img :src="userStore.userInfo?.avatar" />
    </div>
    <h4>{{ userStore.userInfo?.account }}</h4>
  </div>
</template>
2. 封装猜你喜欢接口
javascript
export const getLikeListAPI = ({ limit = 4 }) => {
  return request({
    url:'/goods/relevant',
    params: {
      limit
    }
  })
}
3. 渲染猜你喜欢数据
ts
<script setup>
import { onMounted, ref } from 'vue'
// 导入GoodsItem组件
import GoodsItem from '@/views/Home/components/GoodsItem.vue'
// 获取猜你喜欢列表
const likeList = ref([])
const getLikeList = async () => {
  const res = await getLikeListAPI({ limit: 4 })
  likeList.value = res.result
}

onMounted(() => getLikeList())
</script>

<template>
   <div class="goods-list">
      <GoodsItem v-for="good in likeList" :key="good.id" :goods="good" />
    </div>
</template>
我的订单
1. 基础列表渲染
javascript
/*
params: {
	orderState:0,
  page:1,
  pageSize:2
}
*/


export const getUserOrder = (params) => {
  return request({
    url:'/member/order',
    method:'GET',
    params
  })
}
ts
<script setup>
import { getUserOrder } from '@/apis/order'
import { onMounted, ref } from 'vue'

// 获取订单列表
const orderList = ref([])
const params = ref({
  orderState: 0,
  page: 1,
  pageSize: 2
})
const getOrderList = async () => {
  const res = await getUserOrder(params.value)
  orderList.value = res.result.items
  total.value = res.result.counts
}
onMounted(() => getOrderList())
</script>
2. tab切换实现
ts
<script setup>
// tab列表
const tabTypes = [
  { name: "all", label: "全部订单" },
  { name: "unpay", label: "待付款" },
  { name: "deliver", label: "待发货" },
  { name: "receive", label: "待收货" },
  { name: "comment", label: "待评价" },
  { name: "complete", label: "已完成" },
  { name: "cancel", label: "已取消" }
]

// tab切换
const tabChange = (type) => {
  params.value.orderState = type
  getOrderList()
}

</script>

<template>
  <el-tabs @tab-change="tabChange">
    <!-- 省略... -->
  </el-tabs>
</template>
3. 分页逻实现
页数 = 总条数 / 每页条数
ts
<script setup>
// 补充总条数
const total = ref(0)
const getOrderList = async () => {
  const res = await getUserOrder(params.value)
  // 存入总条数
  total.value = res.result.counts
}
// 页数切换
const pageChange = (page) => {
  params.value.page = page
  getOrderList()
}
</script>

<template>
   <el-pagination
     :total="total"
     @current-change="pageChange"
     :page-size="params.pageSize"
     background
     layout="prev, pager, next" />
</template>
细节优化
1. 默认三级路由设置
javascript
  {
    path: 'member',
    component: Member,
    children: [
      {
        path: '', // 置空path
        component: UserInfo
      },
      {
        path: 'order',
        component: UserOrder
      }
    ]
  }
2. 订单状态显示适配
ts
<script setup>
  // 创建格式化函数
  const fomartPayState = (payState) => {
    const stateMap = {
      1: '待付款',
      2: '待发货',
      3: '待收货',
      4: '待评价',
      5: '已完成',
      6: '已取消'
    }
    return stateMap[payState]
  }
</script>


<template>
  <!-- 调用函数适配显示 -->
  <p>{{ fomartPayState(order.orderState)}}</p>
</template>
Sku组件封装
1. 准备模版渲染规格数据
使用Vite快速创建一个Vue项目,在项目中添加请求插件axios,然后新增一个SKU组件,在根组件中把它渲染出来,下面是规格内容的基础模板
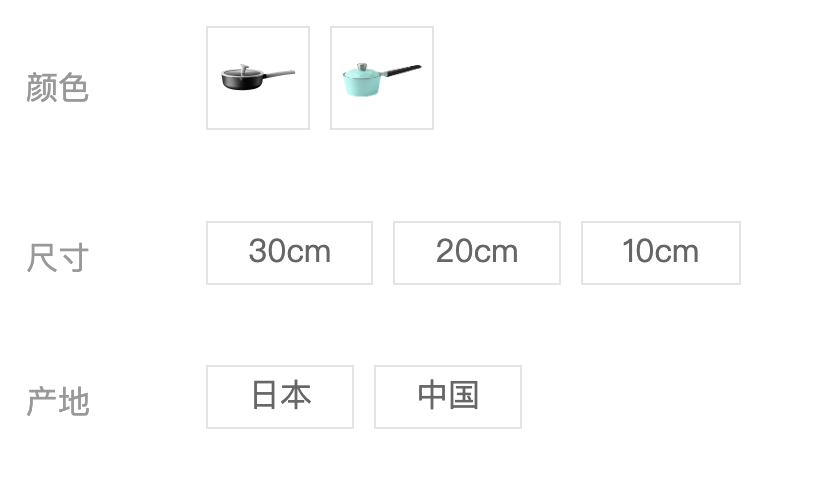
ts
<script setup>
import { onMounted, ref } from 'vue'
import axios from 'axios'
// 商品数据
const goods = ref({})
const getGoods = async () => {
  // 1135076  初始化就有无库存的规格
  // 1369155859933827074 更新之后有无库存项(蓝色-20cm-中国)
  const res = await axios.get('http://pcapi-xiaotuxian-front-devtest.itheima.net/goods?id=1369155859933827074')
  goods.value = res.data.result
}
onMounted(() => getGoods())

</script>

<template>
  <div class="goods-sku">
    <dl v-for="item in goods.specs" :key="item.id">
      <dt>{{ item.name }}</dt>
      <dd>
        <template v-for="val in item.values" :key="val.name">
          <!-- 图片类型规格 -->
          <img v-if="val.picture" :src="val.picture" :title="val.name">
          <!-- 文字类型规格 -->
          <span v-else>{{ val.name }}</span>
        </template>
      </dd>
    </dl>
  </div>
</template>

<style scoped lang="scss">
@mixin sku-state-mixin {
  border: 1px solid #e4e4e4;
  margin-right: 10px;
  cursor: pointer;

  &.selected {
    border-color: #27ba9b;
  }

  &.disabled {
    opacity: 0.6;
    border-style: dashed;
    cursor: not-allowed;
  }
}

.goods-sku {
  padding-left: 10px;
  padding-top: 20px;

  dl {
    display: flex;
    padding-bottom: 20px;
    align-items: center;

    dt {
      width: 50px;
      color: #999;
    }

    dd {
      flex: 1;
      color: #666;

      >img {
        width: 50px;
        height: 50px;
        margin-bottom: 4px;
        @include sku-state-mixin;
      }

      >span {
        display: inline-block;
        height: 30px;
        line-height: 28px;
        padding: 0 20px;
        margin-bottom: 4px;
        @include sku-state-mixin;
      }
    }
  }
}
</style>
2. 选中和取消选中实现
基本思路:
- 每一个规格按钮都拥有自己的选中状态数据-selected,true为选中,false为取消选中
- 配合动态class,把选中状态selected作为判断条件,true让active类名显示,false让active类名不显示
- 点击的是未选中,把同一个规格的其他取消选中,当前点击项选中;点击的是已选中,直接取消
ts
<script setup>
// 省略代码

// 选中和取消选中实现
const changeSku = (item, val) => {
  // 点击的是未选中,把同一个规格的其他取消选中,当前点击项选中,点击的是已选中,直接取消
  if (val.selected) {
    val.selected = false
  } else {
    item.values.forEach(valItem => valItem.selected = false)
    val.selected = true
  }
}

</script>

<template>
  <div class="goods-sku">
    <dl v-for="item in goods.specs" :key="item.id">
      <dt>{{ item.name }}</dt>
      <dd>
        <template v-for="val in item.values" :key="val.name">
          <img v-if="val.picture"
            @click="changeSku(item, val)"
            :class="{ selected: val.selected }"
            :src="val.picture"
            :title="val.name">
          <span v-else
            @click="changeSku(val)"
            :class="{ selected: val.selected }">{{ val.name }}</span>
        </template>
      </dd>
    </dl>
  </div>
</template>
3. 规格禁用功能实现
整体思路分析
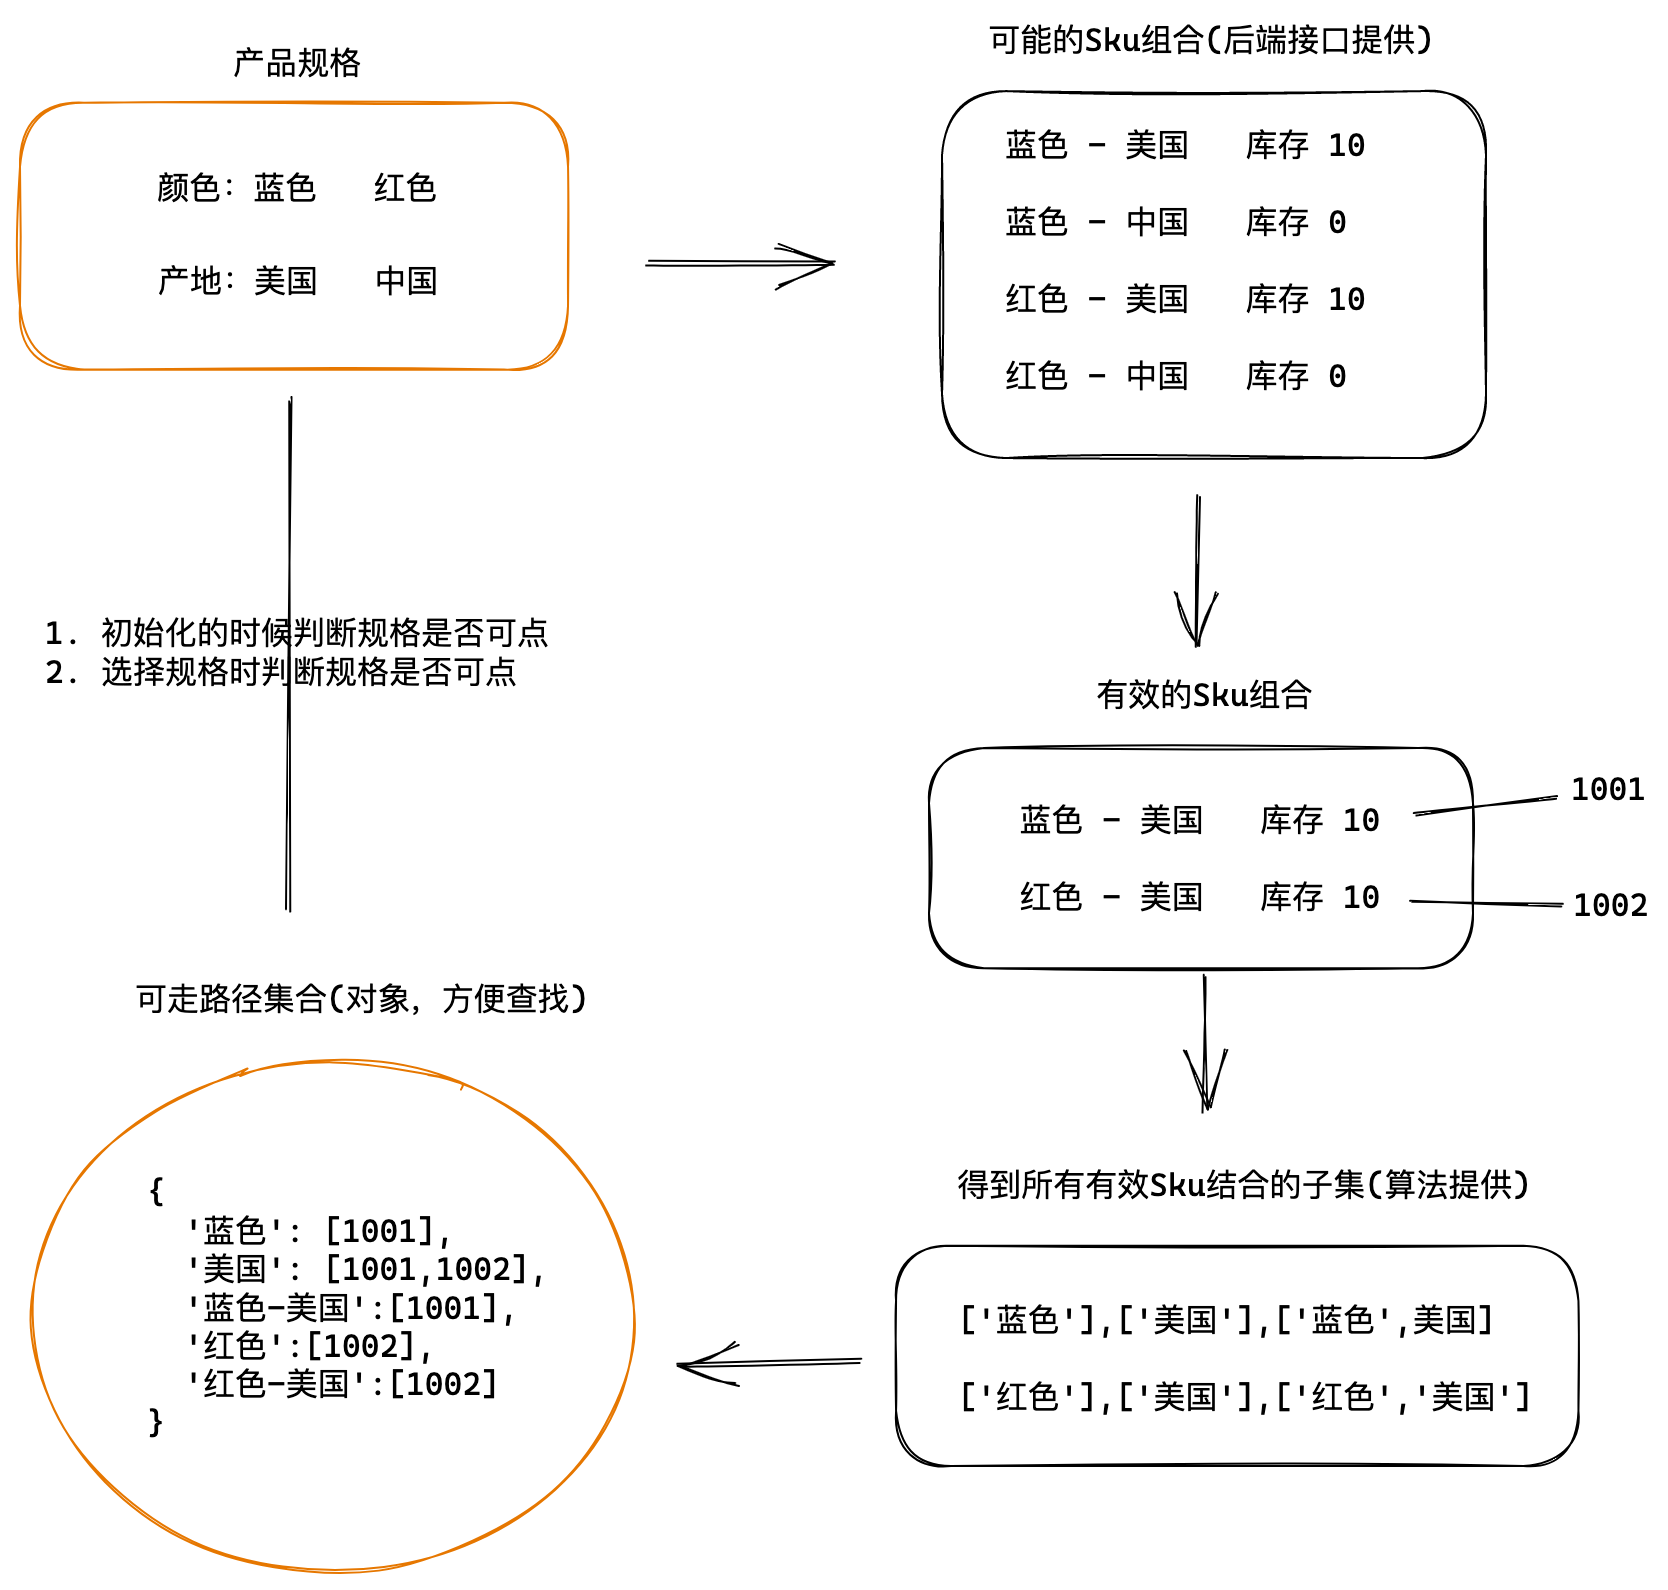
生成路径字典
幂集算法
javascript
export default function bwPowerSet (originalSet) {
  const subSets = []

  // We will have 2^n possible combinations (where n is a length of original set).
  // It is because for every element of original set we will decide whether to include
  // it or not (2 options for each set element).
  const numberOfCombinations = 2 ** originalSet.length

  // Each number in binary representation in a range from 0 to 2^n does exactly what we need:
  // it shows by its bits (0 or 1) whether to include related element from the set or not.
  // For example, for the set {1, 2, 3} the binary number of 0b010 would mean that we need to
  // include only "2" to the current set.
  for (let combinationIndex = 0; combinationIndex < numberOfCombinations; combinationIndex += 1) {
    const subSet = []

    for (let setElementIndex = 0; setElementIndex < originalSet.length; setElementIndex += 1) {
      // Decide whether we need to include current element into the subset or not.
      if (combinationIndex & (1 << setElementIndex)) {
        subSet.push(originalSet[setElementIndex])
      }
    }

    // Add current subset to the list of all subsets.
    subSets.push(subSet)
  }

  return subSets
}
javascript
// 创建生成路径字典对象函数
const getPathMap = (goods) => {
  const pathMap = {}
  // 1. 得到所有有效的Sku集合
  const effectiveSkus = goods.skus.filter(sku => sku.inventory > 0)
  // 2. 根据有效的Sku集合使用powerSet算法得到所有子集 [1,2] => [[1], [2], [1,2]]
  effectiveSkus.forEach(sku => {
    // 2.1 获取可选规格值数组
    const selectedValArr = sku.specs.map(val => val.valueName)
    // 2.2 获取可选值数组的子集
    const valueArrPowerSet = powerSet(selectedValArr)
    // 3. 根据子集生成路径字典对象
    // 3.1 遍历子集 往pathMap中插入数据
    valueArrPowerSet.forEach(arr => {
      // 根据Arr得到字符串的key,约定使用-分割 ['蓝色','美国'] => '蓝色-美国'
      const key = arr.join('-')
      // 给pathMap设置数据
      if (pathMap[key]) {
        pathMap[key].push(sku.id)
      } else {
        pathMap[key] = [sku.id]
      }
    })
  })
  return pathMap
}

// 数据获取完毕生成路径字典
let pathMap = {}
const getGoods = async () => {
  // 1135076  初始化就有无库存的规格
  // 1369155859933827074 更新之后有无库存项(蓝色-20cm-中国)
  const res = await axios.get('http://pcapi-xiaotuxian-front-devtest.itheima.net/goods?id=1135076')
  goods.value = res.data.result
  pathMap = getPathMap(goods.value)
  // 初始化更新按钮状态
  initDisabledState(goods.value.specs, pathMap)
}
根据路径字典设置初始化状态
思路:判断规格的name属性是否能在有效路径字典中找到,如果找不到就禁用
jsx
// 1. 定义初始化函数
// specs:商品源数据 pathMap:路径字典
const initDisabledState = (specs, pathMap) => {
  // 约定:每一个按钮的状态由自身的disabled进行控制
  specs.forEach(item => {
    item.values.forEach(val => {
      // 路径字典中查找是否有数据 有-可以点击 没有-禁用
      val.disabled = !pathMap[val.name]
    })
  })
}

// 2. 在数据返回后进行初始化处理
let patchMap = {}
const getGoods = async () => {
  // 1135076  初始化就有无库存的规格
  // 1369155859933827074 更新之后有无库存项(蓝色-20cm-中国)
  const res = await axios.get('http://pcapi-xiaotuxian-front-devtest.itheima.net/goods?id=1135076')
  goods.value = res.data.result
  pathMap = getPathMap(goods.value)
  // 初始化更新按钮状态
  initDisabledState(goods.value.specs, pathMap)
}

// 3. 适配模板显示
<img :class="{ selected: val.selected, disabled: val.disabled }"/>
<span :class="{ selected: val.selected, disabled: val.disabled }">{{val.name }}</span>
根据路径字典设置组合状态
思路:
- 根据当前选中规格,生成顺序规格数组 => '黑色', undefined, undefined
- 遍历每一个规格按钮
如何规格按钮已经选中,忽略判断
如果规格按钮未选中,拿着按钮的name值按顺序套入匹配数组对应的位置,最后过滤掉没有值的选项,通过-进行拼接成字符串key, 去路径字典中查找,没有找到则把当前规格按钮禁用
javascript
// 获取选中匹配数组 ['黑色',undefined,undefined]
const getSelectedValues = (specs) => {
  const arr = []
  specs.forEach(spec => {
    const selectedVal = spec.values.find(value => value.selected)
    arr.push(selectedVal ? selectedVal.name : undefined)
  })
  return arr
}

const updateDisabledState = (specs, pathMap) => {
  // 约定:每一个按钮的状态由自身的disabled进行控制
  specs.forEach((item, i) => {
    const selectedValues = getSelectedValues(specs)
    item.values.forEach(val => {
      if (val.selected) return
      const _seletedValues = [...selectedValues]
      _seletedValues[i] = val.name
      const key = _seletedValues.filter(value => value).join('*')
      // 路径字典中查找是否有数据 有-可以点击 没有-禁用
      val.disabled = !pathMap[key]
    })
  })
}
4. 产出Prop数据
javascript
const changeSku = (item, val) => {
  // 省略...
  // 产出SKU对象数据
  const index = getSelectedValues(goods.value.specs).findIndex(item => item === undefined)
  if (index > -1) {
    console.log('找到了,信息不完整')
  } else {
    console.log('没有找到,信息完整,可以产出')
    // 获取sku对象
    const key = getSelectedValues(goods.value.specs).join('*')
    const skuIds = pathMap[key]
    console.log(skuIds)
    // 以skuId作为匹配项去goods.value.skus数组中找
    const skuObj = goods.value.skus.find(item => item.id === skuIds[0])
    console.log('sku对象为', skuObj)
  }
}