【 声明:版权所有,欢迎转载,请勿用于商业用途。 联系信箱:feixiaoxing @163.com】
我们知道,easyx本身是作为图形库存在的。也就是说,在这个库上面,简单的api,就可以实现直线、圆形、矩形、运动小球的绘制。其实如果不挑平台的话,用python+opencv的方法其实也非常容易做到这一点的。而且,就算再转成c++的形式,也不难。下面,我们看看python+opencv怎么做图形的绘制。
1、直线的绘制
import cv2
import numpy as np

image = np.ones((500, 500, 3), dtype=np.uint8) * 255

start_point = (50, 50)
end_point = (450, 450)

color = (0, 0, 255)
thickness = 2

cv2.line(image, start_point, end_point, color, thickness)

cv2.imshow('Image with Line', image)
cv2.waitKey(0)
cv2.destroyAllWindows()
2、圆形的绘制
import cv2
import numpy as np

image = np.ones((500, 500, 3), dtype=np.uint8) * 255

center = (250, 250)
radius = 100

color = (0, 255, 0)
thickness = 2


cv2.circle(image, center, radius, color, thickness)


cv2.imshow('Image with Circle', image)
cv2.waitKey(0)
cv2.destroyAllWindows()
3、长方形的绘制
import cv2
import numpy as np

image = np.ones((500, 500, 3), dtype=np.uint8) * 255

top_left = (50, 50)
bottom_right = (450, 450)

color = (255, 0, 0)
thickness = 3

cv2.rectangle(image, top_left, bottom_right, color, thickness)

cv2.imshow('Image with Rectangle', image)
cv2.waitKey(0)
cv2.destroyAllWindows()
4、运动的小球
import cv2
import numpy as np
width, height = 500, 500
image = np.ones((height, width, 3), dtype=np.uint8) * 255
ball_center = (250, 250)
ball_radius = 20
ball_color = (0, 0, 255)
ball_speed = [1, 2]
cv2.namedWindow("Moving Ball")
while True:
image.fill(255)
ball_center = (ball_center[0] + ball_speed[0], ball_center[1] + ball_speed[1])
if ball_center[0] - ball_radius <= 0 or ball_center[0] + ball_radius >= width:
ball_speed[0] = -ball_speed[0]
if ball_center[1] - ball_radius <= 0 or ball_center[1] + ball_radius >= height:
ball_speed[1] = -ball_speed[1]
cv2.circle(image, ball_center, ball_radius, ball_color, -1)
cv2.imshow("Moving Ball", image)
if cv2.waitKey(30) & 0xFF == ord('q'):
break
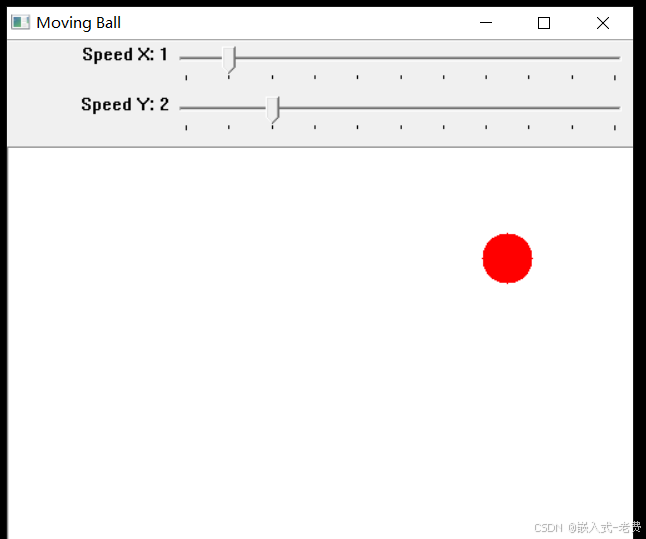
cv2.destroyAllWindows()5、可以配置速度的运动小球
相对而言,这是所有程序里面最复杂的程序。我们通过track bar可以自由设置速度,这样就有了人机交互的功能。也就是说,通过这两个控件,就可以实现速度的自由切换,这样就有了意义。
import cv2
import numpy as np

width, height = 500, 500
image = np.ones((height, width, 3), dtype=np.uint8) * 255

ball_center = (250, 250)
ball_radius = 20
ball_color = (0, 0, 255)
ball_speed = [2, 2]

direction_x = 0
direction_y = 0

cv2.namedWindow("Moving Ball")

def nothing(x):
    pass

cv2.createTrackbar("Speed X", "Moving Ball", 1, 10, nothing)
cv2.createTrackbar("Speed Y", "Moving Ball", 2, 10, nothing)

while True:
    image.fill(255)

    ball_speed[0] = cv2.getTrackbarPos("Speed X", "Moving Ball")
    ball_speed[1] = cv2.getTrackbarPos("Speed Y", "Moving Ball")

    # update speed
    if direction_x == 0:
        ball_speed[0] = ball_speed[0]
    else:
        ball_speed[0] = -ball_speed[0]

    if direction_y == 0:
        ball_speed[1] = ball_speed[1]
    else:
        ball_speed[1] = -ball_speed[1]

    ball_center = (ball_center[0] + ball_speed[0], ball_center[1] + ball_speed[1])

    # update direction
    if ball_center[0] + ball_radius >= width:
        direction_x = 1
    if  ball_center[0] - ball_radius <= 0:
        direction_x = 0

    if ball_center[1] + ball_radius >= height:
        direction_y = 1
    if ball_center[1] - ball_radius <= 0 :
	    direction_y = 0

    print(direction_x);
    print(direction_y);

    #update image
    cv2.circle(image, ball_center, ball_radius, ball_color, -1)

    cv2.imshow("Moving Ball", image)

    key = cv2.waitKey(30) & 0xFF
    if key == ord('q'):
        break

cv2.destroyAllWindows()