视频:第22.1讲 Linux IIC驱动实验-Linux IIC适配器驱动框架简析_哔哩哔哩_bilibili
资料:《【正点原子】I.MX6U开发指南V1.81.pdf》六十一章
目录
[1.1 两个重要结构体](#1.1 两个重要结构体)
[1.1.1 i2c_client](#1.1.1 i2c_client)
[1.1.2 i2c_driver](#1.1.2 i2c_driver)
[1.2 IIC设备的信息描述](#1.2 IIC设备的信息描述)
[1.2.1 无设备树](#1.2.1 无设备树)
[1.2.2 有设备树](#1.2.2 有设备树)
[1.3 设备驱动的匹配](#1.3 设备驱动的匹配)
[1.4 数据收发处理](#1.4 数据收发处理)
[二、IIC控制器 / 适配器驱动](#二、IIC控制器 / 适配器驱动)
[2.1 i2c_adapter](#2.1 i2c_adapter)
[2.2 i2c_algorithm](#2.2 i2c_algorithm)
[3.1 修改设备树](#3.1 修改设备树)
[3.1.1 配置引脚](#3.1.1 配置引脚)
[3.1.2 配置设备节点](#3.1.2 配置设备节点)
[3.2 文件结构](#3.2 文件结构)
[3.3 Makefile](#3.3 Makefile)
[3.4 ap3216creg.h](#3.4 ap3216creg.h)
[3.5 驱动代码](#3.5 驱动代码)
[3.5.1 驱动框架](#3.5.1 驱动框架)
[3.5.2 读写AP3216C的寄存器数据](#3.5.2 读写AP3216C的寄存器数据)
[3.5.2.1 读数据:](#3.5.2.1 读数据:)
[3.5.2.2 写数据:](#3.5.2.2 写数据:)
[3.5.3 完整的驱动代码ap3216c.c](#3.5.3 完整的驱动代码ap3216c.c)
[3.6 应用程序](#3.6 应用程序)
[4.1 设备树](#4.1 设备树)
[4.1.1 配置IIC引脚](#4.1.1 配置IIC引脚)
[4.1.2 配置设备节点](#4.1.2 配置设备节点)
[4.2 文件结构](#4.2 文件结构)
[4.3 Makefile](#4.3 Makefile)
[4.4 mpu6050reg.h MPU6050的各种寄存器](#4.4 mpu6050reg.h MPU6050的各种寄存器)
[4.4.1 读取数据用到的寄存器](#4.4.1 读取数据用到的寄存器)
[4.4.2 初始化用到的寄存器](#4.4.2 初始化用到的寄存器)
[4.5 驱动代码](#4.5 驱动代码)
[4.5.1 框架](#4.5.1 框架)
[4.5.2 读写MPU6050寄存器函数](#4.5.2 读写MPU6050寄存器函数)
[4.5.2.1 写寄存器](#4.5.2.1 写寄存器)
[4.3.2.2 读寄存器](#4.3.2.2 读寄存器)
[4.5.2.3 .read函数](#4.5.2.3 .read函数)
[4.5.3 MPU6050初始化](#4.5.3 MPU6050初始化)
[4.5.4 完整驱动代码](#4.5.4 完整驱动代码)
[4.6 应用程序](#4.6 应用程序)
[4.7 测试](#4.7 测试)
这目录也是又臭又长了
一、IIC设备驱动
1.1 两个重要结构体
设备驱动主要看两个重要结构体:i2c_client和i2c_driver。
这两个结构体都定义在include/linux/i2c.h。
1.1.1 i2c_client
i2c_client表示IIC设备。
cpp
/**
 * struct i2c_client - represent an I2C slave device
 * @flags: I2C_CLIENT_TEN indicates the device uses a ten bit chip address;
 *	I2C_CLIENT_PEC indicates it uses SMBus Packet Error Checking
 * @addr: Address used on the I2C bus connected to the parent adapter.
 * @name: Indicates the type of the device, usually a chip name that's
 *	generic enough to hide second-sourcing and compatible revisions.
 * @adapter: manages the bus segment hosting this I2C device
 * @dev: Driver model device node for the slave.
 * @irq: indicates the IRQ generated by this device (if any)
 * @detected: member of an i2c_driver.clients list or i2c-core's
 *	userspace_devices list
 * @slave_cb: Callback when I2C slave mode of an adapter is used. The adapter
 *	calls it to pass on slave events to the slave driver.
 *
 * An i2c_client identifies a single device (i.e. chip) connected to an
 * i2c bus. The behaviour exposed to Linux is defined by the driver
 * managing the device.

 * struct i2c_client表示一个I2C从设备
 * @flags: I2C_CLIENT_TEN表示该设备使用10位芯片地址
 *         I2C_CLIENT_PEC表示该设备使用SMBus的数据包错误校验
 * @addr: 连接到父适配器的I2C总线上使用的地址
 * @name: 指示设备类型,通常是一个芯片名称;该名称应足够通用,
 *        以便屏蔽第二供货商和兼容修订版本的差异
 * @adapter: 管理承载此I2C设备的总线适配器
 * @dev: 该从设备在驱动模型中的设备节点
 * @irq: 该设备产生的中断号(如果有)
 * @detected: 属于i2c_driver.clients链表或i2c-core的userspace_devices链表的成员
 * @slave_cb: 当适配器处于I2C从模式时使用的回调。适配器调用它,以将从设备事件传递给从设备驱动
 *
 * 一个i2c_client标识连接到某条I2C总线的单个设备(即芯片),其在Linux中暴露的行为由管理该设备的驱动程序定义
 */
struct i2c_client {
	unsigned short flags;		/* div., see below		*/
	unsigned short addr;		/* chip address - NOTE: 7bit	芯片地址------7位地址 */
					/* addresses are stored in the	_LOWER_ 7 bits地址存放在低7位 */
	char name[I2C_NAME_SIZE];
	struct i2c_adapter *adapter;	/* the adapter we sit on  所在的适配器*/
	struct device dev;		/* the device structure	设备结构体 */
	int irq;			/* irq issued by device	该设备产生的中断号 */
	struct list_head detected;
#if IS_ENABLED(CONFIG_I2C_SLAVE)
	i2c_slave_cb_t slave_cb;	/* callback for slave mode 从模式回调 */
#endif
};
i2c_client结构体不需要我们手动创建。在设备树里添加IIC芯片,系统在解析设备树时会自动添加对应的i2c_client。他的功能是方便我们通过其获取设备IIC信息。
1.1.2 i2c_driver
cpp
/**
 * struct i2c_driver - represent an I2C device driver
 * @class: What kind of i2c device we instantiate (for detect)
 * @attach_adapter: Callback for bus addition (deprecated)
 * @probe: Callback for device binding
 * @remove: Callback for device unbinding
 * @shutdown: Callback for device shutdown
 * @alert: Alert callback, for example for the SMBus alert protocol
 * @command: Callback for bus-wide signaling (optional)
 * @driver: Device driver model driver
 * @id_table: List of I2C devices supported by this driver
 * @detect: Callback for device detection
 * @address_list: The I2C addresses to probe (for detect)
 * @clients: List of detected clients we created (for i2c-core use only)
 *
 * The driver.owner field should be set to the module owner of this driver.
 * The driver.name field should be set to the name of this driver.
 *
 * For automatic device detection, both @detect and @address_list must
 * be defined. @class should also be set, otherwise only devices forced
 * with module parameters will be created. The detect function must
 * fill at least the name field of the i2c_board_info structure it is
 * handed upon successful detection, and possibly also the flags field.
 *
 * If @detect is missing, the driver will still work fine for enumerated
 * devices. Detected devices simply won't be supported. This is expected
 * for the many I2C/SMBus devices which can't be detected reliably, and
 * the ones which can always be enumerated in practice.
 *
 * The i2c_client structure which is handed to the @detect callback is
 * not a real i2c_client. It is initialized just enough so that you can
 * call i2c_smbus_read_byte_data and friends on it. Don't do anything
 * else with it. In particular, calling dev_dbg and friends on it is
 * not allowed.
 *
 *
 * struct i2c_driver - 表示一个 I2C 设备驱动
 * @class: 我们实例化的IIC设备的类型(用于检测)
 * @attach_adapter: (已弃用)
 * @probe: 设备匹配时调用  △ △ △
 * @remove: 设备移除时调用  △ △ △
 * @shutdown: 设备关机时调用
 * @alert: 警报回调函数,例如SMBus警报协议
 * @command: 用于总线范围信号(可选)的回调函数
 * @driver: device_driver结构体  △ △ △
 *     driver.owner 此驱动的所有者,一般都是THIS_MODULE  △ △ △
 *     driver.name  此驱动的名称  △ △ △
 *     driver.of_match_table  虽然英文注释中没写,但这个也挺重要,用于设备树匹配  △ △ △
 * @id_table: 该驱动支持的IIC设备列表。在无设备树时使用此列表进行匹配  △ △ △
 * @detect: 设备检测的回调函数
 * @address_list: 要探测的IIC地址(用于检测)
 * @clients: 我们创建的已检测客户端列表(仅供i2c-core使用)
 *

 *
 * 对于自动设备检测,@detect和@address_list都必须定义
 * 还应设置 @class,否则只会创建通过模块参数强制指定的设备
 * detect函数在成功检测后必须填写传入的i2c_board_info结构中的name字段,也可以填写flags字段
 *
 * 如果未定义@detect,驱动程序对于已枚举的设备仍能正常工作,只是检测到的设备不会被支持。
 * 这对许多无法可靠检测的 I2C/SMBus 设备来说是预期的,对于那些在实际使用中总能被枚举的设备也同样适用
 *
 * 传递给@detect回调函数的i2c_client结构并不是真正的i2c_client,
 * 它只被初始化到足以调用i2c_smbus_read_byte_data等函数的程度,
 * 不要对它进行其他操作。特别是不允许在其上调用dev_dbg等函数。
 */
struct i2c_driver {
	unsigned int class;

	/* Notifies the driver that a new bus has appeared. You should avoid
	 * using this, it will be removed in a near future.
	 */
	int (*attach_adapter)(struct i2c_adapter *) __deprecated;

	/* Standard driver model interfaces */
	int (*probe)(struct i2c_client *, const struct i2c_device_id *);
	int (*remove)(struct i2c_client *);

	/* driver model interfaces that don't relate to enumeration  */
	void (*shutdown)(struct i2c_client *);

	/* Alert callback, for example for the SMBus alert protocol.
	 * The format and meaning of the data value depends on the protocol.
	 * For the SMBus alert protocol, there is a single bit of data passed
	 * as the alert response's low bit ("event flag").
	 */
	void (*alert)(struct i2c_client *, unsigned int data);

	/* a ioctl like command that can be used to perform specific functions
	 * with the device.
	 */
	int (*command)(struct i2c_client *client, unsigned int cmd, void *arg);

	struct device_driver driver;
	const struct i2c_device_id *id_table;

	/* Device detection callback for automatic device creation */
	int (*detect)(struct i2c_client *, struct i2c_board_info *);
	const unsigned short *address_list;
	struct list_head clients;
};
注册
cpp
// 定义在drivers/i2c/i2c-core.c
int i2c_register_driver(struct module *owner, struct i2c_driver *driver)
// owner: 一般都是THIS_MODULE
// driver:要注册的i2c_driver
// return:0成功;负值失败
或使用宏定义:
cpp
// 定义在include/linux/i2c.h
// (还是在调用i2c_register_driver,只是能少写一个THIS_MODULE)
#define i2c_add_driver(driver)  i2c_register_driver(THIS_MODULE, driver)
注销
cpp
// 定义在drivers/i2c/i2c-core.c
void i2c_del_driver(struct i2c_driver *driver)
// driver:要注销的i2c_driver
示例
(该示例代码来自《【正点原子】I.MX6U开发指南V1.81》六十一章 示例代码61.1.2.4)
cpp
/* i2c驱动的probe函数 */
static int xxx_probe(struct i2c_client *client, const struct i2c_device_id *id){............}

/* i2c驱动的remove函数 */
static int xxx_remove(struct i2c_client *client){............}

/* 传统匹配方式ID列表 */
static const struct i2c_device_id xxx_id[] = {
    {"xxx", 0},
    ............
    { /* sentinel */ }
};

/* 设备树匹配列表 */
static const struct of_device_id xxx_of_match[] = {
    { .compatible = "xxx" },
    { /* Sentinel */ }
};

/* i2c驱动结构体 */
static struct i2c_driver xxx_driver = {
    .probe = xxx_probe,
    .remove = xxx_remove,
    .driver = {
        .owner = THIS_MODULE,
        .name = "xxx",   // 不用于匹配!
        .of_match_table = xxx_of_match,  // 若定义了of_match_table,表示有设备树,使用of_match_table匹配
        },
    .id_table = xxx_id,  // 若没有设备树,使用id_table进行匹配。具体匹配流程详见1.3
};

/* 驱动入口函数 */
static int __init xxx_init(void){
    int ret = 0;
    ret = i2c_add_driver(&xxx_driver); // 注册i2c_driver
    return ret;
}

/* 驱动出口函数 */
static void __exit xxx_exit(void){
    i2c_del_driver(&xxx_driver);
}

module_init(xxx_init);
module_exit(xxx_exit);
1.2 IIC设备的信息描述
1.2.1 无设备树
无设备树时,需要配置i2c_board_info结构体
cpp
// 定义在include/linux/i2c.h
struct i2c_board_info {
	char		type[I2C_NAME_SIZE];  // IIC设备名    必须设置
	unsigned short	flags;            //
	unsigned short	addr;             // IIC器件地址  必须设置
	void		*platform_data;
	struct dev_archdata	*archdata;
	struct device_node *of_node;
	struct fwnode_handle *fwnode;
	int		irq;
};
1.2.2 有设备树
以mag3110节点为例:
cpp
// 定义在arch/arm/boot/dts/imx6ull-alientek-emmc.dts
&i2c1 {
	clock-frequency = <100000>;
	pinctrl-names = "default";
	pinctrl-0 = <&pinctrl_i2c1>;    // 指定i2c1的引脚
	status = "okay";

	mag3110@0e {                    // 节点名 @ IIC器件地址
		compatible = "fsl,mag3110"; // 用于匹配驱动    必须设置
		reg = <0x0e>;               // IIC器件地址     必须设置
		position = <2>;
	};
    ............
};
1.3 设备驱动的匹配
设备和驱动的匹配由IIC总线完成:
cpp
// 定义在drivers/i2c/i2c-core.c
struct bus_type i2c_bus_type = {
	.name		= "i2c",
	.match		= i2c_device_match, // match就是IIC总线的设备/驱动匹配函数
	.probe		= i2c_device_probe,
	.remove		= i2c_device_remove,
	.shutdown	= i2c_device_shutdown,
};
其中,匹配函数i2c_device_match内容如下:
cpp
// 定义在drivers/i2c/i2c-core.c

// 设备树匹配 -> ACPI匹配 -> name字段匹配
static int i2c_device_match(struct device *dev, struct device_driver *drv){
	struct i2c_client	*client = i2c_verify_client(dev);
	struct i2c_driver	*driver;

	if (!client)
		return 0;

	/* Attempt an OF style match */
    // 设备树设备和驱动的匹配
    // 比较设备树节点的compatible与和of_device_id中的compatible属性是否一致
	if (of_driver_match_device(dev, drv))
		return 1;

	/* Then ACPI style match */
	if (acpi_driver_match_device(dev, drv))   // 用于ACPI形式匹配
		return 1;

	driver = to_i2c_driver(drv);
	/* match on an id table if there is one */
	if (driver->id_table)
		return i2c_match_id(driver->id_table, client) != NULL;
        // i2c_match_id用于传统的、无设备树的I2C设备和驱动匹配过程
        // 比较IIC设备名和i2c_device_id的name是否相等

	return 0;
}
1.4 数据收发处理
i2c_transfer函数
cpp
int i2c_transfer(struct i2c_adapter *adap,  // 使用的IIC控制器/适配器。i2c_client会保存其对应的i2c_adapter
                 struct i2c_msg     *msgs,  // 要发送的消息(一个或多个)
                            int      num)   // 消息数量
// return:负值失败;else:发送的msgs数量
其中,i2c_msg定义如下:
cpp
struct i2c_msg {
	__u16 addr;	/* slave address 从机地址 */
	__u16 flags; // 标志,具体内容如以下define所示

      // 0 表示 发送数据,这里没定义
#define I2C_M_RD		0x0001	/* read data, from slave to master  from 从机 读数据 to 主机 */
					/* I2C_M_RD is guaranteed to be 0x0001! */
#define I2C_M_TEN		0x0010	/* this is a ten bit chip address 10位芯片地址 */
#define I2C_M_DMA_SAFE		0x0200	/* the buffer of this message is DMA safe */
					/* makes only sense in kernelspace */
					/*  */
#define I2C_M_RECV_LEN		0x0400	/* length will be first received byte */
#define I2C_M_NO_RD_ACK		0x0800	/* if I2C_FUNC_PROTOCOL_MANGLING */
#define I2C_M_IGNORE_NAK	0x1000	/* if I2C_FUNC_PROTOCOL_MANGLING */
#define I2C_M_REV_DIR_ADDR	0x2000	/* if I2C_FUNC_PROTOCOL_MANGLING */
#define I2C_M_NOSTART		0x4000	/* if I2C_FUNC_NOSTART */
#define I2C_M_STOP		0x8000	/* if I2C_FUNC_PROTOCOL_MANGLING */
	__u16 len;		/* msg length 本段msg的长度*/
	__u8 *buf;		/* pointer to msg data 消息数据 */
};
具体使用可见3.5.2代码。
二、IIC控制器 / 适配器驱动
(驱动开发只需要完成IIC设备驱动即可,控制器驱动一般由原厂提供,这里只做了解)
IIC总线驱动重点是IIC适配器/控制器驱动。要用到两个结构体:i2c_adapter和i2c_algorithm。
2.1 i2c_adapter
Linux内核将SOC的IIC适配器/控制器抽象为i2c_adapter。IIC适配器/控制器驱动的核心就是申请i2c_adapter结构体、初始化、注册。
cpp
// 定义在include/linux/i2c.h
struct i2c_adapter {
	struct module *owner;
	unsigned int class;		  /* classes to allow probing for */

	const struct i2c_algorithm *algo; /* the algorithm to access the bus 访问总线的算法*/
    // 也就是对外读写的函数。驱动程序通过这些函数来完成读写

	void *algo_data;

	/* data fields that are valid for all devices	*/
	struct rt_mutex bus_lock;

	int timeout;			/* in jiffies */
	int retries;
	struct device dev;		/* the adapter device */

	int nr;    // 编号
	char name[48];
	struct completion dev_released;

	struct mutex userspace_clients_lock;
	struct list_head userspace_clients;

	struct i2c_bus_recovery_info *bus_recovery_info;
	const struct i2c_adapter_quirks *quirks;
};
其中的重点就是i2c_algorithm这个结构体。详见2.2。
注册i2c_adapter
使用以下两个函数函数向系统注册i2c_adapter结构体:
cpp
// 定义在drivers/i2c/i2c-core.c
// 动态分配一个未被占用的编号(/dev/i2c-*中的X)
int i2c_add_numbered_adapter(struct i2c_adapter *adap)
// return:0成功;负值失败
cpp
// 定义在drivers/i2c/i2c-core.c
// 需要预先设置i2c_adapter的nr成员
// 内核会尝试以这个编号进行注册;若该编号已被占用会失败
int i2c_add_adapter(struct i2c_adapter *adapter)
// return:0成功;负值失败
删除i2c_adapter
cpp
// 定义在drivers/i2c/i2c-core.c
void i2c_del_adapter(struct i2c_adapter *adap)
2.2 i2c_algorithm
i2c_algorithm就是IIC适配器/控制器与IIC设备通信的方法。
cpp
// 定义在include/linux/i2c.h
/**
 * struct i2c_algorithm - represent I2C transfer method
 * @master_xfer: Issue a set of i2c transactions to the given I2C adapter
 *   defined by the msgs array, with num messages available to transfer via
 *   the adapter specified by adap.
 * @smbus_xfer: Issue smbus transactions to the given I2C adapter. If this
 *   is not present, then the bus layer will try and convert the SMBus calls
 *   into I2C transfers instead.
 * @functionality: Return the flags that this algorithm/adapter pair supports
 *   from the I2C_FUNC_* flags.
 * @reg_slave: Register given client to I2C slave mode of this adapter
 * @unreg_slave: Unregister given client from I2C slave mode of this adapter
 *
 * The following structs are for those who like to implement new bus drivers:
 * i2c_algorithm is the interface to a class of hardware solutions which can
 * be addressed using the same bus algorithms - i.e. bit-banging or the PCF8584
 * to name two of the most common.
 *
 * The return codes from the @master_xfer field should indicate the type of
 * error code that occurred during the transfer, as documented in the kernel
 * Documentation file Documentation/i2c/fault-codes.

    struct i2c_algorithm:表示 I2C 传输方法
    @master_xfer:向指定的I2C控制器发起一组I2C事务
        这些事务由msgs数组定义,数组中包含num条可通过adap指定的控制器传输的消息
    @smbus_xfer:向指定的I2C控制器发起SMBus事务
        如果该函数未被实现(为NULL),那么I2C总线层会尝试将SMBus调用转换为I2C传输
    @functionalit:返回该算法/控制器组合所支持的功能标志
        这些标志来自I2C_FUNC_*宏定义
    @reg_slave:    将指定的从设备(client)注册到该控制器的I2C从设备模式中
    @unreg_slave:将指定的从设备(client)从该控制器的I2C从设备模式中注销
 */
struct i2c_algorithm {
	/* If an adapter algorithm can't do I2C-level access, set master_xfer
	   to NULL. If an adapter algorithm can do SMBus access, set
	   smbus_xfer. If set to NULL, the SMBus protocol is simulated
	   using common I2C messages
        如果适配器/控制器算法无法进行IIC访问,要将master_xfer设为NULL
        如果适配器/控制器算法可以进行SMBus访问,要设置smbus_xfer
        如果smbus_xfer为NULL,则SMBus协议会使用常规IIC消息进行模拟

	   master_xfer should return the number of messages successfully
	   processed, or a negative value on error
        master_xfer应返回成功处理的消息数量,若错误则返回负值
    */
	int (*master_xfer)(struct i2c_adapter *adap, struct i2c_msg *msgs,
			   int num); // 该函数就是IIC控制器最终进行数据收发的函数
	int (*smbus_xfer) (struct i2c_adapter *adap, u16 addr,
			   unsigned short flags, char read_write,
			   u8 command, int size, union i2c_smbus_data *data);

	/* To determine what the adapter supports */
	u32 (*functionality) (struct i2c_adapter *);

#if IS_ENABLED(CONFIG_I2C_SLAVE)
	int (*reg_slave)(struct i2c_client *client);
	int (*unreg_slave)(struct i2c_client *client);
#endif
};
三、AP3216C驱动
由于我用的mini版并不带AP3216C传感器,因此最终的代码我也不确定是否完全正确,只能说确实能读数据了(虽然都是0)这里只记录一下编写流程。
后面的MPU6050代码倒是肯定能跑。
3.1 修改设备树
打开《IMX6ULL_ALPHA_V2.2(底板原理图).pdf》,搜索AP3216C,可以看到AP3216C使用的是I2C1:
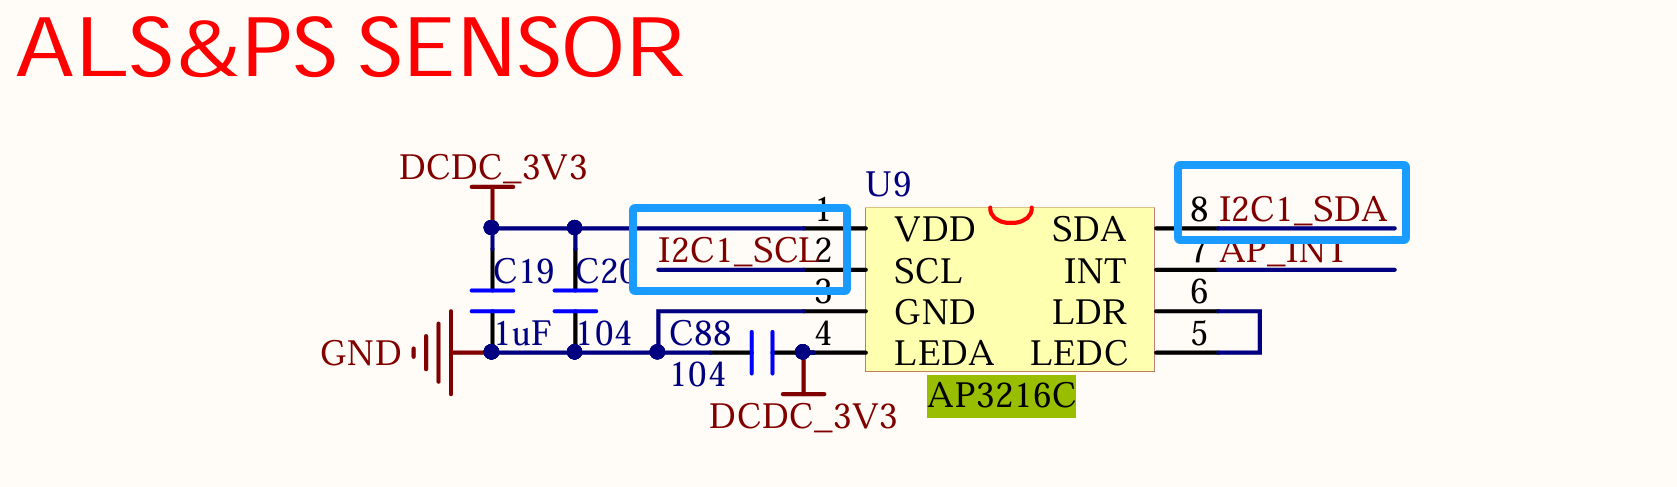
那么我们就要在i2c1下添加ap3216c节点。imx6ull.dtsi下描述的是SOC硬件资源,imx6ull-alientek-emmc.dts是板级资源,因此我们在imx6ull-alientek-emmc.dts的&i2c1下添加ap3216c节点。
3.1.1 配置引脚
i2c1配置如下:
cpp
&i2c1 {
	clock-frequency = <100000>;
	pinctrl-names = "default";
	pinctrl-0 = <&pinctrl_i2c1>;
	status = "okay";

	mag3110@0e {
		compatible = "fsl,mag3110";
		reg = <0x0e>;
		position = <2>;
	};

	fxls8471@1e {
		compatible = "fsl,fxls8471";
		reg = <0x1e>;
		position = <0>;
		interrupt-parent = <&gpio5>;
		interrupts = <0 8>;
	};
};
时钟频率、name、status都不用改,只需要看看pinctrl_i2c1是否符合要求。
AP3216C使用的是I2C1_SCL、I2C1_SDA。去搜索这两个,可以在第5页找到:
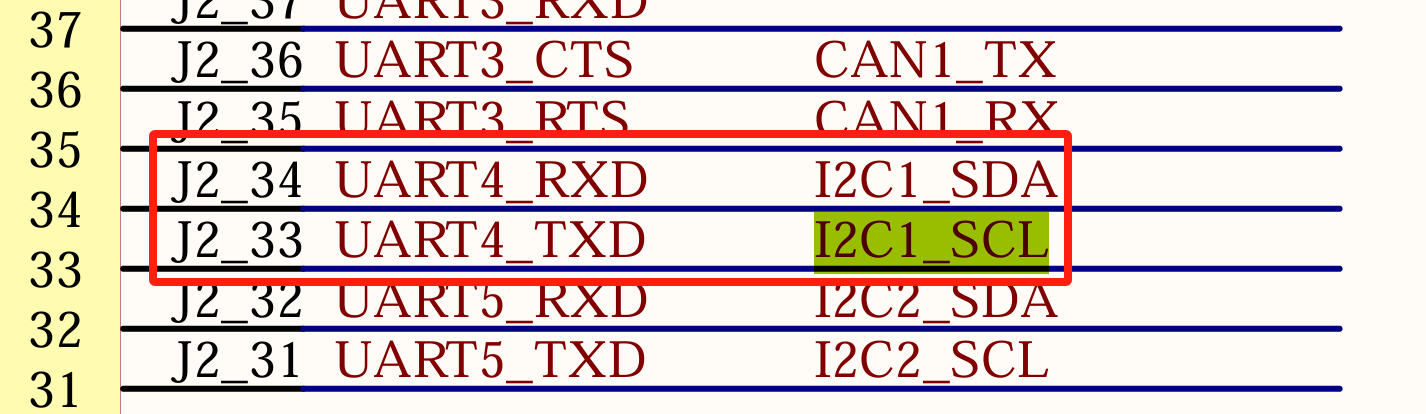
因此现在需要去配置&i2c1中的pinctrl-0,将UART4复用为I2C1。
pinctrl_i2c1的内容如下:
cpp
		pinctrl_i2c1: i2c1grp {
			fsl,pins = <
				MX6UL_PAD_UART4_TX_DATA__I2C1_SCL 0x4001b8b0  // 定义在arch/arm/boot/dts/imx6ul-pinfunc.h
				MX6UL_PAD_UART4_RX_DATA__I2C1_SDA 0x4001b8b0
			>;
		};
巧了,刚好配置的就是UART4复用为I2C1,就不需要改了。
3.1.2 配置设备节点
在《【正点原子】阿尔法Linux开发板(A盘)-基础资料\06、硬件资料\01、芯片资料》中可以找到《AP3216C.pdf》,其中在IIC部分可以找到ap3216c的**7位从设备地址(slave address)**为0x1e:

这里直接告诉我们是7位器件地址为0x1E。有的手册可能会写"读地址为0xAB"(也就是1010 1011共8位),其中最低位 bit0就是读写位 (0写 1读),高7位bit1~7为器件地址。在配置设备树节点时,我们就需要把最低位的读写位去掉,也就是0xAB >> 1 = 0x55,不要直接把0xAB写上去了。
现在就可以完成ap3216c的设备树节点:
cpp
	ap3216c@1e {      // name@器件地址
		compatible = "alientek,ap3216c"; // 因为是自己实验,随便写一个就行了,写驱动时保持一致即可
		reg = <0x1e>; // 器件地址
};还有一件事。i2c1下面还有个fxls8471节点,它的器件地址也是0x1e。同一个总线上,不能存在两个拥有相同器件地址的设备,reg属性必须唯一。 因此我们注释掉fxls8471节点。
在实际使用中,如果确实有两个设备器件地址一样,需要放到不同的iic下面去。
(其实有重复的器件地址也是不会报错的,但是只有一个能正确注册。在启动时,内核会根据设备树节点自动生成i2c_client(1.1.1),如果地址未被占用则注册成功。那么我们只要把ap3216c节点写到fxls8471节点的前面就可以正常注册,而fxls8471无法注册。虽然但是 最好还是把fxls8471注释掉)
现在修改好设备树,编译、复制即可:
bash
make dtbs
sudo cp arch/arm/boot/dts/imx6ull-alientek-emmc.dtb /.../tftpboot/
现在打开开发板,看看是否正确注册了0x1e:
bash
ls /sys/bus/i2c/devices/        # 应能看到0-001e
cd /sys/bus/i2c/devices/0-001e/
cat name                       # 应能看到ap3216c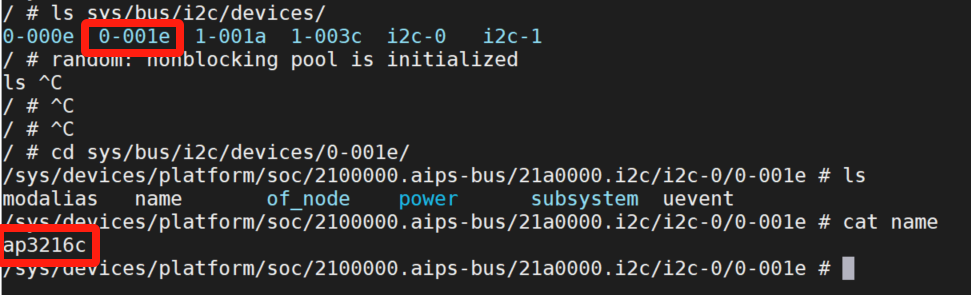
3.2 文件结构
cpp
22_IIC (工作区)
├── .vscode
│   ├── c_cpp_properties.json
│   └── settings.json
├── 22_iic.code-workspace
├── Makefile
├── ap3216creg.h
├── ap3216c.c
└── ap3216cAPP.c
3.3 Makefile
bash
CFLAGS_MODULE += -w

KERNELDIR := /....../linux/linux-imx-rel_imx_4.1.15_2.1.0_ga_alientek  # 内核路径
# KERNELDIR改成自己的 linux-imx-rel_imx_4.1.15_2.1.0_ga_alientek文件路径(这个文件从正点原子"01、例程源码"中直接搜,cp到虚拟机里面)

CURRENT_PATH := $(shell pwd)	# 当前路径

obj-m := ap3216c.o			    # 编译文件

build: kernel_modules			# 编译模块

kernel_modules:
	$(MAKE) -C $(KERNELDIR) M=$(CURRENT_PATH) modules
clean:
	$(MAKE) -C $(KERNELDIR) M=$(CURRENT_PATH) clean
3.4 ap3216creg.h
将用到的AP3216C的寄存器地址都保存到ap3216creg.h中。
在【正点原子】阿尔法Linux开发板(A盘)-基础资料/06、硬件资料/01、芯片资料/中可以找到《AP3216C.pdf》。第12页可以找到相关寄存器地址:
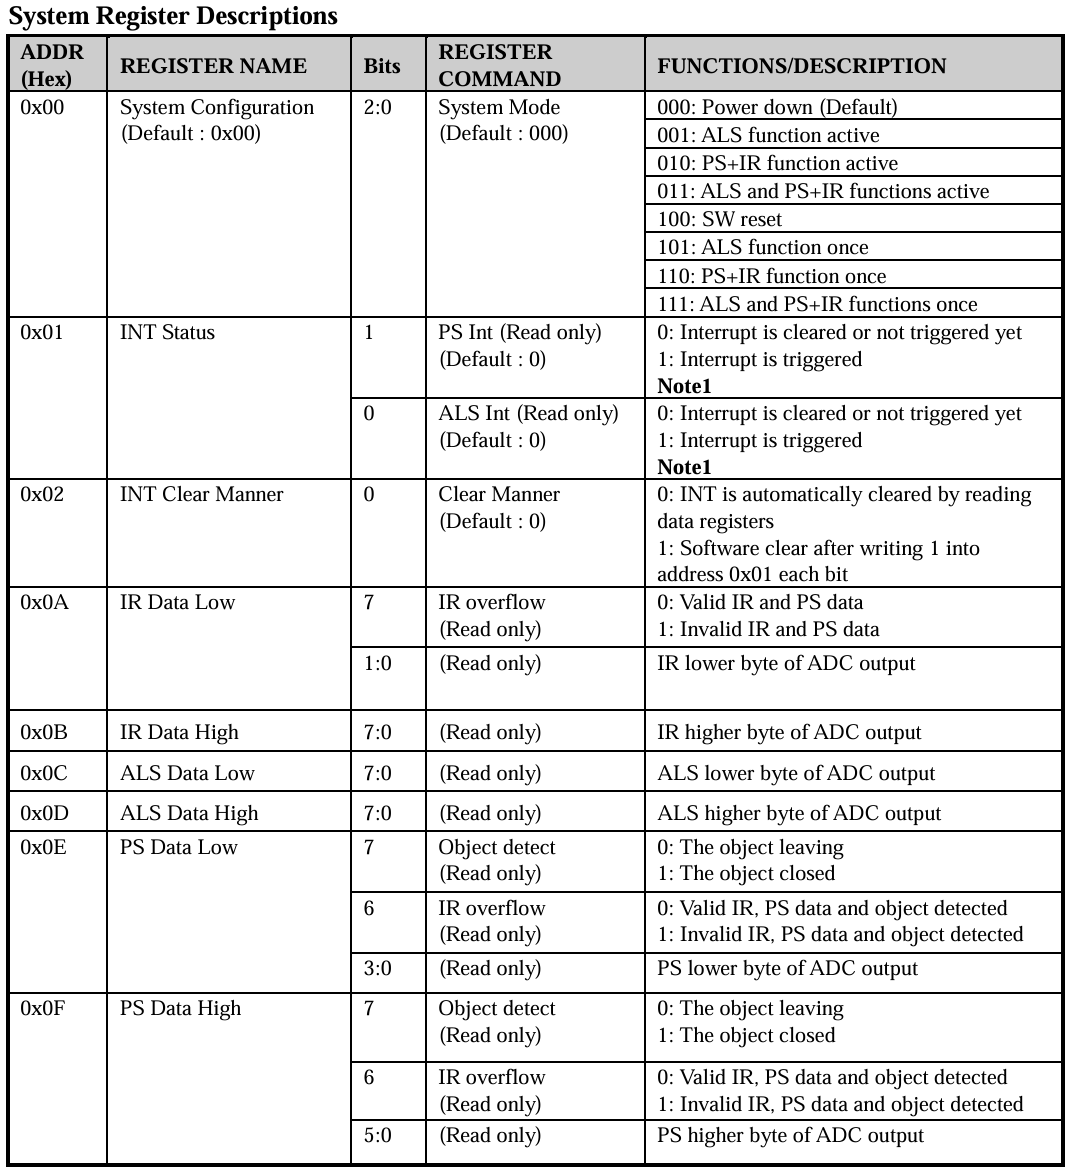
整理为代码写入到ap3216creg.h中:
cpp
#define AP3216C_SYSTEMCONG   0x00    /* 配置寄存器    */
#define AP3216C_INTSTATUS    0X01    /* 中断状态寄存器 */
#define AP3216C_INTCLEAR     0X02    /* 中断清除寄存器 */
#define AP3216C_IRDATALOW    0x0A    /* IR数据低字节  */
#define AP3216C_IRDATAHIGH   0x0B    /* IR数据高字节  */
#define AP3216C_ALSDATALOW   0x0C    /* ALS数据低字节 */
#define AP3216C_ALSDATAHIGH  0X0D    /* ALS数据高字节 */
#define AP3216C_PSDATALOW    0X0E    /* PS数据低字节  */
#define AP3216C_PSDATAHIGH   0X0F    /* PS数据高字节  */
3.5 驱动代码
3.5.1 驱动框架
先搭个框架出来,主要包括了:
驱动入口/出口函数,负责注册/注销i2c_driver;
初始化i2c_driver,以及编写对应的匹配表、probe和remove等函数
cpp
// 无设备树匹配表   与刚才设备树节点的compatible写成一样的即可
static struct i2c_device_id ap3216c_id[] = {
    {"alientek,ap3216c"},
    {/*sentinel*/},
};
// 有设备树匹配表   需要与刚才设备树节点的compatible保持一致
static struct of_device_id ap3216c_of_match[] = {
    { .compatible = "alientek,ap3216c" },
    {/*sentinel*/},
};

// --i2c驱动结构体 及其函数---------------------------------------------------------------

static int ap3216c_probe(struct i2c_client *client, const struct i2c_device_id *id){
    return 0;
}
static int ap3216c_remove(struct i2c_client *client){
    return 0;
}
// i2c_driver
static struct i2c_driver ap3216c_driver{ // 依照1.1.2注释,把最重要的几个写上
    .probe = ap3216c_probe,
    .remove = ap3216c_remove,
    .driver = {
        .owner = THIS_MODULE,
        .name = "ap3216c",
        .of_match_table = of_match_ptr(ap3216c_of_match),
    },
    .id_table = ap3216c_id,
}

// ---驱动入口/出口-----------------------------------------------------------------

// 驱动入口
static int __init ap3216c_init(void){
    int ret = 0;
    ret = i2c_add_driver(&ap3216c_driver); // 注册i2c_driver
    return ret;
}
// 驱动出口
static void __exit ap3216c_exit(void){
    i2c_del_driver(&ap3216c_driver); // 注销i2c_driver
}
module_init(ap3216c_init);
module_exit(ap3216c_exit);
MODULE_LICENSE("GPL");
3.5.2 读写AP3216C的寄存器数据
3.5.2.1 读数据:
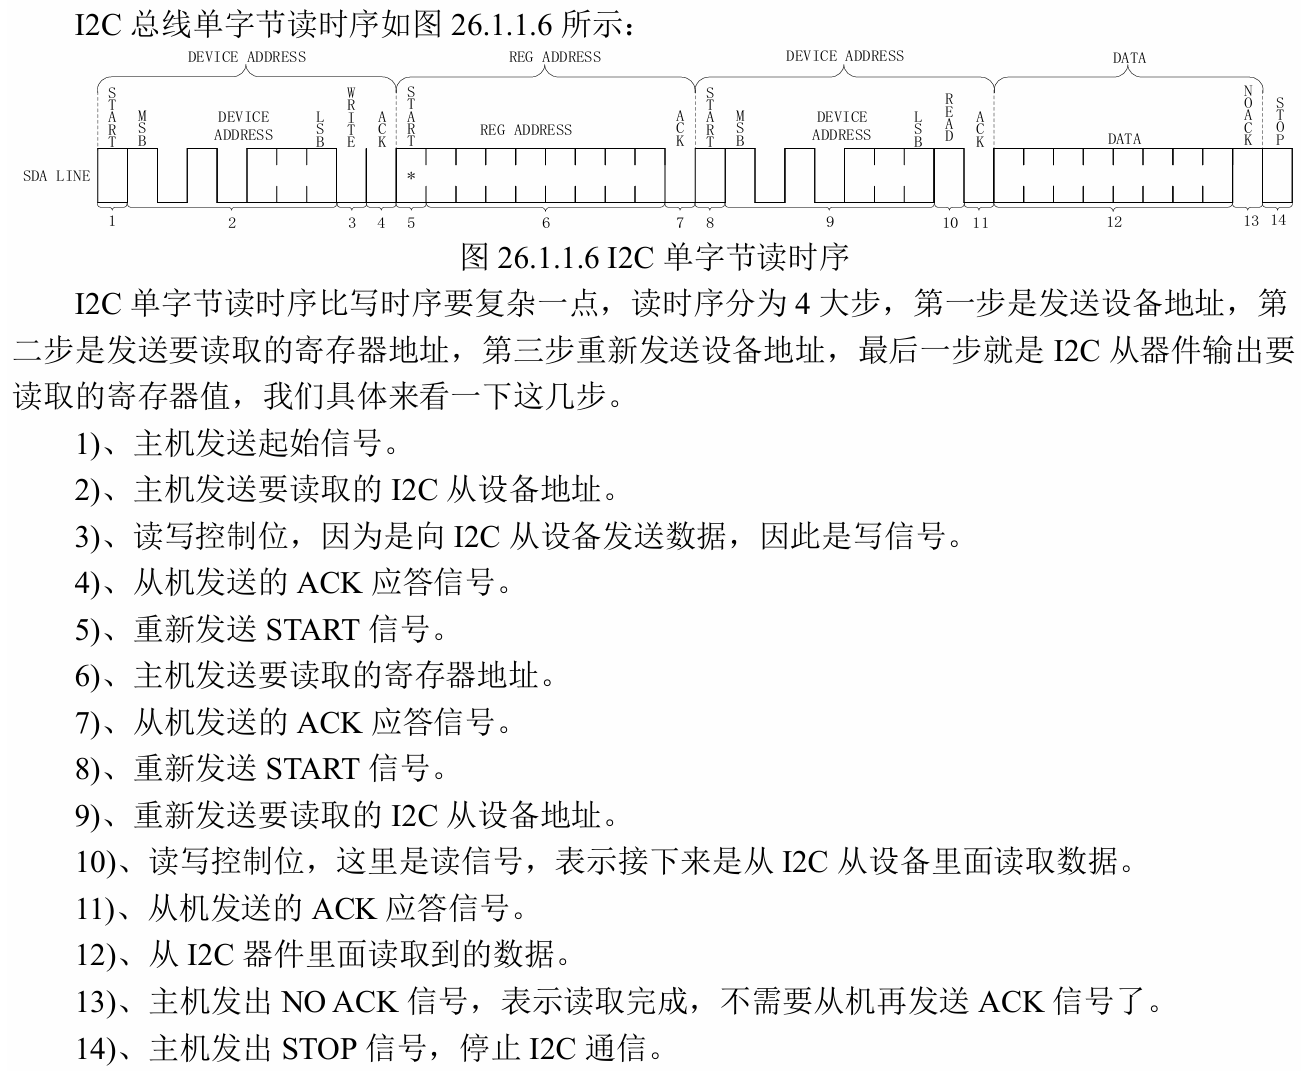
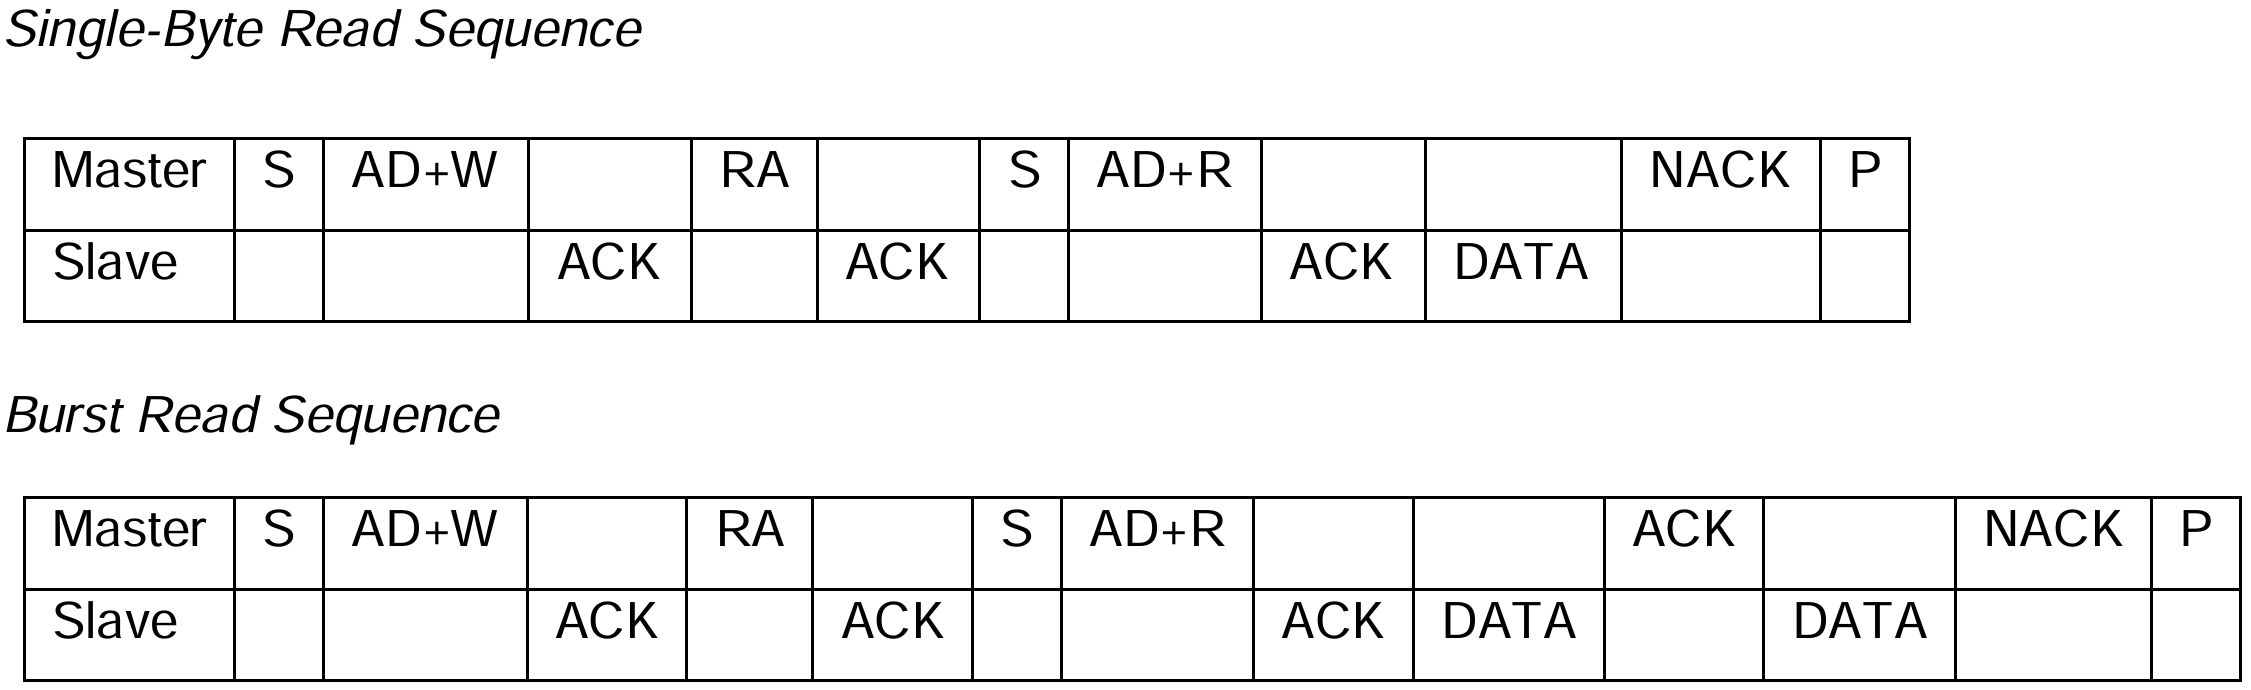
 读取ap3216c寄存器数据流程如下,分为4步:
1、主机 发送 器件地址,最后一位是0(Write),表示主机将要发送 目标从机地址
2、主机 发送 要读的从机寄存器地址
3、主机 再发一次 器件地址,不过此时最后一位是1(Read),表示主机要接收的 目标从机地址
4、总线 将读取到的从机寄存器数据发送给主机
简化一下,就是:①主机发送要读取的寄存器地址,②主机读取返回来的目标数据
综上,可以编写读数据函数:
cpp
// 从AP3216C寄存器读数据
// 依照图26.1.1.6的流程,主机需要:
//      ①发送要读取的寄存器地址(发送模式,发送的内容是寄存器地址)
//      ②接收目标寄存器的数据  (接收模式,接收的内容是目标寄存器的数据)
// reg:要读取的寄存器的地址    val:存储接收到的数据   len:接收的数据的长度
static int ap3216c_read_regs(struct ap3216c_dev_struct *dev, u8 reg, void *val, int len){
    struct i2c_client *client = (struct i2c_client*)dev->private_data;

    struct i2c_msg msg[2]; // i2c_msg详见1.4
    // msg[0]发送:要读取的从机寄存器的首地址(主机发送)
    // msg[1]接收:读取到的目标寄存器的数据(主机接收)

    // ①发送目标寄存器的地址(发送模式,发送的内容是目标寄存器的地址)
    msg[0].addr = client->addr; // 从机地址(AP3216C)
    msg[0].flags = 0; // 发送。flag详见1.4
    msg[0].buf = ®// 发送内容:要读取的寄存器地址
    msg[0].len = 1;   // 要发送的数据长度为1(目标寄存器地址长度为1)(AP3216C的寄存器都是8位)

    // ②接收目标寄存器的数据(接收模式,接收的内容是目标寄存器的数据)
    msg[1].addr = client->addr; // 从机地址(AP3216C)
    msg[1].flags = I2C_M_RD;    // 接收。flag详见1.4
    msg[1].buf = val;           // 读取到的数据保存到val
    msg[1].len = len;           // 要读取的数据长度

    return i2c_transfer(client->adapter, msg, 2); // 发送
}
最后再封装一下:
cpp
// 读取AP3216C一个寄存器
// 对ap3216c_read_regs封装
// reg 要读取的寄存器地址
static unsigned char ap3216c_read_reg(struct ap3216c_dev_struct *dev, u8 reg){
    u8 data = 0;
    ap3216c_read_regs(dev, reg, &data, 1);
    // 可以自己加上错误处理
    return data;
}
读数据详细流程可见《【正点原子】I.MX6U开发指南V1.81》26.1部分:
3.5.2.2 写数据:
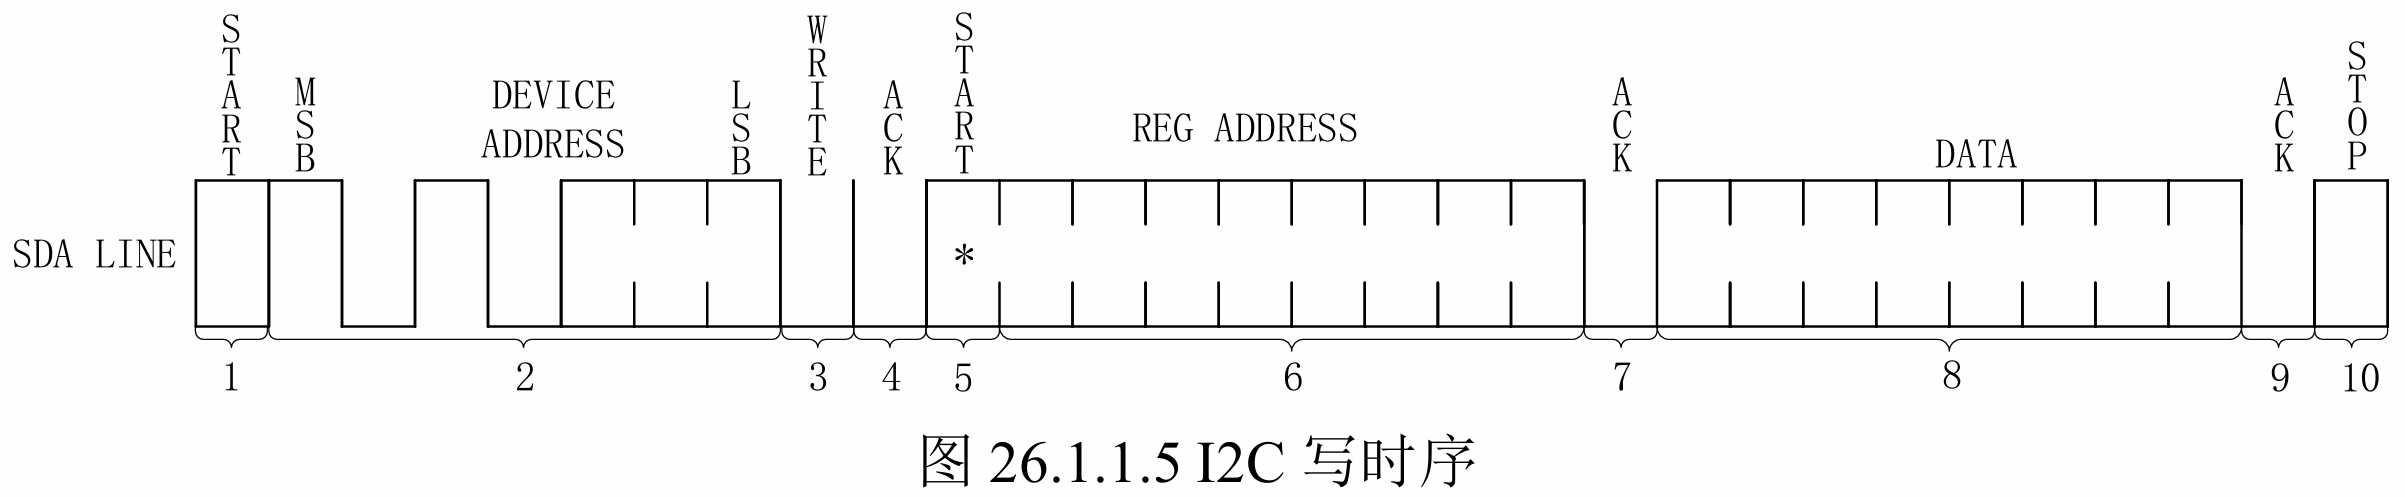
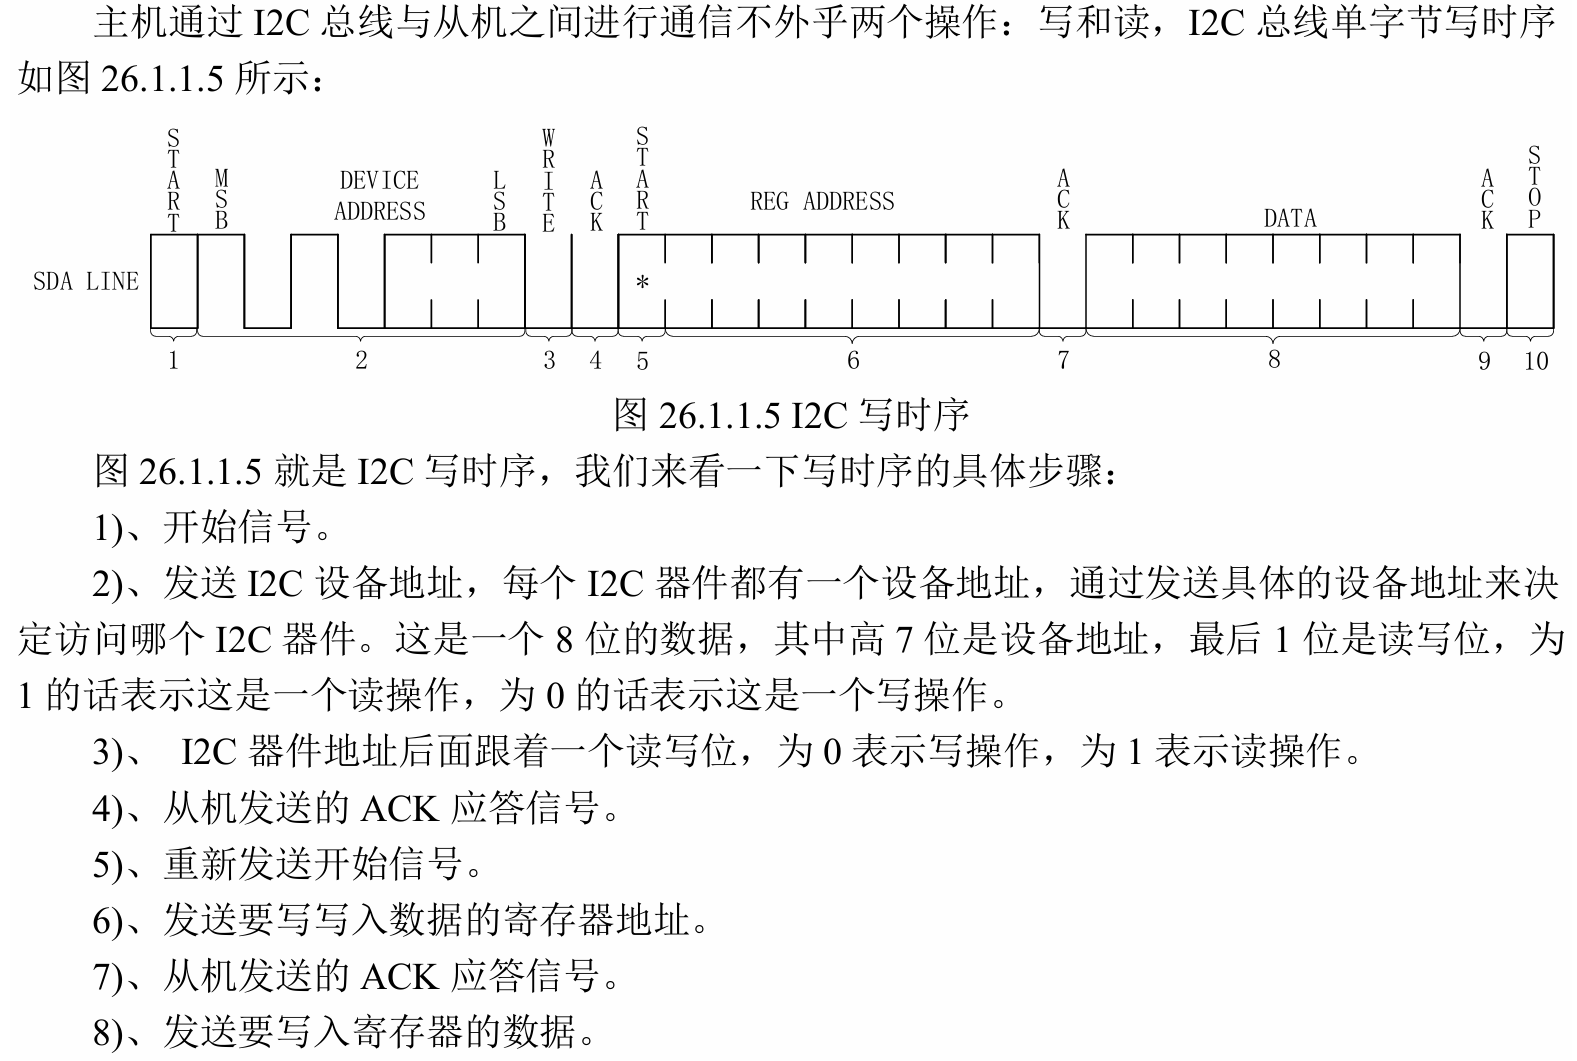
写数据就不需要4步了。先发送目标从机地址,再一次性发送(目标寄存器地址+要写入的数据),要写输入的数据DATA可以为多个字节。
cpp
// 向AP3216C寄存器写数据
// 因为ap3216c的寄存器都是8位的,因此buf可以直接用u8类型
// reg:要写的寄存器地址    buf:要写的数据    len:要写的数据的长度
static int ap3216c_write_regs(struct ap3216c_dev_struct *dev, u8 reg, u8 *buf, int len){
    struct i2c_client *client = (struct i2c_client*)dev->private_data;
    struct i2c_msg msg; // i2c_msg详见1.4
    u8 b[256];

    b[0] = reg;     // 目标寄存器地址存到b[0]
    memcpy(&b[1], buf, len); // 要发送的数据存到b[1~len]

    msg.addr = client->addr; // 从机地址(AP3216C)
    msg.flags = 0; // 发送。flag详见1.4
    msg.buf = b;// 发送内容:要读取的寄存器地址
    msg.len = len + 1;   // 要发送的数据长度(len) + 寄存器地址长度(1)

    return i2c_transfer(client->adapter, &msg, 1); // 这里要写成&msg!不是msg
}
封装一下:
cpp
// 向AP3216C一个寄存器写一个字节的数据
// 对ap3216c_write_regs封装
// reg 要写数据的寄存器地址     data 要写的数据
static void ap3216c_write_reg(struct ap3216c_dev_struct *dev, u8 reg, u8 data){
    u8 buf = 0;
    buf = data;
    ap3216c_write_regs(dev, reg, &buf, 1);
    // 可以自己加上错误处理
}
写数据详细流程可见《【正点原子】I.MX6U开发指南V1.81》26.1部分:

3.5.3 完整的驱动代码ap3216c.c
接下来完善代码:
增加设备结构体
增加操作集函数,即对应的open、read、release函数
完善probe函数(注册设备号,注册字符设备cdev,自动创建设备节点class device)
增加ap3216c寄存器读写函数
cpp
#include<linux/module.h>
#include<linux/input.h>
#include<linux/i2c.h>
#include<linux/cdev.h>
#include<linux/device.h>
#include<linux/fs.h>
#include<linux/uaccess.h>
#include<linux/string.h>
#include<linux/delay.h>
#include"ap3216creg.h"
#define AP3216C_CNT 1
#define AP3216C_NAME "ap3216c"
//=== 设备结构体 =====================================================================
struct ap3216c_dev_struct {
int major; // 主设备号
int minor; // 次设备号
dev_t devid; // 设备号
struct cdev cdev;
struct class *class;
struct device *device;
void *private_data; // 保存i2c_client
// 手册上指明,环境光传感器ALS有16位分辨率(0~65535),IR和PS有10位分辨率(0~1023)。因此这里统一设为short
unsigned short ir, als, ps; // 红外强度 环境光强度 接近距离
};
static struct ap3216c_dev_struct ap3216c_dev;
//=== 读写寄存器函数 =====================================================================
// 从AP3216C寄存器读数据
// 依照图26.1.1.6的流程,主机需要:
// ①发送要读取的寄存器地址(发送模式,发送的内容是寄存器地址)
// ②接收目标寄存器的数据 (接收模式,接收的内容是目标寄存器的数据)
// reg:要读取的寄存器的地址 val:存储接收到的数据 len:接收的数据的长度
static int ap3216c_read_regs(struct ap3216c_dev_struct *dev, u8 reg, void *val, int len){
struct i2c_client *client = (struct i2c_client*)dev->private_data;
struct i2c_msg msg[2]; // i2c_msg详见1.4
// msg[0]发送:要读取的从机寄存器的首地址(主机发送)
// msg[1]接收:读取到的目标寄存器的数据(主机接收)
// ①发送目标寄存器的地址(发送模式,发送的内容是目标寄存器的地址)
msg[0].addr = client->addr; // 从机地址(AP3216C)ss
msg[0].flags = 0; // 发送。flag详见1.4
msg[0].buf = ®// 发送内容:要读取的寄存器地址
msg[0].len = 1; // 要发送的数据长度为1(目标寄存器地址长度为1)(AP3216C的寄存器都是8位)
// ②接收目标寄存器的数据(接收模式,接收的内容是目标寄存器的数据)
msg[1].addr = client->addr; // 从机地址(AP3216C)
msg[1].flags = I2C_M_RD; // 接收。flag详见1.4
msg[1].buf = val; // 读取到的数据保存到val
msg[1].len = len; // 要读取的数据长度
return i2c_transfer(client->adapter, msg, 2); // 发送
}
// 向AP3216C寄存器写数据
// 因为ap3216c的寄存器都是8位的,因此buf可以直接用u8类型
// reg:要写的寄存器地址 buf:要写的数据 len:要写的数据的长度
static int ap3216c_write_regs(struct ap3216c_dev_struct *dev, u8 reg, u8 *buf, int len){
struct i2c_client *client = (struct i2c_client*)dev->private_data;
struct i2c_msg msg; // i2c_msg详见1.4
u8 b[256];
b[0] = reg; // 目标寄存器地址存到b[0]
memcpy(&b[1], buf, len); // 要发送的数据存到b[1]
msg.addr = client->addr; // 从机地址(AP3216C)
msg.flags = 0; // 发送。flag详见1.4
msg.buf = b;// 发送内容:要读取的寄存器地址
msg.len = len + 1; // 要发送的数据长度(len) + 寄存器地址长度(1)
return i2c_transfer(client->adapter, &msg, 1); // 这里要写成&msg!不是msg
}
// 读取AP3216C一个寄存器
// 对ap3216c_read_regs封装
// reg 要读取的寄存器地址
static unsigned char ap3216c_read_reg(struct ap3216c_dev_struct *dev, u8 reg){
u8 data = 0;
ap3216c_read_regs(dev, reg, &data, 1);
// 可以自己加上错误处理
return data;
}
// 向AP3216C一个寄存器写一个字节的数据
// 对ap3216c_write_regs封装
// reg 要写数据的寄存器地址 data 要写的数据
static void ap3216c_write_reg(struct ap3216c_dev_struct *dev, u8 reg, u8 data){
u8 buf = 0;
buf = data;
ap3216c_write_regs(dev, reg, &buf, 1);
// 可以自己加上错误处理
}
// 从AP1632C读取完整的数据
void ap3216c_readdata(struct ap3216c_dev_struct *dev){
unsigned char buf[6];
unsigned char i =0;
for(i=0;i<6;i++){buf[i] = ap3216c_read_reg(dev, AP3216C_IRDATALOW+i);}
if(buf[0] & 0x80){ // 数据无效
dev->ir = 0;
dev->ps = 0;
} else {
dev->ir = ((unsigned short)buf[1] << 2 | (buf[0] & 0x03));
dev->ps = (((unsigned short)buf[5] & 0x3F ) << 4 | (buf[4] & 0x0F));
}
dev->als = ((unsigned short)buf[3] << 8 | buf[2]);
}
//=== 操作集函数 =====================================================================
static int ap3216c_open(struct inode *inode, struct file *filp){
printk("open\r\n");
unsigned char value = 0;
filp->private_data = &ap3216c_dev;
// 初始化AP3216C
ap3216c_write_reg(&ap3216c_dev, AP3216C_SYSTEMCONG, 0x4); // 复位
mdelay(50);
ap3216c_write_reg(&ap3216c_dev, AP3216C_SYSTEMCONG, 0x3); //
value = ap3216c_read_reg(&ap3216c_dev, AP3216C_SYSTEMCONG);
printk("AP3216C_SYSTEMCONG = %#x\r\n",value);
return 0;
}
static int ap3216c_release(struct inode *inode, struct file *filp){printk("release\r\n");struct ap3216c_dev_struct *dev = (struct ap3216c_dev_struct*)filp->private_data; return 0;}
static ssize_t ap3216c_read(struct file *filp, char __user *buf, size_t cnt, loff_t *off){
// printk("read\r\n");
long err = 0;
short data[3]; // 保存 ps als if
struct ap3216c_dev_struct *dev = (struct ap3216c_dev_struct *)filp->private_data;
ap3216c_readdata(dev);
data[0]=dev->ir; // 红外强度
data[1]=dev->als; // 环境光强度
data[2]=dev->ps; // 接近距离
err = copy_to_user(buf, data, sizeof(data));
return 0;
}
static const struct file_operations ap3216c_fops = {
.owner = THIS_MODULE,
.open = ap3216c_open,
.read = ap3216c_read,
.release = ap3216c_release,
};
//=== 匹配表 ==================== 与刚才设备树节点的compatible写成一样的即可 ===================
// 无设备树
static struct i2c_device_id ap3216c_id[] = {{"alientek,ap3216c", 0},{/*sentinel*/},};
// 有设备树
static struct of_device_id ap3216c_of_match[] = {{ .compatible = "alientek,ap3216c" },{/*sentinel*/},};
//== i2c_driver结构体 及其函数 =================================================================
static int ap3216c_probe(struct i2c_client *client, const struct i2c_device_id *id){
printk(" == probe ==\r\n");
int ret;
ap3216c_dev.major = 0; // 系统分配
// 注册设备号 -------------------------------------
if(ap3216c_dev.major){ // 若自定义设备号
ap3216c_dev.devid = MKDEV(ap3216c_dev.major,0);
ret = register_chrdev_region(ap3216c_dev.devid, AP3216C_CNT, AP3216C_NAME);
}else{ // 待系统分配设备号
ret = alloc_chrdev_region(&ap3216c_dev.devid, 0, AP3216C_CNT, AP3216C_NAME);
ap3216c_dev.major = MAJOR(ap3216c_dev.devid);
ap3216c_dev.minor = MINOR(ap3216c_dev.devid);
}
if(ret<0){
printk("chrdev_region error!\r\n");
goto fail_devid;
}
printk("major = %d, minor = %d\r\n",ap3216c_dev.major,ap3216c_dev.minor);
// 注册字符设备cdev -------------------------------------
ap3216c_dev.cdev.owner = THIS_MODULE;
cdev_init(&ap3216c_dev.cdev, &ap3216c_fops);
ret = cdev_add(&ap3216c_dev.cdev, ap3216c_dev.devid, AP3216C_CNT);
if(ret < 0){
printk("cdev_add error!\r\n");
goto fail_cdev;
}
// 自动创建设备节点 -------------------------------------
ap3216c_dev.class = class_create(THIS_MODULE, AP3216C_NAME);
if(IS_ERR(ap3216c_dev.class)){
printk("class create error!\r\n");
ret = PTR_ERR(ap3216c_dev.class);
goto fail_class;
}
ap3216c_dev.device = device_create(ap3216c_dev.class, NULL, ap3216c_dev.devid, NULL, AP3216C_NAME);
if(IS_ERR(ap3216c_dev.device)){
printk("device create error!\r\n");
ret = PTR_ERR(ap3216c_dev.device);
goto fail_device;
}
ap3216c_dev.private_data = client;
return 0;
fail_device:
class_destroy(ap3216c_dev.class);
fail_class:
cdev_del(&ap3216c_dev.cdev);
fail_cdev:
unregister_chrdev_region(ap3216c_dev.devid, AP3216C_CNT);
fail_devid:
return ret;
}
static int ap3216c_remove(struct i2c_client *client){
printk(" == remove ==\r\n");
device_destroy(ap3216c_dev.class, ap3216c_dev.devid); // 摧毁设备
class_destroy(ap3216c_dev.class); // 摧毁类
cdev_del(&ap3216c_dev.cdev); // 删除字符设备
unregister_chrdev_region(ap3216c_dev.devid, AP3216C_CNT); // 注销设备号
return 0;
}
// i2c_driver
static struct i2c_driver ap3216c_driver = { // 依照2.1.2注释,把最重要的几个写上
.probe = ap3216c_probe,
.remove = ap3216c_remove,
.driver = {
.owner = THIS_MODULE,
.name = "ap3216c",
.of_match_table = of_match_ptr(ap3216c_of_match),
},
.id_table = ap3216c_id,
};
// 驱动入口
static int __init ap3216c_init(void){
int ret = 0;
ret = i2c_add_driver(&ap3216c_driver); // 注册i2c_driver
return ret;
}
// 驱动出口
static void __exit ap3216c_exit(void){
i2c_del_driver(&ap3216c_driver); // 注销i2c_driver
}
module_init(ap3216c_init);
module_exit(ap3216c_exit);
MODULE_LICENSE("GPL");3.6 应用程序
cpp
#include<stdio.h>
#include<unistd.h>
#include<sys/types.h>
#include<sys/stat.h>
#include<sys/ioctl.h>
#include<fcntl.h>
#include<stdlib.h>
#include<string.h>
#include<linux/input.h>

#define LEDOFF 0
#define LEDON  1

/*
 * @description    : main主程序
 * @param - argc   : argv数组元素个数
 * @param - argv   : 具体参数
 * @return         : 0 成功; else失败
 * 调用  ./ap3216cAPP /dev/ap3216c
 */

int main(int argc, char *argv[]){
    if(argc != 2){
        printf("Error Usage!\r\n");
        return -1;
    }
    int fd, err;
    char *filename;
    int data[3];
    unsigned short ir, ps, als;

    filename = argv[1];

    fd = open(filename, O_RDWR);
    if(fd <0){
        printf("file %s open failed!\r\n",filename);
        return -1;
    }
    while(1){
        err = read(fd, data, sizeof(data));
        if(err == 0){
            ir = data[0];
            als = data[1];
            ps = data[2];
            printf("AP3216C    ir = %d, als = %d, ps = %d\r\n",ir, ps, als);
        }
        usleep(200000); // 延时200ms
    }
    err = read(fd, &data, sizeof(data));
    close(fd);
    return 0;
}
四、MPU6050驱动
AP3216C没法验证,也不知道对不对,整个MPU6050的驱动吧。
代码参考了以下内容:
I2C子系统--mpu6050驱动实验 --- 野火嵌入式Linux驱动开发实战指南
MPU6050模块 --- 野火STM32模块例程介绍 文档
另外关于MPU6050的手册需要下载:
4.1 设备树
4.1.1 配置IIC引脚
这里偷懒了,依然使用I2C1的引脚。具体配置详见3.1.1。
4.1.2 配置设备节点
下面这张图来自野火。
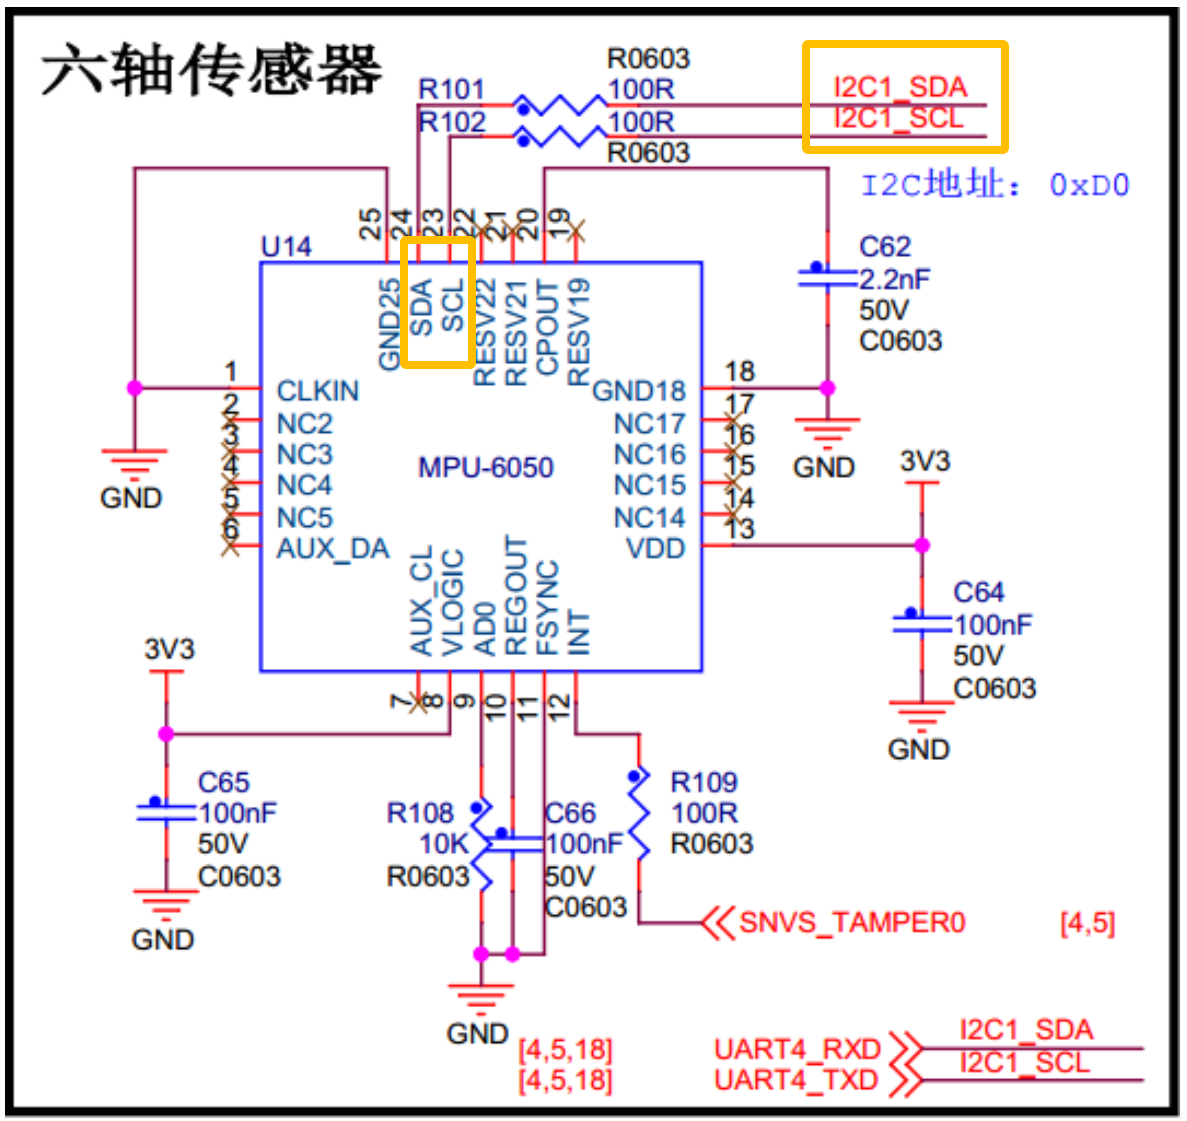
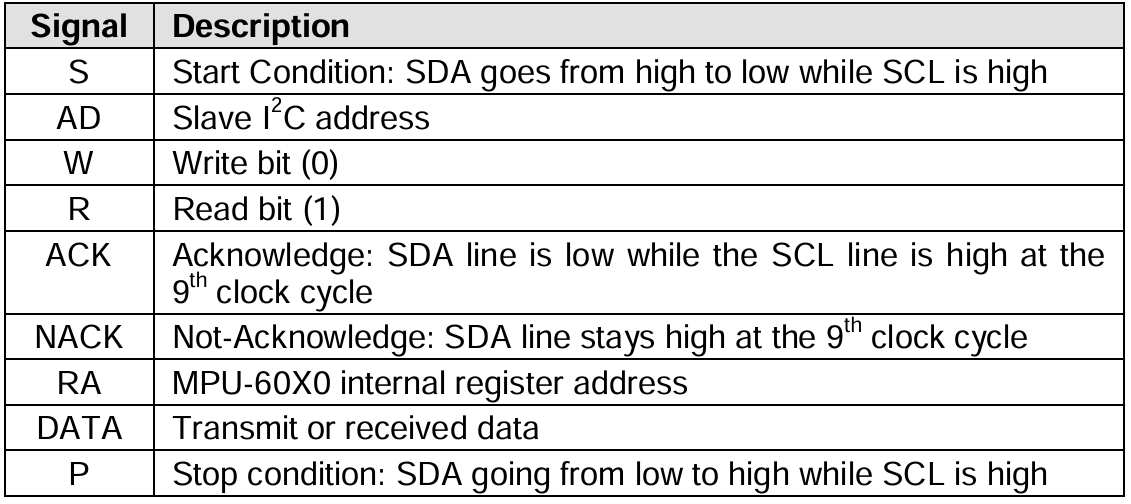
在(ATK-MPU6050 --- 正点原子资料给的网盘资料中的)《MPU-6000 and MPU-6050 Product Specification.pdf》的"9.2 I2C Interface"部分可以看到MPU6050的从机地址:
The slave address of the MPU-60X0 is b110100X which is 7 bits long. The LSB bit of the 7 bit address is determined by the logic level on pin AD0. This allows two MPU-60X0s to be connected to the same I2C bus. When used in this configuration, the address of the one of the devices should be b1101000 (pin AD0 is logic low) and the address of the other should be b1101001 (pin AD0 is logic high).
翻译就是:AD0拉低,从机地址为b1101000,即0x68;AD0拉高,从机地址为b1101001,即0x69。图中可以看出,AD0接了下拉电阻,所以默认以0x68作为从机地址。
将下面这段代码写到imx6ull-alientek-emmc.dts的&i2c1里面:
cpp
	// 新增 2025/11/5  MPU6050节点
	MPU6050@68 {
		compatible = "alientek,mpu6050"; // 因为是自己实验,随便写一个就行了,写驱动时保持一致即可
		reg = <0x68>; // 器件地址
	};
编译、复制:
bash
make dtbs
sudo cp arch/arm/boot/dts/imx6ull-alientek-emmc.dtb /.../tftpboot/
现在打开开发板,看看是否正确注册了0x68:
bash
ls /sys/bus/i2c/devices/        # 应能看到0-0068
cd /sys/bus/i2c/devices/0-0068/
cat name                       # 应能看到mpu6050
4.2 文件结构
cpp
22_IIC_MPU6050 (工作区)
├── .vscode
│   ├── c_cpp_properties.json
│   └── settings.json
├── 22_iic_mpu6050.code-workspace
├── Makefile
├── mpu6050reg.h
├── mpu6050.c
└── mpu6050APP.c
4.3 Makefile
bash
CFLAGS_MODULE += -w

KERNELDIR := /....../imx6ull/linux/linux-imx-rel_imx_4.1.15_2.1.0_ga_alientek  # 内核路径
# KERNELDIR改成自己的 linux-imx-rel_imx_4.1.15_2.1.0_ga_alientek文件路径(这个文件从正点原子"01、例程源码"中直接搜,cp到虚拟机里面)

CURRENT_PATH := $(shell pwd)	# 当前路径

obj-m := mpu6050.o			    # 编译文件

build: kernel_modules			# 编译模块

kernel_modules:
	$(MAKE) -C $(KERNELDIR) M=$(CURRENT_PATH) modules
clean:
	$(MAKE) -C $(KERNELDIR) M=$(CURRENT_PATH) clean
4.4 mpu6050reg.h MPU6050的各种寄存器
本部分的截图来自正点原子资料《MPU-6000 and MPU-6050 Register Map and Descriptions.pdf》。以下简称《pdf》。
4.4.1 读取数据用到的寄存器
在《pdf》的"3 Register Map"中可以找到陀螺仪、加速剂、温度计的输出数据寄存器:
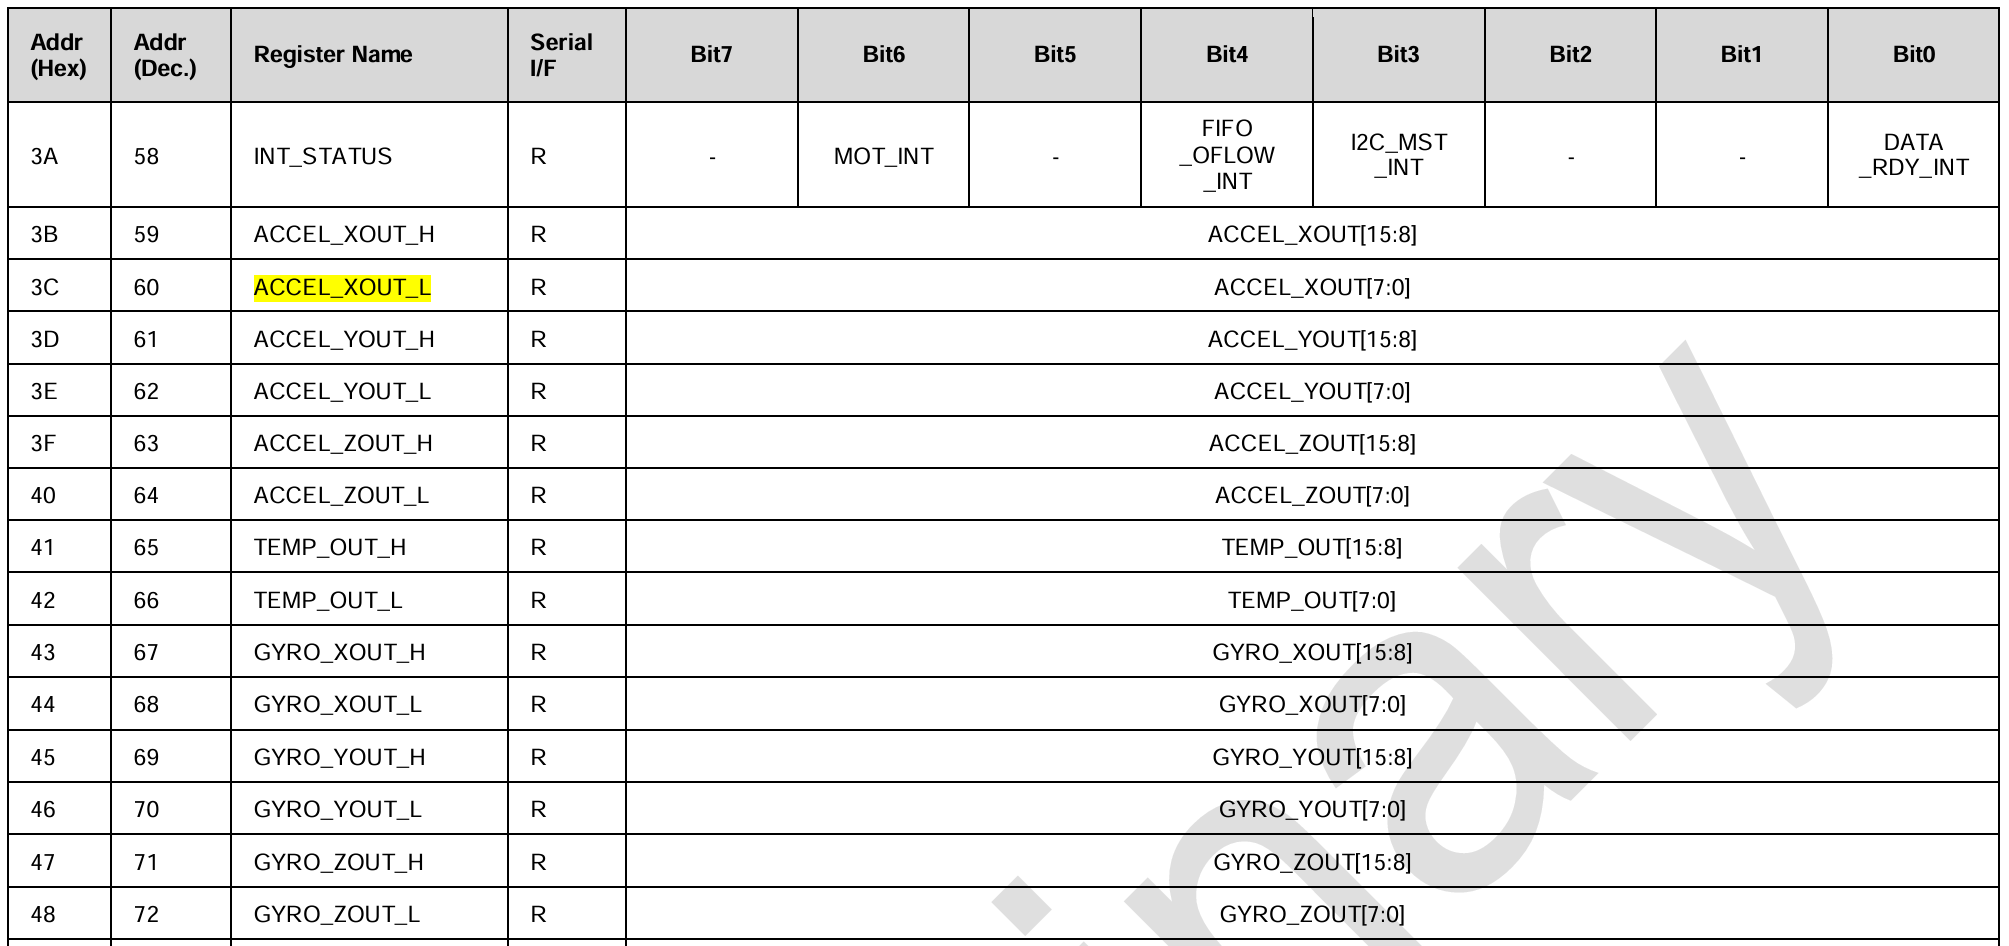
MPU6050的加速度计、陀螺仪每个轴的原始测量值都是16位,但是8位寄存器,因此需要两个寄存器来分别保存高/低8位。
cpp
#define MPU6050_SLAVE_ADDRESS  (0x68<<1)      // 读地址

//加速度数据寄存器
#define ACCEL_XOUT_H   0x3B // X轴
#define ACCEL_XOUT_L   0x3C
#define ACCEL_YOUT_H   0x3D // Y轴
#define ACCEL_YOUT_L   0x3E
#define ACCEL_ZOUT_H   0x3F // Z轴
#define ACCEL_ZOUT_L   0x40

// 温度传感器
#define TEMP_OUT_H     0x41
#define TEMP_OUT_L     0x42

//角速度数据寄存器
#define GYRO_XOUT_H    0x43
#define GYRO_XOUT_L    0x44
#define GYRO_YOUT_H    0x45
#define GYRO_YOUT_L    0x46
#define GYRO_ZOUT_H    0x47
#define GYRO_ZOUT_L    0x48
4.4.2 初始化用到的寄存器
依照mpu6050驱动实验 --- 野火的2.5.2.2.3代码,初始化只用了这4个寄存器。
文字描述太多了,不写了,只标注在《pdf》中的位置。
cpp
// 初始化用到的寄存器
#define PWR_MGMT_1     0x6B   // 配置时钟,是否禁用温度计,循环模式等等      详见《pdf》4.30
#define CONFIG         0x1A   // 控制陀螺仪、加速计的带宽,设置陀螺仪输出率(↓间接控制全芯片采样率),设置数字低通滤波    详见《pdf》4.3
#define SMPLRT_DIV     0x19   // 全芯片的采样率 = 陀螺仪输出速率 ÷ (该寄存器的值+1)     详见《pdf》4.2
#define ACCEL_CONFIG   0x1C   // 设置加速计 量程,设备自检,数字高通滤波   详见《pdf》4.5
把以上两段代码都贴到mpu6050reg.h中。
4.5 驱动代码
4.5.1 框架
还是一样先搭个框架出来。直接在3.5.1的基础上改即可。
cpp
#include<linux/module.h>
#include<linux/input.h>
#include<linux/i2c.h>
#include<linux/cdev.h>
#include<linux/device.h>
#include<linux/fs.h>
#include<linux/uaccess.h>
#include<linux/string.h>
#include<linux/delay.h>
#include"mpu6050reg.h"

#define MPU6050_CNT 1
#define MPU6050_NAME "mpu6050"

// 设备结构体 ===================================================

struct mpu6050_dev_struct {
    dev_t devid;
    int major;
    int minor;
    struct cdev cdev;
    struct class *class;
    struct device *device;
};

// 寄存器读写函数 ===================================================

static int mpu6050_read_reg(){

}
static int mpu6050_write_reg(){

}

// 操作集 ===================================================
static int mpu6050_open(){

}
static int mpu6050_release(){

}
static ssize_t mpu6050_read(){

}

static const struct file_operations mpu6050_fops = {
    .owner = THIS_MODULE,
    .open = mpu6050_open,
    .release = mpu6050_release,
    .read = mpu6050_read,
};

// 匹配表 ===================================================

static struct i2c_device_id mpu6050_id[] = {
    {"alientek,mpu6050"},
    {/*sentinel*/},
};
static struct of_device_id mpu6050_of_match[] = {
    {.compatible = "alientek,mpu6050"},
    {/*sentinel*/},
};

// 总线设备结构体 ===================================================
static int mpu6050_probe(struct i2c_client *client, const struct i2c_device_id *id){
    return 0;
}

static int mpu6050_remove(struct i2c_client *client){
    return 0;
}

static struct i2c_driver mpu6050_driver = {
    .probe = mpu6050_probe,
    .remove = mpu6050_remove,
    .driver = {
        .owner = THIS_MODULE,
        .name = "mpu6050",
        .of_match_table = of_match_ptr(mpu6050_of_match),
    },
    .id_table = mpu6050_id,
};

// 驱动入口/出口 ===================================================

static int __init mpu6050_init(void){
    i2c_add_driver(&mpu6050_driver);
    return 0;
}

static void __exit mpu6050_exit(void){
    i2c_del_driver(&mpu6050_driver);
}

module_init(mpu6050_init);
module_exit(mpu6050_exit);
MODULE_LICENSE("GPL");
4.5.2 读写MPU6050寄存器函数
4.5.2.1 写寄存器
在《MPU6050参考资料/MPU6050-英文原版数据手册.pdf》9.3部分可以找到时序图:
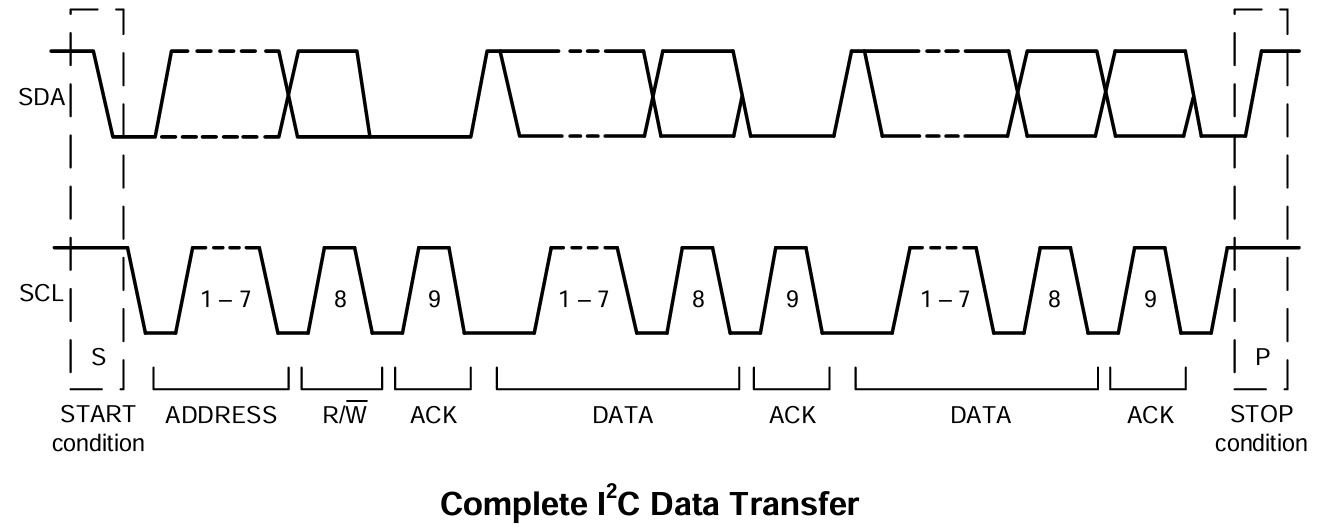
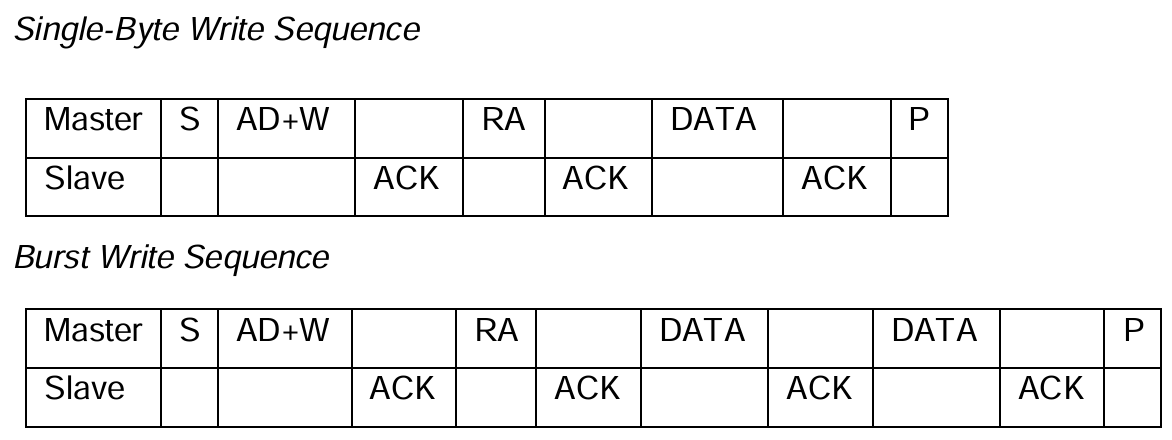
作为主机,需要发送:
起始信号 -> 从机地址+写标志 -> 目标寄存器地址 -> 数据(可连续发送) -> 终止信号
其顺序与3.5.2.1基本一致。起止信号S和P是IIC控制器自动执行的,不需要像裸机那样还得手动拉电平。
cpp
// reg:目标寄存器地址  buf:要写的数据  len:要写的信息的长度
static int mpu6050_write_reg(struct mpu6050_dev_struct *dev, u8 reg, u8 *buf, int len){
    int err = 0;
    struct i2c_client *client = (struct i2c_client*)dev->client;
    struct i2c_msg msg;
    u8 b[256];

    b[0] = reg;
    memcpy(&b[1], buf, len);

    msg.addr = client->addr;// 从机地址(AP3216C)
    msg.flags = 0;          // 发送。flag详见1.4
    msg.buf = b;            // 发送内容:要读取的寄存器地址
    msg.len = len + 1;      // 要发送的数据长度(len) + 寄存器地址长度(1)

    err = i2c_transfer(client->adapter, &msg, 1); // 这里要写成&msg!不是msg
    if(err != 1){
        printk("mpu6050_write_reg fail!\r\n");
        return -1;
    }
    return 0;
}
4.3.2.2 读寄存器
cpp
// mpu6050寄存器读写函数 ===================================================
// reg:目标寄存器地址  data:保存读取到的信息  len:要读取信息的长度
static int mpu6050_read_reg(struct mpu6050_dev_struct *dev, u8 reg, void *data, int len){
    int err = 0;
    struct i2c_client *client = (struct i2c_client*)dev->client;
    struct i2c_msg msg[2];

    // ①发送:要读取的寄存器的地址
    msg[0].addr = client->addr; // 从机地址
    msg[0].flags = 0;           // 发送
    msg[0].buf = ®          // 要发送的数据:目标寄存器地址
    msg[0].len = 1;             // 发送数据的长度

    // ②接收:读到的目标寄存器的数据
    msg[1].addr = client->addr; // 从机地址
    msg[1].flags = I2C_M_RD;    // 接收
    msg[1].buf = data;          // 接收的数据保存到data
    msg[1].len = len;           // 接收数据的长度

    // 发送msg
    err = i2c_transfer(client->adapter, msg, 2);

    if (err!= 2){
        printk("mpu6050_write_reg fail!\r\n");
        return -1;
    }
    return 0;
}
4.5.2.3 .read函数
读取MPU6050原始6轴数据,并发送给用户态
cpp
// 读取6轴信息,并发送给用户态
static ssize_t mpu6050_read(struct file *filp, char __user *buf, size_t cnt, loff_t *off){
    char data_H;
    char data_L;
    int err;
    short mpu6050_data[7]; //保存mpu6050的原始数据。 共6个16位数据
    struct mpu6050_dev_struct *dev = (struct mpu6050_dev_struct*)filp->private_data;
    struct i2c_client *client = (struct i2c_client*)dev->client;
    u8 raw[14];  // 连续14个寄存器的原始字节:AxH,AxL,  AyH,AyL,  AzH,AzL,  TempH,TempL,  GxH,GxL,  GyH,GyL,  GzH,GzL

    size_t to_copy;
    int ret;

    ret = mpu6050_read_reg(dev, ACCEL_XOUT_H, raw, sizeof(raw)); // 从ACCEL_XOUT_H开始连续读取14个字节

    mpu6050_data[0] = (short)((u16)raw[0]  << 8 | raw[1]);  // Ax
    mpu6050_data[1] = (short)((u16)raw[2]  << 8 | raw[3]);  // Ay
    mpu6050_data[2] = (short)((u16)raw[4]  << 8 | raw[5]);  // Az
    // 跳过中间的温度寄存器
    mpu6050_data[3] = (short)((u16)raw[8]  << 8 | raw[9]);  // Gx
    mpu6050_data[4] = (short)((u16)raw[10] << 8 | raw[11]); // Gy
    mpu6050_data[5] = (short)((u16)raw[12] << 8 | raw[13]); // Gz

    err = copy_to_user(buf, mpu6050_data, cnt); // 发送给用户态
    if(err!=0){
        printk("copy to user fail!");
        return -1;
    }
    return 0;
}
4.5.3 MPU6050初始化
下面这段代码是照着mpu6050驱动实验 --- 野火的2.5.2.2.3的代码改的。寄存器具体配置详见4.4.2。
cpp
// MPU6050设备初始化
// 要和MPU6050驱动初始化mpu6050_init区分
static int mpu6050_device_init(struct mpu6050_dev_struct *dev){
    int err = 0;
    short val;
    struct i2c_client *client = (struct i2c_client *)dev->client;

    val = 0x00;
    err += mpu6050_write_reg(dev, PWR_MGMT_1, &val,2); // 启动8MHz振荡器,关闭休眠,关闭睡眠和循环模式,不禁用温度计
    val = 0x06;
    err += mpu6050_write_reg(dev, CONFIG, &val,2);     // 加速度/陀螺带宽为5Hz,陀螺输出率为1kHz;关闭FSYNC采样
    val = 0x07;
    err += mpu6050_write_reg(dev, SMPLRT_DIV, &val,2); // 全芯片采样率 = 陀螺仪输出速率 ÷ (该寄存器的值+1) = 1k ÷ 8 = 125Hz
    val = 0x00;
    err += mpu6050_write_reg(dev, ACCEL_CONFIG, &val,2); // 加速度计量程设为±2g,打开加速度计高通滤波

    if (err < 0){
        printk("mpu6050_device_init fail\n");
        return -1;
    }
    printk("mpu6050_device_init finished!\r\n");
    return 0;
}
4.5.4 完整驱动代码
cpp
#include<linux/module.h>
#include<linux/input.h>
#include<linux/i2c.h>
#include<linux/cdev.h>
#include<linux/device.h>
#include<linux/fs.h>
#include<linux/uaccess.h>
#include<linux/string.h>
#include<linux/delay.h>
#include"mpu6050reg.h"
#define MPU6050_CNT 1
#define MPU6050_NAME "mpu6050"
// 设备结构体 ===================================================
struct mpu6050_dev_struct {
dev_t devid;
int major;
int minor;
struct cdev cdev;
struct class *class;
struct device *device;
struct i2c_client *client;
};
struct mpu6050_dev_struct mpu6050_dev;
// mpu6050寄存器读写函数 ===================================================
// reg:目标寄存器地址 data:保存读取到的信息 len:要读取信息的长度
static int mpu6050_read_reg(struct mpu6050_dev_struct *dev, u8 reg, void *data, int len){
int err = 0;
struct i2c_client *client = (struct i2c_client*)dev->client;
struct i2c_msg msg[2];
// ①发送:要读取的寄存器的地址
msg[0].addr = client->addr; // 从机地址
msg[0].flags = 0; // 发送
msg[0].buf = ® // 要发送的数据:目标寄存器地址
msg[0].len = 1; // 发送数据的长度
// ②接收:读到的目标寄存器的数据
msg[1].addr = client->addr; // 从机地址
msg[1].flags = I2C_M_RD; // 接收
msg[1].buf = data; // 接收的数据保存到data
msg[1].len = len; // 接收数据的长度
// 发送msg
err = i2c_transfer(client->adapter, msg, 2);
if (err!= 2){
printk("mpu6050_write_reg fail!\r\n");
return -1;
}
return 0;
}
// reg:目标寄存器地址 buf:要写的数据 len:要写的信息的长度
static int mpu6050_write_reg(struct mpu6050_dev_struct *dev, u8 reg, u8 *buf, int len){
int err = 0;
struct i2c_client *client = (struct i2c_client*)dev->client;
struct i2c_msg msg;
u8 b[256];
b[0] = reg;
memcpy(&b[1], buf, len);
msg.addr = client->addr;// 从机地址(AP3216C)
msg.flags = 0; // 发送。flag详见1.4
msg.buf = b; // 发送内容:要读取的寄存器地址
msg.len = len + 1; // 要发送的数据长度(len) + 寄存器地址长度(1)
err = i2c_transfer(client->adapter, &msg, 1); // 这里要写成&msg!不是msg
if(err != 1){
printk("mpu6050_write_reg fail!\r\n");
dev_err(&dev->client->dev,
"i2c write bus=%d addr=0x%02x reg=0x%02x err=%d\n",
dev->client->adapter->nr, dev->client->addr, reg, err);
return -1;
}
return 0;
}
// MPU6050设备初始化
// 要和MPU6050驱动初始化mpu6050_init区分
static int mpu6050_device_init(struct mpu6050_dev_struct *dev){
int err = 0;
short val;
struct i2c_client *client = (struct i2c_client *)dev->client;
val = 0x00;
err += mpu6050_write_reg(dev, PWR_MGMT_1, &val,2); // 启动8MHz振荡器,关闭休眠,关闭睡眠和循环模式,不禁用温度计
val = 0x06;
err += mpu6050_write_reg(dev, CONFIG, &val,2); // 加速度/陀螺带宽为5Hz,陀螺输出率为1kHz;关闭FSYNC采样
val = 0x07;
err += mpu6050_write_reg(dev, SMPLRT_DIV, &val,2); // 全芯片采样率 = 陀螺仪输出速率 ÷ (该寄存器的值+1) = 1k ÷ 8 = 125Hz
val = 0x00;
err += mpu6050_write_reg(dev, ACCEL_CONFIG, &val,2); // 加速度计量程设为±2g,打开加速度计高通滤波
if (err < 0){
printk("mpu6050_device_init fail\n");
return -1;
}
printk("mpu6050_device_init finished!\r\n");
return 0;
}
// 操作集 ===================================================
static int mpu6050_open(struct inode *inode, struct file *filp){
printk("==mpu6050 open==\r\n");
filp->private_data = &mpu6050_dev;
if(mpu6050_device_init(&mpu6050_dev))return -EIO;
return 0;
}
static int mpu6050_release(){
printk("mpu6050_release\r\n");
return 0;
}
// 读取6轴信息,并发送给用户态
static ssize_t mpu6050_read(struct file *filp, char __user *buf, size_t cnt, loff_t *off){
char data_H;
char data_L;
int err;
short mpu6050_data[7]; //保存mpu6050的原始数据。 共6个16位数据
struct mpu6050_dev_struct *dev = (struct mpu6050_dev_struct*)filp->private_data;
struct i2c_client *client = (struct i2c_client*)dev->client;
u8 raw[14]; // 连续14个寄存器的原始字节:AxH,AxL, AyH,AyL, AzH,AzL, TempH,TempL, GxH,GxL, GyH,GyL, GzH,GzL
size_t to_copy;
int ret;
ret = mpu6050_read_reg(dev, ACCEL_XOUT_H, raw, sizeof(raw)); // 从ACCEL_XOUT_H开始连续读取14个字节
mpu6050_data[0] = (short)((u16)raw[0] << 8 | raw[1]); // Ax
mpu6050_data[1] = (short)((u16)raw[2] << 8 | raw[3]); // Ay
mpu6050_data[2] = (short)((u16)raw[4] << 8 | raw[5]); // Az
// 跳过中间的温度寄存器
mpu6050_data[3] = (short)((u16)raw[8] << 8 | raw[9]); // Gx
mpu6050_data[4] = (short)((u16)raw[10] << 8 | raw[11]); // Gy
mpu6050_data[5] = (short)((u16)raw[12] << 8 | raw[13]); // Gz
err = copy_to_user(buf, mpu6050_data, cnt); // 发送给用户态
if(err!=0){
printk("copy to user fail!");
return -1;
}
return 0;
}
static const struct file_operations mpu6050_fops = {
.owner = THIS_MODULE,
.open = mpu6050_open,
.release = mpu6050_release,
.read = mpu6050_read,
};
// 匹配表 ===================================================
static struct i2c_device_id mpu6050_id[] = {
{"alientek,mpu6050"},
{/*sentinel*/},
};
static struct of_device_id mpu6050_of_match[] = {
{.compatible = "alientek,mpu6050"},
{/*sentinel*/},
};
// 总线设备结构体 ===================================================
static int mpu6050_probe(struct i2c_client *client, const struct i2c_device_id *id){
printk(" == probe ==\r\n");
int ret = 0;
mpu6050_dev.major = 0; // 待系统分配
// 注册设备号
if(mpu6050_dev.major){ // 自定义设备号
mpu6050_dev.devid = MKDEV(mpu6050_dev.major,0);
ret = register_chrdev_region(mpu6050_dev.devid, MPU6050_CNT, MPU6050_NAME);
} else { // 系统分配设备号
ret = alloc_chrdev_region(&mpu6050_dev.devid, 0, MPU6050_CNT, MPU6050_NAME);
mpu6050_dev.major = MAJOR(mpu6050_dev.devid);
mpu6050_dev.minor = MINOR(mpu6050_dev.devid);
}
if(ret < 0){
printk("chrdev region fail!\r\n");
goto fail_devid;
}
printk("major = %d, minor = %d", mpu6050_dev.major, mpu6050_dev.minor);
// 注册字符设备 cdev
mpu6050_dev.cdev.owner = THIS_MODULE;
cdev_init(&mpu6050_dev.cdev, &mpu6050_fops);
ret = cdev_add(&mpu6050_dev.cdev, mpu6050_dev.devid, MPU6050_CNT);
if(ret < 0){
printk("cdev add fail!\r\n");
goto fail_cdev;
}
// 自动创建设备节点
mpu6050_dev.class = class_create(THIS_MODULE, MPU6050_NAME);
if(IS_ERR(mpu6050_dev.class)){
printk("class_create fail!\r\n");
ret = PTR_ERR(mpu6050_dev.class);
goto fail_class_create;
}
mpu6050_dev.device = device_create(mpu6050_dev.class,NULL,mpu6050_dev.devid, NULL, MPU6050_NAME);
if(IS_ERR(mpu6050_dev.device)){
printk("device create fail!\r\n");
ret = PTR_ERR(mpu6050_dev.device);
goto fail_device_create;
}
mpu6050_dev.client = client;
return 0;
fail_device_create:
class_destroy(mpu6050_dev.class);
fail_class_create:
cdev_del(&mpu6050_dev.cdev);
fail_cdev:
unregister_chrdev_region(mpu6050_dev.devid, MPU6050_CNT);
fail_devid:
return ret;
}
static int mpu6050_remove(struct i2c_client *client){
device_destroy(mpu6050_dev.class, mpu6050_dev.devid);
class_destroy(mpu6050_dev.class);
cdev_del(&mpu6050_dev.cdev);
unregister_chrdev_region(mpu6050_dev.devid, MPU6050_CNT);
return 0;
}
static struct i2c_driver mpu6050_driver = {
.probe = mpu6050_probe,
.remove = mpu6050_remove,
.driver = {
.owner = THIS_MODULE,
.name = "mpu6050",
.of_match_table = of_match_ptr(mpu6050_of_match),
},
.id_table = mpu6050_id,
};
// 驱动入口/出口 ===================================================
static int __init mpu6050_init(void){
i2c_add_driver(&mpu6050_driver);
return 0;
}
static void __exit mpu6050_exit(void){
i2c_del_driver(&mpu6050_driver);
}
module_init(mpu6050_init);
module_exit(mpu6050_exit);
MODULE_LICENSE("GPL");4.6 应用程序
cpp
#include<stdio.h>
#include<unistd.h>
#include<sys/types.h>
#include<sys/stat.h>
#include<sys/ioctl.h>
#include<fcntl.h>
#include<stdlib.h>
#include<string.h>
#include<linux/input.h>

#define LEDOFF 0
#define LEDON  1

/*
 * @description    : main主程序
 * @param - argc   : argv数组元素个数
 * @param - argv   : 具体参数
 * @return         : 0 成功; else失败
 * 调用  ./mpu6050APP /dev/mpu6050
 */

int main(int argc, char *argv[]){
    if(argc != 2){
        printf("Error Usage!\r\n");
        return -1;
    }
    int fd, err;
    char *filename;
    short data[6];

    filename = argv[1];

    fd = open(filename, O_RDWR);
    if(fd <0){
        printf("file %s open failed!\r\n",filename);
        return -1;
    }
    while(1){
        err = read(fd, data, sizeof(data));
        if(err == 0){
            printf("AX=%5d, AY=%5d, AZ=%5d ",(int)data[0],(int)data[1],(int)data[2]);
            printf("GX=%5d, GY=%5d, GZ=%5d\n",(int)data[3],(int)data[4],(int)data[5]);
        }
        usleep(100000); // 100ms
    }
    close(fd);
    return 0;
}
4.7 测试
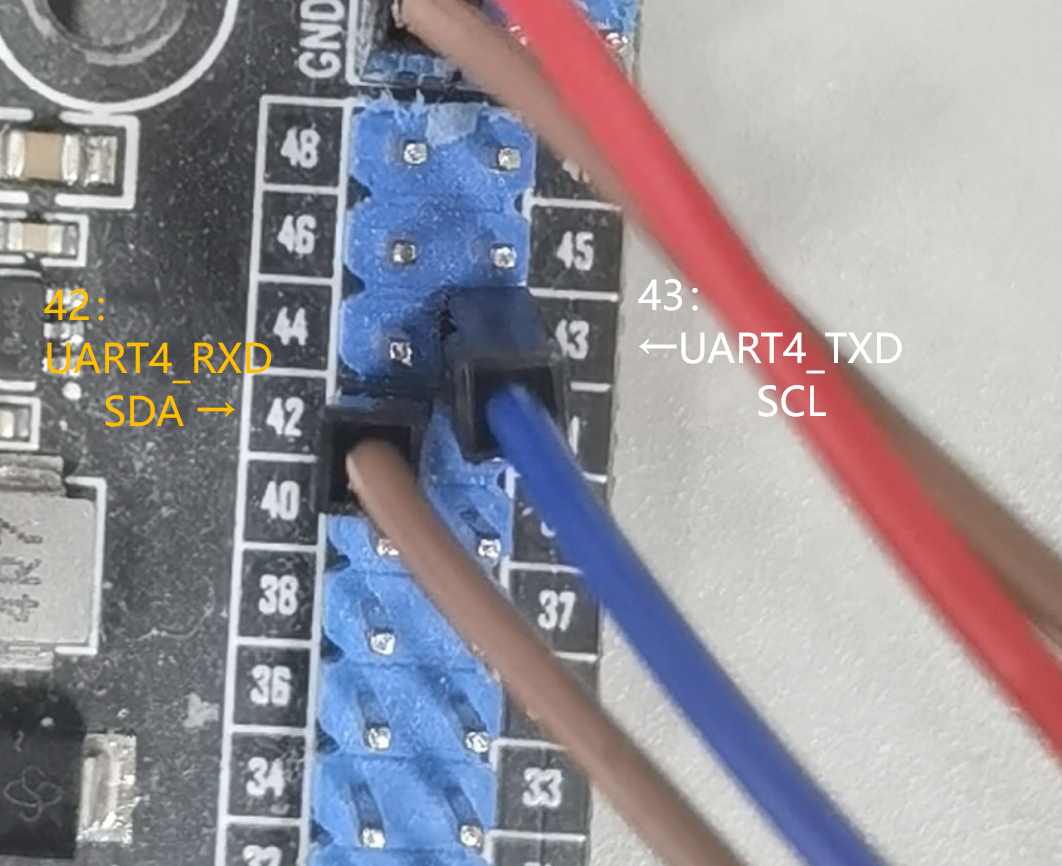
MPU6050只需要接四根线即可。我这里用的是imx6ull mini,MPU6050的SDA接42、SCL接43,再接上VCC和GND即可。AD0默认下拉,不用接。

bash
# VScode

# 设备树编译详见4.1.2,这里就不写了
make
arm-linux-gnueabihf-gcc mpu6050APP.c -o mpu6050APP
sudo cp mpu6050.ko mpu6050APP /home/for/linux/nfs/rootfs/lib/modules/4.1.15/

# 串口

cd /lib/modules/4.1.15/
depmod
modprobe mpu6050.ko
./mpu6050APP /dev/mpu6050
然后就能看到数据了,不过是原始数据
