前言:
本文是根据哔哩哔哩网站上"正点原子【第四期】手把手教你学Linux系列课程之 Linux驱动开发篇"视频的学习笔记,该课程配套开发板为正点原子alpha/mini Linux开发板。在这里会记录下正点原子 I.MX6ULL 开发板的配套视频教程所作的实验和学习笔记内容。本文大量引用了正点原子教学视频和链接中的内容。
引用:
正点原子IMX6U仓库 (GuangzhouXingyi) - Gitee.com
正点原子【第四期】手把手教你学 Linux之驱动开发篇_哔哩哔哩_bilibili
《【正点原子】I.MX6U嵌入式Linux驱动开发指南V1.5.2.pdf》
正点原子资料下载中心 --- 正点原子资料下载中心 1.0.0 文档
正点原子imx6ull-mini-Linux驱动之Linux I2C 驱动实验(21)-CSDN博客
uboot移植(4)--在NXP官方uboot适配ALPHA开发板网络_uboot sr8201f-CSDN博客

正文:
本文是 "正点原子【第四期】手把手教你学 Linux之驱动开发篇-1.1 Linux驱动开发与裸机开发的区别"。本节将参考正点原子的视频教程和配套的正点原子开发指南文档进行学习。
0. 概述
定时器是我们最常用到的功能,一般用来完成定时功能,本章我们就来学习一下 Linux内核提供的定时器 API函数,通过这些定时器 API函数我们可以完成很多要求定时的应用。 Linux内核也提了短延时函数,比如微秒、纳秒、毫秒延时函数,本章我们就来学习一下这些和时间有关的功能。
1 Linux时间管理和内核定时器简介
1.1 内核时间管理简介
学习过 UCOS或 FreeRTOS的同学应该知道, UCOS或 FreeRTOS是需要一个硬件定时器提供系统时钟,一般使用 Systick作为系统时钟源。同理, Linux要运行,也是需要一个系统时钟的,至于这个系统时钟是由哪个定时器提供的,笔者没有去研究过 Linux内核,但是在 Cortex-A7内核中个通用定时器,在《 Cortex-A7 Technical ReferenceManua.pdf》的" 9:Generic Timer章节有简单的讲解,关于这个通用定时器的详细内容,可以参考《 ARM ArchitectureReference Manual ARMv7A and ARMv7-R edition.pdf》的" chapter B8 The Generic Timer"章节。这个通用定时器是可选的,按照笔者学习 FreeRTOS和 STM32的经验,猜测 Linux会将这个通用定时器作为 Linux系统时钟源 (前提是 SOC得选配这个通用定时器 )。具体是怎么做的笔者没有深入研究过,这里仅仅是猜测!不过对于我们 Linux驱动编写者来说,不需要深入研究这些具体的实现,只需要掌握相应的 API函数即可,除非你是内核编写者或者内核爱好者。
Linux内核中有大量的函数需要时间管理,比如周期性的调度程序、延时程序、对于我们驱动编写者来说最常用的定时器。硬件定时器提供时钟源,时钟源的频率可以设置, 设置好以后就周期性的产生定时中断,系统使用定时中断来计时。中断周期性产生的频率就是系统频率,也叫做节拍率 (tick rate)(有的资料也叫系统频率 ),比如 1000Hz 100Hz等等说的就是系统节拍率。系统节拍率是可以设置的,单位是 Hz,我们在编译 Linux内核的时候可以通过图形化界面设置系统节拍率,按照如下路径打开配置界面:
-> Kernel Features
-> Timer frequency (<choice> =y)
选中" Timer frequency",打开以后如图 50.1.1.1所示:
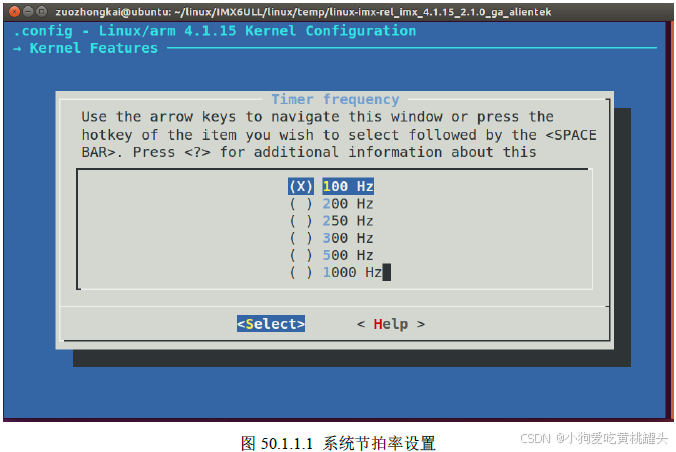
从图 50.1.1.1可以看出,可选的系统节拍率为 100Hz、 200Hz、 250Hz、 300Hz、 500Hz和1000Hz,默认情况下选择 100Hz。设置好以后打开 Linux内核源码根目录下的 .config文件,在此文件中有如图 50.1.1.2所示定义:
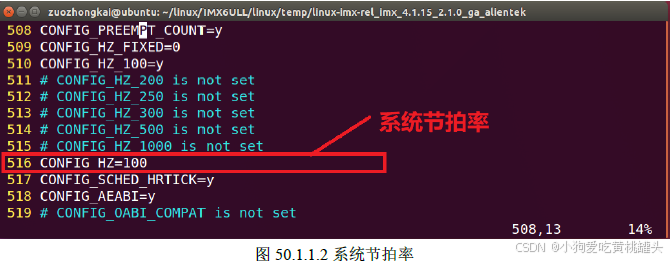
图 50.1.1.2中的 CONFIG_HZ为 100 Linux内核会使用 CONFIG_HZ来设置自己的系统时钟。打开文件 include/asm-generic/param.h,有如下内容
include/asm-generic/param.h
cpp
# undef HZ
# define HZ CONFIG_HZ
# define USER_HZ 100
# define CLOCKS_PER_SEC (USER_HZ)
第 7行定义了一个宏 HZ,宏 HZ就是 CONFIG_HZ,因此 HZ=100,我们后面编写 Linux驱动的候会常常用到 HZ,因为 HZ表示一秒的节拍数,也就是频率。
大多数初学者看到系统节拍率默认为100Hz的时候都会有疑问,怎么这么小? 100Hz是可选的节拍率里面最小的。为什么不选择大一点的呢?这里就引出了一个问题:高节拍率和低节拍率的优缺点:
①、高节拍率会提高系统时间精度,如果采用 100Hz的节拍率,时间精度就是 10ms,采用1000Hz的话时间精度就是 1ms,精度提高了 10倍。高精度时钟的好处有很多,对于那些对时间要求严格的函数来说,能够以更高的精度运行,时间测量也更加准确。
②、高节拍率会导致中断的产生更加频繁,频繁的中断会加剧系统的负担, 1000Hz和 100Hz的统节拍率相比,系统要花费 10倍的"精力"去处理中断。中断服务函数占用处理器的时间增加,但是现在的处理器性能都很强大,所以采用 1000Hz的系统节拍率并不会增加太大的负载压力。根据自己的实际情况,选择合适的系统节拍率,本教程我们全部采用默认的 100Hz系统节拍率。
Linux内核使用全局变量 jiffies来记 录系统从启动以来的系统节拍数,系统启动的时候会将 jiffies初始化为 0 jiffies定义在文件 include/linux/jiffies.h中,定义如下:
include/linux/jiffies.h
cpp
extern u64 __cacheline_aligned_in_smp jiffies_64;
extern unsigned long volatile __cacheline_aligned_in_smp __jiffy_arch_data jiffies;
第 76行,定义了一个 64位的 jiffies_64。
第 77行,定义了一个 unsigned long类型的 32位的 jiffies
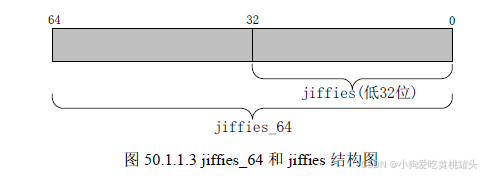
jiffies_64和 jiffies其实是同一个东西, jiffies_64用于 64位系统,而 jiffies用于 32位系统。为了兼容不同的硬件, jiffies其实就是 jiffies_64的低 32位, jiffies_64和 jiffies的结构如图50.1.1.3所示:
当我们访问jiffies 的时候其实访问的是jiffies_64 的低32 位,使用get_jiffies_64 这个函数可以获取jiffies_64 的值。在32 位的系统上读取jiffies 的值,在64 位的系统上jiffes 和jiffies_64表示同一个变量,因此也可以直接读取jiffies 的值。所以不管是32 位的系统还是64 位系统,都可以使用jiffies。
前面说了HZ 表示每秒的节拍数,jiffies 表示系统运行的jiffies 节拍数,所以jiffies/HZ 就是系统运行时间,单位为秒。不管是32 位还是64 位的jiffies,都有溢出的风险,溢出以后会重新从0 开始计数,相当于绕回来了,因此有些资料也将这个现象也叫做绕回。假如HZ 为最大值1000 的时候,32 位的jiffies 只需要49.7 天就发生了绕回,对于64 位的jiffies 来说大概需要5.8 亿年才能绕回,因此jiffies_64 的绕回忽略不计。处理32 位jiffies 的绕回显得尤为重要,Linux 内核提供了如表50.1.1.1 所示的几个API 函数来处理绕回。
|--------------------------------|--------------------------------------|
| 函数 | 描述 |
| timer_after(unknown, known) | unknown 通常为 jiffies 值,known通常是需要对比的值 |
| time_before(unknown, known) | |
| time_after_eq(unknown, known) | |
| time_before_eq(unknown, known) | |
如果unkown 超过known 的话,time_after 函数返回真,否则返回假。如果unkown 没有超过known 的话time_before 函数返回真,否则返回假。time_after_eq 函数和time_after 函数类似,只是多了判断等于这个条件。同理,time_before_eq 函数和time_before 函数也类似。比如我们要判断某段代码执行时间有没有超时,此时就可以使用如下所示代码:
cpp
unsigned long timeout;
timeout = jiffies + (2 * HZ);    //超时的时间点


/*
 * 具体的代码
 */

if(time_before(jiffies, timeout)) {
    /*超时未发生生*/
} else {
    /*超时发生*/
}
timeout 就是超时时间点,比如我们要判断代码执行时间是不是超过了2 秒,那么超时时间点就是jiffies+(2*HZ),如果jiffies 大于timeout 那就表示超时了,否则就是没有超时。第4~6 行就是具体的代码段。第 9行通过函数 time_before来判断 jiffies是否小于 timeout,如果小于的话就表示没有超时。
为了方便开发, Linux内核提供了几个 jiffies和 ms、 us、 ns之间的转换函数,如表 50.1.1.2示:
|---------------------------------------------|---------------------------------|
| 函数 | 描述 |
| int jiffies_to_msecs(const unsigned long j) | 把jiffies类型参数j分别转换为对应的us, ms, ns |
| int jiffies_to_usecs(const unsigned long j) | |
| int jiffies_to_nsecs(const unsigned long j) | |
| long msecs_to_jiffies(const unsigned int m) | 将毫秒、微秒、纳秒转换为 jiffies类型。 |
| long usecs_to_jiffies(const unsigned int u) | |
| long nsecs_to_jiffies(u64_t n) | |
1.2 内核定时器简介
定时器是一个很常用的功能,需要周期性处理的工作都要用到定时器。 Linux 内核定时器采用系统时钟来实现,并不是我们在裸机篇中讲解的 PIT 等硬件定时器。 Linux 内核定时器使用很简单,只需要提供超时时间(相当于定时值)和定时处理函数即可,当超时时间到了以后设置的定时处理函数就会执行,和我们使用硬件定时器的套路一样,只是使用内核定时器不需要做一大堆的寄存器初始化工作。在使用内核定时器的时候要注意一点,内核定时器并不是周期性运行的,超时以后就会自动关闭,因此如果想要实现周期性定时,那么就需要在定时处理函数中重新开启定时器。 Linux 内核使用 timer_list 结构体表示内核定时器, timer_list 定义在文件include/linux/timer.h 中,定义如下(省略掉条件编译):
include/linux/timer.h
cpp
struct timer_list {
	/*
	 * All fields that change during normal runtime grouped to the
	 * same cacheline
	 */
	struct list_head entry;
	unsigned long expires;
	struct tvec_base *base;

	void (*function)(unsigned long);
	unsigned long data;
}
要使用内核定时器首先要先定义一个 timer_list 变量,表示定时器, tiemr_list 结构体的expires 成员变量表示超时时间,单位为节拍数。比如我们现在需要定义一个周期为 2 秒的定时器,那么这个定时器的超时时间就是 jiffies+(2*HZ),因此 expires=jiffies+(2*HZ)。 function 就是定时器超时以后的定时处理函数,我们要做的工作就放到这个函数里面,需要我们编写这个定时处理函数。
定义好定时器以后还需要通过一系列的 API 函数来初始化此定时器,这些函数如下
1、 init_timer 函数
init_timer 函数负责初始化 timer_list 类型变量,当我们定义了一个 timer_list 变量以后一定要先用 init_timer 初始化一下。 init_timer 函数原型如下:
bash
void init_timer(struct timer_list *timer)函数参数和返回值含义如下:
timer:要初始化定时器。
返回值: 没有返回值。
2、 add_timer 函数
add_timer 函数用于向 Linux 内核注册定时器,使用 add_timer 函数向内核注册定时器以后,定时器就会开始运行,函数原型如下:
void add_timer(struct timer_list *timer)
函数参数和返回值含义如下:
timer:要注册的定时器。
返回值: 没有返回值。
3、 del_timer 函数
del_timer 函数用于删除一个定时器,不管定时器有没有被激活,都可以使用此函数删除。在多处理器系统上,定时器可能会在其他的处理器上运行,因此在调用 del_timer 函数删除定时器之前要先等待其他处理器的定时处理器函数退出。 del_timer 函数原型如下:
int del_timer(struct timer_list * timer)
函数参数和返回值含义如下:
timer:要删除的定时器。
返回值: 0,定时器还没被激活; 1,定时器已经激活
4、 del_timer_sync 函数
del_timer_sync 函数是 del_timer 函数的同步版,会等待其他处理器使用完定时器再删除,del_timer_sync 不能使用在中断上下文中。 del_timer_sync 函数原型如下所示:
int del_timer_sync(struct timer_list *timer)
函数参数和返回值含义如下:
timer:要删除的定时器。
返回值: 0,定时器还没被激活; 1,定时器已经激活
5、 mod_timer 函数
mod_timer 函数用于修改定时值,如果定时器还没有激活的话, mod_timer 函数会激活定时器!函数原型如下:
int mod_timer(struct timer_list *timer, unsigned long expires)
函数参数和返回值含义如下:
timer:要修改超时时间(定时值)的定时器。
expires:修改后的超时时间。
返回值: 0,调用 mod_timer 函数前定时器未被激活; 1,调用 mod_timer 函数前定时器已被激活。
关于内核定时器常用的 API 函数就讲这些,内核定时器一般的使用流程如下所示
cpp
struct timer_list timer;

void function(unsigned long arg)
{
    /*
     * 定时器处理代码
     */

   /* 如果需要定时器周期性运行的话就使用 mod_timer
    * 函数重新设置超时值并且启动定时器。
    */
    mod_timer(&dev->timertest, jiffies + msecs_to_jiffies(2000));
}

 /* 初始化函数 */
 void init(void)
 {
     init_timer(&timer); /* 初始化定时器 */

     timer.function = function; /* 设置定时处理函数 */
     timer.expires=jffies + msecs_to_jiffies(2000);/* 超时时间 2 秒 */
     timer.data = (unsigned long)&dev; /* 将设备结构体作为参数 */

     add_timer(&timer); /* 启动定时器 */
 }

 /* 退出函数 */
 void exit(void)
 {
     del_timer(&timer); /* 删除定时器 */
     /* 或者使用 */
     del_timer_sync(&timer);
 }
1.3 Linux 内核短延时函数
有时候我们需要在内核中实现短延时,尤其是在 Linux 驱动中。 Linux 内核提供了毫秒、微秒和纳秒延时函数,这三个函数如表 50.1.3.1 所示:

2 硬件原理图分析
本章使用通过设置一个定时器来实现周期性的闪烁 LED 灯,因此本章例程就使用到了一个LED 灯,关于 LED 灯的硬件原理图参考参考 8.3 小节即可。
3 实验程序编写
本章实验我们使用内核定时器周期性的点亮和熄灭开发板上的 LED 灯, LED 灯的闪烁周期由内核定时器来设置,测试应用程序可以控制内核定时器周期。
3.1 修改设备树文件
本章实验使用到了 LED 灯, LED 灯的设备树节点信息使用 45.4.1 小节创建的即可。
3.2 定时器驱动程序编写
新建名为"12_timer"的文件夹,然后在 12_timer 文件夹里面创建 vscode 工程,工作区命名为"timer"。工程创建好以后新建 timer.c 文件,在 timer.c 里面输入如下内容
cpp
#ifndef _LINUX_TIMER_H
#define _LINUX_TIMER_H

#include <linux/list.h>
#include <linux/ktime.h>
#include <linux/stddef.h>
#include <linux/debugobjects.h>
#include <linux/stringify.h>

struct tvec_base;

struct timer_list {
	/*
	 * All fields that change during normal runtime grouped to the
	 * same cacheline
	 */
	struct list_head entry;
	unsigned long expires;
	struct tvec_base *base;

	void (*function)(unsigned long);
	unsigned long data;

	int slack;

#ifdef CONFIG_TIMER_STATS
	int start_pid;
	void *start_site;
	char start_comm[16];
#endif
#ifdef CONFIG_LOCKDEP
	struct lockdep_map lockdep_map;
#endif
};

extern struct tvec_base boot_tvec_bases;

#ifdef CONFIG_LOCKDEP
/*
 * NB: because we have to copy the lockdep_map, setting the lockdep_map key
 * (second argument) here is required, otherwise it could be initialised to
 * the copy of the lockdep_map later! We use the pointer to and the string
 * "<file>:<line>" as the key resp. the name of the lockdep_map.
 */
#define __TIMER_LOCKDEP_MAP_INITIALIZER(_kn)				\
	.lockdep_map = STATIC_LOCKDEP_MAP_INIT(_kn, &_kn),
#else
#define __TIMER_LOCKDEP_MAP_INITIALIZER(_kn)
#endif

/*
 * Note that all tvec_bases are at least 4 byte aligned and lower two bits
 * of base in timer_list is guaranteed to be zero. Use them for flags.
 *
 * A deferrable timer will work normally when the system is busy, but
 * will not cause a CPU to come out of idle just to service it; instead,
 * the timer will be serviced when the CPU eventually wakes up with a
 * subsequent non-deferrable timer.
 *
 * An irqsafe timer is executed with IRQ disabled and it's safe to wait for
 * the completion of the running instance from IRQ handlers, for example,
 * by calling del_timer_sync().
 *
 * Note: The irq disabled callback execution is a special case for
 * workqueue locking issues. It's not meant for executing random crap
 * with interrupts disabled. Abuse is monitored!
 */
#define TIMER_DEFERRABLE		0x1LU
#define TIMER_IRQSAFE			0x2LU

#define TIMER_FLAG_MASK			0x3LU

#define __TIMER_INITIALIZER(_function, _expires, _data, _flags) { \
		.entry = { .prev = TIMER_ENTRY_STATIC },	\
		.function = (_function),			\
		.expires = (_expires),				\
		.data = (_data),				\
		.base = (void *)((unsigned long)&boot_tvec_bases + (_flags)), \
		.slack = -1,					\
		__TIMER_LOCKDEP_MAP_INITIALIZER(		\
			__FILE__ ":" __stringify(__LINE__))	\
	}

#define TIMER_INITIALIZER(_function, _expires, _data)		\
	__TIMER_INITIALIZER((_function), (_expires), (_data), 0)

#define TIMER_DEFERRED_INITIALIZER(_function, _expires, _data)	\
	__TIMER_INITIALIZER((_function), (_expires), (_data), TIMER_DEFERRABLE)

#define DEFINE_TIMER(_name, _function, _expires, _data)		\
	struct timer_list _name =				\
		TIMER_INITIALIZER(_function, _expires, _data)

void init_timer_key(struct timer_list *timer, unsigned int flags,
		    const char *name, struct lock_class_key *key);

#ifdef CONFIG_DEBUG_OBJECTS_TIMERS
extern void init_timer_on_stack_key(struct timer_list *timer,
				    unsigned int flags, const char *name,
				    struct lock_class_key *key);
extern void destroy_timer_on_stack(struct timer_list *timer);
#else
static inline void destroy_timer_on_stack(struct timer_list *timer) { }
static inline void init_timer_on_stack_key(struct timer_list *timer,
					   unsigned int flags, const char *name,
					   struct lock_class_key *key)
{
	init_timer_key(timer, flags, name, key);
}
#endif

#ifdef CONFIG_LOCKDEP
#define __init_timer(_timer, _flags)					\
	do {								\
		static struct lock_class_key __key;			\
		init_timer_key((_timer), (_flags), #_timer, &__key);	\
	} while (0)

#define __init_timer_on_stack(_timer, _flags)				\
	do {								\
		static struct lock_class_key __key;			\
		init_timer_on_stack_key((_timer), (_flags), #_timer, &__key); \
	} while (0)
#else
#define __init_timer(_timer, _flags)					\
	init_timer_key((_timer), (_flags), NULL, NULL)
#define __init_timer_on_stack(_timer, _flags)				\
	init_timer_on_stack_key((_timer), (_flags), NULL, NULL)
#endif

#define init_timer(timer)						\
	__init_timer((timer), 0)
#define init_timer_deferrable(timer)					\
	__init_timer((timer), TIMER_DEFERRABLE)
#define init_timer_on_stack(timer)					\
	__init_timer_on_stack((timer), 0)

#define __setup_timer(_timer, _fn, _data, _flags)			\
	do {								\
		__init_timer((_timer), (_flags));			\
		(_timer)->function = (_fn);				\
		(_timer)->data = (_data);				\
	} while (0)

#define __setup_timer_on_stack(_timer, _fn, _data, _flags)		\
	do {								\
		__init_timer_on_stack((_timer), (_flags));		\
		(_timer)->function = (_fn);				\
		(_timer)->data = (_data);				\
	} while (0)

#define setup_timer(timer, fn, data)					\
	__setup_timer((timer), (fn), (data), 0)
#define setup_timer_on_stack(timer, fn, data)				\
	__setup_timer_on_stack((timer), (fn), (data), 0)
#define setup_deferrable_timer_on_stack(timer, fn, data)		\
	__setup_timer_on_stack((timer), (fn), (data), TIMER_DEFERRABLE)

/**
 * timer_pending - is a timer pending?
 * @timer: the timer in question
 *
 * timer_pending will tell whether a given timer is currently pending,
 * or not. Callers must ensure serialization wrt. other operations done
 * to this timer, eg. interrupt contexts, or other CPUs on SMP.
 *
 * return value: 1 if the timer is pending, 0 if not.
 */
static inline int timer_pending(const struct timer_list * timer)
{
	return timer->entry.next != NULL;
}

extern void add_timer_on(struct timer_list *timer, int cpu);
extern int del_timer(struct timer_list * timer);
extern int mod_timer(struct timer_list *timer, unsigned long expires);
extern int mod_timer_pending(struct timer_list *timer, unsigned long expires);
extern int mod_timer_pinned(struct timer_list *timer, unsigned long expires);

extern void set_timer_slack(struct timer_list *time, int slack_hz);

#define TIMER_NOT_PINNED	0
#define TIMER_PINNED		1
/*
 * The jiffies value which is added to now, when there is no timer
 * in the timer wheel:
 */
#define NEXT_TIMER_MAX_DELTA	((1UL << 30) - 1)

/*
 * Return when the next timer-wheel timeout occurs (in absolute jiffies),
 * locks the timer base and does the comparison against the given
 * jiffie.
 */
extern unsigned long get_next_timer_interrupt(unsigned long now);

/*
 * Timer-statistics info:
 */
#ifdef CONFIG_TIMER_STATS

extern int timer_stats_active;

#define TIMER_STATS_FLAG_DEFERRABLE	0x1

extern void init_timer_stats(void);

extern void timer_stats_update_stats(void *timer, pid_t pid, void *startf,
				     void *timerf, char *comm,
				     unsigned int timer_flag);

extern void __timer_stats_timer_set_start_info(struct timer_list *timer,
					       void *addr);

static inline void timer_stats_timer_set_start_info(struct timer_list *timer)
{
	if (likely(!timer_stats_active))
		return;
	__timer_stats_timer_set_start_info(timer, __builtin_return_address(0));
}

static inline void timer_stats_timer_clear_start_info(struct timer_list *timer)
{
	timer->start_site = NULL;
}
#else
static inline void init_timer_stats(void)
{
}

static inline void timer_stats_timer_set_start_info(struct timer_list *timer)
{
}

static inline void timer_stats_timer_clear_start_info(struct timer_list *timer)
{
}
#endif

extern void add_timer(struct timer_list *timer);

extern int try_to_del_timer_sync(struct timer_list *timer);

#ifdef CONFIG_SMP
  extern int del_timer_sync(struct timer_list *timer);
#else
# define del_timer_sync(t)		del_timer(t)
#endif

#define del_singleshot_timer_sync(t) del_timer_sync(t)

extern void init_timers(void);
extern void run_local_timers(void);
struct hrtimer;
extern enum hrtimer_restart it_real_fn(struct hrtimer *);

unsigned long __round_jiffies(unsigned long j, int cpu);
unsigned long __round_jiffies_relative(unsigned long j, int cpu);
unsigned long round_jiffies(unsigned long j);
unsigned long round_jiffies_relative(unsigned long j);

unsigned long __round_jiffies_up(unsigned long j, int cpu);
unsigned long __round_jiffies_up_relative(unsigned long j, int cpu);
unsigned long round_jiffies_up(unsigned long j);
unsigned long round_jiffies_up_relative(unsigned long j);

#endif
第 38~50 行,定时器设备结构体,在 48 行定义了一个定时器成员变量 timer。
第 60~82 行, LED 灯初始化函数,从设备树中获取 LED 灯信息,然后初始化相应的 IO。
第 91~102 行,函数 timer_open,对应应用程序的 open 函数,应用程序调用 open 函数打开/dev/timer 驱动文件的时候此函数就会执行。此函数设置文件私有数据为 timerdev,并且初始化定时周期默认为 1 秒,最后调用 led_init 函数初始化 LED 所使用的 IO。
第 111~137 行,函数 timer_unlocked_ioctl,对应应用程序的 ioctl 函数,应用程序调用 ioctl函数向驱动发送控制信息,此函数响应并执行。此函数有三个参数: filp, cmd 和 arg,其中 filp是对应的设备文件, cmd 是应用程序发送过来的命令信息, arg 是应用程序发送过来的参数,在本章例程中 arg 参数表示定时周期。
一共有三种命令 CLOSE_CMD, OPEN_CMD 和 SETPERIOD_CMD,这三个命令分别为关闭定时器、打开定时器、设置定时周期。这三个命令的左右如下:
CLOSE_CMD: 关闭定时器命令, 调用 del_timer_sync 函数关闭定时器。
OPEN_CMD:打开定时器命令,调用 mod_timer 函数打开定时器,定时周期为 timerdev 的timeperiod 成员变量,定时周期默认是 1 秒。
SETPERIOD_CMD:设置定时器周期命令,参数 arg 就是新的定时周期,设置 timerdev 的timeperiod 成员变量为 arg 所表示定时周期指。并且使用 mod_timer 重新打开定时器,使定时器以新的周期运行。
第 140~144 行,定时器驱动操作函数集 timer_fops。
第 147~162 行,函数 timer_function,定时器服务函数,此函有一个参数 arg,在本例程中arg 参数就是 timerdev 的地址,这样通过 arg 参数就可以访问到设备结构体。当定时周期到了后此函数就会被调用。在此函数中将 LED 灯的状态取反,实现 LED 灯闪烁的效果。因为内核
定时器不是循环的定时器,执行一次以后就结束了,因此在 161 行又调用了 mod_timer 函数重新开启定时器。
第 169~209 行,函数 timer_init,驱动入口函数。在第 205~207 行初始化定时器,设置定时器的定时处理函数为 timer_function,另外设置要传递给 timer_function 函数的参数为 timerdev的地址。在此函数中并没有调用 timer_add 函数来开启定时器,因此定时器默认是关闭的,除非应用程序发送打开命令。
第 216~231 行,驱动出口函数,在 219 行关闭 LED,也就是卸载驱动以后 LED 处于熄灭状态。第 220 行调用 del_timer_sync 函数删除定时器,也可以使用 del_timer 函数。
3.3 编写测试 APP
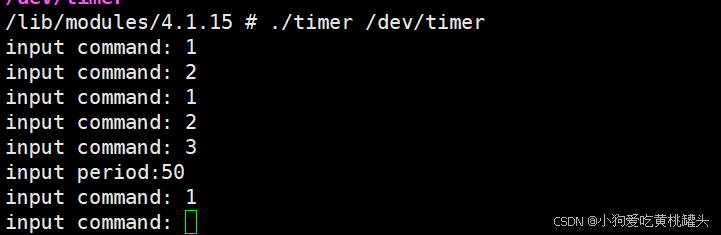
测试 APP 我们要实现的内容如下:
①、运行 APP 以后提示我们输入要测试的命令,输入 1 表示关闭定时器、输入 2 表示打开定时器,输入 3 设置定时器周期。
②、如果要设置定时器周期的话,需要让用户输入要设置的周期值,单位为毫秒。新建名为 timerApp.c 的文件,然后输入如下所示内容:
cpp
#include <stdio.h>
#include <string.h>
#include <sys/types.h>
#include <sys/stat.h>
#include <fcntl.h>
#include <unistd.h>
#include <sys/ioctl.h>


#define IO_START_TIMER  _IO(0xF0, 1)
#define IO_STOP_TIMER   _IO(0xF0, 2)
#define IO_MODD_TIMER   _IOR(0xF0, 3, long)

/*
 * ./keyApp <filename>
 * ./keyApp /dev/key 0
 */
int main(int argc, char *argv[])
{
    int ret = 0;
    int fd = -1;
    char *filename = NULL;
    char read_data[100];
    char write_data[100];


    if(argc < 2) {
        printf("usage:  %s <dev> <opt>\r\n", argv[0]);
        return -1;
    }

    filename = argv[1];
    fd = open(filename, O_RDWR);
    if(fd < 0) {
        printf("open %s fail\r\n");
        return -1;
    }


    int value = 0;
    while(1) {
      printf("input command: ");
      scanf("%d", &value);
      while(getchar() != '\n');

      if(value == 1) {
        ioctl(fd, IO_START_TIMER, NULL);
      }
      else if ( value == 2) {
        ioctl(fd, IO_STOP_TIMER, NULL);
      }
      else if (value == 3) {
        int period = 0;
        printf("input period:");
        scanf("%d", &period);
        while(getchar() != '\n');
        ioctl(fd, IO_MODD_TIMER, period);
      }

    }


    close(fd);
    return 0;
}
4 运行测试
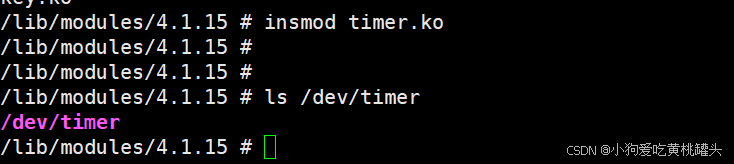
4.1 编译驱动程序和测试 APP
1、编译驱动程序
编写 Makefile 文件,本章实验的 Makefile 文件和第四十章实验基本一样,只是将 obj-m 变量的值改为 timer.o, Makefile 内容如下所示:
4.2 运行测试