ETCD------confd配置管理
文章目录
一、confd简介
1.1、什么是confid
- Confd是一个轻量级的配置管理工具。通过查询后端存储,集合配置模板引擎,保持本地配置最新,同时具备定期探测机制,配置变更自动reload。对应的后端存储可以是etcd、redis、zookeeper等。
1.2、confd用途
- 随着上线的服务越来越多,配置文件和配置项越来越复杂,管理和变更维护配置文件逐渐成为一件麻烦的事情。在这时候,就需要一套集中化的配置文件管理系统。一方面实现配置文件的统一管理,版本回溯,另一方面提供配置文件的自动下发,以及动态加载重启服务。而confd+etcd就是为了解决上述问题提出的一中解决思路。
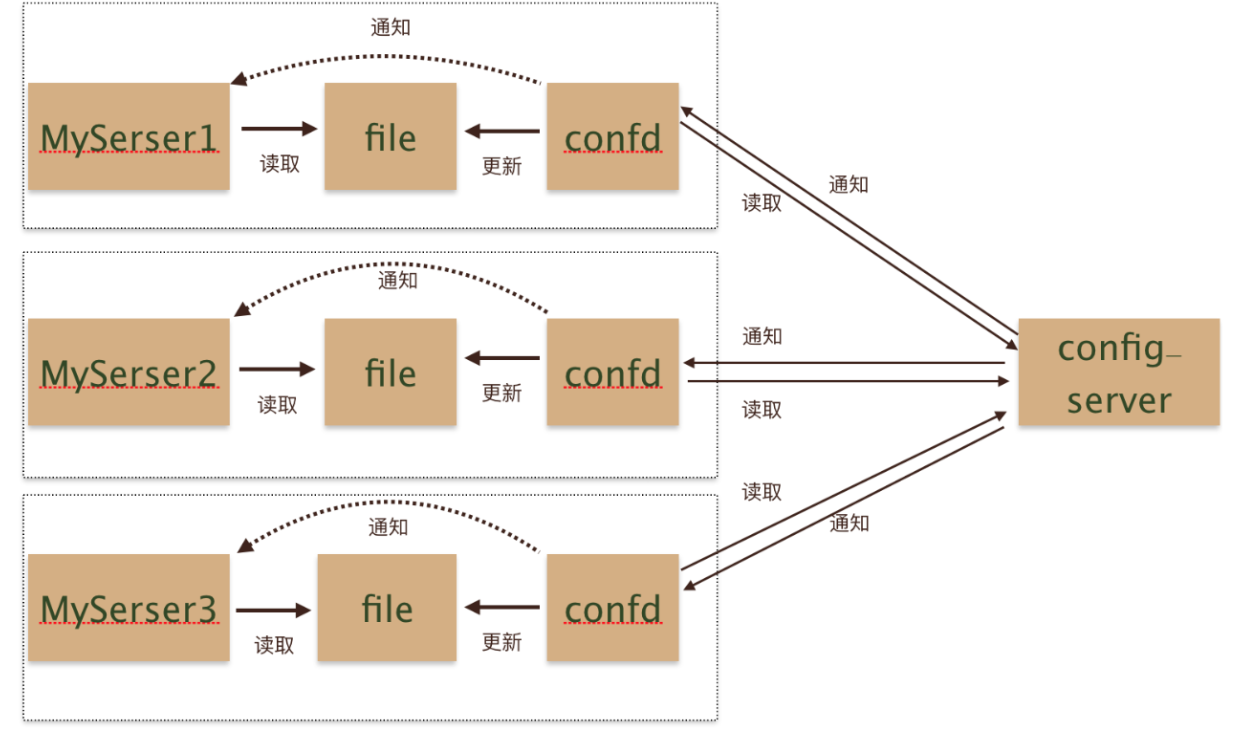
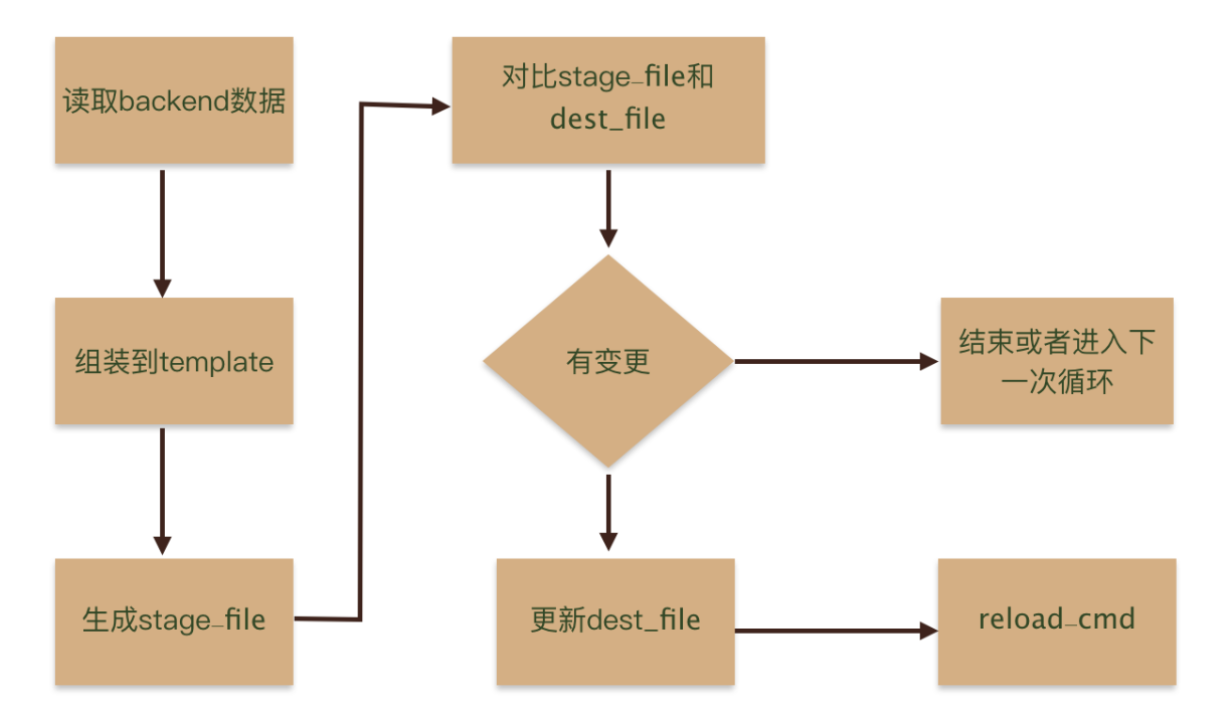
1.3、confd工作原理
1.4、使用confd
- confd配置文件默认在/etc/confd中,可以通过参数-confdir指定。目录中包含两个子目录,分别:conf.d、templates。
- confd会先读取conf.d目录中的配置文件(toml格式),然后根据文件指定的模板路径去渲染模板,再指定<reload_cmd>
- 接下来以Nginx配置为例,通过监听etcd存储变化,动态的修改Nginx主要
- 此次实验,只需要部署一套可用的etcd即可,单节点或者集群都可以
1.5、安装confd
bash
[root@etcd1 ~]# wget https://github.com/kelseyhightower/confd/releases/download/v0.16.0/confd-0.16.0-linux-amd64
[root@etcd1 ~]# mv confd-0.16.0-linux-amd64 /usr/local/bin/confd
[root@etcd1 ~]# chmod +x /usr/local/bin/confd
[root@etcd1 ~]# confd -version
confd 0.16.0 (Git SHA: 7217b0ca, Go Version: go1.10.2)
1.6、创建nginx资源文件
bash
[root@etcd1 ~]# yum -y install nginx
[root@etcd1 ~]# systemctl start nginx
[root@etcd1 ~]# cd /usr/share/nginx/
[root@etcd1 nginx]# tree .
.
├── html
│   ├── 404.html
│   ├── 50x.html
│   ├── index.html
│   └── nginx-logo.png
└── modules
    ├── mod-http-image-filter.conf
    ├── mod-http-perl.conf
    ├── mod-http-xslt-filter.conf
    ├── mod-mail.conf
    └── mod-stream.conf

2 directories, 9 files

[root@etcd1 nginx]# mkdir {v1,v2}
[root@etcd1 nginx]# cat v1/index.html
<h1>V1</h1>
[root@etcd1 nginx]# cat v2/index.html
<h1>V2</h1>
1.7、创建配置目录
bash
[root@etcd1 ~]# mkdir -p /etc/confd/{conf.d,templates}- confd目录主要使用两个核心的目录
- conf.d:主要包含配置的生成逻辑,例如模板,后端存储对应的keys,命令执行等。
- templates:配置模板template,基于不同组件的配置,修改为符合 Glang text templates的模板文件。
1.8、创建模板文件
- Template定义了单一应用配置的模板,默认存储在/etc/confd/templates目录下,模板文件和Go的text/template格式。
- 模板文件常用函数有base、get、gets、lsdir、json等
- 此处的逻辑是使用root_dir变量,动态更新nginx的root文件目录,如果root_dir这个不存key不存,则默认值为/usr/share/nginx/html。
bash
[root@etcd1 ~]# cd /etc/confd/templates/
[root@etcd1 templates]# cat nginx.tmpl
server {
        listen       80;
        server_name  ~^.*$;
        location / {
            root  {{getv "/root_dir" "/usr/share/nginx/html"}};
            index  index.html index.htm;
        }
    }
1.9、创建配置文件
- 默认源配置文件时TOML格式的文件,主要包含配置的生成逻辑,例如模板源,后端存储对应的keys,命令执行等。默认目录在/etc/confd/conf.d。
- 必须参数
- dest:目标文件(字符串类型)
- keys:键数组(字符串数组)
- src:配置模板的相对路径(字符串)
- 可选参数
- gid:拥有该文件的gid。默认为有效gid(整数)
- mode:文件的权限模式(字符串)
- uid:拥有该文件的uid。默认为有效uid(整数)
- reload_cmd:重新加载配置的命令(字符串)
- check_cmd:检查配置的命令(字符串)
- prefix:键前缀的字符串(字符串)
- 必须参数
bash
[root@etcd1 ~]# cat /etc/confd/conf.d/myapp-nginx.toml
[template]
prefix = "/nginx" # 指定字符串前缀,便于区分不同confd项目
src = "nginx.tmpl" #配置模板相对路径
dest = "/etc/nginx/conf.d/myapp.conf" # 目标路径
mode = "0644" # 文件权限
keys = [
  "/root_dir"
] # 键数组,与模板使用的键对应
check_cmd = "/usr/sbin/nginx -t" # 配置检查命令
reload_cmd = "/usr/sbin/nginx -s reload" # 重新加载配置命令
1.10、初始化etcd中的数据
- 现在etcd中创建一个名为/nginx/root_dir的键,值为/usr/share/nginx/v1。需要注意的是如果在配置文件中指定前缀,那么在创建键时键名为前缀+keys。
bash
[root@etcd1 ~]# etcdctl put /nginx/root_dir '/usr/share/nginx/v1'
OK
1.11、启动confd的服务
-
confd支持义daemon或者onetime两种模式运行
- onetime模式:只会生成一次配置文件,之后key无论是否变化都不会再生成,一般很少使用这种模式。
bash[root@etcd1 ~]# confd -onetime -backend etcd -node http://127.0.0.1:2379- daemon模式:confd会监听后端存储的配置变化,根据配置模板动态生成目标配置文件
bash[root@etcd1 ~]# confd -watch -backend etcdv3 -node http://192.168.93.101:2379 2025-11-04T16:57:18+08:00 etcd1 confd[3219]: INFO Backend set to etcdv3 2025-11-04T16:57:18+08:00 etcd1 confd[3219]: INFO Starting confd 2025-11-04T16:57:18+08:00 etcd1 confd[3219]: INFO Backend source(s) set to http://192.168.93.101:2379 2025-11-04T16:57:18+08:00 etcd1 confd[3219]: INFO Target config /etc/nginx/conf.d/myapp.conf out of sync 2025-11-04T16:57:18+08:00 etcd1 confd[3219]: INFO Target config /etc/nginx/conf.d/myapp.conf has been updated- 由日志可知,已经成功根据模板文件和etcd的key生成了配置文件
1.12、访问验证
- 查看生成的nginx配置文件
bash[root@etcd1 ~]# cat /etc/nginx/conf.d/myapp.conf server { listen 80; server_name ~^.*$; location / { root /usr/share/nginx/v1; index index.html index.htm; } }- 访问nginx服务,查看页面
bash[root@etcd1 ~]# curl http://127.0.0.1 <h1>V1</h1>- ok,v1版本的nginx服务访问正常,接下来我们更新/nginx/root_dir,模拟版本更新操作
bash[root@etcd1 ~]# etcdctl put /nginx/root_dir '/usr/share/nginx/v2' OK- 观察confd日志,有检测到了etcd的键值变化,并触发了自动更新操作
bash2025-11-04T17:00:27+08:00 etcd1 confd[3219]: INFO Target config /etc/nginx/conf.d/myapp.conf out of sync 2025-11-04T17:00:27+08:00 etcd1 confd[3219]: INFO Target config /etc/nginx/conf.d/myapp.conf has been updated- 查看新生成的nginx配置文件,并访问验证
bash[root@etcd1 ~]# cat /etc/nginx/conf.d/myapp.conf server { listen 80; server_name ~^.*$; location / { root /usr/share/nginx/v2; index index.html index.htm; } } [root@etcd1 ~]# curl http://127.0.0.1 <h1>V2</h1>- 由此可见,confd实时监听/nginx/root_dir这个key的值变化,当key的值更新时,自动渲染模板文件,生成了新的nginx配置,并自动指定了nginx -t和nginx -s reload操作。