TensorFlow深度学习实战(43)------TensorFlow.js
0. 前言
在本节中,将介绍 TensorFlow.js,TensorFlow.js 是可以在 JavaScript 中原生使用的 TensorFlow 库。
1. TensorFlow.js 简介
TensorFlow.js 是一个开源的 JavaScript 库,允许开发者在浏览器和 Node.js 环境中使用机器学习模型进行训练和推理。它是由 Google 维护的 TensorFlow 的 JavaScript 版本,旨在使前端开发者能够在 Web 浏览器中直接进行机器学习操作,而无需依赖后端服务器。TensorFlow.js 既支持已有的机器学习模型,也允许开发者创建、训练和部署新的模型。TensorFlow.js 可以在原生模式或通过 Node.js 使用,接下来,我们将介绍这两种模式。
2. 原生模型
TensorFlow.js 是一个用于在浏览器中训练和使用机器学习模型的 JavaScript 库。它源于 deeplearn.js,这是一个用于在 JavaScript 中进行深度学习的开源硬件加速库,现在成为 TensorFlow 的一个配套库。
最常见的 TensorFlow.js 用法是将预训练的机器学习/深度学习模型部署到浏览器中,这对于那些由于网络带宽或安全问题可能无法将客户端数据发送回服务器的情况非常有帮助。然而,TensorFlow.js 是一个完整的机器学习平台,除了在浏览器中使用预训练模型,还可以从头开始构建和训练机器学习/深度学习模型,甚至可以使用新的客户端数据对已有的预训练模型进行微调。
TensorFlow.js 应用的一个示例是TensorFlow Projector,它允许客户端使用提供的多种降维算法将自己的数据(作为词向量)在三维空间中可视化。TensorFlow.js 演示页面上列出了多个 TensorFlow.js 应用的示例。
类似于 TensorFlow,TensorFlow.js 也提供了两个主要的 API ------ Ops API 和 Layers API。Ops API 提供了低级张量操作,如矩阵乘法,Layers API 则提供了类似 Keras 的高级神经网络构建模块。
TensorFlow.js 能够在三个不同的后端上运行。最快(也是最复杂)的后端是 WebGL 后端,它提供对 WebGL 的低级 3D 图形 API 的访问,并可以利用 GPU 硬件加速。另一个流行的后端是 Node.js 后端,它允许在服务器端应用中使用 TensorFlow.js。最后,还有基于 CPU 的纯 JavaScript 实现,可以在任意浏览器中运行。
为了更好地理解如何编写 TensorFlow.js 应用,我们将演示如何使用 TensorFlow.js 提供的卷积神经网络对 MNIST 手写数字进行分类。步骤类似于普通的监督学习模型开发流程,加载数据、定义模型、训练模型并进行评估。
JavaScript 代码运行在浏览器环境中的 HTML 页面内。HTML 文件 index.html 表示 HTML 页面,文件导入了 TensorFlow.js (tf.min.js) 和 TensorFlow.js 可视化库 (tfjs-vis.umd.min.js),提供了在应用中将使用的库函数。应用的 JavaScript 代码来自 data.js 和 script.js 文件,这两个文件位于与 index.html 文件相同的目录下:
html
<!DOCTYPE html>
<html>
  <head>
      <meta charset="utf-8">
      <meta http-equiv="X-UA-Compatible" content="IE=edge">
      <meta name="viewport" content="width=device-width, initial-scale=1.0">
      <title>TensorFlow.js MNIST Example</title>

      <!-- Import TensorFlow.js -->
      <script src="https://cdn.jsdelivr.net/npm/@tensorflow/tfjs/dist/tf.min.js"> </script>
      <!-- Import tfjs-vis -->
      <script src="https://cdn.jsdelivr.net/npm/@tensorflow/tfjs-vis/dist/tfjs-vis.umd.min.js"></script>

      <!-- Import the data file -->
      <script src="data.js" type="module"></script>

      <!-- Import the main script file -->
      <script src="script.js" type="module"></script>
  </head>
<body>
</body>
</html>
将文件 index.html、data.js 和 script.js 部署到一个 Web 服务器上,但在开发阶段,我们可以通过调用 Python 自带的一个简单 Web 服务器来启动。这个服务器会在本地的 8000 端口启动,并且可以通过浏览器访问 http://localhost:8000 来渲染 index.html 文件:
shell
$ python -m http.server接下来,加载数据。Google 提供了一个 JavaScript 脚本,我们直接从 index.html 文件中调用它,从 GCP 存储中下载图像和标签,并返回经过打乱和归一化的图像与标签配对批数据,用于训练和测试。我们可以使用以下命令将其下载到与 index.html 文件相同的文件夹中:
shell
$ wget -cO - https://storage.googleapis.com/tfjs-tutorials/mnist_data.js > data.js对于 Windows 用户,首先需要下载并安装wget。
模型定义、训练和评估的代码都在 script.js 文件中定义。定义和构建网络的函数如下所示,与使用 tf.keras 构建顺序模型的方法非常相似。唯一的不同是指定参数的方式,使用名称-值对的字典而不是参数列表。该模型是一个顺序模型,即一系列网络层。最后,模型使用 Adam 优化器进行编译:
js
function getModel() {
  const model = tf.sequential();

  const IMAGE_WIDTH = 28;
  const IMAGE_HEIGHT = 28;
  const IMAGE_CHANNELS = 1;

  // In the first layer of our convolutional neural network we have
  // to specify the input shape. Then we specify some parameters for
  // the convolution operation that takes place in this layer.
  model.add(tf.layers.conv2d({
    inputShape: [IMAGE_WIDTH, IMAGE_HEIGHT, IMAGE_CHANNELS],
    kernelSize: 5,
    filters: 8,
    strides: 1,
    activation: 'relu',
    kernelInitializer: 'varianceScaling'
  }));

  // The MaxPooling layer acts as a sort of downsampling using max values
  // in a region instead of averaging.
  model.add(tf.layers.maxPooling2d({poolSize: [2, 2], strides: [2, 2]}));

  // Repeat another conv2d + maxPooling stack.
  // Note that we have more filters in the convolution.
  model.add(tf.layers.conv2d({
    kernelSize: 5,
    filters: 16,
    strides: 1,
    activation: 'relu',
    kernelInitializer: 'varianceScaling'
  }));
  model.add(tf.layers.maxPooling2d({poolSize: [2, 2], strides: [2, 2]}));

  // Now we flatten the output from the 2D filters into a 1D vector to prepare
  // it for input into our last layer. This is common practice when feeding
  // higher dimensional data to a final classification output layer.
  model.add(tf.layers.flatten());

  // Our last layer is a dense layer which has 10 output units, one for each
  // output class (i.e. 0, 1, 2, 3, 4, 5, 6, 7, 8, 9).
  const NUM_OUTPUT_CLASSES = 10;
  model.add(tf.layers.dense({
    units: NUM_OUTPUT_CLASSES,
    kernelInitializer: 'varianceScaling',
    activation: 'softmax'
  }));


  // Choose an optimizer, loss function and accuracy metric,
  // then compile and return the model
  const optimizer = tf.train.adam();
  model.compile({
    optimizer: optimizer,
    loss: 'categoricalCrossentropy',
    metrics: ['accuracy'],
  });

  return model;
}
然后,模型用训练数据集的批数据上训练 10 个 epoch,并使用测试数据集的批数据进行在线验证,最佳实践是从训练集创建一个单独的验证数据集。然而,为了更专注于展示如何使用 TensorFlow.js 设计一个端到端的深度学习管道,使用 Google 提供的外部 data.js 文件,该文件提供了返回训练和测试批数据的函数。在本节中,使用测试数据集进行验证,并在之后进行评估。
这可能会得到比使用未见过(在训练期间)的测试集更好的准确率,但对于示例而言,这并不重要:
js
async function train(model, data) {
  const metrics = ['loss', 'val_loss', 'acc', 'val_acc'];
  const container = {
    name: 'Model Training', tab: 'Model', styles: { height: '1000px' }
  };
  const fitCallbacks = tfvis.show.fitCallbacks(container, metrics);

  const BATCH_SIZE = 512;
  const TRAIN_DATA_SIZE = 5500;
  const TEST_DATA_SIZE = 1000;

  const [trainXs, trainYs] = tf.tidy(() => {
    const d = data.nextTrainBatch(TRAIN_DATA_SIZE);
    return [
      d.xs.reshape([TRAIN_DATA_SIZE, 28, 28, 1]),
      d.labels
    ];
  });

  const [testXs, testYs] = tf.tidy(() => {
    const d = data.nextTestBatch(TEST_DATA_SIZE);
    return [
      d.xs.reshape([TEST_DATA_SIZE, 28, 28, 1]),
      d.labels
    ];
  });

  return model.fit(trainXs, trainYs, {
    batchSize: BATCH_SIZE,
    validationData: [testXs, testYs],
    epochs: 10,
    shuffle: true,
    callbacks: fitCallbacks
  });
}
一旦模型完成训练,使用模型进行预测并评估模型的预测结果。函数 doPrediction() 进行预测,并计算所有测试集样本中每个类别的准确率,同时生成整个测试集样本的混淆矩阵:
js
const classNames = ['Zero', 'One', 'Two', 'Three', 'Four', 'Five', 'Six', 'Seven', 'Eight', 'Nine'];

function doPrediction(model, data, testDataSize = 500) {
  const IMAGE_WIDTH = 28;
  const IMAGE_HEIGHT = 28;
  const testData = data.nextTestBatch(testDataSize);
  const testxs = testData.xs.reshape([testDataSize, IMAGE_WIDTH, IMAGE_HEIGHT, 1]);
  const labels = testData.labels.argMax(-1);
  const preds = model.predict(testxs).argMax(-1);

  testxs.dispose();
  return [preds, labels];
}


async function showAccuracy(model, data) {
  const [preds, labels] = doPrediction(model, data);
  const classAccuracy = await tfvis.metrics.perClassAccuracy(labels, preds);
  const container = {name: 'Accuracy', tab: 'Evaluation'};
  tfvis.show.perClassAccuracy(container, classAccuracy, classNames);

  labels.dispose();
}

async function showConfusion(model, data) {
  const [preds, labels] = doPrediction(model, data);
  const confusionMatrix = await tfvis.metrics.confusionMatrix(labels, preds);
  const container = {name: 'Confusion Matrix', tab: 'Evaluation'};
  tfvis.render.confusionMatrix(container, {values: confusionMatrix, tickLabels: classNames});

  labels.dispose();
}最后,run() 函数将按顺序调用以上函数,构建一个端到端的机器学习管道:
js
import {MnistData} from './data.js';
async function showExamples(data) {
// Create a container in the visor
const surface =
tfvis.visor().surface({ name: 'Input Data Examples', tab: 'Input Data'});
// Get the examples
const examples = data.nextTestBatch(20);
const numExamples = examples.xs.shape[0];
// Create a canvas element to render each example
for (let i = 0; i < numExamples; i++) {
const imageTensor = tf.tidy(() => {
// Reshape the image to 28x28 px
return examples.xs
.slice([i, 0], [1, examples.xs.shape[1]])
.reshape([28, 28, 1]);
});
const canvas = document.createElement('canvas');
canvas.width = 28;
canvas.height = 28;
canvas.style = 'margin: 4px;';
await tf.browser.toPixels(imageTensor, canvas);
surface.drawArea.appendChild(canvas);
imageTensor.dispose();
}
}
async function run() {
const data = new MnistData();
await data.load();
await showExamples(data);
const model = getModel();
tfvis.show.modelSummary({name: 'Model Architecture', tab: 'Model'}, model);
await train(model, data);
await showAccuracy(model, data);
await showConfusion(model, data);
}
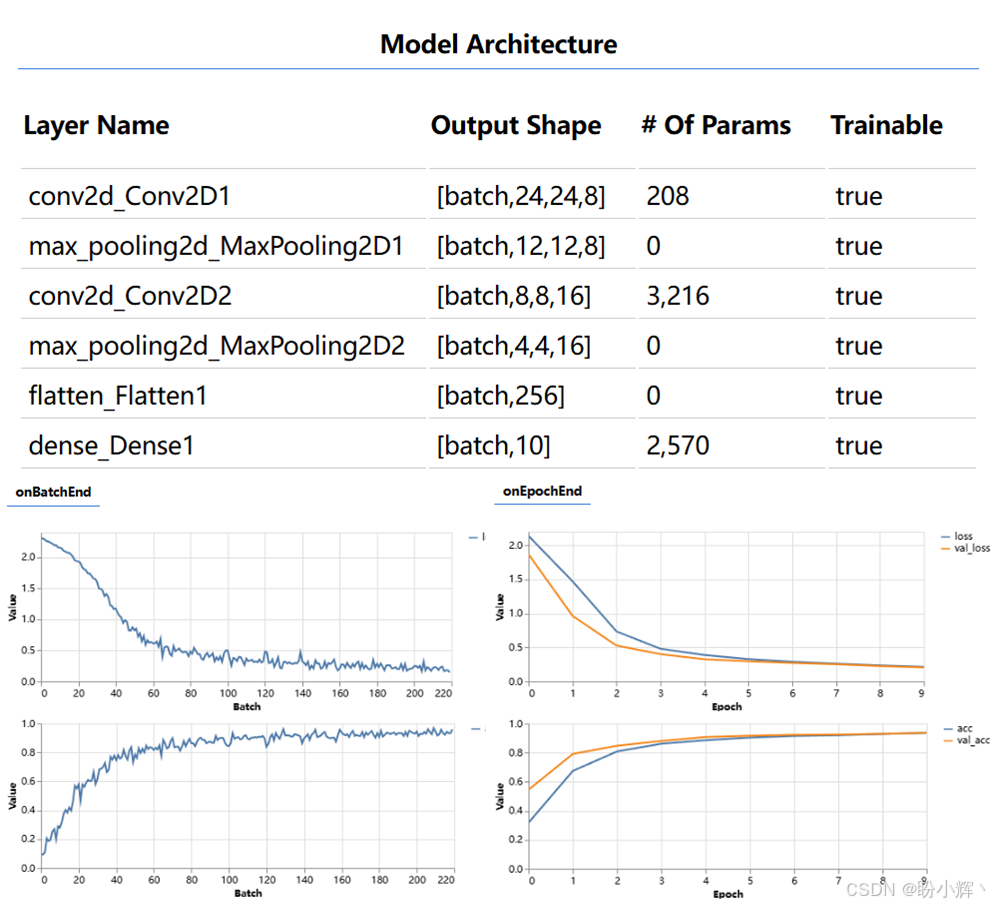
document.addEventListener('DOMContentLoaded', run);刷新浏览器地址 http://localhost:8000/index.html 将调用 run() 方法。模型架构和训练进度如下图所示。上半部分是模型架构,下半部分中,左侧是每个批数据结束时在验证数据集上的损失和准确率,右侧是每个 epoch 结束时在训练数据集(蓝色)和验证数据集(橙色)上的损失和准确率。
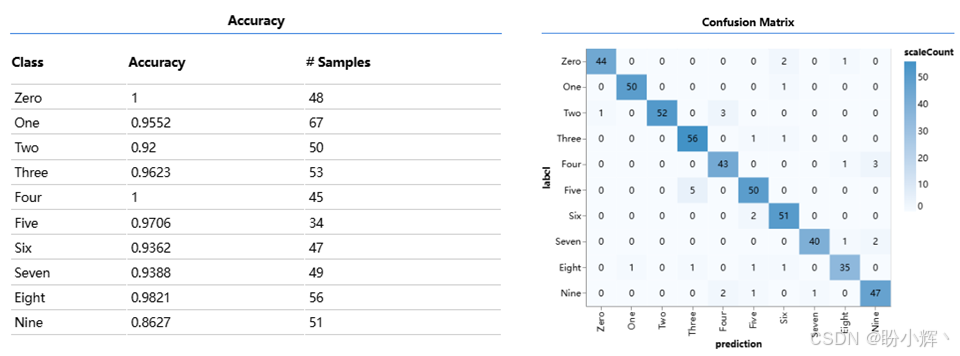
此外,下图展示了训练后的模型在测试数据集上对不同类别的预测准确率,以及测试数据集样本的预测类别与实际类别之间的混淆矩阵。
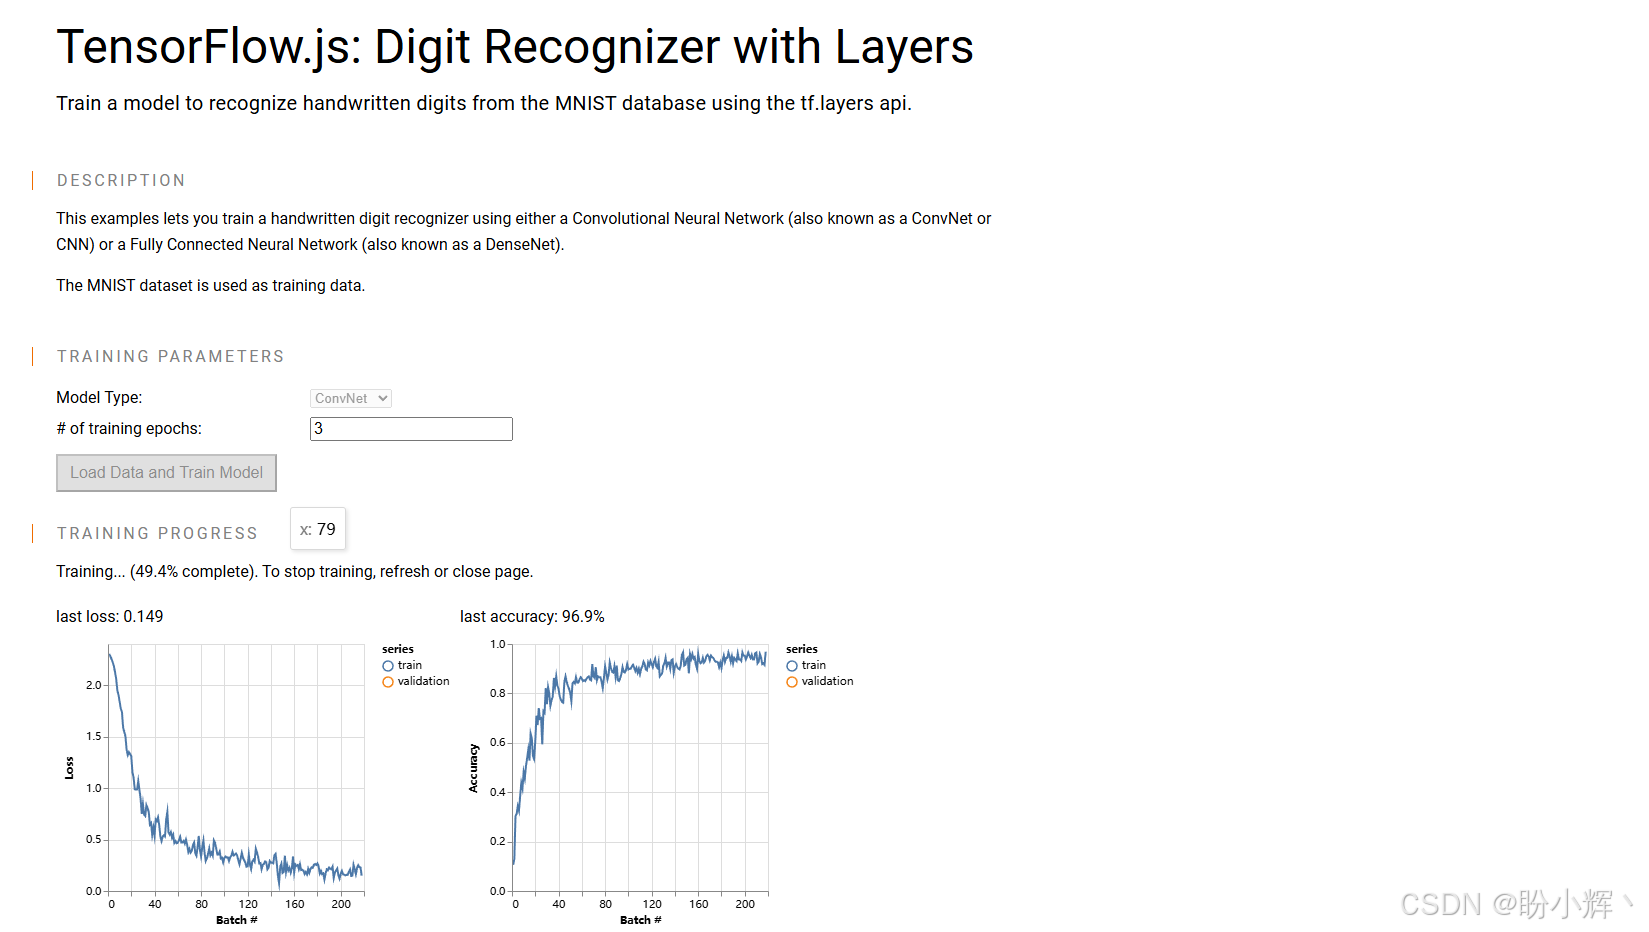
可以查看在 MNIST 数据集上训练 TFJS 模型的实时示例:
我们已经了解了如何在浏览器中使用 TensorFlow.js。下一节将介绍如何将 TensorFlow 模型转换为 TensorFlow.js 模型。
3. 模型转换
将使用 tf.keras 创建的模型转换为 TensorFlow.js 模型,可以离线使用以下命令将 TensorFlow 模型从 /tmp/model.h5 转换并输出为 JavaScript 模型到 /tmp/tfjs_model 目录:
shell
$ tensorflowjs_converter --input_format=keras /tmp/model.h5 /tmp/tfjs_model要使用此命令,需要一个安装了 TensorFlow.js 的 Python 环境,使用以下命令安装转换器:
shell
$ pip install tensorflowjs下一节将介绍如何在 TensorFlow.js 中使用预训练模型。
4. 预训练模型
TensorFlow.js 提供了大量用于图像、视频和文本深度学习的预训练模型。这些模型托管在 npm 上,因此如果熟悉 Node.js 开发,使用这些模型非常简单。常用预训练模型如下:
| 模型 | 描述 | 安装 |
|---|---|---|
| MobileNet | 通过 ImageNet 数据库中的标签对图像进行分类 |
npm i @tensorflow/models/mobilenet |
| PoseNet | 在浏览器中实时进行人体姿态估计 | npm i @tensorflow/models/posenet |
| Coco SSD | 目标检测模型,旨在定位和识别图像中的多个目标对象,基于 TensorFlow 目标检测 API |
npm i @tensorflow/models/coco-ssd |
| BodyPix | 使用 TensorFlow.js 实现的实时人体和身体部位分割 |
npm i @tensorflow/models/body-pix |
| DeepLab v3 | 语义分割模型 | npm i @tensorflow/models/deeplab |
| Speech Commands | 对来自语音命令数据集的 1 秒音频片段进行分类 |
npm i @tensorflow/models/speech-commands |
| Universal Sentence Encoder | 将文本编码为 512 维嵌入,可用于自然语言处理任务,如情感分类和文本相似性 |
npm i @tensorflow/models/universal-sentence-encoder |
| Text Toxicity | 评估评论对对话的潜在影响,从"非常有害"到"非常健康" | npm i @tensorflow/models/toxicity |
| KNN Classifier | 提供用于创建 K-近邻算法分类器的工具包,可用于迁移学习 | npm i @tensorflow/models/knn-classifier |
每个预训练模型都可以直接在 HTML 中使用。例如,使用 KNN 分类器:
html
<html>
<head>
  <!-- Load TensorFlow.js -->
  <script src="https://cdn.jsdelivr.net/npm/@tensorflow/tfjs"></script>
  <!-- Load MobileNet -->
  <script src="https://cdn.jsdelivr.net/npm/@tensorflow-models/mobilenet"></
  script>
  <!-- Load KNN Classifier -->
  <script src="https://cdn.jsdelivr.net/npm/@tensorflow-models/knn-
  classifier"></script>
</head>
接下来,将介绍如何在 Node.js 中使用预训练模型。
5. Node.js
在本节中,我们将介绍如何在 Node.js 中使用 TensorFlow。
通过以下方式导入 CPU 包:
js
import * as tf from '@tensorflow/tfjs-node'通过以下方式导入GPU 包:
js
import * as tf from '@tensorflow/tfjs-node-gpu'使用 Node.js 定义和编译全连接神经网络模型:
js
const model = tf.sequential();
model.add(tf.layers.dense({ units: 1, inputShape: [400] }));
model.compile({
  loss: 'meanSquaredError',
  optimizer: 'sgd',
  metrics: ['MAE']
});
接下来,通过 Node.js 异步调用开始训练:
js
const xs = tf.randomUniform([10000, 400]);
const ys = tf.randomUniform([10000, 1]);
const valXs = tf.randomUniform([1000, 400]);
const valYs = tf.randomUniform([1000, 1]);
async function train() {
  await model.fit(xs, ys, {
    epochs: 100,
    validationData: [valXs, valYs],
  });
}
train();
小结
TensorFlow.js 是一个强大的工具,使得开发者能够在 JavaScript 环境中进行深度学习的训练与推理。它的主要优势在于能够直接在浏览器和 Node.js 环境中运行,极大地简化了 Web 应用中的机器学习集成。在本节中,我们介绍了如何在原生 JavaScript 和 Node.js 中使用 TensorFlow.js。
系列链接
TensorFlow深度学习实战(1)------神经网络与模型训练过程详解
TensorFlow深度学习实战(2)------使用TensorFlow构建神经网络
TensorFlow深度学习实战(3)------深度学习中常用激活函数详解
TensorFlow深度学习实战(4)------正则化技术详解
TensorFlow深度学习实战(5)------神经网络性能优化技术详解
TensorFlow深度学习实战(6)------回归分析详解
TensorFlow深度学习实战(7)------分类任务详解
TensorFlow深度学习实战(8)------卷积神经网络
TensorFlow深度学习实战(9)------卷积神经网络应用
TensorFlow深度学习实战(10)------构建VGG模型实现图像分类
TensorFlow深度学习实战(11)------迁移学习详解
TensorFlow深度学习实战(12)------风格迁移详解
TensorFlow深度学习实战(13)------词嵌入技术详解
TensorFlow深度学习实战(14)------神经嵌入详解
TensorFlow深度学习实战(15)------循环神经网络详解
TensorFlow深度学习实战(16)------编码器-解码器架构
TensorFlow深度学习实战(17)------注意力机制详解
TensorFlow深度学习实战(18)------主成分分析详解
TensorFlow深度学习实战(19)------K-means 聚类详解
TensorFlow深度学习实战(20)------受限玻尔兹曼机
TensorFlow深度学习实战(21)------自组织映射详解
TensorFlow深度学习实战(22)------Transformer架构详解与实现
TensorFlow深度学习实战(23)------从零开始实现Transformer机器翻译
TensorFlow深度学习实战(24)------自编码器详解与实现
TensorFlow深度学习实战(25)------卷积自编码器详解与实现
TensorFlow深度学习实战(26)------变分自编码器详解与实现
TensorFlow深度学习实战(27)------生成对抗网络详解与实现
TensorFlow深度学习实战(28)------CycleGAN详解与实现
TensorFlow深度学习实战(29)------扩散模型(Diffusion Model)
TensorFlow深度学习实战(30)------自监督学习(Self-Supervised Learning)
TensorFlow深度学习实战(31)------强化学习(Reinforcement learning,RL)
TensorFlow深度学习实战(32)------强化学习仿真库Gymnasium
TensorFlow深度学习实战(33)------深度Q网络(Deep Q-Network,DQN)
TensorFlow深度学习实战(34)------深度确定性策略梯度
TensorFlow深度学习实战(35)------TensorFlow Probability
TensorFlow深度学习实战(36)------概率神经网络
TensorFlow深度学习实战(37)------自动机器学习(AutoML)
TensorFlow深度学习实战(38)------深度学习的数学原理
TensorFlow深度学习实战(39)------常用深度学习库
TensorFlow深度学习实战(40)------机器学习实践指南
TensorFlow深度学习实战(41)------图神经网络(GNN)
TensorFlow深度学习实战(42)------TensorFlow生态系统