本文较长,建议点赞收藏。更多AI大模型应用开发学习视频及资料,在智泊AI。
在我们之前的文章中,我们全面概述了 AI Agent 的特征、组件、发展历程、挑战及未来可能性。
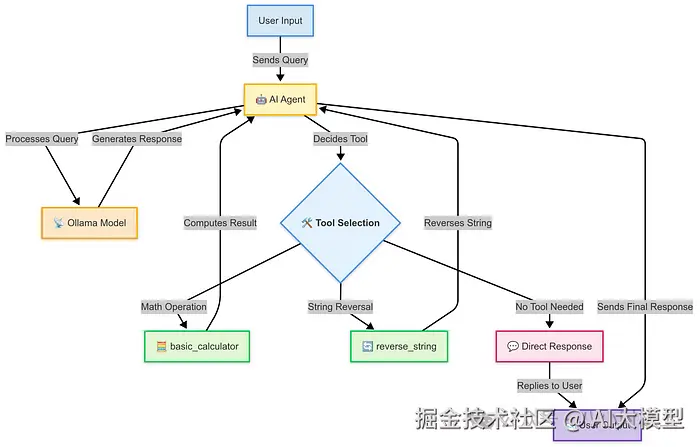
本篇将探讨如何使用 Python 从零开始构建一个Agent。该Agent能够根据用户输入做出决策,选择合适的工具并执行相应任务。让我们开始吧!
1. 什么是 Agent?
Agent 是一个能够感知环境、做出决策并采取行动以实现特定目标的自主实体。Agent 的复杂程度可以从简单响应刺激的反应式 Agent,到能够持续学习和适应的先进 Agent。常见的 Agent 类型包括:
-
反应式 Agent
直接响应环境变化,没有内部记忆。
-
基于模型的 Agent
利用对世界的内部模型进行决策。
-
基于目标的 Agent
根据实现特定目标来规划行动。
-
基于效用的 Agent
通过效用函数评估潜在行动以最大化结果。
例如聊天机器人、推荐系统和自动驾驶汽车,它们都利用不同类型的 Agent 来高效智能地执行任务。
我们构建的 Agent 核心组件包括:
-
模型
Agent 的大脑,负责处理输入并生成响应。
-
工具
Agent 可以基于用户请求执行的预定义函数。
-
工具库
Agent 可用工具的集合。
-
系统提示词
指导 Agent 如何处理用户输入和选择正确工具的指令集。
2. 具体实现
现在,让我们卷起袖子开始构建!

2.1 准备工作
本教程完整代码可在 AI Agents GitHub 仓库获取。
实现代码在此查看: ** github.com/vsingh9076/... **。
运行代码前请确保系统满足以下要求:
1. Python 环境配置
需要安装 Python 来运行 AI Agent:
安装 Python(如未安装)
- 从python.org下载并安装 Python(推荐3.8+版本)
- 验证安装:
css
1python --version创建虚拟环境(推荐) 使用虚拟环境管理依赖:
bash
1python -m venv ai_agents_env
2source ai_agents_env/bin/activate # Windows系统:ai_agents_env\Scripts\activate安装依赖包 进入仓库目录并安装依赖:
1pip install -r requirements.txt2. 本地安装Ollama
Ollama用于高效运行和管理本地语言模型:
下载并安装Ollama
- 访问Ollama官网下载对应操作系统的安装包
- 按照平台指引完成安装
验证Ollama安装 运行以下命令检查是否安装成功:
css
1ollama --version拉取模型(如需) 某些实现可能需要特定模型,可通过以下命令获取:
arduino
1ollama pull mistral # 将'mistral'替换为所需模型名2.2 实现步骤

说明:本章节涉及到的具体代码较多, 建议在 PC 端查看,体验更好
步骤1:配置环境
除了 Python,还需安装requests、json和termcolor库,使用dotenv管理环境变量:
1pip install requests termcolor python-dotenv步骤2:定义模型类
首先创建OllamaModel类,用于与本地 API 交互生成响应:
python
1from termcolor import colored
2import os
3from dotenv import load_dotenv
4load_dotenv()
5## 模型相关
6import requests
7import json
8import operator
9
10class OllamaModel:
11 def __init__(self, model, system_prompt, temperature=0, stop=None):
12 self.model_endpoint = "http://localhost:11434/api/generate"
13 self.temperature = temperature
14 self.model = model
15 self.system_prompt = system_prompt
16 self.headers = {"Content-Type": "application/json"}
17 self.stop = stop
18
19 def generate_text(self, prompt):
20 payload = {
21 "model": self.model,
22 "format": "json",
23 "prompt": prompt,
24 "system": self.system_prompt,
25 "stream": False,
26 "temperature": self.temperature,
27 "stop": self.stop
28 }
29
30 try:
31 request_response = requests.post(
32 self.model_endpoint,
33 headers=self.headers,
34 data=json.dumps(payload)
35 )
36
37 print("请求响应", request_response)
38 request_response_json = request_response.json()
39 response = request_response_json['response']
40 response_dict = json.loads(response)
41
42 print(f"\n\n来自Ollama模型的响应:{response_dict}")
43
44 return response_dict
45 except requests.RequestException as e:
46 response = {"error": f"调用模型时出错!{str(e)}"}
47 return response步骤3:创建 Agent 工具
构建基础计算器和字符串反转工具:
python
1def basic_calculator(input_str):
2 try:
3 if isinstance(input_str, dict):
4 input_dict = input_str
5 else:
6 input_str_clean = input_str.replace("'", """)
7 input_str_clean = input_str_clean.strip().strip(""")
8 input_dict = json.loads(input_str_clean)
9
10 if not all(key in input_dict for key in ['num1', 'num2', 'operation']):
11 return "错误:输入必须包含'num1'、'num2'和'operation'"
12
13 num1 = float(input_dict['num1'])
14 num2 = float(input_dict['num2'])
15 operation = input_dict['operation'].lower()
16
17 except (json.JSONDecodeError, KeyError) as e:
18 return "输入格式无效,请提供有效数字和运算符"
19 except ValueError as e:
20 return "错误:请提供有效数值"
21
22 operations = {
23 'add': operator.add,
24 'plus': operator.add,
25 'subtract': operator.sub,
26 'minus': operator.sub,
27 'multiply': operator.mul,
28 'times': operator.mul,
29 'divide': operator.truediv,
30 'floor_divide': operator.floordiv,
31 'modulus': operator.mod,
32 'power': operator.pow,
33 'lt': operator.lt,
34 'le': operator.le,
35 'eq': operator.eq,
36 'ne': operator.ne,
37 'ge': operator.ge,
38 'gt': operator.gt
39 }
40
41 if operation not in operations:
42 return f"不支持的运算符:'{operation}',支持的操作符有:{', '.join(operations.keys())}"
43
44 try:
45 if (operation in ['divide', 'floor_divide', 'modulus']) and num2 == 0:
46 return "错误:不能除以零"
47
48 result = operations[operation](num1, num2)
49
50 if isinstance(result, bool):
51 result_str = "True" if result else "False"
52 elif isinstance(result, float):
53 result_str = f"{result:.6f}".rstrip('0').rstrip('.')
54 else:
55 result_str = str(result)
56
57 return f"计算结果是:{result_str}"
58 except Exception as e:
59 return f"计算过程中出错:{str(e)}"
60
61def reverse_string(input_string):
62 if not isinstance(input_string, str):
63 return "错误:输入必须是字符串"
64
65 reversed_string = input_string[::-1]
66 return f"反转后的字符串是:{reversed_string}"步骤4:构建工具库
ToolBox类管理所有可用工具:
ruby
1class ToolBox:

2    def __init__(self):

3        self.tools_dict = {}

4

5    def store(self, functions_list):

6        for func in functions_list:

7            self.tools_dict[func.__name__] = func.__doc__

8        return self.tools_dict

9

10    def tools(self):

11        tools_str = ""

12        for name, doc in self.tools_dict.items():

13            tools_str += f"{name}: "{doc}"\n"

14        return tools_str.strip()
步骤5:创建 Agent 类
Agent 类实现决策和执行功能:
ini
1agent_system_prompt_template = """

2您是一个拥有特定工具的智能AI助手,响应必须始终使用以下JSON格式:

3{{

4    "tool_choice": "工具名称",

5    "tool_input": "工具输入"

6}}

7

8工具使用规则:

91. basic_calculator:用于数学计算

10   - 输入格式:{{"num1": 数字, "num2": 数字, "operation": "运算符"}}

112. reverse_string:用于反转文本

12   - 输入格式:直接输入要反转的字符串

133. no tool:用于常规对话

14

15严格规则:

16- 身份类问题必须使用"no tool"

17- 反转文本请求必须提取纯文本

18- 数学运算必须转换数字格式

19

20可用工具列表:

21{tool_descriptions}

22

23注意:响应必须是有效的 JSON 格式!

24"""

25

26class Agent:

27    def __init__(self, tools, model_service, model_name, stop=None):

28        self.tools = tools

29        self.model_service = model_service

30        self.model_name = model_name

31        self.stop = stop

32

33    def prepare_tools(self):

34        toolbox = ToolBox()

35        toolbox.store(self.tools)

36        return toolbox.tools()

37

38    def think(self, prompt):

39        tool_descriptions = self.prepare_tools()

40        agent_system_prompt = agent_system_prompt_template.format(tool_descriptions=tool_descriptions)

41

42        if self.model_service == OllamaModel:

43            model_instance = self.model_service(

44                model=self.model_name,

45                system_prompt=agent_system_prompt,

46                temperature=0,

47                stop=self.stop

48            )

49        else:

50            model_instance = self.model_service(

51                model=self.model_name,

52                system_prompt=agent_system_prompt,

53                temperature=0

54            )

55

56        return model_instance.generate_text(prompt)

57

58    def work(self, prompt):

59        agent_response_dict = self.think(prompt)

60        tool_choice = agent_response_dict.get("tool_choice")

61        tool_input = agent_response_dict.get("tool_input")

62

63        for tool in self.tools:

64            if tool.__name__ == tool_choice:

65                response = tool(tool_input)

66                print(colored(response, 'cyan'))

67                return

68

69        print(colored(tool_input, 'cyan'))
步骤6:运行 Agent
主程序实现交互界面:
python
1if __name__ == "__main__":

2    tools = [basic_calculator, reverse_string]

3

4    # 使用 Ollama 的 llama2 模型

5    model_service = OllamaModel

6    model_name = "llama2"

7    stop = "<|eot_id|>"

8

9    agent = Agent(tools=tools, model_service=model_service, model_name=model_name, stop=stop)

10

11    print("\n欢迎使用AIAgent!输入'exit'退出")

12    print("支持功能:")

13    print("1. 数学计算(如'计算15加7')")

14    print("2. 字符串反转(如'反转hello world')")

15    print("3. 常规问答\n")

16

17    while True:

18        prompt = input("请输入问题:")

19        if prompt.lower() == "exit":

20            break

21        agent.work(prompt)
3. 结论
通过本篇教程,我们从理解 Agent 概念到逐步实现了一个完整案例。我们配置了开发环境,定义了模型结构,创建了核心工具,并最终构建了可交互的 Agent 系统。这种结构化方法为构建自动化决策的 Agent 奠定了坚实基础。随着 AI Agent 的持续进化,其应用场景将不断扩展,推动各行业效率提升和创新发展。敬请期待更多深度解析,助您打造更强大的 AI Agent!
学习资源推荐
如果你想更深入地学习大模型,以下是一些非常有价值的学习资源,这些资源将帮助你从不同角度学习大模型,提升你的实践能力。
本文较长,建议点赞收藏。更多AI大模型应用开发学习视频及资料,在智泊AI。