1. 深度学习OCR技术演进
光学字符识别(
OCR)技术经历了从传统图像处理到深度学习的重要演进。早期OCR系统依赖于手工设计的特征提取器和规则引擎,在规整文档上表现良好,但在复杂场景下面临巨大挑战。随着深度学习技术的发展,特别是CNN和Transformer架构的兴起,OCR技术实现了质的飞跃。DeepSeek-OCR正是在这一技术背景下应运而生,代表了当前OCR领域的最先进水平。与传统OCR系统相比,DeepSeek-OCR摒弃了复杂的规则引擎,采用端到端的深度学习架构,在大规模多语言文本数据上训练,实现了更高的识别准确率和更强的泛化能力。
2. DeepSeek-OCR的市场定位
DeepSeek-OCR定位于企业级 OCR解决方案,专注于解决实际业务场景中的复杂文档识别需求。其核心定位体现在三个层面:
- 技术层面 :提供
state-of-the-art的文本检测与识别精度,在保持高准确率的同时优化推理速度,满足实时处理需求。 - 应用层面:支持多场景适配,从扫描文档到自然场景图像,从印刷体到手写体,具备广泛的适用性。
- 部署层面 :考虑到企业数据安全和隐私保护需求,提供完整的私有化部署方案,支持GPU加速和分布式扩展。
项目地址:https://github.com/deepseek-ai/DeepSeek-OCR
论文地址:https://arxiv.org/abs/2510.18234
官方提供的推理代码仅包含基础功能,缺乏可视化交互界面,导致输入输出过程不够直观便捷。DeepSeek-OCR-WebUI 是基于 DeepSeek-OCR 模型开发的图像识别 Web 应用,具备直观的界面设计和高效的文字识别功能。
✨ 核心亮点
- 🎯 7 种识别模式 - 文档、OCR、图表、查找、自定义等
- 🖼️ 边界框可视化 - Find 模式自动标注位置
- 📦 批量处理 - 支持多张图片逐一识别
- 📄 PDF 支持 - 上传 PDF 文件,自动转换为图片
- 🎨 现代化 UI - 炫酷的渐变背景和动画效果
- 🌐 多语言支持 - 简体中文、繁体中文、英语、日语
- 🍎 Apple Silicon 支持 - Mac M1/M2/M3/M4 原生 MPS 加速
- 🐳 Docker 部署 - 一键启动,开箱即用
- ⚡ GPU 加速 - 基于 NVIDIA GPU 的高性能推理
- 🌏 ModelScope 自动切换 - HuggingFace 不可用时自动切换
2.1 DeepSeek-OCR本地简单测试
操作系统环境 ubuntu-24.04 Server,其次推荐安装Anaconda
2.1.1 创建虚拟环境拉取代码
bash
conda create -n DeepSeek-OCR python=3.12
bash
# 激活虚拟环境
conda activate DeepSeek-OCR
bash
# 克隆代码
git clone https://github.com/deepseek-ai/DeepSeek-OCR.git
bash
# 安装依赖
pip install torch==2.6.0 torchvision==0.21.0 torchaudio==2.6.0 --index-url https://download.pytorch.org/whl/cu118
pip install vllm==0.8.5
pip install -r requirements.txt
pip install flash-attn==2.7.3 --no-build-isolation
bash
# 遇到下面报错,pip的依赖解析器检测到了版本冲突
ERROR: pip's dependency resolver does not currently take into account all the packages that are installed. This behaviour is the source of the following dependency conflicts.
vllm 0.8.5 requires tokenizers>=0.21.1, but you have tokenizers 0.20.3 which is incompatible.
vllm 0.8.5 requires transformers>=4.51.1, but you have transformers 4.46.3 which is incompatible.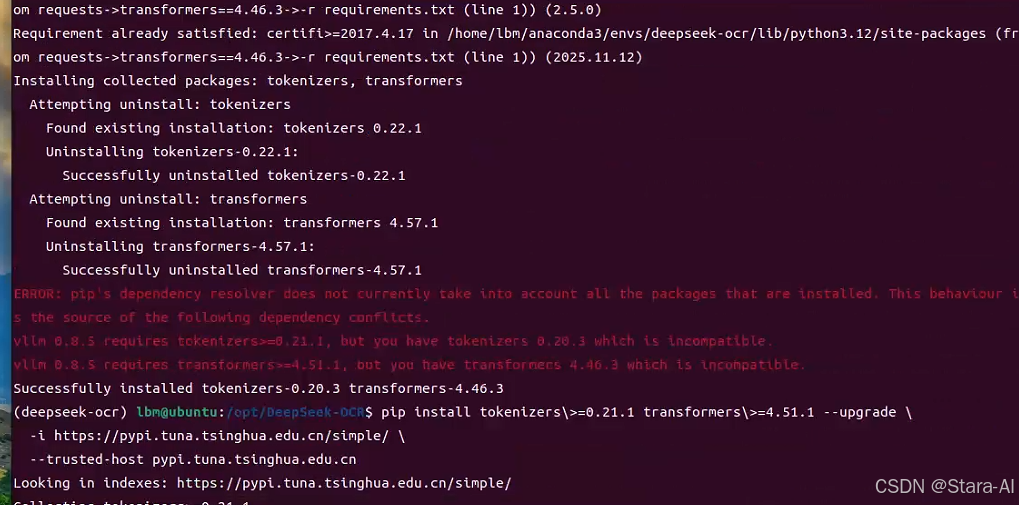
bash
# 解决办法:
# 或者使用国内镜像源升级
pip install tokenizers>=0.21.1 transformers>=4.51.1 --upgrade \
  -i https://pypi.tuna.tsinghua.edu.cn/simple/ \
  --trusted-host pypi.tuna.tsinghua.edu.cn
注意:在安装
flash-attn==2.7.3时如果出现问题,可以根据链接:https://github.com/Dao-AILab/flash-attention/releases下载对应版本的.whl官方包。FlashAttention(flash-attn)是一个专门用于优化Transformer模型中注意力机制(Attention)计算的库,它能显著提升计算速度并大幅减少GPU显存消耗。对于像DeepSeek-OCR这样庞大的模型来说,安装它是比较重要的。
bash
选择 flash-attn版本:

1.要检查本地CUDA版本,请运行nvcc --version命令。版本号会显示在文件名开头(例如cu118对应CUDA 11.8,cu122对应CUDA 12.2)。

2. 版本文件名中的第二部分(如 torch2.1、torch2.2、torch2.3)对应 PyTorch 版本号。要查看本地安装的 PyTorch 版本,可执行命令 `pip show torch`(示例输出:2.6.0+cu118)。

3. 版本号第三部分(如cp311-cp311)对应Python版本,选择与本地Python版本一致即可。可通过pip debug命令查询本地Python版本(当前为3.12)。

建议下载以下版本的安装包:`flash_attn-2.7.3+cu11torch2.6cxx11abiFALSE-cp312-cp312-linux_x86_64.whl`
下载后,上传到 /home/lbm/workspace/ 然后离线安装:
bash
cd ~/workspace
pip install flash_attn-2.7.3+cu11torch2.6cxx11abiFALSE-cp312-cp312-linux_x86_64.whl
2.1.2 下载模型
bash
# 安装魔搭社区工具
pip install modelscope

# 创建模型文件存放目录
mkdir -p ~/models/modelscope/deepseek-ai/DeepSeek-OCR

# 下载模型
modelscope download --model 'deepseek-ai/DeepSeek-OCR' --local_dir '/home/lbm/models/modelscope/deepseek-ai/DeepSeek-OCR'
2.1.3 简易可视化
可以借助Hugging Face官方提供的Gradio页面模板,便于快速上手使用
bash
# 使用镜像站下载
GIT_LFS_SKIP_SMUDGE=1 git clone https://hf-mirror.com/spaces/merterbak/DeepSeek-OCR-Demo
cd ~/DeepSeek-OCR-Demo

# 在安装依赖前,需要修改 requirements.txt 文件。由于其中指定的 flash_attn 版本不适用于当前环境,且该依赖已安装完毕,因此需要移除其版本号限制。

vim requirements.txt
# flash-attn @ https://github.com/Dao-AILab/flash-attention/releases/download/v2.7.3/flash_attn-2.7.3+cu12torch2.6cxx11abiFALSE-cp310-cp310-linux_x86_64.whl

pip install gradio
pip install -r requirements.txt
切换到 ~/DeepSeek-OCR-Demo 目录,编辑 web 启动脚本 app.py:
bash
将模型的加载路径改为本地路径
/home/lbm/models/modelscope/deepseek-ai/DeepSeek-OCR
以及lunch加载函数中设置 share=True,server_name='0.0.0.0',server_port=8080
启动脚本:
bash
python app.py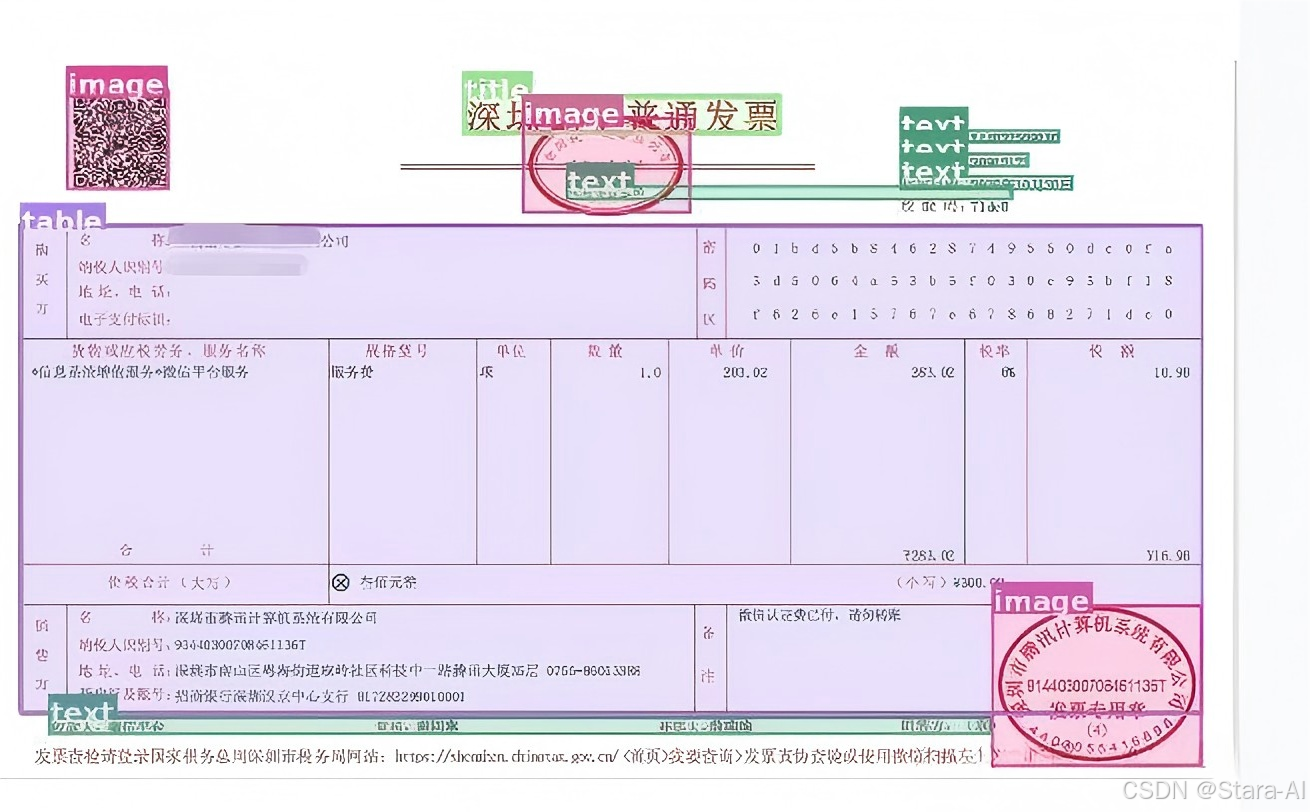
2.2 DeepSeek-OCR-WebUI部署
📈 技术架构
- 引擎: transformers(稳定可靠)
- 模型: deepseek-ai/DeepSeek-OCR
- GPU: NVIDIA L40S (自动检测)
- 推理模式: bfloat16
- 批处理: 逐一顺序处理
🚀 引擎选择transformers 而非 vLLM,主要基于以下考量:
| 特性 | transformers | vLLM |
|---|---|---|
| 稳定性 | ★★★★☆ | ★★★ |
| 兼容性 | ★★★★☆ | ★★★ |
| 速度 | ★★★★☆ | ★★★★☆ |
| 功能支持 | ★★★★☆ | ★★★★ |
| 部署难度 | ★★★★☆ | ★★☆ |
操作系统环境为 ubuntu-24.04 Server
2.2.1 推荐Docker部署
bash
# 1. 更新软件包索引:
sudo apt-get update

# 2. 安装必要的软件包,以允许apt通过HTTPS使用仓库:
sudo apt-get install apt-transport-https ca-certificates curl software-properties-common

# 3. 添加Docker的官方GPG密钥:
curl -fsSL https://download.docker.com/linux/ubuntu/gpg | sudo apt-key add -

# 4. 添加Docker的稳定仓库
sudo add-apt-repository "deb [arch=amd64] https://download.docker.com/linux/ubuntu $(lsb_release -cs) stable"

# 5. 再次更新软件包索引
sudo apt-get update

# 6. 安装最新版本的Docker CE(社区版)
sudo apt-get install docker-ce

# 7. 验证Docker是否安装成功并运行:
sudo systemctl status docker
# 查看docker版本
sudo docker --version

# 8. 非root用户也能运行Docker
# *********这句代码执行后,请重新登录SSH 连接*********
sudo usermod -aG docker ${USER}

# 9. 镜像加速 下载的docker镜像将会被存放到 /data/docker 目录中
sudo tee /etc/docker/daemon.json <<-'EOF'
{
  "data-root": "/data/docker",
  "exec-opts":["native.cgroupdriver=systemd"],
  "registry-mirrors": ["https://docker.1ms.run","https://dockerpull.org","https://cjie.eu.org","https://docker.1panel.dev","https://docker.foreverlink.love","https://dytt.online","https://func.ink","https://lispy.org","https://docker.xiaogenban1993.com","https://docker.xn--6oq72ry9d5zx.cn","https://docker.zhai.cm","https://docker.5z5f.com","https://a.ussh.net","https://docker.cloudlayer.icu","https://docker.linkedbus.com","https://hub.littlediary.cn","https://hub.crdz.gq","https://docker.unsee.tech","https://docker.kejilion.pro","https://registry.dockermirror.com","https://hub.rat.dev","https://dhub.kubesre.xyz","https://docker.nastool.de","https://docker.udayun.com","https://docker.rainbond.cc","https://hub.geekery.cn","https://docker.1panelproxy.com","https://docker.m.daocloud.io","https://mirror.ccs.tencentyun.com","https://4hxooktm.mirror.aliyuncs.com","https://ginger20240704.asia","https://lynn520.xyz","https://docker.mrxn.net","https://dockerhub.icu","https://hub.rat.dev","https://docker.wanpeng.top","https://doublezonline.cloud","https://atomhub.openatom.cn","https://docker.fxxk.dedyn.io","https://hub.geekery.cn"],
  "log-driver":"json-file",
  "log-opts": {"max-size":"100m", "max-file":"3"}
}
EOF

sudo systemctl daemon-reload && sudo systemctl restart docker && sudo systemctl enable docker
2.2.2 拉取代码
bash
git clone https://github.com/neosun100/DeepSeek-OCR-WebUI.git
cd DeepSeek-OCR-WebUI⚡环境检查:GPU驱动版本必须大于等于580.82

项目提供了 Dockerfile,需要修改一下Dockerfile
bash
RUN  apt-get update && apt-get install -y \
    libgl1 \
    libglib2.0-0 \
    pkg-config \
    python3-dev \
    build-essential \
    && rm -rf /var/lib/apt/lists/*

# 添加pip国内镜像加速
RUN pip config set global.index-url https://mirrors.huaweicloud.com/repository/pypi/simple/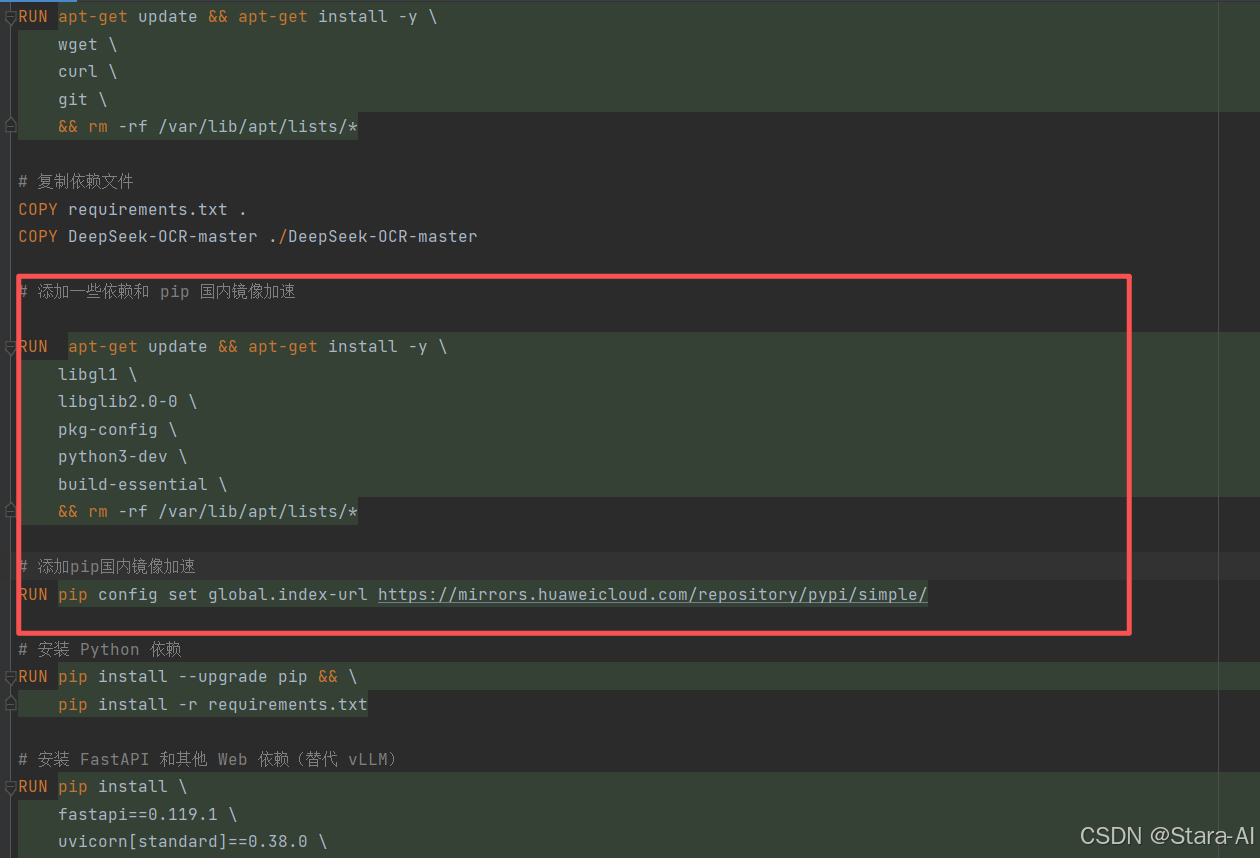
2.2.3 安装 NVIDIA Container Toolkit
默认情况下,Docker 无法直接访问 GPU。若要在容器中使用 NVIDIA GPU,需要先安装并配置 NVIDIA Container Toolkit(原名为 nvidia-docker2)。若未正确完成安装配置,在执行 docker run 命令使用 --gpus all 参数,或在 docker-compose.yml 中配置 deploy.resources.reservations.devices 等 GPU 相关选项时,Docker 将因找不到名为 "nvidia" 的设备驱动而报错。
bash
# 1:确认已安装 NVIDIA 驱动
# 如果提示命令未找到或驱动未加载,请先安装 NVIDIA 官方驱动。
nvidia-smi

# 2.安装 NVIDIA Container Toolkit
# 安装依赖工具
sudo apt-get update && sudo apt-get install -y --no-install-recommends curl gnupg2

# 添加 NVIDIA Container Toolkit 的 GPG 密钥和软件源
# 从 NVIDIA 官方地址下载 GPG 公钥, 下载 NVIDIA 提供的 APT 源列表文件
curl -fsSL https://nvidia.github.io/libnvidia-container/gpgkey | sudo gpg --dearmor -o /usr/share/keyrings/nvidia-container-toolkit-keyring.gpg \
  && curl -s -L https://nvidia.github.io/libnvidia-container/stable/deb/nvidia-container-toolkit.list | \
    sed 's#deb https://#deb [signed-by=/usr/share/keyrings/nvidia-container-toolkit-keyring.gpg] https://#g' | \
    sudo tee /etc/apt/sources.list.d/nvidia-container-toolkit.list
# 启用 experimental 软件源(可选)
sudo sed -i -e '/experimental/ s/^#//g' /etc/apt/sources.list.d/nvidia-container-toolkit.list

# 更新软件包列表
sudo apt-get update

# 设置环境变量 NVIDIA_CONTAINER_TOOLKIT_VERSION=1.18.0-1(方便统一指定版本)。
# libnvidia-container1:底层库,用于在容器内设置 NVIDIA 驱动环境。
# libnvidia-container-tools:配套工具(如 nvidia-container-cli)。
# nvidia-container-toolkit-base:基础运行时钩子(hook)配置。
# nvidia-container-toolkit:集成到 Docker 的 CLI 工具,提供 --gpus 支持。
export NVIDIA_CONTAINER_TOOLKIT_VERSION=1.18.0-1
  sudo apt-get install -y \
      nvidia-container-toolkit=${NVIDIA_CONTAINER_TOOLKIT_VERSION} \
      nvidia-container-toolkit-base=${NVIDIA_CONTAINER_TOOLKIT_VERSION} \
      libnvidia-container-tools=${NVIDIA_CONTAINER_TOOLKIT_VERSION} \
      libnvidia-container1=${NVIDIA_CONTAINER_TOOLKIT_VERSION}
NVIDIA 官方驱动安装参考博主:paopao_wu
安装没问题后设置docker默认使用nvidia-runtime
bash
# 此命令会将配置直接写入 daemon.json 文件
sudo nvidia-ctk runtime configure --runtime=docker

sudo cat /etc/docker/daemon.json

{
   ...
    "runtimes": {
        "nvidia": {
            "args": [],
            "path": "nvidia-container-runtime"
        }
    }
}
bash
# 重启docker
sudo systemctl restart docker
# 检测容器环境中是否支持GPU加速
docker run --rm --gpus all nvidia/cuda:13.0.1-runtime-ubuntu22.04 nvidia-smi
bash
# 或者 `nvidia-smi`,
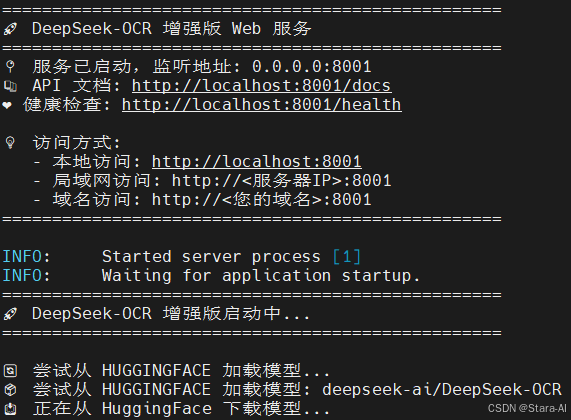
2.2.4 启动服务
bash
cd ~/DeepSeek-OCR-WebUI
# 此时会按照docker-comoose.yml 中的配置 构建镜像
docker compose up -d

# 下面命令只显示了 NAME, STATUS , PORTS 字段
docker compose ps --format "table {{.Name}}\t{{.Status}}\t{{.Ports}}"
NAME                 STATUS                            PORTS
deepseek-ocr-webui   Up 2 minutes (health: starting)   6006/tcp, 8888/tcp, 0.0.0.0:8001->8001/tcp

# 查看docker日志
docker logs -f deepseek-ocr-webui
首次启动会很久,下载依赖, 如果没有科学上网 ,可能 Hugging Face 的模型无法加载到。模型文件被下载到DeepSeek-OCR-WebUI/models 文件夹中
2.2.5 容器管理
bash
# 重启服务(代码已更新后)
docker restart deepseek-ocr-webui

# 完全重启(重新加载模型)
docker compose restart

# 停止服务
docker compose down

# 重新构建并启动
docker compose up -d --build

# 查看资源使用
docker stats deepseek-ocr-webui
2.2.6 访问
bash
http://192.168.6.133:8001/ UI界面
http://192.168.6.133:8001/docs API文档
http://192.168.6.133:8001/health 健康检查
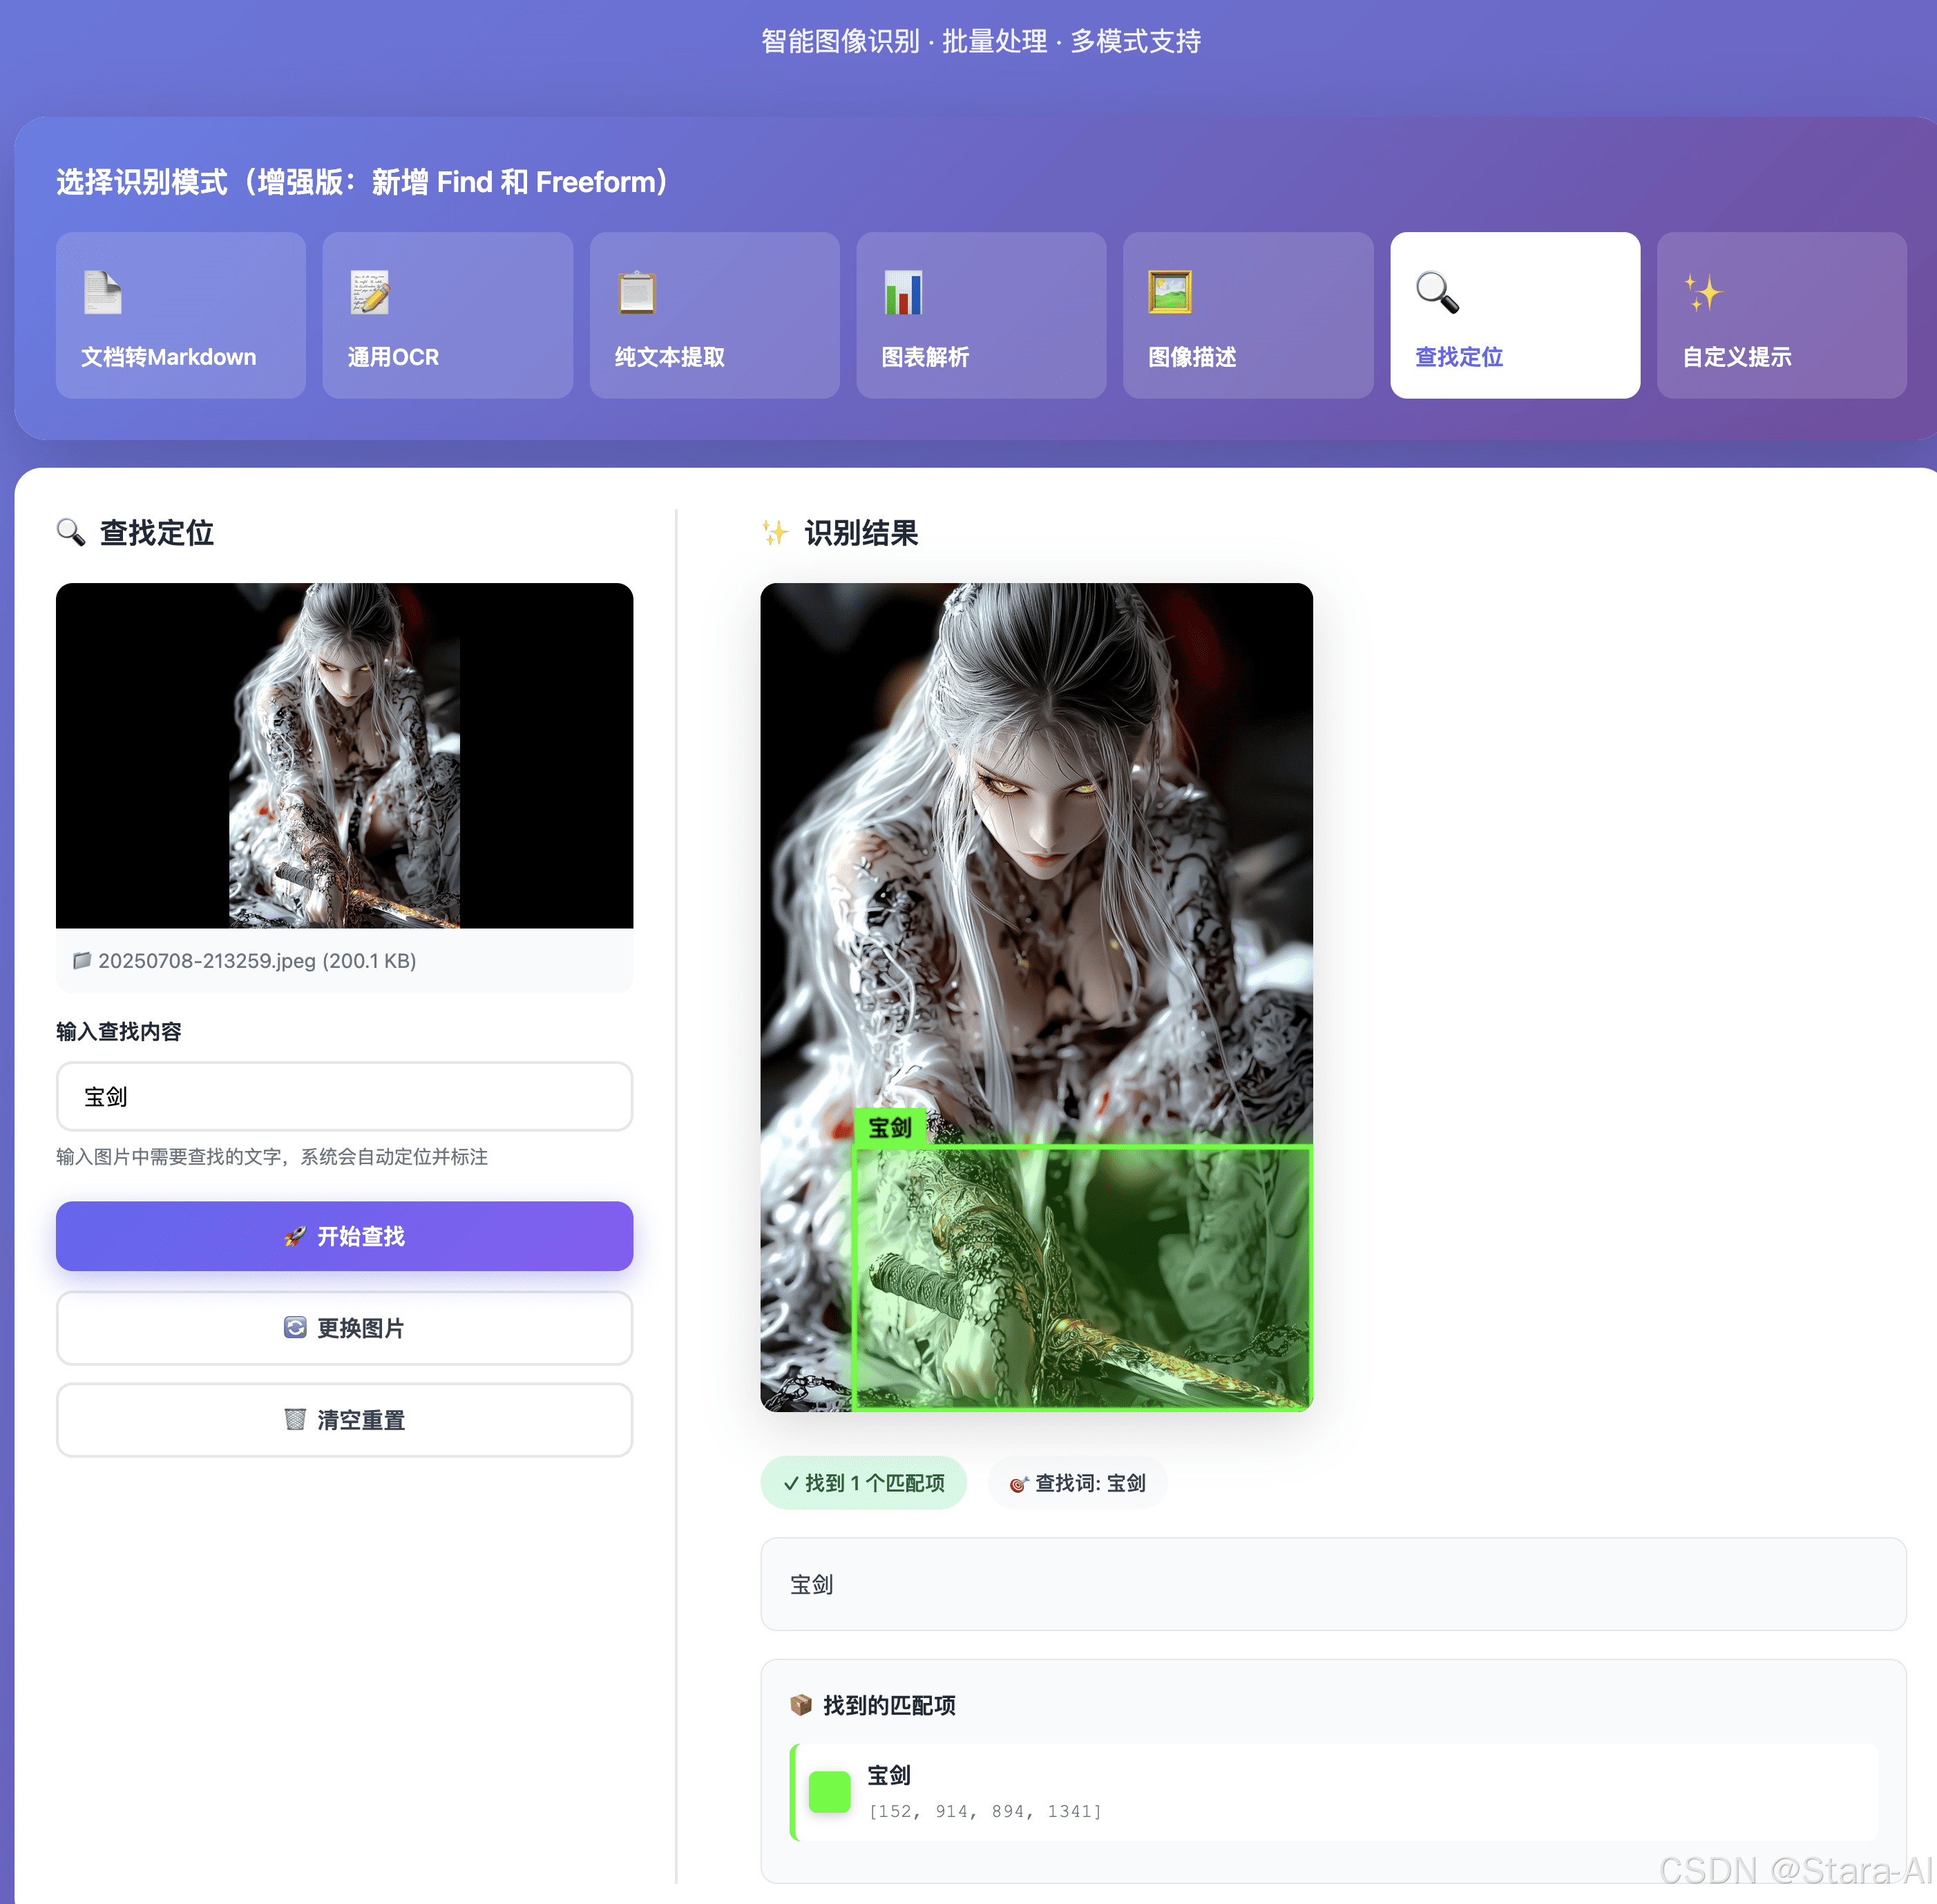
2.2.7 测试通用OCR
上传图片:

识别结果:
bash
============================================================
图片 1: 33621067_112425239106_2.jpg
============================================================

不被嘲笑的夢想
是不值得去實現的
The dream of not being laughed at
Is not worth achieving
锤子科技創始人
羅永浩
RiTOP锐拓
昵享网www.nipic.cn
ID:33621067NO:20221012112425239106
2.2.8 测试图像描述
上传图片:

测试结果:
bash
============================================================
图片 1: y9SyWaZmib19M6n.jpg
============================================================

This image is drawn in a cartoonish art style featuring four elderly individuals standing side-by-side against a blue sky backdrop adorned with white clouds.

Foreground:
1. **Elderly Individuals** - There are four elderly men depicted.
   - The first man on the left wears yellow clothing; he holds what appears to be a mobile phone close to his chest while smiling slightly towards another individual beside him who also smiles back.
   - Next to them stands a second elderly man dressed in red attire holding something similar to a mobile phone near his face, looking up toward someone else's direction.
   - Beside that person is yet another elderly gentleman wearing green clothes, who seems to have closed eyes possibly indicating sleepiness or relaxation, with one hand raised near his head.
   - On the far right end, we see a fourth elderly man donning dark-colored clothes including a hat, appearing somewhat disinterested or bored, with both hands clasped together over his stomach area.

Background:
2. **Sky & Clouds** - A clear azure sky serves as the primary setting behind these figures, dotted sporadically with fluffy white clouds which add depth to the scene.

Text Description (in Chinese):
- At the bottom center part of the illustration reads the phrase "欢迎您回来,大小姐!" written in bold black letters within quotation marks ("欢迎您回来,大小姐!"). This translates roughly to "Welcome back, Miss!"

Overall Aesthetic:
The overall aesthetic exudes warmth through soft lines and gentle colors predominantly used throughout the drawing. It conveys a sense of nostalgia mixed with contentment among the elderly figures set under serene skies filled with light cloud formations.


============================================================
图片 1: y9SyWaZmib19M6n.jpg
============================================================

此图片采用卡通艺术风格绘制,描绘了四位长者并排站立,背景是点缀着白云的蓝天。

前景:
1. **年长人物** - 画中有四位老年男性。
   - 最左侧的第一位男士穿着黄色衣服;他将一个看似手机的东西贴近胸前,同时微微笑着看向身旁另一位同样回以微笑的人。
   - 旁边站着第二位身穿红色衣服的老年男士,手持类似手机的物品靠近脸颊,抬头望向其他人的方向。
   - 其身旁是另一位穿着绿色衣服的老年绅士,他闭着双眼可能表示困倦或放松状态,一只手抬至头部附近。
   - 最右侧是第四位老年男士,身着深色衣物并戴帽子,显得有些不感兴趣或无聊,双手交叉搭在腹部。

背景:
2. **天空与云朵** - 清澈的蔚蓝天空作为人物背后的主背景,零星点缀着蓬松的白云,为场景增添了层次感。

文字描述(中文):
- 插画底部中央处写有短语"欢迎您回来,大小姐!",以粗体黑色文字加引号呈现。

整体美学:
整体美学通过柔和的线条和画面中主要使用的温和色彩散发出温暖感。在布满淡淡云层的宁静天空下,传达了年长人物怀旧与满足交织的情感。
3. 总结
DeepSeek-OCR作为新一代光学字符识别技术的杰出代表,通过端到端的深度学习架构在OCR技术领域树立了新的标杆。本次从基础环境搭建到完整WebUI部署的实践过程,充分验证了其功能的卓越表现------从基础的文档转Markdown 、通用OCR ,到进阶的纯文本提取 、图表解析 ,再到智能化的图像描述 、精准的查找定位 以及高度灵活的自定义提示,全面覆盖了文档智能处理的完整链路。
展望未来,随着多模态大模型技术的持续演进,OCR技术将与文档理解、知识图谱等领域深度融合发展,从单纯的文字提取向智能文档处理 与结构化信息理解方向进化。DeepSeek-OCR凭借其丰富的功能矩阵和稳定的工程表现,有望在知识管理、内容数字化、智能办公等更多场景中发挥核心价值,为各行各业的数字化转型提供更强大的底层技术支撑。
期待DeepSeek-OCR在保持现有技术优势的基础上,进一步优化推理性能、扩展多语言支持,并在多模态交互 和行业定制化方面持续突破,推动OCR技术向更智能、更易用的方向发展。