为什么要使用负载均衡
当我们的Web服务器直接面向用户,往往要承载大量并发请求,单台服务器难以负荷,我使用多台Web服务器组成集群,前端使用Nginx负载均衡,将请求分散的打到我们的后端服务器集群中,实现负载的分发。那么会大大提升系统的吞吐率、请求性能。
负载均衡简单介绍
我们将负载均衡称为SLB(Server Load Balance),Nginx就是SLB的一种,负载均衡的叫法有很多,还可以叫负载、Load Balance、LB,公有云中叫SLB(阿里云负载均衡)、QLB(青云负载均衡)、CLB(腾讯云负载均衡)、ULB(ucloud负载均衡),常见的负载均衡软件有Nginx、Haproxy、LVS,Nginx是七层负载,可以造伪四层,Haproxy是七层负载、LVS是四层负载。
负载均衡分七层和四层,七层从下到上分别是1.物理层、2.数据链路层、3.网络层、4.传输层、5.会话层、6.表示层、7.应用层,而四层负载均衡仅到传输层,所以说四层负载均衡速度更快,但是七层负载均衡更贴近于服务,http协议就是七层协议,我们可以用Nginx做会话保持、URL路径规则匹配、Head头改写等等,这些四层无法实现。本篇文章我们介绍Nginx的七层负载均衡。
配置nginx负载均衡
location / {
proxy_pass http://webs; 将收到的请求转发到webs组
include proxy_params; 负载均衡调用的模块信息
bash
[root@localhost conf.d]# cat default.conf
upstream webs {
  server 192.168.74.7;
  server 192.168.74.8 down;
}

server {
  listen 80;
  server_name www.admin.com;

  location / {
    proxy_pass http://webs;
    include proxy_params;

  location /check {
    check_status;}
}
}
next模块
Nginx负载均衡比较智能,如果一个服务器宕了,会自动访问下一个服务器,但是如果后台服务器没有宕而是返回错误,就需要我们增加一个负载均衡设置了,以保证如果出错能直接访问下一台,而不是返回错误。
bash
  location / {
    proxy_pass http://webs;
    include proxy_params;
    proxy_next_upstream error timeout http_500 http_502 http_503 http_504;
} #这样如果报这些错误也会自动访问下一个服务器节点
Nginx负载均衡调度算法
Nginx 提供了多种负载均衡调度算法,用于决定如何将客户端请求分发到 upstream 定义的后端服务器集群中。选择合适的算法可以根据业务场景(如会话保持、服务器性能差异、负载均衡公平性等)优化服务性能和可用性。以下是五种常用的调度算法:
|------------|----------------------------------------------------------------|
| 调度算法 | 概述 |
| rr轮询 | 按时间顺序逐一分配到不同的后端服务器(默认算法) |
| weigth | 加权轮询,权重越高的服务器接收的请求越多 |
| ip_hash | 根据客户端 IP 地址的哈希值分配请求,确保同一客户端的请求始终转发到同一台后端服务器,适用于需要 会话保持 的场景 |
| url_hash | 根据请求 URL 的哈希值分配请求,确保相同 URL 的请求始终转发到同一台服务器,适用于静态资源缓存场景,需编译时添加模块 |
| least_conn | 最少连接数,哪个机器连接数少就分发哪个 |
Nginx负载均衡后端状态
|--------------|--------------------------|
| 状态 | 概述 |
| down | 当前的服务器不参与负载均衡,一般用于停机维护 |
| backup | 预留的备份服务器,其他服务器全挂了启用备用服务器 |
| max_fails | 允许请求失败的次数 |
| fail_timeout | 经过max_fails失败后,服务器暂停时间 |
| max_conns | 限制最大的接收连接数 |
bash
upstream webs {
    server 172.16.1.7 max_fails=2 fail_timeout=10s;
    server 172.16.1.8;
}

10 秒内如果对 172.16.1.7 的请求失败达到 2 次,Nginx 会将其标记为 "不可用"。
当服务器被标记为 "不可用" 后,Nginx 在接下来的 10 秒内不会再向其转发请求,直到超时后重新尝试检测。
Nginx负载均衡健康检查模块下载安装全流程
步骤 1:安装依赖工具
首先安装编译 Nginx 所需的依赖库:
bash
yum install -y gcc gcc-c++ make zlib-devel pcre-devel openssl-devel wget --disablerepo=redis步骤 2:下载 Nginx 源码和健康检查模块
2.1 下载 Nginx 源码
bash
# 创建工作目录
mkdir -p /usr/local/src/nginx
cd /usr/local/src/nginx

# 下载 Nginx 源码(可从官网 https://nginx.org/download/ 选择版本)
wget https://nginx.org/download/nginx-1.24.0.tar.gz
tar -zxvf nginx-1.24.0.tar.gz2.2下载ngx_http_upstream_check_module 模块
bash
现在windows下载压缩包,然后传给服务器
https://github.com/yaoweibin/nginx_upstream_check_module


cd /usr/local/src/nginx/
unzip nginx_upstream_check_module-master.zip
步骤 3:为 Nginx 打模块补丁(关键步骤)
bash
cd nginx-1.24.0

patch -p1 < ../nginx_upstream_check_module-master/check_1.20.1+.patch
步骤 4:编译安装 Nginx(包含健康检查模块)
bash
执行目录:必须在 Nginx 源码目录(如 nginx-1.24.0)中执行,否则会提示 ./configure: No such file or directory。

路径检查:确保 --add-module 指定的路径(/usr/local/src/nginx/nginx_upstream_check_module-master)是你实际存放 ngx_http_upstream_check_module 模块的目录,路径错误会导致模块无法加载。

使用--add-module格式添加第三方模块

[root@localhost nginx]# cd nginx-1.24.0/
[root@localhost nginx-1.24.0]#./configure \
--prefix=/etc/nginx \
--sbin-path=/usr/sbin/nginx \
--modules-path=/usr/lib64/nginx/modules \
--conf-path=/etc/nginx/nginx.conf \
--error-log-path=/var/log/nginx/error.log \
--http-log-path=/var/log/nginx/access.log \
--pid-path=/var/run/nginx.pid \
--lock-path=/var/run/nginx.lock \
--http-client-body-temp-path=/var/cache/nginx/client_temp \
--http-proxy-temp-path=/var/cache/nginx/proxy_temp \
--http-fastcgi-temp-path=/var/cache/nginx/fastcgi_temp \
--http-uwsgi-temp-path=/var/cache/nginx/uwsgi_temp \
--http-scgi-temp-path=/var/cache/nginx/scgi_temp \
--user=nginx \
--group=nginx \
--with-compat \
--with-file-aio \
--with-threads \
--with-http_addition_module \
--with-http_auth_request_module \
--with-http_dav_module \
--with-http_flv_module \
--with-http_gunzip_module \
--with-http_gzip_static_module \
--with-http_mp4_module \
--with-http_random_index_module \
--with-http_realip_module \
--with-http_secure_link_module \
--with-http_slice_module \
--with-http_ssl_module \
--with-http_stub_status_module \
--with-http_sub_module \
--with-http_v2_module \
--with-mail \
--with-mail_ssl_module \
--with-stream \
--with-stream_realip_module \
--with-stream_ssl_module \
--with-stream_ssl_preread_module \
--add-module=/usr/local/src/nginx/nginx_upstream_check_module-master \
--with-cc-opt='-O2 -g -pipe -Wall -Wp,-D_FORTIFY_SOURCE=2 -fexceptions -fstack-protector-strong --param=ssp-buffer-size=4 -grecord-gcc-switches -m64 -mtune=generic -fPIC' \
--with-ld-opt='-Wl,-z,relro -Wl,-z,now -pie'

#  --prefix  指定nginx 的安装目录
#  --sbin-path 运行命令
#  --add-module 添加模块的目录
步骤 5:编译并安装
bash
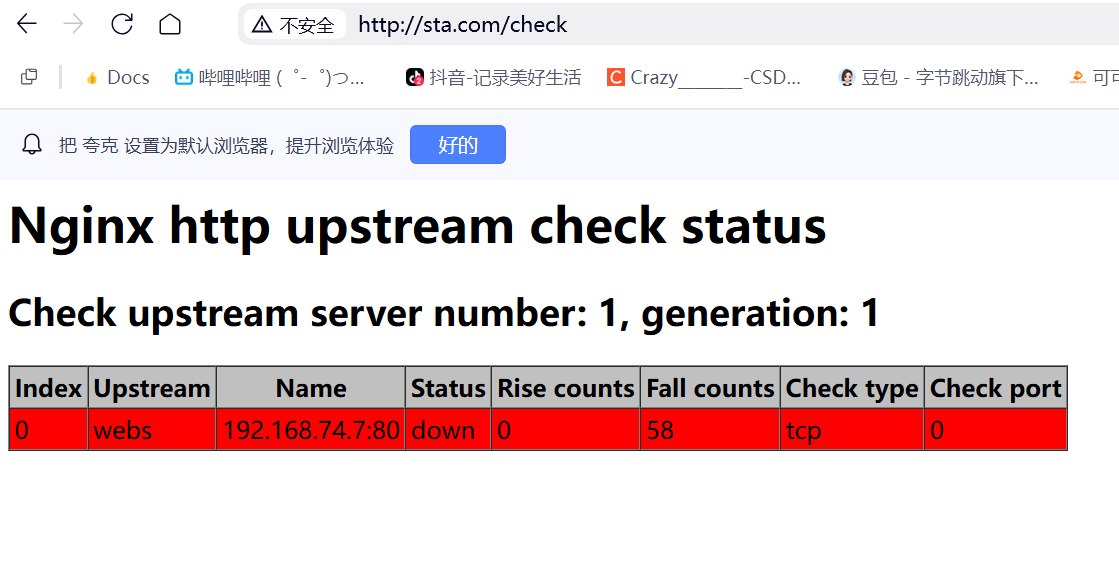
[root@localhost nginx-1.24.0]# make && make install步骤 6:测试模块是否可用
bash
[root@localhost conf.d]# cat default.conf
upstream webs {
  server 192.168.74.7;
  server 192.168.74.8 down;
  check interval=3000 rise=2 fall=3 timeout=1000 type=tcp;
}

server {
  listen 80;
  server_name www.admin.com;

  location / {
    proxy_pass http://webs;
    include proxy_params;
    proxy_next_upstream error timeout http_500 http_502 http_503 http_504;
}

  location /check {
    check_status;
}
}