目录
1.中央转发器
传统的mvc是通过在web.xml配置文件当中配置DispatcherServlet :
XML
<?xml version="1.0" encoding="UTF-8"?>
<web-app>
    <!-- 配置 DispatcherServlet -->
    <servlet>
        <servlet-name>dispatcher</servlet-name>
        <servlet-class>org.springframework.web.servlet.DispatcherServlet</servlet-class>
        <!-- 指定Spring MVC配置文件位置 -->
        <init-param>
            <param-name>contextConfigLocation</param-name>
            <param-value>classpath:springmvc.xml</param-value>
        </init-param>
        <load-on-startup>1</load-on-startup>
    </servlet>

    <!-- 配置Servlet映射 -->
    <servlet-mapping>
        <servlet-name>dispatcher</servlet-name>
        <url-pattern>/</url-pattern>
    </servlet-mapping>
</web-app>
在springboot项目当中,中央转发器被springboot自动接管,不再需要我们在web.xml中配置。
我们可以在源码当中看到配置:
在org.springframework.boot.autoconfigure.web.DispatcherServletAutoConfiguration,\当中:
我们能看到几个关键的方法:
java
Bean(name = DEFAULT_DISPATCHER_SERVLET_BEAN_NAME)
public DispatcherServlet dispatcherServlet() {
	DispatcherServlet dispatcherServlet = new DispatcherServlet();
	dispatcherServlet.setDispatchOptionsRequest(
			this.webMvcProperties.isDispatchOptionsRequest());
	dispatcherServlet.setDispatchTraceRequest(
			this.webMvcProperties.isDispatchTraceRequest());
	dispatcherServlet.setThrowExceptionIfNoHandlerFound(
			this.webMvcProperties.isThrowExceptionIfNoHandlerFound());
	return dispatcherServlet;
}
这个方法自动创建了DispatcherServlet,自动配置了各种属性。
java
@Bean(name = DEFAULT_DISPATCHER_SERVLET_REGISTRATION_BEAN_NAME)
@ConditionalOnBean(value = DispatcherServlet.class, name = DEFAULT_DISPATCHER_SERVLET_BEAN_NAME)
public ServletRegistrationBean dispatcherServletRegistration(
		DispatcherServlet dispatcherServlet) {
	ServletRegistrationBean registration = new ServletRegistrationBean(
			dispatcherServlet, this.serverProperties.getServletMapping());
	registration.setName(DEFAULT_DISPATCHER_SERVLET_BEAN_NAME);
	registration.setLoadOnStartup(
			this.webMvcProperties.getServlet().getLoadOnStartup());
	if (this.multipartConfig != null) {
		registration.setMultipartConfig(this.multipartConfig);
	}
	return registration;
}
这个方法自动创建了servlet
2.控制器Controller
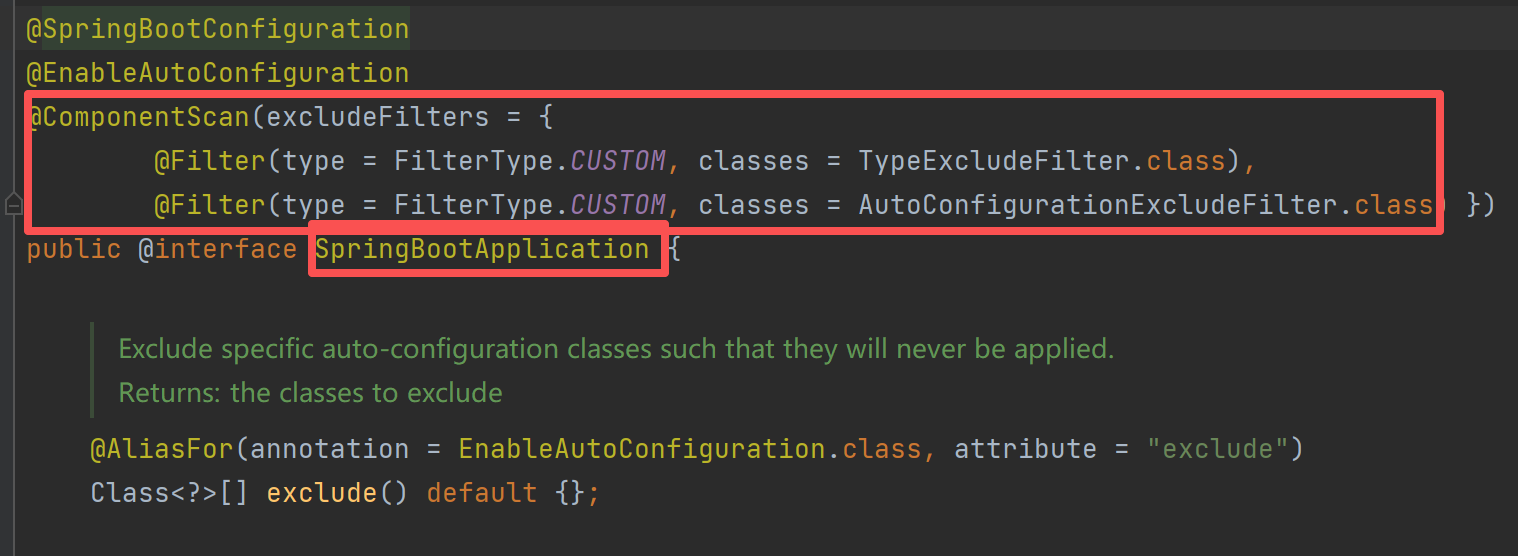
在Springboot的主启动类当中,有@SpringBootApplication注解,里面有@ComponentScan注解,在之前自动装配的时候说过:@ComponentScan 会扫描主启动类所在包及其子包,包括:@Controller,@Service,@Repository,@Component等其他Spring组件
3.视图解析器自动管理
视图解析器InternalResourceViewResolver在springmvc当中的xml配置:
XML
<!-- 在 springmvc.xml 中配置MVC组件 -->
<beans>
    <!-- 组件扫描 -->
    <context:component-scan base-package="com.example.controller"/>

    <!-- 视图解析器 -->
    <bean class="org.springframework.web.servlet.view.InternalResourceViewResolver">
        <property name="prefix" value="/WEB-INF/views/"/>
        <property name="suffix" value=".jsp"/>
    </bean>

    <!-- MVC注解驱动 -->
    <mvc:annotation-driven/>
</beans>
Spring Boot 在 WebMvcAutoConfiguration 中自动配置视图解析器:
java
@Configuration
@ConditionalOnWebApplication
@ConditionalOnClass({ Servlet.class, DispatcherServlet.class })
@AutoConfigureAfter(DispatcherServletAutoConfiguration.class)
public class WebMvcAutoConfiguration {

    @Bean
    @ConditionalOnMissingBean(InternalResourceViewResolver.class)
    @ConditionalOnProperty(prefix = "spring.mvc", name = "view.prefix")
    public InternalResourceViewResolver defaultViewResolver() {
        InternalResourceViewResolver resolver = new InternalResourceViewResolver();
        resolver.setPrefix(this.mvcProperties.getView().getPrefix());
        resolver.setSuffix(this.mvcProperties.getView().getSuffix());
        return resolver;
    }
}
需要满足的条件:
java
@ConditionalOnMissingBean(InternalResourceViewResolver.class)  // 用户没有自定义时才生效
@ConditionalOnProperty(prefix = "spring.mvc", name = "view.prefix")  // 配置了前缀时才生效
所以需要我们手动在application.yaml当中配置:
java
spring.mvc.view.prefix=/WEB-INF/views/
spring.mvc.view.suffix=.jsp
4.消息转换和格式化
Springboot自动配置了消息转换器
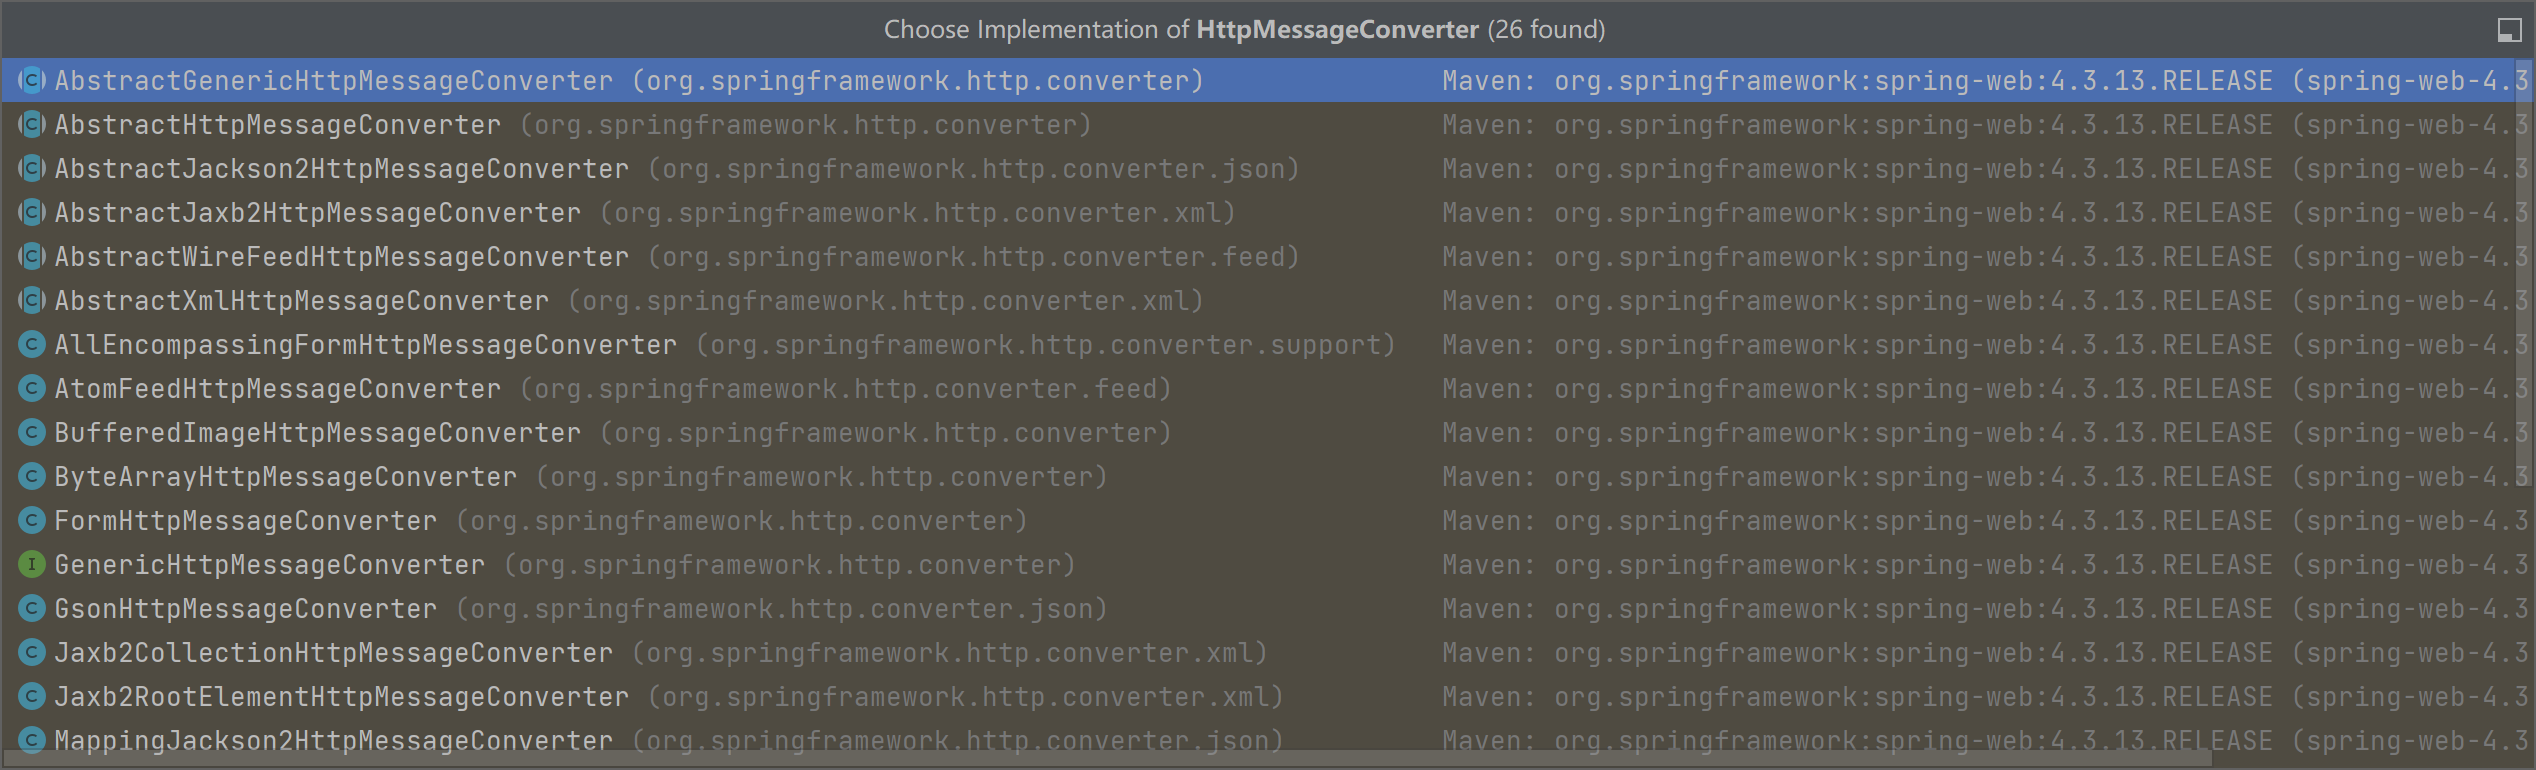
我们在idea中Ctrl+N进入全局查找,输入HttpMessageConverter,找到接口:
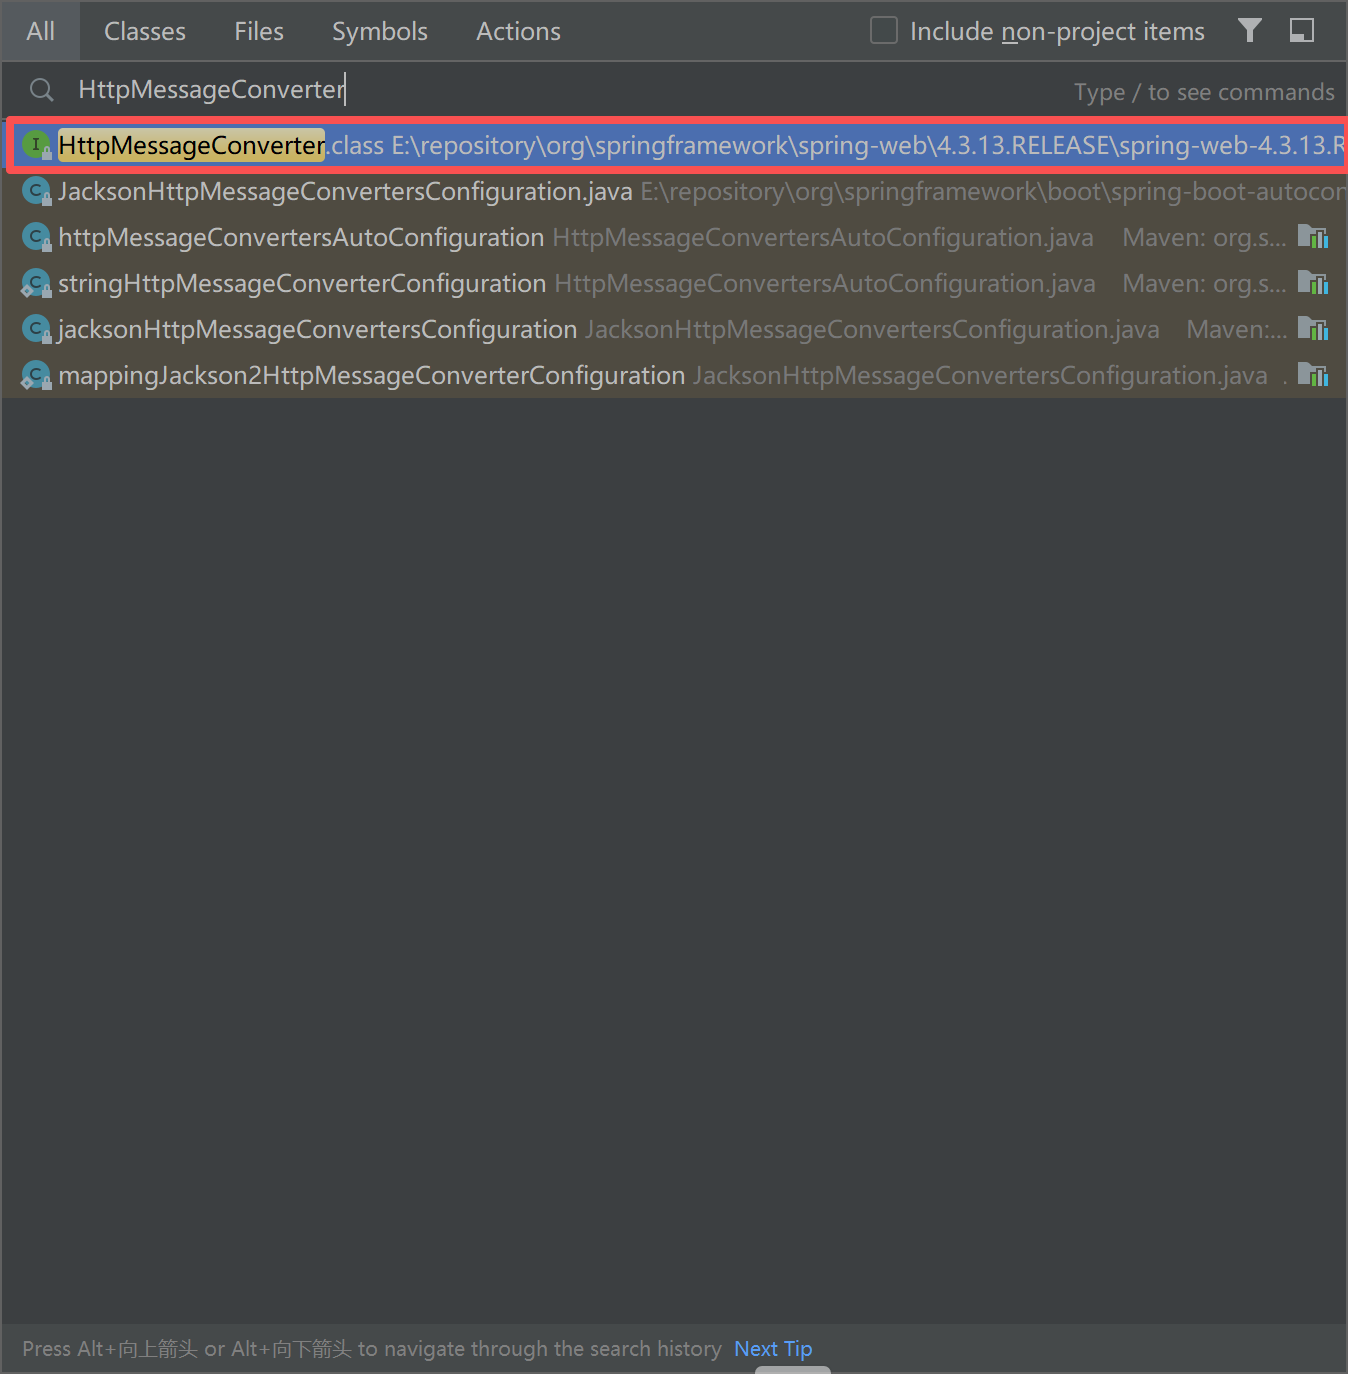
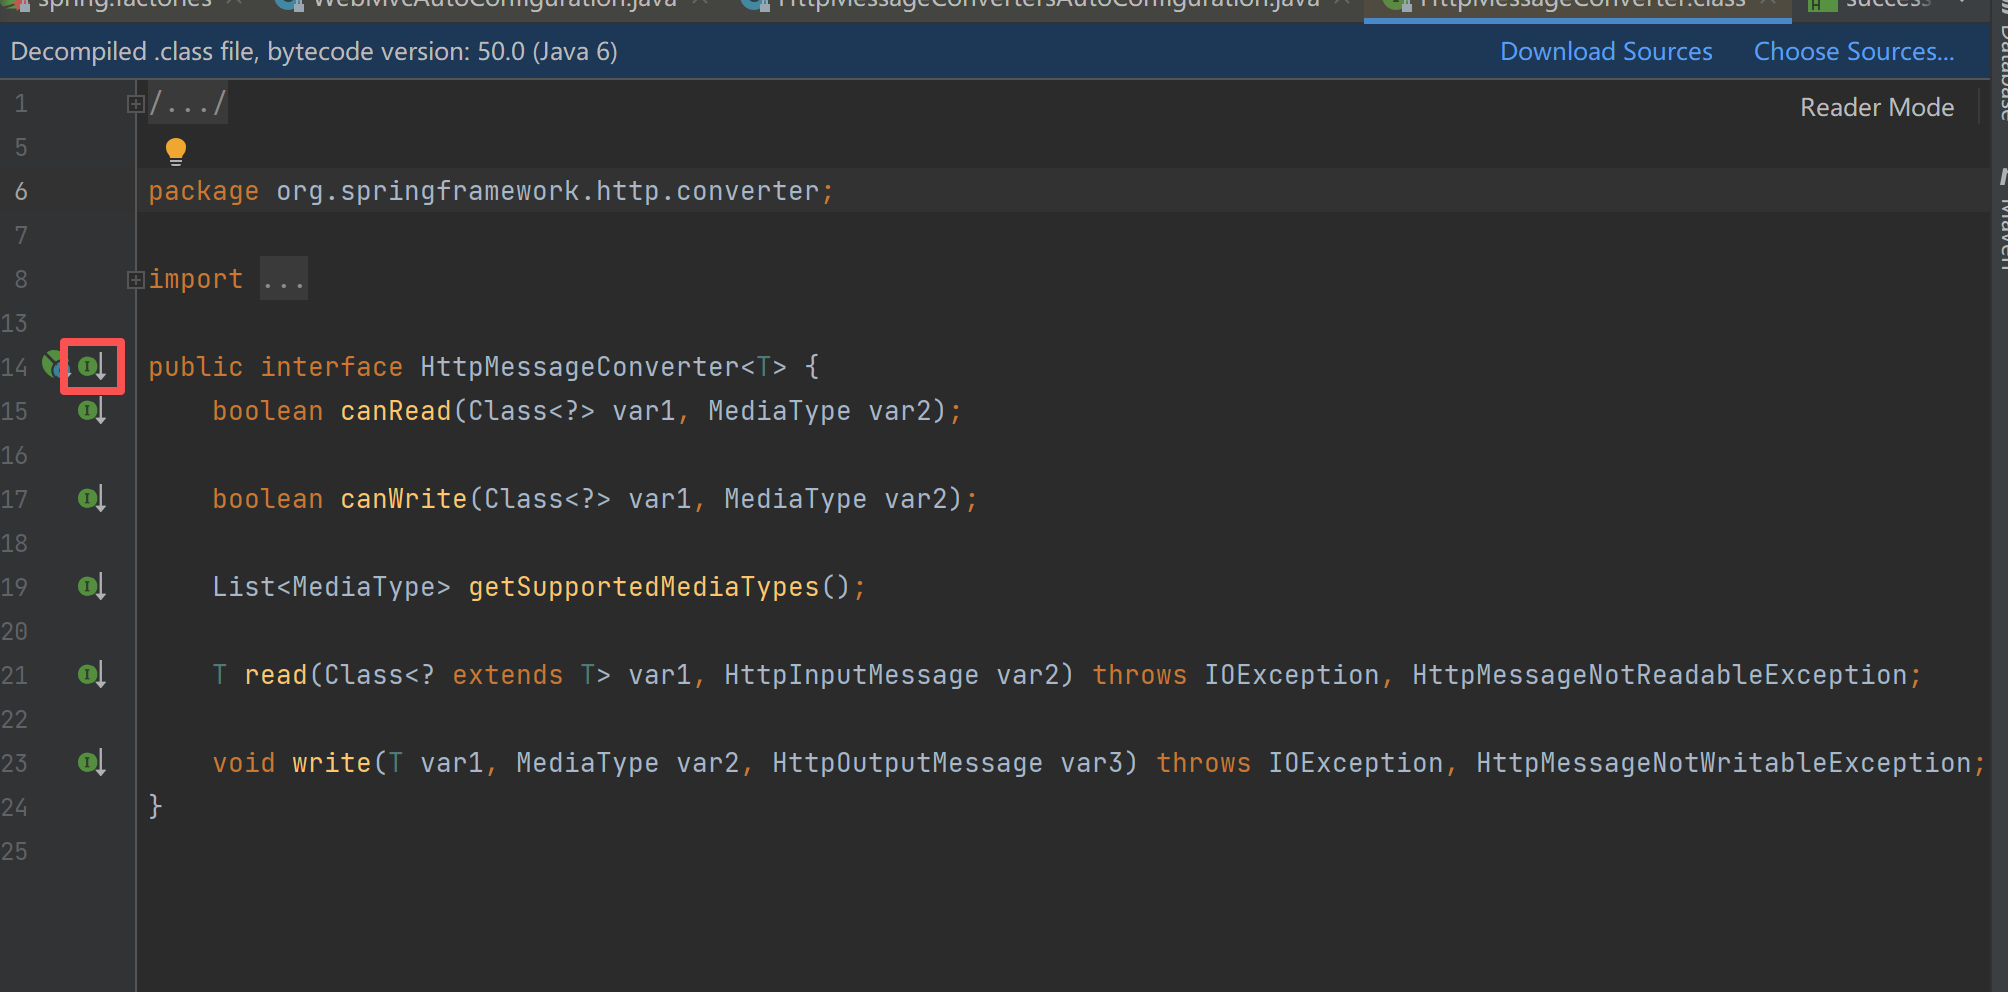
点击之后可以查看其实现类:
格式化转换器的自动注册
我们在WebMvcAutoConfiguration类的addFormatters方法的第一行打断点,然后debug:
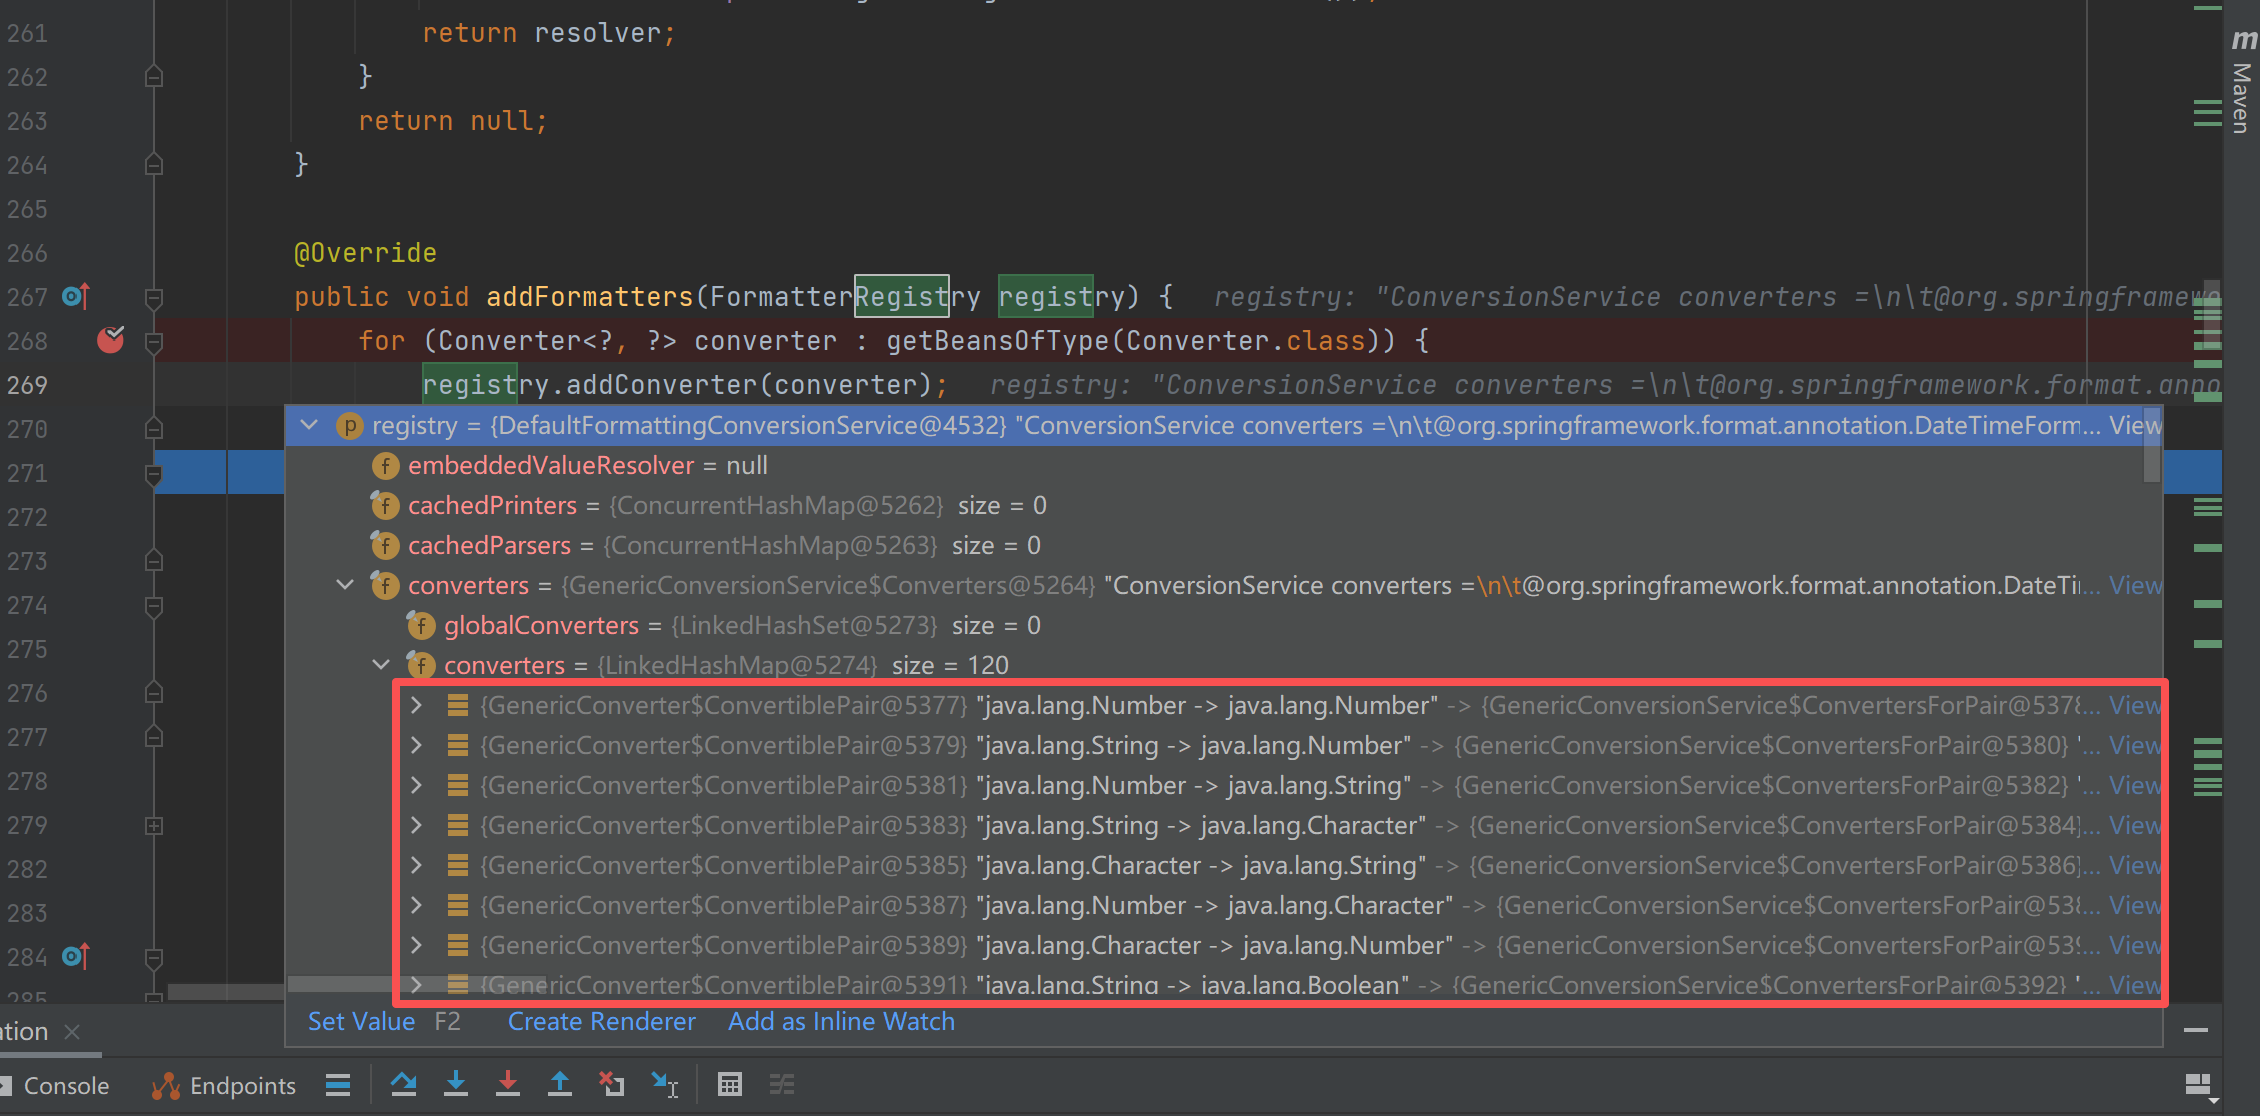
debug的信息可以看到它的主要功能:
类型转换:String ↔ 各种Java类型
数据格式化:日期、数字、货币等格式化
注解驱动:处理 @DateTimeFormat、@NumberFormat 等注解
我们仔细查看debug信息可以看到:
java
// Long类型格式化
@DateTimeFormat java.lang.Long -> java.lang.String:
    DateTimeFormatAnnotationFormatterFactory@d3e3085
@NumberFormat java.lang.Long -> java.lang.String:
    NumberFormatAnnotationFormatterFactory@4b87074a

// Java 8 日期时间格式化
java.time.LocalDate -> java.lang.String:
    Jsr310DateTimeFormatAnnotationFormatterFactory@73ca34e7
java.time.LocalDate -> java.lang.String:
    TemporalAccessorPrinter@4d98e41b

java.time.LocalDateTime -> java.lang.String:
    Jsr310DateTimeFormatAnnotationFormatterFactory@73ca34e7
java.time.LocalDateTime -> java.lang.String:
    TemporalAccessorPrinter@4d98e41b
4.欢迎页面的自动配置
Springboot自动指定resources下的index.html
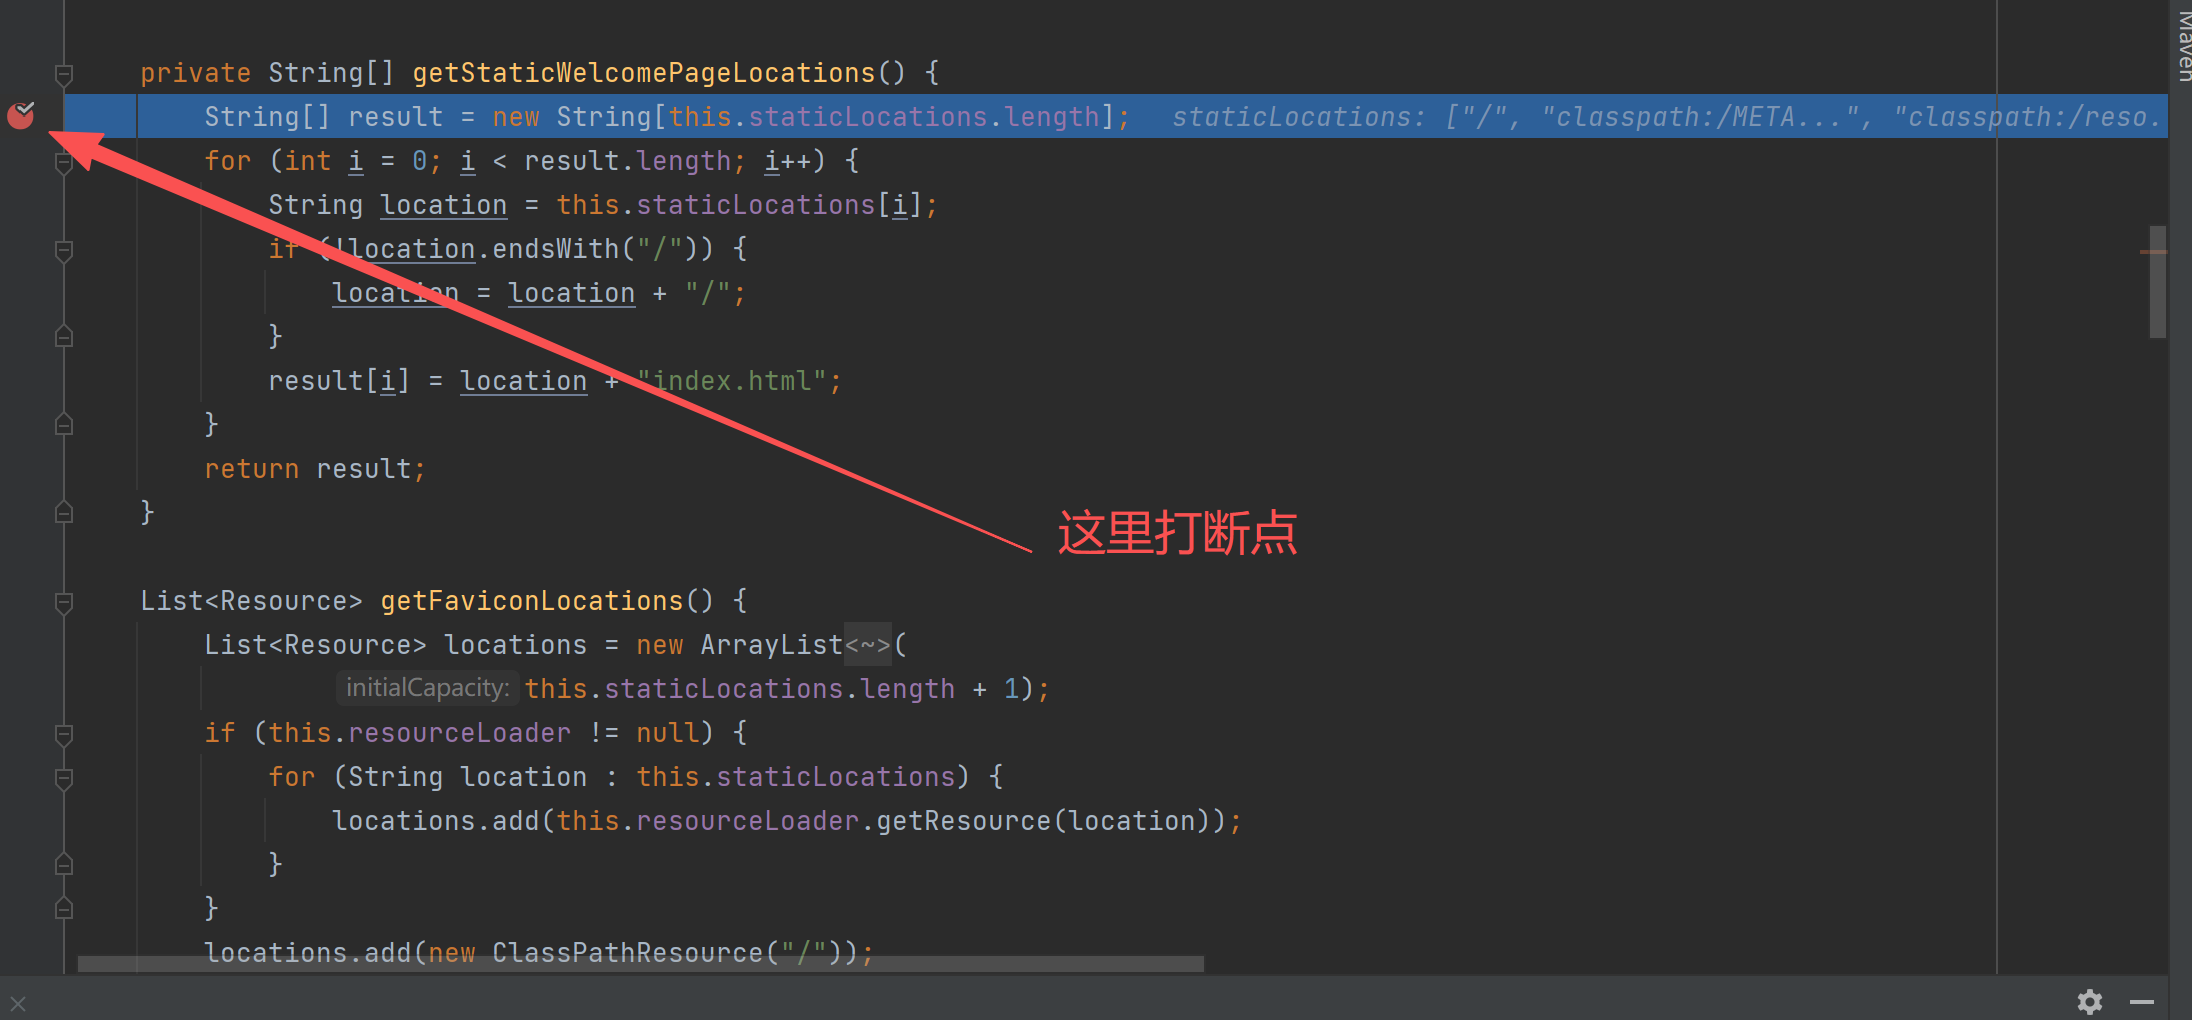
我们全局查找ResourceProperties这个类,在里面能看到getStaticWelcomePageLocations()方法:
java
private String[] getStaticWelcomePageLocations() {
String[] result = new String[this.staticLocations.length];
for (int i = 0; i < result.length; i++) {
String location = this.staticLocations[i];
if (!location.endsWith("/")) {
location = location + "/";
}
result[i] = location + "index.html";
}
return result;
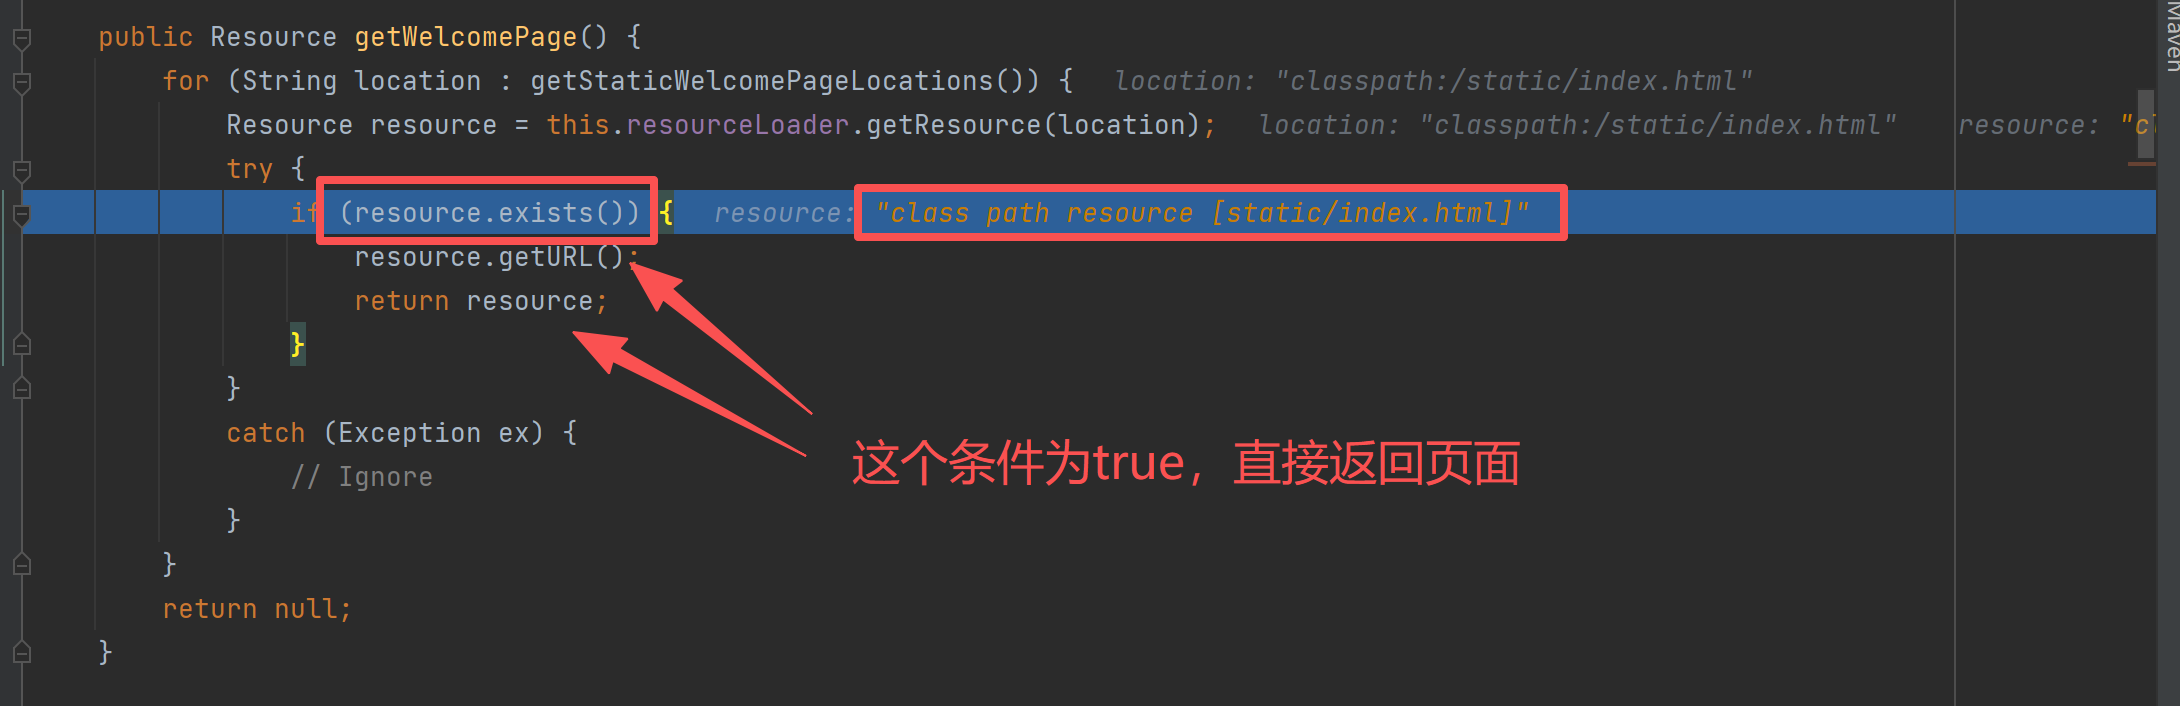
}这个方法可以构建完整的欢迎页面路径,结合getWelcomePage()方法使用:
java
public Resource getWelcomePage() {
for (String location : getStaticWelcomePageLocations()) {
Resource resource = this.resourceLoader.getResource(location);
try {
if (resource.exists()) {
resource.getURL();
return resource;
}
}
catch (Exception ex) {
// Ignore
}
}
return null;
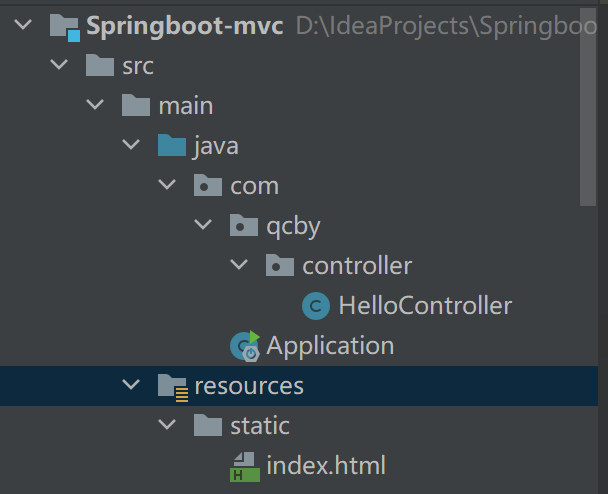
}我们分别在static目录下创建index.html,然后在getWelcomePage()方法的第一行打断点:
如图:(注意不能在resource目录下创建,后续debug时会说)
我们查看debug信息:
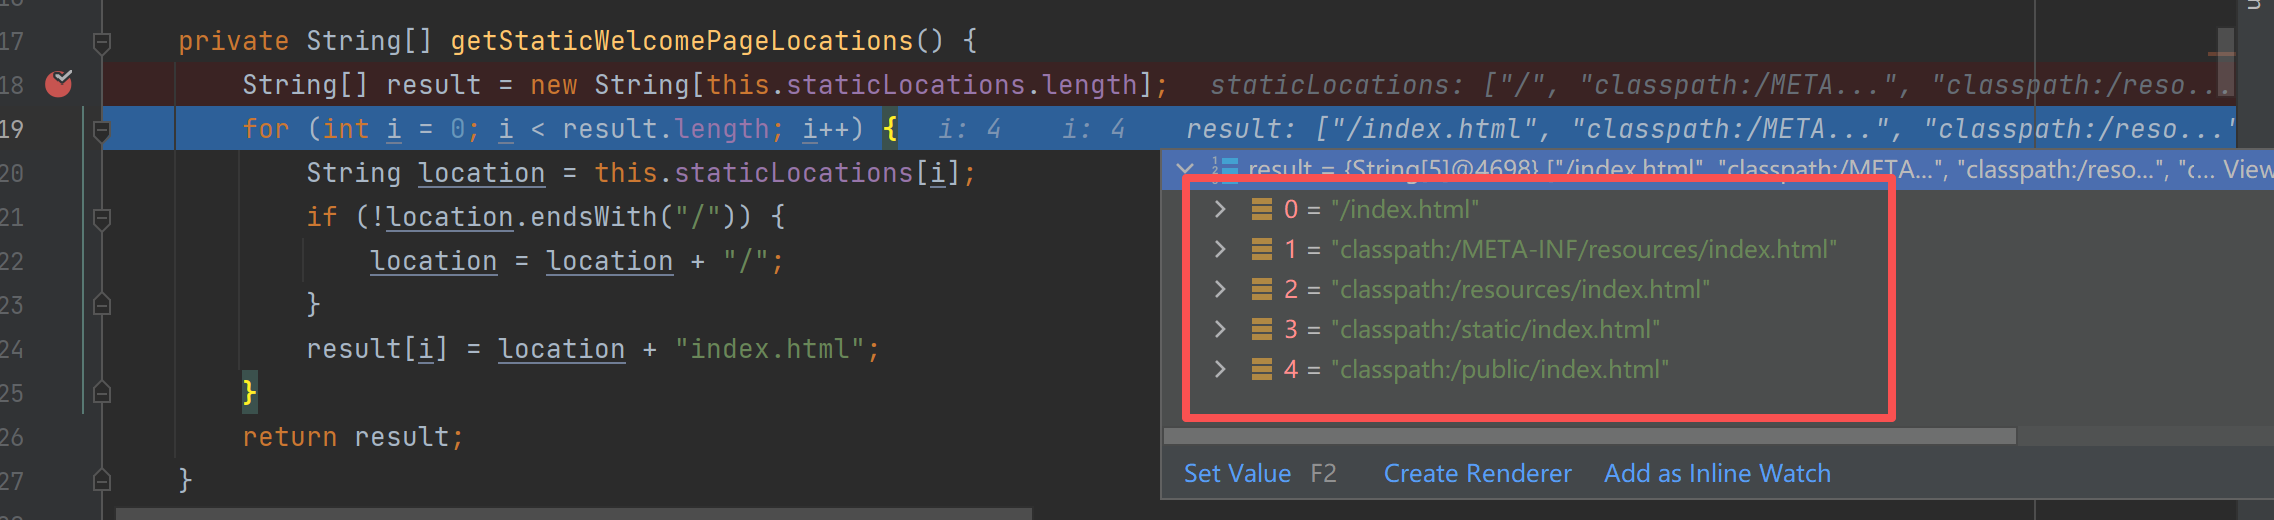
可以看到springboot查找欢迎页面的默认位置:
java
// Spring Boot 只在以下位置查找 index.html:
1. classpath:/META-INF/resources/index.html
2. classpath:/resources/index.html// 注意:这是 resources/resources/ 目录!
3. classpath:/static/index.html
4. classpath:/public/index.html
然后在getWelcomePage()方法中,
Debug 时会按顺序检查:
classpath:/META-INF/resources/index.html → ❌ 不存在
classpath:/resources/index.html → 找到文件
classpath:/static/index.html → 不会执行到这里
classpath:/public/index.html → 不会执行到这里
如图: