引言: 本文介绍了目前MCP Server的开发方式和原理,包括streamable HTTP和STDIO两种。并提供了一个npm脚手架工具帮你创建项目,每个模板项目都是可运行的。
streamable HTTP
原理分析
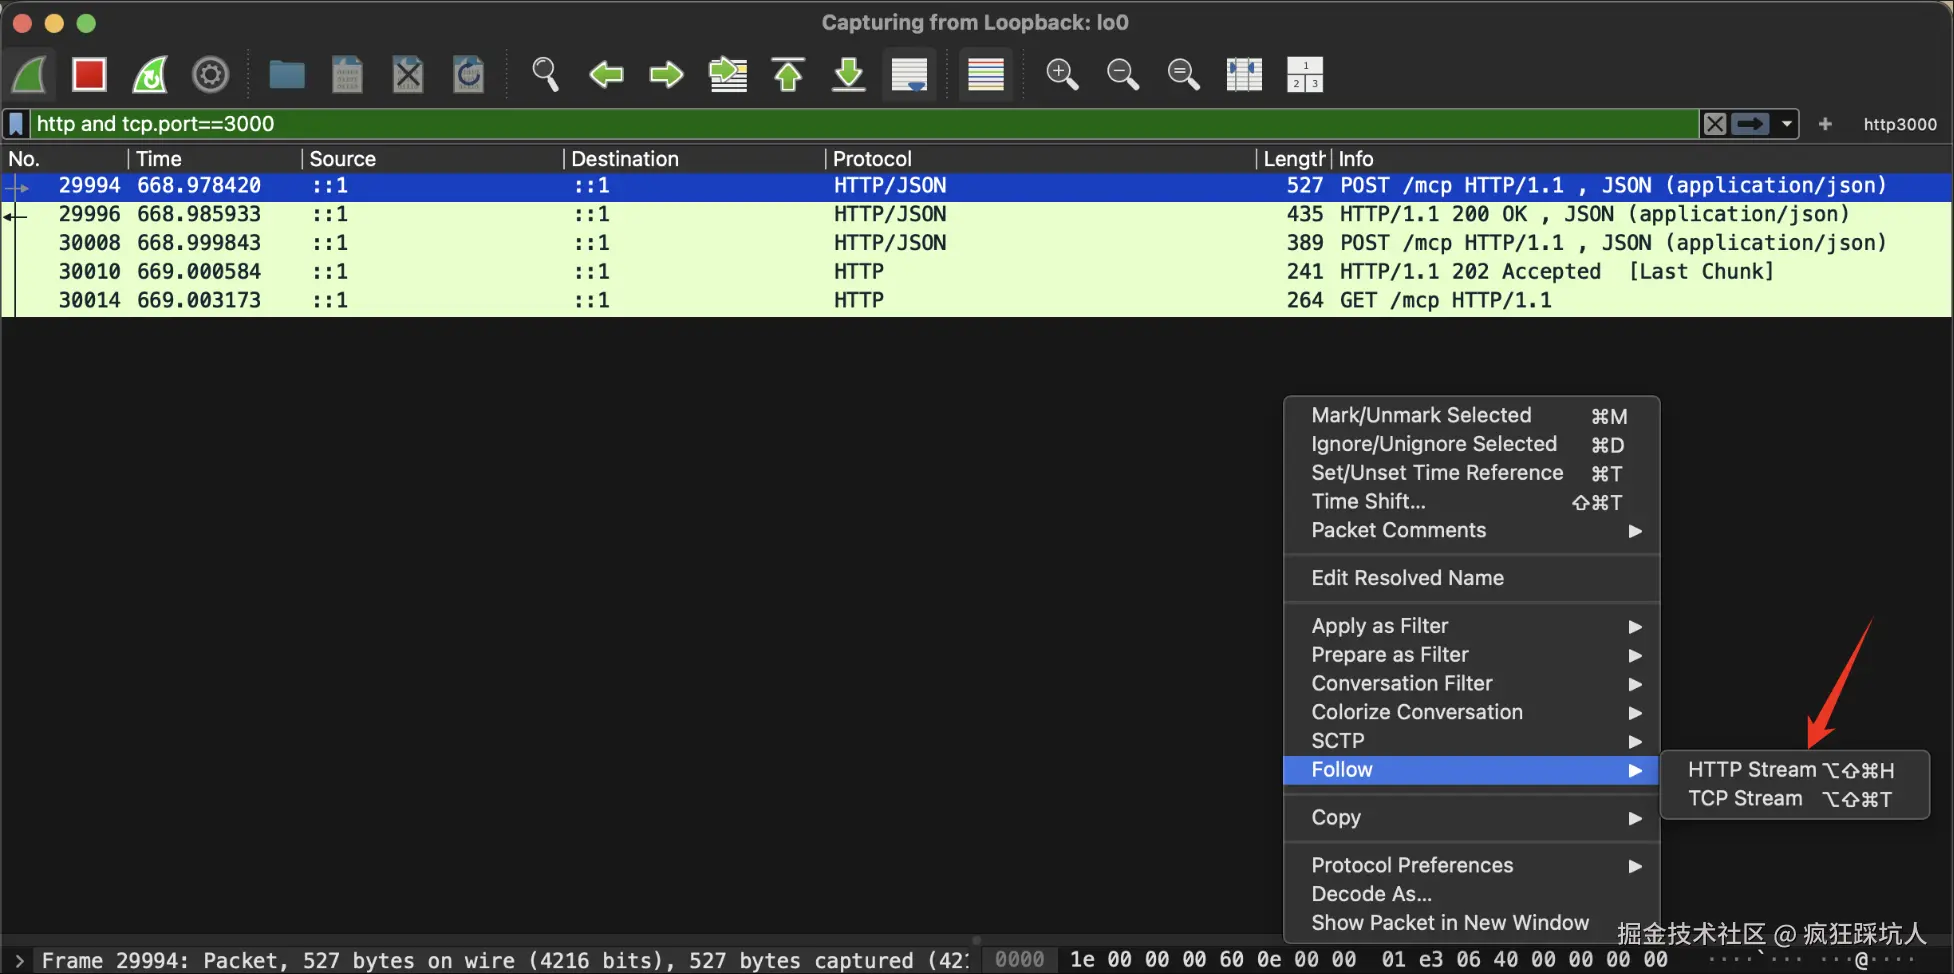
抓包「握手」
MCP Client总共发了三次请求,MCP Server响应2次。实际的握手流程是4次握手,第5次请求是为了通知后续的信息(比如进度,日志等。 目前规范实现来看,第5次握手不影响正常功能)
使用wiresshark抓包结果如下:
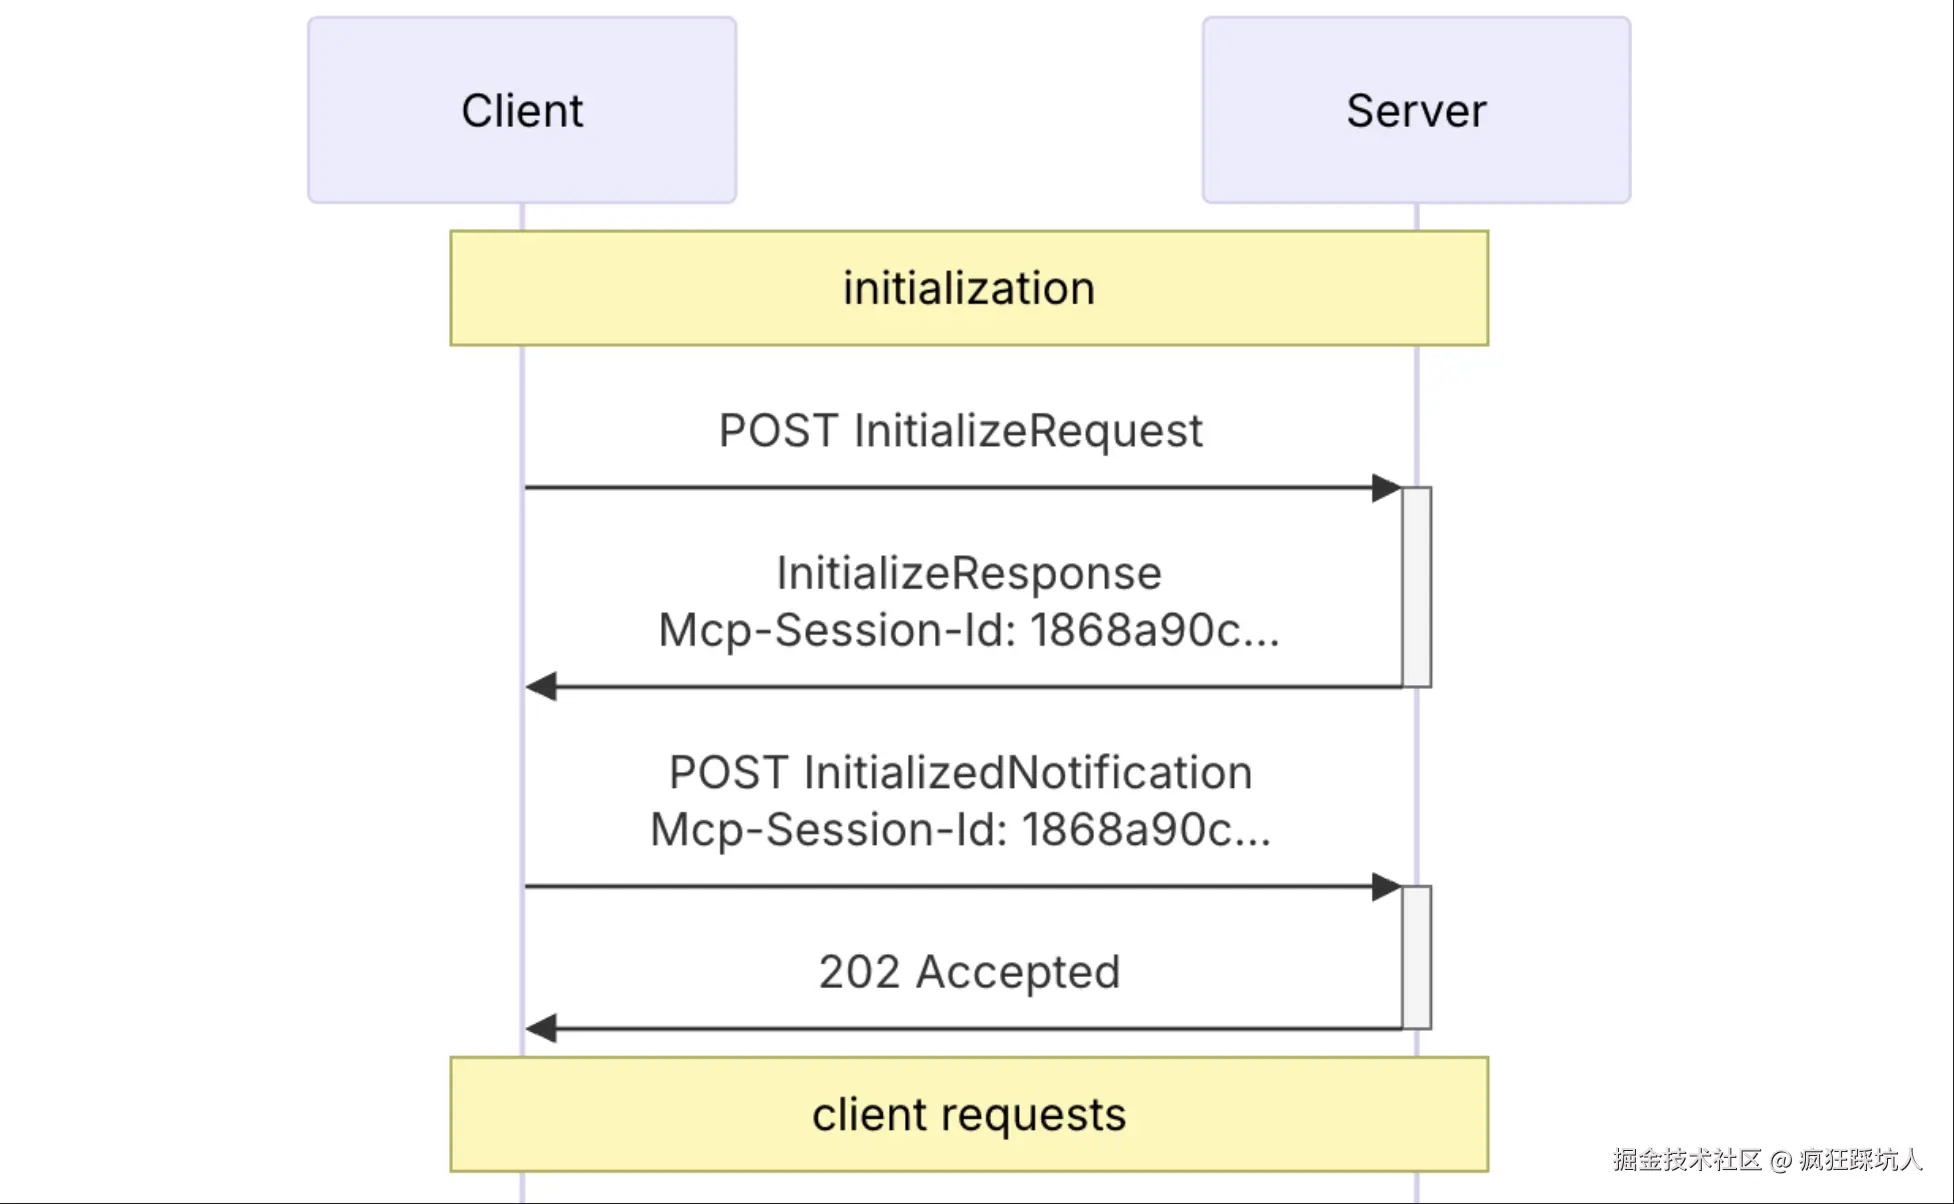
从官网的「initialization」流程来看,也就是4次(第5次未来应该会被普遍实现)
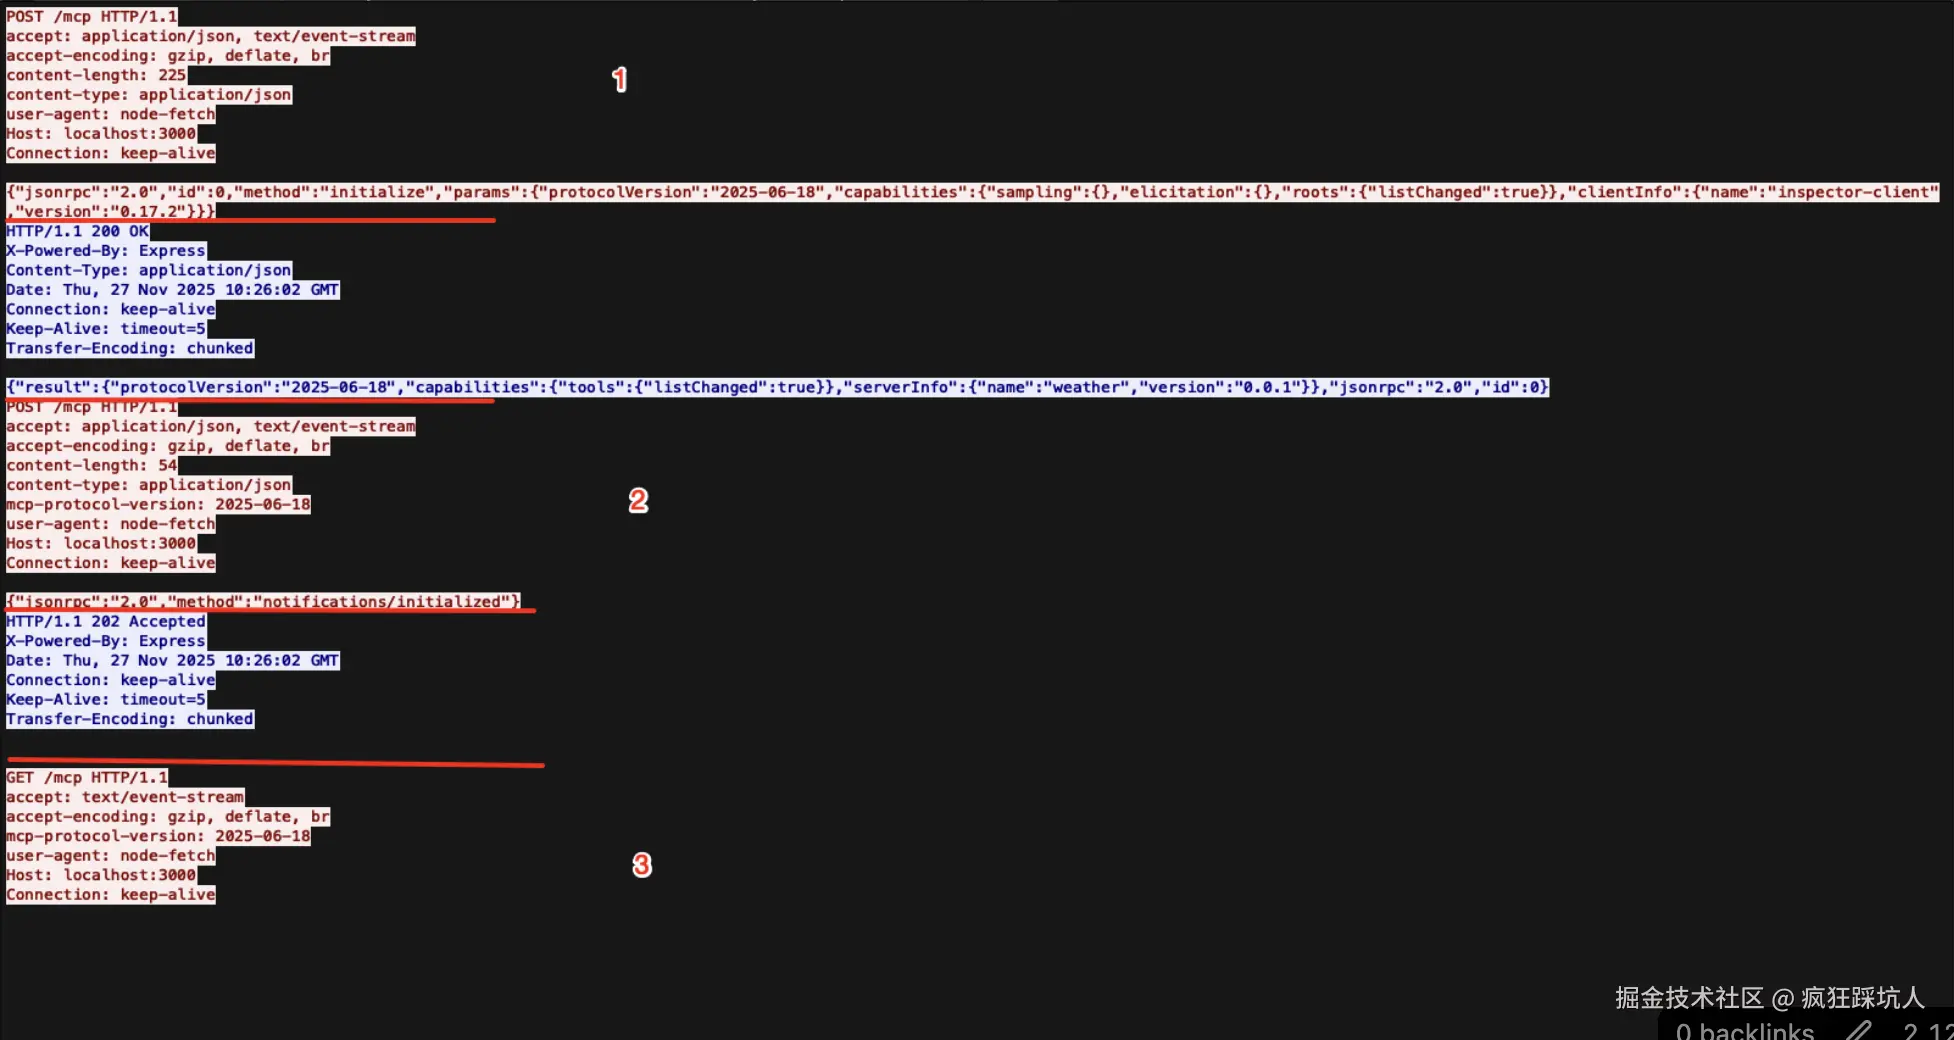
第1次 Post请求,initialize 方法
json
{
  "jsonrpc": "2.0",
  "id": 0,
  "method": "initialize",
  "params": {
    "protocolVersion": "2025-06-18",
    "capabilities": {
      "sampling": {},
      "elicitation": {},
      "roots": {
        "listChanged": true
      }
    },
    "clientInfo": {
      "name": "inspector-client",
      "version": "0.17.2"
    }
  }
}
第2次 :200 OK,响应体如下
json
{
  "result": {
    "protocolVersion": "2025-06-18",
    "capabilities": {
      "tools": {
        "listChanged": true
      }
    },
    "serverInfo": {
      "name": "weather",
      "version": "0.0.1"
    }
  },
  "jsonrpc": "2.0",
  "id": 0
}
第3次 :Post请求,notifications/initialized方法
json
{"jsonrpc":"2.0","method":"notifications/initialized"}第4次 :202 Accepted,无响应体
第5次 :Get请求,此时要求服务端一定是SSE传输了-accept: text/event-stream
vbnet
GET /mcp HTTP/1.1
accept: text/event-stream
总结「握手」流程
-
POST /mcp (initialize)
- 客户端:你好,我是 Inspector Client,我想初始化。
- 服务器:收到,这是我的能力列表(200 OK)。
- 状态:JSON-RPC 会话开始。
-
POST /mcp (notifications/initialized)
- 客户端:我已经收到你的能力了,初始化完成。
- 服务器:收到 (202 Accepted)。
- 状态:逻辑握手完成。
-
GET /mcp (Header: accept: text/event-stream)
- 目的 :客户端现在试图建立长连接通道,以便在未来能收到服务器发来的通知(比如 notifications/message 或 roots/listChanged)。如果没有这个通道,服务器就变成了"哑巴",无法主动联系客户端。
后续通信
tools/list (列出工具)
client->server 请求
请求头:
http
POST /mcp HTTP/1.1
accept: application/json, text/event-stream
accept-encoding: gzip, deflate, br
content-length: 85
content-type: application/json
mcp-protocol-version: 2025-06-18
user-agent: node-fetch
Host: localhost:3000
Connection: keep-alive
请求数据:
json
{
  "jsonrpc": "2.0",
  "id": 1,
  "method": "tools/list",
  "params": {
    "_meta": {
      "progressToken": 1
    }
  }
}
P.S. params中的progressToken是可以用于后续的进度通知的(通过SSE)
server->client 响应
响应头:
http
HTTP/1.1 200 OK
X-Powered-By: Express
Content-Type: application/json
Date: Thu, 27 Nov 2025 11:52:31 GMT
Connection: keep-alive
Keep-Alive: timeout=5
Transfer-Encoding: chunked
响应体:
json
{
  "result": {
    "tools": [
      {
        "name": "get_weather_now",
        "title": "Get Weather Now",
        "description": "Get current weather for a location (city name)",
        "inputSchema": {
          "$schema": "http://json-schema.org/draft-07/schema#",
          "type": "object",
          "properties": {
            "location": {
              "description": "Location name or city (e.g. beijing, shanghai, new york, tokyo)",
              "type": "string"
            }
          },
          "required": [
            "location"
          ]
        }
      }
    ]
  },
  "jsonrpc": "2.0",
  "id": 1
}
这里列出一个工具:
get_weather_now,我们自己定义/注册的工具。我们可以拿到它的title,description和inputSchema,这些语义信息可以帮助LLM理解这个工具。
tools/call (调用tool)
这里通过 mcp inspector 工具调用了get_weather_now,请求体如下:
json
{
  "jsonrpc": "2.0",
  "id": 2,
  "method": "tools/call",
  "params": {
    "_meta": {
      "progressToken": 2
    },
    "name": "get_weather_now",
    "arguments": {
      "location": "北京"
    }
  }
}
响应体:
json
{
  "result": {
    "content": [
      {
        "type": "text",
        "text": "Weather for 北京, CN:\nCondition: 晴\nTemperature: 3°C\nLast Update: 2025-11-27T19:50:14+08:00"
      }
    ]
  },
  "jsonrpc": "2.0",
  "id": 2
}
方法小总结
上面我们列出了两种常见的方法
tools/list。MCP Client在向LLM发请求携带列出的tool,LLM会告诉客户端调用的tool name,然后由MCP client来触发tool调用。tools/call。MCP Client告诉MCP Server 调用哪个tool。
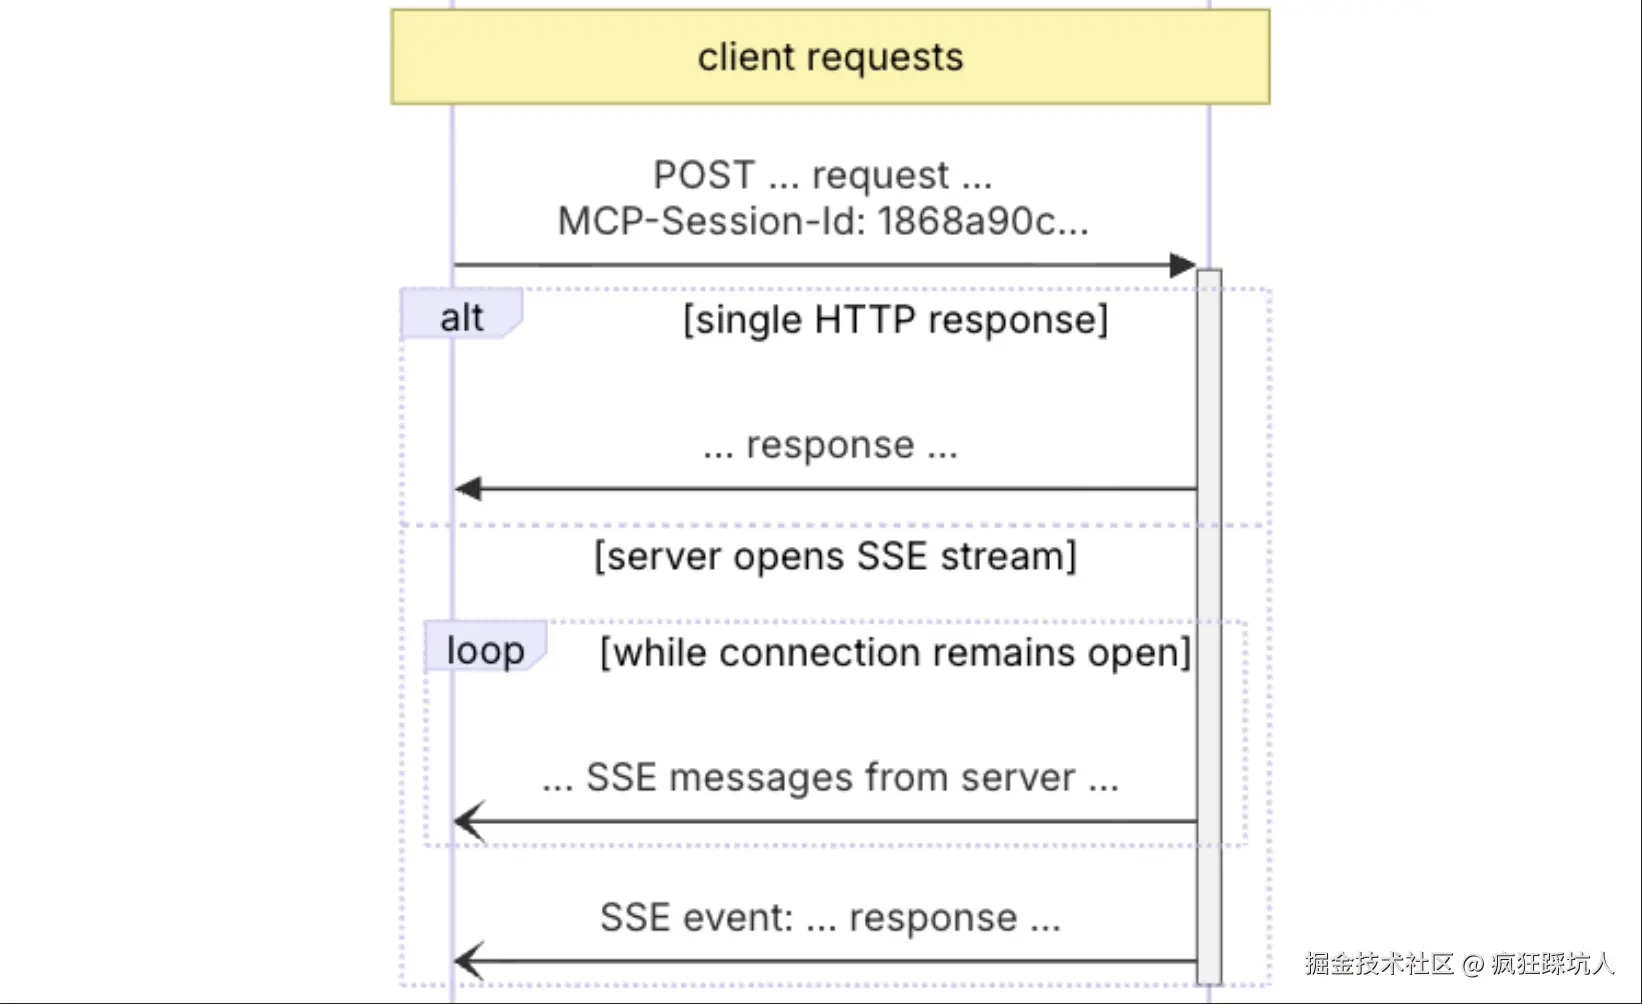
可以结合官网的这张示意图,调用tool就是一次request/response。如果是长任务,可以通过_meta.progressToken作为关联,通过SSE持续通知进度(还记得「握手」流程的第5次握手吗)
代码实战 - 天气工具
准备天气API
这里我使用了心知天气的API,然后自己封装一个node API。 src/core/seniverse.ts
ts
import * as crypto from 'node:crypto';
import * as querystring from 'node:querystring';
/**
 * 查询天气接口
 */
const API_URL = 'https://api.seniverse.com/v3/';
export class SeniverseApi {
    publicKey;
    secretKey;
    constructor(publicKey, secretKey) {
        this.publicKey = publicKey;
        this.secretKey = secretKey;
    }
    async getWeatherNow(location) {
        const params = {
            ts: Math.floor(Date.now() / 1000), // Current timestamp (seconds)
            ttl: 300, // Expiration time
            public_key: this.publicKey,
            location: location
        };
        // Step 2: Sort keys and construct the string for signature
        // "key=value" joined by "&", sorted by key
        const sortedKeys = Object.keys(params).sort();
        const str = sortedKeys.map(key => `${key}=${params[key]}`).join('&');
        // Step 3: HMAC-SHA1 signature
        const signature = crypto
            .createHmac('sha1', this.secretKey)
            .update(str)
            .digest('base64');
        // Step 4 & 5: Add sig to params and encode for URL
        // querystring.encode will handle URL encoding of the signature and other params
        params.sig = signature;
        const queryString = querystring.encode(params);
        const url = `${API_URL}weather/now.json?${queryString}`;
        try {
            const response = await fetch(url);
            if (!response.ok) {
                throw new Error(`HTTP error! status: ${response.status}`);
            }
            return await response.json();
        }
        catch (error) {
            console.error("Error making Seniverse request:", error);
            return null;
        }
    }
}
src/core/index.ts
ts
import { SeniverseApi } from './seniverse.js';

export const seniverseApi = new SeniverseApi(
  process.env.SENIVERSE_PUBLIC_KEY || '',
  process.env.SENIVERSE_SECRET_KEY || '',
);
搭建streamable HTTP类型的MCP
1.使用express提供后端服务,然后设置/mcp endpoint(一般来说MCP client默认就是访问这个endpoint). 2.在MCP协议中,握手/工具调用等都是通过这个一个endpoint来完成的。
3.封装逻辑 封装了一个MyServer类
run方法启动HTTP服务init方法注册工具
4.核心是McpServer和StreamableHTTPServerTransport两个API
McpServer: 负责注册tool.StreamableHTTPServerTransport: 接管了/mcpendpoint的通信逻辑
json
import { McpServer } from "@modelcontextprotocol/sdk/server/mcp.js";
import { StreamableHTTPServerTransport } from "@modelcontextprotocol/sdk/server/streamableHttp.js";
import express from "express";
import { z } from "zod";
import "dotenv/config";
import { seniverseApi } from "./core/index.js";

export class MyServer {
  private mcpServer: McpServer;
  private app: express.Express
  constructor() {
    this.mcpServer = new McpServer({
      name: "weather",
      version: "0.0.1",
    });

    // Set up Express and HTTP transport
    this.app = express();
    this.app.use(express.json());

    this.app.use('/mcp', async (req: express.Request, res: express.Response) => {
        // Create a new transport for each request to prevent request ID collisions
        const transport = new StreamableHTTPServerTransport({
            sessionIdGenerator: undefined,
            enableJsonResponse: true
        });

        res.on('close', () => {
            transport.close();
        });

        await this.mcpServer.connect(transport);
        await transport.handleRequest(req, res, req.body);
    });

  }

  /**
   * 在端口运行Server, 通过HTTP stream传输数据
   */
  async run(): Promise<void> {
    const port = parseInt(process.env.PORT || '3000');
    this.app.listen(port, () => {
        console.log(`Demo MCP Server running on http://localhost:${port}/mcp`);
    }).on('error', error => {
        console.error('Server error:', error);
        process.exit(1);
    });

  }

  /**
   * 初始化,注册工具
   */
  async init(): Promise<void> {
    // Register weather tool
    this.mcpServer.registerTool(
      "get_weather_now",
      {
        title: "Get Weather Now",
        description: "Get current weather for a location (city name)",
        inputSchema: {
          location: z.string().describe("Location name or city (e.g. beijing, shanghai, new york, tokyo)")
        }
      },
      async ({ location }) => {

        const weatherData = await seniverseApi.getWeatherNow(location);
        if (!weatherData || !weatherData.results || weatherData.results.length === 0) {
          return {
            content: [
              {
                type: "text",
                text: `Failed to retrieve weather data for location: ${location}. Please check the location name and try again.`,
              },
            ],
          };
        }

        const result = weatherData.results[0];
        const weatherText = `Weather for ${result.location.name}, ${result.location.country}:\n` +
                            `Condition: ${result.now.text}\n` +
                            `Temperature: ${result.now.temperature}°C\n` +
                            `Last Update: ${result.last_update}`;
        return {
          content: [
            {
              type: "text",
              text: weatherText,
            },
          ],
        };
      },
    );
  }
}
效果如下:
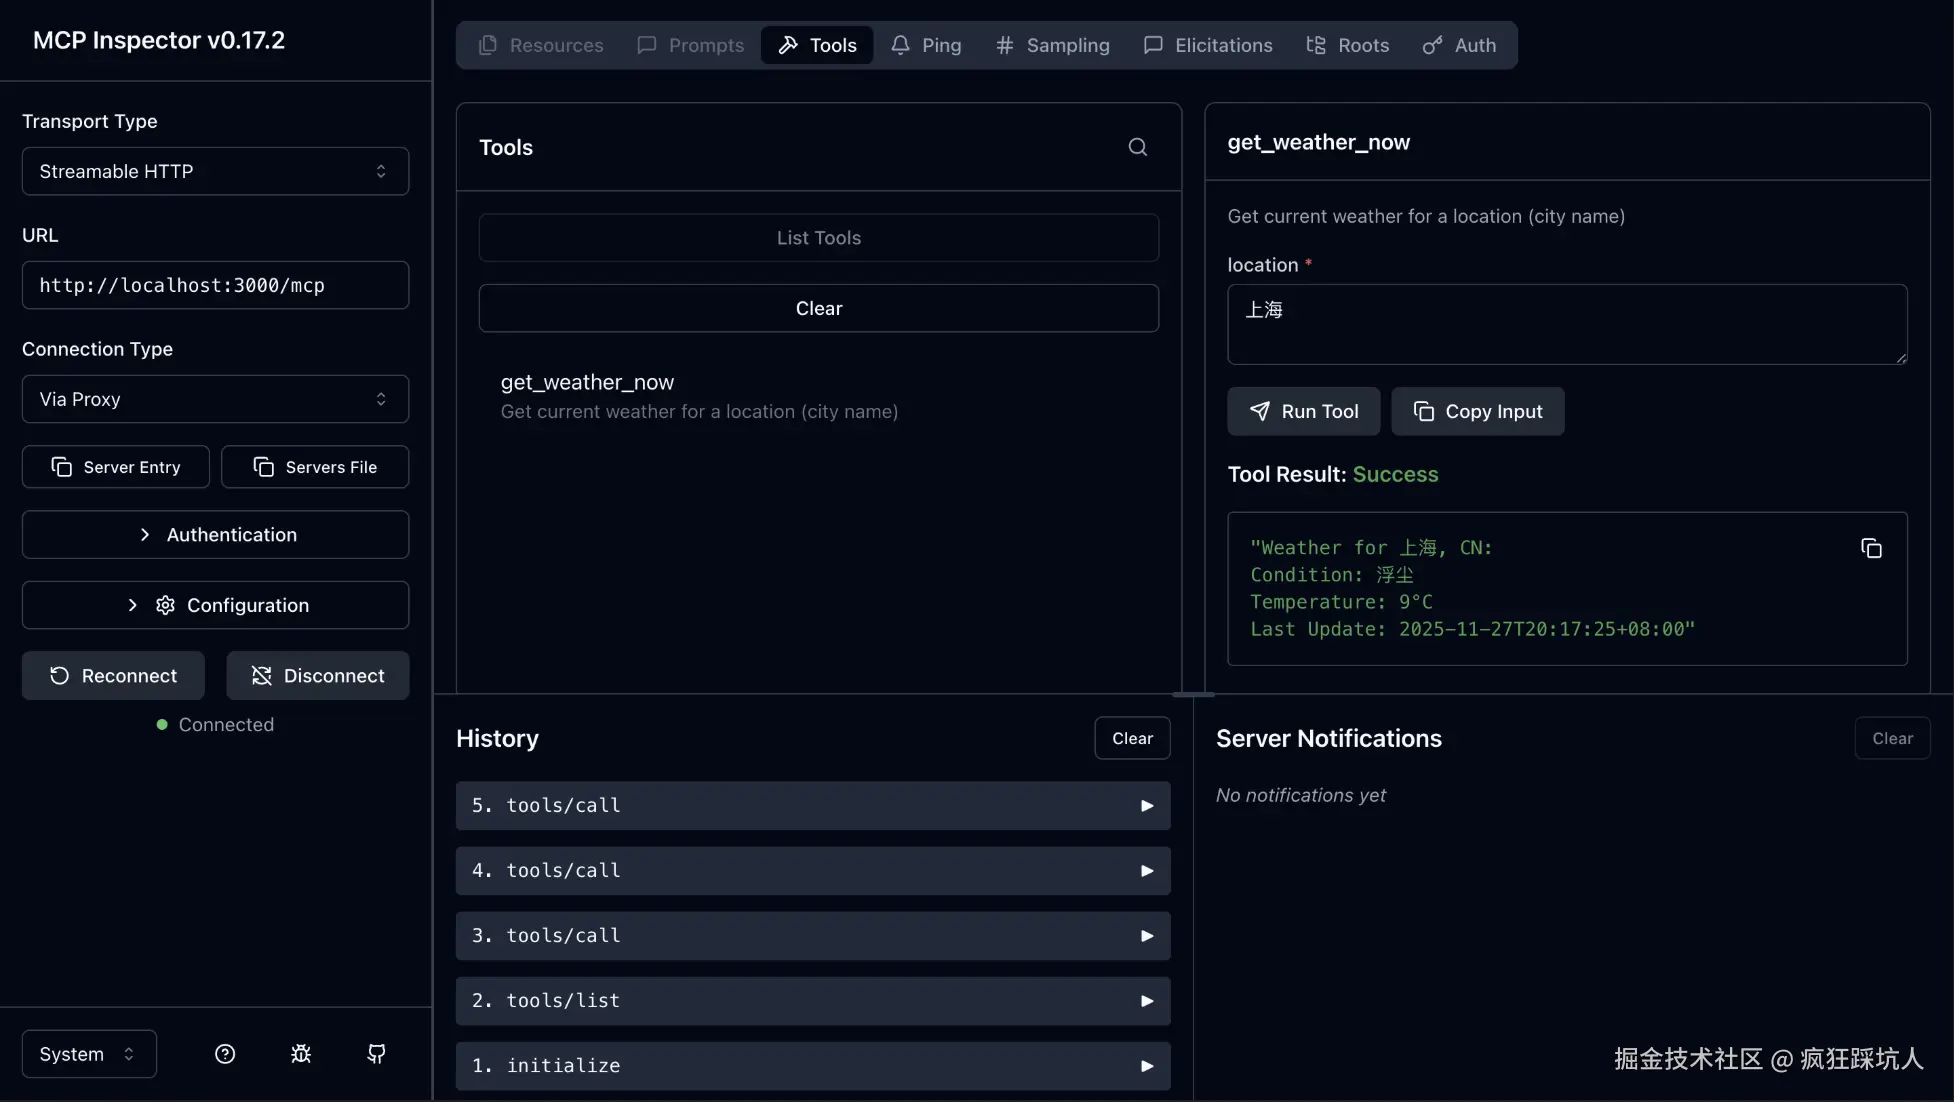
注意左侧侧边栏:
- Transport Type选择
Streamable HTTP - URL 填写你的express 服务地址和endpoint。
stdio
原理分析
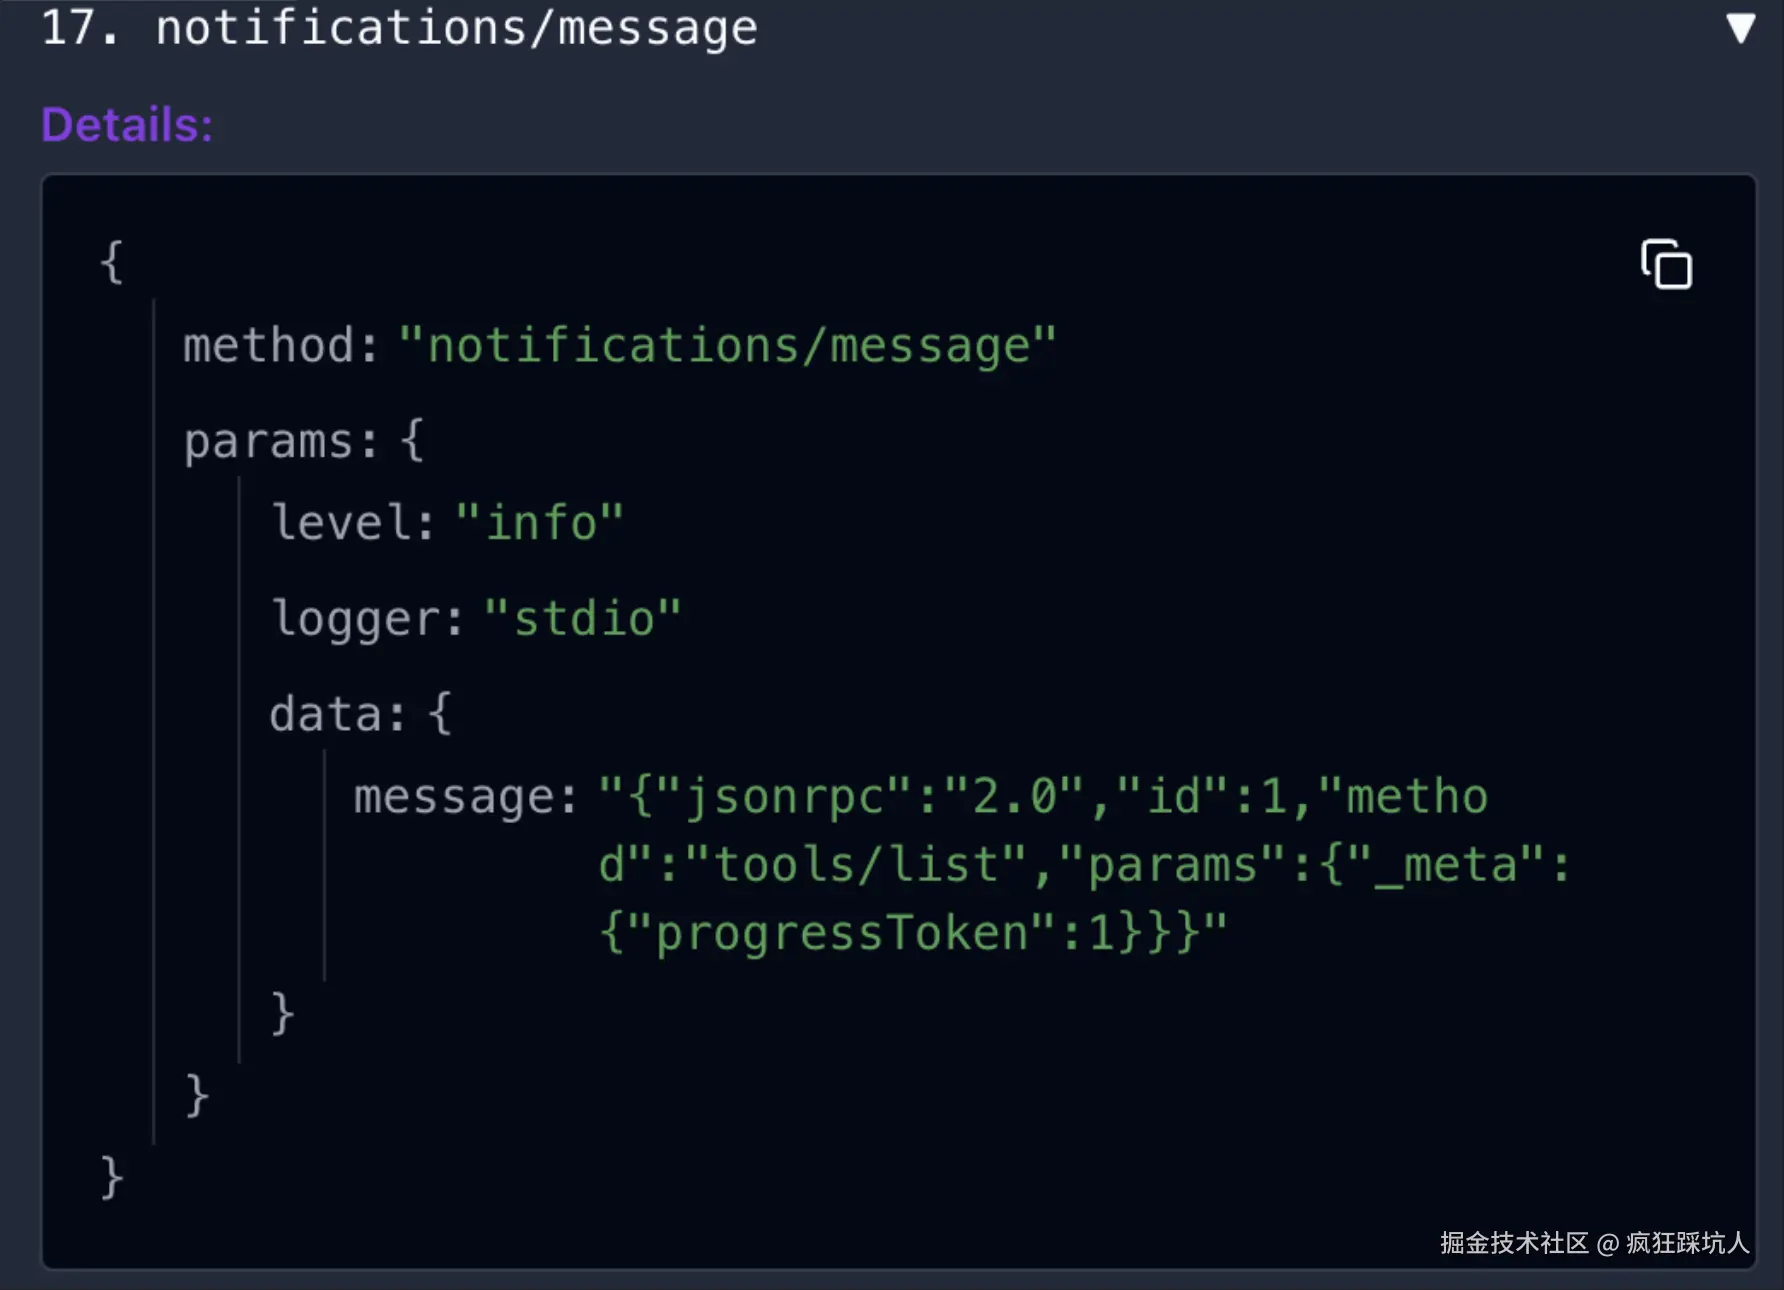
我在项目中,通过监听process.stdin,查看通信Message
ts
// 监听 stdin 输入,可以在inspector面板的"notifications/message"中看到(作为debug用)
    process.stdin.on("data", async (data) => {
      const input = data.toString().trim();
      console.error(input);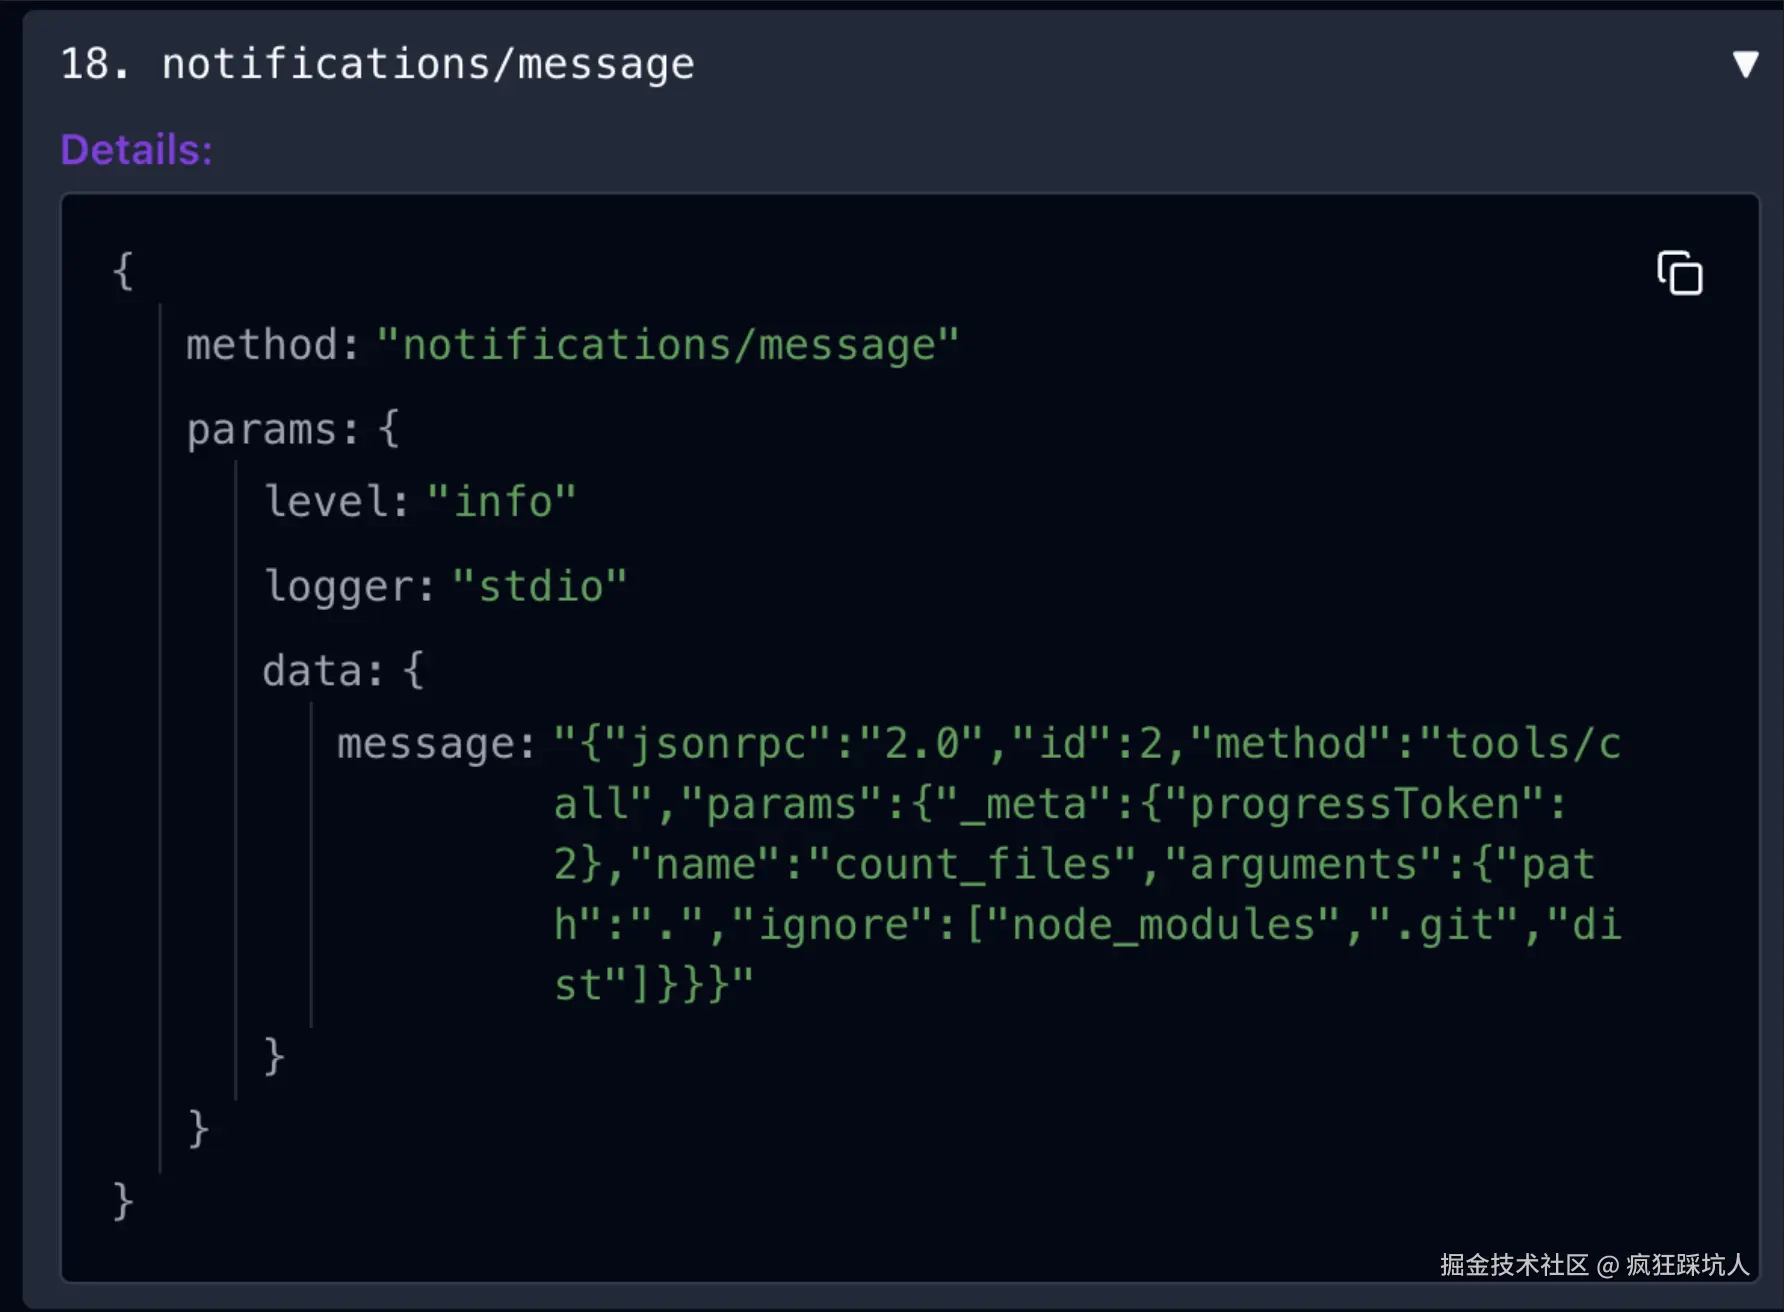
});通过mcp-inspector工具就可以观察到通信信息了,往下看👁
tools/list
tools/call
结合官网的stdio通信原理图
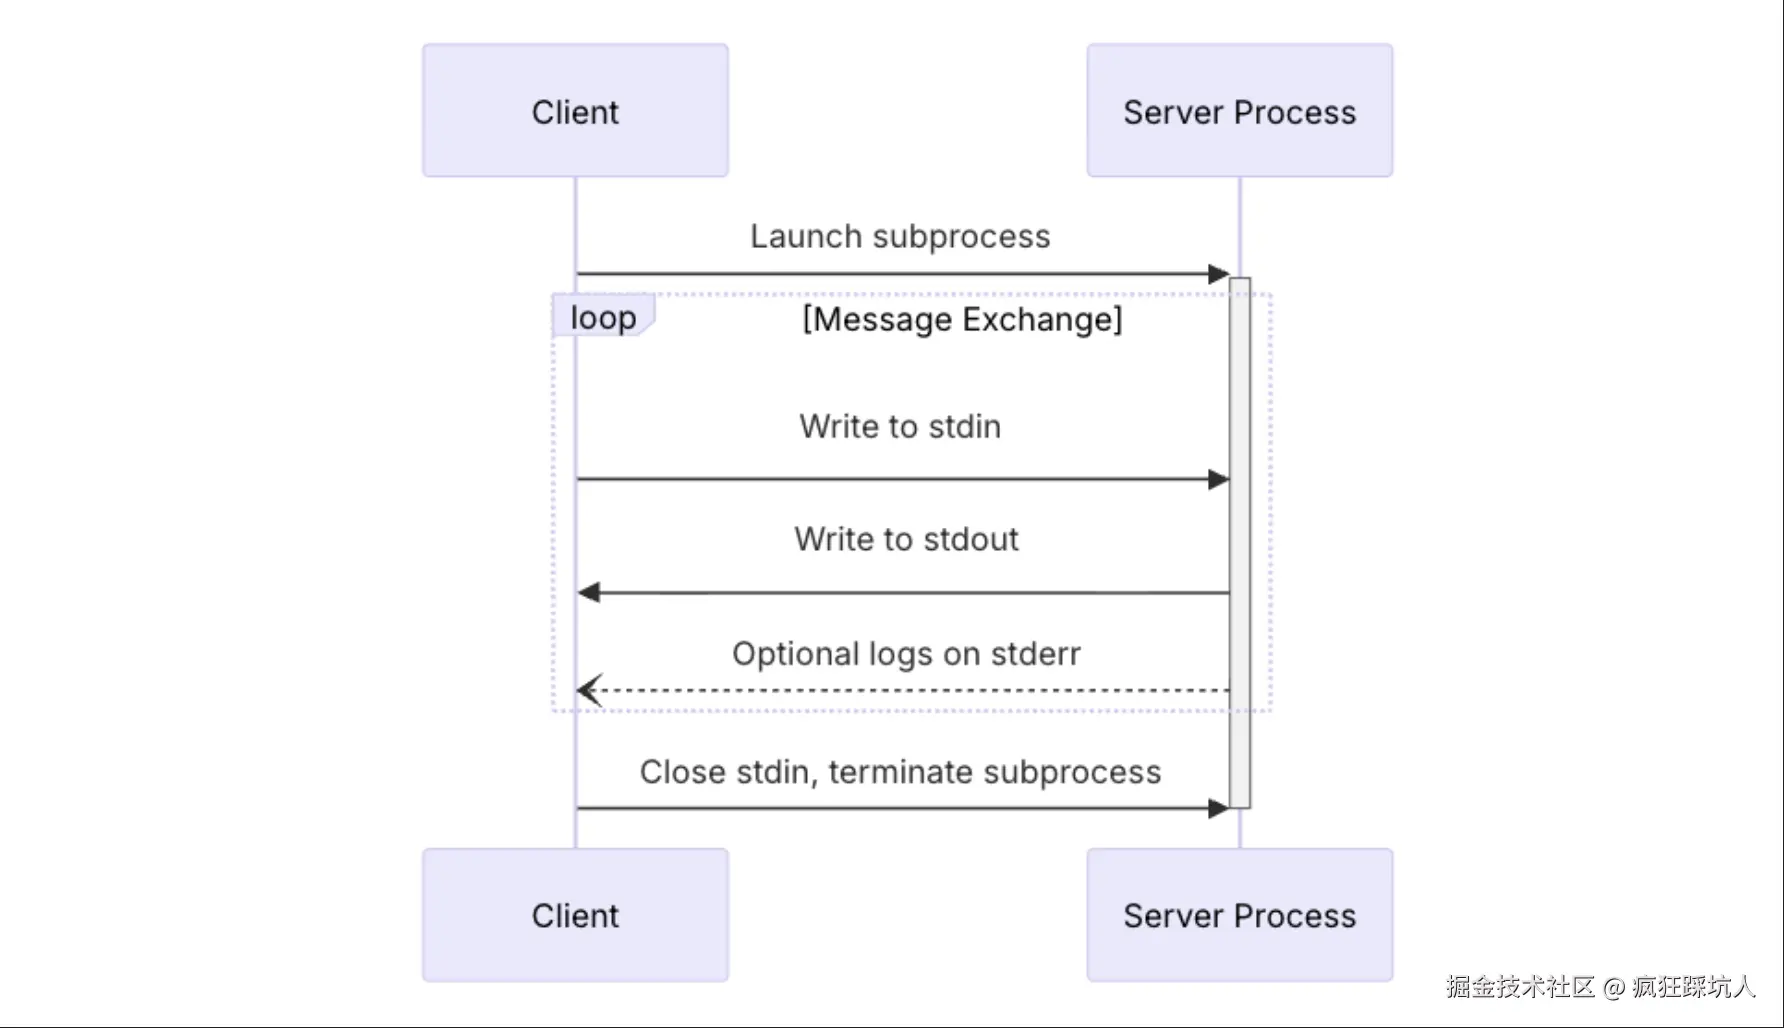
可以总结如下:
- 连接一个stdio MCP服务,不同于streamable HTTP MCP服务需要进行「握手」,只要开启一个子进程(subprocess),就表示连接成功。
- 后续的通信的信息格式遵循
json-rpc:2.0,通过读写process.stdin和process.stdout完成通信。
代码实战 - 统计文件数
比较简单,可以参考我的这篇博客 Node写MCP入门教程,基于StdioServerTransport实现的统计目录下文件夹的MCP Server,并且介绍了mcp inspector的调试和Trae安装使用。
创建MCP项目的脚手架
每次写个新MCP Server都要搭建项目模板,这种重复的工作当然该做成工具辣! 我自己写了一个create-mcp脚手架 Github。create-mcp cli工具已经发布在npm上了,可以npm安装使用。
cli 原理
1.脚手架原理,首先准备两个模板项目
template-stdio模板template-streamable模板
2.然后用Node写一个cli工具,使用了以下依赖,通过命令行交互的方式创建项目
bash
pnpm i minimist prompts fs-extra chalk3.根据你选择的项目名称和模板,帮你拷贝模板,修改为你的「项目名称」
觉得这个cli项目不错的话,给个免费的star吧~ 👉 Github
使用 cli
使用@caikengren-cli/create-mcp创建项目
bash
npx @caikengren-cli/create-mcp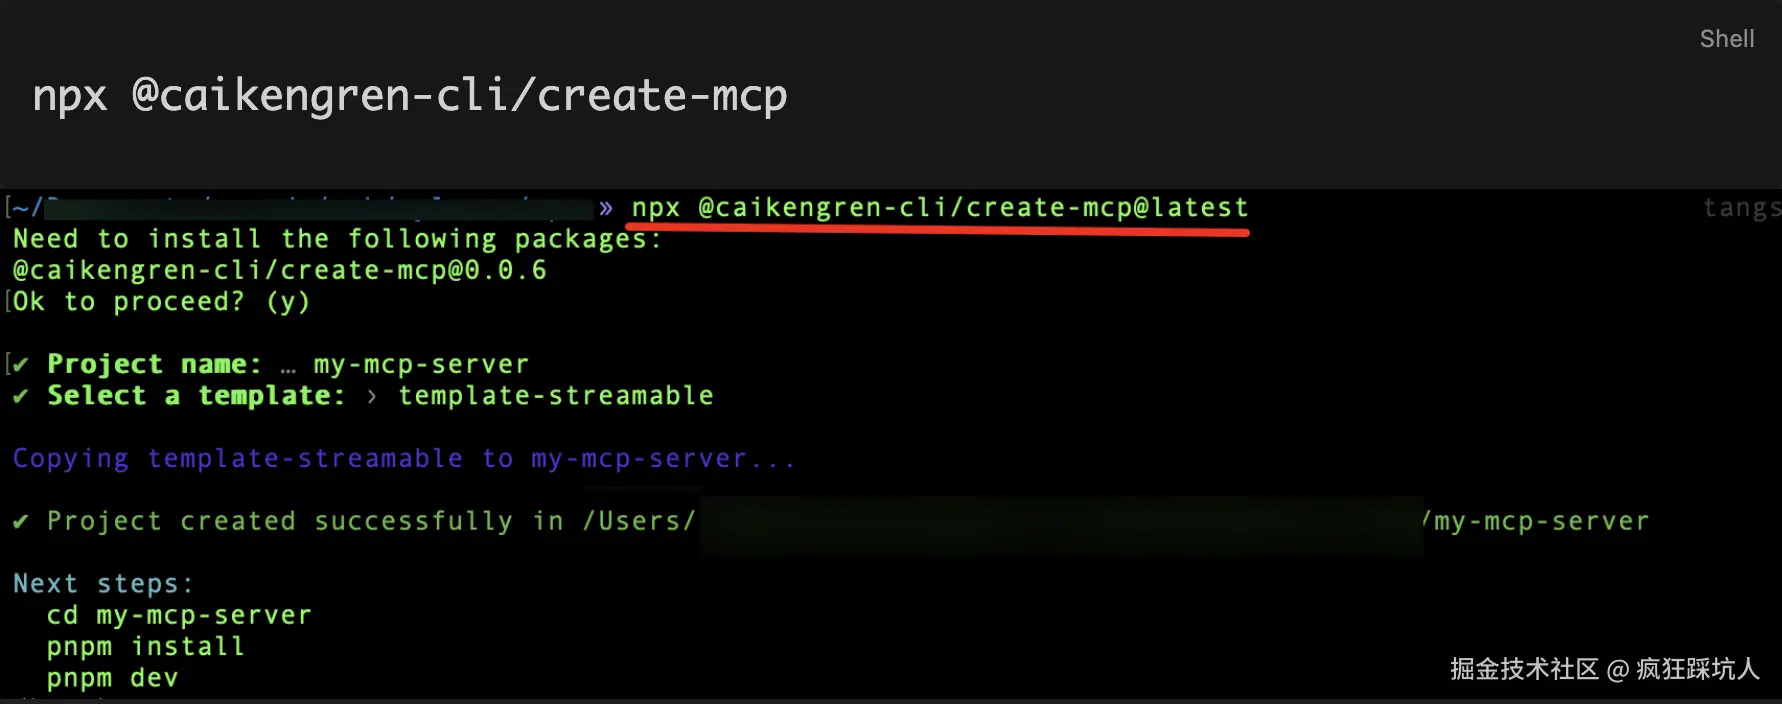
然后依次分别运行下面两个命令
bash
# 编译ts/运行node
pnpm dev

# 打开 mcp-inspector工具调试
pnpm inspect