
关于 Vue2 相关 router 路由配置内容在之前讲了许多,从一级路由配置、声明式导航、路由重定向、嵌套路由、编程式导航、动态路由、命令路由、路由拦截和路由懒加载,那么这里也附上之前的篇目,如果是学完 Vue2 转 Vue3 ,那么对于这篇 Vue3 router 路由配置的内容就会更加容易理解。
· 一级路由、声明式导航、 重定向 : Vue路由1 ------ vue-router
· 嵌套路由、编程式导航、动态路由 : Vue路由2 ------ vue-router
· 命名路由、路由拦截、路由懒加载 : Vue路由3 ------ vue-router
在这篇 xxxxxxxxxxx 的篇目当中简单了讲了 router 路由配置文件的差异,下面来看一下 Vue3的路由配置文件:
javascript
import { createRouter, createWebHistory } from 'vue-router'
import HomeView from '../views/HomeView.vue'

const routes = [
  {
    path: '/',
    name: 'home',
    component: HomeView
  }
]

const router = createRouter({
  history: createWebHistory(process.env.BASE_URL),
  routes
})

export default router
导入了 createRouter 进行创建一个路由对象router,导入 createWebHistory 是什么?从前面的学习知道路由有两种 mode 模式 hash (带#) 和 history ,createWebHistory 就是 history 模式,而 hash模式则需要引入的是 createWebHashHistory ;
javascript
import { createRouter , createWebHashHistory } from 'vue-router'
...
    history : createWebHashHistory(process.env.BASE_URL)
...
对于路由信息的配置 const routes = \[\] 中的内容基本上是可以使用之前在Vue2中router所讲的内容,那么下面来集中测试一下:
1. App.vue
javascript
<template>
  <div>
    <router-link to="/home" active-class="active"> 首页 </router-link>
    <router-link to="/serve" active-class="active"> 服务 </router-link>
    <router-link to="/about" active-class="active"> 关于</router-link>
    <router-view/>
  </div>
</template>
<style>
  .active{
    color: red;
  }
</style>
2. /views 下创建 /views/HomeView.vue ,/views/ServeView.vue,/views/AboutView.vue
javascript
<!-- HomeView.vue -->
<template>
  <div class="home">
    <img alt="Vue logo" src="../assets/logo.png">
    <HelloWorld msg="Welcome to Your Vue.js App"/>
  </div>
</template>

<script>
// @ is an alias to /src
import HelloWorld from '@/components/HelloWorld.vue'

export default {
  name: 'HomeView',
  components: {
    HelloWorld
  }
}
</script>

<!-- ServeView.vue -->
<template>
    <div class="serve">
        <h1>This is an serve page</h1>
    </div>
</template>

<!-- AboutView.vue --><template>
  <div class="about">
    <h1>This is an about page</h1>
  </div>
</template>
3. /router/index.js ------ 路由配置文件
javascript
import { createRouter, createWebHistory } from 'vue-router'
import HomeView from '../views/HomeView.vue'
const routes = [
{
path: '/',
redirect: '/home' // 重定向
},
{
path: '/home',
component: HomeView
},
{
path: '/serve',
component: () => import('../views/ServeView') // 路由懒加载
},
{
path: '/about',
component: () => import('../views/AboutView')
}
]
const router = createRouter({
history: createWebHistory(process.env.BASE_URL),
routes
})
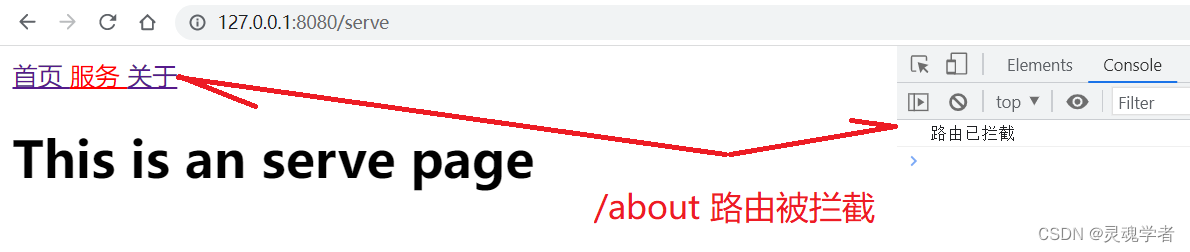
// 路由拦截
router.beforeEach((to, from, next) => {
if (to.fullPath === '/about') {
console.log('路由已拦截')
} else {
next() // 放行
}
})
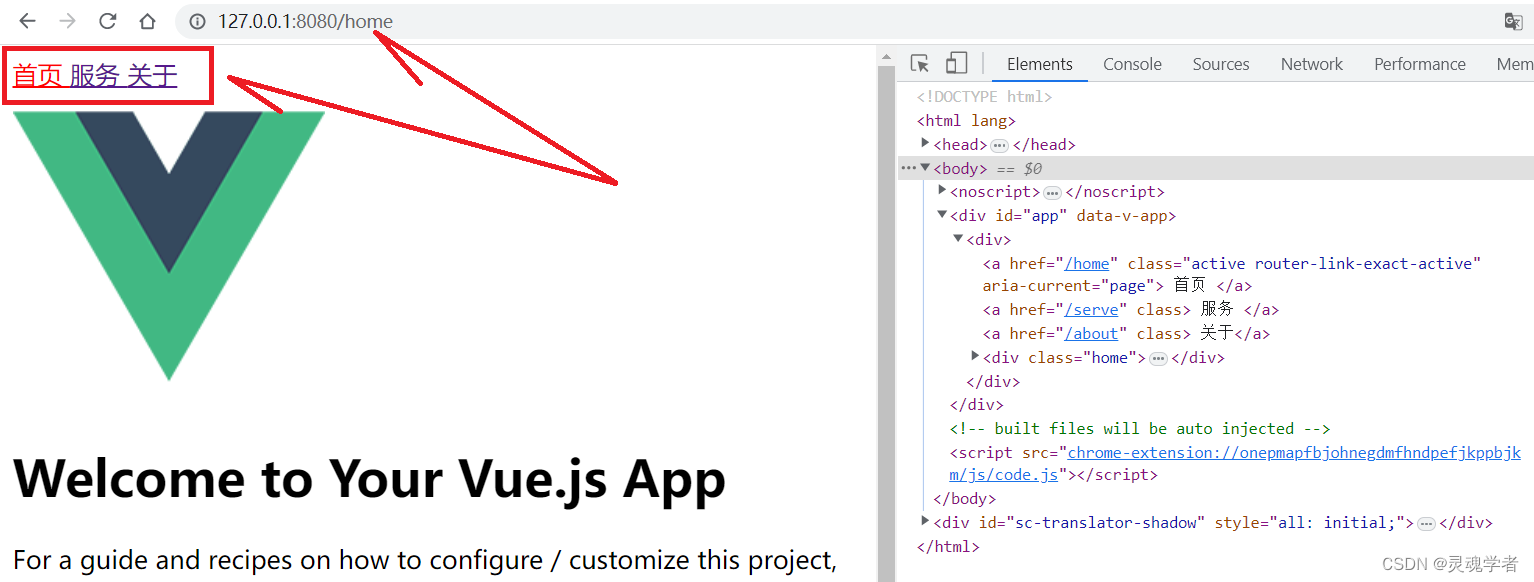
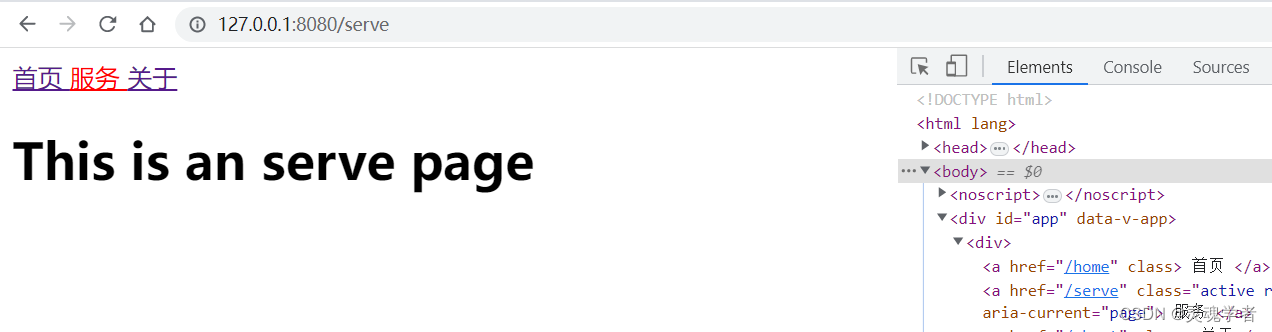
export default router4. 测试运行:
那么对于 Vue3 的配置路由就讲这么多,主要的还是需要对原来 Vue2 的路由配置要理解,对于后续如有讲解项目需要其他注意的内容再来进行补充讲解!感谢大家的支持!!!
