终于到了本系列的最后一期。在前4期详解系列中,我们体验了:
从技术选择角度,覆盖了从Isaac仿真到Cosmos世界模型的多种思路;
从使用流程角度,覆盖了从人工演示到模仿学习的多个环节;
从基础模型角度,覆盖了从动作模型、导航模型到VLA模型的多种类型;
从PAI的使用深度,经历了从DSW探索体验,到DLC、EAS大规模使用的过程。
在这些最佳实践中,不可避免的会用到可视化操作环境,通过在PAI-DSW里启动VNC进程,或者Livestream服务,可以很好的解决这个问题。
但是,手动启动VNC进程仍是比较繁琐的操作。在本期,我们隆重介绍DSW全新的noVNC功能 ,并结合Isaac Sim的协作机器人系统Cortex,搭建软件在环验证系统(Software-In-Loop System)。
在PAI的Notebook Gallery中,我们已经预置了一个最佳实践,就是这个过程的一个具体示例:
https://gallery.pai-ml.com/#/preview/deepLearning/cv/isaac_sim_wf5
下面我们来详细解读这个示例。
环境准备
实例创建
由于SIL系统天然需要可视化体验,我们还是使用DSW作为搭建环境。
在DSW中,使用以下配置创建实例:
-
机型规格:ecs.ebmgn9t.48xlarge
本最佳实践中,无需特殊的自定义数据集和公共数据集配置。
资源下载
在DSW中,使用如下脚本下载所需的数据、代码和模型:
import os
from pathlib import Path

local_dir = Path("/mnt/data/notebook5/")  # 缓存目录
print(f"下载数据和代码到: {local_dir}")

print("开始下载数据和代码...")
package = "bin_picking_demo.tar"
download_from_oss('aigc-data/isaac/nb5/', package, str(local_dir))
print("下载完成")
print("开始解压数据和代码...")
zip_file = os.path.join(local_dir, package)
print(zip_file)
breakpoint()
!tar -xvf {zip_file} -C {local_dir}
!rm {zip_file}
print("解压完成")

import os
from pathlib import Path

local_dir = Path("/root/FoundationPose")  # 缓存目录
print(f"下载预训练模型参数到: {local_dir}")

print("开始下载预训练模型参数...")
package = "weights.tar"
download_from_oss('aigc-data/isaac/nb5/', package, str(local_dir))
print("下载完成")
print("开始解压预训练模型参数...")
zip_file = os.path.join(local_dir, package)
print(zip_file)
!tar -xvf {zip_file} -C {local_dir}
!rm {zip_file}
print("解压完成")
VNC启动
使用以下脚本,安装noVNC服务端,并启动VNC进程:
#安装python env
apt update
apt install python3-venv

#启动vncserver
/opt/TurboVNC/bin/vncserver :1 -geometry 3840x2160

#安装novnc
/etc/dsw/runtime/bin/pai-dsw runtime plugin install novnc

#启动novnc
/etc/dsw/runtime/bin/pai-dsw runtime plugin start-daemon novnc
在DSW的Terminal中输入:
http://localhost:9803跳转至DSW的gateway地址,在链接末尾添加vnc.html
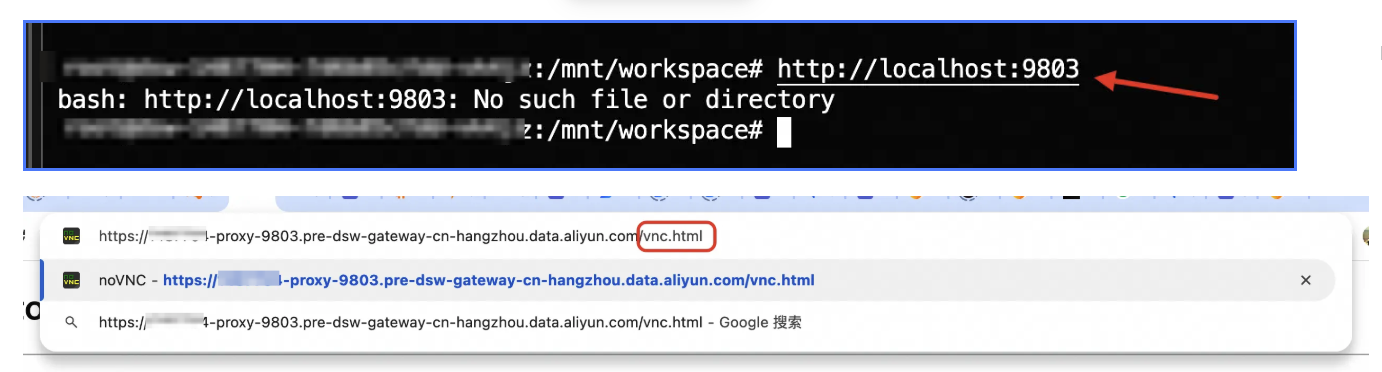
从而打开noVNC界面:
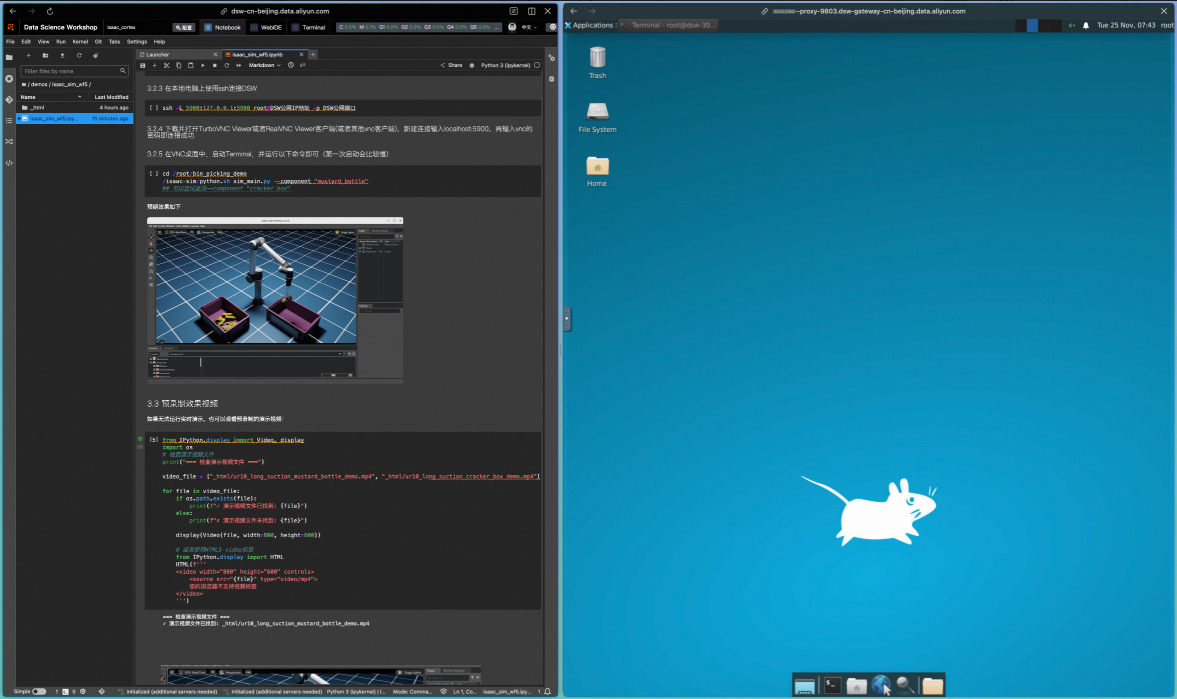
运行验证
在noVNC界面中,运行以下指令:
cd /root/bin_picking_demo
/isaac-sim/python.sh sim_main.py --component "mustard_bottle"
## 可以尝试更改--component "cracker_box"可以看到,在Isaac Lab窗口中,机械臂按照FoundationPose模型的输出,执行了物料识别、抓取和转移的动作;在Terminal窗口中,FastSAM模型完成了物料位置的识别,并通过FoundationPose模型完成了机械臂动作的输出。
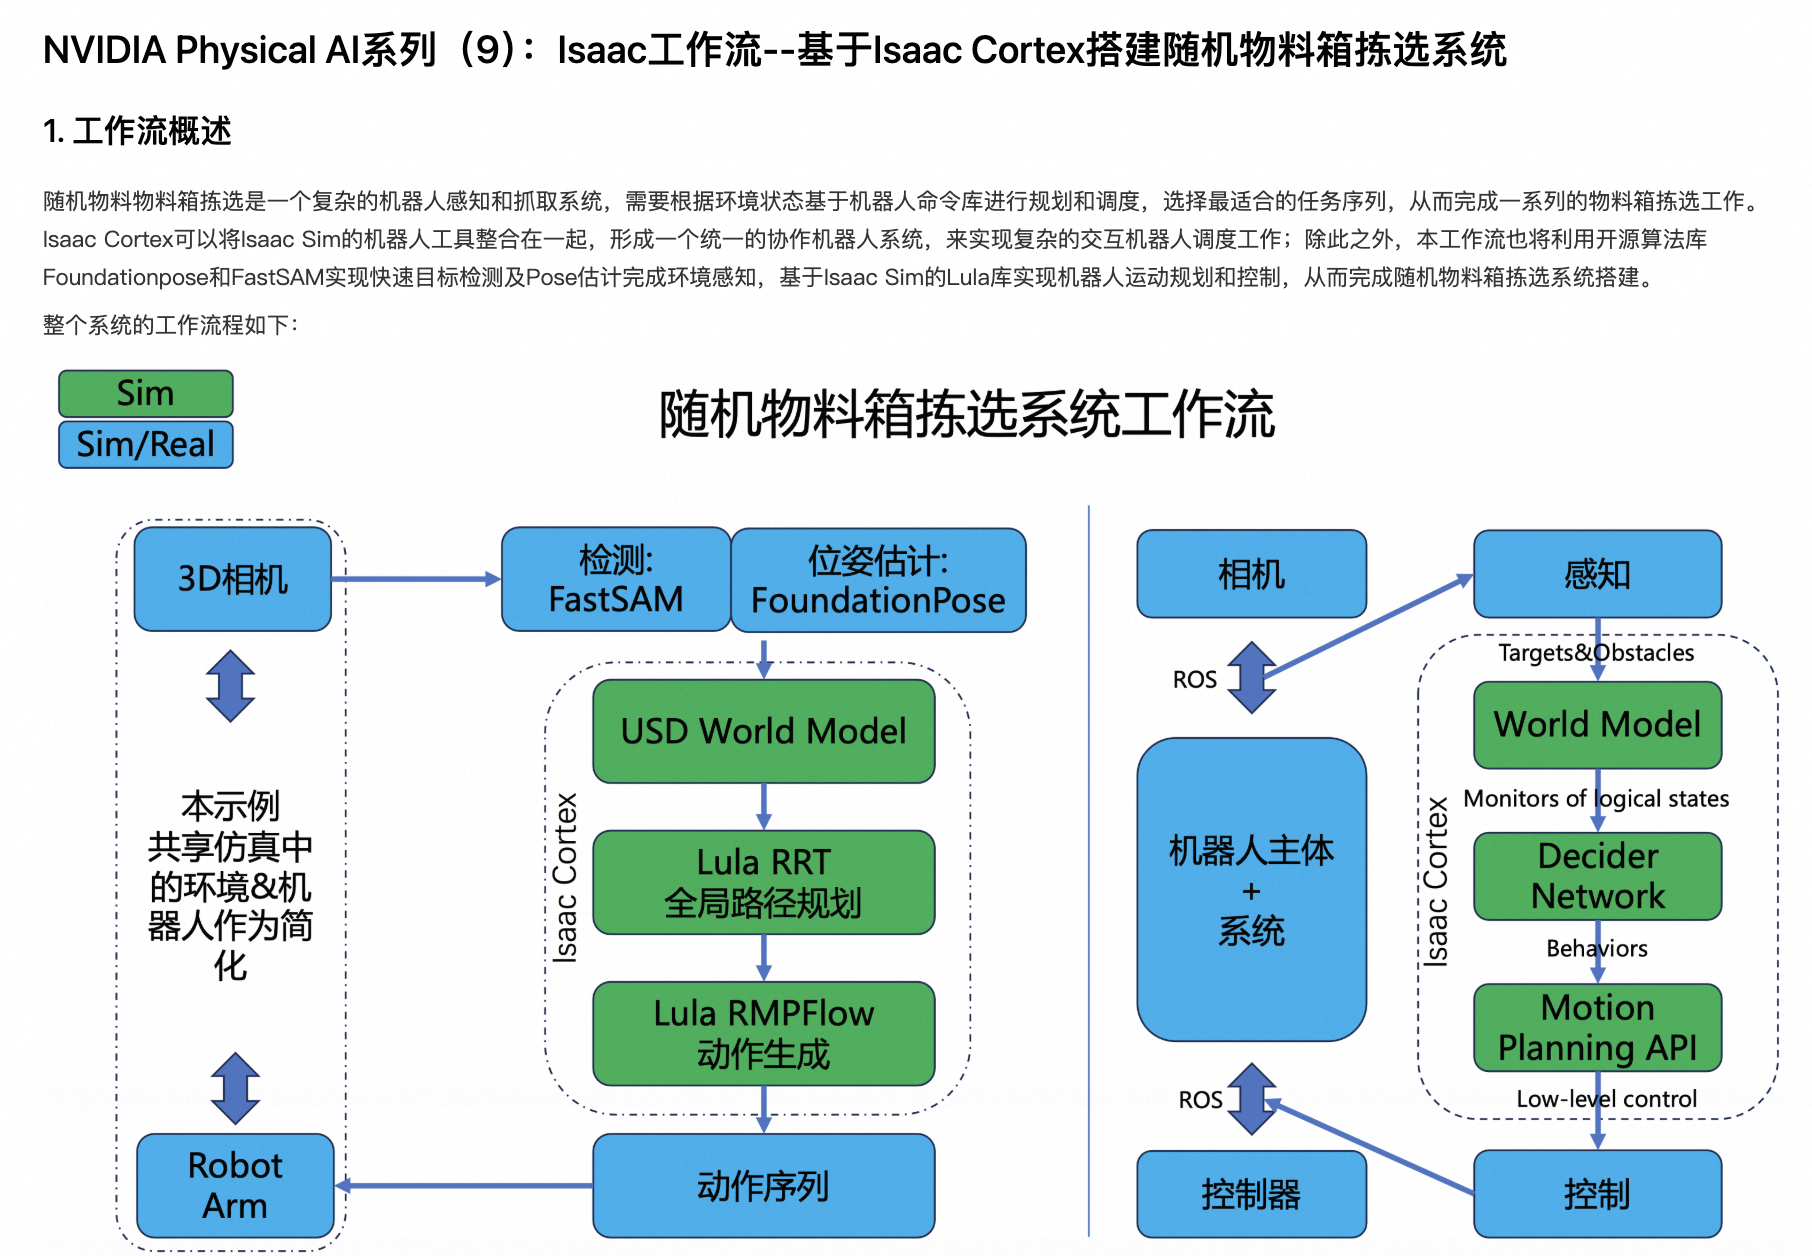
原理解析
系统主入口
此SIL系统的入口位于/mnt/workspace/notebook5/bin_picking_demo/sim_main.py路径下:
if __name__ == "__main__":
    # ------- parse configuration ------- #
    opt = tyro.cli(SimulationConfig)

    # Setup all configuration parameters
    opt, camera_pameters, weights_path, standard_mask_path = setup_configuration(opt)

    # ------- create a separate process for FoundationPose Infer ------- #
    ctx = mp.get_context('spawn')

    data_queue = ctx.Queue() ## image/depth from SIM
    hand_data_queue = ctx.Queue() ## image/depth from hand camera from SIM
    detect_queue = ctx.Queue() ## detections from FoundationPose
    hand_detect_queue = ctx.Queue() ## detections from FoundationPose

    debug = True
    process = ctx.Process(target=inference, args=(data_queue, detect_queue, hand_data_queue, hand_detect_queue, camera_pameters, opt.mesh_file, standard_mask_path, weights_path, debug))
    # Start the subprocess of FoundationPose Inference
    process.start()
    # Start main process of ISAAC Sim
    main(opt, data_queue, detect_queue, hand_data_queue, hand_detect_queue)


    process.terminate()
    process.join()
    print('## Sub process is terminated.')
这段代码中:
-
使用multiprocessing创建感知子进程;仿真在主进程
-
创建数据队列,进行仿真主进程和感知子进程之间的数据交换;仿真主进程从感知子进程中读取检测结果,感知子进程从仿真主进程中获取传感器数据
感知子进程
感知子进程位于 /mnt/workspace/notebook5/bin_picking_demo/foundationpose/multiprocess_foundationpose_infer_sim.py
def inference(data_queue, detect_queue, hand_data_queue, hand_detect_queue, camera_pameters, mesh_file, standard_mask_path, weights_path, debug):
    pose_estimator = FoundationPoseInfer(camera_pameters, mesh_file, standard_mask_path, weights_path, debug)
    pose_tuner = ICPByHandCamera(camera_pameters, mesh_file, weights_path)

    print(f"*** inference *** Initialized !! ")
    last_data_time = time.time()
    timeout_duration = 300  # auto exit time: seconds

    while True:
        if not data_queue.empty():
            rgb_array, depth_array, failed_last, reset = data_queue.get()
            if reset:
                pose_estimator = FoundationPoseInfer(camera_pameters, mesh_file, standard_mask_path, weights_path, debug)
                print("reset: re-init foundation pose")
                continue
            pose_in_cam, mask = pose_estimator.detect(rgb_array, depth_array, failed_last)
            detect_queue.put([pose_in_cam, mask, pose_estimator.extent_bbox])
            print(f"*** inference *** Detect target and add to detect_queue !! ")
            last_data_time = time.time()

        if not hand_data_queue.empty():
            rgb_array_hand, depth_array_hand, \
                pose_in_world, orient_in_world, pose_matrix_in_world, \
                    pose_matrix_in_hand_cam = hand_data_queue.get()
            print(f"[perception] [inference] hand camera received, processing")

            # get world position from head camera
            pose_in_cam, mask = pose_tuner.run(rgb_array_hand, depth_array_hand, pose_matrix_in_hand_cam)

            # TODO: update boxes, use flag: head_camera or hand_camera; update or new
            print(f"[perception] [inference] hand camera processed, sending")
            hand_detect_queue.put([pose_in_cam, mask, pose_estimator.extent_bbox])
            last_data_time = time.time()
        else:
            if time.time() - last_data_time > timeout_duration:
                print(f"*** inference *** No data received for {timeout_duration} seconds. Exiting... ")
                break
            # print(f"*** inference *** No RGBD data received !! ")
        time.sleep(0.01)  # avoid high frequency empty polling, reduce CPU consumption
在这段代码中:
-
使用FastSAM进行目标检测
-
使用FoundationPose进行姿态估计
-
使用ICP进行pose精调
仿真模块
仿真模块与主入口一起,位于/mnt/workspace/notebook5/bin_picking_demo/sim_main.py路径下:
def main(opt, data_queue, detect_queue, hand_data_queue, hand_detect_queue):
    ......
    world = CortexWorld()
    ......
    robot = world.add_robot(CortexUr10LongSuction(name="robot", prim_path="{}/ur10_long_suction".format(env_path), robot_type=opt.robot_type))
    ......
    camera_prim1 = world.stage.DefinePrim("/World/Camera1", "Camera")
    ......
    world.add_task(BinPickingStackedTask(opt, mechanical_part_usd, usd_scale, opt.num_object, rp_head))

    # Reset the world and task to add objects, surface gripper joints, and obstacles, etc.
    world.reset()
    world.add_decider_network(behavior.make_decider_network(data_queue, detect_queue, hand_data_queue, hand_detect_queue, robot, target_pose, opt, rp_head, rp_hand, camera_prim1, camera_prim_hand))

    world.run(simulation_app,render=True, loop_fast=False, play_on_entry=True)
    print('## Simulation_app is closed. ##')
在这段代码中:
-
使用Isaac Cortex创建仿真环境;并配置camera、robot、task等基础资源
-
添加decider_network
-
仿真启动,消费感知子进程数据,更新仿真环境和机械臂姿态,并产生新的传感器数据
总结
通过PAI-DSW和noVNC可视化环境,利用Isaac Sim提供的一系列工具链可以快速搭建复杂的机器人感知和交互系统,实现高效的机器人算法原型开发和验证,并以zero-shot的方式迁移到真机中进行部署验证,提升物理AI系统和算法的研发效率和研发质量。
从本期开始,PAI Physical AI Notebook系列将告一段落,希望大家已经体验到了在PAi平台中进行Physical AI的便捷与高效。阿里云PAI平台是全功能的Physical AI开发平台,可以覆盖仿真数据合成、模仿学习、强化学习、软件在环验证等各个环节。
欢迎访问:
并搜索"NVIDIA Physical AI",获取更多关于PAI Physical AI的最佳实践。