一、环境版本
TensorRT 8.6.1;
CUDA 11.8;
cuDNN 8.6.0;
Python:3.11;
pytorch-cuda:11.8
二、特性
1、YOLOv5 以后的新模型都可以正常推理,可以通用(只要是模型输出的数据定义不变即可),框架是按YOLOv8写的,我推理使用的 YOLOv12的模型,正常推理,没有问题;
2、输入参数通过命令行传入,方便对比不同模型;
3、输入输出的图像尺寸是根据传入模型动态读取的,适应不同输入尺寸的模型;
4、使用 LetterBox 进行前处理,防止图形畸变。
三、模型转换
onnx2tensorrt.py
python
import tensorrt as trt
import onnx

# 加载ONNX模型
onnx_path = "../yolov12s.onnx"
onnx_model = onnx.load(onnx_path)

# 创建TensorRT的Logger对象
logger = trt.Logger(trt.Logger.WARNING)

# 创建TensorRT的Builder对象
builder = trt.Builder(logger)

# 创建TensorRT的BuilderConfig对象
config = builder.create_builder_config()
# 设置最大工作空间大小为1 GB
config.set_memory_pool_limit(trt.MemoryPoolType.WORKSPACE, 1 << 30)
# 设置使用FP16精度
# config.set_flag(trt.BuilderFlag.FP16)

# 创建TensorRT的NetworkDefinition对象
# network = builder.create_network()
# 创建支持显式批处理的网络
explicit_batch_flag = 1 << int(trt.NetworkDefinitionCreationFlag.EXPLICIT_BATCH)
network = builder.create_network(explicit_batch_flag)

# 创建TensorRT的ONNX解析器
parser = trt.OnnxParser(network, logger)

# 解析ONNX模型并将其转换为TensorRT网络
success = parser.parse(onnx_model.SerializeToString())
if not success:
    # 打印解析错误信息
    for i in range(parser.num_errors):
        print(parser.get_error(i))
    exit(1)

# 构建TensorRT的Engine
serialized_engine = builder.build_serialized_network(network, config)
if serialized_engine is None:
    print("引擎构建失败!")
    exit(1)

# 保存TensorRT模型到文件
# 后缀 engine 和 trt 均可
trt_path = "../yolov12s.engine"
with open(trt_path, "wb") as f:
    f.write(serialized_engine)
print(f"TensorRT 引擎已保存至: {trt_path}")
四、推理文件
yolo_infer_tensorrt.py
python
import tensorrt as trt
import pycuda.driver as cuda
import pycuda.autoinit
import numpy as np
import cv2
import time
import argparse
import torchvision.ops as ops
class YOLOv8TRTInference:
"""
YOLOv8 TensorRT 推理类
封装了完整的推理流程:预处理、推理、后处理
"""
def __init__(self, engine_path, conf_threshold=0.5, iou_threshold=0.5):
"""
初始化TensorRT推理引擎
Args:
engine_path: TensorRT引擎文件路径
conf_threshold: 置信度阈值
iou_threshold: NMS IoU阈值
"""
self.conf_threshold = conf_threshold
self.iou_threshold = iou_threshold
# 加载TensorRT引擎
self.logger = trt.Logger(trt.Logger.WARNING)
self.engine = self.load_engine(engine_path)
self.context = self.engine.create_execution_context()
self.input_name = "images" # 输入张量名称
self.output_name = "output0" # 输出张量名称
# 获取输入输出形状
self.input_shape = self.engine.get_tensor_shape(self.input_name)
self.output_shape = self.engine.get_tensor_shape(self.output_name)
# 分配GPU内存
input_bytes = int(np.prod(self.input_shape) * np.dtype(np.float32).itemsize)
output_bytes = int(np.prod(self.output_shape) * np.dtype(np.float32).itemsize)
self.d_input = cuda.mem_alloc(input_bytes)
self.d_output = cuda.mem_alloc(output_bytes)
# 可选:验证张量类型
if not self.engine.get_tensor_mode(self.input_name):
print(f"警告: 张量 '{self.input_name}' 不是输入")
if not self.engine.get_tensor_mode(self.output_name):
print(f"警告: 张量 '{self.output_name}' 不是输出")
# 创建CUDA流
self.stream = cuda.Stream()
# COCO数据集类别名称(YOLOv8默认)
self.class_names = [
"person", "bicycle", "car", "motorcycle", "airplane", "bus", "train", "truck", "boat",
"traffic light", "fire hydrant", "stop sign", "parking meter", "bench", "bird", "cat", "dog",
"horse", "sheep", "cow", "elephant", "bear", "zebra", "giraffe", "backpack", "umbrella",
"handbag", "tie", "suitcase", "frisbee", "skis", "snowboard", "sports ball", "kite",
"baseball bat", "baseball glove", "skateboard", "surfboard", "tennis racket", "bottle",
"wine glass", "cup", "fork", "knife", "spoon", "bowl", "banana", "apple", "sandwich", "orange",
"broccoli", "carrot", "hot dog", "pizza", "donut", "cake", "chair", "couch", "potted plant",
"bed", "dining table", "toilet", "tv", "laptop", "mouse", "remote", "keyboard", "cell phone",
"microwave", "oven", "toaster", "sink", "refrigerator", "book", "clock", "vase", "scissors",
"teddy bear", "hair drier", "toothbrush"
]
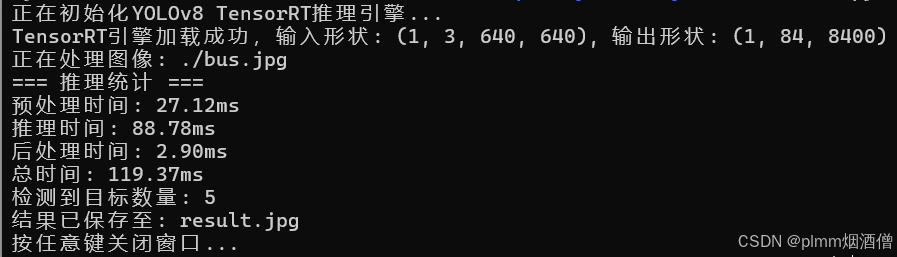
print(f"TensorRT引擎加载成功,输入形状: {self.input_shape}, 输出形状: {self.output_shape}")
def load_engine(self, trt_file):
"""加载TensorRT引擎文件"""
with open(trt_file, "rb") as f:
with trt.Runtime(self.logger) as runtime:
return runtime.deserialize_cuda_engine(f.read())
def preprocess(self, image_path, model_input_size):
"""
图像预处理
Args:
image_path: 输入图像路径
input_size: 输入尺寸
Returns:
预处理后的图像数据
"""
# 读取图像
image = cv2.imread(image_path)
if image is None:
raise ValueError(f"无法读取图像: {image_path}")
self.original_image = image.copy()
# 颜色空间转换 BGR -> RGB
image = cv2.cvtColor(image, cv2.COLOR_BGR2RGB)
# 使用letterbox保持宽高比(与训练一致)
scale, padded_image, pad = self.letterbox(image, (model_input_size, model_input_size))
self.scale = scale # 保存缩放信息用于后处理
self.pad = pad # 记录填充信息
# 归一化
image = padded_image.astype(np.float32) / 255.0
# 转换通道顺序 HWC -> CHW
image = np.transpose(image, (2, 0, 1))
# 添加batch维度
image = np.expand_dims(image, axis=0)
return np.ascontiguousarray(image)
def letterbox(self, im, new_shape=(640, 640), color=(114, 114, 114)):
"""YOLOv8标准的letterbox实现"""
shape = im.shape[:2] # 当前形状 [高, 宽]
# 计算缩放比例
r = min(new_shape[0] / shape[0], new_shape[1] / shape[1])
# 计算填充
new_unpad = int(round(shape[1] * r)), int(round(shape[0] * r))
dw, dh = new_shape[1] - new_unpad[0], new_shape[0] - new_unpad[1]
# 最小矩形填充
dw /= 2
dh /= 2
# 调整图像大小
if shape[::-1] != new_unpad:
im = cv2.resize(im, new_unpad, interpolation=cv2.INTER_LINEAR)
top, bottom = int(round(dh - 0.1)), int(round(dh + 0.1))
left, right = int(round(dw - 0.1)), int(round(dw + 0.1))
# 添加填充
im = cv2.copyMakeBorder(im, top, bottom, left, right,
cv2.BORDER_CONSTANT, value=color)
return r, im, (left, top)
def infer(self, input_image):
"""
执行推理
Args:
input_image: 预处理后的图像数据
Returns:
模型输出结果
"""
# 确保输入形状匹配
if input_image.shape != tuple(self.input_shape):
print(f"错误: 输入形状不匹配! 期望: {self.input_shape}, 实际: {input_image.shape}")
return None
# 传输数据到GPU
cuda.memcpy_htod_async(self.d_input, input_image, self.stream)
# 执行推理
self.context.execute_async_v2(
bindings=[int(self.d_input), int(self.d_output)],
stream_handle=self.stream.handle
)
# 从GPU读取结果
output = np.empty(self.output_shape, dtype=np.float32)
cuda.memcpy_dtoh_async(output, self.d_output, self.stream)
self.stream.synchronize()
return output
def nms(self, detections, conf_thres=0.5, iou_thres=0.5):
"""统一的NMS实现"""
if len(detections) == 0:
return np.array([])
# 提取边界框和置信度
boxes = []
scores = []
classes = []
for det in detections:
if det[4] > conf_thres:
x1, y1, x2, y2 = det[:4]
boxes.append([x1, y1, x2, y2]) # [x1,y1,x2,y2]格式
scores.append(float(det[4]))
classes.append(int(det[5]))
if len(boxes) == 0:
return np.array([])
# 使用OpenCV的NMSBoxes(需要[x,y,w,h]格式)
boxes_xywh = []
for box in boxes:
x1, y1, x2, y2 = box
boxes_xywh.append([x1, y1, x2-x1, y2-y1])
indices = cv2.dnn.NMSBoxes(boxes_xywh, scores, conf_thres, iou_thres)
# 组合结果
filtered_detections = []
if indices is not None:
for i in indices.flatten():
x1, y1, x2, y2 = boxes[i]
filtered_detections.append([
x1, y1, x2, y2,
scores[i],
classes[i]
])
return np.array(filtered_detections)
def postprocess(self, output, orig_image):
"""
后处理:解析模型输出,应用NMS
Args:
output: 模型原始输出
orig_image: 原始图像(用于获取尺寸)
Returns:
后处理结果 [x1, y1, x2, y2, confidence, class_id]
"""
# 重塑输出 (YOLOv8输出格式: [batch, 84, 8400])
predictions = output[0] # 取第一个batch
# 转置为 [8400, 84]
predictions = predictions.transpose()
# 提取边界框和置信度 (cx, cy, w, h 格式)
boxes_xywh = predictions[:, :4] # 特征图上的绝对坐标
scores = predictions[:, 4:]
# 找到最大置信度和对应类别
max_scores = np.max(scores, axis=1)
class_ids = np.argmax(scores, axis=1)
# 应用置信度阈值
conf_mask = max_scores > self.conf_threshold
boxes_xywh = boxes_xywh[conf_mask]
max_scores = max_scores[conf_mask]
class_ids = class_ids[conf_mask]
if len(boxes_xywh) == 0:
return np.array([])
# 坐标缩放(考虑letterbox填充)
orig_h, orig_w = orig_image.shape[:2]
# 获取预处理参数
scale = self.scale
left_pad, top_pad = self.pad
# 从网络输出坐标转换到填充后图像坐标
x_center = boxes_xywh[:, 0]
y_center = boxes_xywh[:, 1]
width = boxes_xywh[:, 2]
height = boxes_xywh[:, 3]
# 转换为xyxy格式
x1 = x_center - width / 2
y1 = y_center - height / 2
x2 = x_center + width / 2
y2 = y_center + height / 2
x1 = (x1 - left_pad) / scale
y1 = (y1 - top_pad) / scale
x2 = (x2 - left_pad) / scale
y2 = (y2 - top_pad) / scale
# 确保坐标不超出原始图像边界
x1 = np.clip(x1, 0, orig_w)
y1 = np.clip(y1, 0, orig_h)
x2 = np.clip(x2, 0, orig_w)
y2 = np.clip(y2, 0, orig_h)
# 组合结果
detections = np.column_stack([x1, y1, x2, y2, max_scores, class_ids])
return detections
def draw_detections(self, image, detections, show_labels=True):
"""
在图像上绘制检测结果
Args:
image: 原始图像
detections: 检测结果
show_labels: 是否显示标签
Returns:
绘制后的图像
"""
result_image = image.copy()
for det in detections:
x1, y1, x2, y2, conf, cls_id = det
# 转换为整数坐标
x1, y1, x2, y2 = int(x1), int(y1), int(x2), int(y2)
# 随机但一致的颜色(基于类别ID)
color = self.get_color(int(cls_id))
# 绘制边界框
cv2.rectangle(result_image, (x1, y1), (x2, y2), color, 2)
if show_labels:
# 准备标签文本
label = f"{self.class_names[int(cls_id)]}: {conf:.2f}"
# 计算标签背景尺寸
(label_width, label_height), baseline = cv2.getTextSize(
label, cv2.FONT_HERSHEY_SIMPLEX, 0.5, 1
)
# 绘制标签背景
cv2.rectangle(
result_image,
(x1, y1 - label_height - baseline - 5),
(x1 + label_width, y1),
color,
-1
)
# 绘制标签文本
cv2.putText(
result_image,
label,
(x1, y1 - baseline - 5),
cv2.FONT_HERSHEY_SIMPLEX,
0.5,
(255, 255, 255),
1
)
return result_image
def get_color(self, class_id):
"""根据类别ID生成颜色"""
colors = [
(255, 0, 0), (0, 255, 0), (0, 0, 255), (255, 255, 0), (255, 0, 255),
(0, 255, 255), (128, 0, 0), (0, 128, 0), (0, 0, 128), (128, 128, 0)
]
return colors[class_id % len(colors)]
def process_image(self, image_path, save_result=True, output_path="result.jpg"):
"""
完整处理流程
Args:
image_path: 输入图像路径
save_result: 是否保存结果
output_path: 输出路径
Returns:
检测结果图像和检测数据
"""
# 记录开始时间
start_time = time.time()
# 预处理
preprocess_time = time.time()
input_image = self.preprocess(image_path, self.input_shape[2])
preprocess_time = time.time() - preprocess_time
# 推理
inference_time = time.time()
output = self.infer(input_image)
inference_time = time.time() - inference_time
# 后处理
postprocess_time = time.time()
detections = self.postprocess(output, self.original_image)
# 应用NMS
if len(detections) > 0:
filtered_detections = self.nms(detections, self.conf_threshold, self.iou_threshold)
# 转换为numpy数组(如果使用的是torch)
if hasattr(filtered_detections, 'numpy'):
filtered_detections = filtered_detections.numpy()
else:
filtered_detections = np.array([])
postprocess_time = time.time() - postprocess_time
# 绘制结果
result_image = self.draw_detections(self.original_image, filtered_detections)
total_time = time.time() - start_time
# 打印统计信息
print(f"=== 推理统计 ===")
print(f"预处理时间: {preprocess_time*1000:.2f}ms")
print(f"推理时间: {inference_time*1000:.2f}ms")
print(f"后处理时间: {postprocess_time*1000:.2f}ms")
print(f"总时间: {total_time*1000:.2f}ms")
print(f"检测到目标数量: {len(filtered_detections)}")
# 保存结果
if save_result:
cv2.imwrite(output_path, result_image)
print(f"结果已保存至: {output_path}")
return result_image, filtered_detections
def main(engine, image, output):
"""主函数"""
try:
# 初始化推理器
print("正在初始化YOLOv8 TensorRT推理引擎...")
yolov8_inference = YOLOv8TRTInference(engine)
# 处理图像
print(f"正在处理图像: {image}")
result_image, detections = yolov8_inference.process_image(
image,
save_result=True,
output_path=output
)
# 显示结果(可选)
cv2.imshow("YOLOv8 Detection Result", result_image)
print("按任意键关闭窗口...")
cv2.waitKey(0)
cv2.destroyAllWindows()
except Exception as e:
print(f"错误: {e}")
import traceback
traceback.print_exc()
if __name__ == "__main__":
args = argparse.ArgumentParser(description="YOLOv8 TensorRT推理")
args.add_argument("--engine", type=str, required=True, help="TensorRT引擎文件路径")
args.add_argument("--image", type=str, required=True, help="测试图像路径")
args.add_argument("--output", type=str, default="result.jpg", help="输出图像路径")
args = args.parse_args()
main(args.engine, args.image, args.output)五、推理结果