首先我们改一下mock里面的菜单数据,改一下 name,商品为 pms 以及 子菜单商品列表为 product

然后我们改一下 home 页面的渲染,一个是路由的 index 改用 name, 一个是右边栏
html
<template>
    <div class="home-container">
        <div class="home-header">头部</div>
        <div class="home-menu">
            <el-menu
                active-text-color="#ffd04b"
                background-color="#545c64"
                class="el-menu-vertical-demo"
                default-active="2"
                text-color="#fff"
                :unique-opened="true"
                :router="true"
            >
                <el-sub-menu v-for="menu in newMenus" :index="menu.id">
                    <template #title>
                        <span>{{ menu.title }}</span>
                    </template>
                    <template v-for="submenu in menu.children">
                        <el-menu-item v-if="submenu.hidden === 0" :index="'/' + menu.name + '/' + submenu.name" :key="submenu.id">
                            {{ submenu.title }}
                        </el-menu-item>
                    </template>
                </el-sub-menu>
            </el-menu>
        </div>
        <div class="home-content">
            <router-view></router-view>
        </div>
    </div>
</template>

<script lang='ts' setup>
/**
{
    id: {
        title: "一级菜单",
        children: [
            {title: "二级菜单"},
            {title: "二级菜单"},
            {title: "二级菜单"},
            {title: "二级菜单"},
        ]
    }
}
 * */
import { computed } from 'vue'
import { useStore } from 'vuex'

interface MenuObj {
    id: string
    name: string
    title: string
    parentId: string
    hidden: 0 | 1
    children?: MenuObj[]
}

interface NewMenus {
    [key: string]: MenuObj
}

const store = useStore();
const newMenus = computed<NewMenus>(() => store.getters.getNewMenus);
console.log('newMenus---------home-----------', newMenus)
</script>

<style lang='less' scoped>
.home-container {
    position: relative;
    height: 100%;

    .home-header {
        height: 70px;
        background-color: goldenrod;
    }

    .home-menu {
        position: absolute;
        top: 70px;
        left: 0;
        bottom: 0;
        width: 250px;
        background-color: #a37676;
    }

    .home-content {
        position: absolute;
        top: 70px;
        right: 0;
        left: 250px;
        bottom: 0;
        background-color: skyblue;
    }
}
</style>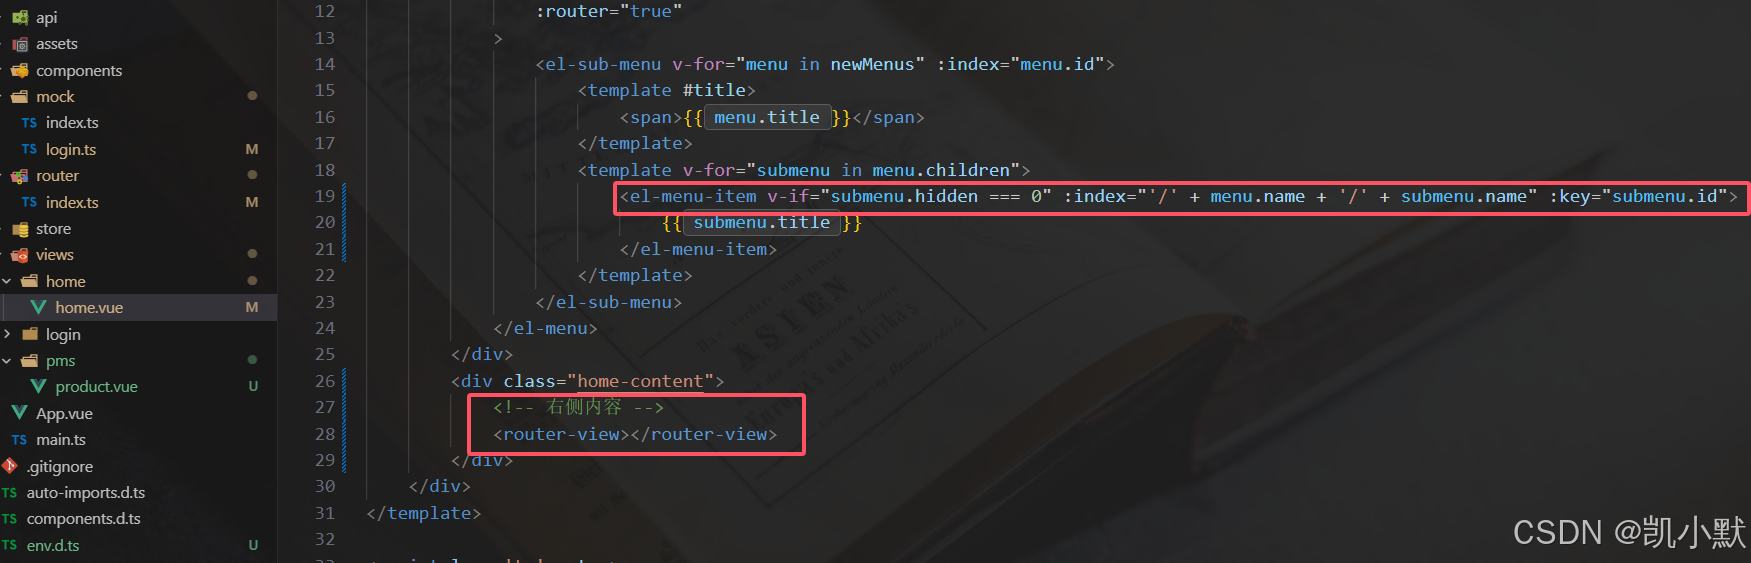
下面我们需要通过菜单接口返回的数据去组装路由的规则,先模拟一下规则
ts
import {
createRouter,
createWebHashHistory,
type RouteRecordRaw
} from 'vue-router'
import { type App } from 'vue'
import store from '../store'
import Cookie from 'js-cookie'
const routes: RouteRecordRaw[] = [
{
path: '/',
redirect: '/login'
},
{
path: '/login',
name: 'login',
component: () => import('../views/login/login.vue')
},
{
path: '/home',
name: 'home',
component: () => import('../views/home/home.vue')
},
// 动态生成的路由配置结构需要如下
{
path: '/pms',
name: 'pms',
component: () => import('../views/home/home.vue'),
children: [
{
path: 'product',
name: 'product',
component: () => import('../views/pms/product.vue'),
}
]
}
]
const router = createRouter({
history: createWebHashHistory(),
routes // 路由配置
})
// 前置导航守卫
router.beforeEach((_to, _from, next) => {
// 1、token && vuex里面的 menus 为空
const token = Cookie.get('token')
console.log(store)
if(token && store.state.menus.length === 0) {
console.log('menus为空')
// 获取用户信息
store.dispatch('getAdminInfoApi');
}
next()
})
export const initRouter = (app: App<Element>) => {
app.use(router)
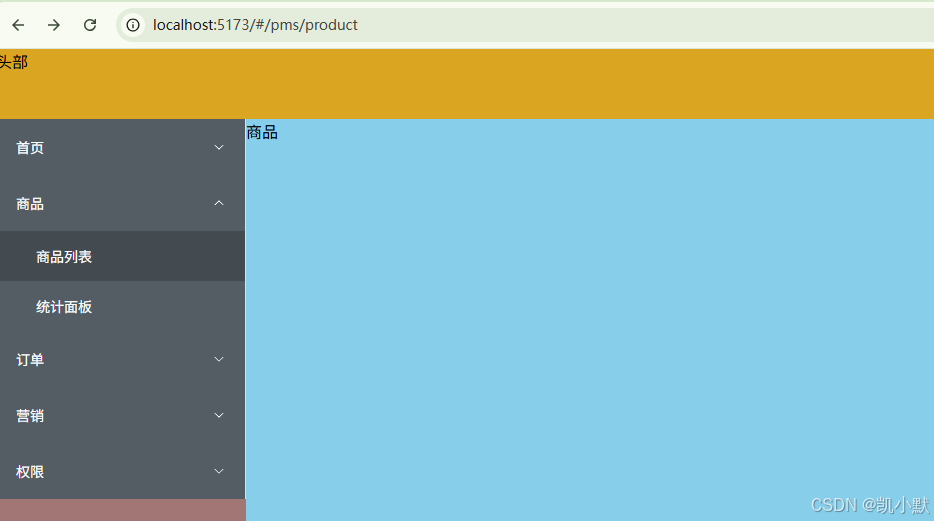
}添加一下 pms/product 页面
html
<template>
    <div class=''>
        商品
    </div>
</template>

<script lang='ts' setup>
import { } from 'vue'

</script>

<style lang='less' scoped>

</style>
点击商品列表就会跳转到 http://localhost:5173/#/pms/product,右侧就是展示商品页面