系列文章:
【轻松入门SpringBoot】从 0 到 1 搭建 SpringBoot 工程-上
目录
[一、Spring 框架](#一、Spring 框架)
[三、从 0 到 1 搭建 Spring Web 工程](#三、从 0 到 1 搭建 Spring Web 工程)
[1.1 war 包](#1.1 war 包)
[1.2 手动管理所有版本号](#1.2 手动管理所有版本号)
[3、搭建一个 web 工程](#3、搭建一个 web 工程)
[3.1 开发效率工具-Lombok](#3.1 开发效率工具-Lombok)
[3.2 类结构](#3.2 类结构)
[3.3 配置文件](#3.3 配置文件)
[3.3.1: src/main/resources/spring-context.xml](#3.3.1: src/main/resources/spring-context.xml)
[3.3.2: src/main/resources/spring-mvc.xml](#3.3.2: src/main/resources/spring-mvc.xml)
[3.3.3: src/main/webapp/WEB-INF/web.xml](#3.3.3: src/main/webapp/WEB-INF/web.xml)
[3.3.3: src/main/webapp/index.jsp(可选)](#3.3.3: src/main/webapp/index.jsp(可选))
[3.4 controller](#3.4 controller)
[3.5 service](#3.5 service)
[3.6 repository](#3.6 repository)
[3.7 entity](#3.7 entity)
[3.8 启动](#3.8 启动)
[1、引入13 个 jar 包](#1、引入13 个 jar 包)
[2、web 工程,这3 个配置文件很重要](#2、web 工程,这3 个配置文件很重要)
前言
为了更好体现 SpringBoot 框架的优势,这篇我们只用 Spring 框架搭建一个功能相同的 web 应用工程,并添加单元测试、集成测试。想学用 SpringBoot 搭建的,请看上一篇。
一、Spring 框架
在前面我们了解过 Spring 框架的核心思想:Spring 框架是一个轻量级的控制反转(IoC)和面向切面(AOP)的容器框架,4 大核心内容:控制反转(IOC)、依赖注入(DI)、面向切面(AOP)、事务管理,简化了传统 JavaEE 开发流程。那么实际应用中,Spring 框架是如何表达这些思想的呢?我们搭个工程感受下。
二、动手搭一套环境吧(可选)
开发环境:IDE:idea
Java:Java8
构建工具:maven
数据库:mysql5.7
Spring:4.3.29.RELEASE,与上一篇的 SpringBoot-2.0.4.RELEASE 中使用的 Spring 版本相同
spring-data-jpa:1.11.23.RELEASE
hibernate:5.2.18.Final
mysql-connector:8.0.30
servlet-api:3.1.0
jackson:2.8.11
Spring 框架需要自定义各个 jar 包的版本,从这里也能看出来 SpringBoot 框架"开箱即用"的特点。
我个人使用 docker 部署了MySQL 服务。
建议学习者自己也搭建部署一下,一是便于本地调试,二是可以深入了解docker 容器化部署。
不部署也没有关系,后面介绍时会附上代码和运行结果。
三、从 0 到 1 搭建 Spring Web 工程
1、添加类路径依赖
File → New → Project
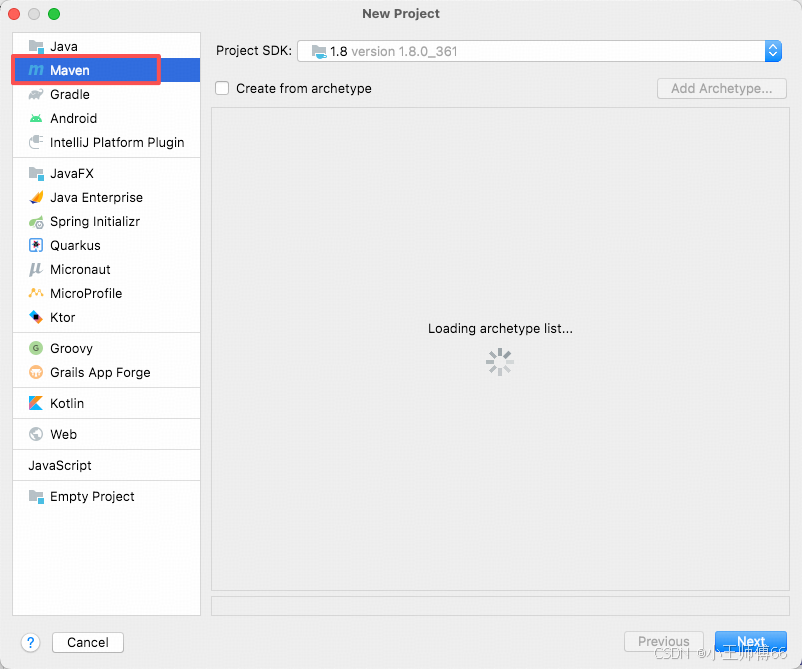
左侧选择 Maven,点击Next。然后再手动添加类路径依赖。
java
<?xml version="1.0" encoding="UTF-8"?>
<project xmlns="http://maven.apache.org/POM/4.0.0"
xmlns:xsi="http://www.w3.org/2001/XMLSchema-instance"
xsi:schemaLocation="http://maven.apache.org/POM/4.0.0 http://maven.apache.org/xsd/maven-4.0.0.xsd">
<modelVersion>4.0.0</modelVersion>
<groupId>com.example</groupId>
<artifactId>spring-uniq</artifactId>
<version>1.0-SNAPSHOT</version>
<packaging>war</packaging> <!-- 传统 Web 工程必须打包为 war 包 -->
<properties>
<!-- 手动管理所有组件版本(Spring Boot 自动管理) -->
<maven.compiler.source>8</maven.compiler.source>
<maven.compiler.target>8</maven.compiler.target>
<spring.version>4.3.29.RELEASE</spring.version>
<spring-data-jpa.version>1.11.23.RELEASE</spring-data-jpa.version>
<hibernate.version>5.2.18.Final</hibernate.version>
<mysql-connector.version>8.0.30</mysql-connector.version>
<servlet-api.version>3.1.0</servlet-api.version>
<jackson.version>2.8.11</jackson.version> <!--json 解析依赖-->
</properties>
<dependencies>
<!-- 1.Spring 核心依赖 (Spring 容器) -->
<dependency>
<groupId>org.springframework</groupId>
<artifactId>spring-core</artifactId>
<version>${spring.version}</version>
</dependency>
<dependency>
<groupId>org.springframework</groupId>
<artifactId>spring-context</artifactId>
<version>${spring.version}</version>
</dependency>
<dependency>
<groupId>org.springframework</groupId>
<artifactId>spring-beans</artifactId>
<version>${spring.version}</version>
</dependency>
<!-- 2.Spring MVC 模块依赖 -->
<dependency>
<groupId>org.springframework</groupId>
<artifactId>spring-web</artifactId>
<version>${spring.version}</version>
</dependency>
<dependency>
<groupId>org.springframework</groupId>
<artifactId>spring-webmvc</artifactId>
<version>${spring.version}</version>
</dependency>
<!-- 3.Spring 数据访问模块:Java 持久化规范:Spring-data-jpa
定义了一套关于:如何通过 Java 对象操作数据库的统一接口/规范-->
<dependency>
<groupId>org.springframework.data</groupId>
<artifactId>spring-data-jpa</artifactId>
<version>${spring-data-jpa.version}</version>
</dependency>
<!-- Spring ORM :帮助hibernate 的 SessionFactory 等组件生成 Spring 能识别的bean,注册到 Spring 容器中,最终由 Spring 管理;
Spring扫描@Component注解标记的类,生成 bean,注册到容器中。未使用 Spring 框架的 jar,类没有被@Component标记,需要中间组件进行适配,才能被Spring识别-->
<dependency>
<groupId>org.springframework</groupId>
<artifactId>spring-orm</artifactId>
<version>${spring.version}</version>
</dependency>
<!-- 4.Hibernate 持久化模块:JPA 规范的具体实现 -->
<dependency>
<groupId>org.hibernate</groupId>
<artifactId>hibernate-core</artifactId>
<version>${hibernate.version}</version>
</dependency>
<!-- 5.mysql驱动 -->
<dependency>
<groupId>mysql</groupId>
<artifactId>mysql-connector-java</artifactId>
<version>${mysql-connector.version}</version>
</dependency>
<!-- 6.Servlet API (web工程必须)-->
<dependency>
<groupId>javax.servlet</groupId>
<artifactId>javax.servlet-api</artifactId>
<version>${servlet-api.version}</version>
<scope>provided</scope> <!-- 服务器已提供,打包时排除 -->
</dependency>
<!-- 7. JSON 解析(Controller 返回 JSON 必需) -->
<dependency>
<groupId>com.fasterxml.jackson.core</groupId>
<artifactId>jackson-databind</artifactId>
<version>${jackson.version}</version>
</dependency>
<dependency>
<groupId>org.projectlombok</groupId>
<artifactId>lombok</artifactId>
<version>1.18.2</version>
<scope>provided</scope> <!-- 关键:provided 表示编译期使用,打包时不包含 -->
</dependency>
<!-- 8. 单元测试 -->
<dependency>
<groupId>junit</groupId>
<artifactId>junit</artifactId>
<version>4.12</version>
<scope>test</scope>
</dependency>
<dependency>
<groupId>org.springframework</groupId>
<artifactId>spring-test</artifactId>
<version>4.3.13.RELEASE</version>
<scope>test</scope>
</dependency>
</dependencies>
<!-- 构建配置:保留原有插件,新增依赖强制解析配置 -->
<build>
<plugins>
<!-- Maven War 插件 -->
<plugin>
<groupId>org.apache.maven.plugins</groupId>
<artifactId>maven-war-plugin</artifactId>
<version>3.3.2</version>
<configuration>
<failOnMissingWebXml>true</failOnMissingWebXml>
</configuration>
</plugin>
</plugins>
</build>
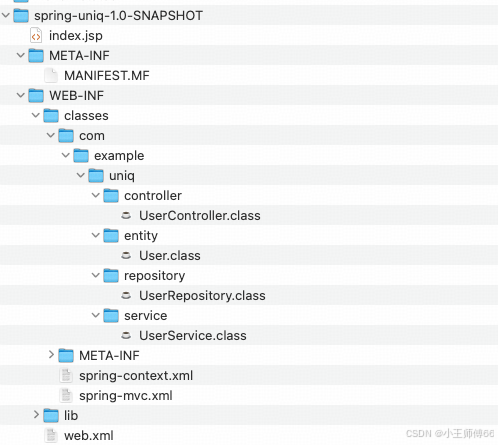
</project>1.1 war 包
war 包是:Web Application Archive 的缩写,是部署到 web 服务器 (如 Tomcat、Jetty)需要打成的压缩包的格式。war 的特点是:统一打包、便携部署 。打好的 war 包包含 web 应用运行所需的全部资源。打成 war 包后,只需将 .war 文件扔到 Tomcat 的 webapps 目录,Tomcat 会自动解压并部署,无需手动配置。
解压后的结构:
1.2 手动管理所有版本号
Spring 框架需要开发者手动管理所有 jar 包版本,而SpringBoot 框架为开发者提供了默认的 jar 包版本。
2、这些依赖的作用
除了 Lombok,这里只添加了 web 工程启动必须的依赖,所以我们一一了解下。
为了方便大家理解和记忆,我们以开一家【直营连锁咖啡馆】来串联这些 jar 包的关系,这里我们假设是星巴克(当然不代表真的星巴克的运营模式)
|-------------|----------------------|--------------------------|------------------------------------------------------------------------------------------------------------------------------------------------------------------------------------------------------------------------------------------------------------------------------------------------------------------------------------------------------------------------------------|-------------------------------------------------------------------------------------------------------------------------------------|-----------------------------------------------------------------------|
| 功能 | 依赖 | 核心作用 | 说明 | 类比 | maven scope |
| 处理 web 请求 | spring-web | 星巴克大堂 | 1、提供 Web 环境下的 Spring 容器初始化、HTTP 工具类等基础能力; 2、如果手动引入 spring-webmvc,Maven 会自动下载 spring-web,无需单独配置。 | 星巴克营业的场地 | compile |
| 处理 web 请求 | spring-webmvc | 星巴克门店-前台服务部 | servlet-api 的真正执行者,接受、分发 web 请求 1.DispatcherServlet 实现 servlet-api 接口,真正的获取参数、赋值相应结果; 2、支持@Controller、@RequestMapping 注解; 3、内置视图解析器、拦截器、静态资源处理等功能 | 具有星巴克特色的接客流程。比如支持啡快下单、线下点单。 Spring-webmvc 有 Spring 专门封装的功能。 | compile |
| 处理 web 请求 | javax.servlet-api | 餐饮行业 "国家统一服务规范"(行业标准) | web 服务器与 Java 程序的桥梁: 提供 servlet 核心接口,是web 服务器调用 Java 程序的规范。当浏览器发出请求1、Tomcat 按照此规范将监听到的请求数据封装成 HttpServletRequest;2、Tomcat再找到实现此规范的具体执行Servlet,如 SpringMVC 的 DispatcherServlet,调用其service()方法,传入HttpServletRequest;3、Java 程序按规范操作 HttpServletRequest 获取参数、处理逻辑,再通过 HttpServletResponse 响应, 若使用SpringMVC 框架,由框架获取参数,处理响应,用户只需要处理业务逻辑。4、Tomcat 按规范把HttpServletResponse 转为 json 返回给浏览器 | Spring-webmvc实现web 服务定制的servlet-api 接口,并支持@Controller、@RequestMapping 注解,内置视图解析器等。 行业规范,所有餐饮行业都要遵守。星巴克可以在遵守的前提下,进行个性化体现。比如:免费热水,电源。 | provided (因为 Tomcat 内部实现了javax.servlet-api,所以运行和打包时不需要此依赖,只在编译和测试时需要) |
| 处理 web 请求 | jackson-databind | 星巴克门店 "统一采购的小票打印机"(通用工具) | 请求和返回值需要在 Java 对象和 json 转换时就需要。 | 需要打印小票时才用到。Spring 的返回值涉及到 Java 对象和json转换时需要,返回 int,或者jsp 时就不需要。 通用工具,未封装上 Spring 风格。 星巴克和瑞幸可能用的同款。 | compile |
| Spring 核心依赖 | spring-context | 星巴克总部- 运营管理部门 | 应用上下文,Bean 运行的容器,如我们接触的"上下文"的作用,承上启下。包括:继承并扩展 BeanFactory、环境配置、组件扫描、事件机制、资源加载。 | Spring 自研体系,只是 Spring 框架的核心,脱离 Spring 无意义。 只有星巴克用,其他咖啡店不用 | compile |
| Spring 核心依赖 | spring-beans | Spring总部- 人力资源管理部门 | Bean 的管理核心:定义 Bean、创建 Bean、依赖注入 Bean、Bean 声明周期管理。 开发者可以不用 new 对象,且由Spring 自动处理 Bean之间的依赖关系。 | Spring 自研体系,只是 Spring 框架的核心,脱离 Spring 无意义。 只有星巴克用,其他咖啡店不用 | compile |
| Spring 核心依赖 | spring-core | 星巴克总部-后勤/运维 | IOC容器的基础实现;提供工具类,封装了反射、类加载等基础功能,使上层组件无需关注具体实现;提供通用工具,如BeanUtils 等;定义 BeanFactory 接口规范。 | Spring 自研体系,只是 Spring 框架的核心,脱离 Spring 无意义。 只有星巴克用,其他咖啡店不用 | compile |
| 数据访问和持久化 | spring-data-jpa | 星巴克总部- 仓库管理系统 | 定义 JPA 规范,Spring 对 JPA 增强封装,简化数据访问层代码,只需定义 Repository 接口(继承 JpaRepository),无需写实现类。整合spring-orm 和hibernate-core | Spring对JPA 规范实现和增强,用户使用Spring 框架可以像使用其他JPA 接口一样,直接调用crud 接口,提升开发效率,减少样板化代码。 定制属于星巴克自己的仓库管理系统。 | compile |
| 数据访问和持久化 | spring-orm | 管理员需要遵循的"星巴克管理规范" | 整合orm 框架,处理成 Spring 能识别的Bean,最终由 Spring 管理对应的orm 框架如 hibernate的生命周期。 | Spring 对orm 框架的包装,便于被 Spring 统一识别管理。 给星巴克仓库管理员发放统一制服。 | compile |
| 数据访问和持久化 | hibernate-core | 仓库管理员 | 1、实体与数据库映射; 2、具体 sql 执行、事务等; 3、与数据库连接。 | 实际处理数据者 | compile |
| MySQL 驱动 | mysql-connector-java | 仓库钥匙 | Java 程序与不同的数据库通信协议不同,需要使用驱动进行"翻译" | 连 MySQL 数据库,需要将 Java 转成 MySQL 数据库能识别的语言,MySQL 数据库"听不懂"Java 语言。 咖啡豆仓库、牛奶仓库,开哪个库门,用哪个钥匙。 | compile |
| 单元测试 | Spring-test | 星巴克总部品控部 | Spring 整合 JUnit 的工具,让测试能加载 Spring 容器 | Spring 在junit 的基础上封装,可以更方便使用 Spring 管理的资源。不使用Spring-test 也能进行单元测试;就像没有品控部门,只有一个试喝员也能检测。 但有了这个工具,可以直接加载 Spring 管理的资源,像写逻辑代码一样写测试代码。 | test 只在测试环境有用,真正交付时不提供。 就像星巴克不会把品控试喝的小勺交付给用户一样。 |
| 单元测试 | junit | 试喝员和他的工具们 | Java 单元测试标准框架,提供测试用例编写、断言、测试运行等基础能力 | Java 测试标准 | test 只在测试环境有用,真正交付时不提供。 就像星巴克不会把品控试喝的小勺交付给用户一样。 |
依赖关系:
spring-webmvc------>spring-web------>javax.servlet-api
spring-context------>spring-beans------>spring-core
spring-data-jpa------>spring-orm------>hibernate-core
3、搭建一个 web 工程
3.1 开发效率工具-Lombok
除了上面必须的依赖,我们可以添加一个 Lombok 依赖,帮我们自动生成 getter、setter 等方法。
java
        <dependency>
            <groupId>org.projectlombok</groupId>
            <artifactId>lombok</artifactId>
            <version>1.18.2</version>
            <scope>provided</scope>
        </dependency>
3.2 类结构
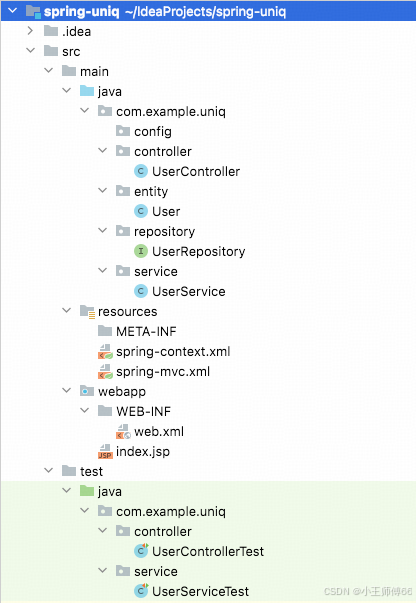
3.3 配置文件
3.3.1: src/main/resources/spring-context.xml
XML
<?xml version="1.0" encoding="UTF-8"?>
<beans xmlns="http://www.springframework.org/schema/beans"
xmlns:xsi="http://www.w3.org/2001/XMLSchema-instance"
xmlns:context="http://www.springframework.org/schema/context" xmlns:tx="http://www.springframework.org/schema/tx"
xmlns:jpa="http://www.springframework.org/schema/data/jpa"
xsi:schemaLocation="http://www.springframework.org/schema/beans http://www.springframework.org/schema/beans/spring-beans.xsd http://www.springframework.org/schema/context https://www.springframework.org/schema/context/spring-context.xsd http://www.springframework.org/schema/tx http://www.springframework.org/schema/tx/spring-tx.xsd http://www.springframework.org/schema/data/jpa http://www.springframework.org/schema/data/jpa/spring-jpa.xsd">
<!--Spring容器配置文件 配置 JPA、数据源、事务管理、Bean 扫描-->
<!-- 1.扫描 service、Repository 等 bean(排除 Controller,由 Spring mvc 扫描) -->
<context:component-scan base-package="com.example.uniq">
<context:exclude-filter type="annotation" expression="org.springframework.stereotype.Controller"/>
</context:component-scan>
<!-- 2.配置数据源(Spring Boot 用 application.yml配置,自动创建 DataSource) -->
<bean id="dataSource" class="org.springframework.jdbc.datasource.DriverManagerDataSource">
<!--使用 MySQL 驱动-->
<property name="driverClassName" value="com.mysql.cj.jdbc.Driver"/>
<property name="url" value="jdbc:mysql://localhost:3307/boot_demo?useSSL=false&serverTimezone=Asia/Shanghai&createDatabaseIfNotExist=true&allowPublicKeyRetrieval=true"/>
<property name="username" value="root"/>
<property name="password" value="123456"/>
</bean>
<!-- 3.配置 JPA 实体管理器工厂 -->
<bean id="entityManagerFactory" class="org.springframework.orm.jpa.LocalContainerEntityManagerFactoryBean">
<property name="dataSource" ref="dataSource"/>
<property name="packagesToScan" value="com.example.uniq.entity"/> <!-- 扫描JPA实体类 -->
<property name="jpaVendorAdapter">
<bean class="org.springframework.orm.jpa.vendor.HibernateJpaVendorAdapter">
<property name="showSql" value="true"/> <!-- 日志中打印 SQL -->
<property name="generateDdl" value="true"/> <!-- 自动创建表结构 (类似 JPA ddl-auto: update)-->
<property name="databasePlatform" value="org.hibernate.dialect.MySQLDialect"/> <!-- 数据库方言 -->
</bean>
</property>
<!-- 新增:Hibernate 额外配置(解决 MySQL 8.0 建表语法错误) -->
<property name="jpaProperties">
<props>
<!-- 强制使用 InnoDB 引擎(MySQL 8.0 默认引擎),避免生成 type=MyISAM -->
<prop key="hibernate.dialect.storage_engine">innodb</prop>
<!-- 可选:明确指定建表引擎为 InnoDB,进一步兼容 -->
<prop key="hibernate.hbm2ddl.auto">update</prop>
</props>
</property>
</bean>
<!-- 4.配置JPA事务管理器 -->
<bean id="transactionManager" class="org.springframework.orm.jpa.JpaTransactionManager">
<property name="entityManagerFactory" ref="entityManagerFactory"/>
</bean>
<!-- 5.开启事务注解 -->
<tx:annotation-driven transaction-manager="transactionManager"/>
<!-- 6.配置 Spring Data JPA (扫描 Repository 接口) -->
<jpa:repositories base-package="com.example.uniq.repository"
entity-manager-factory-ref="entityManagerFactory"
transaction-manager-ref="transactionManager"/>
</beans>3.3.2: src/main/resources/spring-mvc.xml
XML
<?xml version="1.0" encoding="UTF-8"?>
<beans xmlns="http://www.springframework.org/schema/beans"
       xmlns:xsi="http://www.w3.org/2001/XMLSchema-instance"
       xmlns:context="http://www.springframework.org/schema/context"
       xmlns:mvc="http://www.springframework.org/schema/mvc"
       xsi:schemaLocation="http://www.springframework.org/schema/beans http://www.springframework.org/schema/beans/spring-beans.xsd http://www.springframework.org/schema/context https://www.springframework.org/schema/context/spring-context.xsd http://www.springframework.org/schema/mvc https://www.springframework.org/schema/mvc/spring-mvc.xsd">

<!--   1.SpringMVC 配置文件 配置 controller 扫描、 视图解析、json 消息转换器-->
    <context:component-scan base-package="com.example.uniq.controller" use-default-filters="false">
            <context:include-filter type="annotation" expression="org.springframework.stereotype.Controller"/>
    </context:component-scan>

    <!-- 2.启动 Springmvc 注解驱动(支持@RequestMapping @ResponseBody) -->
    <mvc:annotation-driven>
        <!-- 配置 json 消息转换器 controller返回 json 必须 -->
        <mvc:message-converters>
            <bean class="org.springframework.http.converter.json.MappingJackson2HttpMessageConverter"/>
        </mvc:message-converters>
    </mvc:annotation-driven>

    <!-- 3.静态资源处理 -->
    <mvc:default-servlet-handler/>
</beans>
3.3.3: src/main/webapp/WEB-INF/web.xml
XML
<web-app xmlns="http://xmlns.jcp.org/xml/ns/javaee"
xmlns:xsi="http://www.w3.org/2001/XMLSchema-instance"
xsi:schemaLocation="http://xmlns.jcp.org/xml/ns/javaee http://xmlns.jcp.org/xml/ns/javaee/web-app_3_1.xsd"
version="3.1">
<!--1.加载 Spring 容器配置文件(spring-context.xml) -->
<context-param>
<param-name>contextConfigLocation</param-name>
<param-value>classpath:spring-context.xml</param-value>
</context-param>
<listener>
<listener-class>org.springframework.web.context.ContextLoaderListener</listener-class>
</listener>
<!--2.Spring MVC 配置 前端控制器 (DispatcherServlet)-->
<servlet>
<servlet-name>springMvc</servlet-name>
<servlet-class>org.springframework.web.servlet.DispatcherServlet</servlet-class>
<init-param>
<param-name>contextConfigLocation</param-name>
<param-value>classpath:spring-mvc.xml</param-value> <!-- Spring MVC 容器配置文件 -->
</init-param>
<load-on-startup>1</load-on-startup> <!-- 启动时加载 -->
</servlet>
<servlet-mapping>
<servlet-name>springMvc</servlet-name>
<url-pattern>/</url-pattern> <!-- 拦截所有请求 -->
</servlet-mapping>
<!--3.配置字符串编码过滤器 (避免中文乱码) -->
<filter>
<filter-name>characterEncodingFilter</filter-name>
<filter-class>org.springframework.web.filter.CharacterEncodingFilter</filter-class>
<init-param>
<param-name>encoding</param-name>
<param-value>UTF-8</param-value>
</init-param>
<init-param>
<param-name>forceEncoding</param-name>
<param-value>true</param-value>
</init-param>
</filter>
<filter-mapping>
<filter-name>characterEncodingFilter</filter-name>
<url-pattern>/*</url-pattern>
</filter-mapping>
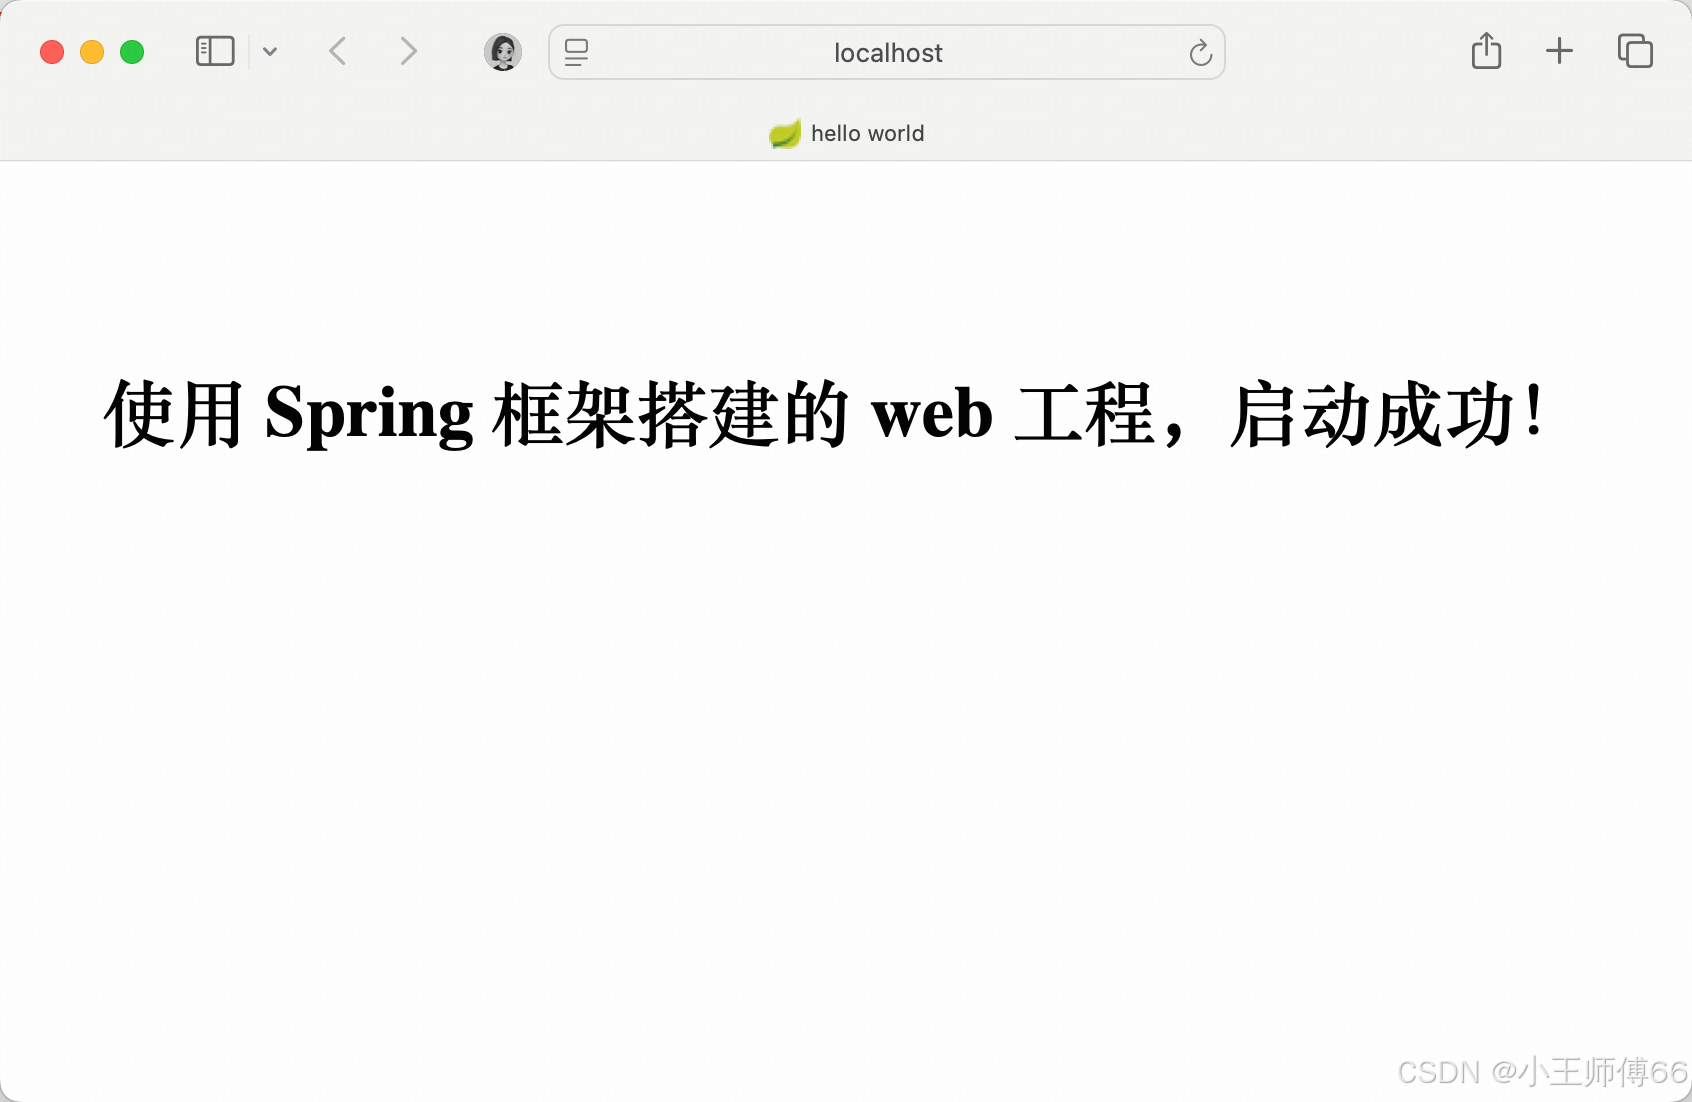
</web-app>3.3.3: src/main/webapp/index.jsp(可选)
javascript
<%@ page contentType="text/html;charset=UTF-8" language="java" %>
<html>
<head>
    <title>hello world</title>
</head>
<body>
<!-- 添加欢迎内容 -->
<h1 style="font-size: 36px; text-align: center; margin-top: 100px;">
    使用 Spring 框架搭建的 web 工程,启动成功!
</h1>
</body>
</html>
在三-2 中我们理解了每个依赖的作用,再理解这些配置文件就简单多了。配置文件,我理解是成语按图索骥中的"图"。
|--------------------|---------------------------------------------------------------------------------------------------------------------------------------------------------|----------------------------------------|
| 配置文件 | 核心作用 | 类比 |
| spring-context.xml | 根容器配置、业务层核心配置,管理【非 web 相关】组件 Spring 按照spring-context.xml的配置,确定组件扫描范围(排除 controller)、数据源配置、JPA/hibernate 整合、事务管理等。有 spring-context.xml这个Spring 容器才能构建起来。 | 开一家"星巴克"店铺的核心指示文件,没它开不了"星巴克"。 |
| spring-mvc.xml | 子容器配置 管理 【web 相关】组件 组件扫描(只扫描 controller),视图解析器配置,静态资源管理等 | 前台对外服务指示文件。 不提供 web 服务时不需要。 |
| web.xml | web 应用入口,Tomcat启动时加载,连接Tomcat 和 Spring 容器 | 前台对外服务指示文件。 不提供 web 服务时不需要。 |
| index.jsp | 欢迎页-可用来标识服务启动成功 | 店门口挂的牌子"营业中"。 不挂牌子,推开门能进能点咖啡,也能说明正在营业。 |
因为星巴克比较出名,所以借用星巴克类比学习一下,大家可以替换成自己知道的任何一家直营店,但注意需要是直营店,加盟店不行,特征不对齐。
3.4 controller
java
package com.example.uniq.controller;

import com.example.uniq.entity.User;
import com.example.uniq.service.UserService;
import org.springframework.beans.factory.annotation.Autowired;
import org.springframework.web.bind.annotation.*;

import java.util.List;

@RestController
@RequestMapping("/users")
public class UserController {
    @Autowired
    private UserService userService;

    // 1. 新增用户:POST 请求 /users
    @PostMapping
    public User createUser(@RequestBody User user) {
        return userService.save(user);
    }

    // 2. 查询所有用户:GET 请求 /users
    @GetMapping
    public List<User> getUsers() {
        return userService.findAll();
    }

    // 3. 根据 ID 查询用户:GET 请求 /users/{id}({id} 是路径参数)
    @GetMapping("/{id}")
    public User getUser(@PathVariable Long id) {
        return userService.findById(id);
    }

    // 4. 根据 ID 修改用户:PUT 请求 /users/{id}
    @PutMapping("/{id}")
    public User updateUser(@PathVariable Long id, @RequestBody User user) {
        User existingUser = userService.findById(id);
        if (existingUser != null) {
            existingUser.setName(user.getName());
            existingUser.setAge(user.getAge());
            return userService.save(existingUser);
        }
        return null;
    }

    // 5. 根据 ID 删除用户:DELETE 请求 /users/{id}
    @DeleteMapping("/{id}")
    public String deleteUser(@PathVariable Long id) {
        userService.deleteById(id);
        return "删除成功";
    }
}
3.5 service
java
package com.example.uniq.service;

import com.example.uniq.entity.User;
import com.example.uniq.repository.UserRepository;
import org.springframework.beans.factory.annotation.Autowired;
import org.springframework.stereotype.Service;

import java.util.List;

@Service
public class UserService {
    @Autowired
    private UserRepository userRepository;

    public User save(User user) {
        return userRepository.save(user);
    }

    public List<User> findAll() {
        return userRepository.findAll();
    }

    public User findById(Long id) {
        return userRepository.findOne(id);
    }

    public void deleteById(Long id) {
        userRepository.delete(id);
    }
}
3.6 repository
java
package com.example.uniq.repository;

import com.example.uniq.entity.User;
import org.springframework.data.jpa.repository.JpaRepository;

public interface UserRepository extends JpaRepository<User, Long> {
}
3.7 entity
java
package com.example.uniq.entity;

import lombok.AllArgsConstructor;
import lombok.Data;
import lombok.NoArgsConstructor;

import javax.persistence.*;

@Data
@Entity
@AllArgsConstructor
@NoArgsConstructor
@Table(name = "user")
public class User {
    @Id // JPA 主键注解
    @GeneratedValue(strategy = GenerationType.IDENTITY) // JPA 主键自动生成策略
    private Long id;
    private String name;   // 用户名
    private Integer age;   // 年龄
}
3.8 启动
这里用idea 启动的

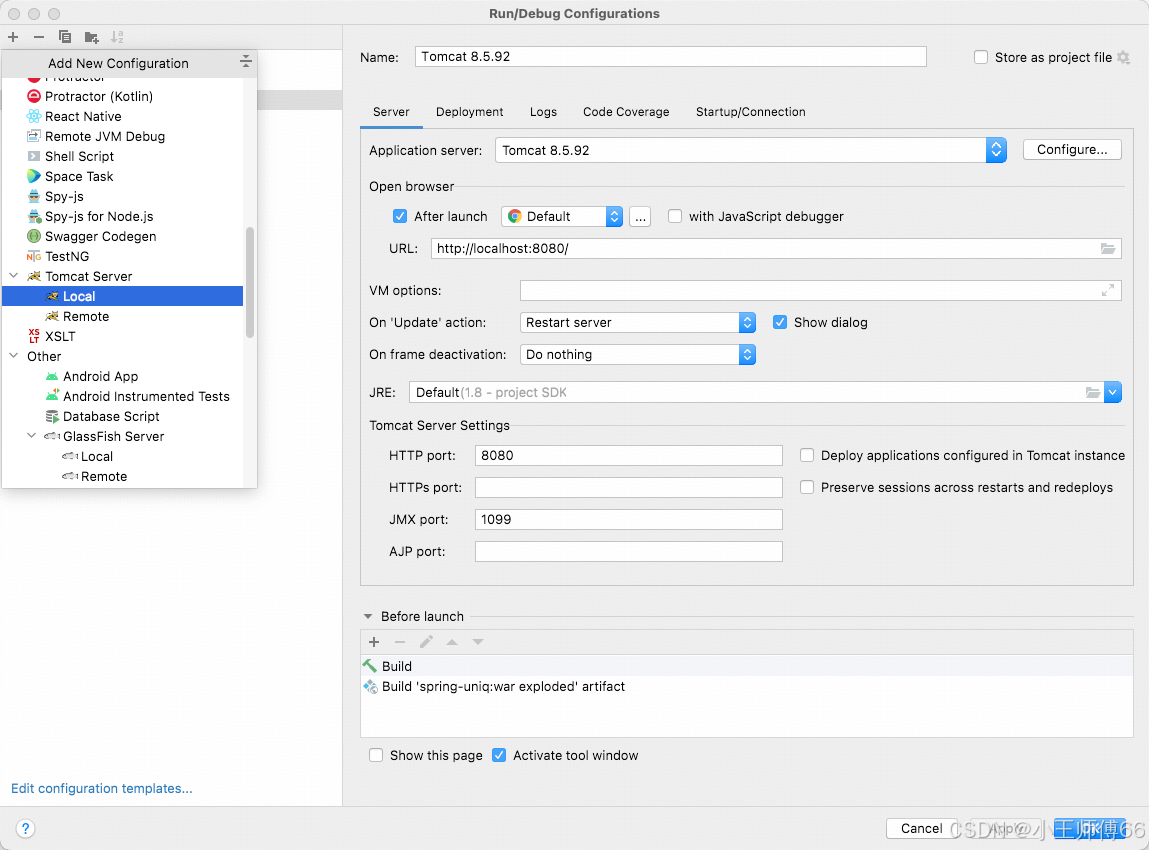
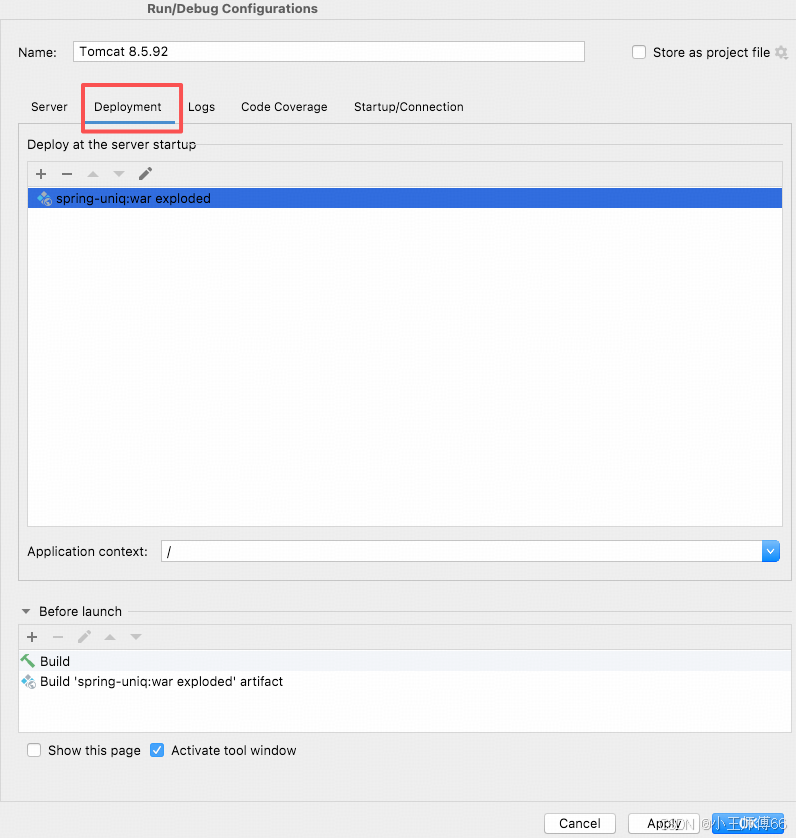
启动成功:
4、测试
我们跟第一篇保持对齐,还是用单元测试
4.1 单元测试:UserService
java
package com.example.uniq.service;

import com.example.uniq.entity.User;
import org.junit.Test;
import org.junit.runner.RunWith;
import org.springframework.beans.factory.annotation.Autowired;
import org.springframework.test.context.ContextConfiguration;
import org.springframework.test.context.junit4.SpringRunner;

import java.util.List;

import static org.junit.Assert.assertNotNull;
import static org.junit.Assert.assertNull;

/**
 * 单元测试
 * 协作机制:运行环境启动,创建 bean,初始化Spring应用上下文管理 bean,将 bean 注入到测试类
 1. SpringRunner启动测试运行环境
2. TestContextManager 扫描测试类上的 @ContextConfiguration 注解
3. 根据 locations属性定位配置文件位置
4. 加载指定的 Spring 配置文件(如 [spring-context.xml](file:///Users/kevinwang/IdeaProjects/spring-uniq/src/main/resources/spring-context.xml))
5. 解析配置文件中的 bean 定义
6. 创建并初始化 Spring 应用上下文
7. 注入 bean

 */
// Spring测试运行器 用于加载 Spring 测试上下文,支持依赖注入和 Spring 测试特性;没有此注解将无法注入依赖的bean
@RunWith(SpringRunner.class)
// 指定 Spring 测试上下文配置文件位置,告诉 SpringTest 框架从哪里加载 bean 定义和应用上下文;
@ContextConfiguration(locations = "classpath:spring-context.xml")
public class UserServiceTest {
    @Autowired
    private UserService userService;

    /**
     * 测试查询所有用户
     */
    @Test
    public void testFindAll() {
        List<User> users = userService.findAll();
        assertNotNull("查询结果不能为空", users);
        System.out.println("查询结果是" + users);
    }

    /**
     * 测试保存用户
     */
    @Test
    public void testSaveUser() {
        User user = new User(null, "小王", 28);
        User savedUser = userService.save(user);
        assertNotNull("保存结果不能为空", savedUser);
        System.out.println("保存结果是" + savedUser);
        userService.save(user);
    }
    /**
     * 测试根据 ID 查询用户
     */
    @Test
    public void testFindById() {
        User user = userService.findById(3L);
        assertNotNull("查询结果不能为空", user);
        System.out.println("查询结果是" + user);
    }

    @Test
    public void testDeleteById() {
        userService.deleteById(3L);
        User deletedUser = userService.findById(3L);
        assertNull("用户删除失败", deletedUser);
        System.out.println("用户删除成功");
    }
}
4.2 集成测试
java
package com.example.uniq.controller;

import com.example.uniq.entity.User;
import com.example.uniq.service.UserService;
import org.junit.Before;
import org.junit.Test;
import org.junit.runner.RunWith;
import org.springframework.beans.factory.annotation.Autowired;
import org.springframework.http.MediaType;
import org.springframework.test.context.ContextConfiguration;
import org.springframework.test.context.junit4.SpringJUnit4ClassRunner;
import org.springframework.test.context.junit4.SpringRunner;
import org.springframework.test.context.web.WebAppConfiguration;
import org.springframework.test.web.servlet.MockMvc;
import org.springframework.test.web.servlet.setup.MockMvcBuilders;
import org.springframework.web.context.WebApplicationContext;

import static org.junit.Assert.*;
import static org.springframework.test.web.servlet.request.MockMvcRequestBuilders.*;
import static org.springframework.test.web.servlet.result.MockMvcResultMatchers.*;

/**
 * 集成测试
 */
@RunWith(SpringRunner.class) // Spring测试运行器
@ContextConfiguration(locations = {"classpath:spring-context.xml", "classpath:spring-mvc.xml"}) // 加载主配置
@WebAppConfiguration // 标记为 web 应用测试
public class UserControllerTest {
    @Autowired
    private WebApplicationContext webApplicationContext;
    @Autowired
    private UserService userService;

    private MockMvc mockMvc;

    @Before
    public void setup() {
        mockMvc = MockMvcBuilders.webAppContextSetup(webApplicationContext).build();
    }

    @Test
    public void testSave() throws Exception {
        // 模拟 http 请求
        mockMvc.perform(post("/users")
                        .contentType(MediaType.APPLICATION_JSON)
                        .content("{\"name\":\"小张\",\"age\":29}"))
                .andExpect(status().isOk())
                // 数据验证
                .andDo(result ->{
                    Long newUserId = Long.valueOf(result.getResponse().getContentAsString().split(":")[1].split(",")[0]);
                    User newUser = userService.findById(newUserId);
                    assertNotNull(newUser);
                    assertEquals(newUser.getName(),"小张");
                });
    }

    /**
     * 测试更新用户
     *
     * @throws Exception
     */
    @Test
    public void testUpdate() throws Exception {
        mockMvc.perform(put("/users/7")
                        .contentType(MediaType.APPLICATION_JSON)
                        .content("{\"name\":\"小兰\",\"age\":60}"))
                .andExpect(status().isOk())
                .andDo(result ->{
                    User newUser = userService.findById(7l);
                    assertNotNull(newUser);
                    assertEquals(newUser.getName(),"小兰");
                    //  会报错:java.lang.AssertionError:
                    //  Expected :60
                    // Actual   :30
                    assertEquals(newUser.getAge().intValue(),30);
                });
    }

    /**
     * 测试查询所有用户
     *
     * @throws Exception
     */
    @Test
    public void testGetUsers() throws Exception {
        mockMvc.perform(get("/users"))
                .andExpect(status().isOk())
                .andExpect(content().contentType(MediaType.APPLICATION_JSON_UTF8))
                .andDo(mvcResult -> {
                    System.out.println(mvcResult.getResponse().getContentAsString());
                });
    }

    /**
     * 测试查询用户
     *
     * @throws Exception
     */
    @Test
    public void testGetUser() throws Exception {
        mockMvc.perform(get("/users/5"))
                .andExpect(status().isOk())
                .andDo(mvcResult -> {
                    System.out.println(mvcResult.getResponse().getContentAsString());
                });
    }

    /**
     * 测试删除用户
     *
     * @throws Exception
     */
    @Test
    public void testDeleteUser(){
        try {
            mockMvc.perform(delete("/users/1"))
                    .andExpect(status().isOk());
        } catch (Exception e) {
            // 因为表里没有 Id=1 的数据,抛出异常:org.springframework.web.util.NestedServletException: Request processing failed; nested exception is org.springframework.dao.EmptyResultDataAccessException: No class com.example.uniq.entity.User entity with id 1 exists!
            System.out.printf("e is" + e);
        }

    }
}
四、总结
1、引入13 个 jar 包
也是分别对应: web 请求,持久化,数据库连接,单元测试。
是上一篇使用 SpringBoot 搭建的 3 倍多。
2、web 工程,这3 个配置文件很重要
spring-context.xml,spring-mvc.xml, web.xml
那么,非 web 工程,哪些配置文件可以去掉呢?
3、特点
显式配置,更容易看到 Spring 的 AOP、IOC的特性。
写这篇文章时,主要时间花在了搭建项目上,边搭边感慨:SpringBoot 框架封装的不错,不用像 Spring 框架这样配来配去。另一部分时间是"编故事",串联依赖关系,大家不用死记硬背这些依赖或者例子,知道核心概念之后,多用、多问为什么,很快就能掌握。写完这篇文章,你问我Spring 框架核心的依赖有哪些,我能轻松的讲出来了。
下一篇文章,我将结合这两个工程,展开对比 Spring 框架、SpringBoot 框架搭建 web 工程时的核心区别,敬请期待吧。