YOLOv11结构解析及源码复现
一、YOLOv11简介
1.1目标检测两大流派概述
在2015年,YOLO模型问世,YOLO全称为You Only Look Once。顾名思义,YOLO将目标检测任务只分为一个阶段的工作,与2014年提出的两阶段检测的R-CNN模型形成鲜明的区别。
YOLO问世之后,目标检测领域正式诞生了以下两大流派:以R-CNN为代表的two-stage流派,以YOLO为首的one-stage流派。
一阶段和两阶段检测模型对比如下:
| ------ | 识别过程 | 性能 |
|---|---|---|
| 两阶段 | 先提取可能包含目标的区域,再对每个区域进行识别,最后给出结果 | 通常精度高,速度慢 |
| 一阶段 | 定位和分类耦合在一起,同步完成 | 通常精度低,速度快 |
1.2YOLO发展历史
自从2015年YOLOv1提出到2025年已有10年时间,截至2025年12月,最新版YOLO是v13版本。
YOLO从v1至v13发展脉络摘要如下:
- 2015年,Joseph Redmon等学者提出了YOLOv1,首次将目标检测端到端地看作单阶段回归问题。Joseph Redmon被称为YOLO之父。论文地址:You Only Look Once: Unified, Real-Time Object Detection
- 2016年,Joseph Redmon等学者提出了YOLOv2,也称为YOLO9000,因为能够识别9000类物体,引入了Anchor Boxes和Batch Normalization,论文地址:YOLO9000: Better, Faster, Stronger
- 2018年,Joseph Redmon等学者提出了YOLOv3,借鉴FPN引入了多尺度预测和使用逻辑回归(Logistic)代替Softmax。论文地址为:YOLOv3: An Incremental Improvement
- 2020年,Joseph Redmon宣布退出计算机视觉领域,停止了YOLO的研究,后续的各版本YOLO不再出自他手。
- 2020年,Alexey Bochkovskiy等学者提出了YOLOv4,系统性地总结了在目标检测中可能提升精度与速度的各种"技巧"。论文地址为:YOLOv4: Optimal Speed and Accuracy of Object Detection
- 2020年,Ultralytics团队提出了YOLOv5,提供了预训练模型(n/s/m/l/x)。只在github上开源了代码,而没有发表论文。
- 2022年,美图提出了YOLOv6,论文地址为:YOLOv6: A Single-Stage Object Detection Framework for Industrial Applications
- 2022年,Chien-Yao Wang等学者提出了YOLOv7,论文地址为:YOLOv7: Trainable bag-of-freebies sets new state-of-the-art for real-time object detectors
- 2023年,Ultralytics团队提出了YOLOv8,引入了C2f模块,增强了特征提取能力。同样只在github上开源了代码,而没有发表论文。
- 2024年,Chien-Yao Wang等学者提出了YOLOv9,引入了注意力机制。论文地址为:YOLOv9: Learning What You Want to Learn Using Programmable Gradient Information
- 2024年,清华大学的Chien-Yao Wang等学者提出了YOLOv10,引入了轻量级的 Transformer模块。论文地址为:YOLOv10: Real-Time End-to-End Object Detection
- 2024年,Ultralytics团队提出了YOLOv11,引入了C3K2模块和free-anchor,同样只在github上开源了代码,而没有发表论文。但有一篇对YOLOv11进行研究的第三方论文:YOLOv11: An Overview of the Key Architectural Enhancements
- 2025年,Yunjie Tian等学者提出了YOLOv12,以区域注意力(Region Attention)替代传统CNN,提升特征表达能力。论文地址为:YOLOv12: Attention-Centric Real-Time Object Detectors
- 2025年,清华大学的Mengqi Lei等学者提出了YOLOv13,论文地址为:YOLOv13: Real-Time Object Detection with Hypergraph-Enhanced Adaptive Visual Perception
1.3YOLOv11简介
YOLOv11于2024年由Ultralytics团队提出,官方github地址为:https://github.com/ultralytics/ultralytics
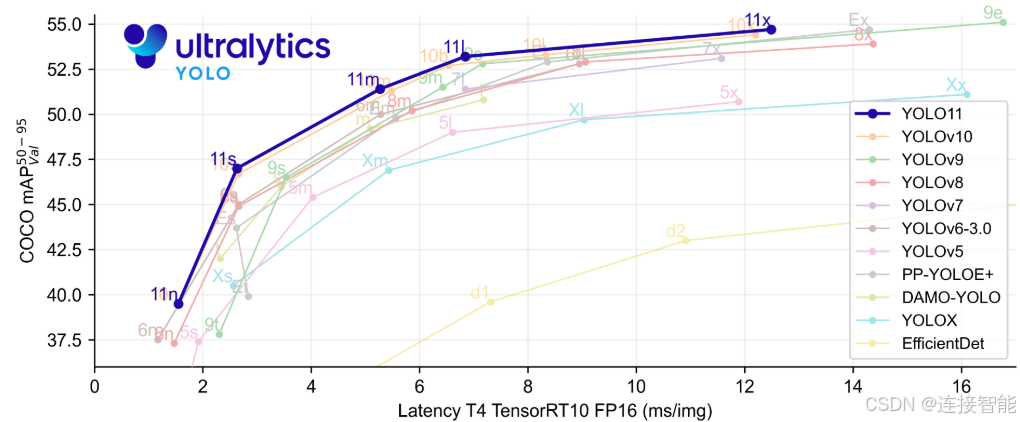
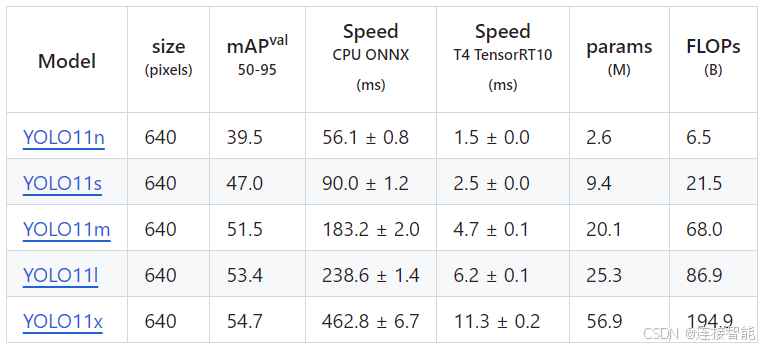
除源代码外,还给出了在COCO数据集上的不同规模的目标识别预训练模型:
除目标识别外,YOLOv11还支持图像分类、图像分割、姿势判断、带有方向的物体识别等应用,并且在github上给出了对应的预训练模型。

二、YOLOv11模型使用方式
2.1使用官方软件包
安装环境要求Python>=3.8,PyTorch>=1.8,通过pip命令安装ultralytics包:
bash
pip install ultralytics然后使用如下示例代码调用YOLOv11训练和预测:
python
from ultralytics import YOLO

# Load a pretrained YOLO11n model
model = YOLO("yolo11n.pt")

# Train the model on the COCO8 dataset for 100 epochs
train_results = model.train(
    data="coco8.yaml",  # Path to dataset configuration file
    epochs=100,  # Number of training epochs
    imgsz=640,  # Image size for training
    device="cpu",  # Device to run on (e.g., 'cpu', 0, [0,1,2,3])
)

# Evaluate the model's performance on the validation set
metrics = model.val()

# Perform object detection on an image
results = model("path/to/image.jpg")  # Predict on an image
results[0].show()  # Display results

# Export the model to ONNX format for deployment
path = model.export(format="onnx")  # Returns the path to the exported model
通过这种方式可以快速上手YOLOv11在自建数据集上训练,验证模型效果。
但无法对YOLOv11模型进行灵活修改,不适用于有更改模型需求的研究人员。
2.2使用替代源码
一般来说,可以下载官方github上的项目源码,然后进行模型更改,但YOLOv11的官方项目文件繁杂,模型模块需要经过多重调用,难以对模型结构有一个清晰的认识。
因此本文在github上进行搜索,查找到了pytorch架构编写的替代版YOLOv11源码:
项目名称为YOLOv11-pt,github地址为:https://github.com/jahongir7174/YOLOv11-pt
读者可自行与官方模型对比,验证是否为无损复现。
2.2.1下载安装
该项目安装页面虽然使用python为3.10,pytorch未说明版本,但本文环境为python3.8.10,pytorch版本为1.10.1,可以正常运行该项目代码。
配置好环境后,使用git命令下载该项目到本地即可使用:
bash
git clone https://github.com/jahongir7174/YOLOv11-pt.git2.2.2源码项目结构
项目结构如图所示:

nets文件夹中仅包含一个nn.py文件,定义了YOLOv11的模型结构。
utils文件夹包含配置文件,weights文件夹保存训练的模型权重。
main.py文件里是具体的训练和测试代码。
三、YOLOv11模型结构解析
YOLOv11延续了YOLO系列的经典三段式架构:
- Backbone:用于提取图像的基本特征;
- Neck:用于多尺度特征融合;
- Head:进行最终的目标分类和边界框预测。
下面以结合官方的模块名称与YOLOv11-pt项目代码,对模型各个组成部分进行讲解。
3.1特征提取
特征提取部分的网络结构主要由CBS模块、C3k2模块、SPPF模块、C2PSA模块堆叠而成。
3.1.1CBS模块
CBS模块是由conv卷积、BatchNorm批正则化和SiLU激活函数依次组成,代码如下:
python
class Conv(torch.nn.Module):
    def __init__(self, in_ch, out_ch, activation, k=1, s=1, p=0, g=1):
        super().__init__()
        self.conv = torch.nn.Conv2d(in_ch, out_ch, k, s, p, groups=g, bias=False)
        self.norm = torch.nn.BatchNorm2d(out_ch, eps=0.001, momentum=0.03)
        self.relu = activation

    def forward(self, x):
        return self.relu(self.norm(self.conv(x)))

    def fuse_forward(self, x):
        return self.relu(self.conv(x))
注意在项目中CBS模块被命名为Conv类,且类中激活函数变量名虽然为relu,但并不是relu函数。
3.1.2C3k2模块
C3k2模块由CBS模块、可选模块、CBS模块依次组成,其中可选模块根据传入参数不同,可以是普通的残差模块,也可以是C3k模块(由若干个CBS模块加残差模块组成),这个参数选择与YOLOv11的n/s/m/l/x不同规模选择有关。
代码如下:
python
class Residual(torch.nn.Module):
    def __init__(self, ch, e=0.5):
        super().__init__()
        self.conv1 = Conv(ch, int(ch * e), torch.nn.SiLU(), k=3, p=1)
        self.conv2 = Conv(int(ch * e), ch, torch.nn.SiLU(), k=3, p=1)

    def forward(self, x):
        return x + self.conv2(self.conv1(x))


class CSPModule(torch.nn.Module):
    def __init__(self, in_ch, out_ch):
        super().__init__()
        self.conv1 = Conv(in_ch, out_ch // 2, torch.nn.SiLU())
        self.conv2 = Conv(in_ch, out_ch // 2, torch.nn.SiLU())
        self.conv3 = Conv(2 * (out_ch // 2), out_ch, torch.nn.SiLU())
        self.res_m = torch.nn.Sequential(Residual(out_ch // 2, e=1.0),
                                         Residual(out_ch // 2, e=1.0))

    def forward(self, x):
        y = self.res_m(self.conv1(x))
        return self.conv3(torch.cat((y, self.conv2(x)), dim=1))


class CSP(torch.nn.Module):
    def __init__(self, in_ch, out_ch, n, csp, r):
        super().__init__()
        self.conv1 = Conv(in_ch, 2 * (out_ch // r), torch.nn.SiLU())
        self.conv2 = Conv((2 + n) * (out_ch // r), out_ch, torch.nn.SiLU())

        if not csp:
            self.res_m = torch.nn.ModuleList(Residual(out_ch // r) for _ in range(n))
        else:
            self.res_m = torch.nn.ModuleList(CSPModule(out_ch // r, out_ch // r) for _ in range(n))

    def forward(self, x):
        y = list(self.conv1(x).chunk(2, 1))
        y.extend(m(y[-1]) for m in self.res_m)
        return self.conv2(torch.cat(y, dim=1))
代码中的CSP类即为C3k2模块,CSPModule类即为C3k模块。
3.1.3SPPF模块
SPPF模块,空间金字塔池化的改进版本,用于捕获不同尺度的特征,代码如下:
python
class SPP(torch.nn.Module):
    def __init__(self, in_ch, out_ch, k=5):
        super().__init__()
        self.conv1 = Conv(in_ch, in_ch // 2, torch.nn.SiLU())
        self.conv2 = Conv(in_ch * 2, out_ch, torch.nn.SiLU())
        self.res_m = torch.nn.MaxPool2d(k, stride=1, padding=k // 2)

    def forward(self, x):
        x = self.conv1(x)
        y1 = self.res_m(x)
        y2 = self.res_m(y1)
        return self.conv2(torch.cat(tensors=[x, y1, y2, self.res_m(y2)], dim=1))
3.1.4C2PSA模块
C2PSA模块是由CBS模块与PSA模块组成,PSA模块是基于注意力机制的引入残差的模块,能够提取更加丰富的特征。代码如下:
python
class Attention(torch.nn.Module):

    def __init__(self, ch, num_head):
        super().__init__()
        self.num_head = num_head
        self.dim_head = ch // num_head
        self.dim_key = self.dim_head // 2
        self.scale = self.dim_key ** -0.5

        self.qkv = Conv(ch, ch + self.dim_key * num_head * 2, torch.nn.Identity())

        self.conv1 = Conv(ch, ch, torch.nn.Identity(), k=3, p=1, g=ch)
        self.conv2 = Conv(ch, ch, torch.nn.Identity())

    def forward(self, x):
        b, c, h, w = x.shape

        qkv = self.qkv(x)
        qkv = qkv.view(b, self.num_head, self.dim_key * 2 + self.dim_head, h * w)

        q, k, v = qkv.split([self.dim_key, self.dim_key, self.dim_head], dim=2)

        attn = (q.transpose(-2, -1) @ k) * self.scale
        attn = attn.softmax(dim=-1)

        x = (v @ attn.transpose(-2, -1)).view(b, c, h, w) + self.conv1(v.reshape(b, c, h, w))
        return self.conv2(x)


class PSABlock(torch.nn.Module):

    def __init__(self, ch, num_head):
        super().__init__()
        self.conv1 = Attention(ch, num_head)
        self.conv2 = torch.nn.Sequential(Conv(ch, ch * 2, torch.nn.SiLU()),
                                         Conv(ch * 2, ch, torch.nn.Identity()))

    def forward(self, x):
        x = x + self.conv1(x)
        return x + self.conv2(x)


class PSA(torch.nn.Module):
    def __init__(self, ch, n):
        super().__init__()
        self.conv1 = Conv(ch, 2 * (ch // 2), torch.nn.SiLU())
        self.conv2 = Conv(2 * (ch // 2), ch, torch.nn.SiLU())
        self.res_m = torch.nn.Sequential(*(PSABlock(ch // 2, ch // 128) for _ in range(n)))

    def forward(self, x):
        x, y = self.conv1(x).chunk(2, 1)
        return self.conv2(torch.cat(tensors=(x, self.res_m(y)), dim=1))
C2PSA模块即为PSA类,PSA模块即为PSABlock类。
3.1.5整体结构
特征提取部分整体结构如下代码所示:
python
class DarkNet(torch.nn.Module):
    def __init__(self, width, depth, csp):
        super().__init__()
        self.p1 = []
        self.p2 = []
        self.p3 = []
        self.p4 = []
        self.p5 = []

        # p1/2
        self.p1.append(Conv(width[0], width[1], torch.nn.SiLU(), k=3, s=2, p=1))
        # p2/4
        self.p2.append(Conv(width[1], width[2], torch.nn.SiLU(), k=3, s=2, p=1))
        self.p2.append(CSP(width[2], width[3], depth[0], csp[0], r=4))
        # p3/8
        self.p3.append(Conv(width[3], width[3], torch.nn.SiLU(), k=3, s=2, p=1))
        self.p3.append(CSP(width[3], width[4], depth[1], csp[0], r=4))
        # p4/16
        self.p4.append(Conv(width[4], width[4], torch.nn.SiLU(), k=3, s=2, p=1))
        self.p4.append(CSP(width[4], width[4], depth[2], csp[1], r=2))
        # p5/32
        self.p5.append(Conv(width[4], width[5], torch.nn.SiLU(), k=3, s=2, p=1))
        self.p5.append(CSP(width[5], width[5], depth[3], csp[1], r=2))
        self.p5.append(SPP(width[5], width[5]))
        self.p5.append(PSA(width[5], depth[4]))

        self.p1 = torch.nn.Sequential(*self.p1)
        self.p2 = torch.nn.Sequential(*self.p2)
        self.p3 = torch.nn.Sequential(*self.p3)
        self.p4 = torch.nn.Sequential(*self.p4)
        self.p5 = torch.nn.Sequential(*self.p5)

    def forward(self, x):
        p1 = self.p1(x)
        p2 = self.p2(p1)
        p3 = self.p3(p2)
        p4 = self.p4(p3)
        p5 = self.p5(p4)
        return p3, p4, p5
特征提取部分最终输出p3, p4, p5三个不同尺度的特征图,进入多尺度特征融合。
3.2多尺度特征融合
特征融合部分较为简单,主要做的工作就是对输入的p3、p4、p5三个特征图进行拼接,然后使用C3k2模块进行进一步的特征提取,代码如下:
python
class DarkFPN(torch.nn.Module):
    def __init__(self, width, depth, csp):
        super().__init__()
        self.up = torch.nn.Upsample(scale_factor=2)
        self.h1 = CSP(width[4] + width[5], width[4], depth[5], csp[0], r=2)
        self.h2 = CSP(width[4] + width[4], width[3], depth[5], csp[0], r=2)
        self.h3 = Conv(width[3], width[3], torch.nn.SiLU(), k=3, s=2, p=1)
        self.h4 = CSP(width[3] + width[4], width[4], depth[5], csp[0], r=2)
        self.h5 = Conv(width[4], width[4], torch.nn.SiLU(), k=3, s=2, p=1)
        self.h6 = CSP(width[4] + width[5], width[5], depth[5], csp[1], r=2)

    def forward(self, x):
        p3, p4, p5 = x
        p4 = self.h1(torch.cat(tensors=[self.up(p5), p4], dim=1))
        p3 = self.h2(torch.cat(tensors=[self.up(p4), p3], dim=1))
        p4 = self.h4(torch.cat(tensors=[self.h3(p3), p4], dim=1))
        p5 = self.h6(torch.cat(tensors=[self.h5(p4), p5], dim=1))
        return p3, p4, p5
特征融合部分通过DarkFPN类实现,最终输出拼接整合后的p3, p4, p5特征图,三个特征图尺度不同,以便检测不同大小的目标。
3.3目标分类和边界框预测
目标分类和边界框预测输出最终的目标检测结果,此部分主要由类别预测模块和边框预测模块组成,分别在p3, p4, p5特征图上进行预测,代码如下:
python
class DFL(torch.nn.Module):
    # Generalized Focal Loss
    # https://ieeexplore.ieee.org/document/9792391
    def __init__(self, ch=16):
        super().__init__()
        self.ch = ch
        self.conv = torch.nn.Conv2d(ch, out_channels=1, kernel_size=1, bias=False).requires_grad_(False)
        x = torch.arange(ch, dtype=torch.float).view(1, ch, 1, 1)
        self.conv.weight.data[:] = torch.nn.Parameter(x)

    def forward(self, x):
        b, c, a = x.shape
        x = x.view(b, 4, self.ch, a).transpose(2, 1)
        return self.conv(x.softmax(1)).view(b, 4, a)


class Head(torch.nn.Module):
    anchors = torch.empty(0)
    strides = torch.empty(0)

    def __init__(self, nc=80, filters=()):
        super().__init__()
        self.ch = 16  # DFL channels
        self.nc = nc  # number of classes
        self.nl = len(filters)  # number of detection layers
        self.no = nc + self.ch * 4  # number of outputs per anchor
        self.stride = torch.zeros(self.nl)  # strides computed during build

        box = max(64, filters[0] // 4)
        cls = max(80, filters[0], self.nc)

        self.dfl = DFL(self.ch)
        self.box = torch.nn.ModuleList(torch.nn.Sequential(Conv(x, box,torch.nn.SiLU(), k=3, p=1),
                                                           Conv(box, box,torch.nn.SiLU(), k=3, p=1),
                                                           torch.nn.Conv2d(box, out_channels=4 * self.ch,
                                                                           kernel_size=1)) for x in filters)
        self.cls = torch.nn.ModuleList(torch.nn.Sequential(Conv(x, x, torch.nn.SiLU(), k=3, p=1, g=x),
                                                           Conv(x, cls, torch.nn.SiLU()),
                                                           Conv(cls, cls, torch.nn.SiLU(), k=3, p=1, g=cls),
                                                           Conv(cls, cls, torch.nn.SiLU()),
                                                           torch.nn.Conv2d(cls, out_channels=self.nc,
                                                                           kernel_size=1)) for x in filters)

    def forward(self, x):
        for i, (box, cls) in enumerate(zip(self.box, self.cls)):
            x[i] = torch.cat(tensors=(box(x[i]), cls(x[i])), dim=1)
        if self.training:
            return x

        self.anchors, self.strides = (i.transpose(0, 1) for i in make_anchors(x, self.stride))
        x = torch.cat([i.view(x[0].shape[0], self.no, -1) for i in x], dim=2)
        box, cls = x.split(split_size=(4 * self.ch, self.nc), dim=1)

        a, b = self.dfl(box).chunk(2, 1)
        a = self.anchors.unsqueeze(0) - a
        b = self.anchors.unsqueeze(0) + b
        box = torch.cat(tensors=((a + b) / 2, b - a), dim=1)

        return torch.cat(tensors=(box * self.strides, cls.sigmoid()), dim=1)

    def initialize_biases(self):
        # Initialize biases
        # WARNING: requires stride availability
        for box, cls, s in zip(self.box, self.cls, self.stride):
            # box
            box[-1].bias.data[:] = 1.0
            # cls (.01 objects, 80 classes, 640 image)
            cls[-1].bias.data[:self.nc] = math.log(5 / self.nc / (640 / s) ** 2)
整体由Head类实现,类别预测模块为self.cls,边框预测模块为self.box。
DFL类,把边界框回归问题从直接回归一个实数转变为回归一个离散分布,然后用期望值还原成真实值,这样能显著提升定位精度。
最终如果是训练模式,则返回原始的cls和box预测图的拼接图,如果是预测模式,在返回cls和box预测图的解码形式。
3.4YOLOv11整体结构
整体结构代码如下:
python
class YOLO(torch.nn.Module):
    def __init__(self, width, depth, csp, num_classes):
        super().__init__()
        self.net = DarkNet(width, depth, csp)
        self.fpn = DarkFPN(width, depth, csp)

        img_dummy = torch.zeros(1, width[0], 256, 256)
        self.head = Head(num_classes, (width[3], width[4], width[5]))
        self.head.stride = torch.tensor([256 / x.shape[-2] for x in self.forward(img_dummy)])
        self.stride = self.head.stride
        self.head.initialize_biases()

    def forward(self, x):
        x = self.net(x)
        x = self.fpn(x)
        return self.head(list(x))

    def fuse(self):
        for m in self.modules():
            if type(m) is Conv and hasattr(m, 'norm'):
                m.conv = fuse_conv(m.conv, m.norm)
                m.forward = m.fuse_forward
                delattr(m, 'norm')
        return self


def yolo_v11_n(num_classes: int = 80):
    csp = [False, True]
    depth = [1, 1, 1, 1, 1, 1]
    width = [3, 16, 32, 64, 128, 256]
    return YOLO(width, depth, csp, num_classes)


def yolo_v11_t(num_classes: int = 80):
    csp = [False, True]
    depth = [1, 1, 1, 1, 1, 1]
    width = [3, 24, 48, 96, 192, 384]
    return YOLO(width, depth, csp, num_classes)


def yolo_v11_s(num_classes: int = 80):
    csp = [False, True]
    depth = [1, 1, 1, 1, 1, 1]
    width = [3, 32, 64, 128, 256, 512]
    return YOLO(width, depth, csp, num_classes)


def yolo_v11_m(num_classes: int = 80):
    csp = [True, True]
    depth = [1, 1, 1, 1, 1, 1]
    width = [3, 64, 128, 256, 512, 512]
    return YOLO(width, depth, csp, num_classes)


def yolo_v11_l(num_classes: int = 80):
    csp = [True, True]
    depth = [2, 2, 2, 2, 2, 2]
    width = [3, 64, 128, 256, 512, 512]
    return YOLO(width, depth, csp, num_classes)


def yolo_v11_x(num_classes: int = 80):
    csp = [True, True]
    depth = [2, 2, 2, 2, 2, 2]
    width = [3, 96, 192, 384, 768, 768]
    return YOLO(width, depth, csp, num_classes)
模型整体结构由YOLO类实现,类内依次调用特征提取、特征融合和最终预测Head模块。
yolo_v11_n~yolo_v11_x函数对应着不同的规模,主要区别在于:
- csp参数控制是否使用C3k模块;
- depth参数控制使用C3k模块的个数;
- width参数控制特征维度。