文章目录
::info
部署对应的WordPress站点,基于LNMP架构,安装Nginx、Mysql、PHP
:::
实验环境
| 容器名字 | 功能 |
|---|---|
| Nginx | 提供网页服务 |
| Mysql | 提供数据库服务 |
| PHP | 中间件 |
实验需求
部署搭建自己的WordPress站点,进行运行自己的站点
实验步骤
1、前期环境准备
1.1、创建目录结构
bash
[root@test01 ~]# mkdir -p /blog/{mysql/{data,logs,conf},nginx}

#上传WordPress的站点资源到/blog下,解压
[root@test01 blog]# ls
mysql  nginx   wordpress-5.7-zh_CN.tar.gz
[root@test01 blog]# tar -xf /blog/wordpress-5.7-zh_CN.tar.gz
[root@test01 blog]# ls
mysql  nginx  wordpress  wordpress-5.7-zh_CN.tar.gz
1.2、创建mysql的配置文件
bash
[root@test01 blog]# cat >> /blog/mysql/conf/my.cnf<<EOF
> [mysqld]
> user=mysql
> datadir=/var/lib/mysql
> character-set-server=utf8
> secure_file_priv=/var/lib/mysql
> expire_logs_days=7
> sql_mode=STRICT_TRANS_TABLES,NO_ZERO_IN_DATE,NO_ZERO_DATE,ERROR_FOR_DIVISION_BY_ZERO,NO_ENGINE_SUBSTITUTION
> max_connections=1000
> [client]
> default-character-set=utf8
> [mysql]
> default-character-set=utf8
> EOF
1.3、创建nginx的配置文件
bash
[root@test01 blog]# cat >>/blog/nginx/default.conf<<EFO
> server {
>     server_name wordpress.jy.com;  #访问服务名
>     listen 80;
>     client_max_body_size 50M;   #设置上传文件的大小
>     root /blog/wordpress;   #WordPress的资源目录
>     index index.php index.html;
>
>     location ~ \.php$ {
>             fastcgi_pass   php:9000; #这里的PHP是指后续运行的PHP的容器的名字
>             fastcgi_index  index.php;
>             fastcgi_param  SCRIPT_FILENAME $document_root$fastcgi_script_name;
>             include        fastcgi_params;
>     }
> }
> EFO

server {
    server_name wordpress.jy.com;   #自定义站点地址
    listen 80;                    #监听80端口
    client_max_body_size 50M;                                  #修改最大上传文件大小
    root /blog/wordpress;			#指定站点路径
    index index.php index.html;                                 #设置访问网页类型

    location ~ \.php$ {
	    fastcgi_pass   php:9000;   #指定php容器名称
	    fastcgi_index  index.php;
	    fastcgi_param  SCRIPT_FILENAME  $document_root$fastcgi_script_name;
	    include        fastcgi_params;
    }
}
1.4、修改解压后的WordPress配置信息
bash
#复制wp-config-sample.php为wp-config.php文件,修改编辑里面的内容
[root@test01 blog]# cd wordpress/
[root@test01 wordpress]# cp wp-config-sample.php wp-config.php
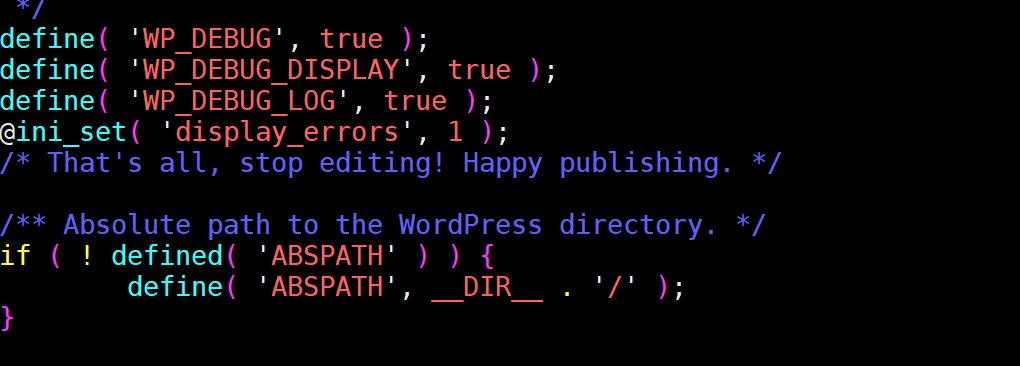
1、开启调试,wp-config.php中默认隐藏错误,需修改配置开启调试,之后才方便进行排查相关问题
找到以下代码段修改:
define( 'WP_DEBUG', false );
在后面追加
// 开启调试模式(显示具体错误)
define( 'WP_DEBUG', true );
// 允许错误显示在页面上(临时排查用)
define( 'WP_DEBUG_DISPLAY', true );
// 将错误写入日志文件(推荐,不暴露给前端)
define( 'WP_DEBUG_LOG', true );
// 关闭 PHP 错误屏蔽
@ini_set( 'display_errors', 1 );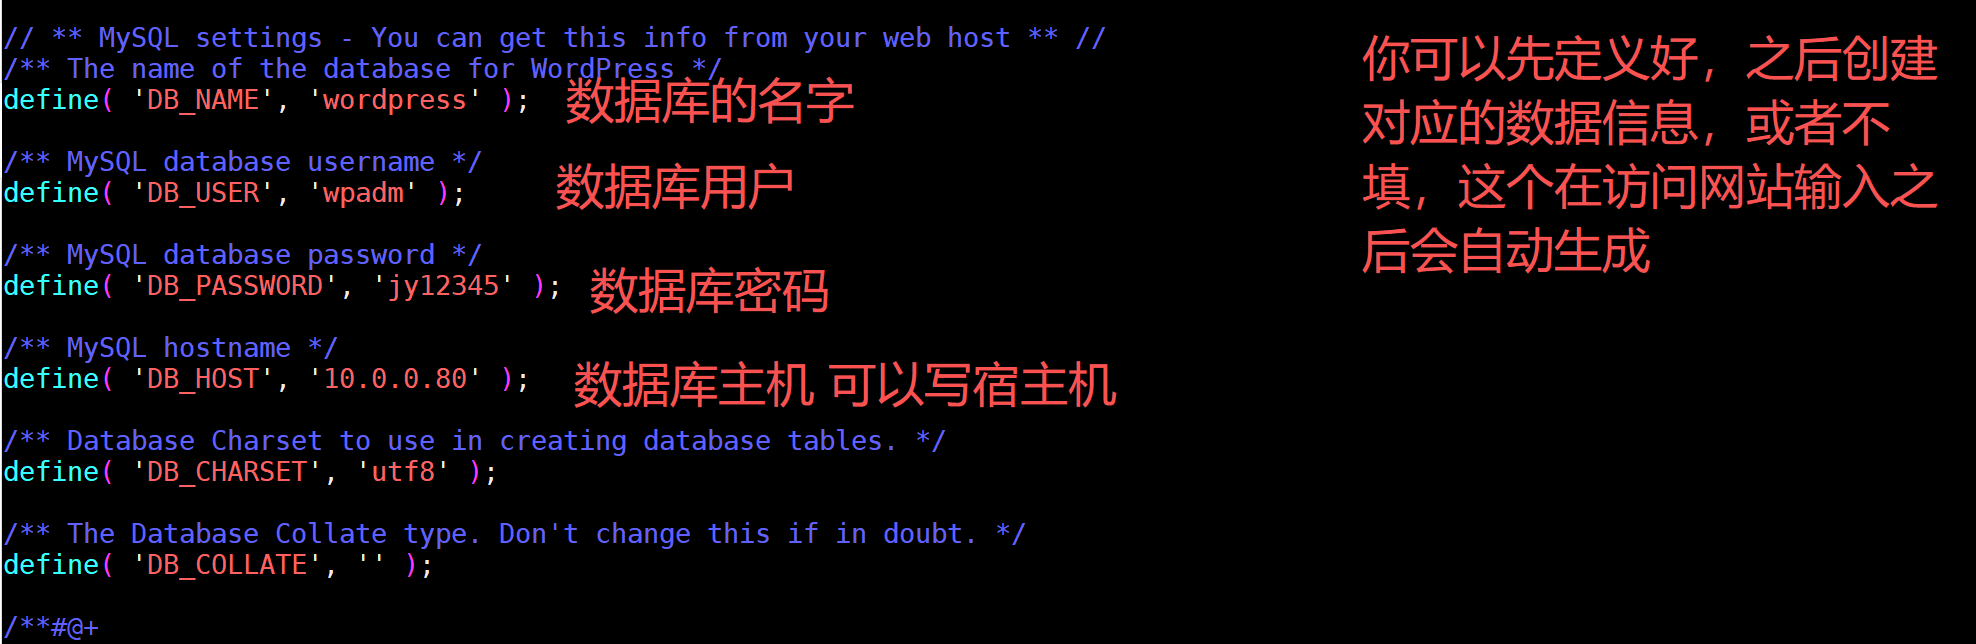
1.5、部署好之后的目录结构
bash
#设置权限
[root@test01 ~]# chown -R 33.33 /blog/
查看目录结构
[root@test01 nginx]# tree  /blog
/blog
├── mysql
│   ├── conf
│   ├── data
│   └── logs
├── nginx
│   ├── default.conf
│
└── wordpress
2、部署MySQL容器
bash
创建容器网络命名空间
[root@test01]# docker network create wp-network
251d118548ce0f362fb6adb6d8636e01614a0bfd3d696856190bfba73c38fb98

1.下载mysql5.7的镜像
[root@test01 ~]# docker pull mysql:5.7.28

2.运行容器
[root@test01 ~]#docker run -d -p 3306:3306 \
--restart=always \
--privileged=true \
-e MYSQL_ROOT_PASSWORD=jy12345 \
-v /blog/mysql/data:/var/lib/mysql \
-v /blog/mysql/logs:/var/log/mysql \
-v /blog/mysql/conf:/etc/mysql/conf.d \
--network wp-network \
--name mysql mysql:5.7.28


参数说明:
--restart=always: 当Docker 重启时,容器会自动启动。
--privileged=true:容器内的root拥有真正root权限,否则容器内root只是外部普通用户权限
-v /blog/mysql/conf.d/my.cnf:/etc/my.cnf:映射配置文件
-v /blog/mysql/data/:/var/lib/mysql:映射数据目录

3.进入容器创建对应的数据库和用户,并完成授权
[root@test01 ~]# docker exec -it mysql /bin/bash
root@416d3f54b035:/# mysql -uroot -pjy12345
mysql> create database wordpress;
mysql> GRANT ALL PRIVILEGES ON wordpress.* TO 'wpadm'@'%' IDENTIFIED BY 'jy12345';
mysql> FLUSH PRIVILEGES;

4、测试账号是否可以登入
[root@test01 nginx]# docker exec -it mysql  mysql -u wpadm -pjy12345
mysql: [Warning] Using a password on the command line interface can be insecure.
Welcome to the MySQL monitor.  Commands end with ; or \g.
Your MySQL connection id is 6
Server version: 5.7.28 MySQL Community Server (GPL)

Copyright (c) 2000, 2019, Oracle and/or its affiliates. All rights reserved.

Oracle is a registered trademark of Oracle Corporation and/or its
affiliates. Other names may be trademarks of their respective
owners.

Type 'help;' or '\h' for help. Type '\c' to clear the current input statement.

mysql>

#重启数据库
[root@test01 ~]#docker restart mysql3、部署PHP容器
bash
//1.下载php-7.3的镜像
[root@test01 ~]# docker pull php:7.3-fpm

//2.运行容器
[root@test01 ~] docker run -dit --name php --network wp-network -v /blog/wordpress:/blog/wordpress php:7.3-fpm
//3.进入容器安装mysql驱动
[root@test01 ~]# docker exec -it php /bin/bash


//变更debian的apt源
# cat > /etc/apt/source.list <<EOF
deb http://mirrors.aliyun.com/debian/ bullseye main non-free contrib
deb-src http://mirrors.aliyun.com/debian/ bullseye main non-free contrib
deb http://mirrors.aliyun.com/debian-security/ bullseye-security main
deb-src http://mirrors.aliyun.com/debian-security/ bullseye-security main
deb http://mirrors.aliyun.com/debian/ bullseye-updates main non-free contrib
deb-src http://mirrors.aliyun.com/debian/ bullseye-updates main non-free contrib
deb http://mirrors.aliyun.com/debian/ bullseye-backports main non-free contrib
deb-src http://mirrors.aliyun.com/debian/ bullseye-backports main non-free contrib
EOF

//更新apt库
[root@test01 ~]# apt-get update
//创建php的配置文件
[root@test01 ~]# echo "output_buffering = 4096" > /usr/local/etc/php/conf.d/php.ini
#设置上传大小
[root@test01 ~]# cat > /usr/local/etc/php/conf.d/php.ini <<EOF
upload_max_filesize = 50M
post_max_size = 50M
EOF

# 安装 MariaDB 兼容开发库(替代 libmysqlclient-dev)
apt install -y --allow-unauthenticated libmariadb-dev-compat libmariadb-dev gcc make pkg-config
# 安装 mysqli 扩展(解决 mysql_connect()
docker-php-ext-install mysqli
# 安装 pdo_mysql 扩展
docker-php-ext-install pdo_mysql
# 查看 PHP 已加载的扩展,确认 mysqli/pdo_mysql 存在
php -m | grep -E "mysqli|pdo_mysql"
mysqli
pdo_mysql

#重启
[root@test01 ~]#docker restart php


注意:如果在后续进行访问WordPress网站的时候提示报错
Fatal error: Uncaught Error: Call to undefined function mysql_connect() in /blog/wordpress/wp-includes/wp-db.php:1685 Stack trace: #0 /blog/wordpress/wp-includes/wp-db.php(632): wpdb->db_connect() #1 /blog/wordpress/wp-includes/load.php(545): wpdb->__construct('wpadm', 'jy12345', 'wordpress', '10.0.0.80') #2 /blog/wordpress/wp-settings.php(124): require_wp_db() #3 /blog/wordpress/wp-config.php(92): require_once('/blog/wordpress...') #4 /blog/wordpress/wp-load.php(37): require_once('/blog/wordpress...') #5 /blog/wordpress/wp-admin/admin.php(34): require_once('/blog/wordpress...') #6 /blog/wordpress/wp-admin/index.php(10): require_once('/blog/wordpress...') #7 {main} thrown in /blog/wordpress/wp-includes/wp-db.php on line 1685
此站点遇到了致命错误

这个是PHP 7.0+ 已彻底移除 mysql_connect() 函数WordPress 尝试调用这个不存在的函数,本质是 PHP 容器未安装 mysqli/PDO_MySQL 扩展
解决方法:
docker exec -it php /bin/bash
# 更新 Debian 源(忽略签名警告,因为是归档源)
apt update --allow-unauthenticated
# 安装 mysqli 扩展编译依赖
apt install -y --allow-unauthenticated libmysqlclient-dev gcc make pkg-config
# 安装 mysqli(解决 mysql_connect() 报错的核心)
docker-php-ext-install mysqli
# 顺带安装 pdo_mysql(WordPress 推荐的扩展,双重保障)
docker-php-ext-install pdo_mysql
# 查看 PHP 已加载的扩展,确认 mysqli/pdo_mysql 存在
php -m | grep -E "mysqli|pdo_mysql"
mysqli
pdo_mysql
# 重启 PHP 容器
docker restart php 4、部署Nginx容器
bash
[root@test01 ~]# docker pull nginx
[root@test01 ~]# docker run -d --restart=always -p 80:80 --name nginx \
-v /blog:/blog \
-v /blog/nginx/default.conf:/etc/nginx/conf.d/default.conf \
--network wp-network --name web01 nginx
//查看所有容器的IP,默认都在一个私网网段中,也可以通过docker network来创建子网来实现
[root@test01 ~]# docker inspect -f '{{.Name}} - {{range .NetworkSettings.Networks}}
{{.IPAddress}}{{end}}' `docker ps -aq`
/nginx - 172.17.0.4
/php - 172.17.0.3
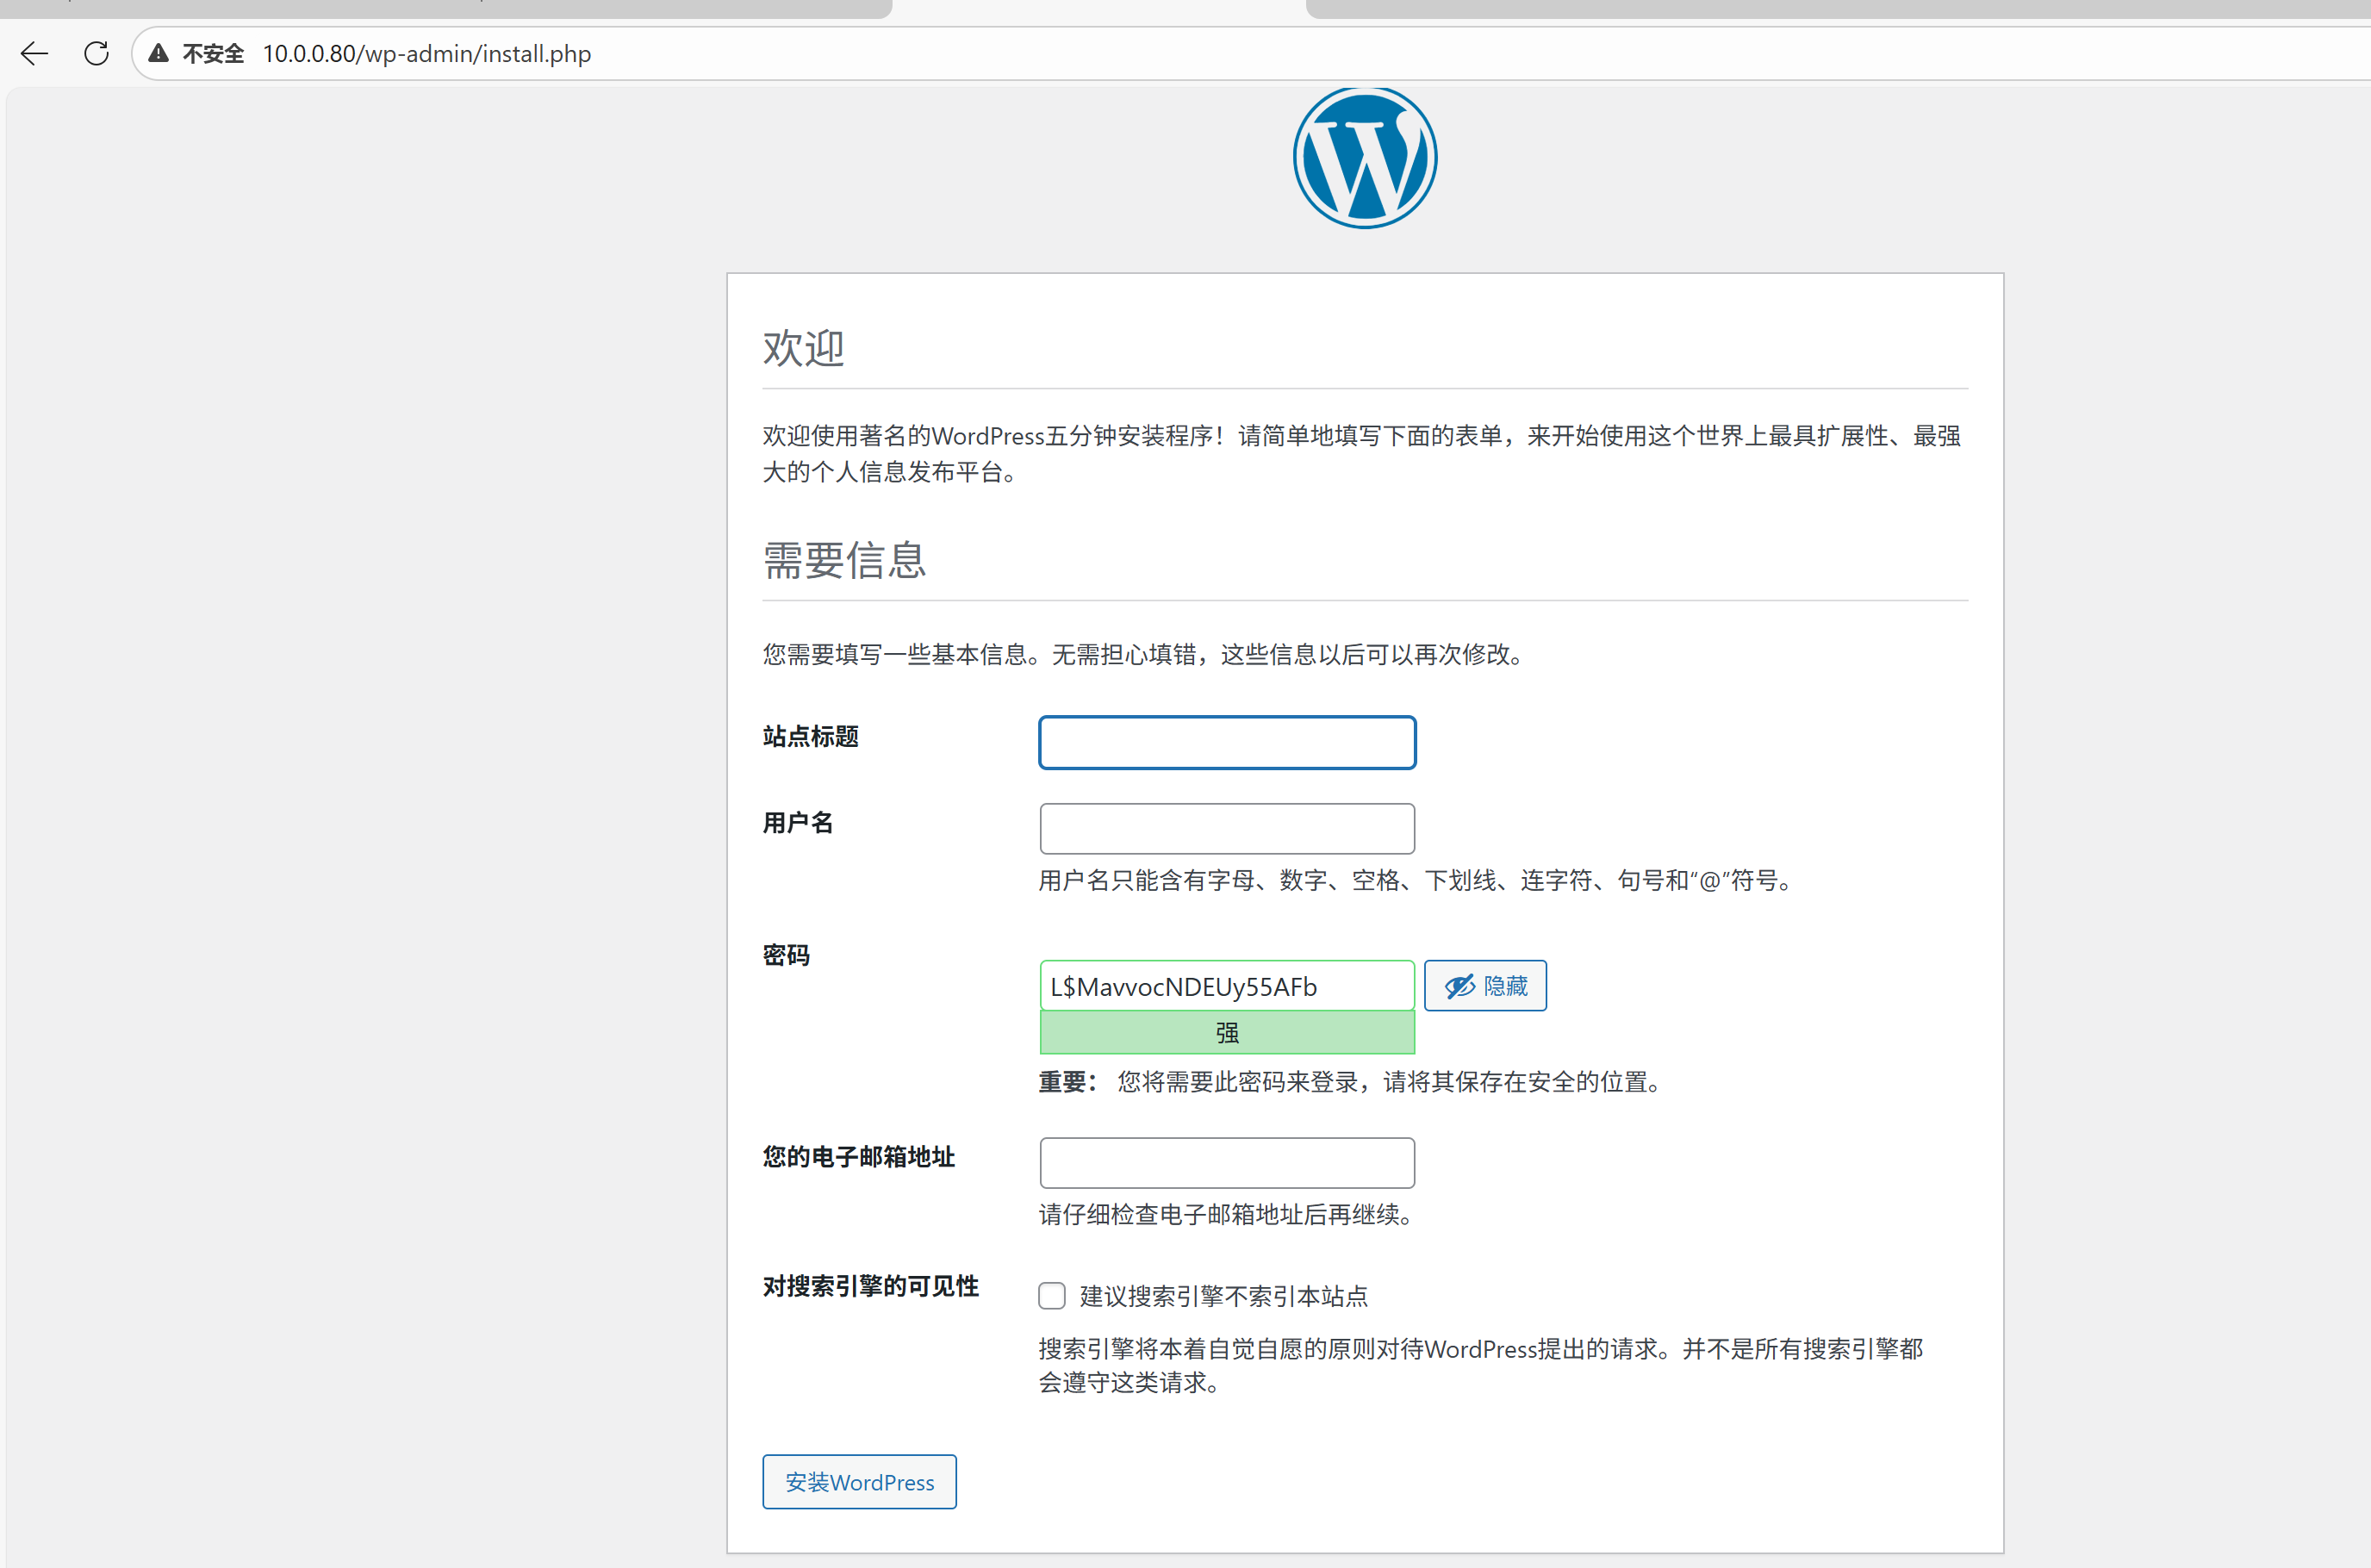
/mysql - 172.17.0.25、访问网站,完成个人信息配置
http://主机IP:80 端口是Nginx映射的
这里我没有做主机映射,所以之间访问的IP,如果做了主机映射可以访问服务域名
部署过程中的问题排查
1、在访问网站的时候提示建立数据库失败
:::info
1、检查数据库是否存在,是否开启服务
2、如果是迁移出去的数据库,查看wordpress站点下面的wp-cpnfig.php文件中数据库的信息是否和db01数据库一致
3、检查数据库容器是否在正常运行,是否有映射端口,端口是否正常开放
root@test01 \~# netstat -lnpt
Proto Recv-Q Send-Q Local Address Foreign Address State PID/Program name
tcp 0 0 127.0.0.1:6010 0.0.0.0:* LISTEN 1442/sshd: root@pts
tcp 0 0 127.0.0.1:6011 0.0.0.0:* LISTEN 1718/sshd: root@pts
tcp 0 0 0.0.0.0:3306 0.0.0.0:* LISTEN 32848/docker-proxy
:::