目前的业务是:对接三个平台,每个平台都会推送订单,有新订单时会通过socket推送给前端,前端需要根据门店配置实现订单的自动静默打印.
问题: 封装好了顾客联和商家联,需要根据不同的订单渲染组件然后获取html和style传给已经实现的静默打印函数。其中商家联组件中还包含了其他组件,例如: 封装的条形码组件
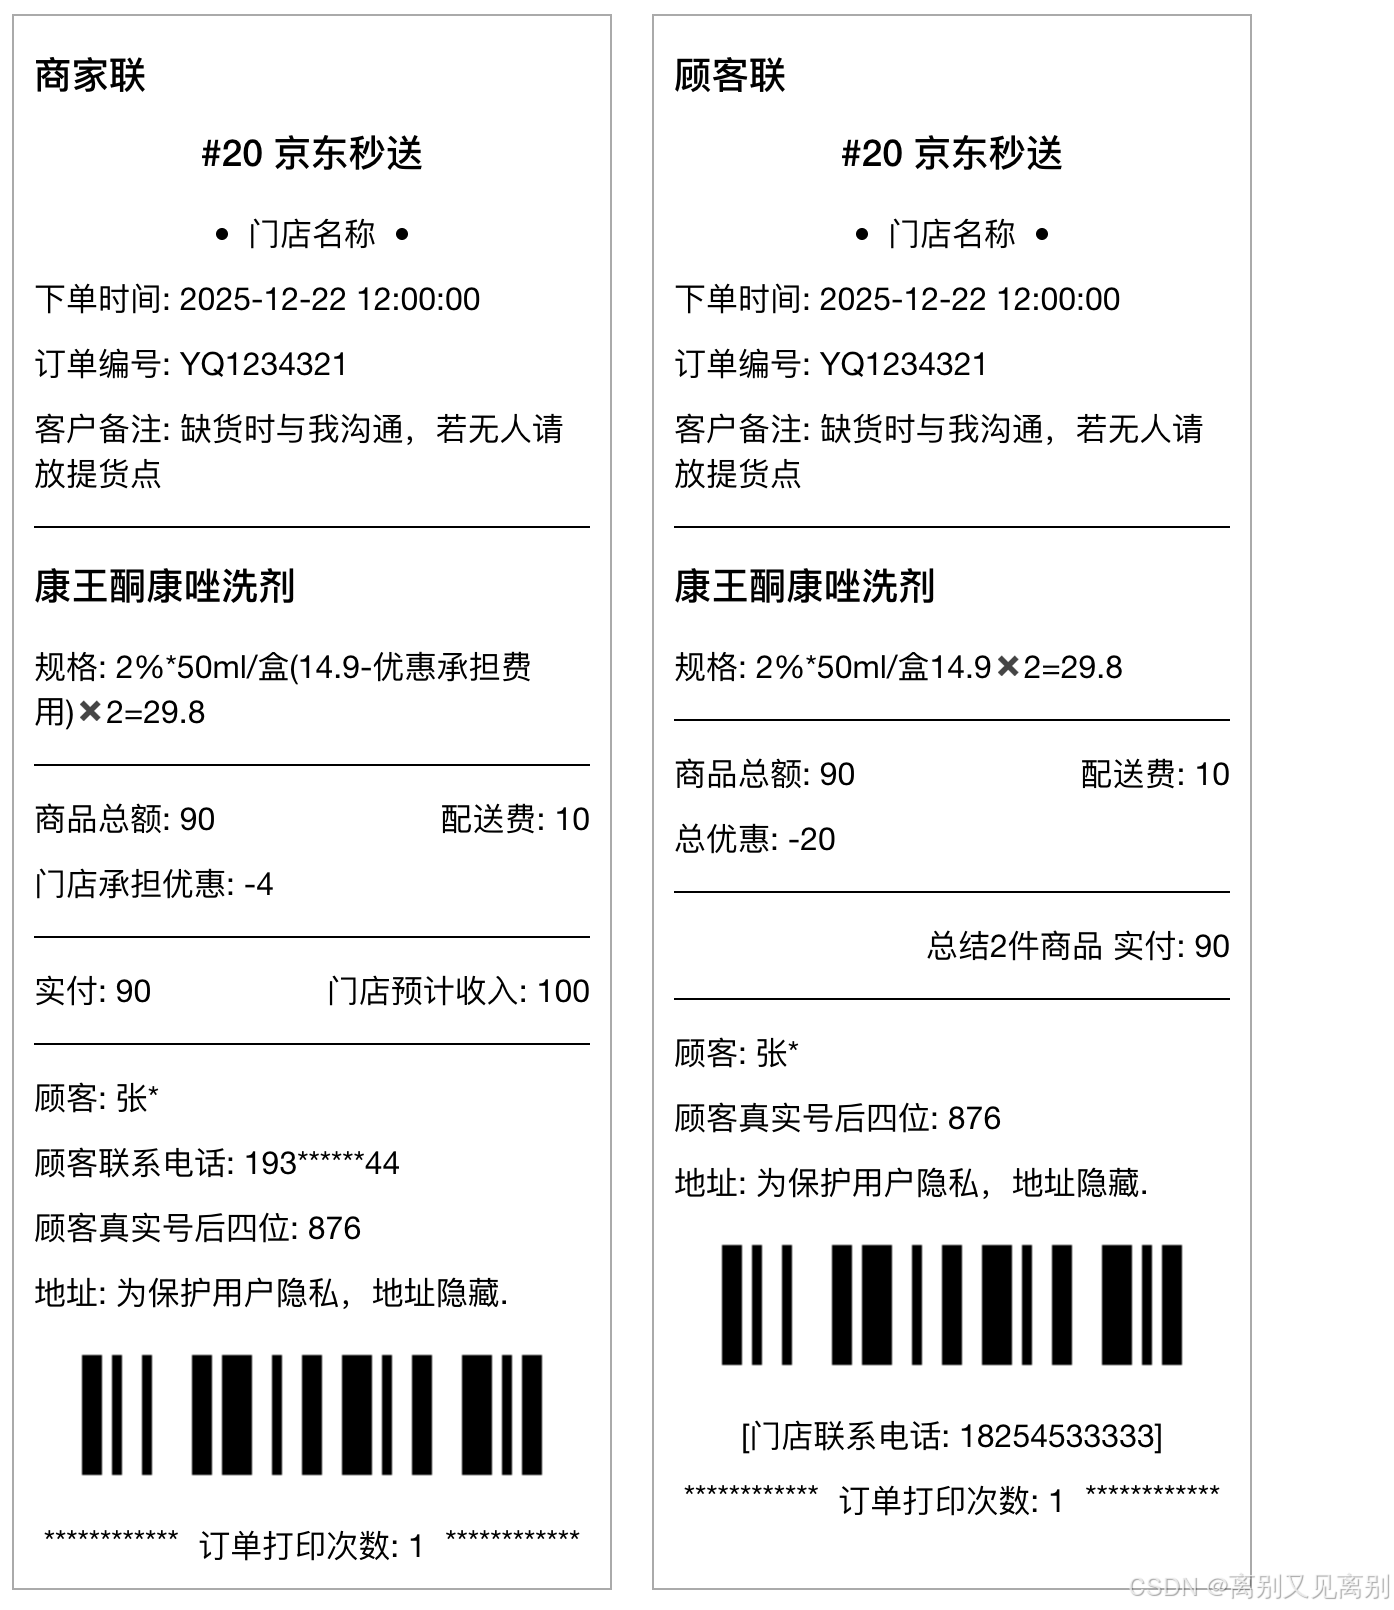
功能截图
组件封装
为了方便只列举一个
js
<template>
  <div class="print-box" id="print-box" ref="printBoxRef">
    <h3>商家联</h3>
    <h3 class="plat-number">#{{ form.orderNum }} {{ form.orderPrintName ? form.orderPrintName :
      getChannelName(form.channelCode, channelType) }}</h3>
    <div class="flex plat-name">
      <span class="dot"></span>
      <a>{{ form.storeName }}</a>
      <span class="dot"></span>
    </div>
    <div class="flex span-column">
      <!-- <a>期望送达时间: 立即送达</a> -->
      <a>下单时间: {{ form.placeTime }}</a>
      <a>订单编号: {{ form.orderNumber }}</a>
      <a>客户备注: {{ form.buyerRemark ? form.buyerRemark : '无' }}</a>
    </div>
    <span class="line"></span>
    <div :key="index" v-for="(item, index) in form.orderProductList">
      <h3>{{ item.name }}</h3>
      <div>
        <span v-if="item.spec">规格: {{ item.spec }}</span>
        <span>({{ item.originalPrice }}-优惠承担费用)✖️{{ item.count }}={{ item.totalPrice }}</span>
      </div>
    </div>
    <span class="line"></span>
    <div class="flex span-column" style="margin-top: 15px;">
      <div class="flex span-between">
        <a>商品总额: {{ form.orderPrice ? form.orderPrice.productTotalMoney : 0 }}</a>
        <a>配送费: {{ form.freightMoney }}</a>
      </div>
      <a>门店承担优惠: -{{ form.orderPrice ? (form.orderPrice.activityExpenditures ? form.orderPrice.activityExpenditures : 0)
        : 0 }}</a>
      <!-- <a>平台承担优惠: -{{ form.orderPrice ? (form.orderPrice.activityExpenditures ? form.orderPrice.activityExpenditures : 0) : 0 }}</a> -->
    </div>
    <span class="line"></span>
    <div class="flex span-between" style="margin-top: 15px;">
      <a>实付: {{ form.orderPrice ? (form.orderPrice.payMoney ? form.orderPrice.payMoney : 0) : 0 }}</a>
      <a>门店预计收入: {{ form.orderPrice ? (form.orderPrice.estimatedRevenue ? form.orderPrice.estimatedRevenue : 0) : 0
      }}</a>
    </div>
    <span class="line"></span>
    <div class="flex span-column" style="margin-top: 15px;">
      <a>顾客: {{ form.consigneeName }}</a>
      <a>顾客联系电话: {{ form.consigneePhone }}</a>
      <a>顾客真实号后四位: {{ form.consigneePhoneLastFour }}</a>
      <a>地址: {{ form.consigneeAddress }}</a>
      <Barcode style="margin:  0 auto;" :text="form.id" />
      <div class="flex span-bottom">
        <span>************</span>
        <a>订单打印次数: {{ form.stampCount ? form.stampCount : 1 }}</a>
        <span>************</span>
      </div>
    </div>
  </div>
</template>

<script>
import Barcode from '@/components/Barcode/index.vue'
export default {
  components: {
    Barcode
  },
  // dicts: ['channel_type'],
  props: {
    form: {
      type: Object,
      default: () => ({})
    },
    channelType: {
      type: Array,
      default: () => []
    }
  },
  data() {
    return {
    };
  },
  watch: {},
  computed: {
  },
  methods: {
    getChannelName(val, list) {
      let res = val
      if (list && list.length > 0) {
        let obj = list.find(item => item.value == val)
        if (obj && obj.label) {
          res = obj.label
        }
      }
      return res;
    },
    getHtml() {
      return this.$refs.printBoxRef.innerHTML
    }
  },
  created() { },
  mounted() { }
};
</script>
<style scoped lang="scss">
@import "../../../assets/print/print.css";
</style>
打印css封装
css
/* 修改后的标准 CSS */
.print-box {
  border: 1px solid #aaaaaa;
  width: auto;
  padding: 10px;
  padding-top: 0px;
  box-sizing: border-box;
}

.plat-number {
  width: 100%;
  text-align: center;
}

.plat-name {
  display: flex; /* 添加 display: flex */
  justify-content: center;
  align-items: center;
  gap: 10px;
}

.dot {
  width: 6px;
  height: 6px;
  background: #000;
  border-radius: 5px;
}

.span-column {
  margin-top: 10px;
  display: flex; /* 添加 display: flex */
  flex-direction: column;
  gap: 10px;
}

.span-between {
  display: flex; /* 添加 display: flex */
  justify-content: space-between;
}

.line {
  height: 1px;
  width: 100%;
  display: block;
  background: #000;
  margin-top: 15px;
}

.span-bottom {
  display: flex; /* 添加 display: flex */
  justify-content: space-around;
}
@media print {
  @page {
   size: 80mm auto; /* 或 58mm auto */
    margin: 0;
    padding: 0;
  }
}
css样式处理
- 安装 "raw-loader": "^4.0.2",
js
npm install raw-loader- 在vue.config.js(chainWebpack方法)中进行配置
js
    config.module
      .rule('raw-css')
      .test(/\.css$/)
      .include
      // 自己存放print.css样式的路径
      .add(path.resolve(__dirname, 'src/assets/print'))  // 只包含 src 目录
      .end()
      .exclude
      .add(/node_modules/)  // 排除 node_modules
      .end()
      .use('raw-loader')
      .loader('raw-loader')
      .end();
渲染
我使用的是监听器进行触发打印函数
js
import Vue from 'vue';
// 处理css样式文本
import cssContent from '!raw-loader!@/assets/print/print.css';
import MerchantPrientTemplate from '@/views/plugins/modules/merchantPrientTemplate.vue';
import CustomerPrientTemplate from '@/views/plugins/modules/customerPrientTemplate.vue';
import { printKey } from '@/utils/printConstant'
export default {
  name: "App",
  components: {  },
  data() {
    return {
      printCSS: cssContent,
    }
  },
  created() {

  },
  methods: {
    async onmessageWSCreateOrder(data) {
      console.log('新订单监听器 ==>', data)
      let detail = (data.detail || {}).data
      let msg = "您有新的订单,请及时处理"
      // 语音播报
      this.speak(msg)
      // 消息通知
      this.$notify({
        title: '新订单提醒',
        dangerouslyUseHTMLString: true,
        message: msg + '<br />' + (detail || {}).sendTime, //detail.content,
        duration: 0
      });
      // todo: 验证是否自动接单,如果自动接单,需要再去获取配置查看是优先打印顾客还是商家,方法可以跟接单操作封装到一个hook中
      try {
        const { isAutoTake, autoPrintEmit } = await useAutoPrint((detail || {}).storeId)
        // 自动接单
        if (isAutoTake) {
          let orderId = (detail || {}).data
          // 自动接单成功后,获取订单详情
          const data = await this.takeOrder(orderId)
          // const { data } = await orderInfo(orderId)
          // 下面就是js渲染组件实现
          let merchantHtml = null;
          let customerHtml = null
          const merchantVue = Vue.extend(MerchantPrientTemplate)
          const merchantVm = new merchantVue({
            propsData: {
              form: data,
              channelType: this.channelType //this.dict.type.channel_type
            }
          })
          // 手动挂载Barcode组件
          merchantVm.$options.components.Barcode = (await import('@/components/Barcode/index.vue')).default;
          merchantVm.$mount();

          // 顾客
          const customerVue = Vue.extend(CustomerPrientTemplate)
          const customerVm = new customerVue({
            propsData: {
              form: data,
              channelType: this.channelType //this.dict.type.channel_type
            }
          })
          customerVm.$options.components.Barcode = (await import('@/components/Barcode/index.vue')).default;
          customerVm.$mount();

          // 等待渲染
          await this.$nextTick();
          // 获取需要打印的html
          merchantHtml = "<body>" + merchantVm.$el.innerHTML + "</body>" + "<style>" + this.printCSS + "</style>";
          merchantVm.$destroy()
          customerHtml = "<body>" + customerVm.$el.innerHTML + "</body>" + "<style>" + this.printCSS + "</style>";
          customerVm.$destroy()
          // 下面console就是最终渲染完后的完整的html+style
          console.log('merchantHtml', merchantHtml)
          console.log('customerHtml', customerHtml)
          // 执行自动打印---此处换成自己实现的静默打印函数
          autoPrintEmit(merchantHtml, customerHtml, printKey.PRINGT_ORDER + orderId)
        } else {
          console.log('不自动接单, 不做处理')
        }
      } catch (e) {
        console.error('新订单 useAutoPrint 异常', e)
      }
    },
  },
  beforeDestroy() {
    console.log('app 销毁监听器')
  },
}
</script>
条码组件
js
<template>
  <div>
    <img ref="barcodeRef" />
  </div>
</template>

<script>
import JsBarcode from "jsbarcode";
export default {
  components: {},
  props: {
    fontSize: {
      type: Number,
      default: 10
    },
    height: {
      type: Number,
      default: 60
    },
    width: {
      type: Number,
      default: 5
    },
    text: {
      type: String,
      default: '编码内容'
    }
  },
  data() {
    return {
    };
  },
  watch: {
    text: {
      handler(val) {
        this.$nextTick(() => {
          this.getBarcode(val)
        })
      },
      deep: true,
      immediate: true
    }
  },
  computed: {},
  methods: {
    getBarcode(text) {
      let options = {
        text: text,//等同于JsBarcode第二个参数
        fontSize: this.fontSize,//条形码下方文字的大小
        height: this.height,//条形码的高度
        width: this.width,//条形码 条的宽度不是总体的宽度 (宽度过小 扫描枪会扫描不出来 )
        displayValue: false,//隐藏条形码下方文本
      };
      // JsBarcode第一个参数是容器ID名 第二个参数是条形码扫描后的内容(默认条形码的内容会在条形码下方展示) 第三个参数是方法的配置项(具体配置查看官网)
      // JsBarcode("#barcode", '5', options);
      JsBarcode(this.$refs.barcodeRef, '5', options);
      //实现批量生成的功能
      // prinList.value.forEach((item, index) => {
      // prinList.value.forEach((item, index) => {
      //   options.text = item.order_number;
      //   options.order_number = item.order_number;
      //   JsBarcode("#barcode-" + index, '5', options);  挂载条形码方法 注意批量生成 容器必须是唯一的 且同时都要存在 思路容器加上循环的index即可
      // });
    }
  },
  created() { },
  mounted() {
    // this.getBarcode()
  }
};
</script>
<style scoped></style>
题外话
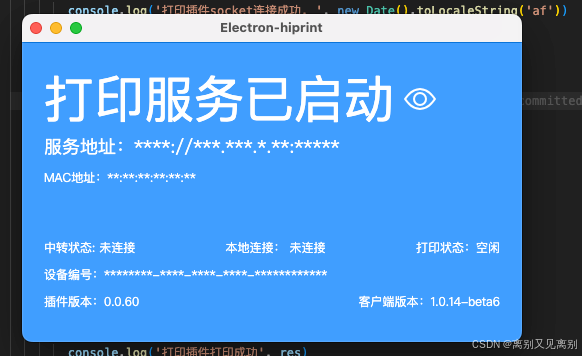
静默打印
electron-hiprint + socket.io-client.js
前端socket封装
js
import { io } from "socket.io-client";
import modal from '../../plugins/modal'
/**
print: {
  description: 描述,
  displayName: 显示名称,
  isDefault: 是否默认,
  name: 名称,
  description: 描述,
  status: 状态
}

html: HTML 字符串。
templateId: 用于标识成功或失败回调的 ID。
printer: 打印机名称。
pageSize: 打印纸张大小

this.socket.emit("news", { html, templateId, printer, pageSize });
// socket.emit("getClientInfo");
// 刷新打印列表
// socket.emit("refreshPrinterList");
 */
const printSocketData = {
  state: {
    socket: null,
    printList: [],
    // todo: url一般为localhost本地固定,只支持同个网段,如果不在同一个网段需要配置中转做云打印,暂时先不做云打印
    url: 'http://127.0.0.1:17521',
    // 链接token,用户动态配置跟插件保持一致
    token: '123456',
    isConnect: false
  },

  mutations: {
    SET_SOCKET(state, socket) {
      state.socket = socket;
      state.isConnect = true
    },
  },

  actions: {
    // 初始化打印机socket
    initPrintSocket({ state, commit, dispatch }) {
      console.log('初始化本地打印socket')
      const socket = io(state.url, {
        transports: ["websocket"],
        auth: {
          token: state.token
        }
      })
      socket.on('connect', () => {
        console.log('打印插件socket连接成功, ', new Date().toLocaleString('af'))
        commit('SET_SOCKET', socket);
      })
      socket.on('connect_error', () => {
        console.log('打印插件连接失败')
        // modal.msgError('打印插件socket连接失败')
      })
      socket.on('error', (e) => {
        console.log('打印插件异常', e)
        modal.msgError('打印插件异常: ' + e)
      })
      socket.on('clientInfo', (clientInfo) => {
        console.log('clientInfo ==>', clientInfo)
      })
      socket.on('printerList', (printerList) => {
        console.log('打印机列表', printerList)
        state.printList = printerList
      })
      socket.on('success', (res) => {
        console.log('打印插件打印成功', res)
        // todo: 打印成功后,执行事件,方便其他操作:比如回调后端增加订单打印次数
        window.dispatchEvent(new CustomEvent('onPrintSuccess', {
          detail: {
            res
          }
        }));
      })

    },
    // 刷新打印机列表
    refreshPrintList({ state }) {
      console.log('state.socket', state.socket)
      console.log('state', state)
      state.socket.emit('refreshPrinterList')
    },
    // 打印机是否存在
    hasPrint({ state }, printName) {
      return new Promise((resolve, reject) => {
        console.log('hasPrint printName', printName)
        if (state.printList && state.printList.length > 0) {
          let obj = state.printList.find(item => item.name === printName)
          console.log('hasPrint find obj ==>', obj)
          if (obj) {
            resolve(true);
          }
        }
        resolve(false);
      })
    },
    /**
     * templateId 可以穿订单id等标识信息
     * @param {*} param0
     * @param {*} param1
     * @returns
     */
    printEmit({ state, dispatch }, { eventName, html, templateId, printer, pageSize = null, printBackground = true }) {
      if (!eventName) {
        modal.msgError('事件名称不能为空')
        return;
      }
      console.log('执行打印')
      if (state.isConnect != true) {
        console.error('当前打印机插件socket未连接或未初始化')
        modal.msgError('当前打印机插件socket未连接或未初始化')
        return;
      }
      dispatch('hasPrint', printer).then(res => {
        console.log('printEmit res', res)
        if (res) {
          console.log('111', { html, templateId, printer, pageSize, printBackground })
          state.socket.emit(eventName, { html, templateId, printer, pageSize, printBackground });
        } else {
          console.error('当前打印机 ' + printer + ',不存在')
          modal.msgError('当前打印机 ' + printer + ',不存在')
        }
      })

    }
  }
};

export default printSocketData;
electron-hiprint
看官网文档> 传送门
安装完后:
如果找不到自己系统的应用,就下载源码自己手动编译即可