图像旋转是图像处理的一个常见操作。OpenCV提供了函数来实现图像的旋转。本文主要介绍实现图像旋转的数学原理、getRotationMatrix2D()函数、warpAffine()函数。
1、旋转之数学原理
对线性代数不熟悉的读者,博主建议先看: 数学基础-线性代数-学习系列
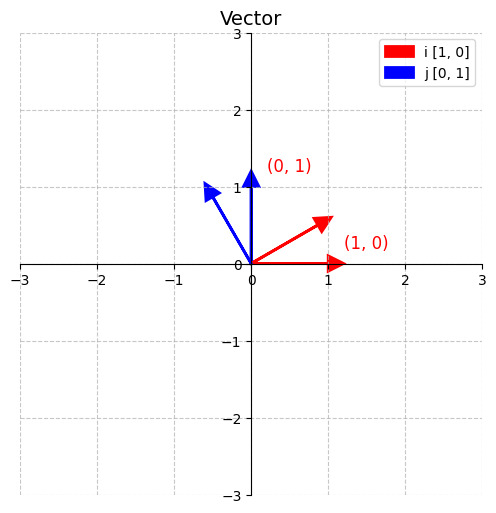
- 一个长度为1指向右边的向量,称作ihat,x方向的单位向量 i ^ \hat{i} i^
- 一个长度为1垂直向上的向量,称作jhat,y方向的单位向量 j ^ \hat{j} j^
i ^ = 1 0 , j ^ = 0 1 \hat{i} = \begin{bmatrix} 1 \\ 0 \end{bmatrix},\quad \hat{j} = \begin{bmatrix} 0 \\ 1 \end{bmatrix} i^=10,j^=01
基向量围绕原点 逆时针旋转30度。 i ^ \hat{i} i^ 和 j ^ \hat{j} j^ 分别落在c o s θ sin θ \] , \[ − sin θ c o s θ \] \\begin{bmatrix} cos\\theta \\\\ \\sin\\theta \\end{bmatrix},\\quad \\begin{bmatrix} -\\sin\\theta \\\\ cos\\theta \\end{bmatrix} \[cosθsinθ\],\[−sinθcosθ
在二维平面上,一个点 ( x , y ) (x, y) (x,y)绕原点逆时针旋转角度 θ \theta θ 后的新坐标 ( x ′ , y ′ ) (x', y') (x′,y′)可表示为:
x ′ y ′ \] = \[ c o s θ − sin θ sin θ cos θ \] \[ x y \] \\begin{bmatrix} x' \\\\ y' \\end{bmatrix} =\\begin{bmatrix} cos\\theta \& -\\sin\\theta \\\\ \\sin\\theta \& \\cos\\theta \\end{bmatrix} \\begin{bmatrix} x \\\\ y \\end{bmatrix} \[x′y′\]=\[cosθsinθ−sinθcosθ\]\[xy
即:
x ′ = x cos θ − y sin θ y ′ = x sin θ + y cos θ x' = x \cos\theta - y \sin\theta \\ y' = x \sin\theta + y \cos\theta x′=xcosθ−ysinθy′=xsinθ+ycosθ
2、图像旋转原理
⚠️ 注意:默认坐标系原点在左上角, x x x 向右, y y y 向下。
由于图像的坐标原点位于左上角,若直接使用上述公式,会导致图像绕左上角旋转,造成严重偏移。
✅ 正确做法是让图像 绕其中心点旋转,需执行以下三步:
- 平移图像:将旋转中心移到原点
- 应用旋转:使用旋转矩阵
- 平移回去:将图像恢复到原始坐标系
这称为 "以某点为中心的旋转变换" ,这是一个线性复合变换
图像旋转的数学过程:平移 → 旋转 → 平移回
在图像处理中,若要实现"以图像中心为轴心"的旋转操作(如常见的图像顺时针/逆时针旋转),不能直接使用简单的旋转变换。否则图像会绕坐标原点旋转,导致部分区域移出画布。
为此,通常采用三步法:
1. 平移到原点 → 2. 旋转 → 3. 平移回去
这一过程属于仿射变换(Affine Transformation的一种典型应用。
2.1 图像旋转示例
假设我们要将一幅图像绕其中心点逆时针旋转角度 θ θ θ。
设原始图像大小为 W × H W \times H W×H,其中心点坐标 为:
( c x , c y ) = ( W 2 , H 2 ) (c_x, c_y) = \left( \frac{W}{2}, \frac{H}{2} \right) (cx,cy)=(2W,2H)
我们希望将图像中任意一点 ( x , y ) (x, y) (x,y) 绕该中心逆时针旋转 θ \theta θ 角度 ,得到新坐标 ( x ′ , y ′ ) (x', y') (x′,y′)。
整个变换分为以下三个步骤。
🔹 第一步:平移到原点(以中心为原点)
将图像整体平移,使中心点移动到坐标原点:
{ x 1 = x − c x y 1 = y − c y ⇒ x 1 y 1 = x y − c x c y \begin{cases} x_1 = x - c_x \\ y_1 = y - c_y \end{cases} \quad \Rightarrow \quad \begin{bmatrix} x_1 \\ y_1 \end{bmatrix} = \begin{bmatrix} x \\ y \end{bmatrix} - \begin{bmatrix} c_x \\ c_y \end{bmatrix} {x1=x−cxy1=y−cy⇒x1y1=xy−cxcy
此时,图像以 ( 0 , 0 ) (0,0) (0,0) 为中心,便于进行标准旋转变换。
🔹 第二步:绕原点旋转 θ \theta θ
使用二维旋转矩阵对点 ( x 1 , y 1 ) (x_1, y_1) (x1,y1) 进行逆时针旋转:
x 2 y 2 \] = \[ cos θ − sin θ sin θ cos θ \] \[ x 1 y 1 \] \\begin{bmatrix} x_2 \\\\ y_2 \\end{bmatrix} = \\begin{bmatrix} \\cos\\theta \& -\\sin\\theta \\\\ \\sin\\theta \& \\cos\\theta \\end{bmatrix} \\begin{bmatrix} x_1 \\\\ y_1 \\end{bmatrix} \[x2y2\]=\[cosθsinθ−sinθcosθ\]\[x1y1
展开为:
{ x 2 = x 1 cos θ − y 1 sin θ y 2 = x 1 sin θ + y 1 cos θ \begin{cases} x_2 = x_1 \cos\theta - y_1 \sin\theta \\ y_2 = x_1 \sin\theta + y_1 \cos\theta \end{cases} {x2=x1cosθ−y1sinθy2=x1sinθ+y1cosθ
🔹 第三步:平移回原中心位置
将旋转后的点重新平移回原始坐标系,即加上中心偏移量:
{ x ′ = x 2 + c x y ′ = y 2 + c y ⇒ x ′ y ′ = x 2 y 2 + c x c y \begin{cases} x' = x_2 + c_x \\ y' = y_2 + c_y \end{cases} \quad \Rightarrow \quad \begin{bmatrix} x' \\ y' \end{bmatrix} = \begin{bmatrix} x_2 \\ y_2 \end{bmatrix} + \begin{bmatrix} c_x \\ c_y \end{bmatrix} {x′=x2+cxy′=y2+cy⇒x′y′=x2y2+cxcy
至此,完成了"绕中心旋转"的全过程。
🧮 三步合并为单个仿射变换
上述三步可合并为一个完整的仿射变换表达式:
x ′ y ′ \] = \[ cos θ − sin θ sin θ cos θ \] ( \[ x y \] − \[ c x c y \] ) + \[ c x c y \] \\begin{bmatrix} x' \\\\ y' \\end{bmatrix} = \\begin{bmatrix} \\cos\\theta \& -\\sin\\theta \\\\ \\sin\\theta \& \\cos\\theta \\end{bmatrix} \\left( \\begin{bmatrix} x \\\\ y \\end{bmatrix} - \\begin{bmatrix} c_x \\\\ c_y \\end{bmatrix} \\right) +\\begin{bmatrix} c_x \\\\ c_y \\end{bmatrix} \[x′y′\]=\[cosθsinθ−sinθcosθ\](\[xy\]−\[cxcy\])+\[cxcy
这对应于 OpenCV 中使用的 2×3 仿射变换矩阵 :
M = cos θ − sin θ t x sin θ cos θ t y M = \begin{bmatrix} \cos\theta & -\sin\theta & t_x \\ \sin\theta & \cos\theta & t_y \end{bmatrix} M=cosθsinθ−sinθcosθtxty
其中平移项为:
t x = c x ( 1 − cos θ ) + c y sin θ t y = c y ( 1 − cos θ ) − c x sin θ t_x = c_x (1 - \cos\theta) + c_y \sin\theta \\ t_y = c_y (1 - \cos\theta) - c_x \sin\theta tx=cx(1−cosθ)+cysinθty=cy(1−cosθ)−cxsinθ
3、函数说明
3.1 getRotationMatrix2D
cv2.getRotationMatrix2D(center, angle, scale)
- center: 旋转中心坐标 (x, y)
- angle: 旋转角度(度)
- scale: 缩放比例(1.0 表示原尺寸)
返回一个 2x3 的仿射变换矩阵。
3.2 cv2.warpAffine(src, M, dsize)
- src: 输入图像
- M: 变换矩阵
- dsize: 输出图像大小 (width, height)
4、代码示例
在 Python 中使用 OpenCV 旋转图像非常简单,可以使用 cv2.getRotationMatrix2D() 和 cv2.warpAffine() 函数来实现图像的任意角度旋转。
python
import cv2
import numpy as np
import os

# 1. 读取图像
img_path = "img/dog.jpg"
if not os.path.exists(img_path):
    raise FileNotFoundError(f"未找到图像文件{img_path}")

img = cv2.imread(img_path, cv2.IMREAD_COLOR)

# 2. 获取图像的中心点
height, width = img.shape[:2]
center = (width // 2, height // 2)

# 3. 定义旋转角度(正数表示逆时针旋转)
angle = 45  # 旋转45度
scale = 1.0  # 缩放比例(1.0 表示不缩放)

# 4. 获取旋转矩阵
rotation_matrix = cv2.getRotationMatrix2D(center, angle, scale)

# 5. 执行仿射变换(旋转)
rotated_image = cv2.warpAffine(img, rotation_matrix, (width, height))

# 6. 显示原图和旋转后的图像
cv2.imshow('Original Image', img)
cv2.imshow('Rotated Image', rotated_image)

# 等待按键,然后关闭窗口
cv2.waitKey(0)
cv2.destroyAllWindows()
大家看看博主测试用图片真容
5、其它问题
5.1 避免图像被裁剪(保留完整旋转图像)
旋转后图像可能超出原始尺寸范围,导致边缘被裁剪。可通过计算新尺寸解决:
python
# 计算旋转后的图像尺寸
cos = abs(rotation_matrix[0, 0])
sin = abs(rotation_matrix[0, 1])

new_width = int((height * sin) + (width * cos))
new_height = int((height * cos) + (width * sin))

# 调整旋转矩阵的平移部分,使图像居中
rotation_matrix[0, 2] += (new_width / 2) - center[0]
rotation_matrix[1, 2] += (new_height / 2) - center[1]

# 应用变换
rotated_image = cv2.warpAffine(
    image,
    rotation_matrix,
    (new_width, new_height)
)
2. 修改背景颜色(默认黑色)
使用 borderValue 参数设置填充颜色(如白色):
python
rotated_image = cv2.warpAffine(
    image,
    rotation_matrix,
    (new_width, new_height),
    borderValue=(255, 255, 255)  # 白色背景
)