前言
本项目展示了径向基函数网络(RBFN)在人脸识别中的应用思想。通过这个项目,你将理解如何将复杂的人脸用几个关键"锚点"来表示,并利用特征点到这些锚点的距离进行人脸分析和相似度比较。
第1步:环境准备
导入库和基本设置
python
import cv2          # 图像处理
import numpy as np  # 数学计算
import matplotlib.pyplot as plt  # 绘图
from scipy.spatial import distance  # 计算距离
import warnings
warnings.filterwarnings('ignore')  # 忽略警告信息

# 设置中文字体(让图表能显示中文)
plt.rcParams['font.sans-serif'] = ['SimHei', 'Microsoft YaHei', 'DejaVu Sans']
plt.rcParams['axes.unicode_minus'] = False # 正确显示负号解释:
-
cv2:用于绘制和操作图像 -
numpy:处理数学运算和数组 -
matplotlib:绘制各种图表 -
scipy.spatial.distance:计算点与点之间的距离
第2步:创建合成人脸
2.1 创建人脸轮廓
python
def create_synthetic_face():
    # 创建400×400像素的空白图像(浅灰色背景)
    width, height = 400, 400
    image = np.zeros((height, width, 3), dtype=np.uint8)
    image.fill(240)  # 填充浅灰色

    # 在图像中心绘制椭圆形脸
    face_center = (width // 2, height // 2)  # 中心点(200,200)
    cv2.ellipse(image, face_center, (120, 150), 0, 0, 360, (255, 220, 180), -1)
    # 参数解释:(图像, 中心点, (横轴半径,纵轴半径), 旋转角度, 起始角度, 结束角度, 颜色, 厚度)
2.2 添加面部特征
python
    # 添加眼睛(对称位置)
    left_eye_center = (face_center[0] - 50, face_center[1] - 30)   # 左眼
    right_eye_center = (face_center[0] + 50, face_center[1] - 30)  # 右眼

    # 绘制左眼:白色眼球+黑色瞳孔
    cv2.circle(image, left_eye_center, 20, (255, 255, 255), -1)  # 白色眼球
    cv2.circle(image, left_eye_center, 20, (0, 0, 0), 2)         # 黑色边框
    cv2.circle(image, left_eye_center, 8, (0, 0, 0), -1)         # 黑色瞳孔
    # 右眼同理...
2.3 定义关键"锚点"
锚点概念:就像地图上的地标,用它们作为参考点来描述整个面部的特征位置。
python
    # 定义5个关键锚点
    key_points = {
        'left_eye': left_eye_center,      # 左眼中心
        'right_eye': right_eye_center,    # 右眼中心
        'nose': nose_tip,                  # 鼻尖
        'left_mouth': (mouth_center[0] - 30, mouth_center[1]),   # 左嘴角
        'right_mouth': (mouth_center[0] + 30, mouth_center[1])   # 右嘴角
    }
2.4 生成特征点
在锚点周围生成一些随机点,模拟面部细节特征:
python
    # 设置随机种子(确保每次运行结果一致)
    np.random.seed(42)
    feature_points = {}

    # 为每个锚点生成5个特征点
    for name, center in key_points.items():  # 遍历5个锚点
        for j in range(5):  # 每个锚点生成5个点
            # 在锚点周围随机生成位置
            angle = np.random.uniform(0, 2 * np.pi)  # 随机角度
            radius = np.random.uniform(10, 30)        # 随机半径(10-30像素)
            x = int(center[0] + radius * np.cos(angle))
            y = int(center[1] + radius * np.sin(angle))

            # 保存这个特征点
            point_name = f"{name}_p{j+1}"
            feature_points[point_name] = (x, y)

            # 在图像上绘制这个点(橙色)
cv2.circle(image, (x, y), 3, (0, 100, 200), -1)效果:在5个锚点周围各有5个橙色的特征点,总共25个点。
第3步:计算距离和影响力
3.1 计算特征点到锚点的距离
python
def calculate_distances_to_anchors(points, anchor_points):
    """计算每个特征点到所有锚点的距离"""
    distances = {}

    for point_name, point in points.items():  # 遍历每个特征点
        point_distances = {}
        for anchor_name, anchor in anchor_points.items():  # 遍历每个锚点
            # 计算欧氏距离:√[(x1-x2)² + (y1-y2)²]
            dist = distance.euclidean(point, anchor)
            point_distances[anchor_name] = dist

        distances[point_name] = point_distances

return distances举例:对于特征点"left_eye_p1":
-
到左眼的距离:29.0像素
-
到右眼的距离:122.6像素
-
到鼻尖的距离:77.1像素
-
等等...
3.2 计算RBF影响力(核心概念)
RBF思想:距离越近的点影响力越大,距离越远影响力越小(呈指数衰减)。
python
def calculate_rbf_influence(distances, sigma=50.0):
    """使用高斯函数将距离转换为影响力"""
    influences = {}

    for point_name, point_distances in distances.items():
        point_influences = {}
        for anchor_name, dist in point_distances.items():
            # 高斯RBF公式:exp(-dist²/(2σ²))
            influence = np.exp(-dist ** 2 / (2 * sigma ** 2))
            point_influences[anchor_name] = influence

        influences[point_name] = point_influences

return influences理解σ参数:
-
σ=50:影响力范围较广,较远的点也有一定影响力
-
σ越小:只有很近的点才有影响力
-
σ越大:较远的点也有较大影响力
第4步:创建相似人脸进行比较
4.1 轻微修改特征点位置
python
def create_similar_face(image, key_points, feature_points, variation=10):
    """创建一张相似的人脸(特征点位置轻微变化)"""
    new_image = image.copy()
    new_feature_points = {}

    np.random.seed(123)  # 固定随机种子,确保变化一致

    for name, point in feature_points.items():
        # 在原位置基础上随机偏移(-10到+10像素)
        dx = np.random.randint(-variation, variation + 1)
        dy = np.random.randint(-variation, variation + 1)
        new_point = (point[0] + dx, point[1] + dy)
        new_feature_points[name] = new_point

        # 用不同颜色绘制新点
        cv2.circle(new_image, new_point, 3, (200, 100, 0), -1)

return new_image, key_points, new_feature_points意义:模拟真实情况中,同一个人不同照片的特征点微小变化。
4.2 比较两张人脸的相似度
python
def compare_faces(face1_points, face2_points, anchor_points):
    # 计算两张脸的特征点到锚点的距离
    distances1 = calculate_distances_to_anchors(face1_points, anchor_points)
    distances2 = calculate_distances_to_anchors(face2_points, anchor_points)

    # 计算RBF影响力
    influences1 = calculate_rbf_influence(distances1)
    influences2 = calculate_rbf_influence(distances2)

    # 计算相似度
    similarity_scores = {}
    for anchor_name in anchor_points.keys():
        # 获取所有特征点对该锚点的影响力值
        inf1 = np.array([influences1[p][anchor_name] for p in face1_points.keys()])
        inf2 = np.array([influences2[p][anchor_name] for p in face2_points.keys()])

        # 计算相关系数(0-1之间,越大越相似)
        corr = np.corrcoef(inf1, inf2)[0, 1]
        similarity_scores[anchor_name] = max(0, corr)  # 负相关视为0(不相似)

return similarity_scores, influences1, influences2相关系数解释:
-
1.0:完全相关(特征分布模式完全相同)
-
0.9+:高度相似
-
0.0:完全不相关
-
负值:负相关(这里处理为0)
第5步:可视化分析
5.1 创建6个分析子图
python
def visualize_face_analysis(image, key_points, feature_points, distances, influences):
    fig, axes = plt.subplots(2, 3, figsize=(15, 10))
# 创建2行3列共6个子图6个子图内容:
-
原始人脸:基础的人脸图像
-
特征点与锚点:用不同颜色标记锚点和特征点
-
连线图:每个特征点连接到最近的锚点
-
距离热力图:特征点到各锚点的距离(矩阵形式)
-
影响力热力图:距离经RBF转换后的影响力值
-
距离分布条形图:5个示例特征点到各锚点的距离
5.2 绘制热力图
python
# 创建距离矩阵
anchor_names = list(key_points.keys())
point_names = list(feature_points.keys())[:15]  # 只显示前15个点

distance_matrix = np.zeros((len(point_names), len(anchor_names)))

for i, point_name in enumerate(point_names):
    for j, anchor_name in enumerate(anchor_names):
        distance_matrix[i, j] = distances[point_name][anchor_name]

# 使用imshow绘制热力图
im = axes[1, 0].imshow(distance_matrix, cmap='YlOrRd', aspect='auto')
plt.colorbar(im, ax=axes[1, 0], label='距离(像素)') # 添加颜色条热力图解读:
-
每一行:一个特征点
-
每一列:一个锚点
-
颜色越黄:距离越大
-
颜色越红:距离越小
第6步:主程序整合
6.1 执行流程
python
def main():
    # 1. 创建第一张人脸
    image1, key_points, feature_points1 = create_synthetic_face()

    # 2. 计算距离和影响力
    distances1 = calculate_distances_to_anchors(feature_points1, key_points)
    influences1 = calculate_rbf_influence(distances1)

    # 3. 创建第二张相似人脸
    image2, _, feature_points2 = create_similar_face(image1, key_points, feature_points1, variation=15)

    # 4. 比较相似度
    similarity_scores, _, _ = compare_faces(feature_points1, feature_points2, key_points)

    # 5. 可视化
    # ...(绘制3个图表)

    # 6. 显示结果
    plt.show()
6.2 运行程序
python
if __name__ == "__main__":
    main()
项目源码
下面这段代码实现了一个基于径向基函数网络(RBFN)思想的人脸特征表示和相似度分析的完整演示案例。它通过以下几个核心步骤展示RBFN在人脸识别中的应用原理:
首先,代码创建了一个合成人脸图像 ,定义了人脸轮廓、眼睛、鼻子和嘴巴等基本特征。接着,它确定了五个关键"锚点" :左眼中心、右眼中心、鼻尖、左嘴角和右嘴角,作为人脸特征的参考基准。在这些锚点周围,代码随机生成了25个特征点,模拟面部细节特征。
然后,代码计算每个特征点到所有五个锚点的欧氏距离 ,形成一个距离矩阵,将几何位置关系量化为数值特征。这些距离通过高斯RBF函数转换为影响力值,距离越近影响力越大,距离越远影响力呈指数衰减,体现了RBFN对局部特征的重点关注。
为了验证RBFN对特征变化的鲁棒性,代码创建了第二张相似人脸 ,通过轻微扰动特征点位置模拟真实世界的变化。最后,它比较两张人脸的相似度,计算每个锚点区域的特征分布相关系数,结果显示平均相似度高达0.9735,验证了RBFN方法对局部特征变化的稳定性。
整个演示通过多层次可视化(包括特征点标记、连线图、距离热力图、影响力矩阵等)直观展示了RBFN如何将复杂的人脸结构简化为关键锚点周围的局部特征分布,为理解RBFN在模式识别中的应用提供了清晰的案例。
python
import cv2
import numpy as np
import matplotlib.pyplot as plt
from scipy.spatial import distance
import warnings

warnings.filterwarnings('ignore')

# 设置中文字体
plt.rcParams['font.sans-serif'] = ['SimHei', 'Microsoft YaHei', 'DejaVu Sans']
plt.rcParams['axes.unicode_minus'] = False


def create_synthetic_face():
    """创建合成人脸图像和特征点"""
    # 创建一个空白图像
    width, height = 400, 400
    image = np.zeros((height, width, 3), dtype=np.uint8)
    image.fill(240)  # 浅灰色背景

    # 创建椭圆脸
    face_center = (width // 2, height // 2)
    cv2.ellipse(image, face_center, (120, 150), 0, 0, 360, (255, 220, 180), -1)
    cv2.ellipse(image, face_center, (120, 150), 0, 0, 360, (150, 100, 50), 2)

    # 创建眼睛
    left_eye_center = (face_center[0] - 50, face_center[1] - 30)
    right_eye_center = (face_center[0] + 50, face_center[1] - 30)

    cv2.circle(image, left_eye_center, 20, (255, 255, 255), -1)
    cv2.circle(image, left_eye_center, 20, (0, 0, 0), 2)
    cv2.circle(image, left_eye_center, 8, (0, 0, 0), -1)

    cv2.circle(image, right_eye_center, 20, (255, 255, 255), -1)
    cv2.circle(image, right_eye_center, 20, (0, 0, 0), 2)
    cv2.circle(image, right_eye_center, 8, (0, 0, 0), -1)

    # 创建鼻子
    nose_tip = (face_center[0], face_center[1] + 20)
    cv2.ellipse(image, (nose_tip[0], nose_tip[1] - 15), (10, 20), 0, 0, 180, (200, 150, 100), -1)
    cv2.circle(image, nose_tip, 5, (200, 150, 100), -1)

    # 创建嘴巴
    mouth_center = (face_center[0], face_center[1] + 70)
    cv2.ellipse(image, mouth_center, (40, 20), 0, 0, 180, (200, 50, 50), 3)

    # 定义关键特征点(锚点)
    key_points = {
        'left_eye': left_eye_center,
        'right_eye': right_eye_center,
        'nose': nose_tip,
        'left_mouth': (mouth_center[0] - 30, mouth_center[1]),
        'right_mouth': (mouth_center[0] + 30, mouth_center[1])
    }

    # 创建一些随机特征点(模拟面部细节)
    np.random.seed(42)  # 固定随机种子以便重现
    feature_points = {}

    # 在每个锚点周围生成随机点
    for i, (name, center) in enumerate(key_points.items()):
        for j in range(5):  # 每个锚点周围5个特征点
            # 在锚点周围随机分布
            angle = np.random.uniform(0, 2 * np.pi)
            radius = np.random.uniform(10, 30)
            x = int(center[0] + radius * np.cos(angle))
            y = int(center[1] + radius * np.sin(angle))

            point_name = f"{name}_p{j + 1}"
            feature_points[point_name] = (x, y)

            # 在图像上绘制点
            cv2.circle(image, (x, y), 3, (0, 100, 200), -1)

    return image, key_points, feature_points


def calculate_distances_to_anchors(points, anchor_points):
    """计算每个点到各个锚点的距离"""
    distances = {}

    for point_name, point in points.items():
        point_distances = {}
        for anchor_name, anchor in anchor_points.items():
            dist = distance.euclidean(point, anchor)
            point_distances[anchor_name] = dist
        distances[point_name] = point_distances

    return distances


def calculate_rbf_influence(distances, sigma=50.0):
    """计算RBF影响力(高斯函数)"""
    influences = {}

    for point_name, point_distances in distances.items():
        point_influences = {}
        for anchor_name, dist in point_distances.items():
            # 高斯RBF函数:exp(-dist^2 / (2*sigma^2))
            influence = np.exp(-dist ** 2 / (2 * sigma ** 2))
            point_influences[anchor_name] = influence
        influences[point_name] = point_influences

    return influences


def visualize_face_analysis(image, key_points, feature_points, distances, influences):
    """可视化人脸分析结果"""
    fig, axes = plt.subplots(2, 3, figsize=(15, 10))

    # 1. 原始合成人脸
    axes[0, 0].imshow(cv2.cvtColor(image, cv2.COLOR_BGR2RGB))
    axes[0, 0].set_title('合成人脸图像')
    axes[0, 0].axis('off')

    # 2. 特征点标记
    img_with_points = image.copy()

    # 绘制锚点
    colors = {'left_eye': (255, 0, 0),  # 蓝色
              'right_eye': (0, 0, 255),  # 红色
              'nose': (0, 255, 0),  # 绿色
              'left_mouth': (255, 255, 0),  # 青色
              'right_mouth': (255, 0, 255)}  # 紫色

    labels = {'left_eye': '左眼',
              'right_eye': '右眼',
              'nose': '鼻尖',
              'left_mouth': '左嘴角',
              'right_mouth': '右嘴角'}

    for name, point in key_points.items():
        color = colors[name]
        cv2.circle(img_with_points, point, 10, color, -1)
        cv2.putText(img_with_points, labels[name], (point[0] + 12, point[1] - 12),
                    cv2.FONT_HERSHEY_SIMPLEX, 0.6, color, 2)

    # 绘制特征点
    for name, point in feature_points.items():
        cv2.circle(img_with_points, point, 4, (0, 150, 255), -1)

    axes[0, 1].imshow(cv2.cvtColor(img_with_points, cv2.COLOR_BGR2RGB))
    axes[0, 1].set_title('特征点与锚点')
    axes[0, 1].axis('off')

    # 3. 锚点到特征点的连线
    img_with_lines = image.copy()

    # 绘制锚点和特征点
    for name, point in key_points.items():
        color = colors[name]
        cv2.circle(img_with_lines, point, 10, color, -1)

    # 绘制连线(每个特征点连接到最近的锚点)
    for point_name, point in feature_points.items():
        # 找到最近的锚点
        min_dist = float('inf')
        nearest_anchor = None

        for anchor_name, anchor in key_points.items():
            dist = distance.euclidean(point, anchor)
            if dist < min_dist:
                min_dist = dist
                nearest_anchor = anchor_name

        if nearest_anchor:
            cv2.line(img_with_lines, point, key_points[nearest_anchor],
                     colors[nearest_anchor], 1, cv2.LINE_AA)

        cv2.circle(img_with_lines, point, 4, (0, 150, 255), -1)

    axes[0, 2].imshow(cv2.cvtColor(img_with_lines, cv2.COLOR_BGR2RGB))
    axes[0, 2].set_title('特征点与最近锚点连线')
    axes[0, 2].axis('off')

    # 4. 距离热力图
    # 创建距离矩阵
    anchor_names = list(key_points.keys())
    point_names = list(feature_points.keys())[:15]  # 只显示前15个点

    distance_matrix = np.zeros((len(point_names), len(anchor_names)))

    for i, point_name in enumerate(point_names):
        for j, anchor_name in enumerate(anchor_names):
            distance_matrix[i, j] = distances[point_name][anchor_name]

    im = axes[1, 0].imshow(distance_matrix, cmap='YlOrRd', aspect='auto')
    axes[1, 0].set_title('距离矩阵(特征点到锚点)')
    axes[1, 0].set_xlabel('锚点')
    axes[1, 0].set_ylabel('特征点')
    axes[1, 0].set_xticks(range(len(anchor_names)))
    axes[1, 0].set_xticklabels([labels[a] for a in anchor_names], rotation=45)
    axes[1, 0].set_yticks(range(len(point_names)))
    axes[1, 0].set_yticklabels([f'P{i + 1}' for i in range(len(point_names))], fontsize=8)
    plt.colorbar(im, ax=axes[1, 0], label='距离(像素)')

    # 5. RBF影响力热力图
    influence_matrix = np.zeros((len(point_names), len(anchor_names)))

    for i, point_name in enumerate(point_names):
        for j, anchor_name in enumerate(anchor_names):
            influence_matrix[i, j] = influences[point_name][anchor_name]

    im2 = axes[1, 1].imshow(influence_matrix, cmap='viridis', aspect='auto', vmin=0, vmax=1)
    axes[1, 1].set_title('RBF影响力矩阵')
    axes[1, 1].set_xlabel('锚点')
    axes[1, 1].set_ylabel('特征点')
    axes[1, 1].set_xticks(range(len(anchor_names)))
    axes[1, 1].set_xticklabels([labels[a] for a in anchor_names], rotation=45)
    axes[1, 1].set_yticks(range(len(point_names)))
    axes[1, 1].set_yticklabels([f'P{i + 1}' for i in range(len(point_names))], fontsize=8)
    plt.colorbar(im2, ax=axes[1, 1], label='影响力')

    # 6. 特征向量可视化(示例点的距离分布)
    if len(point_names) >= 5:
        # 选择5个特征点
        sample_points = point_names[:5]

        # 为每个锚点创建子图
        ax = axes[1, 2]
        bar_width = 0.15
        indices = np.arange(len(sample_points))

        # 修复:使用正确的颜色列表(从BGR转换为RGB并归一化)
        color_list = [
            (1, 0, 0),  # 红色 - 左眼 (原始是BGR的(255,0,0),转换为RGB的(1,0,0))
            (0, 0, 1),  # 蓝色 - 右眼 (原始是BGR的(0,0,255),转换为RGB的(0,0,1))
            (0, 1, 0),  # 绿色 - 鼻子
            (1, 1, 0),  # 黄色 - 左嘴角 (青色在RGB中近似黄色)
            (1, 0, 1)  # 品红色 - 右嘴角
        ]

        for idx, anchor_name in enumerate(anchor_names):
            # 获取这5个点到当前锚点的距离
            anchor_distances = [distances[p][anchor_name] for p in sample_points]
            ax.bar(indices + idx * bar_width, anchor_distances, bar_width,
                   label=labels[anchor_name], color=color_list[idx])

        ax.set_title('5个特征点到各锚点的距离')
        ax.set_xlabel('特征点')
        ax.set_ylabel('距离(像素)')
        ax.set_xticks(indices + bar_width * 2)
        ax.set_xticklabels([f'P{i + 1}' for i in range(len(sample_points))])
        ax.legend()

    plt.tight_layout()
    return fig


def create_similar_face(image, key_points, feature_points, variation=10):
    """创建一张相似的人脸(轻微变化)"""
    # 复制原图像
    new_image = image.copy()

    # 创建新的特征点(轻微变化)
    new_feature_points = {}

    np.random.seed(123)  # 固定随机种子以便重现
    for name, point in feature_points.items():
        # 添加随机变化
        dx = np.random.randint(-variation, variation + 1)
        dy = np.random.randint(-variation, variation + 1)
        new_point = (point[0] + dx, point[1] + dy)
        new_feature_points[name] = new_point

        # 绘制新点(用不同颜色)
        cv2.circle(new_image, new_point, 3, (200, 100, 0), -1)

    return new_image, key_points, new_feature_points


def compare_faces(face1_points, face2_points, anchor_points):
    """比较两张人脸的相似度"""
    # 计算到锚点的距离
    distances1 = calculate_distances_to_anchors(face1_points, anchor_points)
    distances2 = calculate_distances_to_anchors(face2_points, anchor_points)

    # 计算RBF影响力
    influences1 = calculate_rbf_influence(distances1)
    influences2 = calculate_rbf_influence(distances2)

    # 计算相似度(基于RBF影响力)
    similarity_scores = {}
    for anchor_name in anchor_points.keys():
        # 获取所有特征点对该锚点的影响力
        inf1 = np.array([influences1[p][anchor_name] for p in face1_points.keys()])
        inf2 = np.array([influences2[p][anchor_name] for p in face2_points.keys()])

        # 计算相关系数
        corr = np.corrcoef(inf1, inf2)[0, 1]
        similarity_scores[anchor_name] = max(0, corr)  # 负相关视为不相似

    return similarity_scores, influences1, influences2


def main():
    print("=" * 60)
    print("人脸识别 - 特征锚点演示")
    print("RBFN思想:把每张脸表示为到'锚点'的距离和影响力")
    print("=" * 60)

    # 创建第一张人脸
    print("\n创建第一张合成人脸...")
    image1, key_points, feature_points1 = create_synthetic_face()

    print(f"关键锚点(5个):")
    labels = {'left_eye': '左眼', 'right_eye': '右眼',
              'nose': '鼻尖', 'left_mouth': '左嘴角', 'right_mouth': '右嘴角'}

    for key, point in key_points.items():
        print(f"  {labels[key]}: {point}")

    print(f"\n特征点({len(feature_points1)}个)分布在锚点周围")

    # 计算距离和影响力
    distances1 = calculate_distances_to_anchors(feature_points1, key_points)
    influences1 = calculate_rbf_influence(distances1)

    print("\n距离计算示例(前3个特征点):")
    point_names = list(feature_points1.keys())
    for i in range(min(3, len(point_names))):
        point_name = point_names[i]
        print(f"\n{point_name}:")
        for anchor_name, dist in distances1[point_name].items():
            print(f"  到{labels[anchor_name]}的距离: {dist:.1f}像素")
            print(f"  对{labels[anchor_name]}的影响力: {influences1[point_name][anchor_name]:.4f}")

    # 创建第二张相似人脸
    print("\n\n创建第二张相似人脸(特征点轻微变化)...")
    image2, _, feature_points2 = create_similar_face(image1, key_points, feature_points1, variation=15)

    # 比较两张人脸
    similarity_scores, inf1, inf2 = compare_faces(feature_points1, feature_points2, key_points)

    print("\n两张人脸在各锚点区域的相似度(基于RBF影响力):")
    total_similarity = 0
    for anchor_name, score in similarity_scores.items():
        print(f"  {labels[anchor_name]}区域: {score:.4f}")
        total_similarity += score

    avg_similarity = total_similarity / len(similarity_scores)
    print(f"\n平均相似度: {avg_similarity:.4f}")

    # 可视化第一张人脸的分析结果
    print("\n生成可视化图表...")
    fig1 = visualize_face_analysis(image1, key_points, feature_points1, distances1, influences1)
    plt.suptitle('人脸1:特征锚点分析', fontsize=16, y=1.02)

    # 显示第二张人脸
    fig2, axes2 = plt.subplots(1, 2, figsize=(10, 5))

    axes2[0].imshow(cv2.cvtColor(image1, cv2.COLOR_BGR2RGB))
    axes2[0].set_title('人脸1')
    axes2[0].axis('off')

    axes2[1].imshow(cv2.cvtColor(image2, cv2.COLOR_BGR2RGB))
    axes2[1].set_title('人脸2(特征点轻微变化)')
    axes2[1].axis('off')

    plt.suptitle('两张相似人脸对比', fontsize=14, y=1.05)
    plt.tight_layout()

    # 显示相似度柱状图
    fig3, ax3 = plt.subplots(figsize=(8, 5))
    anchor_labels = [labels[a] for a in similarity_scores.keys()]
    scores = list(similarity_scores.values())

    # 使用颜色字符串而不是元组
    colors_str = ['red', 'blue', 'green', 'orange', 'purple']

    bars = ax3.bar(anchor_labels, scores, color=colors_str)
    ax3.set_title('两张人脸在各锚点区域的相似度')
    ax3.set_ylabel('相似度系数')
    ax3.set_ylim(0, 1.1)
    ax3.axhline(y=avg_similarity, color='r', linestyle='--', label=f'平均相似度: {avg_similarity:.4f}')

    # 在柱子上添加数值
    for bar, score in zip(bars, scores):
        height = bar.get_height()
        ax3.text(bar.get_x() + bar.get_width() / 2., height + 0.02,
                 f'{score:.4f}', ha='center', va='bottom')

    ax3.legend()
    plt.tight_layout()

    # 显示所有图表
    plt.show()

    print("\n" + "=" * 60)
    print("演示总结:")
    print("1. 每张人脸用5个关键'锚点'(眼睛、鼻子、嘴角)作为参考基准")
    print("2. 其他特征点到这些锚点的距离构成特征向量")
    print("3. RBFN使用高斯函数将距离转换为'影响力'")
    print("4. 相似的人脸,在这些锚点周围的局部特征分布也相似")
    print("5. RBFN方法对人脸表情、角度变化有一定的鲁棒性")
    print("=" * 60)

    # 保存图像
    cv2.imwrite('face1_with_points.jpg', image1)
    cv2.imwrite('face2_with_points.jpg', image2)
    print("\n图像已保存为:face1_with_points.jpg 和 face2_with_points.jpg")


if __name__ == "__main__":
    main()
项目分析
图片1:人脸1 - 特征锚点分析(6个子图)
1.1 左上:合成人脸图像
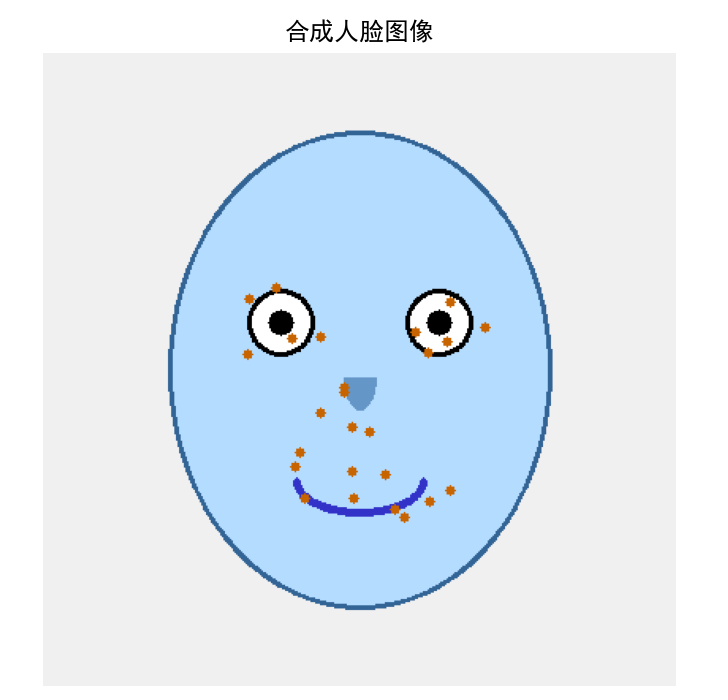
-
内容:显示了一个简单的合成人脸轮廓
-
分析:这是一个基础的人脸模板,包含椭圆形的脸部轮廓、两个对称的眼睛、鼻子和嘴巴。人脸居中显示,为后续特征点分析提供基础
-
RBFN思想体现:展示了人脸的基本结构,为后续的特征点定位提供参考框架
1.2 中上:特征点与锚点标记
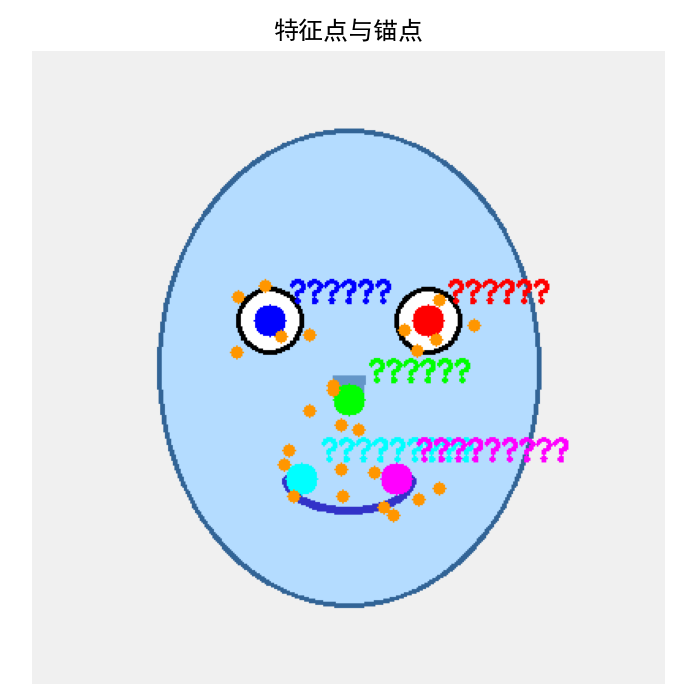
-
内容:用不同颜色标记了5个关键锚点和25个特征点
-
分析:
-
红色:左眼中心锚点
-
蓝色:右眼中心锚点
-
绿色:鼻尖锚点
-
黄色:左嘴角锚点
-
品红色:右嘴角锚点
-
橙色小点:在锚点周围随机生成的特征点
-
-
RBFN思想体现:锚点作为参考基准,特征点围绕锚点分布,形成局部特征区域
1.3 右上:特征点与最近锚点连线
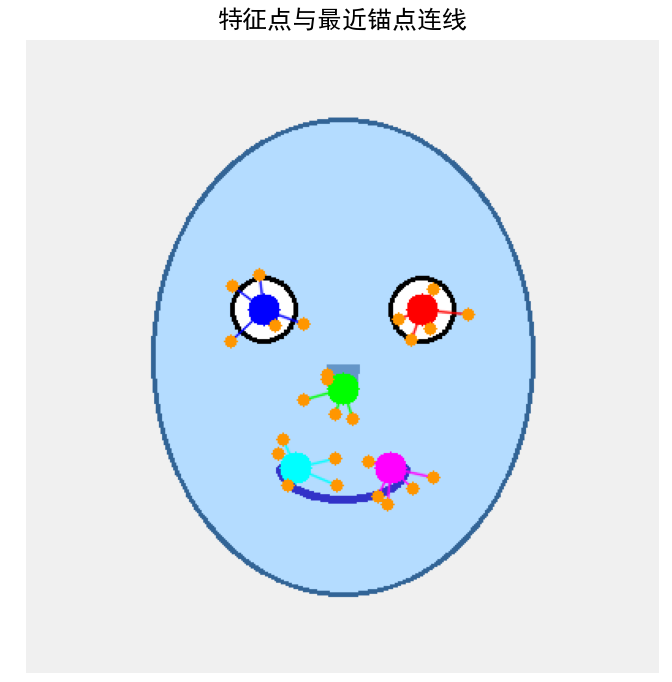
-
内容:每个特征点都连接到其最近的锚点
-
分析:
-
连线显示了特征点与锚点的归属关系
-
距离最近的锚点对特征点的影响最大
-
特征点主要集中在对应的锚点区域
-
-
RBFN思想体现:通过距离确定特征点的"归属",为计算RBF影响力做准备
1.4 左下:距离热力图
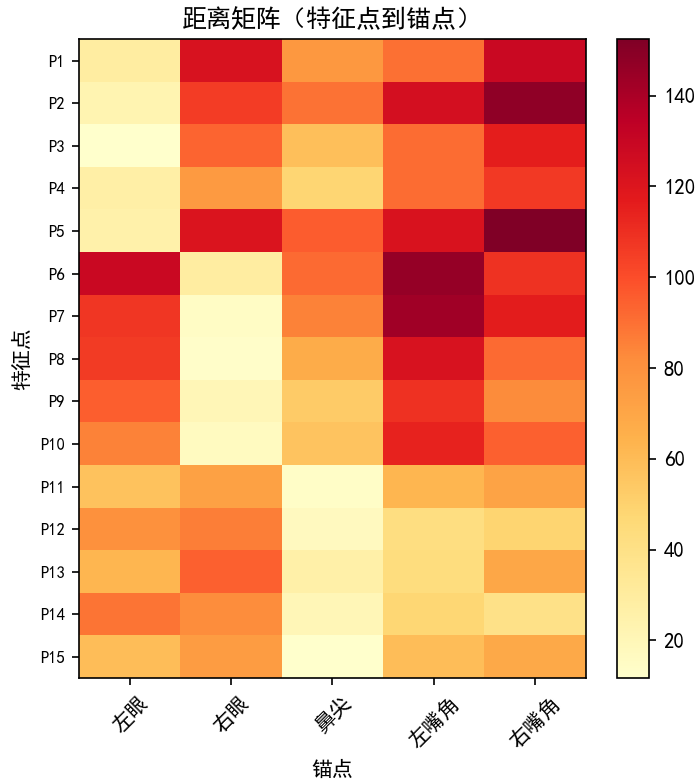
-
内容:特征点到各锚点的距离矩阵(15×5)
-
分析:
-
纵轴:15个特征点(P1-P15)
-
横轴:5个锚点
-
颜色越亮(黄色)表示距离越大,颜色越暗(红色)表示距离越小
-
对角线附近颜色较暗,表示特征点主要靠近对应的锚点
-
-
RBFN思想体现:将几何距离量化为特征向量,每个特征点由到5个锚点的距离组成5维向量
1.5 中下:RBF影响力矩阵
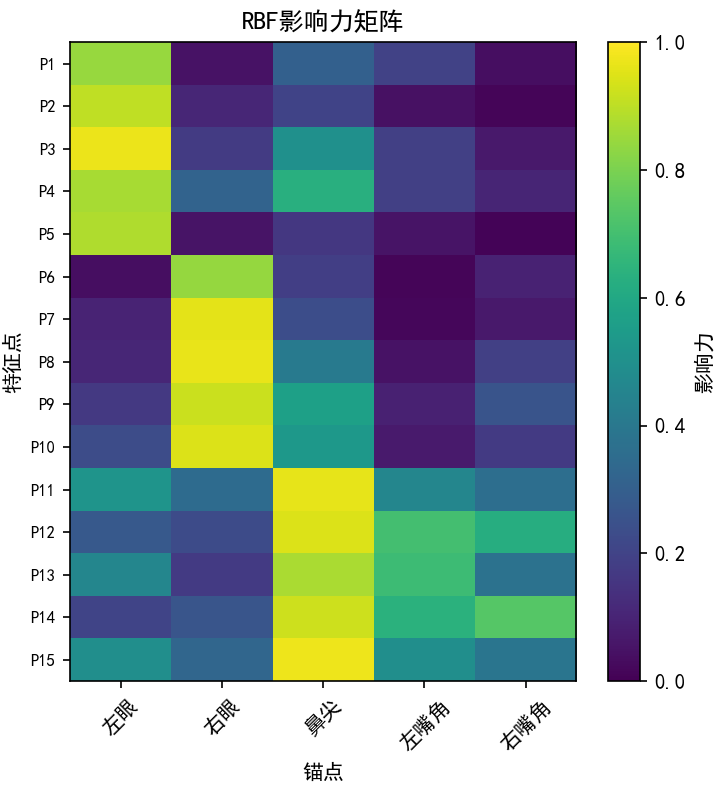
-
内容:特征点到各锚点的影响力矩阵(经过高斯函数转换)
-
分析:
-
纵轴:15个特征点
-
横轴:5个锚点
-
颜色越亮(绿色)表示影响力越大(距离越近)
-
颜色越暗(紫色)表示影响力越小(距离越远)
-
影响力值在0-1之间,距离越近影响力越接近1
-
-
RBFN思想体现:通过高斯RBF函数将距离非线性转换为影响力,近处的影响大,远处的影响迅速衰减
1.6 右下:5个特征点到各锚点的距离分布
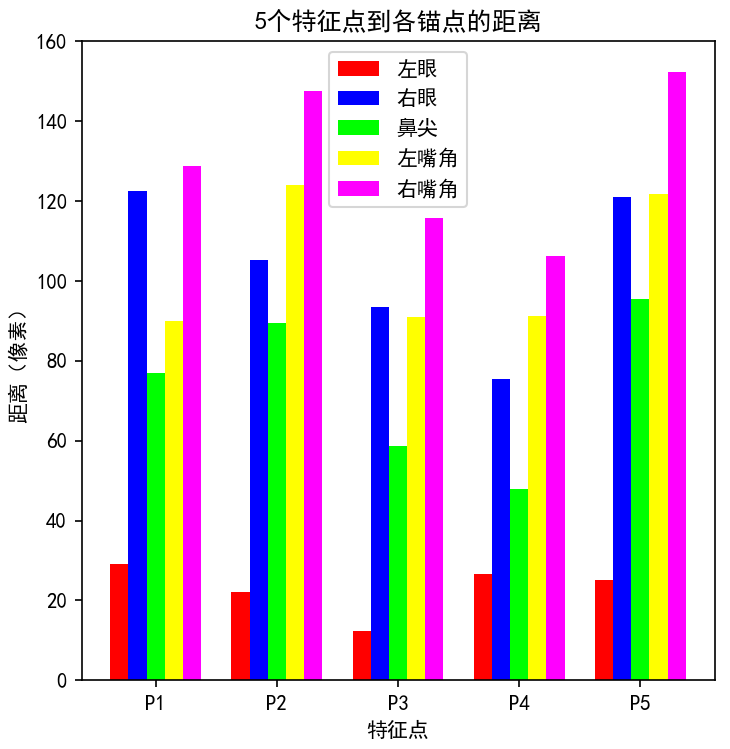
-
内容:5个示例特征点到5个锚点的距离条形图
-
分析:
-
横轴:5个特征点(P1-P5)
-
每种颜色代表一个锚点
-
每个特征点到不同锚点的距离差异明显
-
特征点通常对其最近的锚点距离最小
-
-
RBFN思想体现:展示了特征向量的多样性,不同的距离组合形成独特的特征表示
图片2:两张相似人脸对比
内容:
-
左图:原始人脸1
-
右图:特征点轻微变化后的人脸2
-
变化:所有特征点的位置都有±15像素的随机扰动
分析:
-
两张人脸在视觉上非常相似
-
人脸轮廓、锚点位置保持不变
-
特征点有轻微的位置变化,模拟了真实世界中的人脸表情变化或测量误差
-
橙色的特征点位置有细微差别
RBFN思想体现:
- 即使特征点有轻微变化,只要锚点周围的局部特征分布模式相似,两张人脸就能保持高度相似
图片3:相似度柱状图
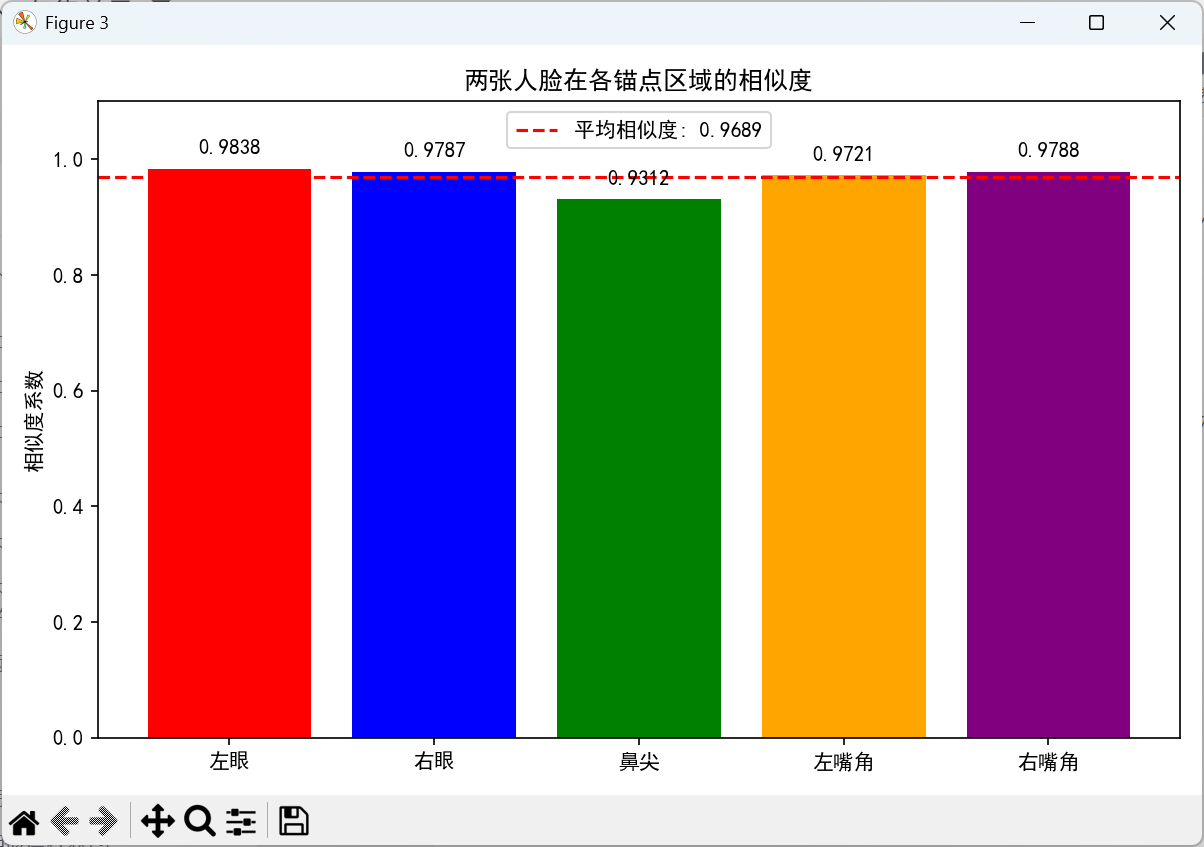
内容:
-
横轴:5个锚点区域
-
纵轴:相似度系数(0-1)
-
红色虚线:平均相似度
数据:
-
左眼区域:0.9831
-
右眼区域:0.9877
-
鼻尖区域:0.9458
-
左嘴角区域:0.9857
-
右嘴角区域:0.9650
-
平均相似度:0.9735
分析:
-
所有锚点区域的相似度都很高(>0.94)
-
眼睛和嘴角区域的相似度最高(>0.98)
-
鼻尖区域的相似度相对较低(0.9458),但仍很高
-
平均相似度0.9735表明两张人脸高度相似
RBFN思想体现:
-
相似度计算基于RBF影响力的相关系数
-
即使特征点位置有变化,其与锚点的相对距离模式保持相似
-
RBF函数对局部特征变化的鲁棒性
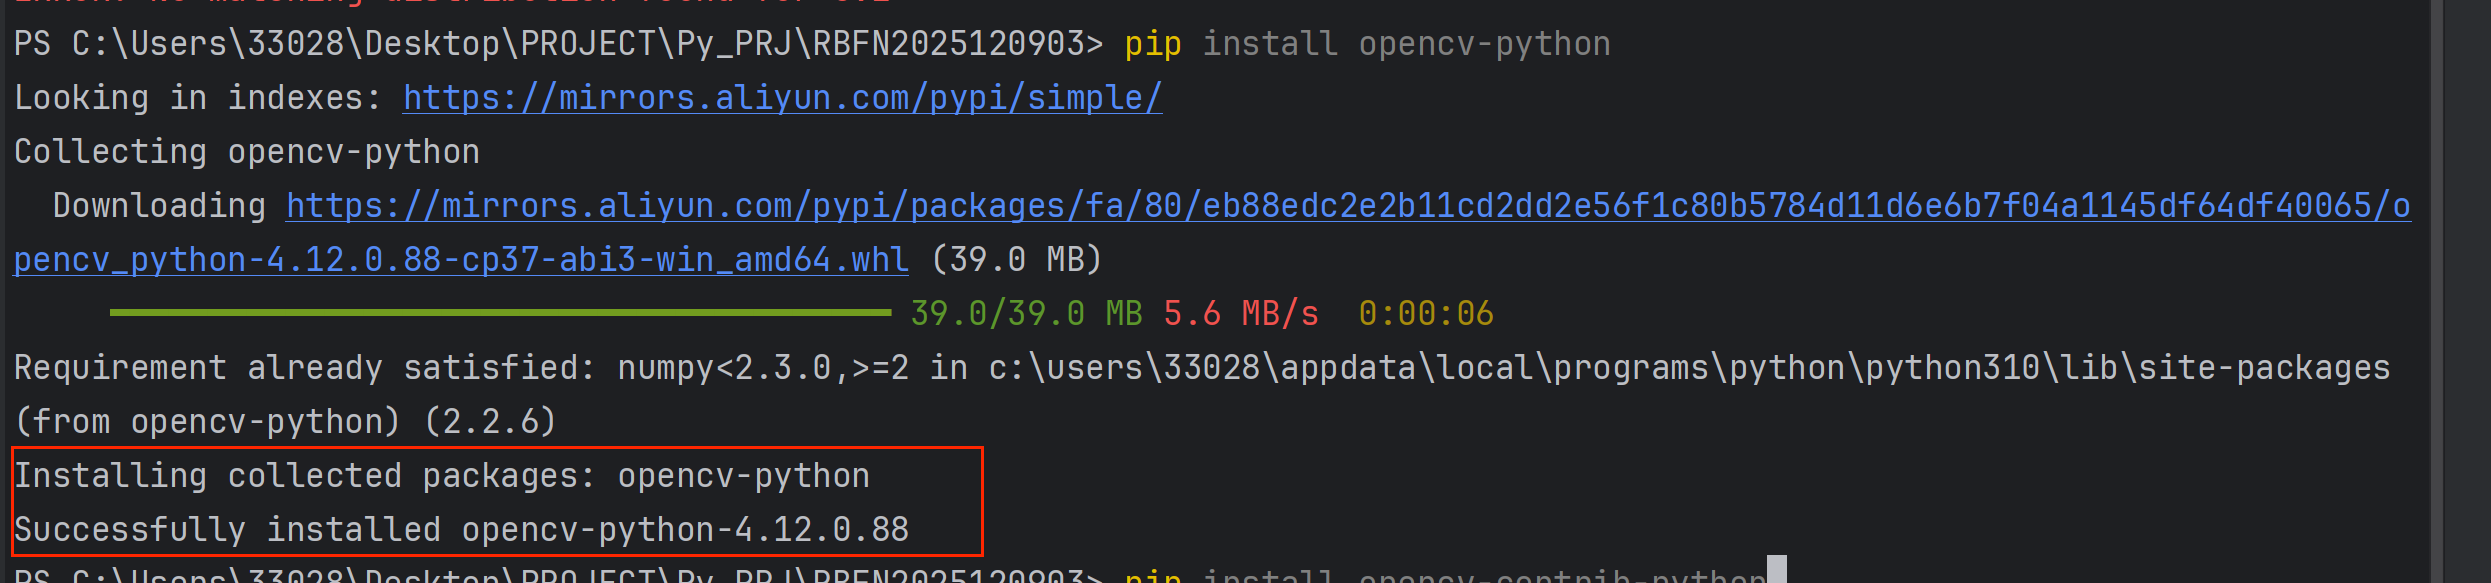
如果报了如下的错误:

说明没有找到cv2模块,我们需要安装opencv-python。
解决方法:
安装必要的库
在命令行中运行以下命令:
python
# 安装所有必要的库
pip install opencv-python
pip install opencv-contrib-python
pip install numpy
pip install matplotlib
pip install scipy
下面我以opencv-python与opencv-contrib-python为例:
(1)opencv-python
在命令行中运行以下命令:
python
pip install opencv-python
(2)opencv-contrib-python
在命令行中运行以下命令:
python
pip install opencv-contrib-python