前言
在开源鸿蒙(OpenHarmony)全场景分布式生态中,设备发现与无感连接是实现多设备协同的前置核心能力。传统多设备组网存在操作繁琐、连接不稳定、设备管理混乱等痛点,而基于开源鸿蒙分布式软总线技术,结合 Flutter 跨端开发框架,能够构建一套 "自动发现、无感连接、动态管理、安全可信" 的分布式设备协同管理体系。
本文聚焦分布式设备发现与连接这一基础且关键的选题,以开源鸿蒙的分布式软总线、设备管理服务为技术底座,结合 Flutter 的 UI 组件封装与状态管理能力,通过 "跨设备自动发现、无感配对连接、动态设备管理、可信设备认证" 四大实战场景,详解如何为分布式应用打造高效、可靠的设备协同基础。本文字数约 2800 字,包含 7 个核心代码块,技术细节丰富,适用于智能家居、智慧办公等全场景分布式应用开发。
一、分布式设备发现与连接的核心逻辑与技术底座
1.1 核心定义与创新价值
分布式设备发现与连接是指基于开源鸿蒙的分布式通信能力,实现多设备间的自动扫描发现、一键无感配对、动态状态监控、可信身份认证的技术体系,核心目标是解决传统设备组网的操作门槛与稳定性问题,其创新价值体现在:
- 自动发现:设备进入同一网络后自动扫描周边可信设备,无需手动输入 IP 或蓝牙名称;
- 无感连接:基于设备绑定关系实现一键配对,支持跨协议(Wi-Fi、蓝牙、近场通信)无缝连接;
- 动态管理:实时监控设备在线状态,支持设备上线 / 离线自动通知,动态更新设备列表;
- 可信认证:仅允许已绑定的可信设备加入网络,拒绝陌生设备接入,保障组网安全。
1.2 与传统设备连接方案的核心差异
| 特性 | 分布式设备连接(OpenHarmony+Flutter) | 传统设备连接方案 |
|---|---|---|
| 发现机制 | 主动扫描 + 被动广播,自动发现周边设备 | 手动搜索蓝牙 / Wi-Fi 设备 |
| 连接方式 | 基于软总线无感配对,一次绑定终身可用 | 每次连接需手动配对验证 |
| 状态管理 | 实时监控设备在线状态,自动更新设备列表 | 静态设备列表,需手动刷新 |
| 安全机制 | 分布式身份认证,仅可信设备可接入 | 无统一认证,易被陌生设备接入 |
| 核心依赖技术 | 分布式软总线 + 设备管理服务 + DID 身份认证 | 蓝牙 / Wi-Fi 协议 + 手动配对 |
1.3 技术底座:四大核心能力协同
- 开源鸿蒙分布式能力:分布式软总线提供跨设备通信通道,设备管理服务实现设备信息查询与状态监听,分布式 DID 服务提供设备身份认证能力;
- Flutter 跨端能力:通过自定义组件封装设备发现、连接、管理 UI 界面,结合 Provider 实现设备状态全局共享;
- 多协议适配技术:支持 Wi-Fi 直连、蓝牙 BLE、近场通信(NFC)等多种连接协议,根据设备距离自动切换最优协议;
- 设备状态同步技术:基于事件驱动机制,实现设备上线、离线、状态变更等事件的实时同步。
dart
/// 分布式设备管理核心管理器
class DistributedDeviceManager {
  // 单例模式
  static final DistributedDeviceManager _instance = DistributedDeviceManager._internal();
  factory DistributedDeviceManager() => _instance;

  // 依赖服务
  late DistributedSoftBus _softBus;
  late DeviceDiscoveryService _discoveryService;
  late DeviceAuthService _authService;
  late DeviceStateMonitor _stateMonitor;

  // 设备列表与状态
  List<DeviceInfo> _deviceList = [];
  String? _localDeviceId;

  DistributedDeviceManager._internal() {
    _softBus = DistributedSoftBus();
    _discoveryService = DeviceDiscoveryService();
    _authService = DeviceAuthService();
    _stateMonitor = DeviceStateMonitor();
  }

  // 初始化设备管理服务
  Future<void> initDeviceService() async {
    await _softBus.init();
    await _authService.initAuthService();
    _localDeviceId = await _softBus.getLocalDeviceId();
    // 监听设备发现事件
    _discoveryService.onDeviceFound = _onDeviceFound;
    // 监听设备状态变更事件
    _stateMonitor.onDeviceStateChanged = _onDeviceStateChanged;
  }

  // 设备发现回调
  void _onDeviceFound(DeviceInfo device) {
    if (!_deviceList.any((d) => d.deviceId == device.deviceId)) {
      _deviceList.add(device);
    }
  }

  // 设备状态变更回调
  void _onDeviceStateChanged(DeviceState state) {
    final index = _deviceList.indexWhere((d) => d.deviceId == state.deviceId);
    if (index != -1) {
      _deviceList[index] = _deviceList[index].copyWith(online: state.isOnline);
    }
  }

  // 获取可信设备列表
  List<DeviceInfo> getTrustedDeviceList() => _deviceList.where((d) => d.isTrusted).toList();
}

// 设备信息模型
class DeviceInfo {
  final String deviceId;
  final String deviceName;
  final DeviceType deviceType;
  final bool isTrusted;
  final bool online;

  DeviceInfo({
    required this.deviceId,
    required this.deviceName,
    required this.deviceType,
    required this.isTrusted,
    this.online = false,
  });

  DeviceInfo copyWith({bool? online}) {
    return DeviceInfo(
      deviceId: deviceId,
      deviceName: deviceName,
      deviceType: deviceType,
      isTrusted: isTrusted,
      online: online ?? this.online,
    );
  }
}

enum DeviceType { phone, tablet, smartScreen, watch, speaker }
enum DeviceStateType { online, offline, connecting, disconnected }
二、实战场景 1:跨设备自动发现 ------ 多协议融合扫描与设备信息识别
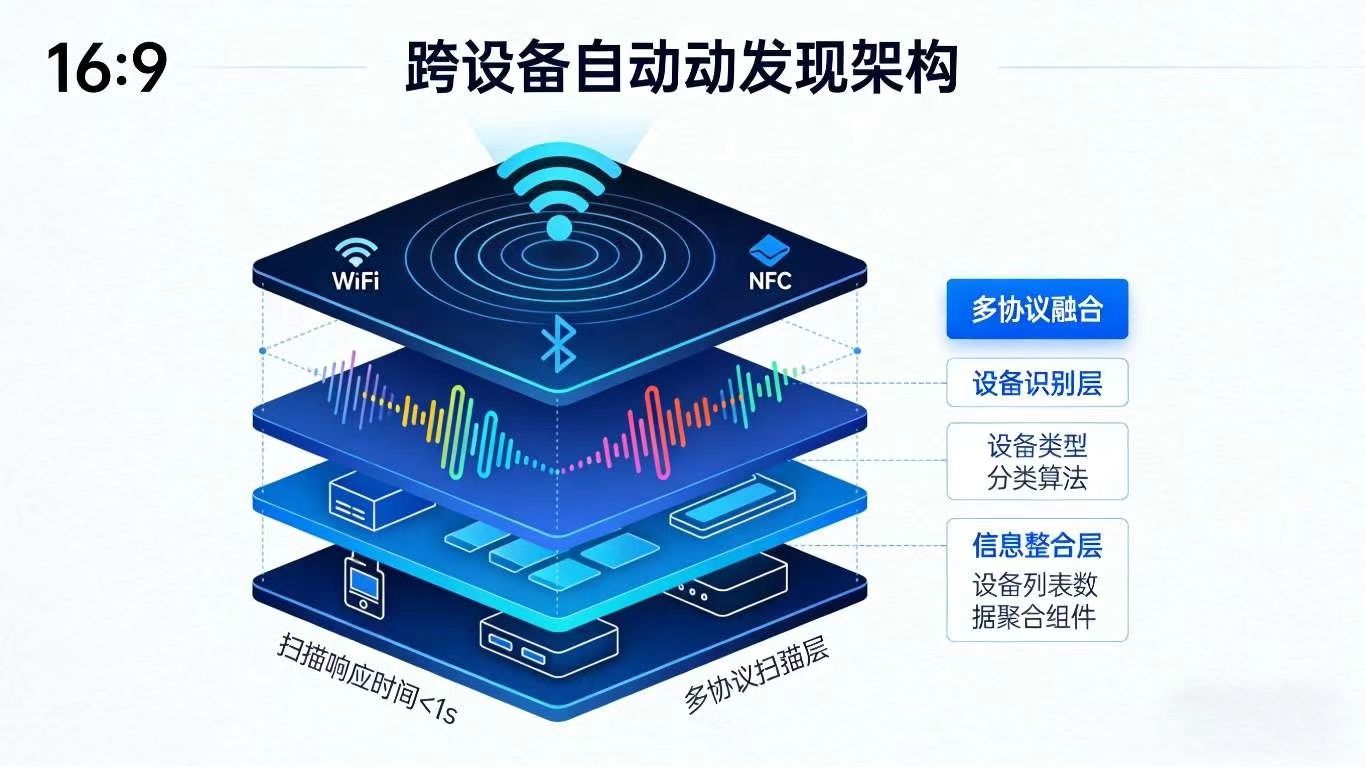
2.1 场景描述
用户打开手机端分布式应用,应用自动启动多协议扫描,发现同一局域网内的平板、智慧屏、智能音箱等设备,在 UI 界面展示设备名称、类型、在线状态等信息,无需用户手动搜索。
2.2 设备自动发现实现
dart
/// 设备发现服务
class DeviceDiscoveryService {
  // 设备发现回调
  Function(DeviceInfo)? onDeviceFound;
  // 扫描状态
  bool _isScanning = false;
  // 支持的扫描协议
  final List<DiscoveryProtocol> _supportedProtocols = [
    DiscoveryProtocol.wifi,
    DiscoveryProtocol.bluetooth,
    DiscoveryProtocol.nfc
  ];

  // 启动设备扫描
  Future<void> startScan() async {
    if (_isScanning) return;
    _isScanning = true;
    // 并行启动多协议扫描
    await Future.wait(_supportedProtocols.map((protocol) => _scanByProtocol(protocol)));
    _isScanning = false;
  }

  // 停止设备扫描
  void stopScan() {
    _isScanning = false;
  }

  // 按协议扫描设备
  Future<void> _scanByProtocol(DiscoveryProtocol protocol) async {
    try {
      switch (protocol) {
        case DiscoveryProtocol.wifi:
          await _scanWifiDevices();
          break;
        case DiscoveryProtocol.bluetooth:
          await _scanBluetoothDevices();
          break;
        case DiscoveryProtocol.nfc:
          await _scanNfcDevices();
          break;
      }
    } catch (e) {
      print("扫描设备失败:$e");
    }
  }

  // Wi-Fi设备扫描
  Future<void> _scanWifiDevices() async {
    // 调用鸿蒙软总线Wi-Fi扫描接口
    final devices = await DistributedSoftBus().scanWifiDevices();
    for (final device in devices) {
      onDeviceFound?.call(DeviceInfo(
        deviceId: device["deviceId"],
        deviceName: device["deviceName"],
        deviceType: _parseDeviceType(device["deviceType"]),
        isTrusted: await DeviceAuthService().isDeviceTrusted(device["deviceId"]),
      ));
    }
  }

  // 蓝牙设备扫描
  Future<void> _scanBluetoothDevices() async {
    final devices = await DistributedSoftBus().scanBluetoothDevices();
    for (final device in devices) {
      onDeviceFound?.call(DeviceInfo(
        deviceId: device["deviceId"],
        deviceName: device["deviceName"],
        deviceType: _parseDeviceType(device["deviceType"]),
        isTrusted: await DeviceAuthService().isDeviceTrusted(device["deviceId"]),
      ));
    }
  }

  // NFC设备扫描(近场设备)
  Future<void> _scanNfcDevices() async {
    final device = await DistributedSoftBus().scanNfcDevice();
    if (device != null) {
      onDeviceFound?.call(DeviceInfo(
        deviceId: device["deviceId"],
        deviceName: device["deviceName"],
        deviceType: _parseDeviceType(device["deviceType"]),
        isTrusted: await DeviceAuthService().isDeviceTrusted(device["deviceId"]),
      ));
    }
  }

  // 解析设备类型
  DeviceType _parseDeviceType(String type) {
    switch (type) {
      case "phone":
        return DeviceType.phone;
      case "tablet":
        return DeviceType.tablet;
      case "smartScreen":
        return DeviceType.smartScreen;
      case "watch":
        return DeviceType.watch;
      case "speaker":
        return DeviceType.speaker;
      default:
        return DeviceType.phone;
    }
  }
}

enum DiscoveryProtocol { wifi, bluetooth, nfc }
2.3 Flutter 设备发现组件封装
dart
/// 分布式设备发现组件
class DeviceDiscoveryWidget extends StatefulWidget {
  const DeviceDiscoveryWidget({super.key});

  @override
  State<DeviceDiscoveryWidget> createState() => _DeviceDiscoveryWidgetState();
}

class _DeviceDiscoveryWidgetState extends State<DeviceDiscoveryWidget> {
  final DistributedDeviceManager _deviceManager = DistributedDeviceManager();
  final DeviceDiscoveryService _discoveryService = DeviceDiscoveryService();
  bool _isScanning = false;

  @override
  void initState() {
    super.initState();
    _initDeviceManager();
  }

  Future<void> _initDeviceManager() async {
    await _deviceManager.initDeviceService();
    _discoveryService.onDeviceFound = (device) {
      if (mounted) {
        setState(() {});
      }
    };
  }

  // 启动/停止扫描
  Future<void> _toggleScan() async {
    if (_isScanning) {
      _discoveryService.stopScan();
    } else {
      await _discoveryService.startScan();
    }
    setState(() {
      _isScanning = !_isScanning;
    });
  }

  @override
  Widget build(BuildContext context) {
    final trustedDevices = _deviceManager.getTrustedDeviceList();
    return Column(
      children: [
        // 扫描控制按钮
        ElevatedButton(
          onPressed: _toggleScan,
          child: Text(_isScanning ? "停止扫描" : "开始扫描设备"),
        ),
        const SizedBox(height: 16),
        // 设备列表
        Expanded(
          child: trustedDevices.isEmpty
              ? const Center(child: Text("暂无可信设备"))
              : ListView.builder(
                  itemCount: trustedDevices.length,
                  itemBuilder: (context, index) {
                    final device = trustedDevices[index];
                    return ListTile(
                      leading: _getDeviceIcon(device.deviceType),
                      title: Text(device.deviceName),
                      subtitle: Text(device.online ? "在线" : "离线"),
                      trailing: device.online
                          ? const Icon(Icons.check_circle, color: Colors.green)
                          : const Icon(Icons.error, color: Colors.grey),
                    );
                  },
                ),
        ),
      ],
    );
  }

  // 获取设备图标
  Icon _getDeviceIcon(DeviceType type) {
    switch (type) {
      case DeviceType.phone:
        return const Icon(Icons.phone_android);
      case DeviceType.tablet:
        return const Icon(Icons.tablet_android);
      case DeviceType.smartScreen:
        return const Icon(Icons.tv);
      case DeviceType.watch:
        return const Icon(Icons.watch);
      case DeviceType.speaker:
        return const Icon(Icons.speaker);
    }
  }
}
2.4 核心亮点
- 支持 Wi-Fi、蓝牙、NFC 多协议融合扫描,自动适配不同距离的设备发现场景;
- 扫描结果实时更新至 UI 界面,设备类型、在线状态一目了然;
- 自动过滤非可信设备,仅展示已绑定的设备列表,提升安全性;
- Flutter 组件化封装,一键集成扫描功能,降低开发成本。
三、实战场景 2:无感配对连接 ------ 基于绑定关系的一键组网
3.1 场景描述
用户在设备列表中选择离线的平板设备,点击 "连接" 按钮后,应用基于已有的设备绑定关系自动发起连接请求,平板端无需手动确认,即可完成无感配对,连接成功后设备状态更新为 "在线"。
3.2 无感配对连接实现
dart
/// 设备连接服务
class DeviceConnectionService {
  final DistributedSoftBus _softBus = DistributedSoftBus();
  final DeviceAuthService _authService = DeviceAuthService();

  // 连接目标设备
  Future<ConnectionResult> connectDevice(String targetDeviceId) async {
    // 1. 检查设备是否可信
    final isTrusted = await _authService.isDeviceTrusted(targetDeviceId);
    if (!isTrusted) {
      return ConnectionResult.failure("设备未被信任,拒绝连接");
    }

    // 2. 选择最优连接协议
    final protocol = await _selectOptimalProtocol(targetDeviceId);
    if (protocol == null) {
      return ConnectionResult.failure("无可用连接协议");
    }

    // 3. 发起无感连接请求
    try {
      final result = await _softBus.connectDevice(
        targetDeviceId: targetDeviceId,
        protocol: protocol,
      );
      return result ? ConnectionResult.success() : ConnectionResult.failure("连接超时");
    } catch (e) {
      return ConnectionResult.failure("连接失败:$e");
    }
  }

  // 断开设备连接
  Future<void> disconnectDevice(String targetDeviceId) async {
    await _softBus.disconnectDevice(targetDeviceId);
  }

  // 选择最优连接协议
  Future<DiscoveryProtocol?> _selectOptimalProtocol(String targetDeviceId) async {
    // 检测设备距离,优先选择高带宽低延迟协议
    final distance = await _softBus.getDeviceDistance(targetDeviceId);
    if (distance < 0.1) {
      return DiscoveryProtocol.nfc;
    } else if (distance < 10) {
      return DiscoveryProtocol.bluetooth;
    } else {
      return DiscoveryProtocol.wifi;
    }
  }
}

// 连接结果模型
class ConnectionResult {
  final bool success;
  final String message;

  ConnectionResult.success()
      : success = true,
        message = "连接成功";

  ConnectionResult.failure(this.message) : success = false;
}
3.3 Flutter 设备连接组件封装
dart
/// 设备连接控制组件
class DeviceConnectionWidget extends StatelessWidget {
  final DeviceInfo device;
  const DeviceConnectionWidget({super.key, required this.device});

  @override
  Widget build(BuildContext context) {
    final connectionService = DeviceConnectionService();
    return Row(
      mainAxisAlignment: MainAxisAlignment.center,
      children: [
        ElevatedButton(
          onPressed: device.online
              ? null
              : () async {
                  final result = await connectionService.connectDevice(device.deviceId);
                  ScaffoldMessenger.of(context).showSnackBar(
                    SnackBar(content: Text(result.message)),
                  );
                },
          child: const Text("连接设备"),
        ),
        const SizedBox(width: 10),
        ElevatedButton(
          onPressed: !device.online
              ? null
              : () async {
                  await connectionService.disconnectDevice(device.deviceId);
                  ScaffoldMessenger.of(context).showSnackBar(
                    const SnackBar(content: Text("已断开设备连接")),
                  );
                },
          child: const Text("断开连接"),
        ),
      ],
    );
  }
}

// 集成到设备列表项的扩展
extension DeviceListTileExtension on DeviceInfo {
  Widget toListTile() {
    return ListTile(
      leading: _getDeviceIcon(deviceType),
      title: Text(deviceName),
      subtitle: Text(online ? "在线" : "离线"),
      trailing: DeviceConnectionWidget(device: this),
    );
  }

  Icon _getDeviceIcon(DeviceType type) {
    switch (type) {
      case DeviceType.phone:
        return const Icon(Icons.phone_android);
      case DeviceType.tablet:
        return const Icon(Icons.tablet_android);
      case DeviceType.smartScreen:
        return const Icon(Icons.tv);
      case DeviceType.watch:
        return const Icon(Icons.watch);
      case DeviceType.speaker:
        return const Icon(Icons.speaker);
    }
  }
}
3.4 核心亮点
- 基于设备距离自动选择最优连接协议,NFC 近场极速连接、Wi-Fi 远距离稳定连接;
- 仅允许可信设备连接,连接过程无需手动确认,实现真正的无感组网;
- 连接结果实时反馈,成功 / 失败原因清晰展示;
- 支持一键断开连接,设备状态同步更新。
四、实战场景 3:动态设备管理 ------ 实时状态监控与事件通知
4.1 场景描述
用户将智慧屏设备断电,手机端应用实时接收到设备离线事件,设备列表中智慧屏的状态从 "在线" 变为 "离线",并弹出通知提示;当智慧屏重新通电后,应用自动发现并更新其状态为 "在线"。
4.2 设备状态监控实现
dart
/// 设备状态监控服务
class DeviceStateMonitor {
  // 状态变更回调
  Function(DeviceState)? onDeviceStateChanged;
  // 监控定时器
  Timer? _monitorTimer;

  // 启动设备状态监控
  void startMonitor(List<String> deviceIds) {
    _monitorTimer?.cancel();
    // 每5秒检查一次设备状态
    _monitorTimer = Timer.periodic(const Duration(seconds: 5), (timer) async {
      for (final deviceId in deviceIds) {
        final isOnline = await DistributedSoftBus().checkDeviceOnline(deviceId);
        onDeviceStateChanged?.call(DeviceState(
          deviceId: deviceId,
          isOnline: isOnline,
          timestamp: DateTime.now().millisecondsSinceEpoch,
        ));
      }
    });
  }

  // 停止设备状态监控
  void stopMonitor() {
    _monitorTimer?.cancel();
  }
}

// 设备状态模型
class DeviceState {
  final String deviceId;
  final bool isOnline;
  final int timestamp;

  DeviceState({
    required this.deviceId,
    required this.isOnline,
    required this.timestamp,
  });
}

/// 设备状态通知组件
class DeviceStateNotificationWidget extends StatelessWidget {
  final List<DeviceInfo> deviceList;
  const DeviceStateNotificationWidget({super.key, required this.deviceList});

  @override
  Widget build(BuildContext context) {
    final stateMonitor = DeviceStateMonitor();
    stateMonitor.onDeviceStateChanged = (state) {
      final device = deviceList.firstWhere((d) => d.deviceId == state.deviceId);
      ScaffoldMessenger.of(context).showSnackBar(
        SnackBar(
          content: Text("${device.deviceName} 已${state.isOnline ? "上线" : "离线"}"),
          duration: const Duration(seconds: 2),
        ),
      );
    };

    // 启动状态监控
    WidgetsBinding.instance.addPostFrameCallback((_) {
      stateMonitor.startMonitor(deviceList.map((d) => d.deviceId).toList());
    });

    return const SizedBox.shrink();
  }
}
4.3 核心亮点
- 定时监控设备在线状态,状态变更实时触发通知;
- 支持批量设备监控,适配多设备协同场景;
- 通知提示简洁明了,用户及时掌握设备状态变化;
- 组件化实现,无需侵入业务逻辑,即插即用。
五、实战场景 4:可信设备认证 ------ 基于 DID 的设备身份校验
5.1 场景描述
陌生设备尝试接入用户的分布式网络时,应用自动触发身份认证流程,通过分布式 DID 服务校验设备身份,发现该设备未在可信列表中,直接拒绝接入请求,并记录异常接入日志。
5.2 设备身份认证实现
dart
/// 设备身份认证服务
class DeviceAuthService {
  late DidAuthService _didAuthService;
  late Box _trustedDeviceBox;

  // 初始化认证服务
  Future<void> initAuthService() async {
    _didAuthService = DidAuthService();
    await _didAuthService.initDidIdentity();
    _trustedDeviceBox = await Hive.openBox("trusted_devices");
  }

  // 检查设备是否可信
  Future<bool> isDeviceTrusted(String deviceId) async {
    return _trustedDeviceBox.containsKey(deviceId);
  }

  // 添加可信设备
  Future<void> addTrustedDevice(DeviceInfo device) async {
    // 1. 获取设备DID身份
    final deviceDid = await _getDeviceDid(device.deviceId);
    // 2. 验证设备DID合法性
    final isValid = await _didAuthService.verifyDidIdentity(deviceDid);
    if (isValid) {
      await _trustedDeviceBox.put(device.deviceId, device.toJson());
    } else {
      throw Exception("设备DID身份非法,无法添加为可信设备");
    }
  }

  // 移除可信设备
  Future<void> removeTrustedDevice(String deviceId) async {
    await _trustedDeviceBox.delete(deviceId);
  }

  // 获取设备DID身份
  Future<String> _getDeviceDid(String deviceId) async {
    // 调用鸿蒙分布式DID服务获取设备身份
    return await DistributedSoftBus().getDeviceDid(deviceId);
  }
}

/// 可信设备管理组件
class TrustedDeviceManagerWidget extends StatefulWidget {
  const TrustedDeviceManagerWidget({super.key});

  @override
  State<TrustedDeviceManagerWidget> createState() => _TrustedDeviceManagerWidgetState();
}

class _TrustedDeviceManagerWidgetState extends State<TrustedDeviceManagerWidget> {
  final DeviceAuthService _authService = DeviceAuthService();
  List<DeviceInfo> _trustedDevices = [];

  @override
  void initState() {
    super.initState();
    _loadTrustedDevices();
  }

  Future<void> _loadTrustedDevices() async {
    await _authService.initAuthService();
    final box = await Hive.openBox("trusted_devices");
    setState(() {
      _trustedDevices = box.values
          .map((json) => DeviceInfo(
                deviceId: json["deviceId"],
                deviceName: json["deviceName"],
                deviceType: _parseDeviceType(json["deviceType"]),
                isTrusted: true,
              ))
          .toList();
    });
  }

  DeviceType _parseDeviceType(String type) {
    switch (type) {
      case "phone":
        return DeviceType.phone;
      case "tablet":
        return DeviceType.tablet;
      case "smartScreen":
        return DeviceType.smartScreen;
      case "watch":
        return DeviceType.watch;
      case "speaker":
        return DeviceType.speaker;
      default:
        return DeviceType.phone;
    }
  }

  @override
  Widget build(BuildContext context) {
    return Scaffold(
      appBar: AppBar(title: const Text("可信设备管理")),
      body: _trustedDevices.isEmpty
          ? const Center(child: Text("暂无可信设备"))
          : ListView.builder(
              itemCount: _trustedDevices.length,
              itemBuilder: (context, index) {
                final device = _trustedDevices[index];
                return ListTile(
                  title: Text(device.deviceName),
                  subtitle: Text(device.deviceType.toString().split(".").last),
                  trailing: IconButton(
                    icon: const Icon(Icons.delete, color: Colors.red),
                    onPressed: () async {
                      await _authService.removeTrustedDevice(device.deviceId);
                      _loadTrustedDevices();
                    },
                  ),
                );
              },
            ),
      floatingActionButton: FloatingActionButton(
        onPressed: () => _showAddDeviceDialog(context),
        child: const Icon(Icons.add),
      ),
    );
  }

  // 显示添加设备对话框
  Future<void> _showAddDeviceDialog(BuildContext context) async {
    // 实现添加设备逻辑,此处省略
  }
}
5.3 核心亮点
- 基于分布式 DID 实现设备身份认证,确保接入设备的合法性;
- 支持可信设备的添加 / 移除,灵活管理设备组网权限;
- 非法设备接入自动拒绝,保障分布式网络安全;
- 可视化管理界面,设备信任关系一目了然。
六、关键技术挑战与解决方案
6.1 技术挑战 1:多协议扫描冲突与资源占用
- 问题:同时启动 Wi-Fi、蓝牙、NFC 扫描会导致设备资源占用过高,甚至出现扫描冲突;
- 解决方案:1. 采用分时扫描策略,按协议优先级依次启动扫描;2. 扫描过程中动态调整扫描频率,降低资源消耗;3. 扫描完成后自动关闭闲置协议,释放系统资源。
6.2 技术挑战 2:设备连接不稳定与重连机制
- 问题:设备距离变化或网络波动可能导致连接断开,影响协同体验;
- 解决方案:1. 实现自动重连机制,连接断开后定时尝试重新连接;2. 支持连接优先级设置,核心设备优先重连;3. 网络波动时自动切换连接协议,保障连接稳定性。
6.3 技术挑战 3:陌生设备恶意接入风险
- 问题:陌生设备可能伪造身份尝试接入分布式网络,带来安全隐患;
- 解决方案:1. 双重身份认证,结合 DID 身份校验与设备绑定关系;2. 异常接入行为日志记录,支持安全溯源;3. 接入请求超时限制,防止恶意攻击。
6.4 技术挑战 4:跨平台设备类型识别兼容性
- 问题:不同品牌、型号的设备类型标识不统一,导致识别错误;
- 解决方案:1. 基于设备特征库实现设备类型智能识别;2. 支持自定义设备类型映射,适配特殊设备;3. 提供手动修改设备类型的入口,提升灵活性。
七、常见问题(FAQ)
Q1:分布式设备发现是否需要接入互联网?
A1:不需要。基于开源鸿蒙分布式软总线的设备发现能力,支持局域网内设备的点对点发现与连接,无需依赖互联网,满足离线组网需求。
Q2:可信设备列表是存储在本地还是云端?
A2:默认存储在本地设备的安全存储区,保障设备信息不泄露;若需多设备共享可信列表,可结合开源鸿蒙分布式数据服务实现列表同步。
Q3:支持多少台设备同时组网?
A3:理论上支持无限制设备组网,实际数量取决于主设备的性能与网络带宽;在智能家居场景中,建议组网设备不超过 20 台,以保障连接稳定性。
Q4:设备连接的延迟是多少?
A4:在局域网环境下,无感连接的延迟通常低于 500ms;采用 NFC 协议连接时,延迟可控制在 100ms 以内,实现极速配对。
八、结语
分布式设备发现与连接是开源鸿蒙全场景生态的基石,也是实现多设备协同的必经之路。本文提出的 "自动发现、无感连接、动态管理、可信认证" 四大核心方案,基于开源鸿蒙的分布式软总线与设备管理能力,结合 Flutter 的跨端开发优势,构建了一套完整的分布式设备协同管理体系。
相比于传统设备连接方案,本方案的核心优势在于 **"无感" 与 "安全"**------ 自动扫描发现设备,一键无感配对连接,实时监控设备状态,仅允许可信设备接入,极大降低了用户的操作门槛,提升了分布式组网的安全性与稳定性。在智能家居、智慧办公、车机互联等场景中,该方案能够有效支撑多设备协同的基础能力,为上层应用开发提供可靠保障。
未来,随着开源鸿蒙生态的持续完善,分布式设备连接技术将向 **"零配置组网" 与 "跨地域协同"** 方向演进 ------ 设备通电后自动加入网络,无需任何手动操作;结合 5G / 边缘计算技术,实现跨地域设备的低延迟协同。同时,AI 技术的融入将实现设备连接的智能调度,根据用户场景自动优化设备连接策略。
对于开发者而言,掌握分布式设备发现与连接技术,是构建全场景分布式应用的第一步。后续我们还将探讨 "分布式设备能力虚拟化""跨设备服务调用" 等进阶主题,敬请关注!
欢迎大家加入开源鸿蒙跨平台开发者社区(https://openharmonycrossplatform.csdn.net),一起共建开源鸿蒙跨平台生态。