使用 Google ADK 创建你的第一个 AI Agent
- [Google ADK](#Google ADK)
- [1️⃣ 安装 ADK](#1️⃣ 安装 ADK)
- [2️⃣ 创建 ADK 项目](#2️⃣ 创建 ADK 项目)
- [3️⃣ 编写你的第一个 Agent(可调用工具)](#3️⃣ 编写你的第一个 Agent(可调用工具))
- [4️⃣ 配置模型访问:两种方式](#4️⃣ 配置模型访问:两种方式)
-
- [A)方式 1:使用 GOOGLE_API_KEY(开发者模式)](#A)方式 1:使用 GOOGLE_API_KEY(开发者模式))
- [B)方式 2:通过公司 Gateway / Proxy 访问(企业模式)](#B)方式 2:通过公司 Gateway / Proxy 访问(企业模式))
- [5️⃣ 运行你的 Agent](#5️⃣ 运行你的 Agent)
-
- [方式 A:在终端与 Agent 对话](#方式 A:在终端与 Agent 对话)
- [方式 B:通过 Web UI(可视化)](#方式 B:通过 Web UI(可视化))
- [6️⃣ 完整流程回顾(你现在已经做到了)](#6️⃣ 完整流程回顾(你现在已经做到了))
《AI - AI Agent 是什么?为什么最近这么火?》介绍了有关 AI Agent 的基本概念,本篇文章将带你从零开始,构建一个最基础、可运行、能调用工具的 AI Agent。
阅读完本文,你将能够:
✔ 安装 ADK
✔ 创建一个最简单的 Agent
✔ 让 Agent 调用你的 Python 工具函数
✔ 用 CLI 与 Web UI 与 Agent 对话
✔ 正确配置 GOOGLE_API_KEY
✔ 在企业环境下通过自定义 Proxy 访问模型(含 LiteLLM 配置要点)
Google ADK
Google ADK(Agent Development Kit)是 Google 推出的用于开发和部署 AI Agents 的灵活,模块化框架,使得 AI Agents 开发更像软件开发,从而帮助开发者更轻松地构建:
- 可调用工具(tool)的 Agent
- 支持规划(planning)的多步骤 Agent
- 多 Agent 协作系统
- 可执行代码的 Agent
- 与企业基础设施集成的高级 Agent
1️⃣ 安装 ADK
请确保你的 Python 是 3.11 及以上版本,推荐使用虚拟环境:
bash
python -m venv .venv
source .venv/bin/activate   # macOS / Linux
# 或者
.venv\Scripts\activate.ps1  # Windows PowerShell
安装 ADK:
bash
pip install google-adk2️⃣ 创建 ADK 项目
运行:
bash
adk create my_agent结构如下:
r
my_agent/
  agent.py       # main agent code
  __init__.py
.env # API keys or project IDs最关键文件就是:agent.py
3️⃣ 编写你的第一个 Agent(可调用工具)
我们实现一个最简单的"时间助手":输入城市 → 调用工具函数 → 返回时间。
编辑 agent.py:
python
from google.adk.agents.llm_agent import Agent

# Mock tool implementation
def get_current_time(city: str) -> dict:
    """Returns the current time in a specified city."""
    return {"status": "success", "city": city, "time": "10:30 AM"}

root_agent = Agent(
    model='gemini-3-pro-preview',
    name='root_agent',
    description="Tells the current time in a specified city.",
    instruction="You are a helpful assistant that tells the current time in cities. Use the 'get_current_time' tool for this purpose.",
    tools=[get_current_time],
)
这个 Agent 已经具备:
-
LLM 能力(通过模型 gemini-3-pro-preview)
-
自动判断何时调用工具 get_current_time
-
引导式角色指令(instruction)
-
稳定且可扩展的 Agent 框架结构
4️⃣ 配置模型访问:两种方式
模型访问方式是本篇的重点之一,因为工程实践中会遇到两种完全不同的环境:
A)方式 1:使用 GOOGLE_API_KEY(开发者模式)
在 Google AI Studio 创建 Key, 把 Key 写进 .env 文件:
env
GOOGLE_API_KEY="你的 API Key"ADK 会自动读取这个 Key 并访问 Google 官方 API。
适用于:
-
个人开发
-
本地调试
-
原型验证(PoC)
B)方式 2:通过公司 Gateway / Proxy 访问(企业模式)
很多企业不允许代码直接访问 Google API,统一要求:
- 所有 API 调用必须走公司自己的 Gateway
- Gateway 负责流量审计、鉴权、计费、合规
- 应用只用访问内部安全域,例如 https://ai-proxy.mycompany.com/gemini
这种情况下:
❌ 你通常不会有 GOOGLE_API_KEY
✔ 你需要告诉 ADK:所有模型调用必须走企业 Proxy
ADK 是支持 LiteLLM Provider,只要你配置好"自定义模型 Provider"。
工作方式是:你的 Agent → 公司 Gateway → Google Gemini API
🔧 企业 Proxy 配置(最关键的两行)
python
import litellm
litellm.use_litellm_proxy = True
启用 use_litellm_proxy, LiteLLM 才会认为:
"开发者要我走自定义网关,而不是默认模型 vendor 的 API。"
如果不启用 use_litellm_proxy,LiteLLM 会继续默认访问 Google 官方 API,而不是你的 Proxy。
LiteLLM 默认有自动路由策略:
| 模型名 | 默认访问位置 |
|---|---|
| "gpt-4o" | 连接 OpenAI 官方 |
| "gemini-2.0-flash" | 连接 Google 官方 |
| "claude-3" | 连接 Anthropic 官方 |
env 文件配置:
env
# Model access endpoints configurations
AI_GATEWAY_ENDPOINT="your company proxy endpoint"
AI_GATEWAY_TENANT_KEY="your company tenant key"
AGENT_MODEL = "your model"完整示例(agent.py):
python
from google.adk.agents.llm_agent import Agent
from google.adk.models.lite_llm import LiteLlm
import os
import litellm

# Use LN proxy so provider is inferred by gateway
litellm.use_litellm_proxy = True

# Mock tool implementation
def get_current_time(city: str) -> dict:
    """Returns the current time in a specified city."""
    return {"status": "success", "city": city, "time": "10:30 AM"}

endpoint = os.getenv("AI_GATEWAY_ENDPOINT")
tenant_key = os.getenv("AI_GATEWAY_TENANT_KEY")
modle = os.getenv("AGENT_MODEL")

proxy_model = LiteLlm(
    model = modle,
    api_base = endpoint,
    api_key = tenant_key
)

root_agent = Agent(
    model=proxy_model,
    name='root_agent',
    description="Tells the current time in a specified city.",
    instruction="You are a helpful assistant that tells the current time in cities. Use the 'get_current_time' tool for this purpose.",
    tools=[get_current_time],
)
这种方式适用于:
- 企业内网环境
- 合规要求不能外网访问
- Proxy 会统一鉴权与限流
- 企业使用多种 LLM(OpenAI / Gemini / Claude)
5️⃣ 运行你的 Agent
方式 A:在终端与 Agent 对话
bash
adk run my_agentuser: 用户输入
root_agent:来自 Agent 的响应
bash
PS C:\xxxx\my_agents> adk run my_agent
Log setup complete: C:\Users\xxxx\AppData\Local\Temp\agents_log\agent.20251215_184832.log
To access latest log: tail -F C:\Users\xxxx\AppData\Local\Temp\agents_log\agent.20251215_184832.log
C:\Users\xxxx\AppData\Local\Programs\Python\Python311\Lib\site-packages\google\adk\cli\cli.py:155: UserWarning: [EXPERIMENTAL] InMemoryCredentialService: This feature is experimental and may change or be removed in future versions without notice. It may introduce breaking changes at any time.
credential_service = InMemoryCredentialService()
C:\Users\xxxx\AppData\Local\Programs\Python\Python311\Lib\site-packages\google\adk\auth\credential_service\in_memory_credential_service.py:33: UserWarning: [EXPERIMENTAL] BaseCredentialService: This feature is experimental and may change or be removed in future versions without notice. It may introduce breaking changes at any time.
super().__init__()
Running agent root_agent, type exit to exit.
[user]: hi
18:48:49 - LiteLLM:INFO: utils.py:3419 -
LiteLLM completion() model= OpenAI_gpt-4o-xxxx; provider = litellm_proxy
[root_agent]: Hello! How can I assist you today?
[user]: what can you do for me
18:49:02 - LiteLLM:INFO: utils.py:3419 -
LiteLLM completion() model= OpenAI_gpt-4o-xxxx; provider = litellm_proxy
[root_agent]: I can tell you the current time in any city around the world! Just let me know the city you'd like to know the time for.
[user]: shanghai
18:49:09 - LiteLLM:INFO: utils.py:3419 -
LiteLLM completion() model= OpenAI_gpt-4o-xxxx; provider = litellm_proxy
18:49:10 - LiteLLM:INFO: utils.py:3419 -
LiteLLM completion() model= OpenAI_gpt-4o-xxxx; provider = litellm_proxy
[root_agent]: The current time in Shanghai is 10:30 AM.
[user]: beijing
18:49:16 - LiteLLM:INFO: utils.py:3419 -
LiteLLM completion() model= OpenAI_gpt-4o-xxxx; provider = litellm_proxy
18:49:17 - LiteLLM:INFO: utils.py:3419 -
LiteLLM completion() model= OpenAI_gpt-4o-xxxx; provider = litellm_proxy
[root_agent]: The current time in Beijing is also 10:30 AM.
[user]: 你能用中文告诉我上海现在几点了?
18:49:57 - LiteLLM:INFO: utils.py:3419 -
LiteLLM completion() model= OpenAI_gpt-4o-xxxx; provider = litellm_proxy
[root_agent]: 上海现在是上午10:30。
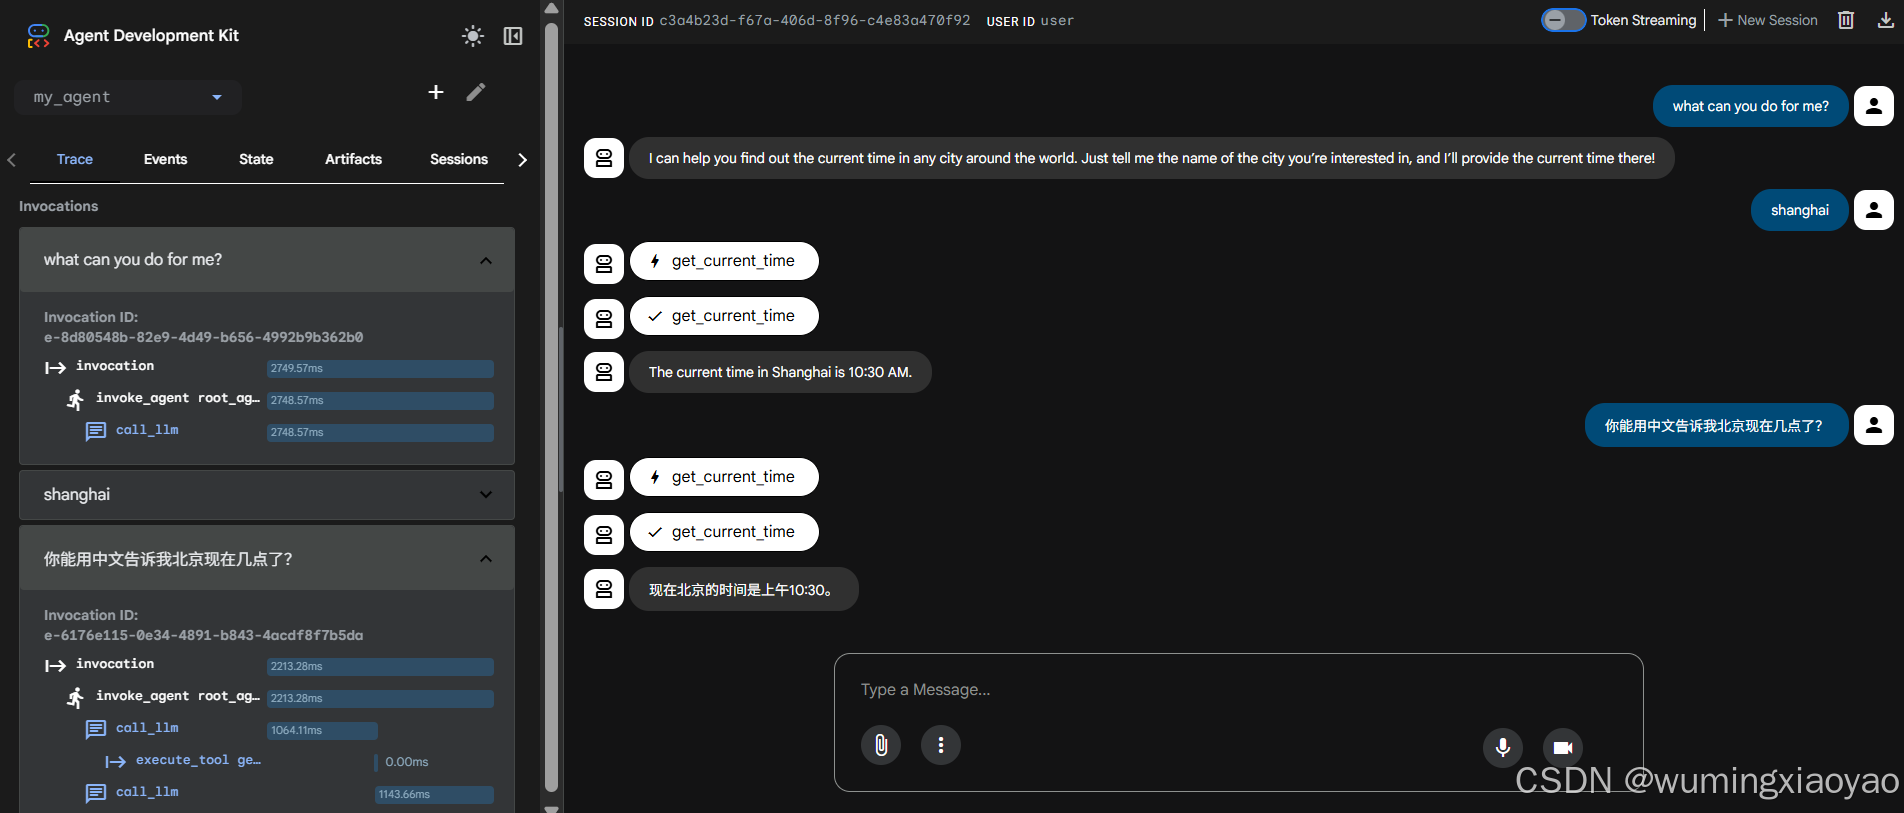
[user]: 方式 B:通过 Web UI(可视化)
在 my_agent 的父目录 运行:
python
adk web --port 8001注意:如果 8001 端口号被其他程序在使用,需要换过一个没有在使用的的端口号。

打开浏览器访问:http://localhost:8001 或 http://127.0.0.1:8001
选择 my_agent,即可像对话应用一样与 Agent 聊天。
Web UI 非常适合开发调试,但不适合生产部署。
6️⃣ 完整流程回顾(你现在已经做到了)
你已经成功完成:
✔ 创建 ADK 项目
✔ 写一个可调用 Python 工具的 Agent
✔ 配置模型访问(GOOGLE_API_KEY / 企业 Proxy 两种模式)
✔ 通过 CLI 和 Web UI 与 Agent 对话
✔ 理解了 LiteLLM 代理模式的关键属性:
bash
litellm.use_litellm_proxy = True这是大量工程师会忽略的隐藏点。