最近遇到了snmp引擎id冲突的问题,当所管理交换机之间引擎id冲突的时候,全局用户列表(struct usmUser *puserList)和(struct enginetime_struct etimelist)会有问题。网上针对这块的资料少之又少,so 在此记录下gdb调试以及阅读net-snmp源码所得出来的【关于net-snmp中engineid冲突时全局etimelist的赋值情况】,如有错误敬请指出!
一、表结构(enginetime_struct)
objectivec
typedef struct enginetime_struct {
        u_char         *engineID;
        u_int           engineID_len;

        u_int           engineTime;
        u_int           engineBoot;
        /*
         * Time & boots values received from last authenticated
         * *   message within the previous time window.
         */

        time_t          lastReceivedEngineTime;
        /*
         * Timestamp made when engineTime/engineBoots was last
         * *   updated.  Measured in seconds.
         */

#ifdef LCD_TIME_SYNC_OPT
        u_int           authenticatedFlag;
#endif
        struct enginetime_struct *next;
    } enginetime   , *Enginetime;
(1)engineID:是设备唯一标识,可以认为是snmpv3通信中设备的身份证,必须是全网唯一的,在rfc3414、rfc3411均有相关信息(可自行查询)
(2)engineBoot:是设备snmp重启的次数
(3)engineTime:是设备snmp启动后的相对时间(误差在USM_TIME_WINDOW 150s,详情可见usm_check_and_update_timeliness函数中有判断)
objectivec
/*
 * Boots is ok, see if the boots is the same but the time
 * is old.
 */
if (theirBoots == boots_uint && time_uint < theirLastTime) {
    if (time_difference > USM_TIME_WINDOW) {
            DEBUGMSGTL(("usm", "%s\n", "Message too old."));
            *error = SNMPERR_USM_NOTINTIMEWINDOW;
            return -1;
    }

    else {    /* Old, but acceptable */

            *error = SNMPERR_SUCCESS;
            return 0;
    }
}
(4)lastReceivedEngineTime:记录上次接受到的用于计算窗口时间差值是否在150s以内
(5)authenticatedFlag:是否是权威引擎ID(正常认证通过才算,看了下只有在执行完usm_check_and_update_timeliness()检查通过之后才会更新的是否将此值设置为True)
objectivec
usm_process_in_msg函数内部调用:(snmpusm.c)
        /*
         * Perform the timeliness/time manager functions.
         */
        if (secLevel == SNMP_SEC_LEVEL_AUTHNOPRIV
            || secLevel == SNMP_SEC_LEVEL_AUTHPRIV) {
            if (usm_check_and_update_timeliness(secEngineID, *secEngineIDLen,
                                            boots_uint, time_uint,
                                            &error) == -1) {
                goto err;
            }
        }

usm_check_and_update_timeliness函数内部调用:(snmpusm.c)
        /*
         * Message is ok, either boots has been advanced, or
         * time is greater than before with the same boots.
         */

        if (set_enginetime(secEngineID, secEngineIDLen,
                           boots_uint, time_uint, TRUE)
            != SNMPERR_SUCCESS) {
            DEBUGMSGTL(("usm", "%s\n",
                        "Failed updating remote boot/time."));
            *error = SNMPERR_USM_GENERICERROR;
            return -1;
        }
二、引擎ID探测过程梳理
2.1 会话设置(session.flags)
snmp_sess_init()函数是初始化一个session,里面的flags初始化是设置的不自动探测引擎ID,当我们使用snmpv3的时候,如果没有取消这个flags,snmp_open是就不会执行探测引擎ID操作,此操作将会在之后的实际工作中比如snmp_send的时候调用,因为snmp_open->snmp_sess_add结束的时候会将此flags清空掉。具体代码如下:
objectivec
snmp_sess_add_ex函数:(snmp_api.c)

    if (slp->session->version == SNMP_VERSION_3) {
        DEBUGMSGTL(("snmp_sess_add",
                    "adding v3 session -- maybe engineID probe now\n"));
        if (!snmpv3_engineID_probe(slp, slp->session)) {
            DEBUGMSGTL(("snmp_sess_add", "engine ID probe failed\n"));
            snmp_sess_close(slp);
            return NULL;
        }
    }

    slp->session->flags &= ~SNMP_FLAGS_DONT_PROBE;


snmpv3_engineID_probe代码:(snmp_api.c)

int snmpv3_engineID_probe(struct session_list *slp, netsnmp_session * in_session)
{
    netsnmp_session *session;
    int             status;
    struct snmp_secmod_def *sptr = NULL;

    if (slp == NULL || slp->session == NULL) {
        return 0;
    }

    session = slp->session;
    netsnmp_assert_or_return(session != NULL, 0);
    sptr = find_sec_mod(session->securityModel);

    /*
     * If we are opening a V3 session and we don't know engineID we must probe
     * it -- this must be done after the session is created and inserted in the
     * list so that the response can handled correctly.
     */

    if (session->version == SNMP_VERSION_3 &&
        (0 == (session->flags & SNMP_FLAGS_DONT_PROBE))) {
        if (NULL != sptr && NULL != sptr->probe_engineid) {
            DEBUGMSGTL(("snmp_api", "probing for engineID using security model callback...\n"));
            /* security model specific mechanism of determining engineID */
            status = (*sptr->probe_engineid) (slp, in_session);
            if (status != SNMPERR_SUCCESS)
                return 0;
        } else {
            /* XXX: default to the default RFC5343 contextEngineID Probe? */
            return 0;
        }
    }

    /*
     * see if there is a hook to call now that we're done probing for an
     * engineID
     */
    if (sptr && sptr->post_probe_engineid) {
        status = (*sptr->post_probe_engineid)(slp, in_session);
        if (status != SNMPERR_SUCCESS)
            return 0;
    }

    return 1;
}
2.2 回调注册(snmpsm_init.h)
程序初始化都会调用init_snmp,此函数调用了init_snmpv3函数,这是初始化snmpv3相关内容的,其中init_secmod()函数内部的(#include "snmpsm_init.h")是通过configure生成的头文件,里面会注册回调函数:decode、probe_engineid、post_probe_engineid等。
objectivec
init_snmp
    init_snmpv3
        init_secmod
            #include "snmpsm_init.h"(由configure生成)


以下是net-snmp代码内容:

void init_secmod(void)
{
    snmp_register_callback(SNMP_CALLBACK_LIBRARY,
                           SNMP_CALLBACK_SESSION_INIT, set_default_secmod,
                           NULL);

    netsnmp_ds_register_config(ASN_OCTET_STR, "snmp", "defSecurityModel",
			       NETSNMP_DS_LIBRARY_ID, NETSNMP_DS_LIB_SECMODEL);
    /*
     * this file is generated by configure for all the stuff we're using
     */
#include "snmpsm_init.h"
}
2.3 探测流程
2.3.1 调用探测
- 初始化会话:snmp_sess_init() ==> session->flags &= ~SNMP_FLAGS_DONT_PROBE
- 打开会话:snmp_open ==> snmp_sess_open ==> _sess_open
- 添加会话:snmp_sess_add ==> snmp_sess_add_ex
- 探测引擎ID:snmpv3_engineID_probe
- 探测引擎ID:sptr->probe_engineid(snmpusm: usm_discover_engineid)
- 添加userlist:sptr->post_probe_engineid(usm_create_user_from_session_hook)
2.3.2 探测流程
- usm_discover_engineid
- 生成空pdu请求:usm_build_probe_pdu
- 同步探测:snmp_sess_synch_response
- 发送请求:snmp_sess_send
- 接收请求:snmp_sess_read2 ==> _sess_read
- 处理数据包:_sess_process_packet
- 将数据包解析为协议数据单元pdu:_sess_process_packet_parse_pdu
- _snmp_parse
- snmpv3_parse
- 解析msgGlobalData
- 解码&验证传入数据:回调函数decode(usm_process_in_msg)
- 解析安全参数:usm_parse_security_parameters
- 如果需要认证或加密:usm_check_and_update_timeliness(重点)
- 如果不需要认证加密:set_enginetime(重点)
- snmpv3_parse
- _snmp_parse
- 处理协议数据单元&调用回调函数:_sess_process_packet_handle_pdu
- 会调用我们注册的回调函数session.callbback
- 后序步骤省略(本文重点不在介绍此处...)
三、设置etimelist过程梳理(介绍前面两处重点)
objectivec
    /*
     * Perform the timeliness/time manager functions.
     */
    if (secLevel == SNMP_SEC_LEVEL_AUTHNOPRIV
        || secLevel == SNMP_SEC_LEVEL_AUTHPRIV) {
        if (usm_check_and_update_timeliness(secEngineID, *secEngineIDLen,
                                            boots_uint, time_uint,
                                            &error) == -1) {
            goto err;
        }
    }
#ifdef							LCD_TIME_SYNC_OPT
    /*
     * Cache the unauthenticated time to use in case we don't have
     * anything better - this guess will be no worse than (0,0)
     * that we normally use.
     */
    else {
        set_enginetime(secEngineID, *secEngineIDLen,
                       boots_uint, time_uint, FALSE);
    }
#endif /* LCD_TIME_SYNC_OPT */当我们发送空pdu进行触发设备响应其引擎id、启动次数、窗口时间时,以及探测过程中设置的认证和加密不对的时候,交换机返回的响应包里面secLeavel都是1(详情见下图 ),也就是noauthnopriv,所以一定进入的是set_enginetime(),传入的最后一个参数为FALSE,意味着此窗口时间不是权威的。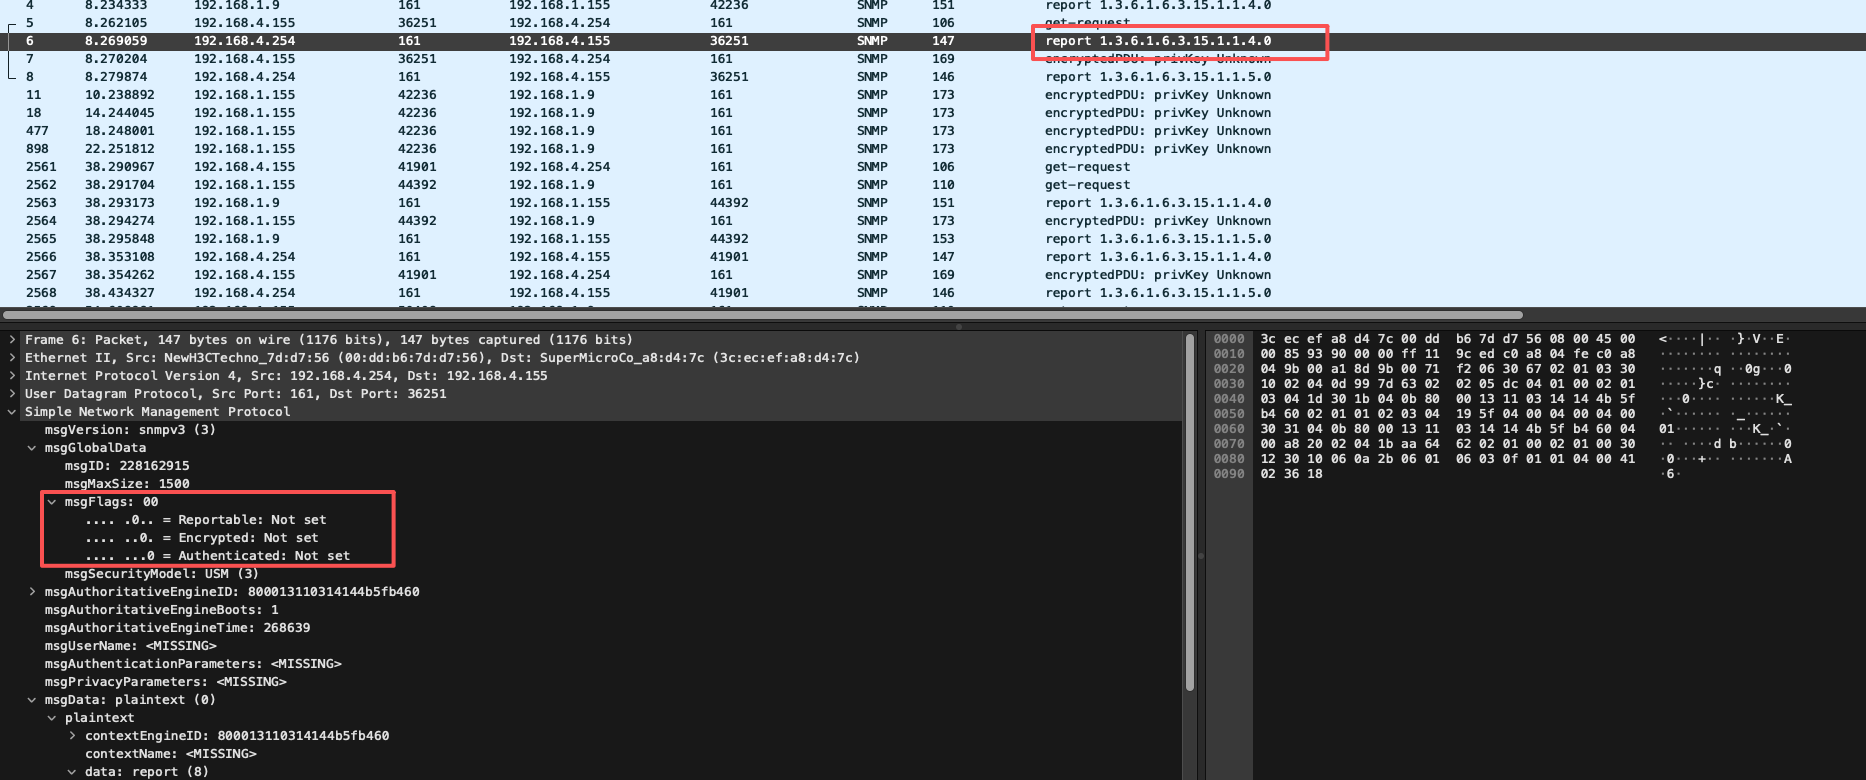
3.1 情形一:引擎冲突设备全部认证加密密码不对
当所有设备都没有认证通过时,意味着这些设备不是权威的,参见之前set_enginetime函数我们可以知道,if (authenticated || !e->authenticatedFlag) 判断条件一定为true,结果就是,此冲突engineid对应的engineboot和enginetime一直在被覆盖,而且下一台设备请求的时候会使用上次覆盖的boot和time值。
3.2 情形二:引擎冲突设备部分认证加密密码是对的
当部分设备已经认证信息是正确的时,也就意味着此冲突engineid的authenticatedFlag为1,那么认证不通过的设备无论响应什么值都不会再被认可,而认证通过的设备则通过usm_check_and_update_timeliness函数调用的set_enginetime(),传入的事TRUE,所以这些设备之间会相互覆盖engineboot和enginetime值。(PS:对于认证通过的设备,究竟哪一台会胜出,我们在情况三中统一说明)
3.3 情形三:引擎冲突设备认证加密密码全部是对的
当全部引擎ID冲突设备的认证和加密信息都正确时,那么这些设备之间会相互覆盖engineboot和enginetime值,但,究竟谁会胜出呢?如果一直相互覆盖,那所有设备联动状态都是异常的了,而实际联动过程中会发现总会有一台是联动正常的。下面我们看net-snmp代码:
objectivec
int usm_create_user_from_session(netsnmp_session * session)
{
    struct usmUser *user;
    int             user_just_created = 0;
    char *cp;

    /*
     * - don't create-another/copy-into user for this session by default
     * - bail now (no error) if we don't have an engineID
     */
    if (SNMP_FLAGS_USER_CREATED == (session->flags & SNMP_FLAGS_USER_CREATED) ||
        session->securityModel != SNMP_SEC_MODEL_USM ||
        session->version != SNMP_VERSION_3 ||
        session->securityNameLen == 0 ||
        session->securityEngineIDLen == 0)
        return SNMPERR_SUCCESS;

    DEBUGMSGTL(("usm", "no flag defined...  continuing\n"));
    session->flags |= SNMP_FLAGS_USER_CREATED;

    /*
     * now that we have the engineID, create an entry in the USM list
     * for this user using the information in the session
     */
    user = usm_get_user_from_list(session->securityEngineID,
                                  session->securityEngineIDLen,
                                  session->securityName,
                                  usm_get_userList(), 0);
    if (NULL != user) {
        DEBUGMSGTL(("usm", "user exists x=%p\n", user));
    } else {
        if (usm_build_user(&user, session) != SNMPERR_SUCCESS)
            return SNMPERR_GENERR;
        user_just_created = 1;
    }

    /*
     * copy the auth protocol
     */
    if (user->authProtocol == NULL && session->securityAuthProto != NULL) {
        SNMP_FREE(user->authProtocol);
        user->authProtocol =
            snmp_duplicate_objid(session->securityAuthProto,
                                 session->securityAuthProtoLen);
        if (user->authProtocol == NULL) {
            usm_free_user(user);
            return SNMPERR_GENERR;
        }
        user->authProtocolLen = session->securityAuthProtoLen;
    }

    /*
     * copy the priv protocol
     */
    if (user->privProtocol == NULL && session->securityPrivProto != NULL) {
        SNMP_FREE(user->privProtocol);
        user->privProtocol =
            snmp_duplicate_objid(session->securityPrivProto,
                                 session->securityPrivProtoLen);
        if (user->privProtocol == NULL) {
            usm_free_user(user);
            return SNMPERR_GENERR;
        }
        user->privProtocolLen = session->securityPrivProtoLen;
    }

    /*
     * copy in the authentication Key.  If not localized, localize it
     */
    if (user->authKey == NULL) {
        if (session->securityAuthLocalKey != NULL
            && session->securityAuthLocalKeyLen != 0) {
            /* already localized key passed in.  use it */
            SNMP_FREE(user->authKey);
            user->authKey = netsnmp_memdup(session->securityAuthLocalKey,
                                           session->securityAuthLocalKeyLen);
            if (!user->authKey) {
                usm_free_user(user);
                return SNMPERR_GENERR;
            }
            user->authKeyLen = session->securityAuthLocalKeyLen;
        } else if (session->securityAuthKeyLen != 0) {
            SNMP_FREE(user->authKey);
            user->authKey = (u_char *) calloc(1, USM_LENGTH_KU_HASHBLOCK);
            user->authKeyLen = USM_LENGTH_KU_HASHBLOCK;
            if ((user->authKey == NULL) ||
                generate_kul(user->authProtocol, user->authProtocolLen,
                             user->engineID, user->engineIDLen,
                             session->securityAuthKey,
                             session->securityAuthKeyLen, user->authKey,
                             &user->authKeyLen) != SNMPERR_SUCCESS) {
                usm_free_user(user);
                return SNMPERR_GENERR;
            }
        } else if ((cp = netsnmp_ds_get_string(NETSNMP_DS_LIBRARY_ID,
                                               NETSNMP_DS_LIB_AUTHLOCALIZEDKEY))) {
            size_t buflen = USM_AUTH_KU_LEN;
            SNMP_FREE(user->authKey);
            user->authKey = (u_char *)malloc(buflen); /* max length needed */
            user->authKeyLen = 0;
            /* it will be a hex string */
            if ((NULL == user->authKey) ||
                !snmp_hex_to_binary(&user->authKey, &buflen, &user->authKeyLen,
                                    0, cp)) {
                usm_free_user(user);
                return SNMPERR_GENERR;
            }
        }
    }

    /*
     * copy in the privacy Key.  If not localized, localize it
     */
    if (user->privKey == NULL) {
        /** save buffer size in case we need to extend key */
        int keyBufSize = USM_PRIV_KU_LEN;

        DEBUGMSGTL(("usm", "copying privKey\n"));
        if (session->securityPrivLocalKey != NULL
            && session->securityPrivLocalKeyLen != 0) {
            /* already localized key passed in.  use it */
            SNMP_FREE(user->privKey);
            user->privKey = netsnmp_memdup(session->securityPrivLocalKey,
                                           session->securityPrivLocalKeyLen);
            if (!user->privKey) {
                usm_free_user(user);
                return SNMPERR_GENERR;
            }
            keyBufSize = user->privKeyLen = session->securityPrivLocalKeyLen;
        } else if (session->securityPrivKeyLen != 0) {
            SNMP_FREE(user->privKey);
            user->privKey = (u_char *) calloc(1, keyBufSize);
            user->privKeyLen = keyBufSize;
            if ((user->privKey == NULL) ||
                generate_kul(user->authProtocol, user->authProtocolLen,
                             user->engineID, user->engineIDLen,
                             session->securityPrivKey,
                             session->securityPrivKeyLen, user->privKey,
                             &user->privKeyLen) != SNMPERR_SUCCESS) {
                usm_free_user(user);
                return SNMPERR_GENERR;
            }
        } else if ((cp = netsnmp_ds_get_string(NETSNMP_DS_LIBRARY_ID,
                                               NETSNMP_DS_LIB_PRIVLOCALIZEDKEY))) {
            size_t buflen = keyBufSize;
            user->privKey = (u_char *)malloc(buflen); /* max length needed */
            user->privKeyLen = 0;
            /* it will be a hex string */
            if ((NULL == user->privKey) ||
                !snmp_hex_to_binary(&user->privKey, &buflen, &user->privKeyLen,
                                    0, cp)) {
                usm_free_user(user);
                return SNMPERR_GENERR;
            }
        }
        if (usm_extend_user_kul(user, keyBufSize) != SNMPERR_SUCCESS) {
            usm_free_user(user);
            return SNMPERR_GENERR;
        }
    }

    if (user_just_created) {
        /*
         * add the user into the database
         */
        user->userStatus = RS_ACTIVE;
        user->userStorageType = ST_READONLY;
        usm_add_user(user);
    }
    DEBUGMSGTL(("9:usm", "user created\n"));

    return SNMPERR_SUCCESS;


}
当探测引擎ID完成之后,post_probe_engineid函数会调用usm_create_user_from_session_hook,基于当前session配置的认证账号密码生成authkey和privkey,并且create user加入到全局的puserlist中。而我们之前提过解包的时候decode回调函数(usm_process_in_msg),这个函数内部在set_enginetime之前,有两个步骤至关重要:
(1)基于引擎ID获取全局userlist中的用户信息usm_get_user_from_list
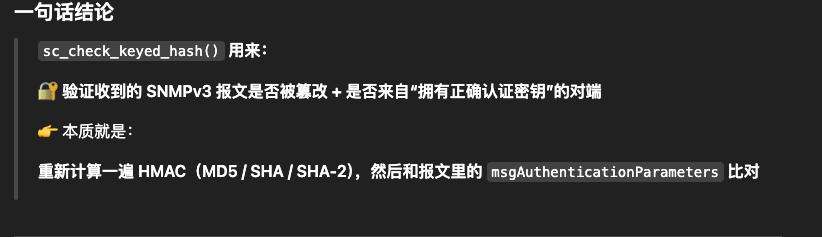
(2)调用sc_check_keyed_hash函数基于获取的puser进行校验,以下为解释:
至此我相信大家也就看出问题了吧,认证和加密信息正确的情况下,谁第一个探测完并且将信息加入到全局的userlist,谁就胜出成为那台联动成功的设备了。此处虽然介绍的是收包解析,但发包的时候也是如此,也是使用userlist中的authkey和privkey来加密数据,而剩余的设备要么收包后校验失败,要么因为使用错误的authkey和privkey去向设备请求信息导致认证失败。
3.4 情形四:引擎冲突设备认证加密密码全部是对的&密码一致
当认证加密密码一致的时候,就不会存在情况三中的解包或者发包校验问题,但会检查窗口时间。当全部联动成功&认证加密一致的时候,engineboot和enginetime会覆盖,但不是相互覆盖,而是采用递增覆盖的方式,最大的会胜出,小的会报错SNMPERR_USM_NOTINTIMEWINDOW。
详情看usm_check_and_update_timeliness里面的代码逻辑:
objectivec
        u_int           theirBoots, theirTime, theirLastTime;
        u_int           time_difference;

        if (get_enginetime_ex(secEngineID, secEngineIDLen,
                              &theirBoots, &theirTime,
                              &theirLastTime, TRUE)
            != SNMPERR_SUCCESS) {
            DEBUGMSGTL(("usm", "%s\n",
                        "Failed to get remote engine's times."));

            *error = SNMPERR_USM_GENERICERROR;
            return -1;
        }

        time_difference = theirTime > time_uint ?
            theirTime - time_uint : time_uint - theirTime;


        /*
         * XXX  Contrary to the pseudocode:
         *      See if boots is invalid first.
         */
        if (theirBoots == ENGINEBOOT_MAX || theirBoots > boots_uint) {
            DEBUGMSGTL(("usm", "%s\n", "Remote boot count invalid."));

            *error = SNMPERR_USM_NOTINTIMEWINDOW;
            return -1;
        }


        /*
         * Boots is ok, see if the boots is the same but the time
         * is old.
         */
        if (theirBoots == boots_uint && time_uint < theirLastTime) {
            if (time_difference > USM_TIME_WINDOW) {
                DEBUGMSGTL(("usm", "%s\n", "Message too old."));
                *error = SNMPERR_USM_NOTINTIMEWINDOW;
                return -1;
            }

            else {              /* Old, but acceptable */

                *error = SNMPERR_SUCCESS;
                return 0;
            }
        }


        /*
         * Message is ok, either boots has been advanced, or
         * time is greater than before with the same boots.
         */

        if (set_enginetime(secEngineID, secEngineIDLen,
                           boots_uint, time_uint, TRUE)
            != SNMPERR_SUCCESS) {
            DEBUGMSGTL(("usm", "%s\n",
                        "Failed updating remote boot/time."));
            *error = SNMPERR_USM_GENERICERROR;
            return -1;
        }

        *error = SNMPERR_SUCCESS;
        return 0;               /* Fresh message and time updated */

    }                           /* endif -- local or remote time reference. */
以上就是我的理解,如有不正确,欢迎大家指正,共同进步,谢谢!