1. 背景
bert_score是一个用于评估文本生成质量的Python库,基于预训练的BERT模型计算参考文本与生成文本之间的语义相似度。它通过比较两个文本的BERT嵌入向量来评估它们的匹配程度,比传统的n-gram匹配方法(如BLEU、ROUGE)更能捕捉语义层面的相似性。一般bert_score 是仅仅支持指定模型名称然后再代码实现里面从Hugging Face上面拉取模型。但是如果我们在有限制的网络环境中在线拉取模型就会失败,比较合适的解决办法就是先将模型下载到本地,然后给bert_score指定模型路径。
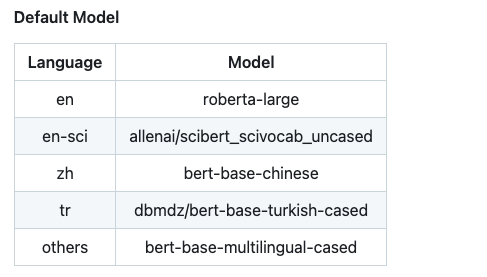
2. 支持的模型和语言
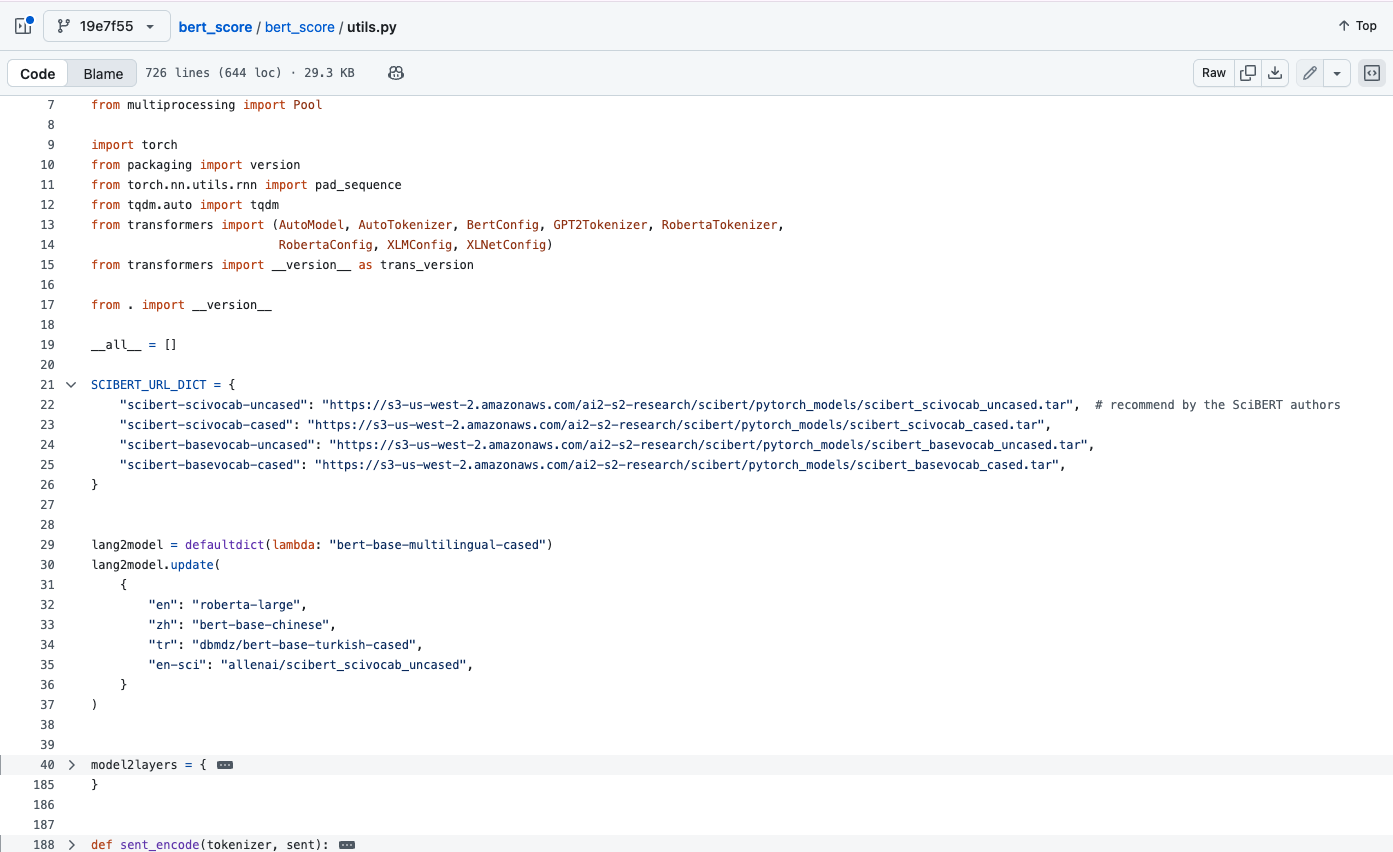
bert_score中通过model_type和lang两个参数来执行模型和对应的文本语言。
具体文档可以参考:https://github.com/Tiiiger/bert_score
python
from bert_score import score

candidates = ["The cat sits on the mat."]  # 生成文本
references = ["A cat is sitting on the rug."]  # 参考文本

# 计算BERTScore
P, R, F1 = score(candidates, references, model_type='roberta-large',lang="en")

print(f"Precision: {P.mean():.3f}, Recall: {R.mean():.3f}, F1: {F1.mean():.3f}")
3.支持本地模型的方法
3.1 修改源码
- 在score方法里面可以看到get_model和get_tokenizer两个方法

2.点进去可以看到对应函数的源码
python
def get_model(model_type, num_layers, all_layers=None):
    if model_type.startswith("scibert"):
        model = AutoModel.from_pretrained(cache_scibert(model_type))
    elif "t5" in model_type:
        from transformers import T5EncoderModel

        model = T5EncoderModel.from_pretrained(model_type)
    else:
        model = AutoModel.from_pretrained(model_type)
    model.eval()

    if hasattr(model, "decoder") and hasattr(model, "encoder"):
        model = model.encoder

    # drop unused layers
    # ......
    return model


def get_tokenizer(model_type, use_fast=False):
    if model_type.startswith("scibert"):
        model_type = cache_scibert(model_type)

    if version.parse(trans_version) >= version.parse("4.0.0"):
        tokenizer = AutoTokenizer.from_pretrained(model_type, use_fast=use_fast)
    else:
        assert not use_fast, "Fast tokenizer is not available for version < 4.0.0"
        tokenizer = AutoTokenizer.from_pretrained(model_type)

return tokenizer- 修改源码直接将我们的model_path硬编码进去,当然为了更好的适配性,可以将model_path做成一个可选参数,然后传递出去给score函数
python
def get_model(model_type, num_layers, all_layers=None):
    model_path = 'xxx'
    if model_type.startswith("scibert"):
        model = AutoModel.from_pretrained(cache_scibert(model_type))
    elif "t5" in model_type:
        from transformers import T5EncoderModel

        model = T5EncoderModel.from_pretrained(model_path)
    else:
        model = AutoModel.from_pretrained(model_path)
    model.eval()


def get_tokenizer(model_type, use_fast=False):
    if model_type.startswith("scibert"):
        model_type = cache_scibert(model_type)

    model_path = 'xxx'
    if version.parse(trans_version) >= version.parse("4.0.0"):
        tokenizer = AutoTokenizer.from_pretrained(model_path, use_fast=use_fast)
    else:
        assert not use_fast, "Fast tokenizer is not available for version < 4.0.0"
        tokenizer = AutoTokenizer.from_pretrained(model_path)

    return tokenizer
3.2 添加对应的num_layers参数
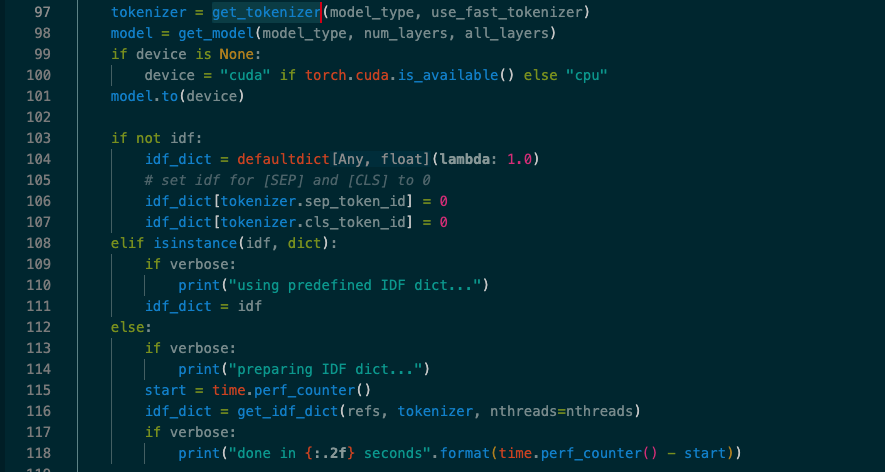
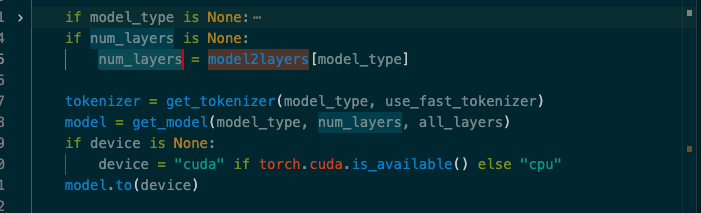
这里还有一种方法就是通过给model_type传递给本地模型所在的路径。同时传递num_layers参数来指定。
原因是因为其实Transformers里面的xxx.from_pretrained方法其实也是可以支持你配置本地路径来加载的,这里加载模型也不会有问题。但是在bert_score中他是需要提前知道层数来优化计算过程的。这里才是报错的原因。
 这一部分代码是在utils文件中。
python
def calculate_bert_score(original_text: str, polished_text: str, lang: str = "zh",model_type:str=None) -> float:
    try:
        # 使用bert_score计算F1分数
        score_params = {
            "verbose": False,
            "device": "cuda" if torch.cuda.is_available() else "cpu"
        }
        if model_type is None:
            score_params["model_type"] = BERT_MODEL_PATH #指定模型路径
            score_params["num_layers"] = BERT_BASE_CHINESE_NUM_LAYERS#执行模型层数(12)
        else:
            score_params["model_type"] = model_type
        P, R, F1 = score([polished_text], [original_text], **score_params)

        # 返回F1分数(转换为Python float)
        f1_score = F1.item() if hasattr(F1, 'item') else float(F1)
        return f1_score

    except Exception as e:
        print(f"计算bert_score时出错: {str(e)}")
        # 如果计算失败,返回一个默认值或者抛出异常
        raise