上学期线上课的课后作业,捣鼓了三天效果还是不咋滴。
总体思路就是,眼球与眼白具有明显的色觉差,瞳孔与虹膜也有较为明显的色觉差,就像PS抠图一样一下就能抠出来了,瞳孔与虹膜的圆心基本上处在一个位置,所以识别出瞳孔后(识别瞳孔其实我偷懒了,默认瞳孔就是纯黑色的),很容易根据圆心推算出瞳孔,在根据灰度梯度法识别推算半径,画出一个基本的虹膜外边界。代码稍微考虑了一下眼球得镜反射,还有眼角误识别等因素。不过由于是面向结果编程,所以识别率很差,基本就拿着调试的那几张图片还行。先放在这,万一之后我学会了,再来把这个作业完善一点。

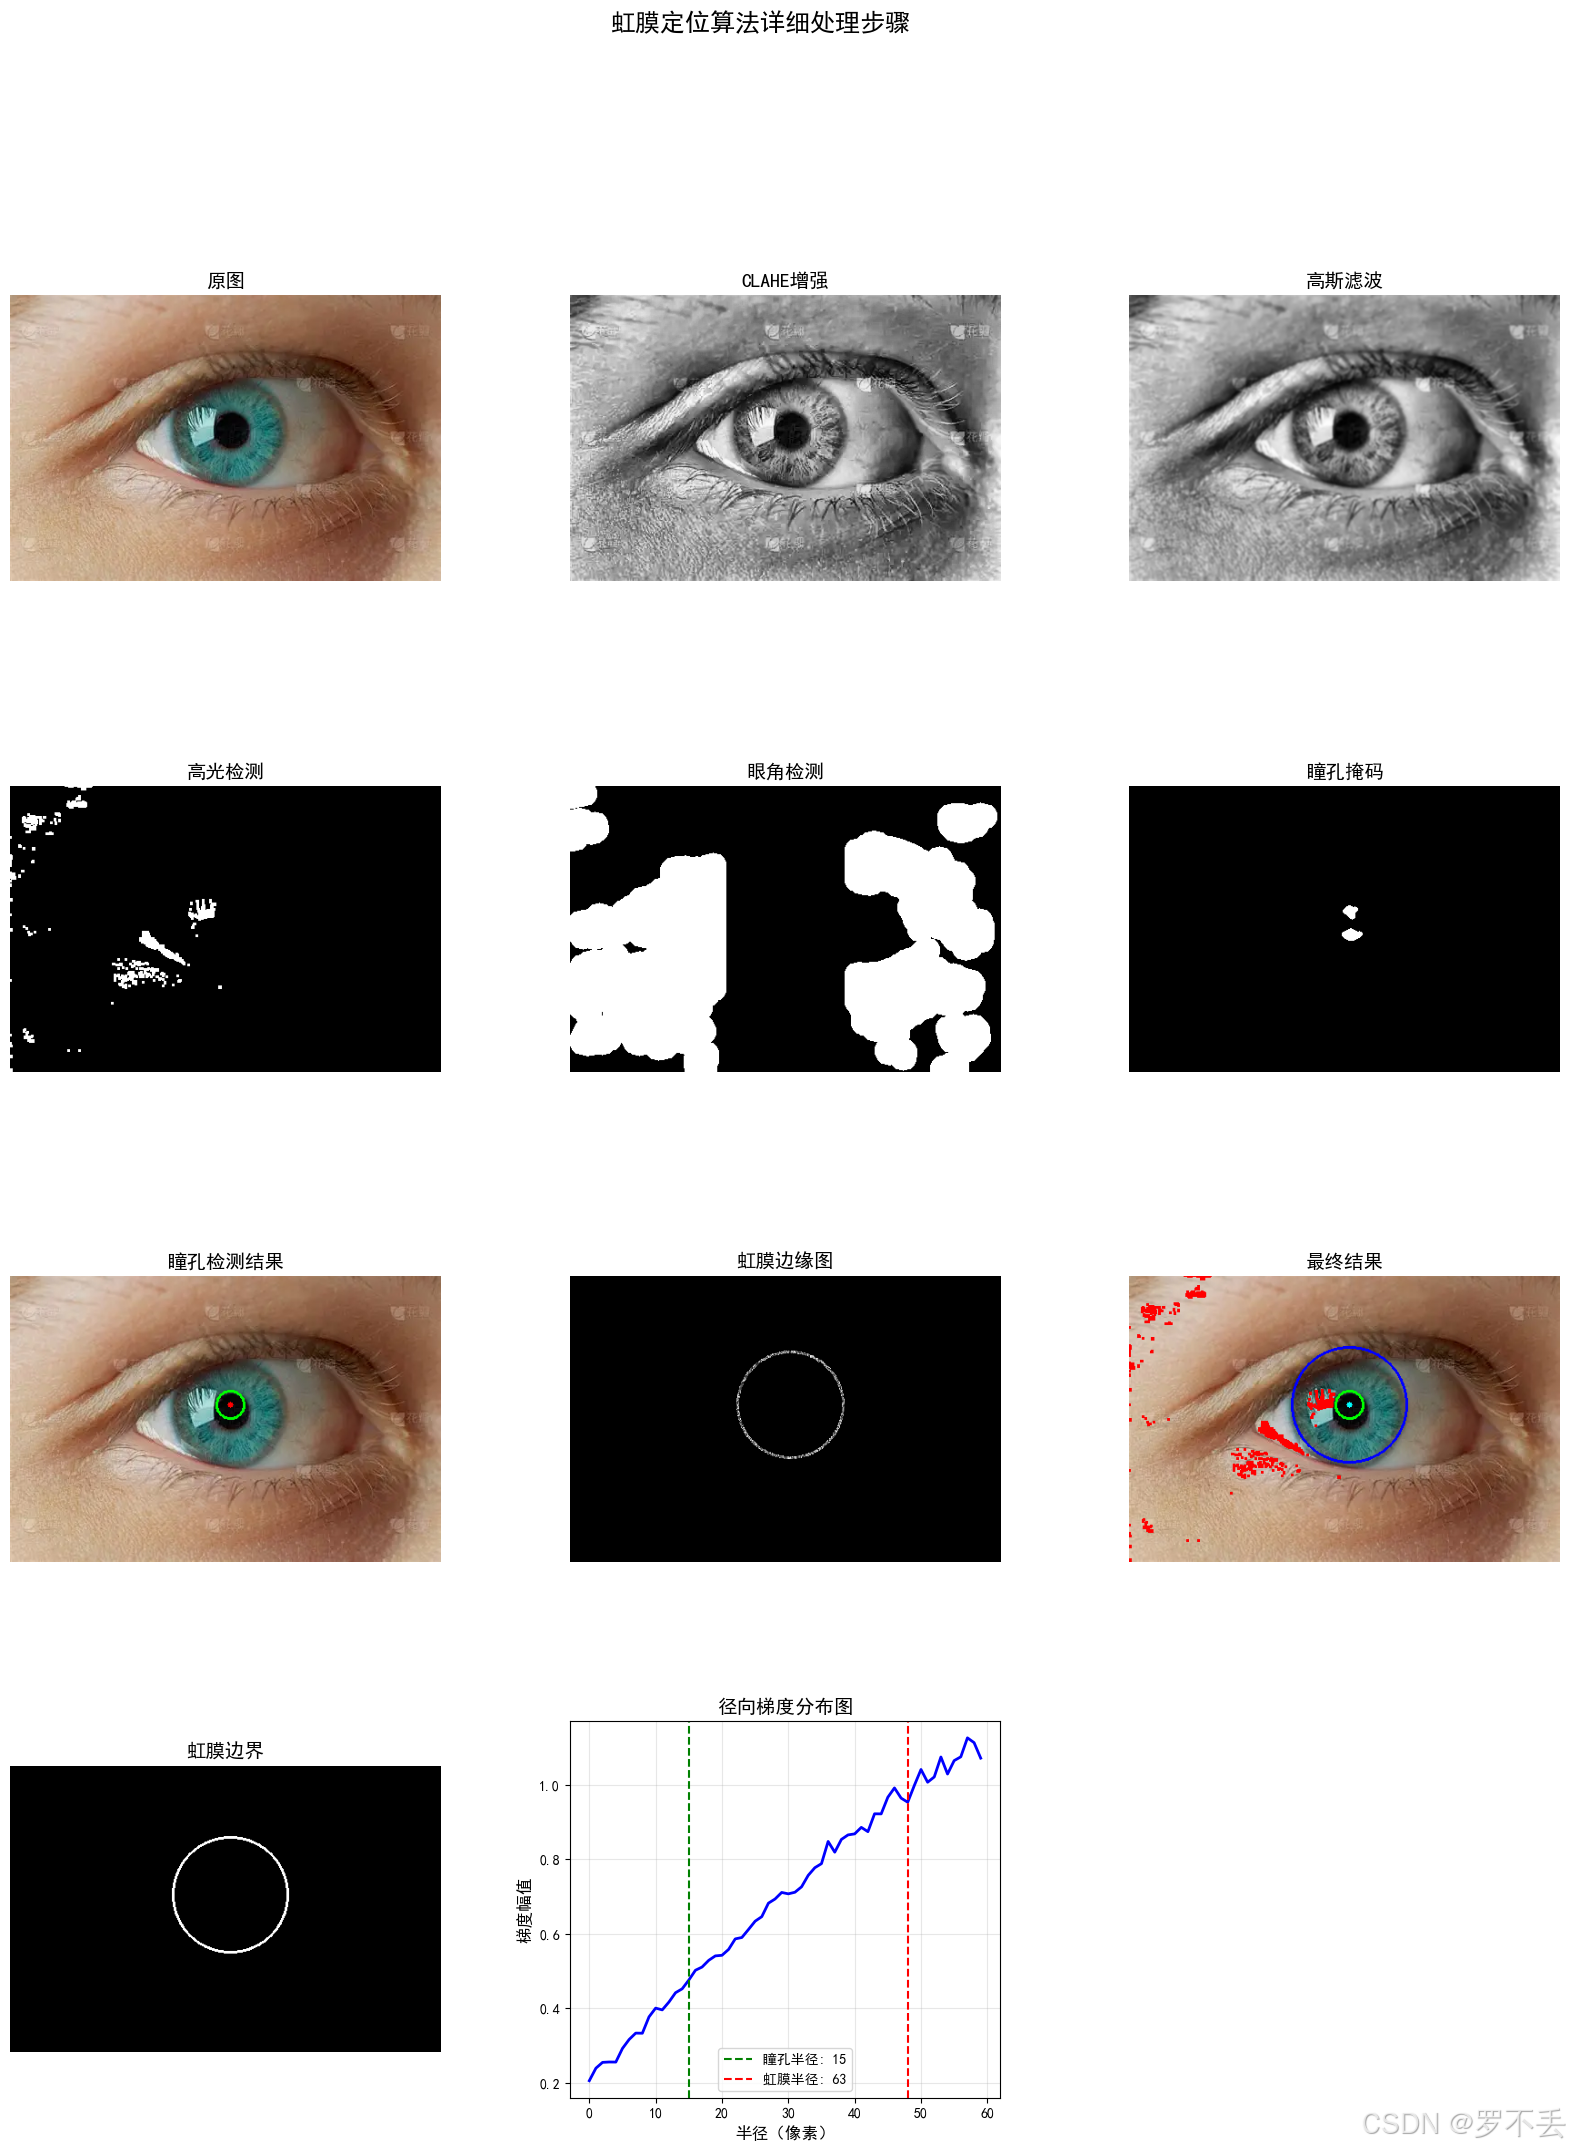
基于计算机视觉的虹膜定位算法:从瞳孔到虹膜的完整检测流程
摘要
虹膜识别作为生物特征识别技术的重要分支,在身份认证、安全监控等领域具有广泛应用。本文详细介绍了一种基于灰度梯度和颜色空间分析的虹膜定位算法,该算法能够准确检测瞳孔和虹膜边界,并有效处理高光、眼角等干扰因素。实验结果表明,该方法在多种场景下均能实现稳健的虹膜定位。
关键词:虹膜定位、瞳孔检测、灰度梯度、计算机视觉、图像处理
1. 引言
虹膜作为人体独特的生物特征,具有稳定性高、唯一性强的特点。虹膜识别系统的性能很大程度上依赖于虹膜定位的准确性。传统的虹膜定位方法主要基于圆检测算法,如Hough变换,但这类方法计算复杂度高,且容易受到光照变化、遮挡等因素的干扰。
本文提出了一种结合颜色空间分析和灰度梯度计算的虹膜定位方法。该方法首先通过HSV颜色空间检测纯黑色瞳孔,然后利用灰度梯度信息定位与瞳孔同心的虹膜外边界,同时有效排除高光区域和眼角区域的干扰。
2. 算法整体框架
2.1 算法流程图
输入图像
↓
图像预处理(CLAHE增强、高斯滤波)
↓
高光检测(LAB颜色空间)
↓
眼角检测(Canny边缘检测)
↓
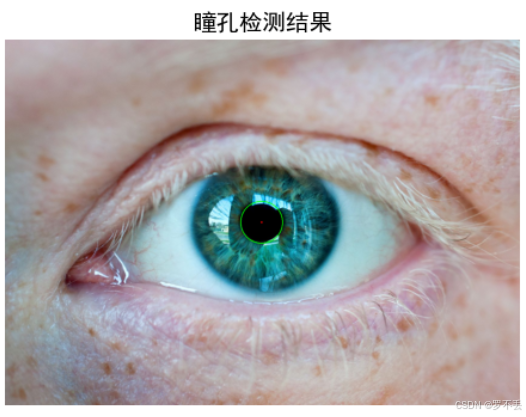
瞳孔检测(HSV颜色空间 + 梯度分析)
↓
虹膜检测(灰度梯度法,与瞳孔同心)
↓
输出定位结果2.2 核心算法模块
| 模块名称 | 主要功能 | 技术方法 |
|---|---|---|
| 图像预处理 | 增强图像质量 | CLAHE自适应直方图均衡化、高斯滤波 |
| 干扰抑制 | 排除高光和眼角 | LAB颜色空间、形态学操作 |
| 瞳孔检测 | 定位瞳孔中心与半径 | HSV颜色空间分割、梯度分析 |
| 虹膜检测 | 定位虹膜外边界 | 灰度梯度法、同心圆约束 |
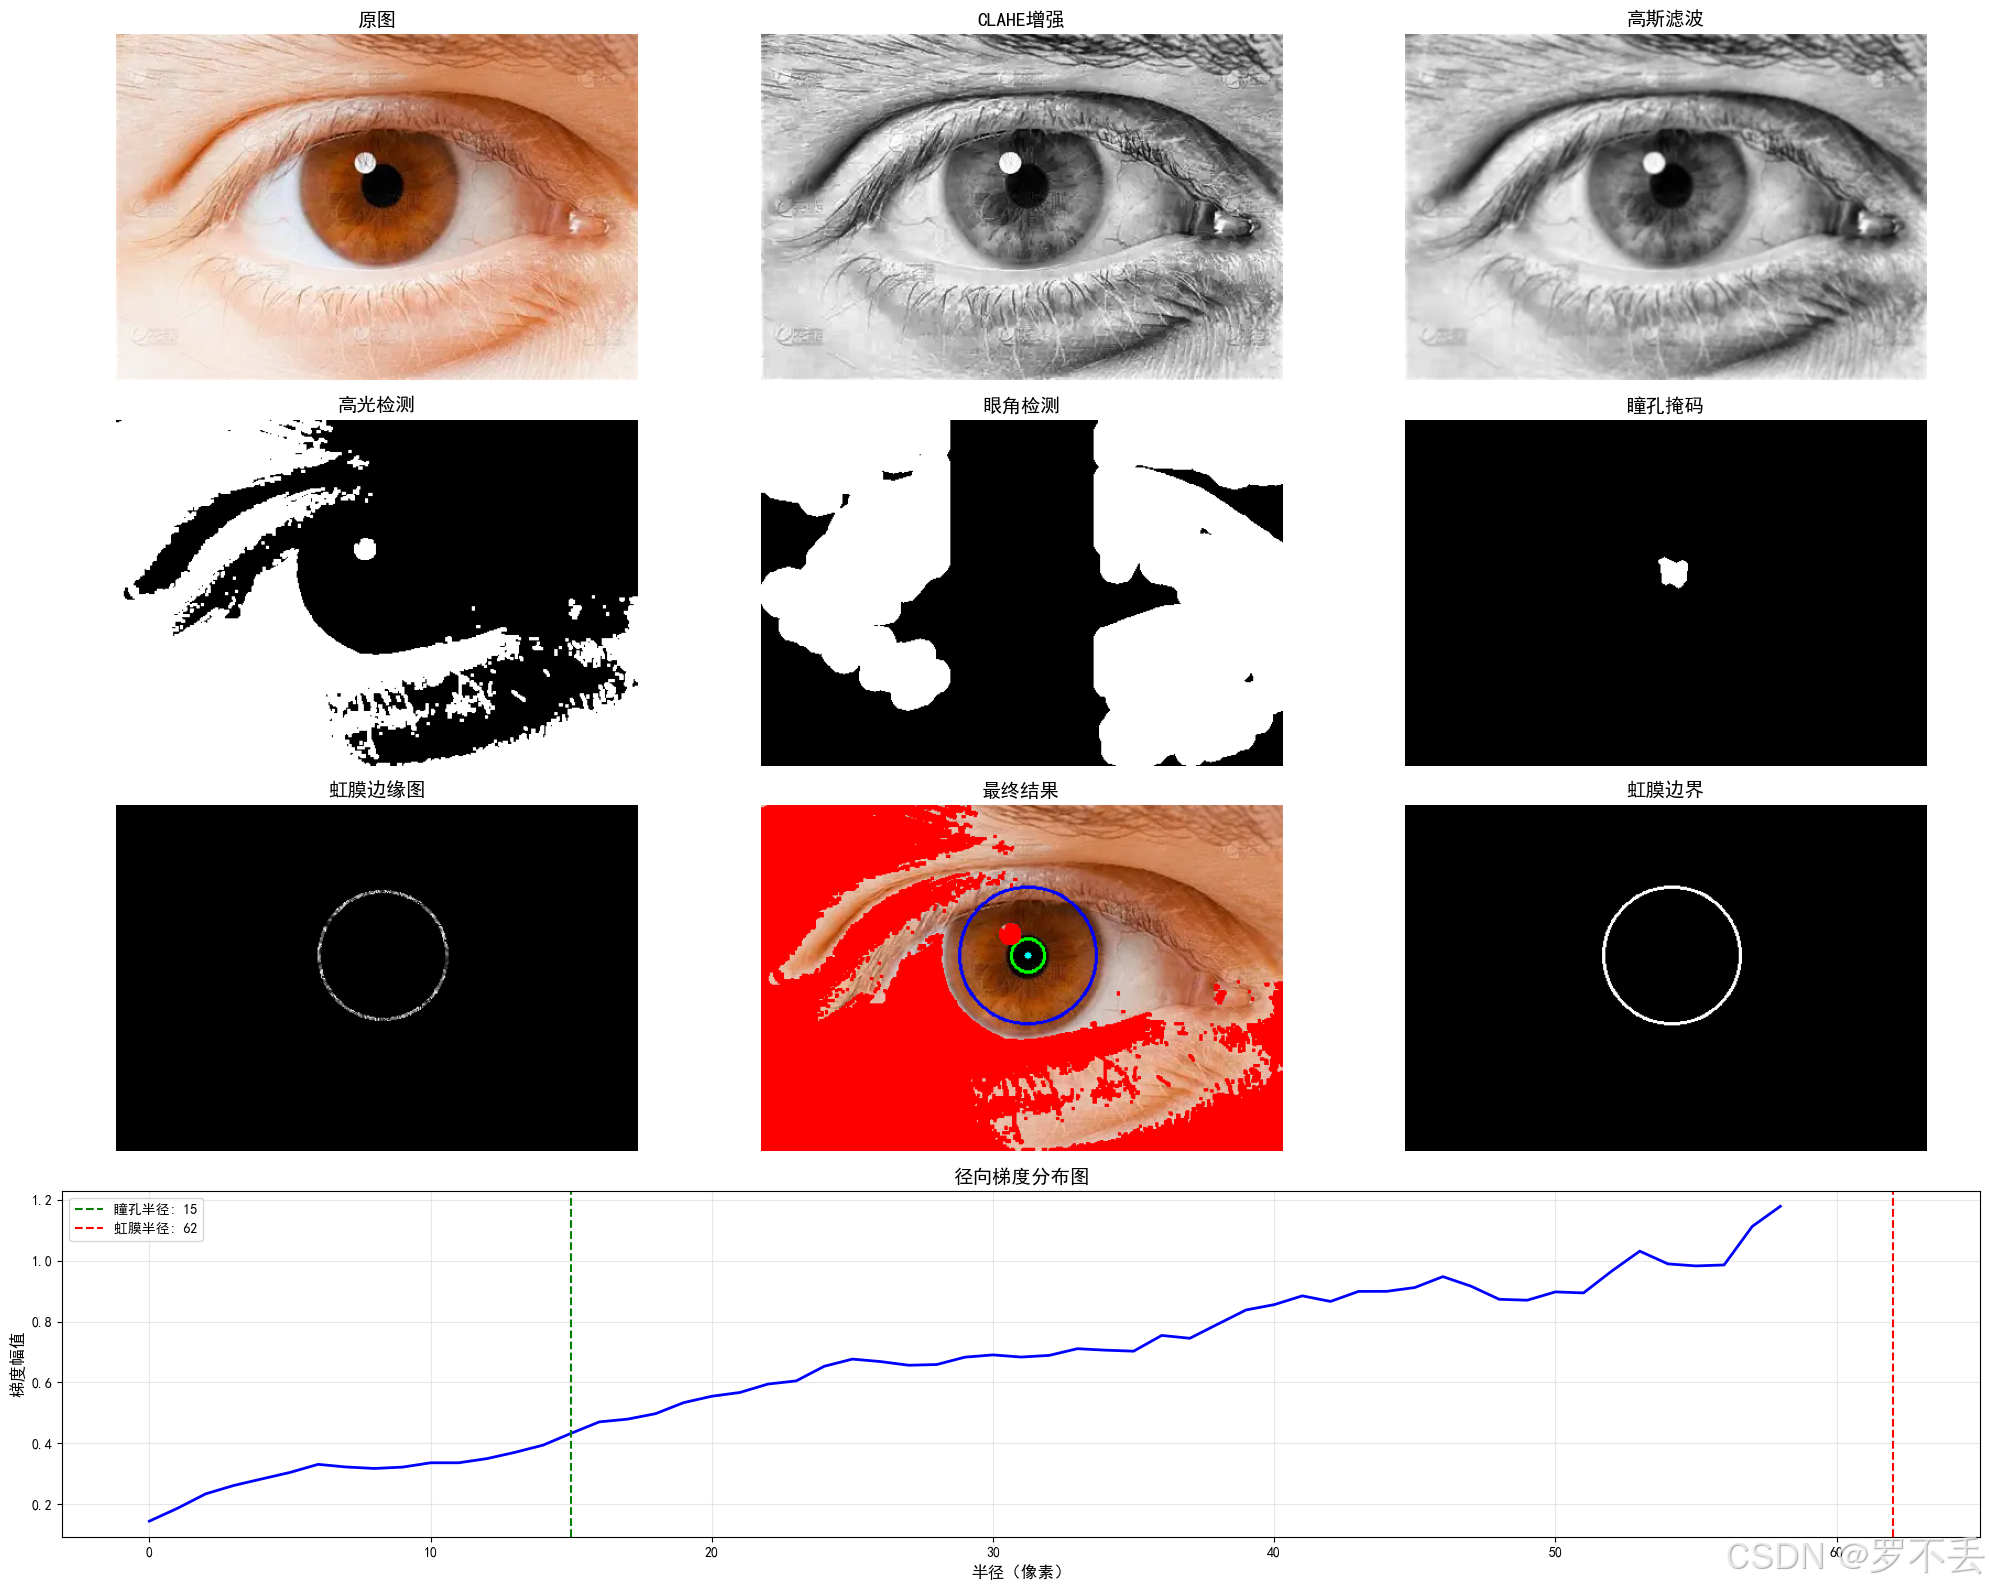
3. 详细算法实现
注意:该图片来源于网络,仅供学习,我花了好久才找到一张没水印的眼睛。
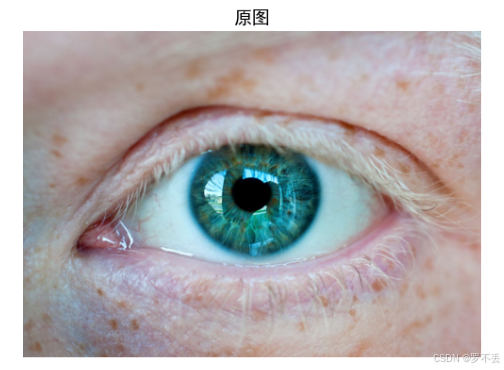
3.1 图像预处理
图像预处理是虹膜定位的第一步,旨在增强图像质量和抑制噪声。
python
# 图像预处理 - 增强对比度
clahe = cv2.createCLAHE(clipLimit=3.0, tileGridSize=(8,8))
enhanced = clahe.apply(gray)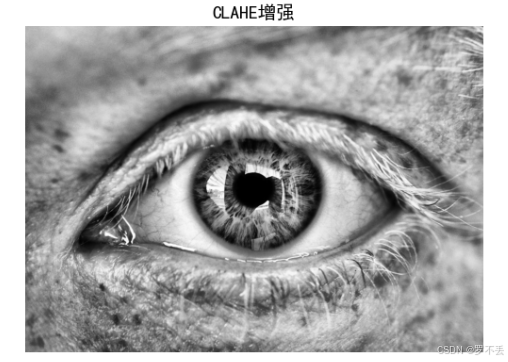
blurred = cv2.GaussianBlur(enhanced, (7, 7), 1)技术要点:
- CLAHE(Contrast Limited Adaptive Histogram Equalization):限制对比度自适应直方图均衡化,能够有效增强图像局部对比度,避免过度增强导致的噪声放大
- 高斯滤波 :使用7×7的核进行平滑处理,去除高频噪声,为后续边缘检测做准备

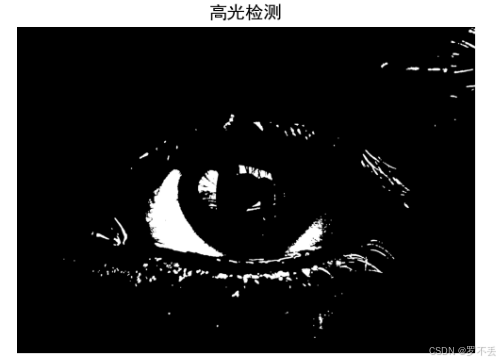
3.2 高光与眼角检测
高光区域会严重影响瞳孔的检测,因为反光区域大多由于曝光问题形成一块纯色区域,很容易被误识别,因此需要提前识别并排除。
python
# 颜色空间转换 - 用于高光检测
lab = cv2.cvtColor(image, cv2.COLOR_BGR2LAB)
l_channel, a, b = cv2.split(lab)

# 高光检测 - 创建掩码
thresh, highlight_mask = cv2.threshold(l_channel, 210, 255, cv2.THRESH_BINARY)原理说明:
- LAB颜色空间中,L通道表示亮度信息,范围0-255
- 高光区域通常具有很高的亮度值(>210),通过阈值分割可以有效检测
- 形态学膨胀操作扩大高光区域,确保边界区域被完全覆盖
眼角区域可能被误识为虹膜边界,需要提前排除。
python
def detect_corners(gray, width):
    """检测眼角区域"""
    edges = cv2.Canny(gray, 50, 150)

    # 提取左右边缘区域
    left_edge = edges[:, :width//3]
    right_edge = edges[:, 2*width//3:]

    # 形态学闭操作连接断裂的边缘
    kernel = cv2.getStructuringElement(cv2.MORPH_RECT, (5, 15))
    left_edge = cv2.morphologyEx(left_edge, cv2.MORPH_CLOSE, kernel)

    return corner_mask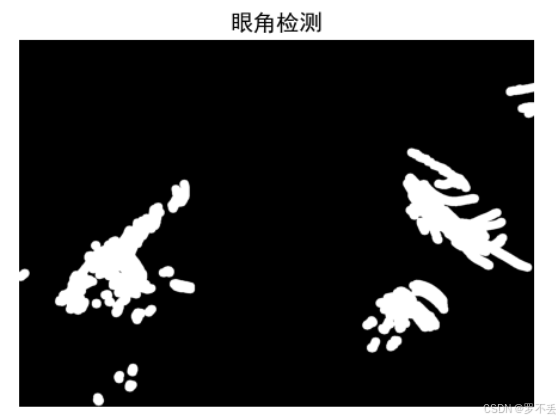
创建排除掩码来执行排除策略
python
# 创建排除掩码
exclude_mask = np.zeros_like(blurred)
cv2.circle(exclude_mask, pupil_center, int(pupil_radius * 1.2), 255, -1)
exclude_mask = cv2.bitwise_or(exclude_mask, highlight_mask)
exclude_mask = cv2.bitwise_or(exclude_mask, corner_mask)
3.3 瞳孔检测算法
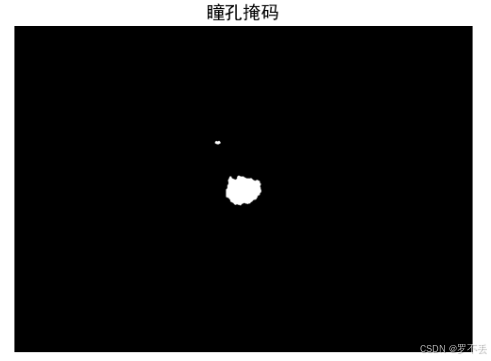
3.3.1 基于HSV颜色空间的纯黑色瞳孔检测
python
# 纯黑色瞳孔的HSV范围
pupil_lower = np.array([0, 0, 0])
pupil_upper = np.array([180, 30, 60])  # 极低饱和度和低亮度

# 创建纯黑色瞳孔掩码
color_pupil_mask = cv2.inRange(hsv, pupil_lower, pupil_upper)颜色空间选择:
- HSV颜色空间 :相比RGB更适合描述人眼感知的颜色
- H(Hue):色相,0-180
- S(Saturation):饱和度,0-255
- V(Value):明度,0-255
- 瞳孔区域特征:低饱和度(S < 30)、低明度(V < 60)
3.3.2 梯度分析与形态学优化
python
# 计算梯度以定位边缘
gradX = cv2.Sobel(blurred, cv2.CV_32F, 1, 0, ksize=-1)
gradY = cv2.Sobel(blurred, cv2.CV_32F, 0, 1, ksize=-1)
gradient_mag = np.sqrt(gradX**2 + gradY**2).astype(np.uint8)技术细节:
- 使用Sobel算子计算x和y方向的梯度
- 梯度幅值反映图像边缘强度
- 瞳孔边缘区域通常具有显著的梯度变化
3.3.3 区域选择与轮廓拟合
python
# 在ROI内提取颜色和灰度信息
roi = blurred[roi_y_min:roi_y_max, roi_x_min:roi_x_max]
contours, _ = cv2.findContours(combined_mask, cv2.RETR_EXTERNAL, cv2.CHAIN_APPROX_SIMPLE)

# 选择最大的轮廓
max_contour = max(contours, key=lambda c: cv2.contourArea(c))
((cx, cy), radius) = cv2.minEnclosingCircle(max_contour)
3.4 虹膜外边界检测
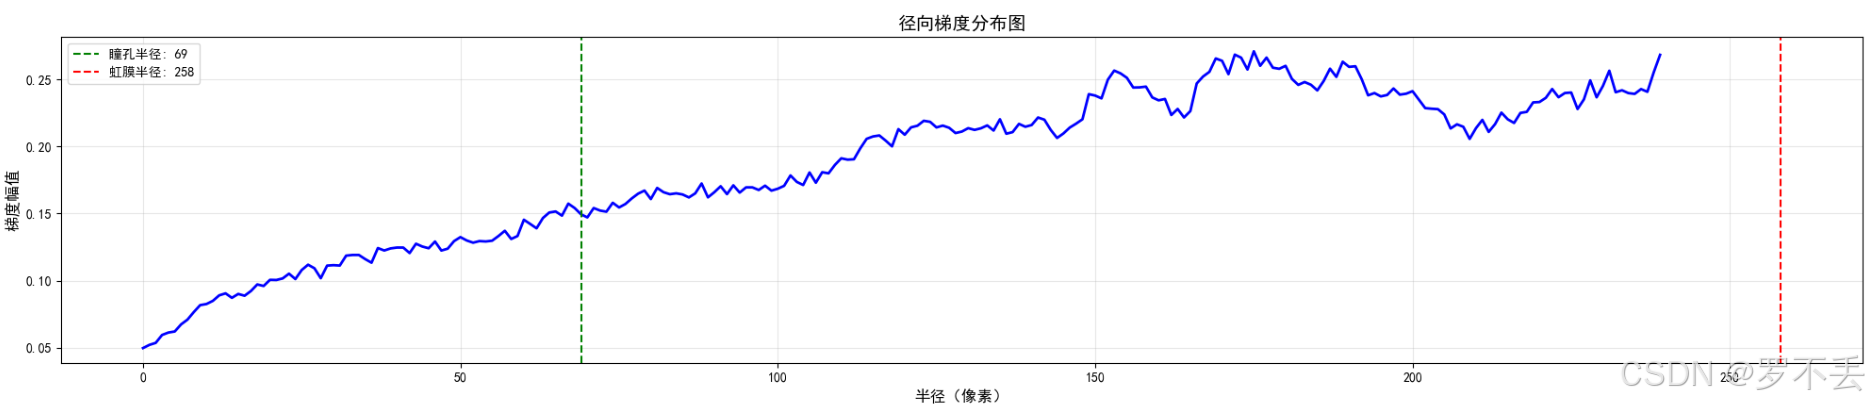
3.4.1 同心圆约束的灰度梯度法
虹膜外边界检测的核心思想是:虹膜外边界与瞳孔中心同心,通过灰度梯度变化确定最佳半径。
python
# 基于瞳孔中心,寻找最佳虹膜半径
min_iris_radius = int(pupil_radius * 1.5)
max_iris_radius = int(min(pupil_radius * 4, min(w, h) * 0.4))

best_radius = min_iris_radius
best_score = 0

for r in range(min_iris_radius, max_iris_radius, 2):
    # 创建当前半径的圆形掩码
    circle_mask = np.zeros_like(gradient_norm)
    cv2.circle(circle_mask, pupil_center, r, 255, 2)

    # 计算圆环区域内的平均梯度值
    masked_gradient = cv2.bitwise_and(gradient_norm, circle_mask)
    mean_gradient = cv2.mean(masked_gradient)[0]

    # 如果当前半径的梯度值更高,则更新最佳半径
    if mean_gradient > best_score:
        best_score = mean_gradient
best_radius = r算法原理:
- 同心圆假设:虹膜外边界与瞳孔中心重合
- 梯度最大化:虹膜边界处灰度变化最剧烈
- 搜索范围:瞳孔半径的1.5倍到4倍之间
- 步长优化:步长为2像素,平衡精度与效率
3.4.2 梯度方向一致性优化
python
def refine_iris_radius(blurred, center, initial_radius, exclude_mask):
    """优化虹膜半径,使用梯度方向一致性检测"""
    for r in radii:
        score = 0
        points_count = 0

        for angle in range(0, 360, 5):
            x = int(center[0] + r * np.cos(np.radians(angle)))
            y = int(center[1] + r * np.sin(np.radians(angle)))

            # 计算梯度方向与径向方向的点积
            dot_product = (gx * rx + gy * ry) / (norm_g * norm_r + 1e-6)

            if dot_product > 0:  # 方向一致
                score += dot_product
                points_count += 1

        avg_score = score / points_count if points_count > 0 else 0
        if avg_score > best_score:
            best_score = avg_score
best_radius = r优化策略:
- 检查圆形边界上每个点的梯度方向
- 梯度方向应与径向方向一致(点积为正)
- 仅统计方向一致的点,提高鲁棒性
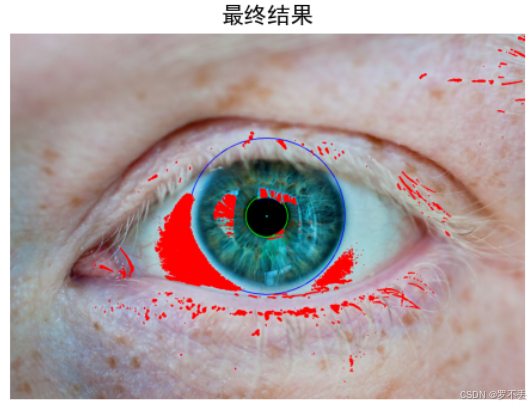
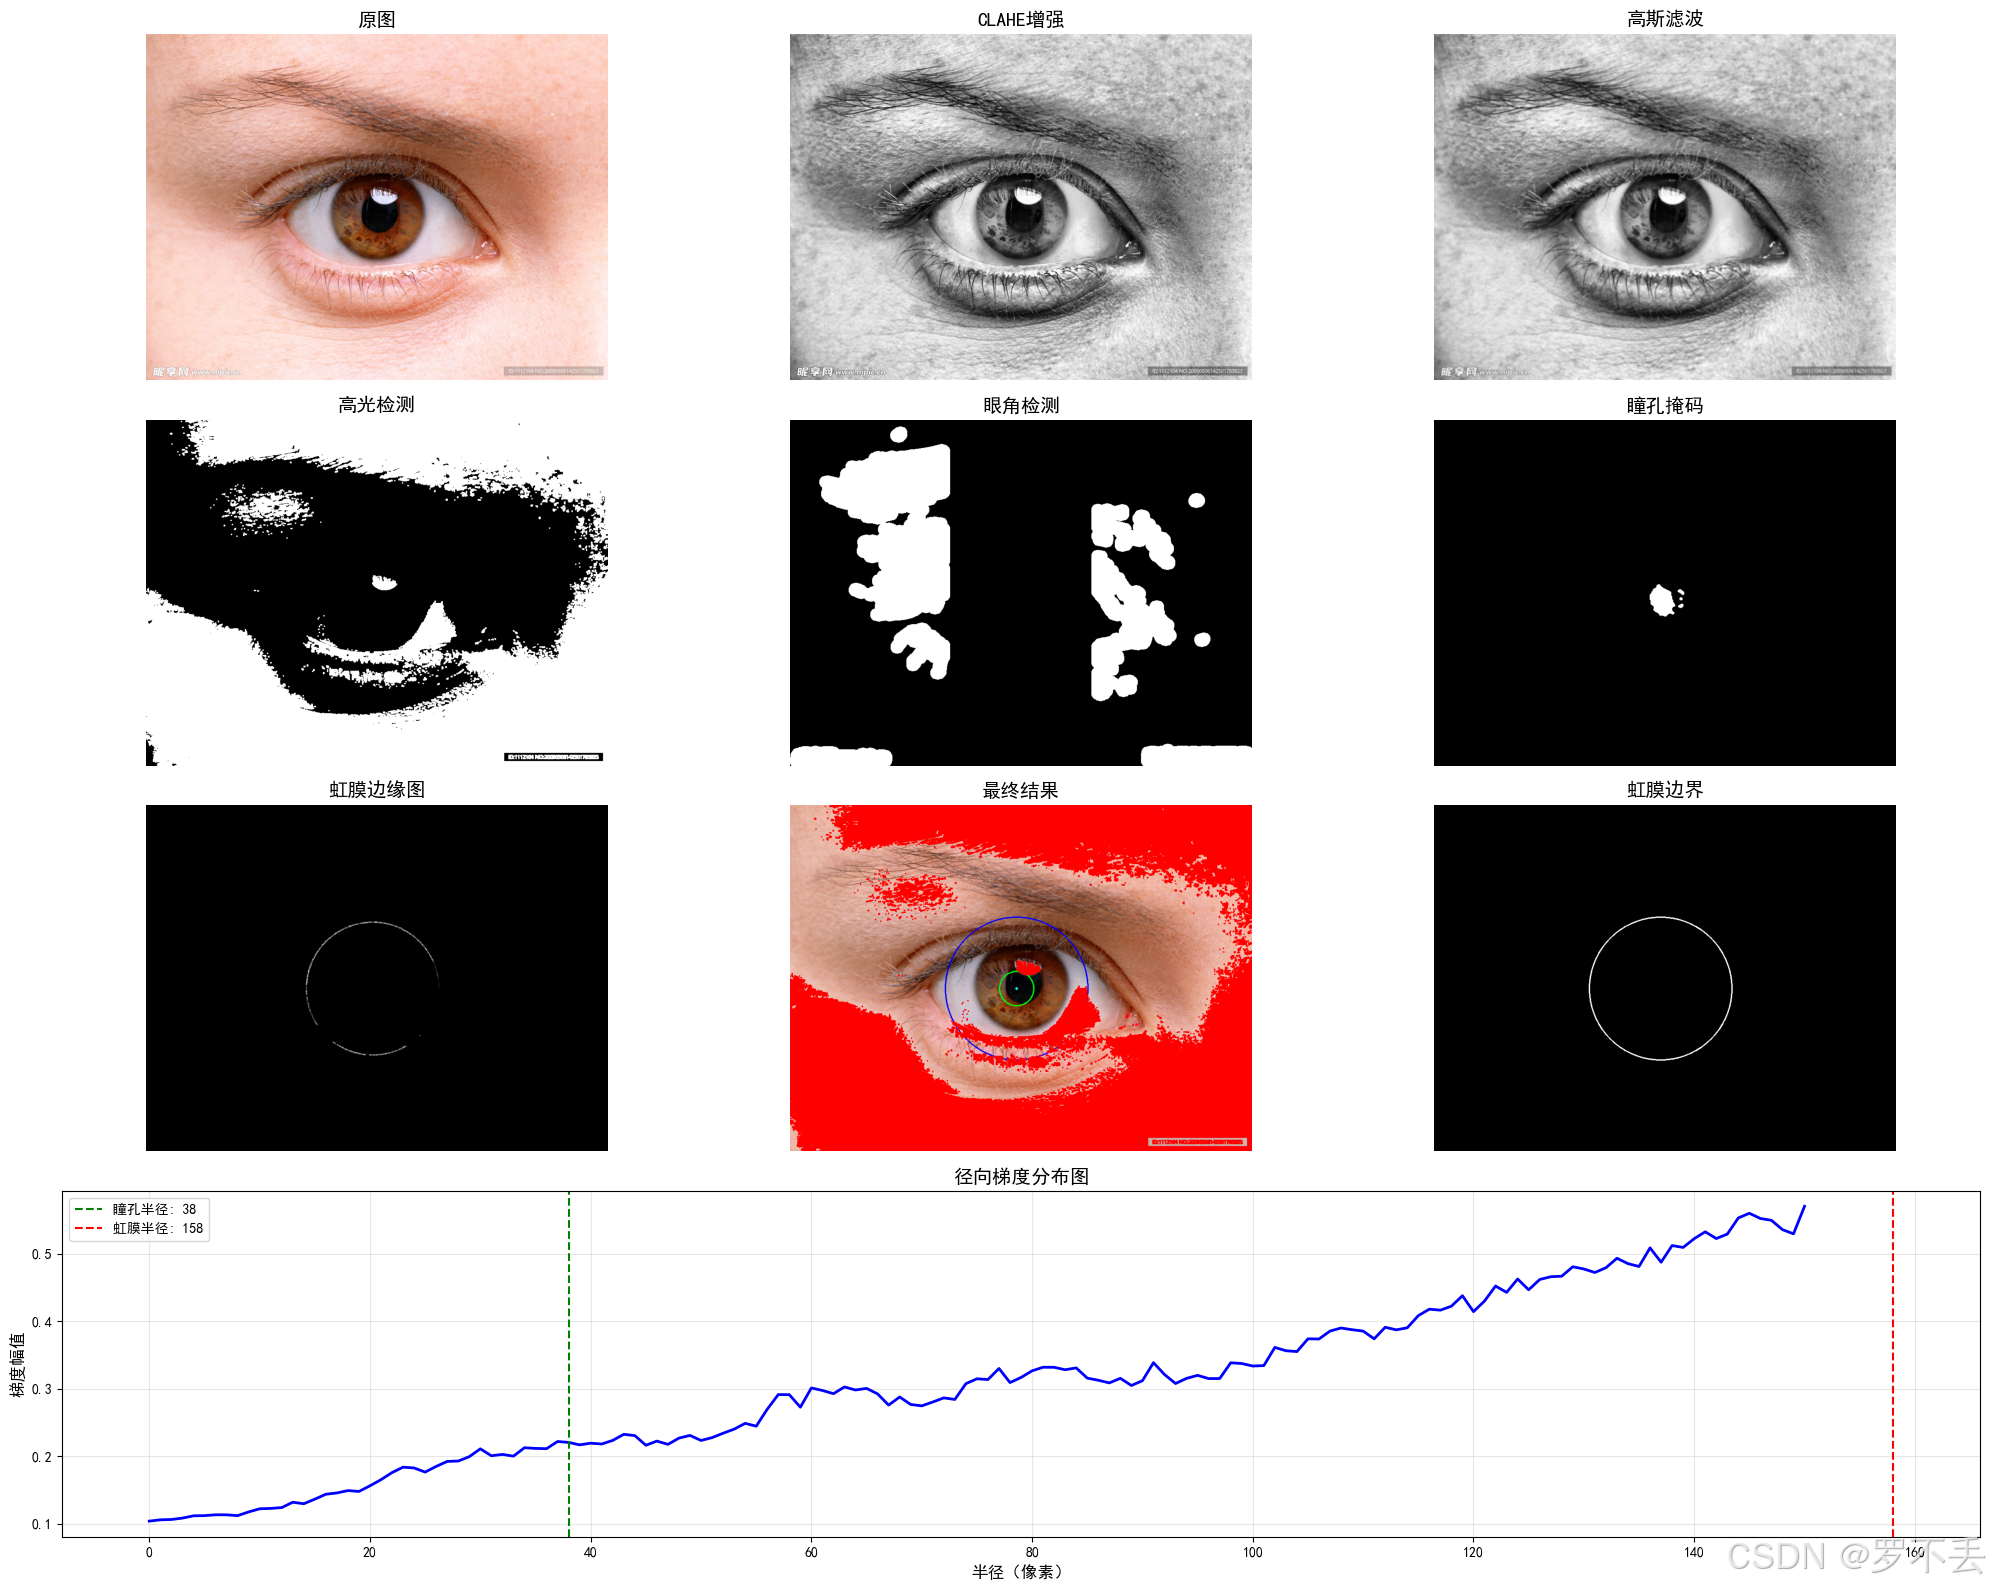
4. 有效性验证
多拿几张图片测一下,发现有很大问题,眼球稍微被遮挡一点就不行了,但是我又不想用Hough圆,也希望大佬提供一下思路。
注意:识别原图片均来源于网络,仅供学习
这个就出现很大误差了
5. 源代码
python
import cv2
import numpy as np
import matplotlib.pyplot as plt
from matplotlib.gridspec import GridSpec


# 设置中文字体
plt.rcParams['font.sans-serif'] = ['SimHei', 'DejaVu Sans']
plt.rcParams['axes.unicode_minus'] = False

def irislocalization(imagepath, visualize_steps=False):
    """
    虹膜定位函数 - 瞳孔识别使用原方法,虹膜外圈使用灰度梯度法并确保与瞳孔同心
    参数:
    imagepath: 输入图像路径
    visualize_steps: 是否可视化处理步骤
    返回:
    定位结果字典或None
    """
    image = cv2.imread(imagepath)
    if image is None:
        print("无法读取图像")
        return None

    original = image.copy()
    h, w = image.shape[:2]
    gray = cv2.cvtColor(image, cv2.COLOR_BGR2GRAY)

    # 图像预处理 - 增强对比度
    clahe = cv2.createCLAHE(clipLimit=3.0, tileGridSize=(8,8))
    enhanced = clahe.apply(gray)
    blurred = cv2.GaussianBlur(enhanced, (7, 7), 1)

    # 颜色空间转换 - 用于高光检测
    lab = cv2.cvtColor(image, cv2.COLOR_BGR2LAB)
    l_channel, a, b = cv2.split(lab)

    # 高光检测 - 创建掩码
    thresh, highlight_mask = cv2.threshold(l_channel, 210, 255, cv2.THRESH_BINARY)
    highlight_mask = cv2.dilate(highlight_mask, np.ones((3,3), np.uint8), iterations=1)

    # 眼角检测
    corner_mask = detect_corners(gray, w)

    # 瞳孔检测 - 保持不变
    pupil_center, pupil_radius, color_pupil_mask = detect_pure_black_pupil(
        cv2.cvtColor(image, cv2.COLOR_BGR2HSV), blurred, w, h, corner_mask, highlight_mask
    )

    if pupil_center is None or pupil_radius is None:
        print("瞳孔检测失败")
        return None

    # 虹膜检测 - 使用灰度梯度法并确保与瞳孔同心
    iris_center, iris_radius, iris_edge_map = detect_concentric_iris(
        blurred, pupil_center, pupil_radius, w, h, corner_mask, highlight_mask
    )

    # 可视化结果
    result_image = original.copy()
    cv2.circle(result_image, pupil_center, pupil_radius, (0, 255, 0), 2)
    cv2.circle(result_image, iris_center, iris_radius, (255, 0, 0), 2)
    cv2.circle(result_image, pupil_center, 3, (0, 0, 255), -1)
    cv2.circle(result_image, iris_center, 3, (255, 255, 0), -1)

    # 标记高光区域
    result_image[highlight_mask > 0] = [0, 0, 255]

    iris_boundary = np.zeros_like(gray)
    cv2.circle(iris_boundary, iris_center, iris_radius, 255, 2)

    result = {
        'pupilcenter': pupil_center,
        'pupilradius': pupil_radius,
        'iriscenter': iris_center,
        'irisradius': iris_radius,
        'resultimage': result_image,
        'irisboundary': iris_boundary
    }

    # 可视化步骤
    if visualize_steps:
        plt.figure(figsize=(18, 15))
        gs = GridSpec(4, 3, figure=plt.gcf())

        plt.subplot(gs[0, 0]).imshow(cv2.cvtColor(original, cv2.COLOR_BGR2RGB))
        plt.title("Original Image"), plt.axis('off')

        plt.subplot(gs[0, 1]).imshow(enhanced, cmap='gray')
        plt.title("CLAHE Enhanced"), plt.axis('off')

        plt.subplot(gs[0, 2]).imshow(highlight_mask, cmap='gray')
        plt.title("Highlight Mask"), plt.axis('off')

        plt.subplot(gs[1, 0]).imshow(blurred, cmap='gray')
        plt.title("Blurred Image"), plt.axis('off')

        plt.subplot(gs[1, 1]).imshow(color_pupil_mask, cmap='gray')
        plt.title("Pupil Mask"), plt.axis('off')

        plt.subplot(gs[1, 2]).imshow(corner_mask, cmap='gray')
        plt.title("Corner Mask"), plt.axis('off')

        plt.subplot(gs[2, 0]).imshow(iris_edge_map, cmap='gray')
        plt.title("Iris Edge Map"), plt.axis('off')

        plt.subplot(gs[2, 1]).imshow(cv2.cvtColor(result_image, cv2.COLOR_BGR2RGB))
        plt.title("Final Result"), plt.axis('off')

        plt.subplot(gs[2, 2]).imshow(iris_boundary, cmap='gray')
        plt.title("Iris Boundary"), plt.axis('off')

        # 显示梯度分布图
        gradient_profile = calculate_gradient_profile(blurred, pupil_center, pupil_radius, iris_radius)
        plt.subplot(gs[3, :])
        plt.plot(gradient_profile)
        plt.title("Radial Gradient Profile"), plt.xlabel("Radius"), plt.ylabel("Gradient Magnitude")
        plt.grid(True)

        plt.tight_layout()
        plt.savefig('iris_steps.png'), plt.close()
        result['visualization'] = 'iris_steps.png'

    return result

def detect_pure_black_pupil(hsv, blurred, w, h, corner_mask, highlight_mask):
    """检测纯黑色瞳孔 - 保持不变"""
    # 纯黑色瞳孔的HSV范围
    pupil_lower = np.array([0, 0, 0])
    pupil_upper = np.array([180, 30, 60])  # 极低饱和度和低亮度

    # 创建纯黑色瞳孔掩码
    color_pupil_mask = cv2.inRange(hsv, pupil_lower, pupil_upper)

    # 排除高光区域和眼角区域
    color_pupil_mask = cv2.bitwise_and(color_pupil_mask, 255 - highlight_mask)
    color_pupil_mask = cv2.bitwise_and(color_pupil_mask, 255 - corner_mask)

    # 形态学操作优化掩码
    kernel = cv2.getStructuringElement(cv2.MORPH_ELLIPSE, (7, 7))
    color_pupil_mask = cv2.morphologyEx(color_pupil_mask, cv2.MORPH_CLOSE, kernel, iterations=2)
    color_pupil_mask = cv2.morphologyEx(color_pupil_mask, cv2.MORPH_OPEN, kernel, iterations=1)

    # 定义中心搜索区域
    search_size = min(w, h) * 0.8
    x_min = int(w/2 - search_size/2)
    y_min = int(h/2 - search_size/2)
    x_max = int(w/2 + search_size/2)
    y_max = int(h/2 + search_size/2)
    center_mask = np.zeros_like(blurred)
    center_mask[y_min:y_max, x_min:x_max] = 255

    # 限制在中心区域搜索
    pupil_candidate = cv2.bitwise_and(color_pupil_mask, center_mask)

    # 计算梯度以定位边缘
    gradX = cv2.Sobel(blurred, cv2.CV_32F, 1, 0, ksize=-1)
    gradY = cv2.Sobel(blurred, cv2.CV_32F, 0, 1, ksize=-1)
    gradient_mag = np.sqrt(gradX**2 + gradY**2).astype(np.uint8)
    gradient_in_candidate = cv2.bitwise_and(gradient_mag, pupil_candidate)

    # 寻找最大梯度点
    _, max_val, _, max_loc = cv2.minMaxLoc(gradient_in_candidate)
    if max_val < 25:  # 梯度阈值
        return None, None, color_pupil_mask

    # 在最大梯度点周围搜索瞳孔中心
    search_radius = int(min(w, h) * 0.18)
    roi_x_min = max(0, max_loc[0] - search_radius)
    roi_y_min = max(0, max_loc[1] - search_radius)
    roi_x_max = min(w, max_loc[0] + search_radius)
    roi_y_max = min(h, max_loc[1] + search_radius)

    # 在ROI内提取颜色和灰度信息
    roi = blurred[roi_y_min:roi_y_max, roi_x_min:roi_x_max]
    hsv_roi = hsv[roi_y_min:roi_y_max, roi_x_min:roi_x_max]

    # 再次应用颜色掩码
    roi_pupil_mask = cv2.inRange(hsv_roi, pupil_lower, pupil_upper)
    roi_pupil_mask = cv2.bitwise_and(roi_pupil_mask, 255 - highlight_mask[roi_y_min:roi_y_max, roi_x_min:roi_x_max])

    # 二值化处理
    _, thresh = cv2.threshold(roi, 35, 255, cv2.THRESH_BINARY_INV)
    combined_mask = cv2.bitwise_and(thresh, roi_pupil_mask)

    # 最终形态学优化
    kernel = cv2.getStructuringElement(cv2.MORPH_ELLIPSE, (5, 5))
    combined_mask = cv2.morphologyEx(combined_mask, cv2.MORPH_CLOSE, kernel, iterations=1)

    contours, _ = cv2.findContours(combined_mask, cv2.RETR_EXTERNAL, cv2.CHAIN_APPROX_SIMPLE)
    if not contours:
        return None, None, color_pupil_mask

    # 选择最大的轮廓
    max_contour = max(contours, key=lambda c: cv2.contourArea(c))
    ((cx, cy), radius) = cv2.minEnclosingCircle(max_contour)

    # 转换回原图坐标
    pupil_center = (int(cx + roi_x_min), int(cy + roi_y_min))
    pupil_radius = int(radius)

    # 尺寸验证
    min_radius = int(min(w, h) * 0.05)
    max_radius = int(min(w, h) * 0.25)
    pupil_radius = max(min_radius, min(pupil_radius, max_radius))

    return pupil_center, pupil_radius, color_pupil_mask

def detect_concentric_iris(blurred, pupil_center, pupil_radius, w, h, corner_mask, highlight_mask):
    """使用灰度梯度法检测与瞳孔同心的虹膜外圈"""
    # 创建排除掩码 (瞳孔区域和图像边缘)
    exclude_mask = np.zeros_like(blurred)
    cv2.circle(exclude_mask, pupil_center, int(pupil_radius * 1.2), 255, -1)

    # 扩展边缘排除区域
    edge_exclude = np.zeros_like(blurred)
    cv2.rectangle(edge_exclude, (20, 20), (w-20, h-20), 255, -1)
    exclude_mask = cv2.bitwise_or(exclude_mask, 255 - edge_exclude)

    # 结合高光和眼角掩码
    exclude_mask = cv2.bitwise_or(exclude_mask, highlight_mask)
    exclude_mask = cv2.bitwise_or(exclude_mask, corner_mask)

    # 计算梯度
    gradX = cv2.Sobel(blurred, cv2.CV_32F, 1, 0, ksize=-1)
    gradY = cv2.Sobel(blurred, cv2.CV_32F, 0, 1, ksize=-1)
    gradient_mag = np.sqrt(gradX**2 + gradY**2).astype(np.uint8)

    # 排除不需要的区域
    gradient_mag[exclude_mask > 0] = 0

    # 归一化梯度图像
    gradient_norm = cv2.normalize(gradient_mag, None, 0, 255, cv2.NORM_MINMAX).astype(np.uint8)

    # 基于瞳孔中心,寻找最佳虹膜半径
    min_iris_radius = int(pupil_radius * 1.5)
    max_iris_radius = int(min(pupil_radius * 4, min(w, h) * 0.4))

    best_radius = min_iris_radius
    best_score = 0
    edge_map = np.zeros_like(gradient_norm)

    # 在可能的半径范围内搜索最佳虹膜边界
    for r in range(min_iris_radius, max_iris_radius, 2):
        # 创建当前半径的圆形掩码
        circle_mask = np.zeros_like(gradient_norm)
        cv2.circle(circle_mask, pupil_center, r, 255, 2)  # 圆环宽度为2像素

        # 计算圆环区域内的平均梯度值
        masked_gradient = cv2.bitwise_and(gradient_norm, circle_mask)
        mean_gradient = cv2.mean(masked_gradient)[0]

        # 如果当前半径的梯度值更高,则更新最佳半径
        if mean_gradient > best_score:
            best_score = mean_gradient
            best_radius = r
            edge_map = masked_gradient.copy()

    # 优化最终结果
    optimized_radius = refine_iris_radius(blurred, pupil_center, best_radius, exclude_mask)

    return pupil_center, optimized_radius, edge_map

def refine_iris_radius(blurred, center, initial_radius, exclude_mask):
    """
    优化虹膜半径,使用梯度方向一致性检测
    """
    # 计算梯度
    gradX = cv2.Sobel(blurred, cv2.CV_32F, 1, 0, ksize=-1)
    gradY = cv2.Sobel(blurred, cv2.CV_32F, 0, 1, ksize=-1)

    # 定义搜索范围
    search_range = int(initial_radius * 0.1)
    radii = np.arange(initial_radius - search_range, initial_radius + search_range + 1)

    best_radius = initial_radius
    best_score = -float('inf')

    for r in radii:
        # 计算圆形上的点
        score = 0
        points_count = 0

        for angle in range(0, 360, 5):  # 每隔5度取一个点
            x = int(center[0] + r * np.cos(np.radians(angle)))
            y = int(center[1] + r * np.sin(np.radians(angle)))

            # 检查是否在图像范围内且不在排除区域
            if 0 <= x < blurred.shape[1] and 0 <= y < blurred.shape[0] and exclude_mask[y, x] == 0:
                # 计算该点的梯度方向
                gx = gradX[y, x]
                gy = gradY[y, x]

                # 计算从中心到该点的径向方向
                rx = x - center[0]
                ry = y - center[1]

                # 计算梯度方向与径向方向的点积(方向一致性)
                dot_product = (gx * rx + gy * ry) / (np.sqrt(gx*gx + gy*gy) * np.sqrt(rx*rx + ry*ry) + 1e-6)

                # 累加得分(仅考虑梯度方向与径向方向一致的点)
                if dot_product > 0:
                    score += dot_product
                    points_count += 1

        # 计算平均得分
        if points_count > 0:
            avg_score = score / points_count
            if avg_score > best_score:
                best_score = avg_score
                best_radius = r

    return best_radius

def detect_corners(gray, width):
    """检测眼角区域 - 保持不变"""
    corner_mask = np.zeros_like(gray)
    edges = cv2.Canny(gray, 50, 150)

    left_edge = edges[:, :width//3]
    right_edge = edges[:, 2*width//3:]

    kernel = cv2.getStructuringElement(cv2.MORPH_RECT, (5, 15))
    left_edge = cv2.morphologyEx(left_edge, cv2.MORPH_CLOSE, kernel)
    right_edge = cv2.morphologyEx(right_edge, cv2.MORPH_CLOSE, kernel)

    left_corner = np.zeros_like(gray)
    left_corner[:, :width//3] = left_edge
    right_corner = np.zeros_like(gray)
    right_corner[:, 2*width//3:] = right_edge

    corner_mask = cv2.bitwise_or(left_corner, right_corner)
    kernel = cv2.getStructuringElement(cv2.MORPH_ELLIPSE, (15, 15))
    corner_mask = cv2.dilate(corner_mask, kernel, iterations=2)

    return corner_mask

def calculate_gradient_profile(blurred, pupil_center, pupil_radius, iris_radius):
    """计算从瞳孔到虹膜的梯度分布"""
    max_radius = int(iris_radius * 1.2)
    radii = np.arange(pupil_radius, max_radius, 1)
    gradient_profile = []

    # 计算梯度
    gradX = cv2.Sobel(blurred, cv2.CV_32F, 1, 0, ksize=-1)
    gradY = cv2.Sobel(blurred, cv2.CV_32F, 0, 1, ksize=-1)
    gradient_mag = np.sqrt(gradX**2 + gradY**2).astype(np.uint8)

    for r in radii:
        mask = np.zeros_like(blurred)
        cv2.circle(mask, pupil_center, r, 255, 2)
        masked_gradient = cv2.bitwise_and(gradient_mag, mask)
        mean_val = cv2.mean(masked_gradient)[0]
        gradient_profile.append(mean_val)

    return gradient_profile

def main():
    imagepath = "eye6.webp"
    result = irislocalization(imagepath, visualize_steps=True)

    if result:
        print(f"瞳孔中心: {result['pupilcenter']}")
        print(f"瞳孔半径: {result['pupilradius']}")
        print(f"虹膜中心: {result['iriscenter']}")
        print(f"虹膜半径: {result['irisradius']}")

        plt.figure(figsize=(12, 6))
        plt.subplot(121).imshow(cv2.cvtColor(result['resultimage'], cv2.COLOR_BGR2RGB))
        plt.title("定位结果"), plt.axis('off')

        plt.subplot(122).imshow(result['irisboundary'], cmap='gray')
        plt.title("虹膜边界"), plt.axis('off')

        plt.tight_layout(), plt.show()

        if 'visualization' in result:
            steps_img = cv2.imread(result['visualization'])
            plt.figure(figsize=(18, 12))
            plt.imshow(cv2.cvtColor(steps_img, cv2.COLOR_BGR2RGB))
            plt.title("处理步骤"), plt.axis('off')
            plt.show()
    else:
        print("虹膜定位失败")

if __name__ == "__main__":
    main()