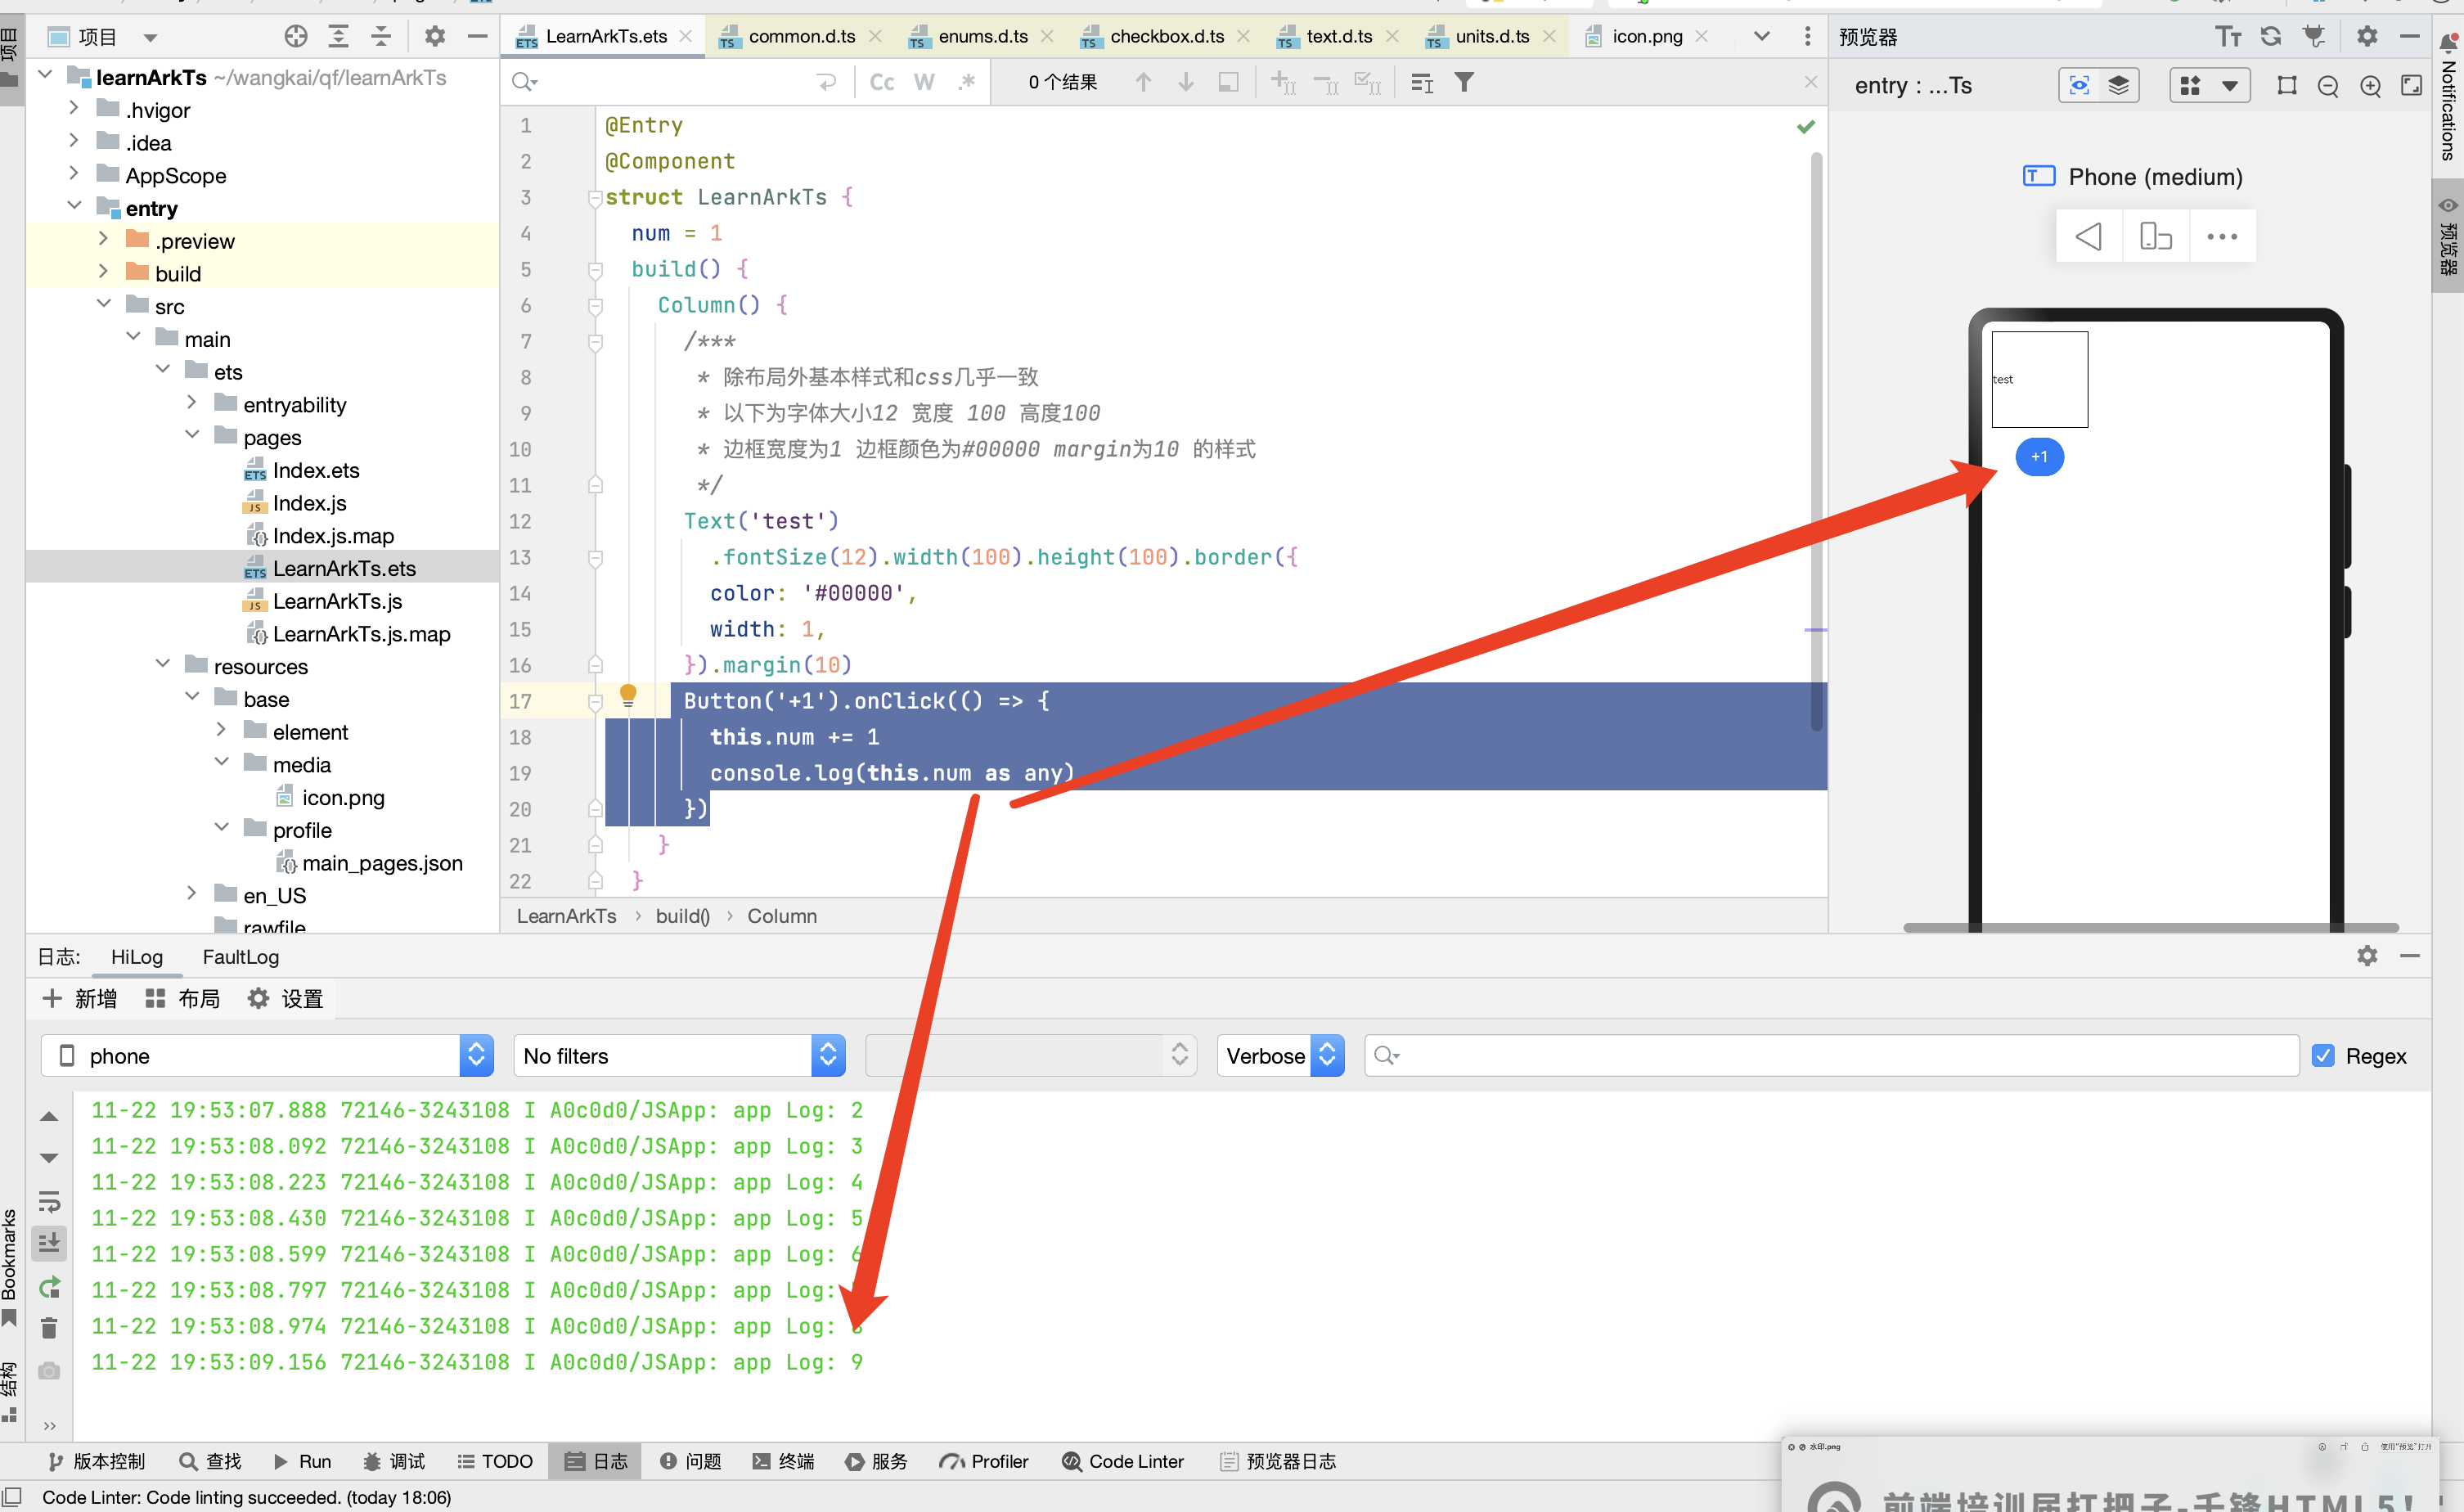
1 预览+日志的方式debug
这种方式只能进行基本数据类型的打印,适合简单调试
-
原始类型,也就是非字符串需要String() 或者 .toString()
-
对象类型,需要JSON.stringify转换
-
预览器-没事,模拟器-打印必须加前缀 否则找不到xh
@Entry
@Component
struct Index {
@State num:number = 111
@State animal:{name: string,age:number}[] = [
{name:'狗', age: 10},
{name:'猫', age: 11},
]
build() {
Button('打印调试').onClick(() => {
// 细节1:仅支持打印字符串
// 细节2:所以遇到数值型就得转换 String()、toString()
// 细节3:所有遇到对象也的转换为字符串打印 或者 json数据格式
// 细节4:预览器-没事,模拟器-打印必须加前缀 否则找不到
// 致命一击:看的是预览器的打印, 测试的是模拟器
// console.log(this.num)
console.log('qf ', String(this.num))
console.log('qf ', (this.num).toString())
// console.log(this.animal)
console.log('qf ', JSON.stringify(this.animal))
})
}
}2 断点调试
以模拟器为例
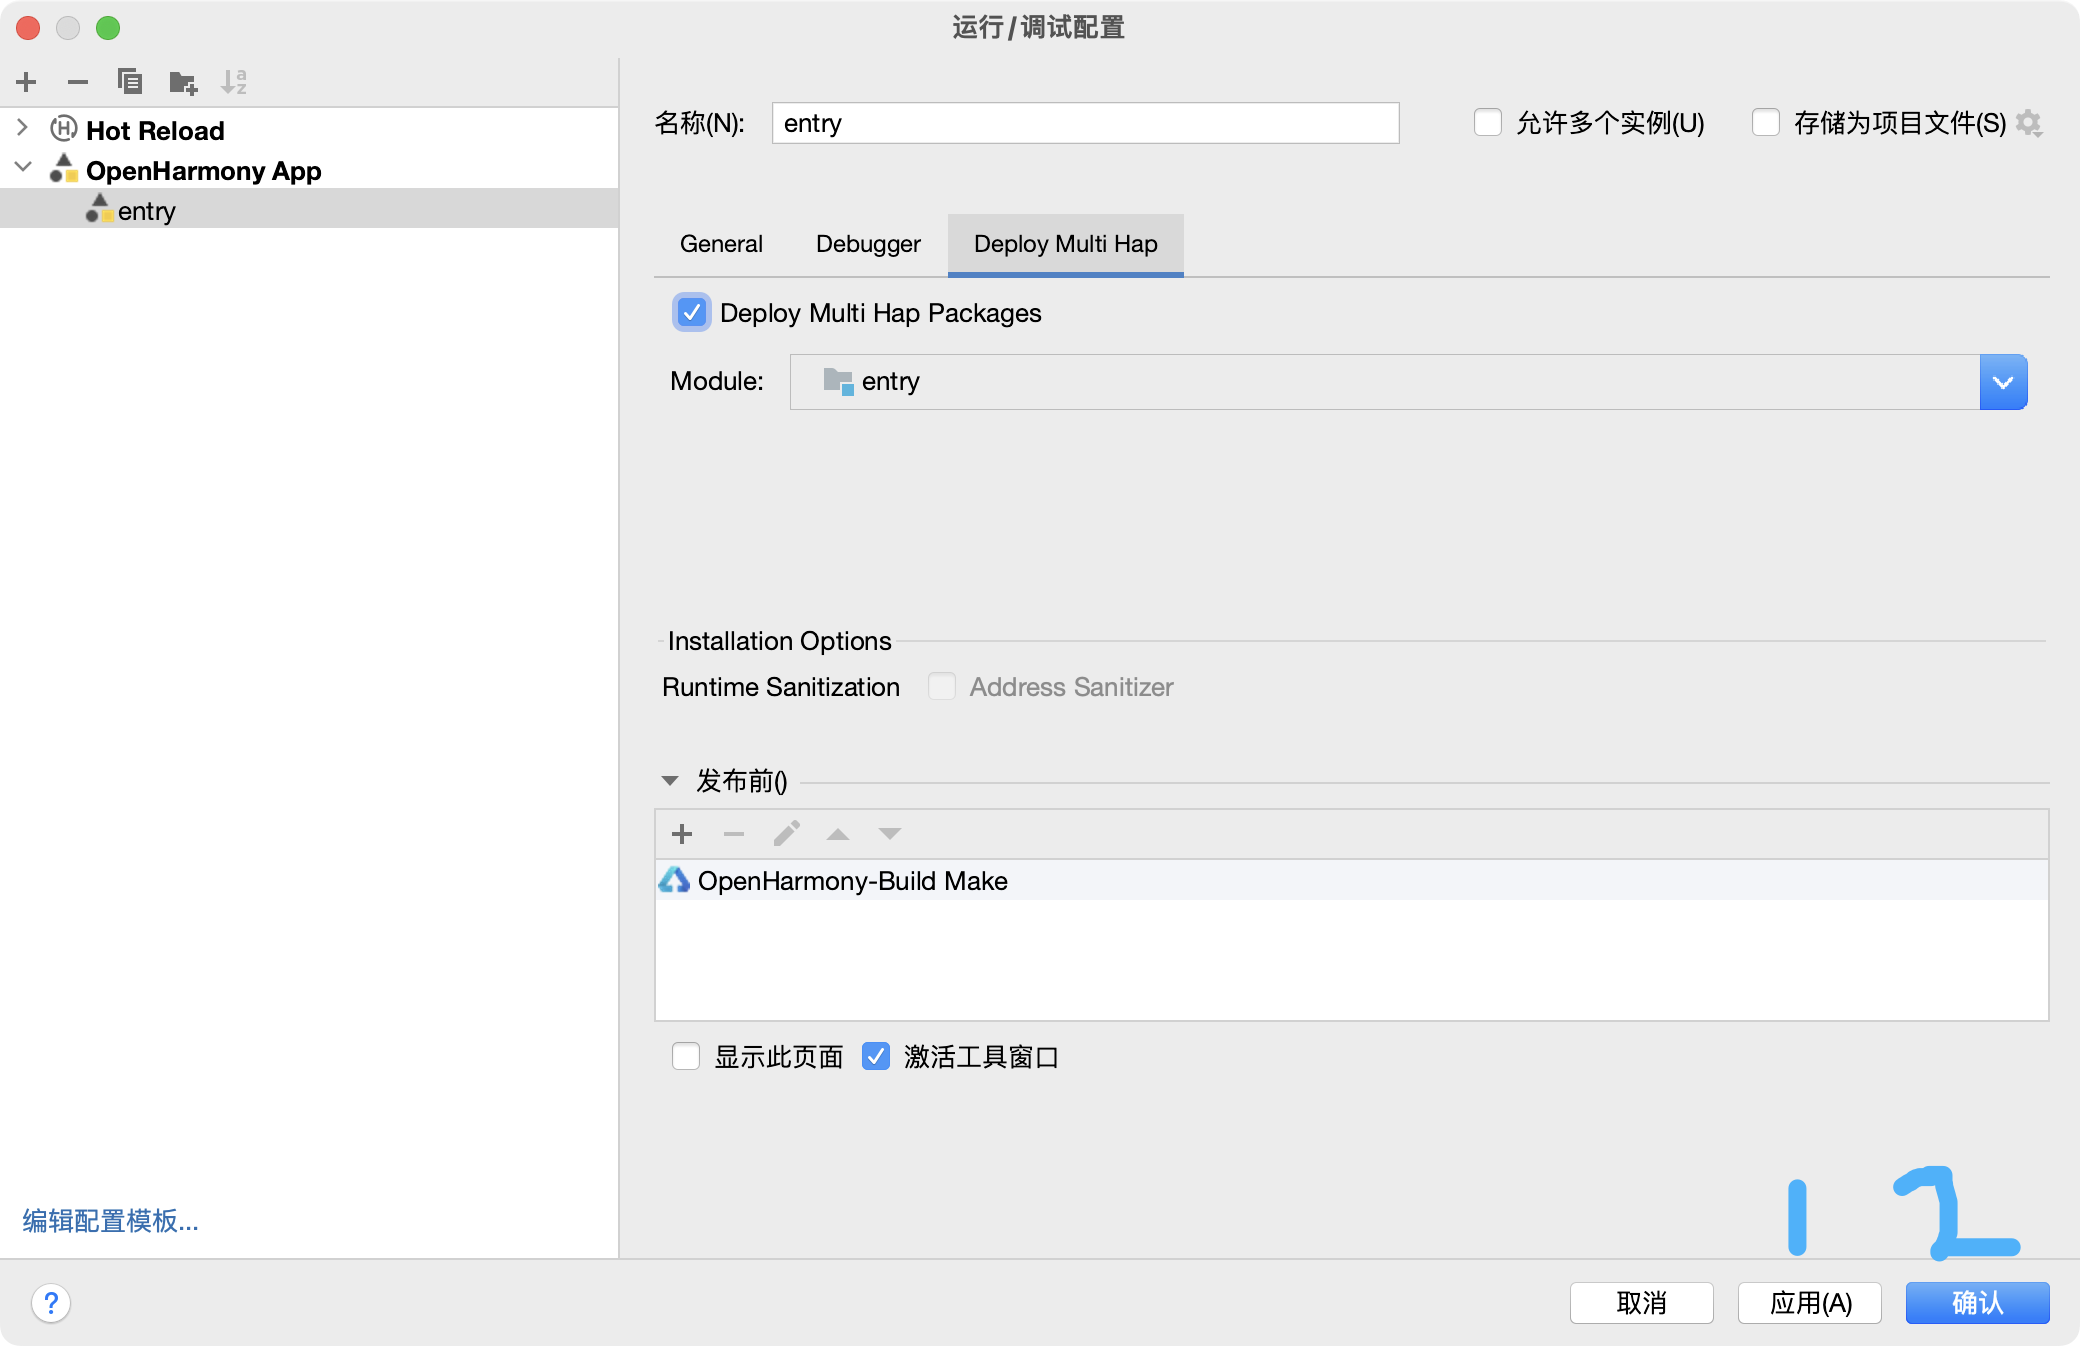
a. 点击编辑配置
@Entry
@Component
struct Index {
onTest() {
let sum = 0
for (let i=1; i<=10; i++) {
sum+=i
}
console.log(sum.toString())
}
build() {
Column() {
Button('start12').onClick(this.onTest)
}
}
}
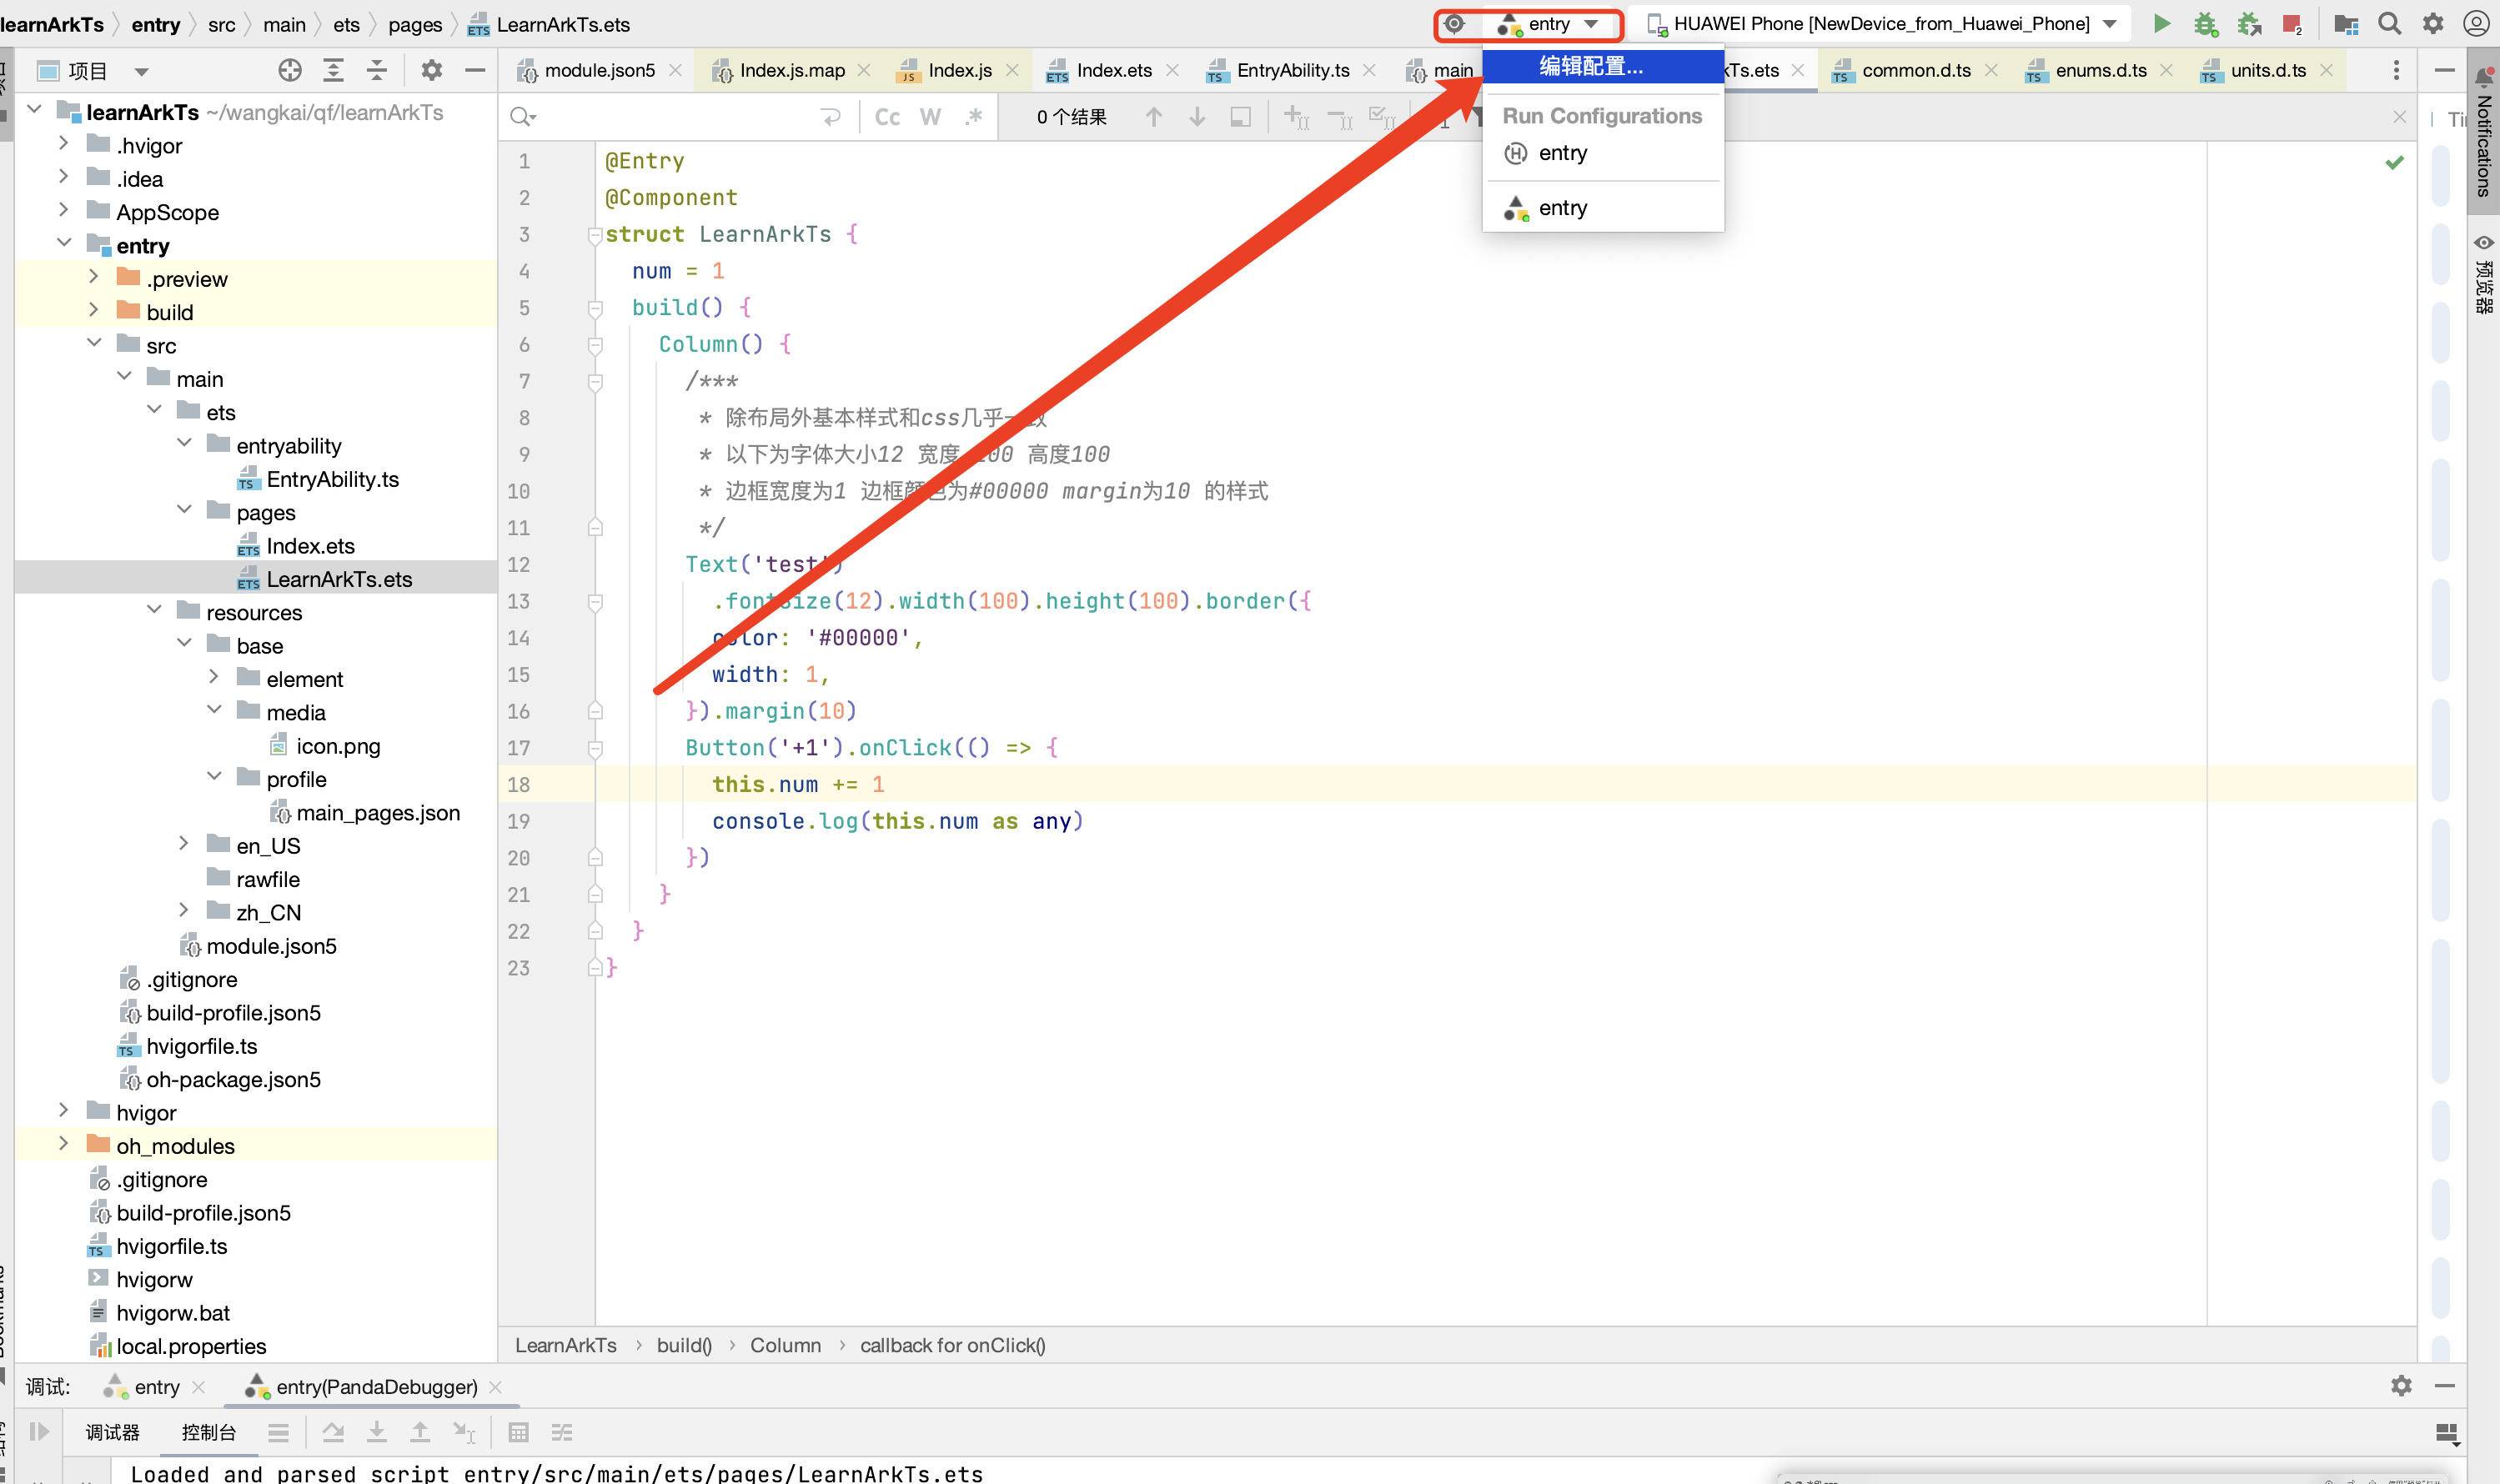
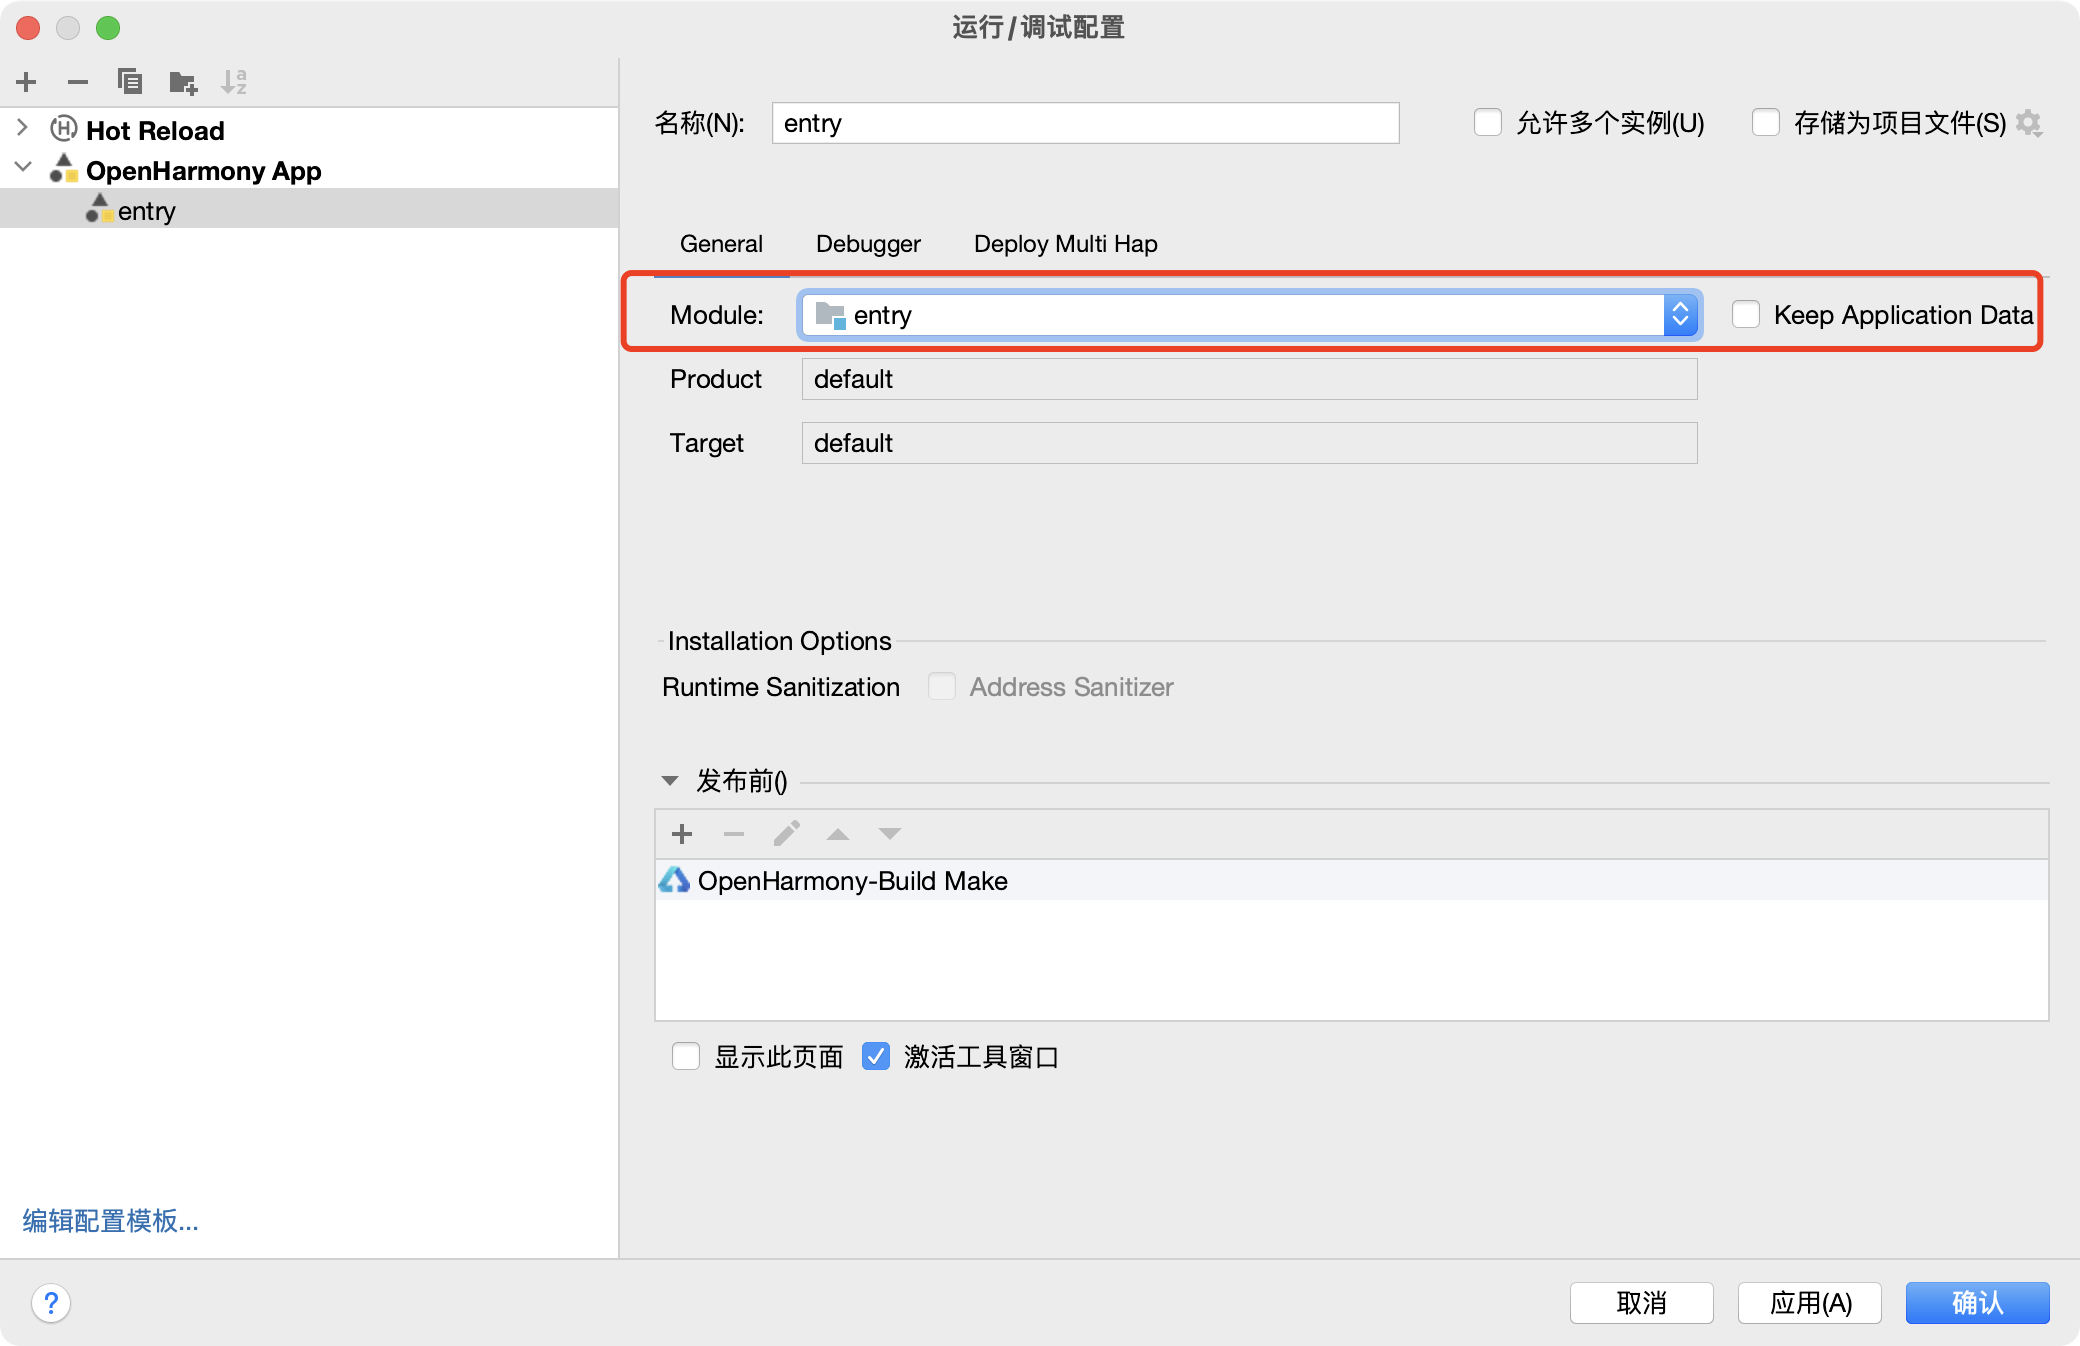
b. 选择对应的entry
-
安装方式一:先卸载应用/服务后,再重新安装,该方式会清除设备上的所有应用/服务缓存数据(默认安装方式)。
-
安装方式二:采用覆盖安装方式,不卸载应用/服务,该方式会保留应用/服务的缓存数据
-
采用默认安装即可
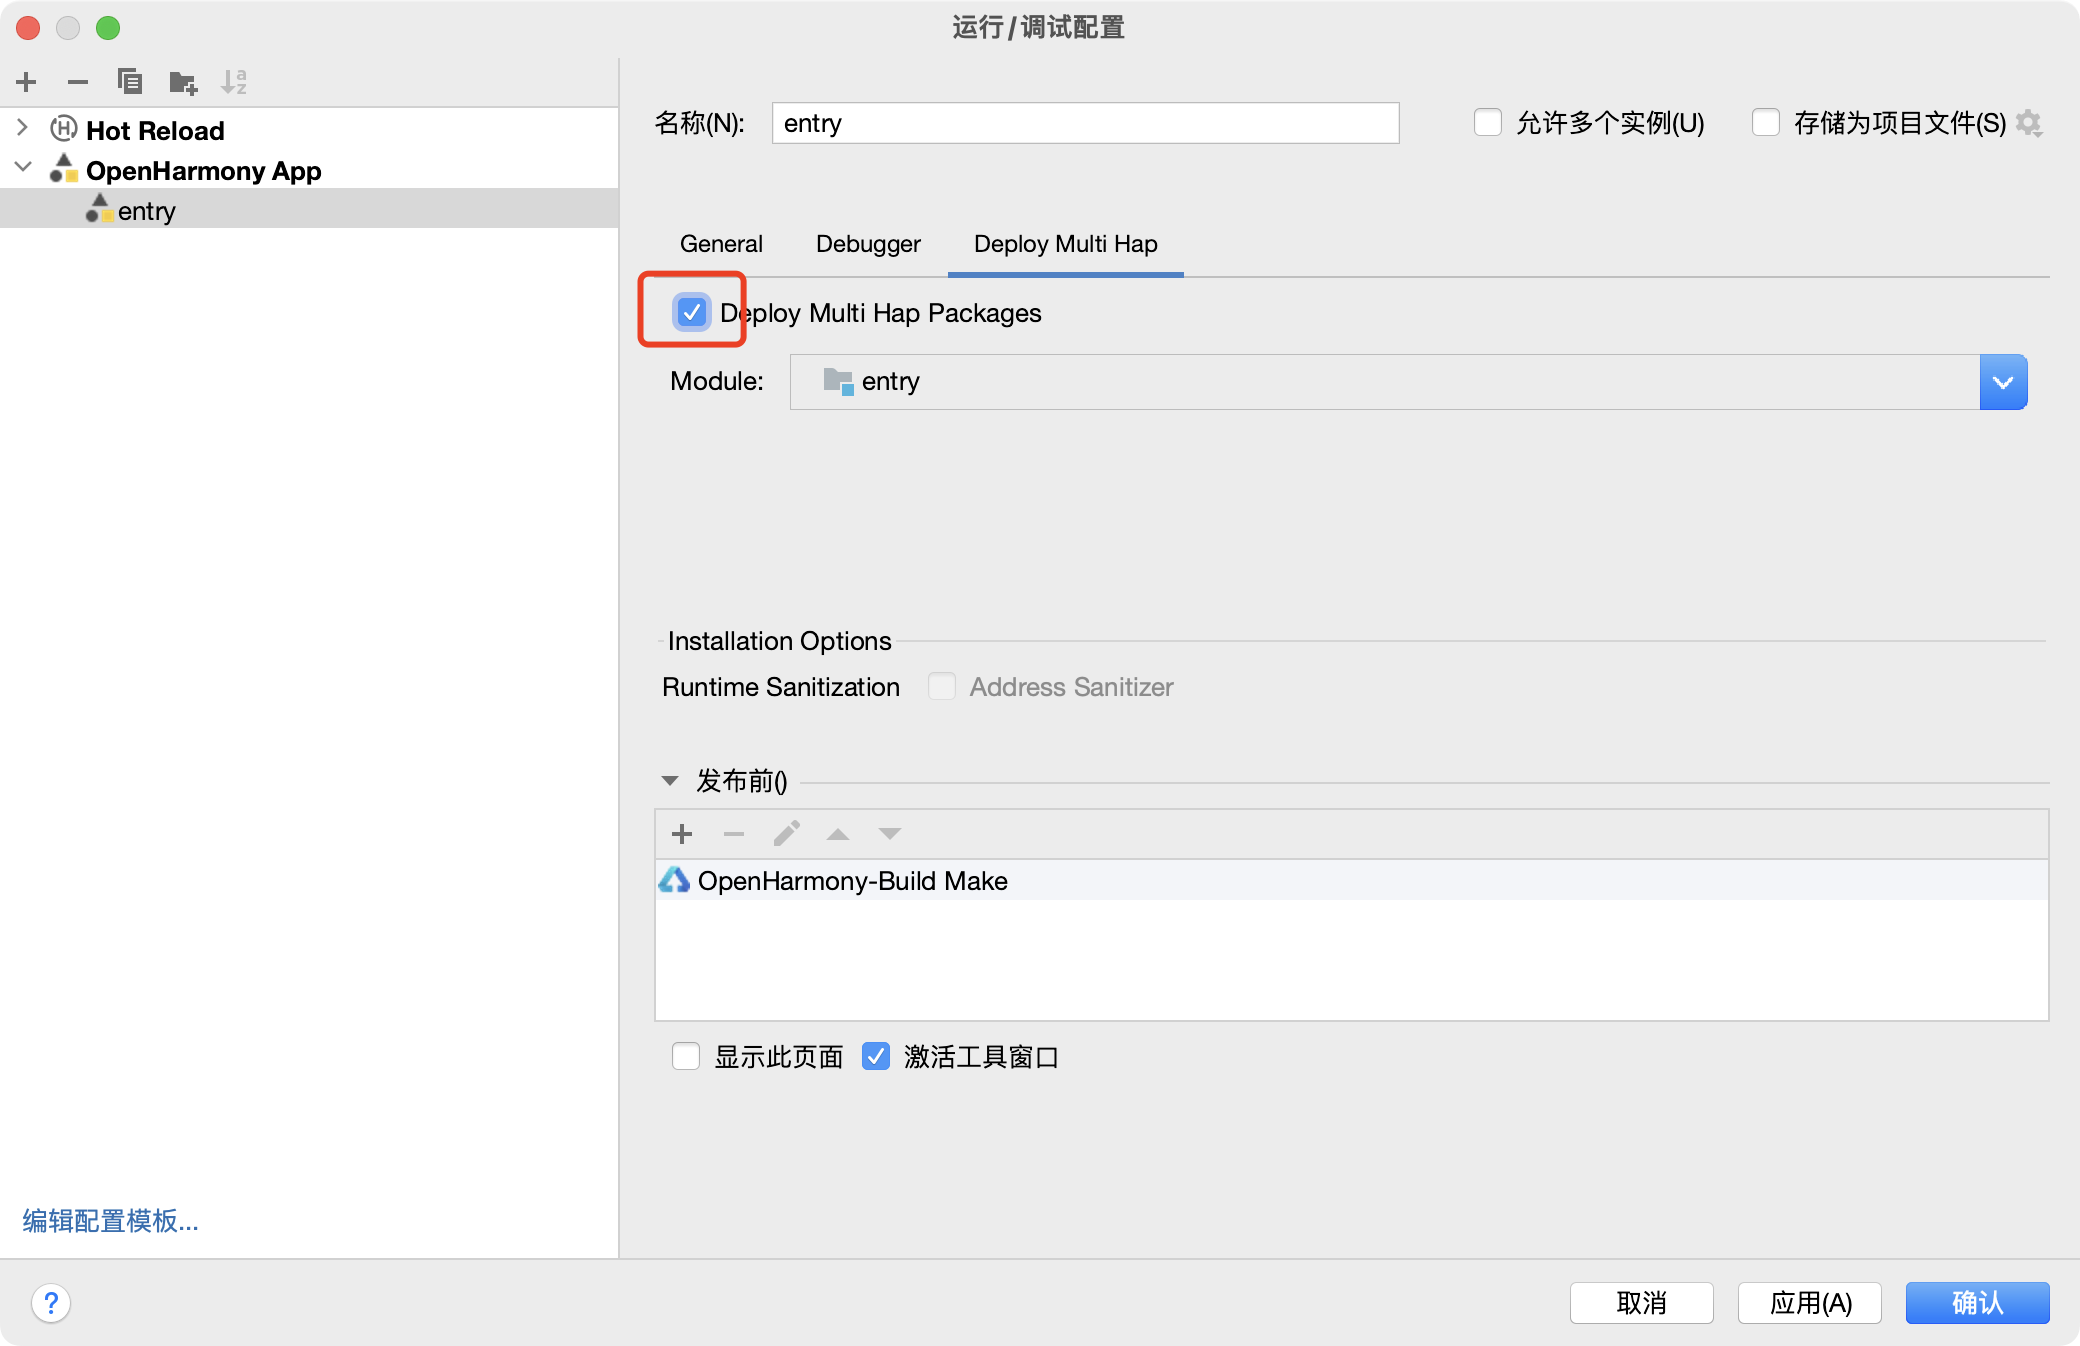
c. 多模块调试支持
如果一个工程中同一个设备存在多个模块(如Phone设备,存在entry和feature模块),且存在模块间的调用时,在调试阶段需要同时安装多个模块的hap包到设备中。此时,需要在Deploy Multi Hap中选择多个模块,启动调试时,DevEco Studio会将所有的模块都安装到设备上。DevEco Studio V3.1 Release开始支持
d. 点击应用后再点击确定完成配置
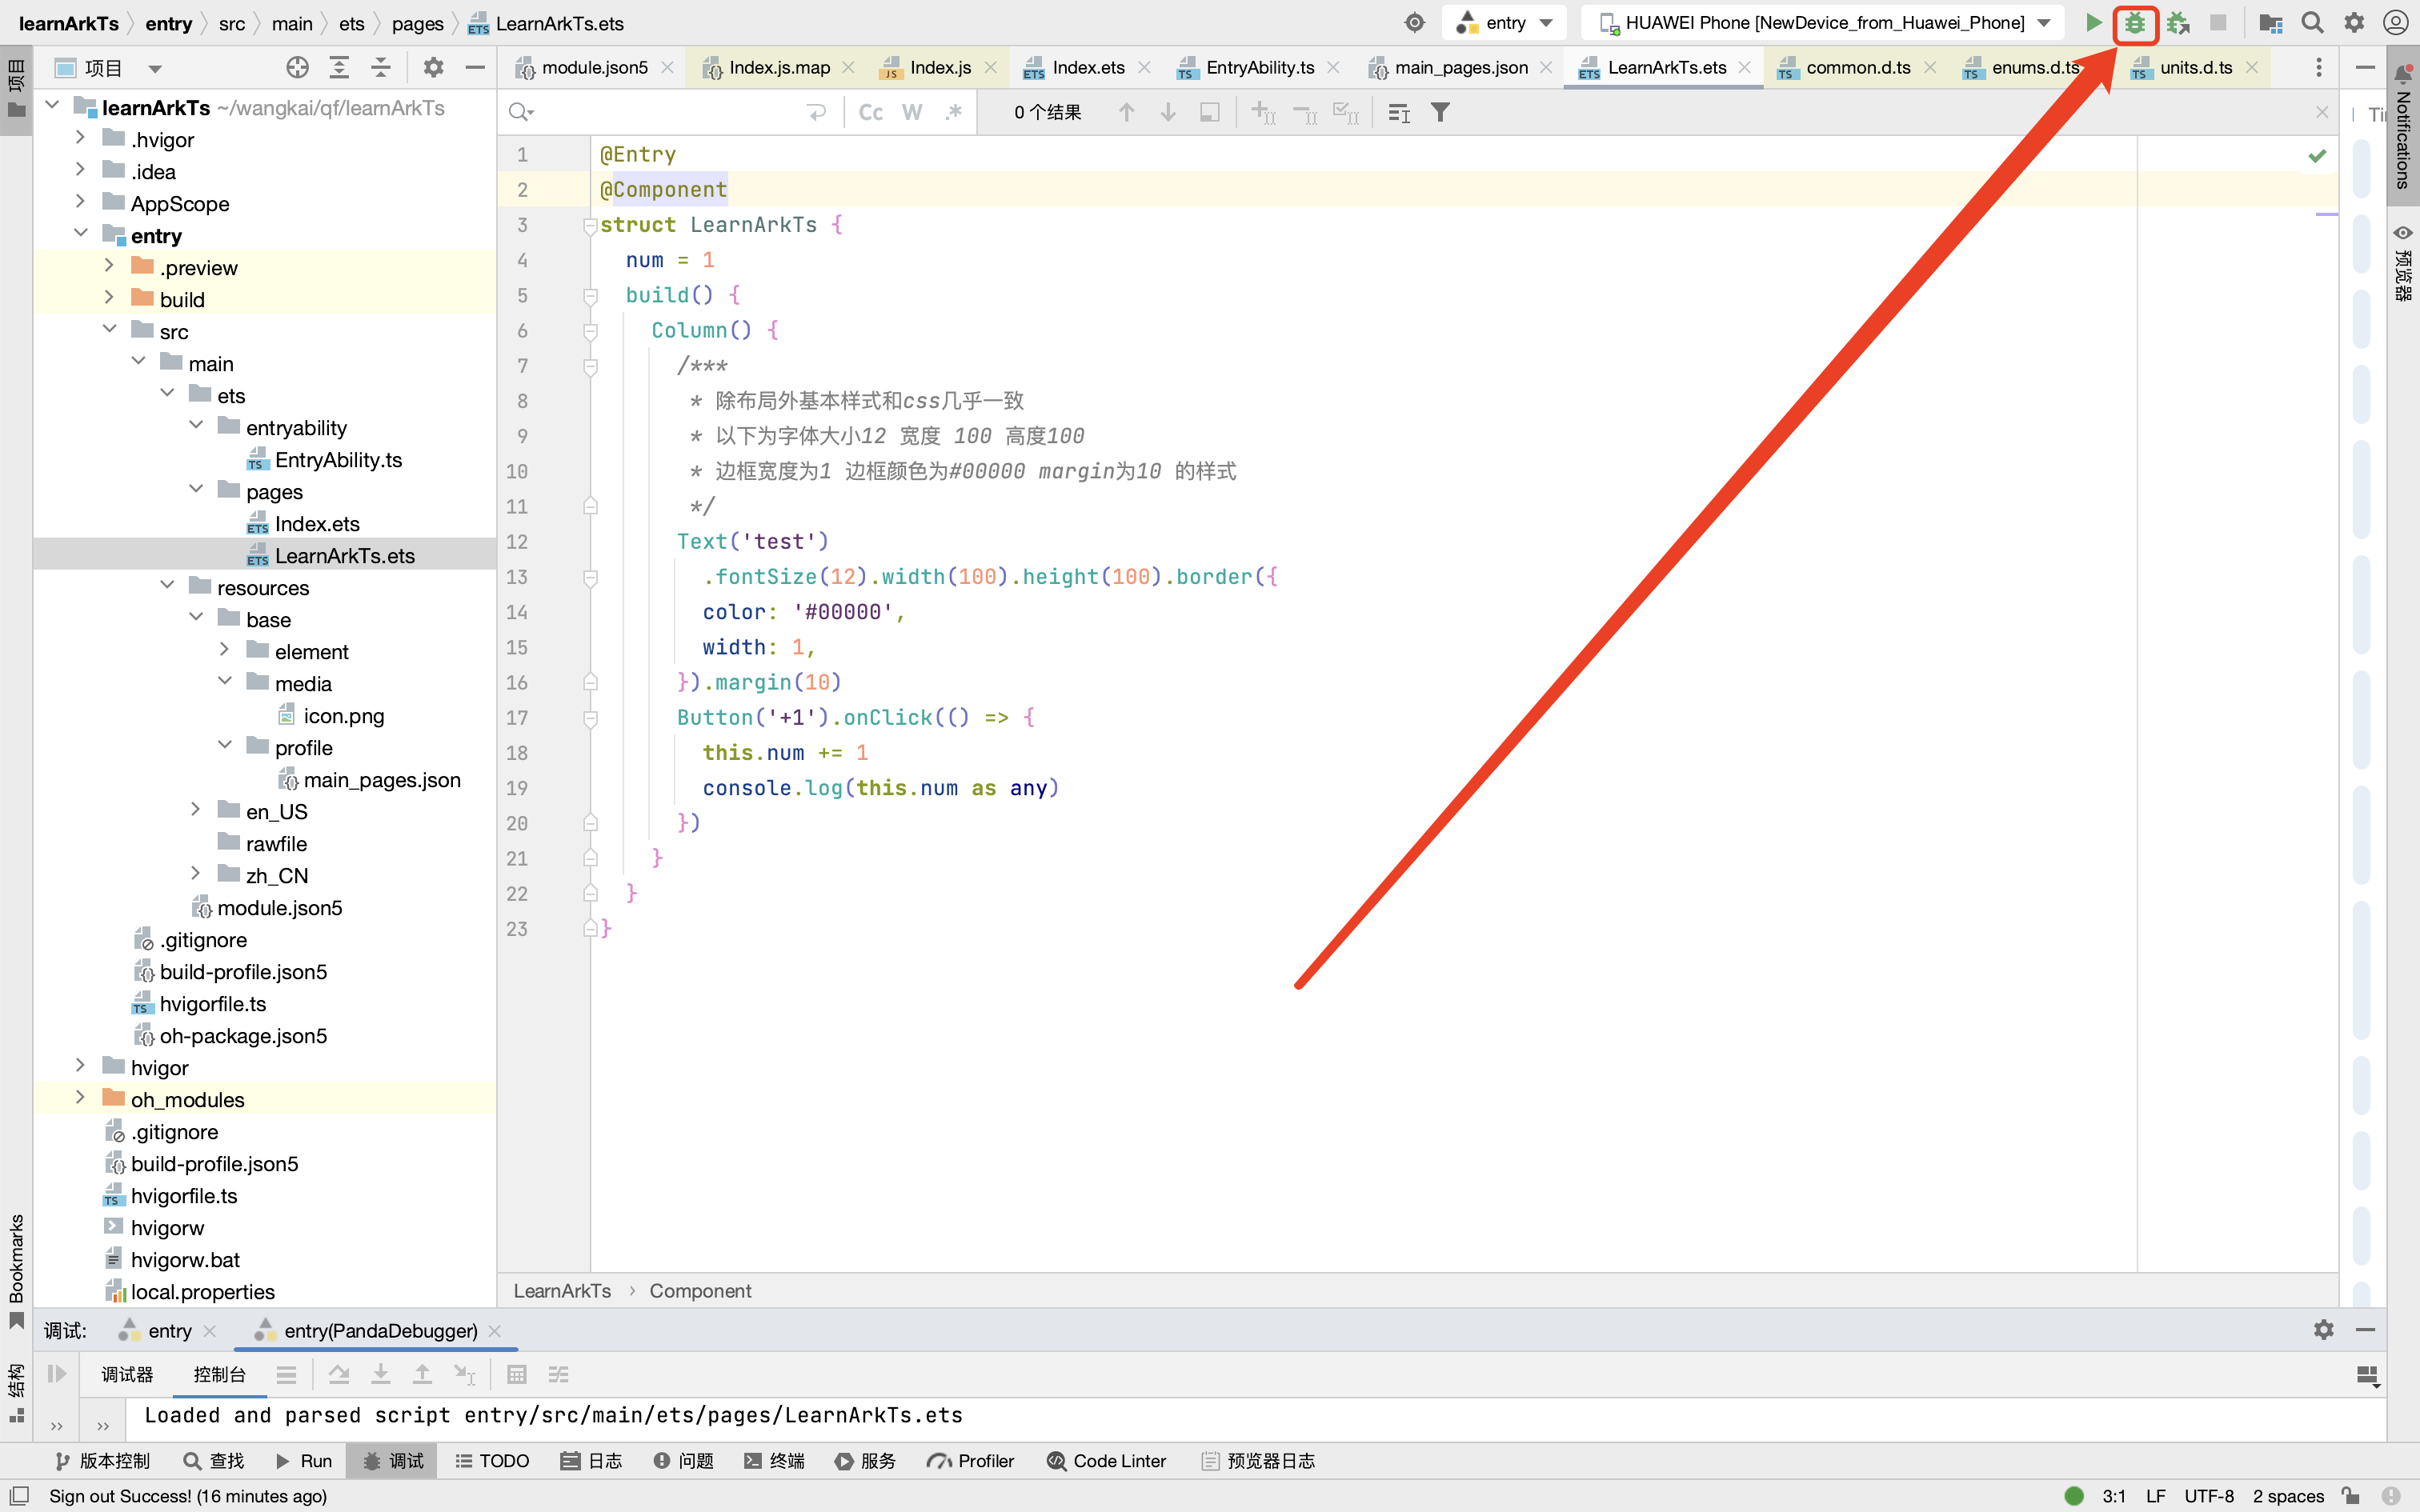
e. 开始调试
注意:提前打开模拟器,代码修改后需要重新点击进行调试
点击小绿logo进行断电调试
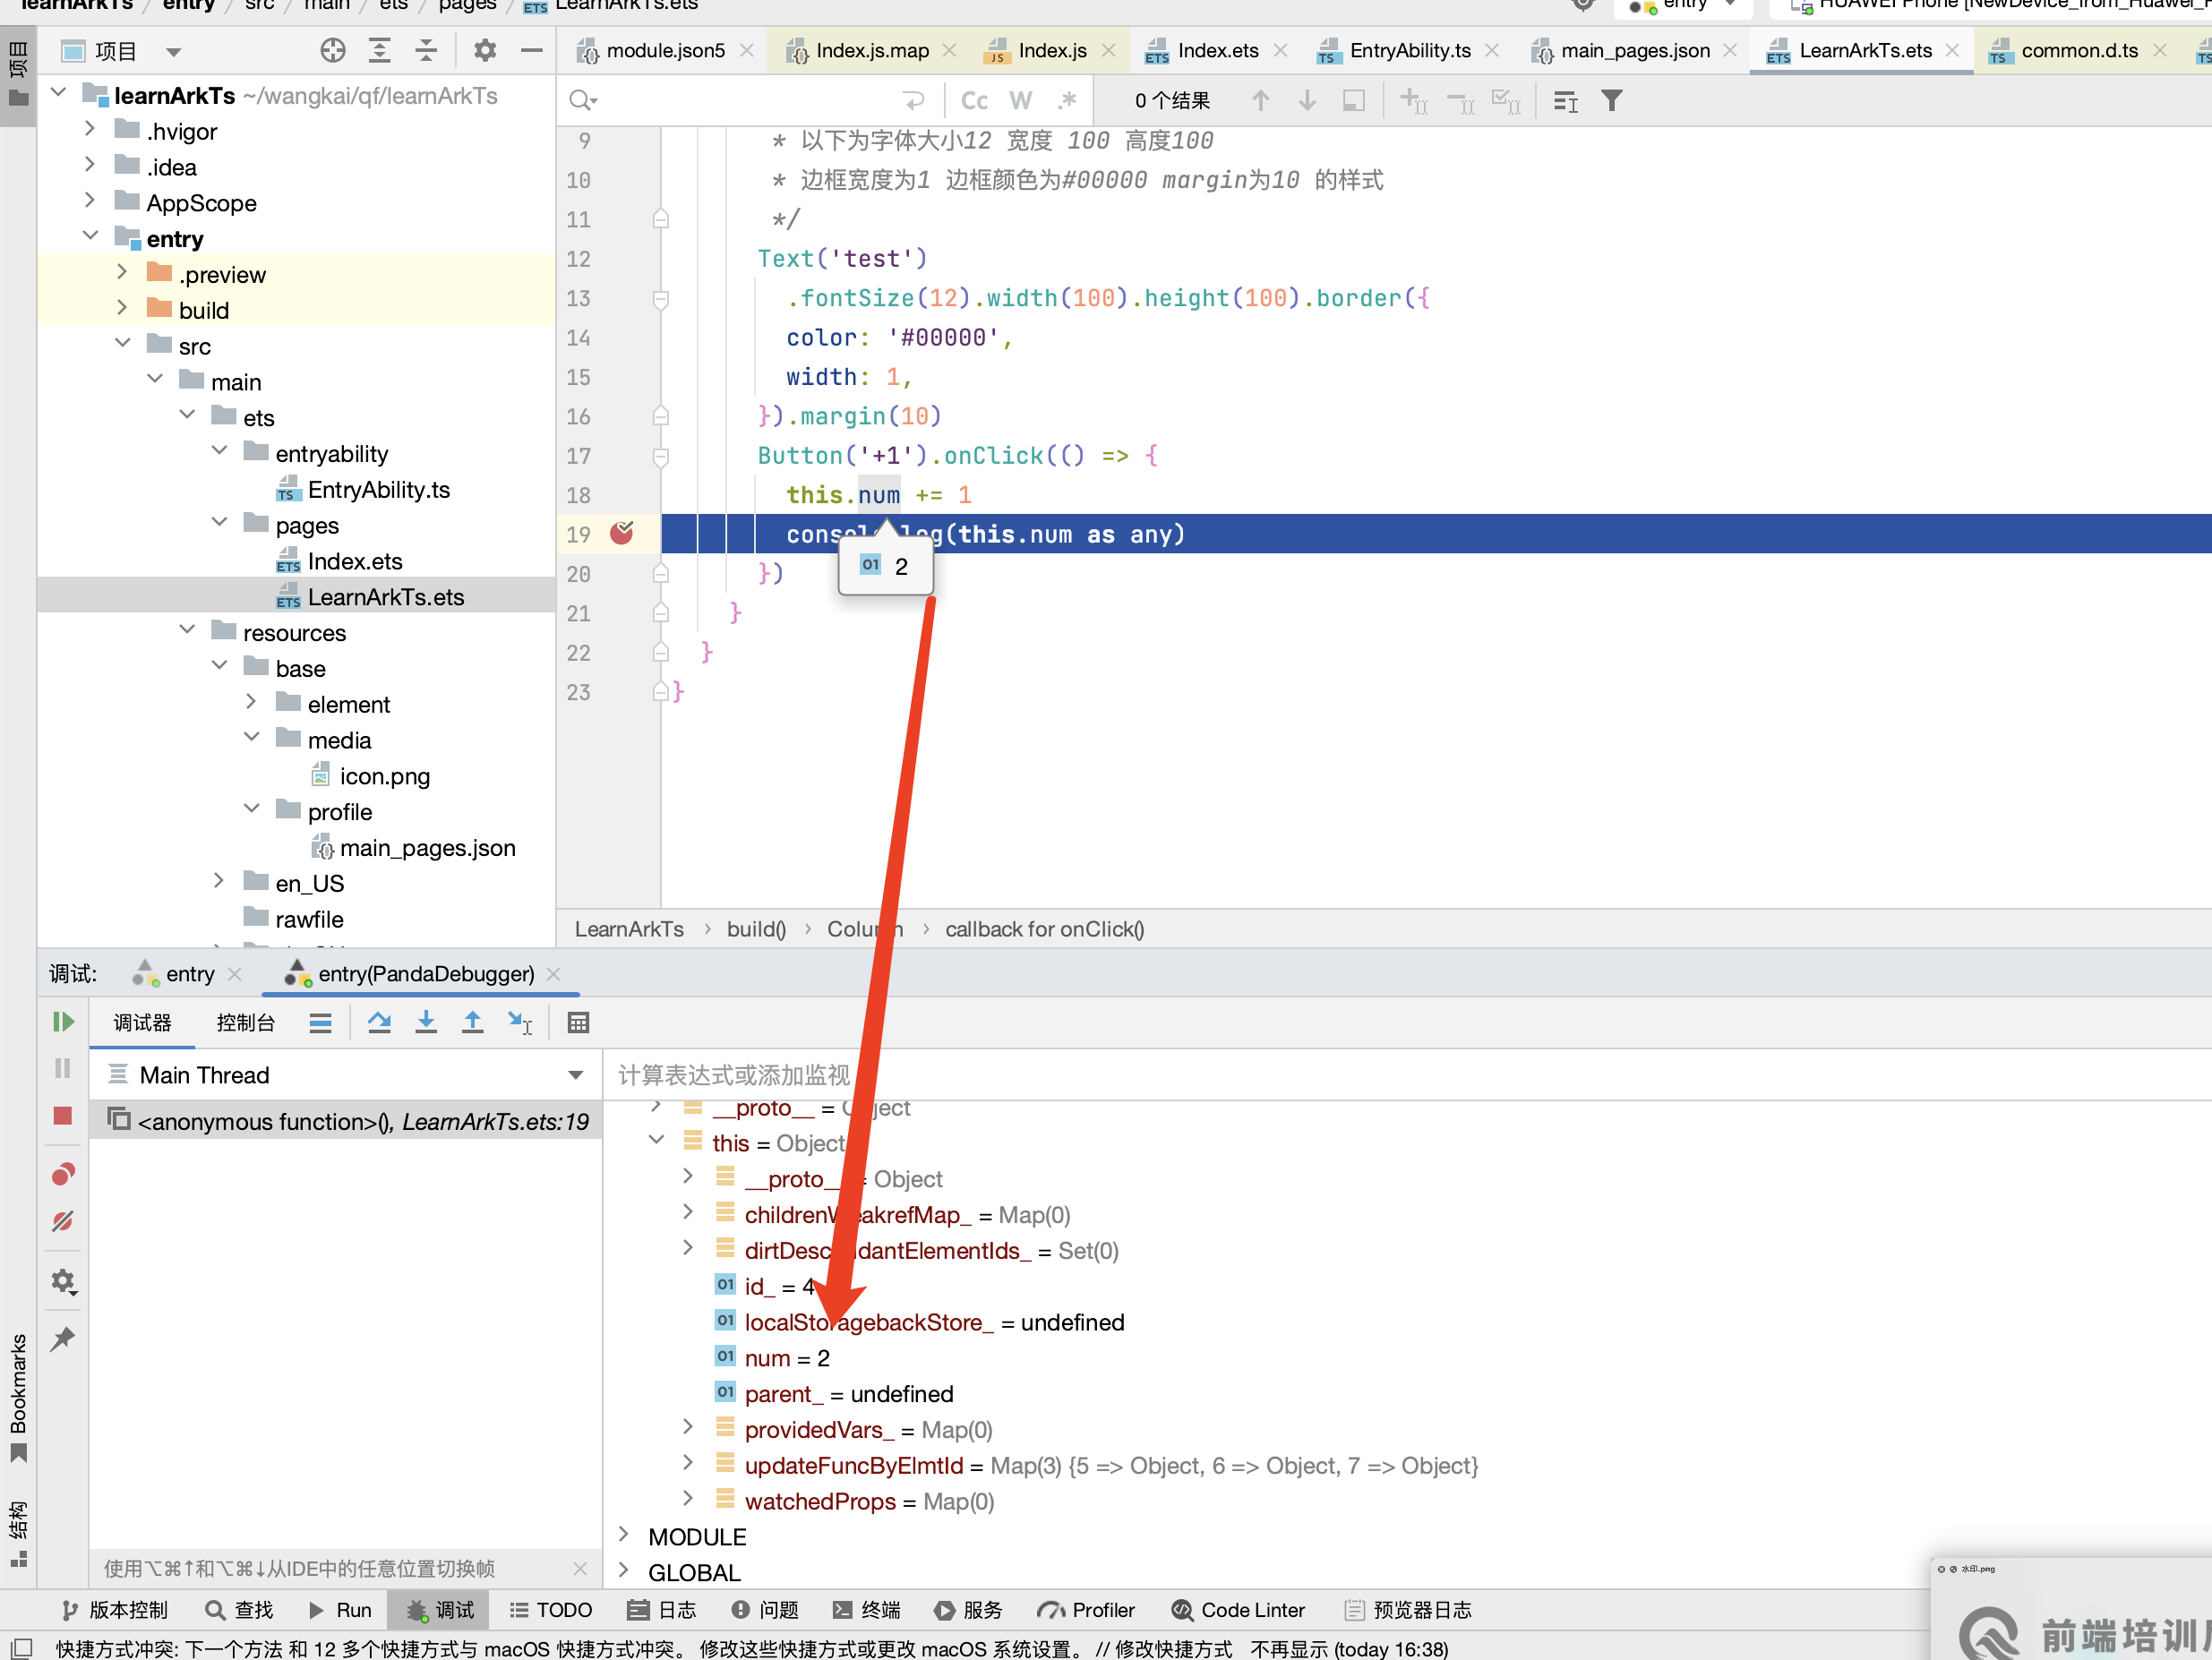
f. 相关功能键使用
| 按钮 | 名称 | 功能 | 快捷键 |
|---|---|---|---|
 |
Resume Program | 当程序执行到断点时停止执行,单击此按钮程序继续执行。 | F9 (macOS为Option+Command+R) |
 |
Step Over | 在单步调试时,直接前进到下一行(如果在函数中存在子函数时,不会进入子函数内单步执行,而是将整个子函数当作一步执行)。 | F8 (macOS为F8) |
 |
Step Into | 在单步调试时,遇到子函数后,进入子函数并继续单步执行。 | F7 (macOS为F7) |
 |
Force Step Into | 在单步调试时,强制进入方法。 | Alt+Shift+F7 (macOS为Option+Shift+F7) |
 |
Step Out | 在单步调试执行到子函数内时,单击Step Out会执行完子函数剩余部分,并跳出返回到上一层函数。 | Shift+F8 (macOS为Shift+F8) |
 |
Stop | 停止调试任务。 | Ctrl+F2 (macOS为Command+F2) |
 |
Run To Cursor | 断点执行到鼠标停留处。 | Alt+F9 (macOS为Option+F9) |
1、点击右上角entry位置 配置多模块 忽略
2、点击代码断点
3、点击右上角小虫子 debug调试
3 this指向
原生
简单概括: 调用当前方法的对象 也就是谁调用的打印的就是谁
固定公式
普通函数   window
对象函数   对象本身
事件函数   事件源
定时器函数  window
箭头函数   父function中的this  父没有function就是window
自定义     call/apply/bind
构造函数   this === 实例化对象 === 公共空间/原型对象上方法中的this
code
<button>+1</button>
<script>
const fn1 = function() {
console.log('普通函数 window: ', this)
}
fn1()
const obj1 = {
a:1,
b:2,
c: function() {},
d() {
console.log('对象函数 对象本身:', this)
}
}
obj1.d()
document.querySelector('button').onclick = function() {
console.log('事件函数:', this)
}
setTimeout(function() { // TODO: 切记别写箭头 写了就是父级this指向
console.log('定时器函数 window: ', this)
}, 0)
class Animal {
a = 1
b = 2
eat() {
console.log('构造函数/类中的 自身', this)
}
}
const dog = new Animal() // {a:1,b:2}
dog.eat()
</script>鸿蒙
this 自身/组件实例
@Entry
@Component
struct Index {
// 需 求:验证鸿蒙中的this是谁,确保写项目别出问题
// 明确1: 鸿蒙声明响应式数据参考了class语法
// 明确2: 加@State修饰符才有影响是 =》 @State 当数据改变会重新同步到视图
// 1 定义数据 组件大括号里面声明 {} => 修饰符 数据名:类型 = 数据
// 2 获取数据 this.数据名
// 3 更新数据 this.数据名 = 数据
// @State 响应式数据名:类型 = 数据
// @State 状态:类型 = 数据
// 声明/定义 响应式数据
// 声明/定义 状态
@State num:number = 1
aaa = 1111
bbbb = 2222
cccc = 3333
dddd = function() {}
other() {}
build() {
Column() {
Text(String(this.num))
Button('测试响应式效果')
.onClick(() => {
console.log('hello')
this.num++
console.log('内存数据:',this.num) // 组件自身、组件实例 里面存放了 自身数据
})
Button('打印this').onClick(() => {
console.log('this是谁:', this) // 留心:对象看不到具体数据,咱们可以吧对象转换为字符串 JSON数据格式
console.log('this是谁:', JSON.stringify(this))
// console.log('this是谁:', this.fn)
console.log('this是谁:', this.other)
})
}
}
}this使用细节
箭头函数调用或者箭头函数声明否则this会出现undefined情况,推荐声明统一正常写,调用加箭头
const obj1 = {
    a:1,
    b:2,
    c: function() {},
    d() {
        console.log(1, this)
        setTimeout(() => {
            console.log(2, this)
        }, 0)
        setTimeout(function() {
            console.log(3, this)
        }, 0)
    }
}
obj1.d()@Entry
@Component
struct Index {
// es6 类class语法 属性名 = 数据 只不过赋值是一个函数
// onTest1 = () => {
//
// }
// es6 类class语法 原型的写法
// onTest2() {
onTest2 = () => { // 父级环境中的this 因为父级是组件实例
console.log('hello', this)
}
build() {
Column() {
// 调用数据 this.状态名
// 调用函数 this.函数名() this.函数名
// - 区别1:有小括号执行了
// - 去背2:如果打印他们两 有小括号因为执行了所以打印的结果 没写return undefined、 没有小括号打印的是函数本身
// Button('this调用函数的细节').onClick(() => {
// console.log('【不加】小括号调用:', this.onTest2) // 函数本身
// console.log('【 加】小括号调用:', this.onTest2()) // 执行打印返回结果
// })
// Button('this调用函数的细节').onClick(this.onTest2())
Button('this调用函数的细节').onClick(this.onTest2) // 发现undefined
// Button('this调用函数的细节').onClick(() => {
// this.onTest2()
// })
}
}
}欢迎加入课程班级,考取鸿蒙认证: