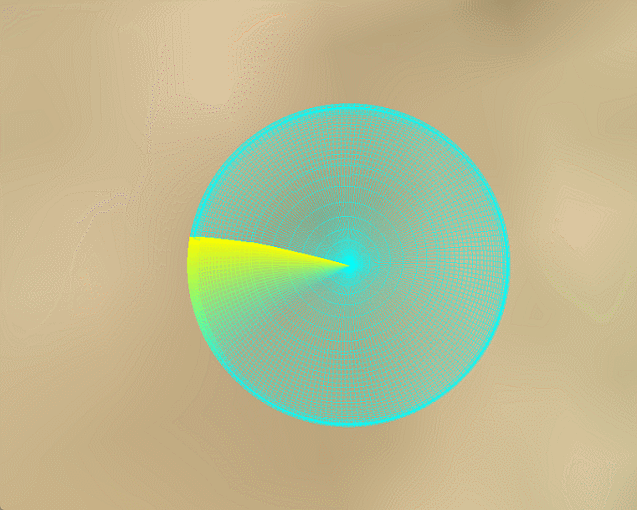
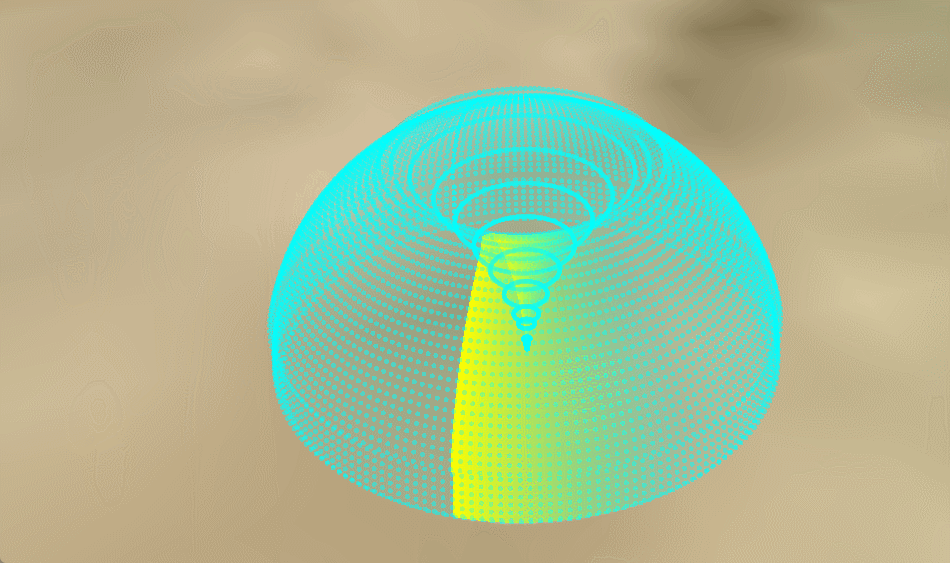
一、效果
二、前言
由算法工程师给出雷达包络数据点,数据由方位角、高度、距离三部分组成的数组。我将这些点连成了线和面,加上了着色器扫描效果,跟之前分享的代码相比都中规中矩,没啥需要特别说明的。
三、核心代码
1.顶点的计算
        //数据的俯仰值在递增、等增到一定值比如82之后,偏航值+1,俯仰值又在增,依次类推。数据是从经线的底部到顶部、顺时针转圈给出的。
        for (var pIndex = 0; pIndex < pointSum; pIndex++) {
            //     console.log( pIndex+'  偏航角:' +mergedArray[pIndex].azimuth+'  俯仰角:' +mergedArray[pIndex].elevation+'  距离' +mergedArray[pIndex].distance);
            var heading = Cesium.Math.toRadians(pointArray[pIndex].azimuth);
            var pitch = Cesium.Math.toRadians(pointArray[pIndex].elevation);
            var radius = pointArray[pIndex].distance;


            var x = radius * Math.sin(heading) * Math.cos(pitch);
            var y = radius * Math.cos(heading) * Math.cos(pitch);
            var z = radius * Math.sin(pitch);

            points.push(x);
            points.push(y);
            points.push(z);

        }
2.线段生成
   // 创建线框几何体 - 使用LINES图元
        var wireframeIndices = [];
        for (var vvv = 0; vvv < vSteps - 1; vvv++) {
            for (var hhh = 0; hhh < hSteps; hhh++) {
                var index2 = vvv * hSteps + hhh;
                // 垂直线(纬度方向)
                wireframeIndices.push(index2, index2 + hSteps);
                // 水平线(经度方向) - 仅当不是最后一条经线时
                if (hhh < hSteps - 1) {
                    wireframeIndices.push(index2, index2 + 1);
                }
            }
        }

        console.log(wireframeIndices);
//构建几何体对象
        var geometry2 = new Cesium.Geometry({
            attributes: {
                position: new Cesium.GeometryAttribute({
                    componentDatatype: Cesium.ComponentDatatype.DOUBLE,
                    componentsPerAttribute: 3,
                    values: points
                })
            },
            indices: wireframeIndices,
            primitiveType: Cesium.PrimitiveType.LINES,
            boundingSphere: Cesium.BoundingSphere.fromVertices(points)
        });

        //构建对象实例
        var instance = new Cesium.GeometryInstance({
            geometry: geometry2,
            attributes: {
                color: Cesium.ColorGeometryInstanceAttribute.fromColor(Cesium.Color.AQUA.withAlpha(0.5)) //******
            },
            id: 'top',
            modelMatrix: Cesium.Matrix4.multiplyByTranslation(Cesium.Transforms.eastNorthUpToFixedFrame(
                Cesium.Cartesian3.fromDegrees(105.59777, 40.03883)), new Cesium.Cartesian3(0.0, 0.0, 10.0), new Cesium.Matrix4()),
        });

        //创建这个外表
        var appearance = new Cesium.PerInstanceColorAppearance({
            flat: true,
            translucent: true,
            vertexShaderSource: vs,
            fragmentShaderSource: fs,
        });
3.动态扫描实现
//顶点着色器
        var vs = `attribute vec3 position3DHigh;
               attribute vec3 position3DLow;
               attribute vec4 color;
               attribute float batchId;
               varying vec4 v_color;
               varying vec3 v_position;
               void main()
               {
                    v_position = position3DHigh + position3DLow;
                    v_color = color;

                    //方式1
                    // vec4 p = czm_computePosition();
                    // gl_Position = czm_modelViewProjectionRelativeToEye *p;

                    //方式2
                    gl_Position = czm_modelViewProjection * vec4(v_position,1.0);

                    //方式3
                    //vec4 p = czm_translateRelativeToEye(position3DHigh, position3DLow);
                    //gl_Position = czm_modelViewProjectionRelativeToEye * p;

               }`;

        //片元着色器 - 修正了扫描方向和区域判断
        var fs = `varying vec4 v_color;
               varying vec3 v_position;
               uniform float u_time;
               uniform float u_scanWidth; // 扫描扇区宽度(弧度)

               void main()
               {

                   // 计算当前点在XOY平面上的角度(相对于X轴)
                   float currentAngle = atan(v_position.y, v_position.x);//[-czm_pi,czm_pi]

                   // 计算扫描线的角度(随时间变化,取负号使旋转方向为顺时针)
                   float scanAngle = mod(-u_time, 2.0*czm_pi); // [0,2PI]

                   // 计算当前点相对于扫描线的角度差(带方向)currentAngle - scanAngle在[-3PI,czm_pi]
                   float angleDiff = mod(currentAngle - scanAngle + 3.0*czm_pi, 2.0*czm_pi) - czm_pi;//最终结果在[-czm_pi,czm_pi]

                   // 判断是否在扫描扇区内(只考虑扫描线前方的区域)
                   if(angleDiff > 0.0 && angleDiff < u_scanWidth) {
                       // 计算相对距离(0-1范围),0表示扫描线位置,1表示扫描区域末尾
                       float relativeDistance = angleDiff / u_scanWidth;
                       // 透明度从1.0(扫描线位置)线性过渡到几何体的基础透明度(扫描区域末尾)
                       float alphaFactor = 1.0 - relativeDistance;
                       vec3 scanColor = vec3(1.0, 1.0, 0.0);
                       gl_FragColor = vec4(mix(v_color.rgb, scanColor, alphaFactor), mix(v_color.a, 1.0, alphaFactor));
                   } else {
                       gl_FragColor = v_color;
                   }
               }`;
四、变形效果(只绘制出点)
修改点1:
替换掉顶点和片源着色器为如下:
    const vs = `
        attribute vec3 position3DHigh;
        attribute vec3 position3DLow;
        varying vec3 v_position;
        attribute vec4 color;
        varying vec4 v_color;
        attribute float batchId;
        void main() {
            v_position = position3DHigh + position3DLow;
            gl_Position = czm_projection * czm_modelView * vec4(v_position, 1.0);
            gl_PointSize = 5.0;  // 设置点的大小(单位:像素)
            v_color = color;
        }
`;

        const fs = `
        varying vec4 v_color;
        void main() {
            gl_FragColor = v_color;
            // 如果需要圆形点而不是方形点
            vec2 coord = gl_PointCoord - vec2(0.5);
            if (length(coord) > 0.5) {
                discard;
            }
        }
`;
修改点2:
修改绘制方式为点,并去掉索引,其他不变,代码如下:
        //构建几何体对象
        var geometry2 = new Cesium.Geometry({
            attributes: {
                position: new Cesium.GeometryAttribute({
                    componentDatatype: Cesium.ComponentDatatype.DOUBLE,
                    componentsPerAttribute: 3,
                    values: points
                })
            },
            // indices: wireframeIndices,
            primitiveType: Cesium.PrimitiveType.POINTS,
            boundingSphere: Cesium.BoundingSphere.fromVertices(points)
});绘制方法参见我的这边博文Cesium实现半球扫描效果
原创不易,记得点赞加关注哦,我会持续分享实用的功能(:-