目录
- 引子
-
- [LangGraph 概览](#LangGraph 概览)
- 安装
- 快速开始(Quickstart)
-
- [1. 定义工具和模型](#1. 定义工具和模型)
- [2. 定义状态(State)](#2. 定义状态(State))
- [3. 定义模型节点(Model Node)](#3. 定义模型节点(Model Node))
- [4. 定义工具节点(Tool Node)](#4. 定义工具节点(Tool Node))
- [5. 定义结束逻辑(End Logic)](#5. 定义结束逻辑(End Logic))
- [6. 构建并编译 Agent](#6. 构建并编译 Agent)
- [用 LangGraph 的方式思考(Thinking in LangGraph)](#用 LangGraph 的方式思考(Thinking in LangGraph))
-
- 第一步:将你的工作流拆解为离散步骤
- 第二步:明确每个步骤需要做什么
- 第三步:设计你的状态(State)
- [第四步:构建你的节点(Build your nodes)](#第四步:构建你的节点(Build your nodes))
-
- [合理处理错误(Handle errors appropriately)](#合理处理错误(Handle errors appropriately))
-
- [瞬时错误(Transient errors)](#瞬时错误(Transient errors))
- [LLM 可恢复错误(LLM-recoverable errors)](#LLM 可恢复错误(LLM-recoverable errors))
- [用户可修复错误(User-fixable errors)](#用户可修复错误(User-fixable errors))
- [未知错误(Unexpected errors)](#未知错误(Unexpected errors))
- [实现邮件 Agent 的节点(Implementing our email agent nodes)](#实现邮件 Agent 的节点(Implementing our email agent nodes))
-
- [读取与分类节点(Read and classify nodes)](#读取与分类节点(Read and classify nodes))
- [检索与缺陷跟踪节点(Search and tracking nodes)](#检索与缺陷跟踪节点(Search and tracking nodes))
- [回复节点(Response nodes)](#回复节点(Response nodes))
- [人工审核节点(Human review node)](#人工审核节点(Human review node))
- [发送回复节点(Send reply node)](#发送回复节点(Send reply node))
- [第五步:连接节点(Step 5: Wire it together)](#第五步:连接节点(Step 5: Wire it together))
- [工作流与 Agent(Workflows and agents)](#工作流与 Agent(Workflows and agents))
-
- 环境设置(Setup)
- [LLM 与增强(LLMs and augmentations)](#LLM 与增强(LLMs and augmentations))
- [Prompt 链(Prompt chaining)](#Prompt 链(Prompt chaining))
- 并行化(Parallelization)
- 路由(Routing)
- [Orchestrator-Worker 模式](#Orchestrator-Worker 模式)
- 评估-优化器(Evaluator-Optimizer)
- 代理(Agents)
- 核心能力
-
- 持久化
-
- 线程(Threads)
- 检查点(Checkpoints)
-
- [获取状态(Get state)](#获取状态(Get state))
- [获取状态历史(Get state history)](#获取状态历史(Get state history))
- 回放(Replay)
- [更新状态(Update state)](#更新状态(Update state))
- [内存存储(Memory Store)](#内存存储(Memory Store))
- [检查点库(Checkpointer libraries)](#检查点库(Checkpointer libraries))
- [持久化执行(Durable execution)](#持久化执行(Durable execution))
-
- [确定性与一致性重放(Determinism and Consistent Replay)](#确定性与一致性重放(Determinism and Consistent Replay))
- [持久化级别(Durability modes)](#持久化级别(Durability modes))
- [在节点中使用 task](#在节点中使用 task)
- [恢复工作流(Resuming Workflows)](#恢复工作流(Resuming Workflows))
- [工作流恢复时的起始点(Starting Points for Resuming Workflows)](#工作流恢复时的起始点(Starting Points for Resuming Workflows))
- 流式输出(Streaming)
-
- [支持的流式模式(Supported stream modes)](#支持的流式模式(Supported stream modes))
- 基本用法示例
- [同时使用多种流式模式(Stream multiple modes)](#同时使用多种流式模式(Stream multiple modes))
- [流式输出图状态(Stream graph state)](#流式输出图状态(Stream graph state))
- [流式输出子图结果(Stream subgraph outputs)](#流式输出子图结果(Stream subgraph outputs))
- [LLM Token 流式输出](#LLM Token 流式输出)
- [流式输出自定义数据(Stream custom data)](#流式输出自定义数据(Stream custom data))
- [与任意 LLM 一起使用(Use with any LLM)](#与任意 LLM 一起使用(Use with any LLM))
- [为特定聊天模型禁用流式输出(Disable streaming for specific chat models)](#为特定聊天模型禁用流式输出(Disable streaming for specific chat models))
- 中断(Interrupts)
-
- [使用 interrupt 暂停执行(Pause using interrupt)](#使用 interrupt 暂停执行(Pause using interrupt))
- [恢复中断(Resuming interrupts)](#恢复中断(Resuming interrupts))
- [常见模式(Common patterns)](#常见模式(Common patterns))
- [批准或拒绝(Approve or reject)](#批准或拒绝(Approve or reject))
- [审核并编辑状态(Review and edit state)](#审核并编辑状态(Review and edit state))
- [在工具(tool)中使用中断(Interrupts in tools)](#在工具(tool)中使用中断(Interrupts in tools))
- [校验人工输入(Validating human input)](#校验人工输入(Validating human input))
- [中断规则(Rules of interrupts)](#中断规则(Rules of interrupts))
-
- [不要在 try/except 中包裹 interrupt](#不要在 try/except 中包裹 interrupt)
- [不要在节点内重新排序中断调用(Do not reorder interrupt calls within a node)](#不要在节点内重新排序中断调用(Do not reorder interrupt calls within a node))
- [不要在中断调用中返回复杂值(Do not return complex values in interrupt calls)](#不要在中断调用中返回复杂值(Do not return complex values in interrupt calls))
- [中断前调用的副作用必须幂等(Side effects called before interrupt must be idempotent)](#中断前调用的副作用必须幂等(Side effects called before interrupt must be idempotent))
- [在节点中以函数方式调用子图(Using with subgraphs called as functions)](#在节点中以函数方式调用子图(Using with subgraphs called as functions))
- [使用中断进行调试(Debugging with interrupts)](#使用中断进行调试(Debugging with interrupts))
- [使用时间旅行(Use time-travel)](#使用时间旅行(Use time-travel))
-
- [在 LangGraph 中使用时间旅行](#在 LangGraph 中使用时间旅行)
- 记忆(Memory)
-
- 添加短期内存
- 添加长期记忆
- 管理短期记忆
-
- 裁剪消息
- 删除消息
- 总结消息
- 管理检查点(Checkpoints)
-
- 查看线程状态
- [查看线程历史记录(View the history of the thread)](#查看线程历史记录(View the history of the thread))
- 删除线程的所有检查点
- 数据库管理
- 子图(Subgraphs)
- 结尾
引子
在写完《未必是跨时代的更新------langChain v1.0》之后,我其实并不想再继续讨论"框架之争"。因为在我看来,绝大多数争论都跑偏了:大家讨论的是 API 漂不漂亮、抽象层多不多、概念新不新,却很少有人回到一个最根本的问题------Agent 框架究竟是为了解决什么问题而存在的。
如果把问题拆到最小粒度,其实答案非常朴素。所谓 agent,无非就是把人类的自然语言输入,转化为一次或多次对大模型的推理调用,并在必要的时候,结合上下文、工具和状态,形成一个可控、可复用的执行过程。模型才是核心,推理路径才是关键,其余的一切,都应该是为"让这件事更简单、更清晰、更可控"服务的。
但过去很长一段时间里,我们看到的却恰恰相反。框架不再致力于隐藏复杂性,而是不断制造新的复杂性:生命周期、上下文引擎、中间件、递归调用、层层包装的 Runnable、抽象再抽象的 Chain。Agent 被包装得越来越像一个 Web 框架,开发者被迫去理解大量与"模型推理本身"几乎无关的概念,只是为了完成一次原本非常直接的调用。
问题是,这些复杂度真的带来了价值吗?
我用内存维护对话状态,在用户退出时持久化到 MySQL 或 MongoDB,下次加载恢复;我在模型调用前对字符串做脱敏、合规、过滤;我按需决定是否调用工具、是否继续对话------这些已经覆盖了现实系统中 90% 的 Agent 需求。它们不需要上下文引擎,不需要生命周期管理,更不需要一套模仿 Web 中间件的递归执行模型。
程序需要的是清晰的逻辑,而不是不断堆叠的概念。
抽象的意义是减少心智负担,而不是让人为了"用框架"而去理解框架本身。
也正因为如此,当我真正开始使用 langgraph,而不是只停留在概念和示例层面时,才第一次感受到:它并不是在"教你如何使用 Agent",而是在把"如何构建 Agent 的控制权,重新交还给开发者"。你可以显式地设计节点,显式地定义状态流转,显式地决定模型在什么时候、以什么方式运行。没有多余的修辞,没有强行灌输的范式,只有一张清晰的执行图。
这,才是我认为真正配得上"跨时代更新"的地方。
LangGraph 概览
使用 LangGraph 获取对 Agent 的真正控制力,设计能够可靠处理复杂任务的智能体系统。
LangGraph 已被包括 Klarna、Replit、Elastic 在内的多家引领 Agent 未来形态的公司所采用。它是一个偏底层的编排框架与运行时 ,用于构建、管理和部署长时间运行、具备状态的 Agent。
LangGraph 的定位非常明确:足够底层,并且只专注于 Agent 编排本身。在使用 LangGraph 之前,我们建议你先熟悉构建 Agent 所需的一些基础组件,尤其是模型(models)和工具(tools)。
在官方文档中,我们会经常使用 LangChain 提供的组件来集成模型和工具,但使用 LangGraph 并不依赖 LangChain。如果你刚开始接触 Agent,或者更倾向于使用更高层的抽象,我们仍然建议直接使用 LangChain 提供的 Agent,它们为常见的 LLM 推理与工具调用流程提供了现成的架构。
LangGraph 关注的是 Agent 编排中最核心、也最底层的能力:可持久化执行(durable execution) 、流式处理(streaming)、**人类参与决策(human-in-the-loop)**等关键特性。
安装
bash
pip install -U langgraph
或
uv add langgraph
然后,创建一个最简单的 Hello World 示例:
python
from langgraph.graph import StateGraph, MessagesState, START, END

def mock_llm(state: MessagesState):
    return {"messages": [{"role": "ai", "content": "hello world"}]}

graph = StateGraph(MessagesState)
graph.add_node(mock_llm)
graph.add_edge(START, "mock_llm")
graph.add_edge("mock_llm", END)
graph = graph.compile()

graph.invoke({"messages": [{"role": "user", "content": "hi!"}]})
核心优势(Core benefits)
LangGraph 为任何长时间运行、具备状态的工作流或 Agent 提供了底层支撑基础设施。
LangGraph 不会抽象 prompt 或 agent 架构本身,而是专注于提供以下几个核心能力:
可持久化执行(Durable execution)
构建能够在失败后继续运行的 Agent,并支持长时间执行任务,在中断后从上一次停止的位置恢复。
人类参与决策(Human-in-the-loop)
允许在任意时刻检查并修改 Agent 的状态,将人工审查和干预无缝地纳入执行流程。
完整的记忆体系(Comprehensive memory)
构建真正有状态的 Agent,既支持用于当前推理过程的短期工作记忆,也支持跨会话的长期记忆。
通过 LangSmith 进行调试(Debugging with LangSmith)
借助可视化工具深入观察复杂 Agent 的行为,追踪执行路径、捕获状态变化,并提供详细的运行时指标。
面向生产环境的部署能力(Production-ready deployment)
使用专为长时间运行、有状态工作流设计的可扩展基础设施,放心地部署复杂的 Agent 系统,应对真实生产环境中的挑战。
安装
要安装 LangGraph 的基础包:
bash
pip install -U langgraph
或
uv add langgraph
在使用 LangGraph 时,通常还需要访问大模型(LLMs)并定义工具(tools),这些方式可以由你自行决定。
其中一种方式是通过 LangChain 来完成这些工作。(是的,langchain用langgraph进行过一次重构,导致你用langchain的产品就会自动下3-5个包,感情我吃饭还得把筷子,勺子,餐盘,桌子,锅碗瓢盆,柴米油盐酱醋茶一起买了。)
bash
pip install -U langchain
# Requires Python 3.10+
uv add langchain
⚠️ 需要 Python 3.10 及以上版本
如果你需要使用特定的大模型提供方(LLM provider)的 SDK,还需要单独安装对应的依赖包。
快速开始(Quickstart)
官网快速入门演示如何使用 LangGraph 的 Graph API 或 Functional API 构建一个计算器 Agent。
- 如果更倾向于将 Agent 定义为由节点和边组成的图结构 ,请使用 Graph API
- 如果更倾向于将 Agent 定义为一个单一函数 ,请使用 Functional API
我建议任何时候都使用图结构!!
1. 定义工具和模型
在本示例中,我们将使用 Claude Sonnet 4.5 模型,并定义加法、乘法和除法三个工具。
python
from langchain.tools import tool
from langchain.chat_models import init_chat_model


model = init_chat_model(
    "claude-sonnet-4-5-20250929",
    temperature=0
)
定义工具:
python
@tool
def multiply(a: int, b: int) -> int:
    """Multiply `a` and `b`.

    Args:
        a: First int
        b: Second int
    """
    return a * b


@tool
def add(a: int, b: int) -> int:
    """Adds `a` and `b`.

    Args:
        a: First int
        b: Second int
    """
    return a + b


@tool
def divide(a: int, b: int) -> float:
    """Divide `a` and `b`.

    Args:
        a: First int
        b: Second int
    """
    return a / b
将工具绑定到 LLM:
python
tools = [add, multiply, divide]
tools_by_name = {tool.name: tool for tool in tools}
model_with_tools = model.bind_tools(tools)
2. 定义状态(State)
Graph 的状态用于存储对话消息以及 LLM 的调用次数。
在 LangGraph 中,状态会在 Agent 执行过程中持续存在。
Annotated 类型配合 operator.add 的作用是:确保新消息会被追加到现有消息列表中,而不是直接覆盖。
python
from langchain.messages import AnyMessage
from typing_extensions import TypedDict, Annotated
import operator


class MessagesState(TypedDict):
    messages: Annotated[list[AnyMessage], operator.add]
    llm_calls: int
3. 定义模型节点(Model Node)
模型节点负责调用 LLM,并决定是否需要调用工具。
python
from langchain.messages import SystemMessage


def llm_call(state: dict):
    """LLM decides whether to call a tool or not"""

    return {
        "messages": [
            model_with_tools.invoke(
                [
                    SystemMessage(
                        content="You are a helpful assistant tasked with performing arithmetic on a set of inputs."
                    )
                ]
                + state["messages"]
            )
        ],
        "llm_calls": state.get('llm_calls', 0) + 1
    }
4. 定义工具节点(Tool Node)
工具节点用于执行模型请求的工具调用,并返回结果。
python
from langchain.messages import ToolMessage


def tool_node(state: dict):
    """Performs the tool call"""

    result = []
    for tool_call in state["messages"][-1].tool_calls:
        tool = tools_by_name[tool_call["name"]]
        observation = tool.invoke(tool_call["args"])
        result.append(ToolMessage(content=observation, tool_call_id=tool_call["id"]))
    return {"messages": result}
5. 定义结束逻辑(End Logic)
条件边函数用于判断:如果 LLM 触发了工具调用,就继续执行;否则结束流程并回复用户。
python
from typing import Literal
from langgraph.graph import StateGraph, START, END


def should_continue(state: MessagesState) -> Literal["tool_node", END]:
    """Decide if we should continue the loop or stop based upon whether the LLM made a tool call"""

    messages = state["messages"]
    last_message = messages[-1]

    # If the LLM makes a tool call, then perform an action
    if last_message.tool_calls:
        return "tool_node"

    # Otherwise, we stop (reply to the user)
    return END
6. 构建并编译 Agent
使用 StateGraph 构建 Agent,并通过 compile 方法进行编译。
python
# Build workflow
agent_builder = StateGraph(MessagesState)

# Add nodes
agent_builder.add_node("llm_call", llm_call)
agent_builder.add_node("tool_node", tool_node)

# Add edges to connect nodes
agent_builder.add_edge(START, "llm_call")
agent_builder.add_conditional_edges(
    "llm_call",
    should_continue,
    ["tool_node", END]
)
agent_builder.add_edge("tool_node", "llm_call")

# Compile the agent
agent = agent_builder.compile()
可视化 Agent 结构:
python
from IPython.display import Image, display
display(Image(agent.get_graph(xray=True).draw_mermaid_png()))
调用 Agent:
python
from langchain.messages import HumanMessage
messages = [HumanMessage(content="Add 3 and 4.")]
messages = agent.invoke({"messages": messages})
for m in messages["messages"]:
    m.pretty_print()
🎉 恭喜!你已经成功使用 LangGraph 的 Graph API 构建了你的第一个 Agent。
用 LangGraph 的方式思考(Thinking in LangGraph)
当你使用 LangGraph 构建 Agent 时,第一步是将整个流程拆分为若干离散的步骤(nodes,节点)。
接下来,你需要描述在每个节点中可能发生的决策与状态流转。
最后,通过一个**共享状态(state)**将所有节点连接起来,使每个节点都可以从中读取数据、并向其中写入数据。
假设你需要构建一个用于处理客户支持邮件的 AI Agent。你的产品团队给出了如下需求:
这个 Agent 需要能够:
- 读取客户发来的邮件
- 按紧急程度和主题对邮件进行分类
- 查询相关文档以回答用户问题
- 起草合适的回复内容
- 将复杂问题升级给人工客服
- 在需要时安排后续跟进
需要处理的示例场景:
-
简单的产品问题 :
"我该如何重置密码?"
-
缺陷报告 :
"当我选择 PDF 格式时,导出功能会崩溃。"
-
紧急的计费问题 :
"我的订阅被重复扣费了!"
-
功能建议 :
"你们能不能在移动端应用里加一个暗色模式?"
-
复杂的技术问题 :
"我们的 API 集成偶尔会失败,并返回 504 错误。"
在 LangGraph 中实现一个 Agent,通常都会遵循同样的五个步骤。
第一步:将你的工作流拆解为离散步骤
首先,识别业务流程中的不同步骤。
每一个步骤都会成为一个节点(node),也就是一个只负责单一职责的函数。
接着,草拟这些步骤之间是如何相互连接的。
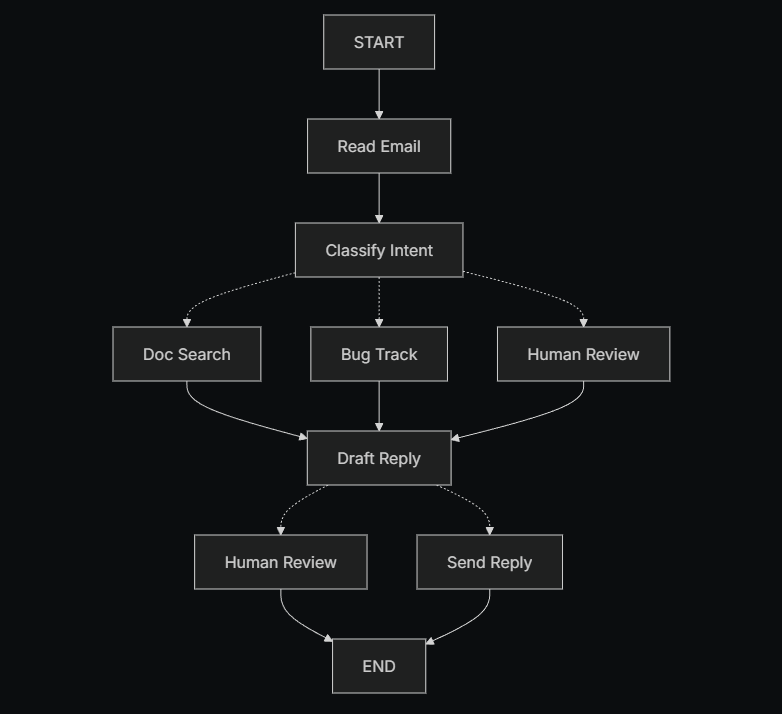
图中的箭头表示可能的执行路径 ,但真正决定走哪一条路径的逻辑,发生在各个节点内部。
既然我们已经识别出了工作流中的各个组成部分,接下来就需要明确每个节点具体要做什么:
- 读取邮件(Read Email):提取并解析邮件内容
- 意图分类(Classify Intent):使用 LLM 对邮件的紧急程度和主题进行分类,并将流程路由到合适的处理分支
- 文档检索(Doc Search):查询知识库,获取相关信息
- 缺陷跟踪(Bug Track):在缺陷跟踪系统中创建或更新问题
- 起草回复(Draft Reply):生成合适的回复内容
- 人工审核(Human Review):将问题升级给人工客服进行审批或处理
- 发送回复(Send Reply):发送最终的邮件回复
需要注意的是:
有些节点会决定接下来流程该往哪里走 (例如:意图分类、起草回复、人工审核),而另一些节点的下一步是固定的(例如:读取邮件一定会进入意图分类,文档检索一定会进入起草回复)。
第二步:明确每个步骤需要做什么
对于图中的每一个节点,你需要确定它代表哪一类操作 ,以及它在正确运行时需要哪些上下文信息。
LLM 节点(LLM steps)
当你需要理解、分析、生成文本,或进行推理与决策时使用。
数据节点(Data steps)
当你需要从外部系统或数据源中获取信息时使用。
动作节点(Action steps)
当你需要执行外部操作时使用。
用户输入节点(User input steps)
当流程中需要人工介入时使用。
LLM 节点
当某个步骤需要理解、分析、生成文本或做出推理决策时:
意图分类(Classify intent)
- 静态上下文(prompt) :
分类类别、紧急程度定义、输出格式 - 动态上下文(来自 state) :
邮件内容、发件人信息 - 期望结果 :
用于决定后续路由的结构化分类结果
起草回复(Draft reply)
- 静态上下文(prompt) :
语气规范、公司政策、回复模板 - 动态上下文(来自 state) :
分类结果、检索结果、客户历史信息 - 期望结果 :
一封可供审核的专业邮件回复草稿
数据节点
当某个步骤需要从外部数据源中检索信息时:
文档检索(Document search)
- 参数 :
基于意图和主题构建的查询条件 - 重试策略 :
是,对瞬时失败使用指数退避 - 缓存 :
可缓存高频查询以减少 API 调用
客户历史查询(Customer history lookup)
- 参数 :
从 state 中获取的客户邮箱或 ID - 重试策略 :
是,但在不可用时降级为只返回基础信息 - 缓存 :
是,设置 TTL 以平衡数据新鲜度与性能
动作节点
当某个步骤需要执行外部操作时:
发送回复(Send reply)
- 执行时机 :
在通过人工或自动审核之后 - 重试策略 :
是,对网络问题使用指数退避 - 不应缓存 :
每一次发送都是一次唯一动作
缺陷跟踪(Bug track)
- 执行时机 :
当意图被识别为"缺陷"时始终执行 - 重试策略 :
是,确保不会丢失缺陷报告 - 返回结果 :
工单 ID,用于在回复中引用
用户输入节点
当某个步骤需要人工介入时:
人工审核节点(Human review)
- 决策所需上下文 :
原始邮件、回复草稿、紧急程度、分类结果 - 期望输入格式 :
是否通过的布尔值,以及可选的修改后回复内容 - 触发条件 :
高紧急程度、复杂问题或质量风险场景
第三步:设计你的状态(State)
状态(State)是 Agent 中所有节点都可以访问的共享内存。
你可以把它理解为 Agent 在执行过程中随身携带的一本笔记,用来记录它学到了什么、做出了哪些决策。
什么样的数据应该放进 State? 针对每一条数据,可以问自己两个问题:
应该放入 State 的数据
- 是否需要在多个步骤之间持续存在?
如果需要跨步骤保留,就应该放进 state。
不应该存储在 State 中的数据
- 是否可以从其他数据推导出来?
如果可以,就在需要的时候动态计算,而不是直接存进 state。
在邮件 Agent 中,我们需要追踪的内容包括:
- 原始邮件内容和发件人信息(之后无法重新构造)
- 分类结果(会被多个后续节点使用)
- 检索结果和客户数据(重新获取成本较高)
- 回复草稿(需要在人工审核过程中持续存在)
- 执行元数据(用于调试和故障恢复)
保持 State 原始化,按需格式化 Prompt
一个关键原则是:State 中只存原始数据,不存格式化后的文本。在真正需要时,再在各个节点内部对数据进行 prompt 格式化。
这种分离带来的好处包括:
- 不同节点可以用不同方式格式化同一份数据
- 修改 prompt 模板时,无需变更 state 的结构
- 调试更直观 ------ 可以清楚地看到每个节点实际接收到的数据
- Agent 可以持续演进,而不会破坏已有状态数据
定义我们的 State:
python
from typing import TypedDict, Literal

# 定义邮件分类结构
class EmailClassification(TypedDict):
    intent: Literal["question", "bug", "billing", "feature", "complex"]
    urgency: Literal["low", "medium", "high", "critical"]
    topic: str
    summary: str


class EmailAgentState(TypedDict):
    # 原始邮件数据
    email_content: str
    sender_email: str
    email_id: str

    # 分类结果
    classification: EmailClassification | None

    # 原始搜索 / API 结果
    search_results: list[str] | None  # 原始文档片段列表
    customer_history: dict | None     # 来自 CRM 的原始客户数据

    # 生成内容
    draft_response: str | None
    messages: list[str] | None
可以看到,state 中只包含原始数据:
没有 prompt 模板、没有格式化字符串、没有指令性文本。
分类结果以一个字典的形式直接存储,原样来自 LLM 的输出。
第四步:构建你的节点(Build your nodes)
现在,我们将每一个步骤实现为一个函数。在 LangGraph 中,一个节点本质上就是一个 Python 函数 :
它接收当前的 state,并返回对 state 的更新。
合理处理错误(Handle errors appropriately)
不同类型的错误,需要采用不同的处理策略:
| 错误类型 | 由谁修复 | 处理策略 | 适用场景 |
|---|---|---|---|
| 瞬时错误(网络问题、限流) | 系统(自动) | 重试策略 | 通常重试后即可恢复的临时故障 |
| LLM 可恢复错误(工具失败、解析错误) | LLM | 将错误写入 state 并回环 | LLM 能"看到"错误并调整策略 |
| 用户可修复错误(信息缺失、指令不清) | 人 | 使用 interrupt() 暂停 |
需要用户输入才能继续 |
| 未知错误 | 开发者 | 直接抛出 | 需要人工调试的问题 |
瞬时错误(Transient errors)
为网络异常或限流问题添加自动重试策略:
python
from langgraph.types import RetryPolicy

workflow.add_node(
    "search_documentation",
    search_documentation,
    retry_policy=RetryPolicy(max_attempts=3, initial_interval=1.0)
)
LLM 可恢复错误(LLM-recoverable errors)
将错误写入 state,并回到 Agent 节点,让 LLM 知道哪里出了问题,从而尝试新的策略:
python
from langgraph.types import Command


def execute_tool(state: State) -> Command[Literal["agent", "execute_tool"]]:
    try:
        result = run_tool(state['tool_call'])
        return Command(update={"tool_result": result}, goto="agent")
    except ToolError as e:
        # 让 LLM 看到错误并重新尝试
        return Command(
            update={"tool_result": f"Tool error: {str(e)}"},
            goto="agent"
        )
用户可修复错误(User-fixable errors)
当缺少关键信息(例如账号 ID、订单号、说明不清)时,暂停流程并向用户收集信息:
python
from langgraph.types import Command


def lookup_customer_history(state: State) -> Command[Literal["draft_response"]]:
    if not state.get('customer_id'):
        user_input = interrupt({
            "message": "Customer ID needed",
            "request": "Please provide the customer's account ID to look up their subscription history"
        })
        return Command(
            update={"customer_id": user_input['customer_id']},
            goto="lookup_customer_history"
        )
    # 信息齐全后继续执行
    customer_data = fetch_customer_history(state['customer_id'])
    return Command(update={"customer_history": customer_data}, goto="draft_response")
未知错误(Unexpected errors)
对于无法预期、也无法在当前节点处理的错误,不要吞掉异常,直接抛出,交给开发者排查:
python
def send_reply(state: EmailAgentState):
    try:
        email_service.send(state["draft_response"])
    except Exception:
        raise  # 将未知错误直接暴露出来用于调试
实现邮件 Agent 的节点(Implementing our email agent nodes)
我们将把每个节点实现为一个简单的函数。
记住:节点接收 state,执行操作,然后返回对 state 的更新。
读取与分类节点(Read and classify nodes)
python
from typing import Literal
from langgraph.graph import StateGraph, START, END
from langgraph.types import interrupt, Command, RetryPolicy
from langchain_openai import ChatOpenAI
from langchain.messages import HumanMessage

llm = ChatOpenAI(model="gpt-5-nano")

def read_email(state: EmailAgentState) -> dict:
    """提取并解析邮件内容"""
    # 在生产环境中,这里会连接你的邮件服务
    return {
        "messages": [HumanMessage(content=f"Processing email: {state['email_content']}")]
    }

def classify_intent(state: EmailAgentState) -> Command[Literal["search_documentation", "human_review", "draft_response", "bug_tracking"]]:
    """使用 LLM 对邮件意图和紧急程度进行分类,并路由到相应节点"""

    # 创建结构化 LLM,返回 EmailClassification dict
    structured_llm = llm.with_structured_output(EmailClassification)

    # 动态生成 prompt,不存入 state
    classification_prompt = f"""
    Analyze this customer email and classify it:

    Email: {state['email_content']}
    From: {state['sender_email']}

    Provide classification including intent, urgency, topic, and summary.
    """

    # 获取结构化响应,直接为 dict
    classification = structured_llm.invoke(classification_prompt)

    # 根据分类结果确定下一节点
    if classification['intent'] == 'billing' or classification['urgency'] == 'critical':
        goto = "human_review"
    elif classification['intent'] in ['question', 'feature']:
        goto = "search_documentation"
    elif classification['intent'] == 'bug':
        goto = "bug_tracking"
    else:
        goto = "draft_response"

    # 将分类结果作为单个 dict 存入 state
    return Command(
        update={"classification": classification},
        goto=goto
    )
检索与缺陷跟踪节点(Search and tracking nodes)
python
def search_documentation(state: EmailAgentState) -> Command[Literal["draft_response"]]:
    """从知识库中检索相关信息"""

    # 根据分类构建搜索查询
    classification = state.get('classification', {})
    query = f"{classification.get('intent', '')} {classification.get('topic', '')}"

    try:
        # 在此实现搜索逻辑
        # 存储原始搜索结果,而非格式化文本
        search_results = [
            "Reset password via Settings > Security > Change Password",
            "Password must be at least 12 characters",
            "Include uppercase, lowercase, numbers, and symbols"
        ]
    except SearchAPIError as e:
        # 对可恢复的搜索错误,存储错误信息继续
        search_results = [f"Search temporarily unavailable: {str(e)}"]

    return Command(
        update={"search_results": search_results},  # 存储原始结果或错误
        goto="draft_response"
    )

def bug_tracking(state: EmailAgentState) -> Command[Literal["draft_response"]]:
    """在缺陷跟踪系统中创建或更新工单"""

    # 在缺陷系统中创建工单
    ticket_id = "BUG-12345"  # 生产环境通过 API 创建

    return Command(
        update={
            "search_results": [f"Bug ticket {ticket_id} created"],
            "current_step": "bug_tracked"
        },
        goto="draft_response"
    )
回复节点(Response nodes)
python
def draft_response(state: EmailAgentState) -> Command[Literal["human_review", "send_reply"]]:
    """根据上下文生成回复,并根据质量路由到下一节点"""

    classification = state.get('classification', {})

    # 动态格式化上下文
    context_sections = []

    if state.get('search_results'):
        formatted_docs = "\n".join([f"- {doc}" for doc in state['search_results']])
        context_sections.append(f"Relevant documentation:\n{formatted_docs}")

    if state.get('customer_history'):
        context_sections.append(f"Customer tier: {state['customer_history'].get('tier', 'standard')}")

    # 构建 prompt
    draft_prompt = f"""
    Draft a response to this customer email:
    {state['email_content']}

    Email intent: {classification.get('intent', 'unknown')}
    Urgency level: {classification.get('urgency', 'medium')}

    {chr(10).join(context_sections)}

    Guidelines:
    - Be professional and helpful
    - Address their specific concern
    - Use the provided documentation when relevant
    """

    response = llm.invoke(draft_prompt)

    # 判断是否需要人工审核
    needs_review = (
        classification.get('urgency') in ['high', 'critical'] or
        classification.get('intent') == 'complex'
    )

    goto = "human_review" if needs_review else "send_reply"

    return Command(
        update={"draft_response": response.content},  # 仅存储原始回复
        goto=goto
    )
人工审核节点(Human review node)
python
def human_review(state: EmailAgentState) -> Command[Literal["send_reply", END]]:
    """暂停以供人工审核,并根据决策路由"""

    classification = state.get('classification', {})

    # interrupt() 必须在前,之后的代码会在恢复时重新执行
    human_decision = interrupt({
        "email_id": state.get('email_id',''),
        "original_email": state.get('email_content',''),
        "draft_response": state.get('draft_response',''),
        "urgency": classification.get('urgency'),
        "intent": classification.get('intent'),
        "action": "Please review and approve/edit this response"
    })

    # 处理人工决策
    if human_decision.get("approved"):
        return Command(
            update={"draft_response": human_decision.get("edited_response", state.get('draft_response',''))},
            goto="send_reply"
        )
    else:
        # 拒绝意味着人工直接处理
        return Command(update={}, goto=END)
发送回复节点(Send reply node)
python
def send_reply(state: EmailAgentState) -> dict:
    """发送邮件回复"""
    # 与邮件服务集成
    print(f"Sending reply: {state['draft_response'][:100]}...")
    return {}
这套节点实现展示了 LangGraph 的显式状态 + 节点可控性:
- 所有节点只处理自己的职责
- 状态存储原始数据
- 所有路由逻辑都在节点内部明确控制
第五步:连接节点(Step 5: Wire it together)
现在我们将节点连接成一个可运行的图。
由于每个节点自己处理路由决策,我们只需要添加一些必要的边(edges)。
为了启用 human-in-the-loop 并使用 interrupt() 暂停,需要在编译时使用 checkpointer 来在运行间保存状态。
python
from langgraph.checkpoint.memory import MemorySaver
from langgraph.types import RetryPolicy

# 创建图
workflow = StateGraph(EmailAgentState)

# 添加节点并设置合适的错误处理
workflow.add_node("read_email", read_email)
workflow.add_node("classify_intent", classify_intent)

# 对可能出现瞬时故障的节点添加重试策略
workflow.add_node(
    "search_documentation",
    search_documentation,
    retry_policy=RetryPolicy(max_attempts=3)
)
workflow.add_node("bug_tracking", bug_tracking)
workflow.add_node("draft_response", draft_response)
workflow.add_node("human_review", human_review)
workflow.add_node("send_reply", send_reply)

# 仅添加必要的边
workflow.add_edge(START, "read_email")
workflow.add_edge("read_email", "classify_intent")
workflow.add_edge("send_reply", END)

# 使用 checkpointer 编译图以持久化状态
memory = MemorySaver()
app = workflow.compile(checkpointer=memory)
注意:图结构非常简洁,因为路由发生在节点内部,通过 Command 对象 声明下一步去向。
每个节点通过类型提示(如
Command[Literal["node1", "node2"]])明确可去节点,使流程清晰可追踪。
测试你的 Agent(Try out your agent)
下面以一封紧急账单问题的邮件进行测试,该问题需要人工审核:
python
# 初始状态
initial_state = {
    "email_content": "I was charged twice for my subscription! This is urgent!",
    "sender_email": "customer@example.com",
    "email_id": "email_123",
    "messages": []
}

# 运行时指定 thread_id 以保持状态
config = {"configurable": {"thread_id": "customer_123"}}
result = app.invoke(initial_state, config)

# 图将在 human_review 节点暂停
print(f"human review interrupt:{result['__interrupt__']}")
当准备好人工输入后,提供决策以恢复执行:
python
from langgraph.types import Command

human_response = Command(
    resume={
        "approved": True,
        "edited_response": "We sincerely apologize for the double charge. I've initiated an immediate refund..."
    }
)

# 恢复执行
final_result = app.invoke(human_response, config)
print(f"Email sent successfully!")
执行流程说明:
- 当图运行到
interrupt()时,会暂停并将所有状态保存到 checkpointer。- 它可以在几天后恢复,并从暂停位置继续执行。
thread_id确保同一对话的所有状态被完整保留。
工作流与 Agent(Workflows and agents)
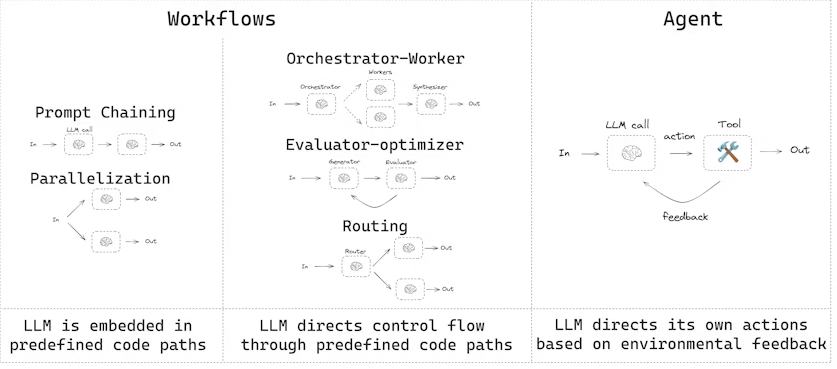
- 工作流(Workflows):有预定的代码路径,按照特定顺序运行。
- Agent:动态定义自己的流程和工具使用方式。
使用 LangGraph 构建 Agent 和工作流有多项优势,包括:
- 状态持久化(persistence)
- 流式执行(streaming)
- 调试支持(debugging)
- 部署支持(deployment)
环境设置(Setup)
要构建工作流或 Agent,你可以使用任何支持结构化输出 和工具调用 的聊天模型。下面示例使用 Anthropic 模型:
bash
pip install langchain_core langchain-anthropic langgraph初始化 LLM:
python
import os
import getpass
from langchain_anthropic import ChatAnthropic

def _set_env(var: str):
    if not os.environ.get(var):
        os.environ[var] = getpass.getpass(f"{var}: ")

# 设置 Anthropic API Key
_set_env("ANTHROPIC_API_KEY")

# 初始化模型
llm = ChatAnthropic(model="claude-sonnet-4-5-20250929")
LLM 与增强(LLMs and augmentations)
工作流和智能 Agent 系统都是基于 LLM(大语言模型)以及你为它们添加的各种增强功能。
工具调用(tool calling)、结构化输出(structured outputs)和短期记忆(short-term memory)只是定制 LLM 的几种方式。

python
from pydantic import BaseModel, Field

class SearchQuery(BaseModel):
    search_query: str = Field(None, description="Query that is optimized web search.")
    justification: str = Field(
        None, description="Why this query is relevant to the user's request."
    )
使用结构化输出增强 LLM
python
# 增强 LLM,使其返回结构化输出
structured_llm = llm.with_structured_output(SearchQuery)

# 调用增强后的 LLM
output = structured_llm.invoke("How does Calcium CT score relate to high cholesterol?")
工具调用示例(Tool calling)
python
# 定义一个工具
def multiply(a: int, b: int) -> int:
    return a * b

# 增强 LLM,使其可以调用工具
llm_with_tools = llm.bind_tools([multiply])

# 调用 LLM,触发工具调用
msg = llm_with_tools.invoke("What is 2 times 3?")

# 获取工具调用信息
msg.tool_calls
Prompt 链(Prompt chaining)
Prompt 链是指每次 LLM 调用都处理上一次调用的输出。它通常用于执行可以拆分为更小、可验证步骤的任务。例如:
- 将文档翻译成不同语言
- 验证生成内容的一致性
python
from typing_extensions import TypedDict
from langgraph.graph import StateGraph, START, END
from IPython.display import Image, display

# Graph 状态
class State(TypedDict):
    topic: str
    joke: str
    improved_joke: str
    final_joke: str
定义节点(Nodes)
python
def generate_joke(state: State):
    """第一次 LLM 调用,生成初始笑话"""
    msg = llm.invoke(f"Write a short joke about {state['topic']}")
    return {"joke": msg.content}


def check_punchline(state: State):
    """检查笑话是否有 punchline"""
    if "?" in state["joke"] or "!" in state["joke"]:
        return "Pass"
    return "Fail"


def improve_joke(state: State):
    """第二次 LLM 调用,改进笑话"""
    msg = llm.invoke(f"Make this joke funnier by adding wordplay: {state['joke']}")
    return {"improved_joke": msg.content}


def polish_joke(state: State):
    """第三次 LLM 调用,进行最终润色"""
    msg = llm.invoke(f"Add a surprising twist to this joke: {state['improved_joke']}")
    return {"final_joke": msg.content}
构建工作流(Build workflow)
python
workflow = StateGraph(State)

# 添加节点
workflow.add_node("generate_joke", generate_joke)
workflow.add_node("improve_joke", improve_joke)
workflow.add_node("polish_joke", polish_joke)

# 添加边连接节点
workflow.add_edge(START, "generate_joke")
workflow.add_conditional_edges(
    "generate_joke", check_punchline, {"Fail": "improve_joke", "Pass": END}
)
workflow.add_edge("improve_joke", "polish_joke")
workflow.add_edge("polish_joke", END)

# 编译
chain = workflow.compile()

# 展示工作流
display(Image(chain.get_graph().draw_mermaid_png()))
调用工作流(Invoke)
python
state = chain.invoke({"topic": "cats"})
print("Initial joke:")
print(state["joke"])
print("\n--- --- ---\n")

if "improved_joke" in state:
    print("Improved joke:")
    print(state["improved_joke"])
    print("\n--- --- ---\n")

    print("Final joke:")
    print(state["final_joke"])
else:
    print("Final joke:")
    print(state["joke"])
并行化(Parallelization)
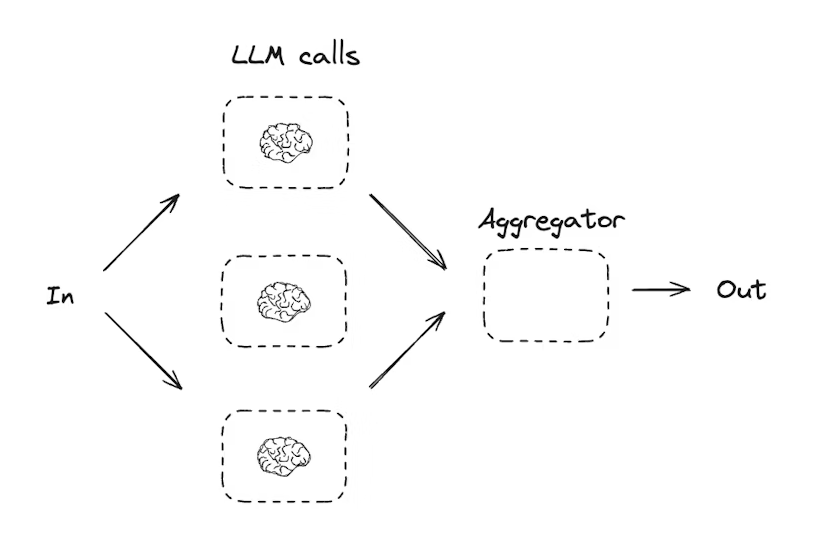
并行化指 LLM 同时处理一个任务。这可以通过同时运行多个独立子任务 ,或重复运行相同任务以检查不同输出来实现。
并行化通常用于:
- 将子任务拆分并并行执行,提高速度
- 任务重复执行以检查不同输出,提高结果可信度
示例:
- 一个子任务处理文档关键词,另一个子任务检查格式错误
- 一个任务多次运行,对文档按不同标准评分(引用数量、来源数量、来源质量等)
python
from typing_extensions import TypedDict
from langgraph.graph import StateGraph, START, END
from IPython.display import Image, display

# Graph 状态
class State(TypedDict):
    topic: str
    joke: str
    story: str
    poem: str
    combined_output: str
定义节点(Nodes)
python
def call_llm_1(state: State):
    """第一次 LLM 调用,生成笑话"""
    msg = llm.invoke(f"Write a joke about {state['topic']}")
    return {"joke": msg.content}

def call_llm_2(state: State):
    """第二次 LLM 调用,生成故事"""
    msg = llm.invoke(f"Write a story about {state['topic']}")
    return {"story": msg.content}

def call_llm_3(state: State):
    """第三次 LLM 调用,生成诗歌"""
    msg = llm.invoke(f"Write a poem about {state['topic']}")
    return {"poem": msg.content}

def aggregator(state: State):
    """将笑话、故事和诗组合成单一输出"""
    combined = f"Here's a story, joke, and poem about {state['topic']}!\n\n"
    combined += f"STORY:\n{state['story']}\n\n"
    combined += f"JOKE:\n{state['joke']}\n\n"
    combined += f"POEM:\n{state['poem']}"
    return {"combined_output": combined}
构建工作流(Build workflow)
python
parallel_builder = StateGraph(State)

# 添加节点
parallel_builder.add_node("call_llm_1", call_llm_1)
parallel_builder.add_node("call_llm_2", call_llm_2)
parallel_builder.add_node("call_llm_3", call_llm_3)
parallel_builder.add_node("aggregator", aggregator)

# 添加边连接节点,实现并行
parallel_builder.add_edge(START, "call_llm_1")
parallel_builder.add_edge(START, "call_llm_2")
parallel_builder.add_edge(START, "call_llm_3")
parallel_builder.add_edge("call_llm_1", "aggregator")
parallel_builder.add_edge("call_llm_2", "aggregator")
parallel_builder.add_edge("call_llm_3", "aggregator")
parallel_builder.add_edge("aggregator", END)

# 编译工作流
parallel_workflow = parallel_builder.compile()

# 展示工作流
display(Image(parallel_workflow.get_graph().draw_mermaid_png()))
调用工作流(Invoke)
python
state = parallel_workflow.invoke({"topic": "cats"})
print(state["combined_output"])
路由(Routing)
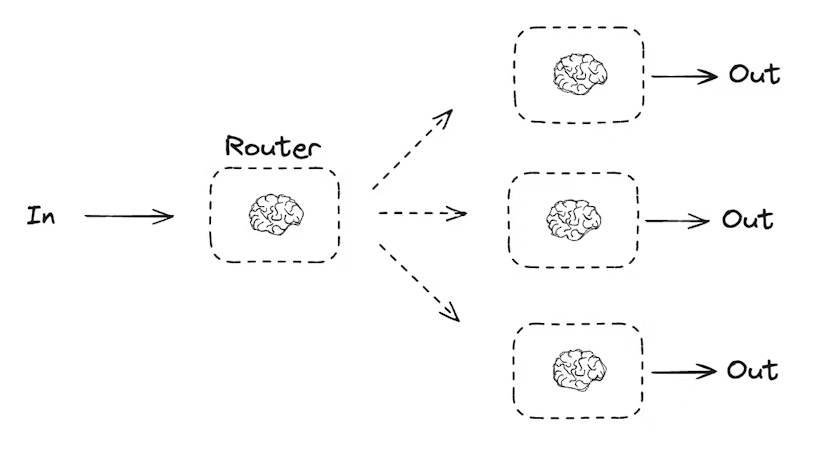
路由工作流会处理输入,然后将其引导到特定上下文的任务中。这使得你可以为复杂任务定义专门的流程。例如,一个用于回答产品相关问题的工作流,可能先处理问题类型,然后将请求路由到定价、退款、退货等特定流程。
python
from typing_extensions import Literal
from langchain.messages import HumanMessage, SystemMessage
from pydantic import BaseModel, Field
from langgraph.graph import StateGraph, START, END
from typing_extensions import TypedDict
from IPython.display import Image, display

# 用于路由逻辑的结构化输出 schema
class Route(BaseModel):
    step: Literal["poem", "story", "joke"] = Field(
        None, description="下一步路由步骤"
    )

# 使用 schema 增强 LLM 输出,实现路由逻辑
router = llm.with_structured_output(Route)

# Graph 状态
class State(TypedDict):
    input: str
    decision: str
    output: str
定义节点(Nodes)
python
def llm_call_1(state: State):
    """写故事"""
    result = llm.invoke(state["input"])
    return {"output": result.content}

def llm_call_2(state: State):
    """写笑话"""
    result = llm.invoke(state["input"])
    return {"output": result.content}

def llm_call_3(state: State):
    """写诗"""
    result = llm.invoke(state["input"])
    return {"output": result.content}

def llm_call_router(state: State):
    """将输入路由到对应节点"""
    # 使用增强 LLM 的结构化输出作为路由逻辑
    decision = router.invoke(
        [
            SystemMessage(
                content="根据用户请求,将输入路由到 story, joke, 或 poem。"
            ),
            HumanMessage(content=state["input"]),
        ]
    )
    return {"decision": decision.step}

# 条件边函数,根据决策路由到对应节点
def route_decision(state: State):
    if state["decision"] == "story":
        return "llm_call_1"
    elif state["decision"] == "joke":
        return "llm_call_2"
    elif state["decision"] == "poem":
        return "llm_call_3"
构建工作流(Build workflow)
python
router_builder = StateGraph(State)

# 添加节点
router_builder.add_node("llm_call_1", llm_call_1)
router_builder.add_node("llm_call_2", llm_call_2)
router_builder.add_node("llm_call_3", llm_call_3)
router_builder.add_node("llm_call_router", llm_call_router)

# 添加边连接节点
router_builder.add_edge(START, "llm_call_router")
router_builder.add_conditional_edges(
    "llm_call_router",
    route_decision,
    {  # route_decision 返回值 : 下一个节点名称
        "llm_call_1": "llm_call_1",
        "llm_call_2": "llm_call_2",
        "llm_call_3": "llm_call_3",
    },
)
router_builder.add_edge("llm_call_1", END)
router_builder.add_edge("llm_call_2", END)
router_builder.add_edge("llm_call_3", END)

# 编译工作流
router_workflow = router_builder.compile()

# 展示工作流
display(Image(router_workflow.get_graph().draw_mermaid_png()))
调用工作流(Invoke)
python
state = router_workflow.invoke({"input": "Write me a joke about cats"})
print(state["output"])
Orchestrator-Worker 模式
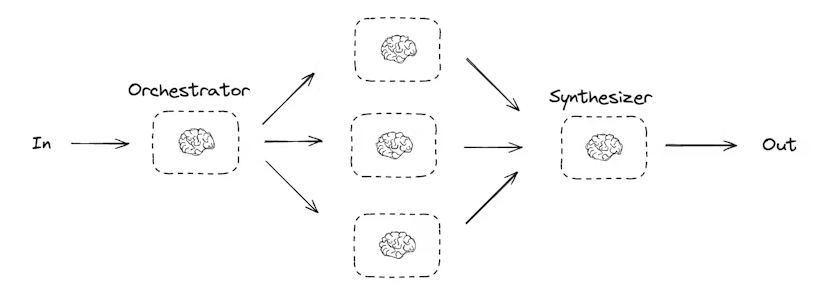
在 orchestrator-worker(协调器-工作者) 配置中:
- 协调器(Orchestrator)将任务拆分为子任务
- 将子任务委派给工作者(Worker)
- 综合工作者输出生成最终结果
这种工作流提供了更多灵活性,通常用于子任务无法像并行化那样预定义的场景。
例如,一个工作流需要在多个未知数量的文档中更新 Python 库的安装说明,就可能使用这种模式。
python
from typing import Annotated, List
import operator
from pydantic import BaseModel, Field
from langchain.messages import SystemMessage, HumanMessage
from langgraph.graph import StateGraph, START, END
from langgraph.types import Send
from typing_extensions import TypedDict
from IPython.display import Image, display
定义结构化输出 schema
python
# 用于规划的结构化输出 schema
class Section(BaseModel):
    name: str = Field(description="该报告部分的名称")
    description: str = Field(description="本部分涉及的主要主题和概念概览")

class Sections(BaseModel):
    sections: List[Section] = Field(description="报告的各部分")
增强 LLM,使其返回结构化输出:
python
planner = llm.with_structured_output(Sections)协调器-工作者(Orchestrator-Worker)工作流非常常见,LangGraph 对此提供了内置支持。Send API 允许你动态创建工作者节点,并向它们发送特定输入。每个工作者拥有自己的状态,所有工作者的输出都会写入一个共享的状态键,该键对协调器图(Orchestrator Graph)可访问。
这样,协调器就可以访问所有工作者的输出,并将它们综合生成最终结果。下面的示例展示了如何遍历一个部分列表,并使用 Send API 将每个部分分配给相应的工作者。
python
from langgraph.types import Send
# 协调器状态
class State(TypedDict):
    topic: str  # 报告主题
    sections: list[Section]  # 报告部分列表
    completed_sections: Annotated[list, operator.add]  # 所有工作者并行写入此 key
    final_report: str  # 最终报告内容

# 工作者状态
class WorkerState(TypedDict):
    section: Section
    completed_sections: Annotated[list, operator.add]
节点实现
python
def orchestrator(state: State):
    """生成报告规划的协调器"""
    report_sections = planner.invoke(
        [
            SystemMessage(content="生成报告规划"),
            HumanMessage(content=f"报告主题:{state['topic']}"),
        ]
    )
    return {"sections": report_sections.sections}

def llm_call(state: WorkerState):
    """工作者生成报告部分"""
    section = llm.invoke(
        [
            SystemMessage(content="根据提供的名称和描述写报告部分。每部分无需前言,使用 Markdown 格式。"),
            HumanMessage(content=f"部分名称: {state['section'].name}, 描述: {state['section'].description}")
        ]
    )
    return {"completed_sections": [section.content]}

def synthesizer(state: State):
    """综合各部分生成最终报告"""
    completed_report_sections = "\n\n---\n\n".join(state["completed_sections"])
    return {"final_report": completed_report_sections}
动态分配工作者
python
def assign_workers(state: State):
    """为规划中的每个部分分配工作者"""
    # 使用 Send API 并行启动工作者生成部分
    return [Send("llm_call", {"section": s}) for s in state["sections"]]
构建工作流
python
orchestrator_worker_builder = StateGraph(State)

# 添加节点
orchestrator_worker_builder.add_node("orchestrator", orchestrator)
orchestrator_worker_builder.add_node("llm_call", llm_call)
orchestrator_worker_builder.add_node("synthesizer", synthesizer)

# 添加边
orchestrator_worker_builder.add_edge(START, "orchestrator")
orchestrator_worker_builder.add_conditional_edges("orchestrator", assign_workers, ["llm_call"])
orchestrator_worker_builder.add_edge("llm_call", "synthesizer")
orchestrator_worker_builder.add_edge("synthesizer", END)

# 编译工作流
orchestrator_worker = orchestrator_worker_builder.compile()

# 展示工作流
display(Image(orchestrator_worker.get_graph().draw_mermaid_png()))
调用工作流
python
state = orchestrator_worker.invoke({"topic": "Create a report on LLM scaling laws"})

from IPython.display import Markdown
Markdown(state["final_report"])
评估-优化器(Evaluator-Optimizer)
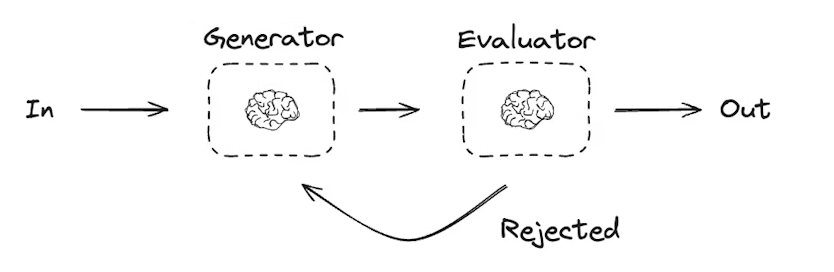
在评估-优化器工作流中,一个 LLM 调用负责生成响应,另一个 LLM 或人工参与负责评估该响应。如果评估器或人工判断响应需要改进,则会提供反馈,并重新生成响应。这个循环会持续进行,直到生成可接受的响应为止。
评估-优化器工作流通常用于任务有特定成功标准,但需要迭代才能达到该标准的场景。例如,在两种语言之间翻译文本时,并不总能一次性得到完美的对应翻译,可能需要经过几轮迭代,才能生成在两种语言中意义相同的译文。
python
# 图状态
class State(TypedDict):
    joke: str
    topic: str
    feedback: str
    funny_or_not: str

# 用于评估的结构化输出 Schema
class Feedback(BaseModel):
    grade: Literal["funny", "not funny"] = Field(
        description="判断笑话是否有趣。",
    )
    feedback: str = Field(
        description="如果笑话不有趣,提供改进建议。",
    )

# 用结构化输出增强 LLM
evaluator = llm.with_structured_output(Feedback)

# 节点
def llm_call_generator(state: State):
    """LLM 生成笑话"""
    if state.get("feedback"):
        msg = llm.invoke(
            f"写一个关于 {state['topic']} 的笑话,但请参考反馈:{state['feedback']}"
        )
    else:
        msg = llm.invoke(f"写一个关于 {state['topic']} 的笑话")
    return {"joke": msg.content}

def llm_call_evaluator(state: State):
    """LLM 评估笑话"""
    grade = evaluator.invoke(f"评估笑话:{state['joke']}")
    return {"funny_or_not": grade.grade, "feedback": grade.feedback}

# 条件边函数,根据评估结果返回生成器或结束
def route_joke(state: State):
    """根据评估结果决定返回笑话生成器或结束"""
    if state["funny_or_not"] == "funny":
        return "Accepted"
    elif state["funny_or_not"] == "not funny":
        return "Rejected + Feedback"

# 构建工作流
optimizer_builder = StateGraph(State)

# 添加节点
optimizer_builder.add_node("llm_call_generator", llm_call_generator)
optimizer_builder.add_node("llm_call_evaluator", llm_call_evaluator)

# 添加节点连接边
optimizer_builder.add_edge(START, "llm_call_generator")
optimizer_builder.add_edge("llm_call_generator", "llm_call_evaluator")
optimizer_builder.add_conditional_edges(
    "llm_call_evaluator",
    route_joke,
    {
        "Accepted": END,
        "Rejected + Feedback": "llm_call_generator",
    },
)

# 编译工作流
optimizer_workflow = optimizer_builder.compile()

# 显示工作流
display(Image(optimizer_workflow.get_graph().draw_mermaid_png()))

# 调用
state = optimizer_workflow.invoke({"topic": "Cats"})
print(state["joke"])
代理(Agents)
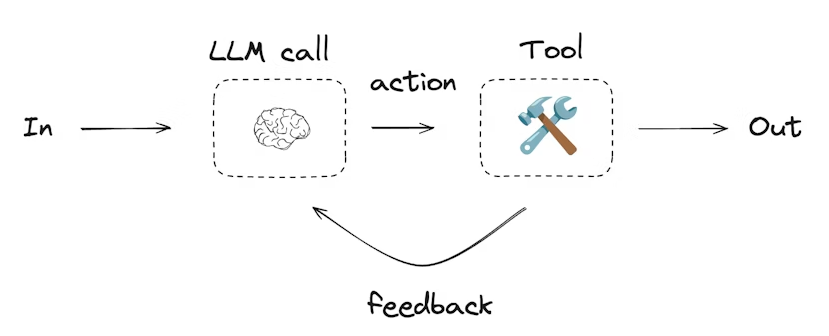
代理通常实现为使用工具执行操作的 LLM。它们在连续的反馈循环中工作,适用于问题和解决方案不可预测的情况。代理比工作流具有更高的自主性,可以决定使用哪些工具以及如何解决问题。你仍然可以定义可用的工具集以及代理的行为准则。
python
from langchain.tools import tool

# 定义工具
@tool
def multiply(a: int, b: int) -> int:
    """计算 a 和 b 的乘积"""
    return a * b

@tool
def add(a: int, b: int) -> int:
    """计算 a 和 b 的和"""
    return a + b

@tool
def divide(a: int, b: int) -> float:
    """计算 a 除以 b"""
    return a / b

# 用工具增强 LLM
tools = [add, multiply, divide]
tools_by_name = {tool.name: tool for tool in tools}
llm_with_tools = llm.bind_tools(tools)
python
from langgraph.graph import MessagesState
from langchain.messages import SystemMessage, HumanMessage, ToolMessage

# 节点
def llm_call(state: MessagesState):
    """LLM 决定是否调用工具"""
    return {
        "messages": [
            llm_with_tools.invoke(
                [
                    SystemMessage(
                        content="你是一个助手,需要对输入进行算术运算。"
                    )
                ]
                + state["messages"]
            )
        ]
    }

def tool_node(state: dict):
    """执行工具调用"""
    result = []
    for tool_call in state["messages"][-1].tool_calls:
        tool = tools_by_name[tool_call["name"]]
        observation = tool.invoke(tool_call["args"])
        result.append(ToolMessage(content=observation, tool_call_id=tool_call["id"]))
    return {"messages": result}

# 条件边函数,根据 LLM 是否调用工具决定流程
def should_continue(state: MessagesState) -> Literal["tool_node", END]:
    """判断是否继续循环或结束"""
    messages = state["messages"]
    last_message = messages[-1]

    if last_message.tool_calls:
        return "tool_node"
    return END

# 构建工作流
agent_builder = StateGraph(MessagesState)
agent_builder.add_node("llm_call", llm_call)
agent_builder.add_node("tool_node", tool_node)

agent_builder.add_edge(START, "llm_call")
agent_builder.add_conditional_edges("llm_call", should_continue, ["tool_node", END])
agent_builder.add_edge("tool_node", "llm_call")

# 编译代理
agent = agent_builder.compile()

# 显示代理
display(Image(agent.get_graph(xray=True).draw_mermaid_png()))

# 调用代理
messages = [HumanMessage(content="Add 3 and 4.")]
messages = agent.invoke({"messages": messages})
for m in messages["messages"]:
    m.pretty_print()
核心能力
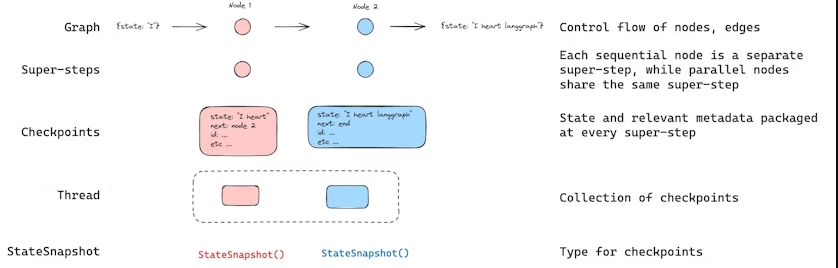
持久化
LangGraph 内置了持久化层,通过 checkpointers 实现。当你使用 checkpointer 编译图时,checkpointer 会在每个super-step保存图状态的检查点。这些检查点会保存到一个 线程(thread) 中,在图执行结束后仍可以访问。因为线程允许在执行后访问图的状态,所以许多强大功能成为可能,包括 human-in-the-loop(人类介入)、内存、时间旅行、容错 等。
Agent Server 会自动处理检查点。在使用 Agent Server 时,你无需手动实现或配置 checkpointer。服务器会在后台处理所有持久化基础设施。
线程(Threads)
线程是分配给每个检查点的唯一 ID 或线程标识符,它包含一系列运行的累计状态。当执行运行时,助手底层图的状态会被持久化到线程中。
在使用 checkpointer 调用图时,必须在配置的可配置部分指定 thread_id:
json
{"configurable": {"thread_id": "1"}}线程的当前状态和历史状态都可以被检索。为了持久化状态,必须在执行运行前创建线程。LangSmith API 提供了多个端点来创建和管理线程及线程状态,详细信息请参见 API 文档。
checkpointer 使用 thread_id 作为存储和检索检查点的主键。如果没有 thread_id,checkpointer 将无法保存状态,也无法在中断后恢复执行,因为 checkpointer 依赖 thread_id 加载已保存的状态。
检查点(Checkpoints)
线程在某一时间点的状态称为 检查点(checkpoint) 。检查点是图状态在每个super-step保存的快照,用 StateSnapshot 对象表示,具有以下关键属性:
- config:与该检查点关联的配置(Config)。
- metadata:与该检查点关联的元数据。
- values:此时刻各状态通道(state channels)的值。
- next:一个元组,表示图中下一步要执行的节点名称。
- tasks :一个包含 PregelTask 对象的元组,记录下一步任务的信息。如果步骤之前尝试过,它会包含错误信息;如果图在某个节点内部被动态中断,tasks 会包含与中断相关的额外数据。
检查点是持久化的,可以用于在之后恢复线程状态。
下面通过一个简单的示例来看调用图时保存了哪些检查点:
python
from langgraph.graph import StateGraph, START, END
from langgraph.checkpoint.memory import InMemorySaver
from langchain_core.runnables import RunnableConfig
from typing import Annotated
from typing_extensions import TypedDict
from operator import add

class State(TypedDict):
    foo: str
    bar: Annotated[list[str], add]

def node_a(state: State):
    return {"foo": "a", "bar": ["a"]}

def node_b(state: State):
    return {"foo": "b", "bar": ["b"]}

workflow = StateGraph(State)
workflow.add_node(node_a)
workflow.add_node(node_b)
workflow.add_edge(START, "node_a")
workflow.add_edge("node_a", "node_b")
workflow.add_edge("node_b", END)

checkpointer = InMemorySaver()
graph = workflow.compile(checkpointer=checkpointer)

config: RunnableConfig = {"configurable": {"thread_id": "1"}}
graph.invoke({"foo": "", "bar":[]}, config)
执行上述图后,我们预期会看到 4 个检查点:
- 空检查点,
START为下一步要执行的节点。 - 包含用户输入
{'foo': '', 'bar': []}的检查点,node_a为下一步要执行的节点。 - 包含
node_a输出{'foo': 'a', 'bar': ['a']}的检查点,node_b为下一步要执行的节点。 - 包含
node_b输出{'foo': 'b', 'bar': ['a', 'b']}的检查点,没有下一步节点。
注意,由于
bar通道有 reducer,因此其值包含了两个节点的输出。
获取状态(Get state)
在与已保存的图状态交互时,必须指定 线程标识符(thread_id) 。你可以通过调用 graph.get_state(config) 查看图的最新状态。该方法会返回一个 StateSnapshot 对象,对应于与配置中提供的线程 ID 关联的最新检查点,或者如果提供了 checkpoint_id,则对应于该线程中特定检查点。
python
# 获取最新状态快照
config = {"configurable": {"thread_id": "1"}}
graph.get_state(config)

# 获取指定 checkpoint_id 的状态快照
config = {
    "configurable": {
        "thread_id": "1",
        "checkpoint_id": "1ef663ba-28fe-6528-8002-5a559208592c"
    }
}
graph.get_state(config)在示例中,get_state 的输出类似于:
python
StateSnapshot(
    values={'foo': 'b', 'bar': ['a', 'b']},
    next=(),
    config={'configurable': {'thread_id': '1', 'checkpoint_ns': '', 'checkpoint_id': '1ef663ba-28fe-6528-8002-5a559208592c'}},
    metadata={'source': 'loop', 'writes': {'node_b': {'foo': 'b', 'bar': ['b']}}, 'step': 2},
    created_at='2024-08-29T19:19:38.821749+00:00',
    parent_config={'configurable': {'thread_id': '1', 'checkpoint_ns': '', 'checkpoint_id': '1ef663ba-28f9-6ec4-8001-31981c2c39f8'}},
    tasks=()
)
获取状态历史(Get state history)
你可以调用 graph.get_state_history(config) 获取给定线程的完整图执行历史。该方法返回与配置中提供的线程 ID 关联的 StateSnapshot 对象列表。检查点按时间顺序排列,列表中第一个是最近的检查点。
python
config = {"configurable": {"thread_id": "1"}}
list(graph.get_state_history(config))在示例中,get_state_history 输出类似于:
python
[
    StateSnapshot(
        values={'foo': 'b', 'bar': ['a', 'b']},
        next=(),
        config={'configurable': {'thread_id': '1', 'checkpoint_ns': '', 'checkpoint_id': '1ef663ba-28fe-6528-8002-5a559208592c'}},
        metadata={'source': 'loop', 'writes': {'node_b': {'foo': 'b', 'bar': ['b']}}, 'step': 2},
        created_at='2024-08-29T19:19:38.821749+00:00',
        parent_config={'configurable': {'thread_id': '1', 'checkpoint_ns': '', 'checkpoint_id': '1ef663ba-28f9-6ec4-8001-31981c2c39f8'}},
        tasks=(),
    ),
    StateSnapshot(
        values={'foo': 'a', 'bar': ['a']},
        next=('node_b',),
        ...
    ),
    StateSnapshot(
        values={'foo': '', 'bar': []},
        next=('node_a',),
        ...
    ),
    StateSnapshot(
        values={'bar': []},
        next=('__start__',),
        ...
    )
]
回放(Replay)
也可以回放之前的图执行。如果在调用图时提供 thread_id 和 checkpoint_id,LangGraph 会重新执行与 checkpoint_id 对应检查点之前的步骤(回放这些步骤),而只执行检查点之后的步骤(即新的分支)。
- thread_id:线程 ID
- checkpoint_id:线程中特定检查点的标识符
调用示例:
python
config = {"configurable": {"thread_id": "1", "checkpoint_id": "0c62ca34-ac19-445d-bbb0-5b4984975b2a"}}
graph.invoke(None, config=config)
重要说明:LangGraph 会判断某一步骤是否已被执行过。如果已经执行,LangGraph 会回放该步骤,而不会重新执行,仅针对提供的 checkpoint_id 之前的步骤。checkpoint_id 之后的步骤将重新执行,即使之前已经执行过。
这就是 LangGraph 的 时间旅行(time-travel)和回放(replay) 功能。
更新状态(Update state)
除了从特定检查点回放图(replay)之外,我们还可以直接编辑图的状态。这可以通过 update_state 方法实现。该方法接受三个不同的参数:
config
- 配置中应包含
thread_id,用于指定要更新的线程。 - 如果只传递
thread_id,则更新(或分叉)当前状态。 - 可选地,如果包含
checkpoint_id字段,则会分叉该特定检查点的状态。
values
- 这些值用于更新图的状态。
- 注意,这种更新与节点更新状态的方式完全相同。
- 如果图状态中的某些通道(channel)定义了 reducer 函数,则这些值会被传入 reducer 进行合并处理。
- 也就是说,
update_state并不会自动覆盖每个通道的值,只会覆盖没有 reducer 的通道。
示例:
假设图的状态模式定义如下(参考上文完整示例):
python
from typing import Annotated
from typing_extensions import TypedDict
from operator import add

class State(TypedDict):
    foo: int
    bar: Annotated[list[str], add]
当前图状态为:
python
{"foo": 1, "bar": ["a"]}如果执行更新:
python
graph.update_state(config, {"foo": 2, "bar": ["b"]})更新后的状态将为:
python
{"foo": 2, "bar": ["a", "b"]}foo通道被完全覆盖(因为该通道没有指定 reducer,update_state会直接覆盖)。bar通道指定了 reducer,因此新值"b"会被追加到现有状态中。
as_node
update_state可以选择性地指定as_node参数。- 如果提供,更新会被视作来自节点
as_node。 - 如果未提供,默认使用最后一个更新状态的节点(如果不模糊)。
- 之所以重要,是因为下一步执行取决于最后一次更新状态的节点,通过
as_node可以控制下一步执行的节点。
内存存储(Memory Store)
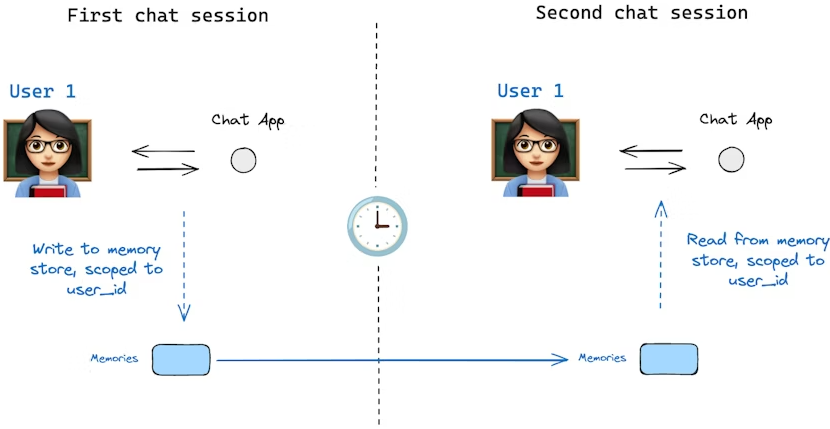
状态模式(state schema)指定了一组键(keys),这些键会在图(graph)执行过程中被填充。如上文所述,状态可以由检查点器(checkpointer)在图的每一步写入到某个线程,从而实现状态持久化。
但是,如果我们希望在多个线程之间保留某些信息呢?考虑这样一个聊天机器人(chatbot)的场景,我们希望在与某个用户的所有聊天会话(例如线程)中保留该用户的特定信息。
仅依靠检查点器,我们无法在不同线程之间共享信息。这就引出了 Store 接口的必要性。作为示例,我们可以定义一个 InMemoryStore 来在不同线程间存储关于用户的信息。操作方法与之前类似:编译图时使用检查点器,同时引入新的 in_memory_store 变量。
LangGraph API 自动处理存储:使用 LangGraph API 时,无需手动实现或配置存储。API 会在后台自动处理所有存储基础设施。
基本用法
首先,我们在不使用 LangGraph 的情况下单独展示内存存储的用法:
python
from langgraph.store.memory import InMemoryStore

in_memory_store = InMemoryStore()
内存按元组(tuple)进行命名空间(namespace)管理,在本例中命名空间为 (<user_id>, "memories")。命名空间可以任意长度,也可以表示任意内容,不必局限于用户。
python
user_id = "1"
namespace_for_memory = (user_id, "memories")
我们使用 store.put 方法将记忆保存到存储中的命名空间。当保存时,需要指定命名空间(如上所定义),以及记忆的键值对:键(key)是记忆的唯一标识(memory_id),值(value,字典形式)是记忆内容本身。
python
import uuid

memory_id = str(uuid.uuid4())
memory = {"food_preference": "I like pizza"}

in_memory_store.put(namespace_for_memory, memory_id, memory)
可以使用 store.search 方法读取命名空间中的记忆,它会返回指定用户的所有记忆列表,最新的记忆在列表末尾:
python
memories = in_memory_store.search(namespace_for_memory)
memories[-1].dict()
输出示例:
python
{
 'value': {'food_preference': 'I like pizza'},
 'key': '07e0caf4-1631-47b7-b15f-65515d4c1843',
 'namespace': ['1', 'memories'],
 'created_at': '2024-10-02T17:22:31.590602+00:00',
 'updated_at': '2024-10-02T17:22:31.590605+00:00'
}
每种记忆类型都是一个 Python 类(Item),具有特定属性。可以通过 .dict() 方法将其转换为字典形式访问。
其属性包括:
value:记忆的值(本身是一个字典)key:该记忆在命名空间中的唯一键namespace:字符串列表,表示该记忆的命名空间created_at:记忆创建的时间戳updated_at:记忆更新的时间戳
语义搜索(Semantic Search)
除了简单的检索外,Store 还支持语义搜索,这使你可以根据意义而非精确匹配来查找记忆。要启用语义搜索,需要为 Store 配置嵌入模型(embedding model):
python
from langchain.embeddings import init_embeddings
from langgraph.store.memory import InMemoryStore

store = InMemoryStore(
    index={
        "embed": init_embeddings("openai:text-embedding-3-small"),  # 嵌入提供器
        "dims": 1536,                                              # 嵌入维度
        "fields": ["food_preference", "$"]                        # 需要进行嵌入的字段
    }
)
现在在搜索时,可以使用自然语言查询来找到相关记忆:
python
# 查找关于食物偏好的记忆
# (前提是已将记忆放入 Store 中)
memories = store.search(
    namespace_for_memory,
    query="What does the user like to eat?",  # 自然语言查询
    limit=3  # 返回前 3 条匹配
)
你可以通过配置 fields 参数或在存储记忆时指定 index 参数来控制哪些部分的记忆需要嵌入:
python
# 存储时只嵌入特定字段
store.put(
    namespace_for_memory,
    str(uuid.uuid4()),
    {
        "food_preference": "I love Italian cuisine",
        "context": "Discussing dinner plans"
    },
    index=["food_preference"]  # 只嵌入 "food_preference" 字段
)

# 不进行嵌入的存储(仍可检索,但不可语义搜索)
store.put(
    namespace_for_memory,
    str(uuid.uuid4()),
    {"system_info": "Last updated: 2024-01-01"},
    index=False
)
在 LangGraph 中使用
有了上述配置后,我们可以在 LangGraph 中使用 in_memory_store。in_memory_store 与检查点器(checkpointer)配合使用:检查点器将状态保存到线程中,而 in_memory_store 允许我们存储任意信息,以便跨线程访问。我们在编译图时同时传入检查点器和 in_memory_store:
python
from langgraph.checkpoint.memory import InMemorySaver

# 启用线程(会话)
checkpointer = InMemorySaver()

# ... 定义图 ...

# 编译图,传入检查点器和存储
graph = graph.compile(checkpointer=checkpointer, store=in_memory_store)
调用图时,像之前一样传入 thread_id,同时也传入 user_id,用于将记忆命名空间化到特定用户:
python
user_id = "1"
config = {"configurable": {"thread_id": "1", "user_id": user_id}}

# 与 AI 打个招呼
for update in graph.stream(
    {"messages": [{"role": "user", "content": "hi"}]},
    config,
    stream_mode="updates"
):
    print(update)
在任意节点中,可以通过传入 store: BaseStore 和 config: RunnableConfig 访问 in_memory_store 和 user_id。下面展示如何在节点中使用语义搜索查找相关记忆:
python
def update_memory(state: MessagesState, config: RunnableConfig, *, store: BaseStore):
    # 从 config 获取用户 ID
    user_id = config["configurable"]["user_id"]

    # 命名空间化
    namespace = (user_id, "memories")

    # ... 分析对话并生成新记忆 ...

    memory_id = str(uuid.uuid4())
    store.put(namespace, memory_id, {"memory": memory})
如上所示,也可以在任意节点中使用 store.search 获取记忆。记忆返回的是对象列表,可以用 .dict() 转为字典:
python
memories[-1].dict()
{
 'value': {'food_preference': 'I like pizza'},
 'key': '07e0caf4-1631-47b7-b15f-65515d4c1843',
 'namespace': ['1', 'memories'],
 'created_at': '2024-10-02T17:22:31.590602+00:00',
 'updated_at': '2024-10-02T17:22:31.590605+00:00'
}
这些记忆可以在模型调用中使用:
python
def call_model(state: MessagesState, config: RunnableConfig, *, store: BaseStore):
    user_id = config["configurable"]["user_id"]
    namespace = (user_id, "memories")

    # 根据最新消息搜索相关记忆
    memories = store.search(
        namespace,
        query=state["messages"][-1].content,
        limit=3
    )
    info = "\n".join([d.value["memory"] for d in memories])

    # ... 在模型调用中使用这些记忆 ...
即使创建了新线程,只要 user_id 相同,也能访问相同的记忆:
python
config = {"configurable": {"thread_id": "2", "user_id": "1"}}

for update in graph.stream(
    {"messages": [{"role": "user", "content": "hi, tell me about my memories"}]},
    config,
    stream_mode="updates"
):
    print(update)
在使用 LangSmith(本地或云端)时,base store 默认可用,无需在图编译时指定。但若要启用语义搜索,需要在 langgraph.json 文件中配置索引设置,例如:
json
{
    ...
    "store": {
        "index": {
            "embed": "openai:text-embeddings-3-small",
            "dims": 1536,
            "fields": ["$"]
        }
    }
}
检查点库(Checkpointer libraries)
在底层,检查点功能由符合 BaseCheckpointSaver 接口的检查点器(checkpointer)对象提供。LangGraph 提供了多种检查点器实现,它们都是通过独立可安装的库实现的:
- langgraph-checkpoint :检查点器保存器的基础接口(
BaseCheckpointSaver)和序列化/反序列化接口(SerializerProtocol)。包括用于实验的内存检查点器实现(InMemorySaver)。LangGraph 默认包含此库。 - langgraph-checkpoint-sqlite :使用 SQLite 数据库的检查点器实现(
SqliteSaver/AsyncSqliteSaver),适合实验和本地工作流,需要单独安装。 - langgraph-checkpoint-postgres :使用 Postgres 数据库的高级检查点器(
PostgresSaver/AsyncPostgresSaver),用于 LangSmith,适合生产环境,需要单独安装。
检查点器接口(Checkpointer interface)
每个检查点器都遵循 BaseCheckpointSaver 接口,并实现以下方法:
.put:保存检查点及其配置和元数据。.put_writes:保存与检查点关联的中间写入(即待处理写入)。.get_tuple:根据配置(thread_id和checkpoint_id)获取检查点元组,用于填充graph.get_state()中的StateSnapshot。.list:列出匹配特定配置和筛选条件的检查点,用于graph.get_state_history()中填充状态历史。
如果检查点器用于异步图执行(如通过 .ainvoke、.astream、.abatch 执行图),将使用上述方法的异步版本:.aput、.aput_writes、.aget_tuple、.alist。
对于异步执行图,你可以使用 InMemorySaver,或使用 SQLite/Postgres 检查点器的异步版本:AsyncSqliteSaver / AsyncPostgresSaver。
序列化(Serializer)
当检查点器保存图状态时,需要序列化状态中的 channel 值,这通过序列化器对象实现。
langgraph_checkpoint定义了序列化器实现协议(protocol),并提供默认实现JsonPlusSerializer,支持多种类型,包括 LangChain 和 LangGraph 原语、datetime、enum 等。
使用 pickle 进行序列化
默认的 JsonPlusSerializer 底层使用 ormsgpack 和 JSON,但并不适用于所有对象类型。
如果希望对当前 msgpack 编码器不支持的对象(如 Pandas DataFrame)回退使用 pickle,可以通过 JsonPlusSerializer 的 pickle_fallback 参数启用:
python
from langgraph.checkpoint.memory import InMemorySaver
from langgraph.checkpoint.serde.jsonplus import JsonPlusSerializer

# ... 定义图 ...
graph.compile(
    checkpointer=InMemorySaver(serde=JsonPlusSerializer(pickle_fallback=True))
)
加密(Encryption)
检查点器可以选择对所有持久化状态进行加密。要启用加密,可将 EncryptedSerializer 实例传入任意 BaseCheckpointSaver 的 serde 参数。创建加密序列化器最简单的方法是使用 from_pycryptodome_aes,它会从环境变量 LANGGRAPH_AES_KEY 中读取 AES 密钥,也可以直接传入 key 参数:
python
import sqlite3
from langgraph.checkpoint.serde.encrypted import EncryptedSerializer
from langgraph.checkpoint.sqlite import SqliteSaver

serde = EncryptedSerializer.from_pycryptodome_aes()  # 读取 LANGGRAPH_AES_KEY
checkpointer = SqliteSaver(sqlite3.connect("checkpoint.db"), serde=serde)
python
from langgraph.checkpoint.serde.encrypted import EncryptedSerializer
from langgraph.checkpoint.postgres import PostgresSaver

serde = EncryptedSerializer.from_pycryptodome_aes()
checkpointer = PostgresSaver.from_conn_string("postgresql://...", serde=serde)
checkpointer.setup()
在 LangSmith 上运行时,只要存在 LANGGRAPH_AES_KEY,加密会自动启用,因此只需提供环境变量即可。
如果需要使用其他加密方案,可以通过实现 CipherProtocol 并传入 EncryptedSerializer 来实现。
持久化执行(Durable execution)
持久化执行是一种技术:在流程或工作流的关键节点保存执行进度,使其可以暂停,并在之后精确地从中断处继续执行 。这种机制在需要 human-in-the-loop 的场景中特别有用,用户可以在流程继续之前对其进行检查、验证或修改;同时也非常适合可能被中断或出错的长时间运行任务(例如调用 LLM 超时)。通过保留已经完成的工作,持久化执行使流程能够在不重复处理之前步骤的情况下继续运行------即使中断发生在很久之后(例如一周后)。
LangGraph 内置的持久化层为工作流提供了持久化执行能力,确保每一步执行状态都会被保存到一个可靠的存储中。这样一来,无论工作流是由于系统故障还是因为人工介入而被中断,都可以从最近一次记录的状态继续执行。
如果你在使用 LangGraph 时配置了检查点器(checkpointer),那么持久化执行已经自动启用 。你可以在任意时刻暂停和恢复工作流,即使发生中断或失败也是如此。为了充分发挥持久化执行的优势,需要确保你的工作流是确定性的(deterministic)和幂等的(idempotent),并将所有副作用操作或非确定性操作封装在 task 中。你可以同时使用 StateGraph(Graph API)和 Functional API 中的 task。
要在 LangGraph 中使用持久化执行,需要满足以下条件:
- 启用持久化:在工作流中指定一个检查点器,用于保存工作流的执行进度。
- 指定线程标识符(thread_id):在执行工作流时提供线程 ID,用于跟踪某个具体工作流实例的执行历史。
- 封装非确定性或有副作用的操作 :将所有非确定性操作(如随机数生成)或具有副作用的操作(如文件写入、API 调用)包裹在 task 中。这样在工作流恢复时,这些操作不会被重复执行,而是直接从持久化层中读取结果。更多内容可参见 Determinism and Consistent Replay。
确定性与一致性重放(Determinism and Consistent Replay)
当你恢复一个工作流执行时,代码不会从中断时的那一行代码继续执行;相反,系统会找到一个合适的起始点,从该位置开始重放执行流程,直到到达中断点。
这意味着,在为持久化执行编写工作流时,必须将所有非确定性操作(如随机数生成)以及所有带有副作用的操作(如文件写入、API 调用)封装在节点中。
为了确保工作流具有确定性,并且能够被一致地重放,请遵循以下准则:
-
避免重复执行工作
如果一个节点中包含多个带副作用的操作(例如日志记录、文件写入或网络调用),应将每个操作封装为独立的 task。这样在工作流恢复时,这些操作不会被再次执行,而是从持久化层中获取其结果。
-
封装非确定性操作
将所有可能产生非确定性结果的代码(例如随机数生成)封装在 task 或节点中。这样在恢复执行时,工作流可以严格按照已记录的执行顺序和结果继续运行。
-
使用幂等操作
在可能的情况下,确保所有副作用操作(如 API 调用、文件写入)都是幂等的。幂等意味着:即使在工作流失败后重试执行,该操作的效果也与首次执行时相同。这一点对于涉及数据写入的操作尤为重要。如果某个 task 已启动但未成功完成,在恢复执行时该 task 可能会被重新运行,此时需要依赖已记录的结果来保持一致性。可以通过使用幂等键(idempotency key)或检查已有结果来避免意外的重复操作,从而保证工作流执行的平稳和可预测性。
持久化级别(Durability modes)
LangGraph 支持三种持久化级别(durability modes),用于在性能 与数据一致性之间根据应用需求进行权衡。持久化级别越高,工作流执行时引入的开销也越大。你可以在调用任意图执行方法时指定持久化级别:
python
graph.stream(
    {"input": "test"},
    durability="sync"
)
三种持久化级别从低到高依次为:
-
"exit" :
仅在图执行结束时(无论是成功结束、发生错误,还是被中断)才会持久化变更。
这种方式对长时间运行的图具有最佳性能,但中间状态不会被保存,因此如果在执行过程中发生系统故障(例如进程崩溃),将无法从中途恢复。
-
"async" :
在执行下一步的同时,以异步方式 持久化变更。
这种方式在性能和持久性之间取得了较好的平衡,但存在一个小风险:如果进程在执行过程中崩溃,某些检查点可能尚未来得及写入。
-
"sync" :
在开始下一步之前,同步 持久化所有变更。
这种方式保证每一个检查点在继续执行前都已写入,提供最高级别的持久性,但会带来一定的性能开销。
在节点中使用 task
如果一个节点中包含多个操作,相比将这些操作拆分为多个独立节点,将每个操作转换为 task 往往会更容易实现和维护。
python
from typing import NotRequired
from typing_extensions import TypedDict
import uuid

from langgraph.checkpoint.memory import InMemorySaver
from langgraph.graph import StateGraph, START, END
import requests

# 定义一个 TypedDict 表示状态
class State(TypedDict):
    url: str
    result: NotRequired[str]

def call_api(state: State):
    """示例节点:发起一次 API 请求。"""
    result = requests.get(state['url']).text[:100]  # 带副作用的操作
    return {
        "result": result
    }

# 创建 StateGraph 构建器,并添加 call_api 节点
builder = StateGraph(State)
builder.add_node("call_api", call_api)

# 将 START 和 END 连接到 call_api 节点
builder.add_edge(START, "call_api")
builder.add_edge("call_api", END)

# 指定检查点器
checkpointer = InMemorySaver()

# 使用检查点器编译图
graph = builder.compile(checkpointer=checkpointer)

# 定义包含 thread_id 的配置
thread_id = uuid.uuid4()
config = {"configurable": {"thread_id": thread_id}}

# 调用图
graph.invoke({"url": "https://www.example.com"}, config)
恢复工作流(Resuming Workflows)
在你的工作流中启用持久化执行之后,可以在以下场景中恢复执行:
-
暂停与恢复工作流 :
使用
interrupt函数在特定位置暂停工作流,并通过Command原语在更新状态后恢复执行。更多细节可参见 Interrupts 相关文档。 -
故障恢复 :
当发生异常(例如 LLM 服务提供方宕机)时,可以从最近一次成功的检查点 自动恢复工作流。这通常通过使用**相同的线程标识符(thread_id)**重新执行工作流,并将输入值设为
None来实现(Functional API 中有对应示例)。
工作流恢复时的起始点(Starting Points for Resuming Workflows)
-
使用 StateGraph(Graph API)时 :
恢复执行的起点是执行被中断的那个节点的起始位置。
-
在节点内部调用子图(subgraph)时 :
恢复执行的起点是调用该子图的父节点 。在子图内部,起始点则是执行中断的具体节点。
-
使用 Functional API 时 :
恢复执行的起点是执行中断的入口函数(entrypoint)的起始位置。
流式输出(Streaming)
LangGraph 实现了一套流式(streaming)系统,用于实时输出执行过程中的更新信息。流式输出对于提升基于 LLM 构建的应用的响应性至关重要。通过在完整响应尚未生成之前就逐步展示输出,流式机制可以显著改善用户体验(UX),尤其是在需要应对 LLM 调用延迟的场景下。
使用 LangGraph 的 streaming,你可以实现:
-
流式输出图状态 :通过
updates或values模式获取状态更新或完整状态值 -
流式输出子图结果:同时包含父图和任意嵌套子图的输出
-
流式输出 LLM token:在节点、子图或工具中任意位置捕获 LLM 的 token 流
-
流式输出自定义数据:直接从工具函数中发送自定义更新或进度信号
-
支持多种流式模式:可选择
values(完整状态)updates(状态增量)messages(LLM token + 元数据)custom(用户自定义数据)debug(详细执行追踪)
支持的流式模式(Supported stream modes)
在调用 stream 或 astream 方法时,可以通过列表传入一个或多个流式模式:
| 模式 | 说明 |
|---|---|
values |
在图的每一步执行后,流式输出完整的状态值 |
updates |
在图的每一步执行后,流式输出状态的增量更新。如果在同一步中有多个更新(例如执行了多个节点),这些更新会分别流式输出 |
custom |
流式输出图节点内部发送的自定义数据 |
messages |
在任意调用 LLM 的节点中,流式输出 (LLM token, metadata) 二元组 |
debug |
在图执行的整个过程中,尽可能流式输出详细信息 |
基本用法示例
LangGraph 的图对象提供了 stream(同步)和 astream(异步)方法,以迭代器的形式返回流式输出结果:
python
for chunk in graph.stream(inputs, stream_mode="updates"):
    print(chunk)
扩展示例:流式输出状态更新
python
from typing import TypedDict
from langgraph.graph import StateGraph, START, END

class State(TypedDict):
    topic: str
    joke: str

def refine_topic(state: State):
    return {"topic": state["topic"] + " and cats"}

def generate_joke(state: State):
    return {"joke": f"This is a joke about {state['topic']}"}

graph = (
    StateGraph(State)
    .add_node(refine_topic)
    .add_node(generate_joke)
    .add_edge(START, "refine_topic")
    .add_edge("refine_topic", "generate_joke")
    .add_edge("generate_joke", END)
    .compile()
)

# stream() 方法返回一个迭代器,用于逐步输出流式结果
for chunk in graph.stream(
    {"topic": "ice cream"},
    # 设置 stream_mode="updates" 仅流式输出每个节点执行后的状态增量
    # 也可以使用其他流式模式,详见支持的流式模式说明
    stream_mode="updates",
):
    print(chunk)
输出示例:
python
{'refineTopic': {'topic': 'ice cream and cats'}}
{'generateJoke': {'joke': 'This is a joke about ice cream and cats'}}
同时使用多种流式模式(Stream multiple modes)
你可以将 stream_mode 设置为列表,以同时启用多种流式模式。
此时,流式输出结果将以 (mode, chunk) 形式返回,其中 mode 是流式模式名称,chunk 是该模式下输出的数据:
python
for mode, chunk in graph.stream(inputs, stream_mode=["updates", "custom"]):
    print(chunk)
流式输出图状态(Stream graph state)
可以使用 updates 和 values 两种流式模式,在图执行过程中实时输出图的状态。
updates:在图的每一步执行后,流式输出状态的增量更新values:在图的每一步执行后,流式输出完整的状态值
python
from typing import TypedDict
from langgraph.graph import StateGraph, START, END

class State(TypedDict):
    topic: str
    joke: str

def refine_topic(state: State):
    return {"topic": state["topic"] + " and cats"}

def generate_joke(state: State):
    return {"joke": f"This is a joke about {state['topic']}"}

graph = (
    StateGraph(State)
    .add_node(refine_topic)
    .add_node(generate_joke)
    .add_edge(START, "refine_topic")
    .add_edge("refine_topic", "generate_joke")
    .add_edge("generate_joke", END)
    .compile()
)updates使用该模式,仅流式输出每一步中各节点返回的状态更新 。流式结果中包含节点名称以及该节点产生的更新内容。
python
for chunk in graph.stream(
    {"topic": "ice cream"},
    stream_mode="updates",
):
print(chunk)values使用该模式,在每一步执行完成后,流式输出当前图的完整状态。
python
for chunk in graph.stream(
    {"topic": "ice cream"},
    stream_mode="values",
):
    print(chunk)
流式输出子图结果(Stream subgraph outputs)
如果希望在流式输出中包含**子图(subgraph)**的执行结果,可以在父图的 .stream() 方法中设置 subgraphs=True。这样,父图和所有子图的输出都会被流式返回。
流式输出的格式为二元组 (namespace, data):
namespace:一个元组,表示调用子图的节点路径
例如:("parent_node:<task_id>", "child_node:<task_id>")data:对应节点产生的流式数据
python
for chunk in graph.stream(
    {"foo": "foo"},
    # 设置 subgraphs=True 以流式输出子图结果
    subgraphs=True,
    stream_mode="updates",
):
    print(chunk)
扩展示例:从子图中进行流式输出
python
from langgraph.graph import START, StateGraph
from typing import TypedDict

# 定义子图
class SubgraphState(TypedDict):
    foo: str  # 注意:该字段与父图状态共享
    bar: str

def subgraph_node_1(state: SubgraphState):
    return {"bar": "bar"}

def subgraph_node_2(state: SubgraphState):
    return {"foo": state["foo"] + state["bar"]}

subgraph_builder = StateGraph(SubgraphState)
subgraph_builder.add_node(subgraph_node_1)
subgraph_builder.add_node(subgraph_node_2)
subgraph_builder.add_edge(START, "subgraph_node_1")
subgraph_builder.add_edge("subgraph_node_1", "subgraph_node_2")
subgraph = subgraph_builder.compile()

# 定义父图
class ParentState(TypedDict):
    foo: str

def node_1(state: ParentState):
    return {"foo": "hi! " + state["foo"]}

builder = StateGraph(ParentState)
builder.add_node("node_1", node_1)
builder.add_node("node_2", subgraph)
builder.add_edge(START, "node_1")
builder.add_edge("node_1", "node_2")
graph = builder.compile()

for chunk in graph.stream(
    {"foo": "foo"},
    stream_mode="updates",
    # 设置 subgraphs=True 以流式输出子图结果
    subgraphs=True,
):
    print(chunk)
输出示例:
python
((), {'node_1': {'foo': 'hi! foo'}})
(('node_2:dfddc4ba-c3c5-6887-5012-a243b5b377c2',), {'subgraph_node_1': {'bar': 'bar'}})
(('node_2:dfddc4ba-c3c5-6887-5012-a243b5b377c2',), {'subgraph_node_2': {'foo': 'hi! foobar'}})
((), {'node_2': {'foo': 'hi! foobar'}})
需要注意的是:
这里不仅接收到了节点产生的状态更新 ,还同时接收到了对应的 namespace,用于指明当前流式数据来自哪个图或子图。这使得在复杂的嵌套图结构中,也能清晰地区分不同执行层级的输出。
使用 debug 流式模式,可以在图执行的整个过程中尽可能多地流式输出信息。
流式输出的内容包括节点名称 以及完整的状态。
python
for chunk in graph.stream(
    {"topic": "ice cream"},
    stream_mode="debug",
):
    print(chunk)
LLM Token 流式输出
使用 messages 流式模式,可以从图中的任意位置(包括节点、工具、子图或任务)逐 token 地流式输出大语言模型(LLM)的生成结果。
messages 模式下的流式输出是一个二元组 (message_chunk, metadata),其中:
- message_chunk:LLM 输出的 token 或消息片段
- metadata:一个字典,包含图节点信息以及 LLM 调用相关的元数据
如果你的 LLM 不是通过 LangChain 集成提供的,也可以使用 custom 模式来流式输出其结果。详情请参见 use with any LLM。
注意(Python < 3.11 的异步配置)
在 Python 3.11 以下版本中使用异步代码时,必须在
ainvoke()中显式传入RunnableConfig,否则无法正确启用流式输出。
python
from dataclasses import dataclass

from langchain.chat_models import init_chat_model
from langgraph.graph import StateGraph, START


@dataclass
class MyState:
    topic: str
    joke: str = ""


model = init_chat_model(model="gpt-4o-mini")

def call_model(state: MyState):
    """调用 LLM,根据主题生成一个笑话"""
    # 注意:即使使用的是 .invoke 而不是 .stream,
    # 依然会产生 message 事件
    model_response = model.invoke(
        [
            {"role": "user", "content": f"Generate a joke about {state.topic}"}
        ]
    )
    return {"joke": model_response.content}

graph = (
    StateGraph(MyState)
    .add_node(call_model)
    .add_edge(START, "call_model")
    .compile()
)

# "messages" 流式模式会返回 (message_chunk, metadata) 的迭代器
# message_chunk 是 LLM 输出的 token
# metadata 包含调用该 LLM 的图节点等信息
for message_chunk, metadata in graph.stream(
    {"topic": "ice cream"},
    stream_mode="messages",
):
    if message_chunk.content:
        print(message_chunk.content, end="|", flush=True)
你可以为 LLM 调用关联 tags(标签),然后根据这些标签过滤流式输出的 token。
python
from langchain.chat_models import init_chat_model

# model_1 带有 "joke" 标签
model_1 = init_chat_model(model="gpt-4o-mini", tags=['joke'])
# model_2 带有 "poem" 标签
model_2 = init_chat_model(model="gpt-4o-mini", tags=['poem'])

graph = ... # 定义一个使用这些 LLM 的图

# 设置 stream_mode="messages" 以流式输出 LLM tokens
# metadata 中包含 LLM 调用信息,包括 tags
async for msg, metadata in graph.astream(
    {"topic": "cats"},
    stream_mode="messages",
):
    # 根据 metadata 中的 tags 字段进行过滤
    # 只输出带有 "joke" 标签的 LLM token
    if metadata["tags"] == ["joke"]:
        print(msg.content, end="|", flush=True)
扩展示例:按标签过滤
python
from typing import TypedDict

from langchain.chat_models import init_chat_model
from langgraph.graph import START, StateGraph

# joke_model 带有 "joke" 标签
joke_model = init_chat_model(model="gpt-4o-mini", tags=["joke"])
# poem_model 带有 "poem" 标签
poem_model = init_chat_model(model="gpt-4o-mini", tags=["poem"])


class State(TypedDict):
    topic: str
    joke: str
    poem: str


async def call_model(state, config):
    topic = state["topic"]
    print("Writing joke...")
    # 注意:在 Python < 3.11 中,必须显式传递 config
    # 以确保上下文变量能正确传播
    joke_response = await joke_model.ainvoke(
        [{"role": "user", "content": f"Write a joke about {topic}"}],
        config,
    )
    print("\n\nWriting poem...")
    poem_response = await poem_model.ainvoke(
        [{"role": "user", "content": f"Write a short poem about {topic}"}],
        config,
    )
    return {"joke": joke_response.content, "poem": poem_response.content}


graph = (
    StateGraph(State)
    .add_node(call_model)
    .add_edge(START, "call_model")
    .compile()
)

# 使用 "messages" 模式流式输出 LLM tokens
# metadata 中包含 LLM 调用的 tags
async for msg, metadata in graph.astream(
    {"topic": "cats"},
    stream_mode="messages",
):
    if metadata["tags"] == ["joke"]:
        print(msg.content, end="|", flush=True)
按节点过滤(Filter by node)
如果只希望从特定节点 流式输出 LLM token,可以使用 stream_mode="messages",并根据流式元数据中的 langgraph_node 字段进行过滤:
python
# "messages" 模式返回 (message_chunk, metadata)
# metadata 中包含 LLM 被调用的图节点信息
for msg, metadata in graph.stream(
    inputs,
    stream_mode="messages",
):
    # 根据 metadata["langgraph_node"] 过滤
    # 只保留指定节点产生的 token
    if msg.content and metadata["langgraph_node"] == "some_node_name":
        ...
扩展示例:仅从指定节点流式输出 LLM tokens
python
from typing import TypedDict
from langgraph.graph import START, StateGraph
from langchain_openai import ChatOpenAI

model = ChatOpenAI(model="gpt-4o-mini")


class State(TypedDict):
    topic: str
    joke: str
    poem: str


def write_joke(state: State):
    topic = state["topic"]
    joke_response = model.invoke(
        [{"role": "user", "content": f"Write a joke about {topic}"}]
    )
    return {"joke": joke_response.content}


def write_poem(state: State):
    topic = state["topic"]
    poem_response = model.invoke(
        [{"role": "user", "content": f"Write a short poem about {topic}"}]
    )
    return {"poem": poem_response.content}


graph = (
    StateGraph(State)
    .add_node(write_joke)
    .add_node(write_poem)
    # 并发生成笑话和诗歌
    .add_edge(START, "write_joke")
    .add_edge(START, "write_poem")
    .compile()
)

# 使用 "messages" 模式流式输出 LLM tokens
for msg, metadata in graph.stream(
    {"topic": "cats"},
    stream_mode="messages",
):
    # 仅输出来自 write_poem 节点的 token
    if msg.content and metadata["langgraph_node"] == "write_poem":
        print(msg.content, end="|", flush=True)
流式输出自定义数据(Stream custom data)
如果你希望从 LangGraph 的节点或工具内部 向外发送用户自定义的数据,可以按以下步骤操作:
- 使用
get_stream_writer获取流写入器(stream writer),并通过它发送自定义数据。 - 在调用
.stream()或.astream()时,将stream_mode设置为"custom",即可在流中接收到这些自定义数据。
你也可以组合多个模式(例如["updates", "custom"]),但至少要包含"custom"。
python
from typing import TypedDict
from langgraph.config import get_stream_writer
from langgraph.graph import StateGraph, START

class State(TypedDict):
    query: str
    answer: str

def node(state: State):
    # 获取 stream writer,用于发送自定义数据
    writer = get_stream_writer()
    # 发送一个自定义的键值对(例如:进度更新)
    writer({"custom_key": "Generating custom data inside node"})
    return {"answer": "some data"}

graph = (
    StateGraph(State)
    .add_node(node)
    .add_edge(START, "node")
    .compile()
)

inputs = {"query": "example"}

# 设置 stream_mode="custom",以在流中接收自定义数据
for chunk in graph.stream(inputs, stream_mode="custom"):
    print(chunk)
与任意 LLM 一起使用(Use with any LLM)
你可以使用 stream_mode="custom" 从任何 LLM API 中流式输出数据 ------ 即使该 API 并未实现 LangChain 的 Chat Model 接口。
这使得你可以非常灵活地集成原生 LLM 客户端或带有自定义流式接口的外部服务,从而让 LangGraph 适配各种定制化场景。
python
from langgraph.config import get_stream_writer

def call_arbitrary_model(state):
    """示例节点:调用任意模型并流式输出其结果"""
    # 获取 stream writer,用于发送自定义数据
    writer = get_stream_writer()
    # 假设你有一个会逐块产出结果的流式客户端
    for chunk in your_custom_streaming_client(state["topic"]):
        # 通过 writer 将自定义数据写入流中
        writer({"custom_llm_chunk": chunk})
    return {"result": "completed"}

graph = (
    StateGraph(State)
    .add_node(call_arbitrary_model)
    # 根据需要添加其他节点和边
    .compile()
)

# 设置 stream_mode="custom",以接收自定义流式数据
for chunk in graph.stream(
    {"topic": "cats"},
    stream_mode="custom",
):
    # chunk 中即为从 LLM 流式输出的自定义数据
    print(chunk)
扩展示例:流式输出任意聊天模型(streaming arbitrary chat model)
python
import operator
import json

from typing import TypedDict
from typing_extensions import Annotated
from langgraph.graph import StateGraph, START

from openai import AsyncOpenAI

openai_client = AsyncOpenAI()
model_name = "gpt-4o-mini"


async def stream_tokens(model_name: str, messages: list[dict]):
    response = await openai_client.chat.completions.create(
        messages=messages, model=model_name, stream=True
    )
    role = None
    async for chunk in response:
        delta = chunk.choices[0].delta

        if delta.role is not None:
            role = delta.role

        if delta.content:
            yield {"role": role, "content": delta.content}
python
# 这是我们的工具
async def get_items(place: str) -> str:
    """使用该工具列出在指定地点可能找到的物品"""
    writer = get_stream_writer()
    response = ""
    async for msg_chunk in stream_tokens(
        model_name,
        [
            {
                "role": "user",
                "content": (
                    "Can you tell me what kind of items "
                    f"i might find in the following place: '{place}'. "
                    "List at least 3 such items separating them by a comma. "
                    "And include a brief description of each item."
                ),
            }
        ],
    ):
        response += msg_chunk["content"]
        writer(msg_chunk)

    return response
python
class State(TypedDict):
    messages: Annotated[list[dict], operator.add]
python
# 工具调用图节点
async def call_tool(state: State):
    ai_message = state["messages"][-1]
    tool_call = ai_message["tool_calls"][-1]

    function_name = tool_call["function"]["name"]
    if function_name != "get_items":
        raise ValueError(f"Tool {function_name} not supported")

    function_arguments = tool_call["function"]["arguments"]
    arguments = json.loads(function_arguments)

    function_response = await get_items(**arguments)
    tool_message = {
        "tool_call_id": tool_call["id"],
        "role": "tool",
        "name": function_name,
        "content": function_response,
    }
    return {"messages": [tool_message]}
python
graph = (
    StateGraph(State)
    .add_node(call_tool)
    .add_edge(START, "call_tool")
    .compile()
)
调用包含工具调用的 AIMessage:
python
inputs = {
    "messages": [
        {
            "content": None,
            "role": "assistant",
            "tool_calls": [
                {
                    "id": "1",
                    "function": {
                        "arguments": '{"place":"bedroom"}',
                        "name": "get_items",
                    },
                    "type": "function",
                }
            ],
        }
    ]
}

async for chunk in graph.astream(
    inputs,
    stream_mode="custom",
):
    print(chunk["content"], end="|", flush=True)
为特定聊天模型禁用流式输出(Disable streaming for specific chat models)
如果你的应用同时使用支持流式输出 和不支持流式输出的模型,可能需要显式地为不支持的模型禁用 streaming。
在初始化模型时设置 streaming=False:
python
from langchain.chat_models import init_chat_model

model = init_chat_model(
    "claude-sonnet-4-5-20250929",
    # 设置 streaming=False 以禁用该聊天模型的流式输出
    streaming=False
)
或
go
from langchain_openai import ChatOpenAI

# Set streaming=False to disable streaming for the chat model
model = ChatOpenAI(model="o1-preview", streaming=False)
并非所有聊天模型的集成都支持 streaming 参数。
如果你的模型不支持该参数,可以改用 disable_streaming=True。
该参数在所有聊天模型的基类中都可用。
中断(Interrupts)
中断 允许你在图执行的特定位置暂停执行,并在继续之前等待外部输入。这使得 human-in-the-loop(人在回路中) 的模式成为可能,即流程必须依赖外部输入才能继续推进。当触发中断时,LangGraph 会通过其持久化层保存当前图的状态,并无限期等待,直到你恢复执行。
中断的实现方式是在图节点中的任意位置调用 interrupt() 函数。该函数接受任意可 JSON 序列化的值 ,并将其返回给调用方。当你准备继续执行时,通过使用 Command 重新调用图,这个 Command 中携带的值会作为 interrupt() 在节点内部的返回值。
与静态断点 (在特定节点前或后暂停)不同,中断是动态的 :
它们可以放置在代码的任何位置,并且可以根据你的业务逻辑有条件地触发。
一些关键概念:
-
检查点保证位置可恢复 :
checkpointer 会写入精确的图状态,因此你可以在之后恢复执行,即使图处于错误状态。
-
thread_id 是你的执行指针 :
通过设置
config={"configurable": {"thread_id": ...}},告诉 checkpointer 应该加载哪一份状态。 -
中断载荷通过
__interrupt__暴露 :你传给
interrupt()的值会在返回结果的__interrupt__字段中返回,方便你知道图当前在等待什么。 -
thread_id 相当于持久化游标 :
复用同一个
thread_id会恢复到同一个检查点;使用新的thread_id则会开启一个全新的线程,状态为空。
使用 interrupt 暂停执行(Pause using interrupt)
interrupt 函数会暂停图的执行,并向调用方返回一个值。当你在某个节点中调用 interrupt 时,LangGraph 会保存当前图状态,并等待你提供输入以恢复执行。
使用 interrupt 需要满足以下条件:
- 配置一个 checkpointer 用于持久化图状态(生产环境中应使用持久化的 checkpointer)
- 在 config 中指定
thread_id,以便运行时知道从哪份状态恢复 - 在需要暂停的地方调用
interrupt()(传入的载荷必须是可 JSON 序列化的)
python
from langgraph.types import interrupt

def approval_node(state: State):
    # 暂停并请求审批
    approved = interrupt("Do you approve this action?")

    # 当恢复执行时,Command(resume=...) 的值会在这里返回
    return {"approved": approved}
当你调用 interrupt 时,会发生以下事情:
- 图执行在调用
interrupt的精确位置被挂起 - 当前状态通过 checkpointer 保存下来,以便后续恢复
(在生产环境中,这通常应是基于数据库等持久化存储的 checkpointer) - 传给
interrupt的值会通过__interrupt__字段返回给调用方
(可以是字符串、对象、数组等任意可 JSON 序列化的值) - 图会无限期等待,直到你恢复执行
- 当恢复执行时,响应值会传回节点中,作为
interrupt()的返回值
恢复中断(Resuming interrupts)
当中断暂停执行后,你可以通过再次调用图,并传入包含 resume 值的 Command 来恢复执行。
这个 resume 值会传回给 interrupt 调用,使节点能够带着外部输入继续运行。
python
from langgraph.types import Command

# 初次执行 ------ 命中 interrupt 并暂停
# thread_id 是持久化指针(生产环境中应使用稳定的 ID)
config = {"configurable": {"thread_id": "thread-1"}}
result = graph.invoke({"input": "data"}, config=config)

# 查看中断信息
# __interrupt__ 中包含传给 interrupt() 的载荷
print(result["__interrupt__"])
# > [Interrupt(value='Do you approve this action?')]

# 使用人工响应恢复执行
# resume 中的值会成为节点内 interrupt() 的返回值
graph.invoke(Command(resume=True), config=config)
恢复执行时需要注意的要点:
- 必须使用与中断时相同的 thread_id
- 传给
Command(resume=...)的值会成为interrupt()的返回值 - 恢复后,节点会从该节点的起始位置重新执行 ,
因此interrupt之前的代码会再次运行 resume的值可以是任意可 JSON 序列化的值
常见模式(Common patterns)
中断(interrupt)最核心的功能是暂停执行并等待外部输入。这一功能适用于多种场景,包括:
- 审批工作流(Approval workflows):在执行关键操作(如 API 调用、数据库修改、金融交易)之前暂停,等待人工审批。
- 审核与编辑(Review and edit):在继续执行之前,让人类审核并修改 LLM 输出或工具调用结果。
- 中断工具调用(Interrupting tool calls):在执行工具调用之前暂停,允许人工审核和编辑工具调用内容。
- 验证人工输入(Validating human input):在进入下一步之前暂停,用于校验用户或人工输入的有效性。
批准或拒绝(Approve or reject)
中断最常见的用法之一,是在执行关键操作之前暂停流程并请求审批。例如,你可能希望在发起 API 调用、修改数据库,或做出其他重要决策之前,让人类进行确认。
python
from typing import Literal
from langgraph.types import interrupt, Command

def approval_node(state: State) -> Command[Literal["proceed", "cancel"]]:
    # 暂停执行;载荷会出现在 result["__interrupt__"] 中
    is_approved = interrupt({
        "question": "Do you want to proceed with this action?",
        "details": state["action_details"]
    })

    # 根据响应进行路由
    if is_approved:
        return Command(goto="proceed")  # 在提供 resume 载荷后执行
    else:
        return Command(goto="cancel")
恢复图执行时,通过传入 true 表示批准,false 表示拒绝:
python
# 批准
graph.invoke(Command(resume=True), config=config)

# 拒绝
graph.invoke(Command(resume=False), config=config)
审核并编辑状态(Review and edit state)
有时你希望在继续执行之前,让人类审核并编辑图状态中的一部分内容 。这在以下场景中特别有用:
纠正 LLM 生成的内容、补充缺失信息,或进行人工调整。
python
from langgraph.types import interrupt

def review_node(state: State):
    # 暂停并展示当前内容供审核(会显示在 result["__interrupt__"] 中)
    edited_content = interrupt({
        "instruction": "Review and edit this content",
        "content": state["generated_text"]
    })

    # 使用编辑后的版本更新状态
    return {"generated_text": edited_content}
恢复执行时,提供编辑后的内容即可:
python
graph.invoke(
    Command(resume="The edited and improved text"),  # 该值会成为 interrupt() 的返回值
    config=config
)
在工具(tool)中使用中断(Interrupts in tools)
你也可以直接在 工具函数(tool) 内部使用中断。这会让工具在每次被调用时都先暂停等待审批,并允许人工在工具真正执行之前进行审核或修改。
首先,定义一个使用 interrupt 的工具:
python
from langchain.tools import tool
from langgraph.types import interrupt

@tool
def send_email(to: str, subject: str, body: str):
    """Send an email to a recipient."""

    # 发送前暂停;载荷会出现在 result["__interrupt__"] 中
    response = interrupt({
        "action": "send_email",
        "to": to,
        "subject": subject,
        "body": body,
        "message": "Approve sending this email?"
    })

    if response.get("action") == "approve":
        # resume 的值可以在真正执行前覆盖原始输入
        final_to = response.get("to", to)
        final_subject = response.get("subject", subject)
        final_body = response.get("body", body)
        return f"Email sent to {final_to} with subject '{final_subject}'"
return "Email cancelled by user"当你希望审批逻辑与工具本身绑定 、并在图的不同位置复用该工具时,这种方式非常有用。
LLM 可以像往常一样调用工具,而每当工具被调用时,中断都会自动触发,让你可以选择批准、修改或取消该操作。
校验人工输入(Validating human input)
有时你需要对人类输入进行校验,如果输入无效就重新询问。可以通过在循环中多次调用 interrupt 来实现这一点。
python
from langgraph.types import interrupt

def get_age_node(state: State):
    prompt = "What is your age?"

    while True:
        answer = interrupt(prompt)  # 载荷会出现在 result["__interrupt__"] 中

        # 校验输入
        if isinstance(answer, int) and answer > 0:
            # 输入有效,继续执行
            break
        else:
            # 输入无效,使用更明确的提示再次询问
            prompt = f"'{answer}' is not a valid age. Please enter a positive number."

    return {"age": answer}
每当你使用无效输入恢复图执行时,节点都会用更清晰的提示再次询问;一旦提供了有效输入,节点执行完成,图会继续向下运行。
中断规则(Rules of interrupts)
当你在节点中调用 interrupt 时,LangGraph 会通过抛出一个特殊异常来暂停执行。这个异常会沿调用栈向上传播,由运行时捕获,通知图保存当前状态并等待外部输入。
当执行恢复时(即你提供所需输入后),运行时会从节点的开头重新启动整个节点 ,而不是从 interrupt 被调用的那一行继续执行。这意味着中断之前执行的代码会再次运行。因此,在使用中断时,需要遵循一些重要规则以确保行为符合预期。
不要在 try/except 中包裹 interrupt
中断通过抛出特殊异常来暂停执行。如果你将 interrupt 放入 try/except 块中,会捕获该异常,导致中断无法返回到图中。
✅ 将 interrupt 调用与可能出错的代码分开
✅ 在 try/except 块中使用具体异常类型
分离逻辑示例:
显式异常处理
python
def node_a(state: State):
    # ✅ 好:先中断,再单独处理可能的错误
    interrupt("What's your name?")
    try:
        fetch_data()  # 可能会失败
    except Exception as e:
        print(e)
    return state
捕获特定异常类型
python
def node_a(state: State):
    # ✅ 好:捕获特定异常类型
    # 不会捕获 interrupt 异常
    try:
        name = interrupt("What's your name?")
        fetch_data()  # 可能会失败
    except NetworkException as e:
        print(e)
    return state
🔴 不要在裸 try/except 块中包裹 interrupt
python
def node_a(state: State):
    # ❌ 错误:裸 try/except 会捕获 interrupt 异常
    try:
        interrupt("What's your name?")
    except Exception as e:
        print(e)
    return state
不要在节点内重新排序中断调用(Do not reorder interrupt calls within a node)
在单个节点中使用多个中断很常见,但如果处理不当,可能会导致意外行为。
当节点中包含多个 interrupt 调用时,LangGraph 会为执行该节点的任务维护一个resume 值列表 。每次执行恢复时,都会从节点开头开始。对于遇到的每个中断,LangGraph 会检查任务的 resume 列表中是否存在匹配的值。匹配严格基于索引,因此节点中中断调用的顺序非常重要。
✅ 保持中断调用在节点执行中顺序一致
python
def node_a(state: State):
    # ✅ 好:中断调用顺序在每次执行中保持一致
    name = interrupt("What's your name?")
    age = interrupt("What's your age?")
    city = interrupt("What's your city?")

    return {
        "name": name,
        "age": age,
        "city": city
    }
🔴 不要在节点中有条件地跳过中断调用
🔴 不要使用非确定性逻辑循环中断调用
条件跳过中断(Skipping interrupts)
python
def node_a(state: State):
    # ❌ 错误:有条件地跳过中断会改变顺序
    name = interrupt("What's your name?")

    # 首次运行可能跳过该中断
    # 恢复执行时可能不跳过 ------ 导致索引不匹配
    if state.get("needs_age"):
        age = interrupt("What's your age?")

    city = interrupt("What's your city?")

    return {"name": name, "city": city}
循环中断(Looping interrupts)
python
def node_a(state: State):
    # ❌ 错误:基于非确定性数据循环中断
    # 中断次数在不同执行中可能变化
    results = []
    for item in state.get("dynamic_list", []):  # 列表可能在不同运行中变化
        result = interrupt(f"Approve {item}?")
        results.append(result)

    return {"results": results}
不要在中断调用中返回复杂值(Do not return complex values in interrupt calls)
根据所使用的检查点器(checkpointer),复杂值可能无法序列化(例如,函数无法被序列化)。为了让你的图在任何部署环境中都能适用,最佳实践是仅使用可合理序列化的值。
✅ 向 interrupt 传递简单的、JSON 可序列化类型
✅ 传递仅包含简单值的字典/对象
简单值示例
python
def node_a(state: State):
    # ✅ 好:传递可序列化的简单类型
    name = interrupt("What's your name?")
    count = interrupt(42)
    approved = interrupt(True)

    return {"name": name, "count": count, "approved": approved}
结构化数据示例
python
def node_a(state: State):
    # ✅ 好:传递只包含简单值的字典
    response = interrupt({
        "question": "Enter user details",
        "fields": ["name", "email", "age"],
        "current_values": state.get("user", {})
    })

    return {"user": response}
🔴 不要向 interrupt 传递函数、类实例或其他复杂对象
函数示例
python
def validate_input(value):
    return len(value) > 0

def node_a(state: State):
    # ❌ 错误:向 interrupt 传递函数
    # 函数无法被序列化
    response = interrupt({
        "question": "What's your name?",
        "validator": validate_input  # 会失败
    })
    return {"name": response}
类实例示例
python
class DataProcessor:
    def __init__(self, config):
        self.config = config

def node_a(state: State):
    processor = DataProcessor({"mode": "strict"})

    # ❌ 错误:向 interrupt 传递类实例
    # 类实例无法被序列化
    response = interrupt({
        "question": "Enter data to process",
        "processor": processor  # 会失败
    })
    return {"result": response}
中断前调用的副作用必须幂等(Side effects called before interrupt must be idempotent)
由于中断通过重新运行它所在的节点来工作,中断前调用的副作用最好是幂等的 。
幂等性指同一操作重复执行多次,其结果不会在初次执行之外发生变化。
例如,你可能在节点内调用 API 更新记录。如果在此调用之后触发了中断,当节点恢复时,该调用会被重复执行,可能会覆盖初始更新或创建重复记录。
✅ 在中断前使用幂等操作
✅ 将副作用放在中断调用之后
✅ 尽可能将副作用分离到独立节点
幂等操作示例
python
def node_a(state: State):
    # ✅ 好:使用幂等的 upsert 操作
    # 多次运行结果相同
    db.upsert_user(
        user_id=state["user_id"],
        status="pending_approval"
    )

    approved = interrupt("Approve this change?")

    return {"approved": approved}
在中断后执行副作用示例
python
def node_a(state: State):
    # ✅ 好:将副作用放在中断之后
    # 确保仅在获得批准后执行一次
    approved = interrupt("Approve this change?")

    if approved:
        db.create_audit_log(
            user_id=state["user_id"],
            action="approved"
        )

    return {"approved": approved}
分离副作用到不同节点示例
python
def approval_node(state: State):
    # ✅ 好:仅处理中断
    approved = interrupt("Approve this change?")
    return {"approved": approved}

def notification_node(state: State):
    # ✅ 好:副作用在独立节点执行
    # 在批准后运行,只执行一次
    if state.approved:
        send_notification(
            user_id=state["user_id"],
            status="approved"
        )
    return state
🔴 不要在中断前执行非幂等操作
🔴 不要创建新记录而不检查是否已存在
创建记录示例(错误)
python
def node_a(state: State):
    # ❌ 错误:中断前创建新记录
    # 恢复时会生成重复记录
    audit_id = db.create_audit_log({
        "user_id": state["user_id"],
        "action": "pending_approval",
        "timestamp": datetime.now()
    })

    approved = interrupt("Approve this change?")
    return {"approved": approved, "audit_id": audit_id}
向列表追加示例(错误)
python
def node_a(state: State):
    # ❌ 错误:中断前追加到列表
    # 恢复时会重复添加条目
    db.append_to_history(state["user_id"], "approval_requested")

    approved = interrupt("Approve this change?")
    return {"approved": approved}
在节点中以函数方式调用子图(Using with subgraphs called as functions)
当在一个节点内调用子图时,如果触发了中断:
- 父图会从调用子图的节点开头开始恢复执行。
- 子图 也会从其内部调用
interrupt的节点开头开始恢复执行。
python
def node_in_parent_graph(state: State):
    some_code()  # <-- 恢复时会重新执行
    # 以函数方式调用子图
    # 子图内部包含 `interrupt` 调用
    subgraph_result = subgraph.invoke(some_input)
    # ...

def node_in_subgraph(state: State):
    some_other_code()  # <-- 恢复时也会重新执行
    result = interrupt("What's your name?")
    # ...
使用中断进行调试(Debugging with interrupts)
为了调试和测试图(graph),可以使用**静态中断(static interrupts)**作为断点,一次逐节点地执行图。静态中断在节点执行前或执行后触发。可在编译图时通过 interrupt_before 和 interrupt_after 指定。
编译时设置
python
graph = builder.compile(
    interrupt_before=["node_a"],    # 在 node_a 执行前暂停
    interrupt_after=["node_b", "node_c"],  # 在 node_b 和 node_c 执行后暂停
    checkpointer=checkpointer,
)

# 为图传递 thread ID
config = {
    "configurable": {
        "thread_id": "some_thread"
    }
}

# 运行图直到遇到断点
graph.invoke(inputs, config=config)

# 恢复图执行
graph.invoke(None, config=config)interrupt_before指定在节点执行前应暂停的位置。interrupt_after指定在节点执行后应暂停的位置。- 需要提供 checkpointer 以启用断点。
- 图会一直运行到第一个断点被触发。
- 恢复图时,将输入设置为
None,图会运行到下一个断点。
运行时设置(可动态修改)
graph.invoke 支持在运行时传入 interrupt_before 和 interrupt_after 参数,可在每次调用时调整。
python
config = {
    "configurable": {
        "thread_id": "some_thread"
    }
}

# 运行图直到遇到断点
graph.invoke(
    inputs,
    interrupt_before=["node_a"],
    interrupt_after=["node_b", "node_c"],
    config=config,
)

# 恢复图执行
graph.invoke(None, config=config)interrupt_before:节点执行前暂停。interrupt_after:节点执行后暂停。- 图会运行到第一个断点,并在恢复时继续执行直到下一个断点。
使用时间旅行(Use time-travel)
在处理非确定性系统(如由 LLM 驱动的智能体)时,深入检查其决策过程非常有用,能够帮助你:
- 理解推理过程:分析导致成功结果的步骤。
- 调试错误:找出错误发生的原因和位置。
- 探索替代方案:测试不同路径以发现更优解。
LangGraph 提供时间旅行功能来支持这些用例。具体来说,你可以从之前的检查点(checkpoint)恢复执行------可以选择重放相同状态,也可以修改状态以探索替代方案。在所有情况下,从过去的执行恢复都会在历史中产生一个新的分支(fork)。
在 LangGraph 中使用时间旅行
-
运行图 :使用
invoke或stream方法,并提供初始输入运行图。 -
定位检查点:
- 使用
get_state_history方法获取指定thread_id的执行历史,并找到所需的checkpoint_id。 - 或者在希望暂停的节点前设置
interrupt,然后找到该中断之前记录的最近检查点。
- 使用
-
更新图状态(可选) :使用
update_state方法修改检查点处的状态,并从替代状态恢复执行。 -
从检查点恢复执行 :使用
invoke或stream方法,输入为None,并在配置中包含相应的thread_id和checkpoint_id。
以下示例展示了一个简单的 LangGraph 工作流,它通过 LLM 生成一个笑话主题并写出笑话,同时演示如何:
- 运行图
- 获取过去执行的检查点
- 可选修改状态
- 从选定检查点恢复执行以探索替代结果
安装依赖
bash
pip install --quiet -U langgraph langchain_anthropic设置 Anthropic API 密钥
python
import getpass
import os

def _set_env(var: str):
    if not os.environ.get(var):
        os.environ[var] = getpass.getpass(f"{var}: ")

_set_env("ANTHROPIC_API_KEY")
注册 LangSmith 可以帮助快速发现问题,并提升 LangGraph 项目的性能。LangSmith 可使用追踪数据来调试、测试和监控你基于 LangGraph 构建的 LLM 应用。
构建工作流
python
import uuid
from typing_extensions import TypedDict, NotRequired
from langgraph.graph import StateGraph, START, END
from langchain.chat_models import init_chat_model
from langgraph.checkpoint.memory import InMemorySaver

class State(TypedDict):
    topic: NotRequired[str]
    joke: NotRequired[str]

model = init_chat_model(
    "claude-sonnet-4-5-20250929",
    temperature=0,
)

def generate_topic(state: State):
    """LLM 调用生成笑话主题"""
    msg = model.invoke("Give me a funny topic for a joke")
    return {"topic": msg.content}

def write_joke(state: State):
    """LLM 调用,根据主题写一个笑话"""
    msg = model.invoke(f"Write a short joke about {state['topic']}")
    return {"joke": msg.content}

# 构建工作流
workflow = StateGraph(State)

# 添加节点
workflow.add_node("generate_topic", generate_topic)
workflow.add_node("write_joke", write_joke)

# 添加边连接节点
workflow.add_edge(START, "generate_topic")
workflow.add_edge("generate_topic", "write_joke")
workflow.add_edge("write_joke", END)

# 编译
checkpointer = InMemorySaver()
graph = workflow.compile(checkpointer=checkpointer)
graph
运行图
python
config = {
    "configurable": {
        "thread_id": uuid.uuid4(),
    }
}
state = graph.invoke({}, config)

print(state["topic"])
print()
print(state["joke"])
输出示例:
How about "The Secret Life of Socks in the Dryer"? You know, exploring the mysterious phenomenon of how socks go into the laundry as pairs but come out as singles. Where do they go? Are they starting new lives elsewhere? Is there a sock paradise we don't know about? There's a lot of comedic potential in the everyday mystery that unites us all!

# The Secret Life of Socks in the Dryer

I finally discovered where all my missing socks go after the dryer. Turns out they're not missing at all---they've just eloped with someone else's socks from the laundromat to start new lives together.

My blue argyle is now living in Bermuda with a red polka dot, posting vacation photos on Sockstagram and sending me lint as alimony.
确认检查点
python
# 状态按时间倒序返回
states = list(graph.get_state_history(config))

for state in states:
    print(state.next)
    print(state.config["configurable"]["checkpoint_id"])
    print()
输出示例:
()
1f02ac4a-ec9f-6524-8002-8f7b0bbeed0e

('write_joke',)
1f02ac4a-ce2a-6494-8001-cb2e2d651227

('generate_topic',)
1f02ac4a-a4e0-630d-8000-b73c254ba748

('__start__',)
1f02ac4a-a4dd-665e-bfff-e6c8c44315d9
选择某个状态(例如倒数第二个):
python
selected_state = states[1]
print(selected_state.next)
print(selected_state.values)
输出示例:
('write_joke',)
{'topic': 'How about "The Secret Life of Socks in the Dryer"? You know, exploring the mysterious phenomenon of how socks go into the laundry as pairs but come out as singles. Where do they go? Are they starting new lives elsewhere? Is there a sock paradise we don\'t know about? There\'s a lot of comedic potential in the everyday mystery that unites us all!'}
更新状态
update_state 会创建一个新的检查点,该检查点属于同一个线程,但会生成新的检查点 ID。
python
new_config = graph.update_state(selected_state.config, values={"topic": "chickens"})
print(new_config)
输出示例:
{'configurable': {'thread_id': 'c62e2e03-c27b-4cb6-8cea-ea9bfedae006', 'checkpoint_ns': '', 'checkpoint_id': '1f02ac4a-ecee-600b-8002-a1d21df32e4c'}}从检查点恢复执行
python
graph.invoke(None, new_config)输出示例:
python
{'topic': 'chickens',
 'joke': 'Why did the chicken join a band?\n\nBecause it had excellent drumsticks!'}
记忆(Memory)
AI 应用需要内存来在多次交互中共享上下文。在 LangGraph 中,你可以添加两种类型的内存:
- 短期内存:作为代理状态的一部分,用于支持多轮对话。
- 长期内存:用于跨会话存储用户特定或应用级的数据。
添加短期内存
短期内存(线程级持久化)使代理能够跟踪多轮对话。添加短期内存的方法如下:
python
from langgraph.checkpoint.memory import InMemorySaver
from langgraph.graph import StateGraph

# 使用内存检查点保存器
checkpointer = InMemorySaver()

builder = StateGraph(...)
graph = builder.compile(checkpointer=checkpointer)

# 调用图时传入线程 ID,实现多轮对话
graph.invoke(
    {"messages": [{"role": "user", "content": "hi! i am Bob"}]},
    {"configurable": {"thread_id": "1"}},
)
在生产环境中,应使用数据库支持的检查点保存器(checkpointer):
python
from langgraph.checkpoint.postgres import PostgresSaver

DB_URI = "postgresql://postgres:postgres@localhost:5442/postgres?sslmode=disable"
with PostgresSaver.from_conn_string(DB_URI) as checkpointer:
    builder = StateGraph(...)
    graph = builder.compile(checkpointer=checkpointer)
示例:使用 Postgres 检查点保存器
bash
pip install -U "psycopg[binary,pool]" langgraph langgraph-checkpoint-postgres第一次使用 Postgres 检查点保存器时,需要调用 checkpointer.setup() 来初始化。
python
from langchain.chat_models import init_chat_model
from langgraph.graph import StateGraph, MessagesState, START
from langgraph.checkpoint.postgres.aio import AsyncPostgresSaver

model = init_chat_model(model="claude-haiku-4-5-20251001")

DB_URI = "postgresql://postgres:postgres@localhost:5442/postgres?sslmode=disable"
async with AsyncPostgresSaver.from_conn_string(DB_URI) as checkpointer:
    # await checkpointer.setup()

    async def call_model(state: MessagesState):
        response = await model.ainvoke(state["messages"])
        return {"messages": response}

    builder = StateGraph(MessagesState)
    builder.add_node(call_model)
    builder.add_edge(START, "call_model")

    graph = builder.compile(checkpointer=checkpointer)

    config = {
        "configurable": {
            "thread_id": "1"
        }
    }

    async for chunk in graph.astream(
        {"messages": [{"role": "user", "content": "hi! I'm bob"}]},
        config,
        stream_mode="values"
    ):
        chunk["messages"][-1].pretty_print()

    async for chunk in graph.astream(
        {"messages": [{"role": "user", "content": "what's my name?"}]},
        config,
        stream_mode="values"
    ):
        chunk["messages"][-1].pretty_print()
使用 MongoDB 异步检查点
安装依赖:
bash
pip install -U pymongo langgraph langgraph-checkpoint-mongodb使用 MongoDB 检查点,需要先准备一个 MongoDB 集群。
python
from langchain.chat_models import init_chat_model
from langgraph.graph import StateGraph, MessagesState, START
from langgraph.checkpoint.mongodb.aio import AsyncMongoDBSaver

model = init_chat_model(model="claude-haiku-4-5-20251001")
DB_URI = "localhost:27017"

async with AsyncMongoDBSaver.from_conn_string(DB_URI) as checkpointer:
    async def call_model(state: MessagesState):
        response = await model.ainvoke(state["messages"])
        return {"messages": response}

    builder = StateGraph(MessagesState)
    builder.add_node(call_model)
    builder.add_edge(START, "call_model")

    graph = builder.compile(checkpointer=checkpointer)

    config = {"configurable": {"thread_id": "1"}}

    async for chunk in graph.astream(
        {"messages": [{"role": "user", "content": "hi! I'm bob"}]},
        config,
        stream_mode="values"
    ):
        chunk["messages"][-1].pretty_print()

    async for chunk in graph.astream(
        {"messages": [{"role": "user", "content": "what's my name?"}]},
        config,
        stream_mode="values"
    ):
        chunk["messages"][-1].pretty_print()
使用 Redis 异步检查点
安装依赖:
bash
pip install -U langgraph langgraph-checkpoint-redis第一次使用 Redis 检查点,需要调用
checkpointer.setup()或checkpointer.asetup()初始化。
python
from langchain.chat_models import init_chat_model
from langgraph.graph import StateGraph, MessagesState, START
from langgraph.checkpoint.redis.aio import AsyncRedisSaver

model = init_chat_model(model="claude-haiku-4-5-20251001")
DB_URI = "redis://localhost:6379"

async with AsyncRedisSaver.from_conn_string(DB_URI) as checkpointer:
    # await checkpointer.asetup()

    async def call_model(state: MessagesState):
        response = await model.ainvoke(state["messages"])
        return {"messages": response}

    builder = StateGraph(MessagesState)
    builder.add_node(call_model)
    builder.add_edge(START, "call_model")

    graph = builder.compile(checkpointer=checkpointer)

    config = {"configurable": {"thread_id": "1"}}

    async for chunk in graph.astream(
        {"messages": [{"role": "user", "content": "hi! I'm bob"}]},
        config,
        stream_mode="values"
    ):
        chunk["messages"][-1].pretty_print()

    async for chunk in graph.astream(
        {"messages": [{"role": "user", "content": "what's my name?"}]},
        config,
        stream_mode="values"
    ):
        chunk["messages"][-1].pretty_print()
如果你的图中包含子图,只需要在编译父图时提供检查点(checkpointer),LangGraph 会自动将检查点传递给子图。
python
from langgraph.graph import START, StateGraph
from langgraph.checkpoint.memory import InMemorySaver
from typing import TypedDict

class State(TypedDict):
    foo: str

# 子图
def subgraph_node_1(state: State):
    return {"foo": state["foo"] + "bar"}

subgraph_builder = StateGraph(State)
subgraph_builder.add_node(subgraph_node_1)
subgraph_builder.add_edge(START, "subgraph_node_1")
subgraph = subgraph_builder.compile()

# 父图
builder = StateGraph(State)
builder.add_node("node_1", subgraph)
builder.add_edge(START, "node_1")

checkpointer = InMemorySaver()
graph = builder.compile(checkpointer=checkpointer)
如果你希望子图拥有自己的独立记忆,可以在编译子图时指定相应的检查点选项。这在多智能体系统中非常有用,例如你希望每个智能体都能跟踪自己的消息历史。
python
subgraph_builder = StateGraph(...)
subgraph = subgraph_builder.compile(checkpointer=True)
添加长期记忆
使用长期记忆可以在对话中存储用户特定或应用特定的数据。
python
from langgraph.store.memory import InMemoryStore
from langgraph.graph import StateGraph

store = InMemoryStore()

builder = StateGraph(...)
graph = builder.compile(store=store)
在生产环境中,应使用由数据库支持的存储:
python
from langgraph.store.postgres import PostgresStore

DB_URI = "postgresql://postgres:postgres@localhost:5442/postgres?sslmode=disable"
with PostgresStore.from_conn_string(DB_URI) as store:
    builder = StateGraph(...)
    graph = builder.compile(store=store)
示例:使用 Postgres 存储
bash
pip install -U "psycopg[binary,pool]" langgraph langgraph-checkpoint-postgres第一次使用 Postgres store 时需要调用 store.setup()。
python
from langchain_core.runnables import RunnableConfig
from langchain.chat_models import init_chat_model
from langgraph.graph import StateGraph, MessagesState, START
from langgraph.checkpoint.postgres.aio import AsyncPostgresSaver
from langgraph.store.postgres.aio import AsyncPostgresStore
from langgraph.store.base import BaseStore
import uuid

model = init_chat_model(model="claude-haiku-4-5-20251001")

DB_URI = "postgresql://postgres:postgres@localhost:5442/postgres?sslmode=disable"

async with (
    AsyncPostgresStore.from_conn_string(DB_URI) as store,
    AsyncPostgresSaver.from_conn_string(DB_URI) as checkpointer,
):
    # await store.setup()
    # await checkpointer.setup()

    async def call_model(
        state: MessagesState,
        config: RunnableConfig,
        *,
        store: BaseStore,
    ):
        user_id = config["configurable"]["user_id"]
        namespace = ("memories", user_id)
        memories = await store.asearch(namespace, query=str(state["messages"][-1].content))
        info = "\n".join([d.value["data"] for d in memories])
        system_msg = f"You are a helpful assistant talking to the user. User info: {info}"

        # 如果用户请求记住信息,则存储新记忆
        last_message = state["messages"][-1]
        if "remember" in last_message.content.lower():
            memory = "User name is Bob"
            await store.aput(namespace, str(uuid.uuid4()), {"data": memory})

        response = await model.ainvoke(
            [{"role": "system", "content": system_msg}] + state["messages"]
        )
        return {"messages": response}

    builder = StateGraph(MessagesState)
    builder.add_node(call_model)
    builder.add_edge(START, "call_model")

    graph = builder.compile(
        checkpointer=checkpointer,
        store=store,
    )

    config = {
        "configurable": {
            "thread_id": "1",
            "user_id": "1",
        }
    }
    async for chunk in graph.astream(
        {"messages": [{"role": "user", "content": "Hi! Remember: my name is Bob"}]},
        config,
        stream_mode="values",
    ):
        chunk["messages"][-1].pretty_print()

    config = {
        "configurable": {
            "thread_id": "2",
            "user_id": "1",
        }
    }

    async for chunk in graph.astream(
        {"messages": [{"role": "user", "content": "what is my name?"}]},
        config,
        stream_mode="values",
    ):
        chunk["messages"][-1].pretty_print()
示例:使用 Redis 存储
bash
pip install -U langgraph langgraph-checkpoint-redis第一次使用 Redis store 时需要调用 store.setup()。
异步示例与 Postgres 类似,只需将 AsyncPostgresStore 和 AsyncPostgresSaver 替换为 AsyncRedisStore 和 AsyncRedisSaver。
在图的记忆存储中启用语义搜索,可以让图代理通过语义相似度搜索存储项。
python
from langchain.embeddings import init_embeddings
from langgraph.store.memory import InMemoryStore

# 创建支持语义搜索的存储
embeddings = init_embeddings("openai:text-embedding-3-small")
store = InMemoryStore(
    index={
        "embed": embeddings,
        "dims": 1536,
    }
)

store.put(("user_123", "memories"), "1", {"text": "I love pizza"})
store.put(("user_123", "memories"), "2", {"text": "I am a plumber"})

items = store.search(
    ("user_123", "memories"), query="I'm hungry", limit=1
)
长期记忆 + 语义搜索示例
python
from langchain.embeddings import init_embeddings
from langchain.chat_models import init_chat_model
from langgraph.store.base import BaseStore
from langgraph.store.memory import InMemoryStore
from langgraph.graph import START, MessagesState, StateGraph

model = init_chat_model("gpt-4o-mini")

# 创建支持语义搜索的存储
embeddings = init_embeddings("openai:text-embedding-3-small")
store = InMemoryStore(
    index={
        "embed": embeddings,
        "dims": 1536,
    }
)

store.put(("user_123", "memories"), "1", {"text": "I love pizza"})
store.put(("user_123", "memories"), "2", {"text": "I am a plumber"})

def chat(state, *, store: BaseStore):
    # 根据用户最后一条消息进行搜索
    items = store.search(
        ("user_123", "memories"), query=state["messages"][-1].content, limit=2
    )
    memories = "\n".join(item.value["text"] for item in items)
    memories = f"## Memories of user\n{memories}" if memories else ""
    response = model.invoke(
        [
            {"role": "system", "content": f"You are a helpful assistant.\n{memories}"},
            *state["messages"],
        ]
    )
    return {"messages": [response]}

builder = StateGraph(MessagesState)
builder.add_node(chat)
builder.add_edge(START, "chat")
graph = builder.compile(store=store)

for message, metadata in graph.stream(
    input={"messages": [{"role": "user", "content": "I'm hungry"}]},
    stream_mode="messages",
):
    print(message.content, end="")
管理短期记忆
启用短期记忆后,长对话可能会超过 LLM 的上下文窗口。常见解决方案包括:
- 裁剪消息:删除前 N 条或后 N 条消息(在调用 LLM 之前)
- 从 LangGraph 状态中永久删除消息
- 总结消息:对历史消息进行总结,并用总结替换原消息
- 管理检查点:用于存储和检索消息历史
- 自定义策略(例如消息过滤等)
这些方法可以让代理在不超过 LLM 上下文窗口的情况下,跟踪对话历史。
裁剪消息
大多数 LLM 有最大支持的上下文窗口(以 token 为单位)。
裁剪消息的一种方法是统计消息历史中的 token 数量,当接近限制时进行截断。如果使用 LangChain,可以使用 trim_messages 工具,指定保留的 token 数量,以及处理边界的策略(例如保留最后 max_tokens)。
裁剪消息历史示例:
python
from langchain_core.messages.utils import (
    trim_messages,
    count_tokens_approximately
)

def call_model(state: MessagesState):
    messages = trim_messages(
        state["messages"],
        strategy="last",
        token_counter=count_tokens_approximately,
        max_tokens=128,
        start_on="human",
        end_on=("human", "tool"),
    )
    response = model.invoke(messages)
    return {"messages": [response]}

builder = StateGraph(MessagesState)
builder.add_node(call_model)
完整示例:裁剪消息
python
from langchain_core.messages.utils import (
    trim_messages,
    count_tokens_approximately
)
from langchain.chat_models import init_chat_model
from langgraph.graph import StateGraph, START, MessagesState
from langgraph.checkpoint.memory import InMemorySaver

model = init_chat_model("claude-sonnet-4-5-20250929")
summarization_model = model.bind(max_tokens=128)

def call_model(state: MessagesState):
    messages = trim_messages(
        state["messages"],
        strategy="last",
        token_counter=count_tokens_approximately,
        max_tokens=128,
        start_on="human",
        end_on=("human", "tool"),
    )
    response = model.invoke(messages)
    return {"messages": [response]}

checkpointer = InMemorySaver()
builder = StateGraph(MessagesState)
builder.add_node(call_model)
builder.add_edge(START, "call_model")
graph = builder.compile(checkpointer=checkpointer)

config = {"configurable": {"thread_id": "1"}}

graph.invoke({"messages": "hi, my name is bob"}, config)
graph.invoke({"messages": "write a short poem about cats"}, config)
graph.invoke({"messages": "now do the same but for dogs"}, config)
final_response = graph.invoke({"messages": "what's my name?"}, config)

final_response["messages"][-1].pretty_print()输出示例:
你的名字是 Bob,就像你一开始自我介绍时提到的那样。删除消息
你可以从图状态中删除消息来管理消息历史。这在你想删除特定消息或清空整个消息历史时非常有用。
要从图状态中删除消息,可以使用 RemoveMessage。
注意 :要让 RemoveMessage 生效,需要使用带有 add_messages reducer 的状态键,例如 MessagesState。
删除特定消息
python
from langchain.messages import RemoveMessage

def delete_messages(state):
    messages = state["messages"]
    if len(messages) > 2:
        # 删除最早的两条消息
        return {"messages": [RemoveMessage(id=m.id) for m in messages[:2]]}
删除所有消息
python
from langgraph.graph.message import REMOVE_ALL_MESSAGES

def delete_messages(state):
return {"messages": [RemoveMessage(id=REMOVE_ALL_MESSAGES)]}提示:删除消息时,确保生成的消息历史是有效的。检查你使用的 LLM 提供商的限制,例如:
- 某些提供商要求消息历史以用户消息开头
- 大多数提供商要求带工具调用的助手消息必须紧跟对应的工具结果消息
完整示例:删除消息
python
from langchain.messages import RemoveMessage

def delete_messages(state):
    messages = state["messages"]
    if len(messages) > 2:
        return {"messages": [RemoveMessage(id=m.id) for m in messages[:2]]}

def call_model(state: MessagesState):
    response = model.invoke(state["messages"])
    return {"messages": response}

builder = StateGraph(MessagesState)
builder.add_sequence([call_model, delete_messages])
builder.add_edge(START, "call_model")

checkpointer = InMemorySaver()
app = builder.compile(checkpointer=checkpointer)

for event in app.stream({"messages": [{"role": "user", "content": "hi! I'm bob"}]}, config, stream_mode="values"):
    print([(message.type, message.content) for message in event["messages"]])

for event in app.stream({"messages": [{"role": "user", "content": "what's my name?"}]}, config, stream_mode="values"):
print([(message.type, message.content) for message in event["messages"]])输出示例:
[('human', "hi! I'm bob")]
[('human', "hi! I'm bob"), ('ai', 'Hi Bob! How are you doing today? Is there anything I can help you with?')]
[('human', "hi! I'm bob"), ('ai', 'Hi Bob! How are you doing today? Is there anything I can help you with?'), ('human', "what's my name?")]
[('human', "hi! I'm bob"), ('ai', 'Hi Bob! How are you doing today? Is there anything I can help you with?'), ('human', "what's my name?"), ('ai', 'Your name is Bob.')]
[('human', "what's my name?"), ('ai', 'Your name is Bob.')]
总结消息
裁剪或删除消息(如上所示)的问题在于,你可能会丢失消息队列中的信息。因此,有些应用采用更高级的方法:使用聊天模型对消息历史进行总结。
可以使用提示和编排逻辑来总结消息历史。例如,在 LangGraph 中,可以扩展 MessagesState 来包含 summary 键:
python
from langgraph.graph import MessagesState

class State(MessagesState):
    summary: str
然后,可以根据已有的 summary 生成新的对话摘要。这个 summarize_conversation 节点可以在消息积累到一定数量后调用。
python
def summarize_conversation(state: State):
    # 获取已有摘要
    summary = state.get("summary", "")

    # 创建摘要提示
    if summary:
        summary_message = (
            f"This is a summary of the conversation to date: {summary}\n\n"
            "Extend the summary by taking into account the new messages above:"
        )
    else:
        summary_message = "Create a summary of the conversation above:"

    # 将提示添加到消息历史
    messages = state["messages"] + [HumanMessage(content=summary_message)]
    response = model.invoke(messages)

    # 删除除最近两条消息外的其他消息
    delete_messages = [RemoveMessage(id=m.id) for m in state["messages"][:-2]]
    return {"summary": response.content, "messages": delete_messages}
完整示例:总结消息
python
from typing import Any, TypedDict
from langchain.chat_models import init_chat_model
from langchain.messages import AnyMessage
from langchain_core.messages.utils import count_tokens_approximately
from langgraph.graph import StateGraph, START, MessagesState
from langgraph.checkpoint.memory import InMemorySaver
from langmem.short_term import SummarizationNode, RunningSummary

model = init_chat_model("claude-sonnet-4-5-20250929")
summarization_model = model.bind(max_tokens=128)

class State(MessagesState):
    context: dict[str, RunningSummary]

class LLMInputState(TypedDict):
    summarized_messages: list[AnyMessage]
    context: dict[str, RunningSummary]

summarization_node = SummarizationNode(
    token_counter=count_tokens_approximately,
    model=summarization_model,
    max_tokens=256,
    max_tokens_before_summary=256,
    max_summary_tokens=128,
)

def call_model(state: LLMInputState):
    response = model.invoke(state["summarized_messages"])
    return {"messages": [response]}

checkpointer = InMemorySaver()
builder = StateGraph(State)
builder.add_node(call_model)
builder.add_node("summarize", summarization_node)
builder.add_edge(START, "summarize")
builder.add_edge("summarize", "call_model")
graph = builder.compile(checkpointer=checkpointer)

# 调用图
config = {"configurable": {"thread_id": "1"}}
graph.invoke({"messages": "hi, my name is bob"}, config)
graph.invoke({"messages": "write a short poem about cats"}, config)
graph.invoke({"messages": "now do the same but for dogs"}, config)
final_response = graph.invoke({"messages": "what's my name?"}, config)

final_response["messages"][-1].pretty_print()
print("\nSummary:", final_response["context"]["running_summary"].summary)说明:
- 我们在
context字段中跟踪运行中的摘要(SummarizationNode所需)。 - 定义私有状态,只用于过滤传给
call_model节点的输入,从而隔离 summarization 节点返回的消息。
输出示例:
从我们的对话来看,你自我介绍为 Bob。这是你在开始对话时告诉我的名字。

Summary: 在这次对话中,我认识了 Bob,他请求我写一首关于猫的诗。我创作了《猫之奥秘》,描绘了猫的优雅动作、独立性及其与人类的特殊关系。随后 Bob 请求写一首关于狗的诗,我写了《狗之乐》,强调了狗的忠诚、热情和陪伴。两首诗风格相似,但各自突出了不同宠物的独特特性。
管理检查点(Checkpoints)
你可以查看或删除由检查点管理器(checkpointer)存储的信息。
查看线程状态
Graph/Functional API 示例:
python
config = {
    "configurable": {
        "thread_id": "1",
        # 可选:提供特定检查点的 ID,
        # 如果不提供,则显示最新的检查点
        # "checkpoint_id": "1f029ca3-1f5b-6704-8004-820c16b69a5a"
    }
}

graph.get_state(config)
返回示例:
python
StateSnapshot(
    values={
        'messages': [
            HumanMessage(content="hi! I'm bob"),
            AIMessage(content="Hi Bob! How are you doing today?"),
            HumanMessage(content="what's my name?"),
            AIMessage(content="Your name is Bob.")
        ]
    },
    next=(),
    config={
        'configurable': {
            'thread_id': '1',
            'checkpoint_ns': '',
            'checkpoint_id': '1f029ca3-1f5b-6704-8004-820c16b69a5a'
        }
    },
    metadata={
        'source': 'loop',
        'writes': {'call_model': {'messages': AIMessage(content='Your name is Bob.')}} ,
        'step': 4,
        'parents': {},
        'thread_id': '1'
    },
    created_at='2025-05-05T16:01:24.680462+00:00',
    parent_config={
        'configurable': {
            'thread_id': '1',
            'checkpoint_ns': '',
            'checkpoint_id': '1f029ca3-1790-6b0a-8003-baf965b6a38f'
        }
    },
    tasks=(),
    interrupts=()
)
使用 Checkpointer API 查看
python
config = {
    "configurable": {
        "thread_id": "1",
        # 可选:提供特定检查点的 ID,
        # 否则将返回最新的检查点
        # "checkpoint_id": "1f029ca3-1f5b-6704-8004-820c16b69a5a"
    }
}

checkpointer.get_tuple(config)
返回示例:
python
CheckpointTuple(
    config={
        'configurable': {
            'thread_id': '1',
            'checkpoint_ns': '',
            'checkpoint_id': '1f029ca3-1f5b-6704-8004-820c16b69a5a'
        }
    },
    checkpoint={
        'v': 3,
        'ts': '2025-05-05T16:01:24.680462+00:00',
        'id': '1f029ca3-1f5b-6704-8004-820c16b69a5a',
        'channel_versions': {
            '__start__': '00000000000000000000000000000005.0.5290678567601859',
            'messages': '00000000000000000000000000000006.0.3205149138784782',
            'branch:to:call_model': '00000000000000000000000000000006.0.14611156755133758'
        },
        'versions_seen': {
            '__input__': {},
            '__start__': {'__start__': '00000000000000000000000000000004.0.5736472536395331'},
            'call_model': {'branch:to:call_model': '00000000000000000000000000000005.0.1410174088651449'}
        },
        'channel_values': {
            'messages': [
                HumanMessage(content="hi! I'm bob"),
                AIMessage(content="Hi Bob! How are you doing today?"),
                HumanMessage(content="what's my name?"),
                AIMessage(content="Your name is Bob.")
            ]
        }
    },
    metadata={
        'source': 'loop',
        'writes': {'call_model': {'messages': AIMessage(content='Your name is Bob.')}} ,
        'step': 4,
        'parents': {},
        'thread_id': '1'
    },
    parent_config={
        'configurable': {
            'thread_id': '1',
            'checkpoint_ns': '',
            'checkpoint_id': '1f029ca3-1790-6b0a-8003-baf965b6a38f'
        }
    },
    pending_writes=[]
)说明:
graph.get_state(config)返回线程的当前状态快照,包括消息历史、元数据、父配置和创建时间。checkpointer.get_tuple(config)返回检查点元组,包含版本信息、通道状态、消息内容和写入记录。- 可以通过提供
checkpoint_id查看特定检查点,否则返回最新检查点。
查看线程历史记录(View the history of the thread)
你可以通过 Graph/Functional API 或 Checkpointer API 查看线程的完整历史状态。
Graph/Functional API 示例
python
config = {
    "configurable": {
        "thread_id": "1"
    }
}

list(graph.get_state_history(config))
返回示例(按时间倒序展示最新状态在前):
- 最新状态快照:
python
StateSnapshot(
    values={'messages': [
        HumanMessage(content="hi! I'm bob"),
        AIMessage(content='Hi Bob! How are you doing today? Is there anything I can help you with?'),
        HumanMessage(content="what's my name?"),
        AIMessage(content='Your name is Bob.')
    ]},
    next=(),
    config={'configurable': {'thread_id': '1', 'checkpoint_ns': '', 'checkpoint_id': '1f029ca3-1f5b-6704-8004-820c16b69a5a'}},
    metadata={'source': 'loop', 'writes': {'call_model': {'messages': AIMessage(content='Your name is Bob.')}}, 'step': 4, 'parents': {}, 'thread_id': '1'},
    created_at='2025-05-05T16:01:24.680462+00:00',
    parent_config={'configurable': {'thread_id': '1', 'checkpoint_ns': '', 'checkpoint_id': '1f029ca3-1790-6b0a-8003-baf965b6a38f'}},
    tasks=(),
    interrupts=()
)- 之前的状态快照:
python
StateSnapshot(
    values={'messages': [
        HumanMessage(content="hi! I'm bob"),
        AIMessage(content='Hi Bob! How are you doing today? Is there anything I can help you with?'),
        HumanMessage(content="what's my name?")
    ]},
    next=('call_model',),
    config={'configurable': {'thread_id': '1', 'checkpoint_ns': '', 'checkpoint_id': '1f029ca3-1790-6b0a-8003-baf965b6a38f'}},
    metadata={'source': 'loop', 'writes': None, 'step': 3, 'parents': {}, 'thread_id': '1'},
    created_at='2025-05-05T16:01:23.863421+00:00',
    parent_config={...},
    tasks=(PregelTask(...),),
    interrupts=()
)- 更早的状态快照:
python
StateSnapshot(
    values={'messages': [
        HumanMessage(content="hi! I'm bob"),
        AIMessage(content='Hi Bob! How are you doing today? Is there anything I can help you with?')
    ]},
    next=('__start__',),
    config={...},
    metadata={'source': 'input', 'writes': {'__start__': {'messages': [{'role': 'user', 'content': "what's my name?"}]}}, 'step': 2, 'parents': {}, 'thread_id': '1'},
    created_at='2025-05-05T16:01:23.863173+00:00',
    parent_config={...},
    tasks=(PregelTask(...),),
    interrupts=()
)
依次类推,每个 StateSnapshot 都表示线程在某一步的状态,包括:
values:当前消息内容next:下一步节点config:线程与检查点信息metadata:状态来源、写入信息、步骤号等created_at:状态创建时间tasks:相关任务列表
Checkpointer API 示例
python
config = {
    "configurable": {
        "thread_id": "1"
    }
}

list(checkpointer.list(config))
返回示例:
python
[
    CheckpointTuple(
        config={'configurable': {'thread_id': '1', 'checkpoint_ns': '', 'checkpoint_id': '1f029ca3-1f5b-6704-8004-820c16b69a5a'}},
        checkpoint={
            'v': 3,
            'ts': '2025-05-05T16:01:24.680462+00:00',
            'id': '1f029ca3-1f5b-6704-8004-820c16b69a5a',
            'channel_versions': {...},
            'versions_seen': {...},
            'channel_values': {'messages': [
                HumanMessage(content="hi! I'm bob"),
                AIMessage(content='Hi Bob! How are you doing today? Is there anything I can help you with?'),
                HumanMessage(content="what's my name?"),
                AIMessage(content='Your name is Bob.')
            ]}
        },
        metadata={'source': 'loop', 'writes': {'call_model': {'messages': AIMessage(content='Your name is Bob.')}}, 'step': 4, 'parents': {}, 'thread_id': '1'},
        parent_config={'configurable': {'thread_id': '1', 'checkpoint_ns': '', 'checkpoint_id': '1f029ca3-1790-6b0a-8003-baf965b6a38f'}},
        pending_writes=[]
    ),
    ...
]- 每个
CheckpointTuple对应线程中的一个检查点 checkpoint_values存储了当时的消息状态metadata记录了写入操作、步骤号、线程 ID- 可以用它追踪历史消息或回滚状态
删除线程的所有检查点
python
thread_id = "1"
checkpointer.delete_thread(thread_id)
数据库管理
如果你使用了任何基于数据库的持久化实现(例如 Postgres 或 Redis)来存储短期和/或长期记忆,则需要先运行迁移(migrations)以建立所需的数据库模式,然后才能在数据库中使用。
- 按惯例,大多数数据库相关库会在
checkpointer或store实例上定义一个setup()方法,用于执行所需的迁移。 - 但是,你仍应根据你所使用的
BaseCheckpointSaver或BaseStore的具体实现,确认方法名称及使用方式。
建议将迁移作为单独的部署步骤运行,或者确保在服务器启动时执行迁移。
子图(Subgraphs)
子图是可以作为节点在其他图中使用的图。
子图的用途包括:
- 构建多代理系统
- 在多个图中复用一组节点
- 分布式开发:当你希望不同团队独立开发图的不同部分时,可以将每个部分定义为子图,只要遵守子图接口(输入和输出 schema),父图就可以在不了解子图内部细节的情况下构建
在添加子图时,需要定义父图和子图之间的通信方式:
- 从节点调用图 ------ 子图从父图的节点内部被调用
- 将图作为节点添加 ------ 子图直接作为父图的节点添加,并与父图共享状态键
从节点调用图
实现子图的一种简单方式是在另一图的节点内部调用图。此时子图可以拥有与父图完全不同的状态 schema(无共享键)。
例如,在多代理系统中,你可能希望为每个代理保持私有的消息历史。
你需要定义一个节点函数来调用子图。该函数需要在调用子图前,将父图状态转换为子图状态;并在返回节点状态更新前,将结果转换回父图状态。
python
from typing_extensions import TypedDict
from langgraph.graph.state import StateGraph, START

class SubgraphState(TypedDict):
    bar: str

# 子图
def subgraph_node_1(state: SubgraphState):
    return {"bar": "hi! " + state["bar"]}

subgraph_builder = StateGraph(SubgraphState)
subgraph_builder.add_node(subgraph_node_1)
subgraph_builder.add_edge(START, "subgraph_node_1")
subgraph = subgraph_builder.compile()

# 父图
class State(TypedDict):
    foo: str

def call_subgraph(state: State):
    # 转换父图状态到子图状态
    subgraph_output = subgraph.invoke({"bar": state["foo"]})
    # 将结果转换回父图状态
    return {"foo": subgraph_output["bar"]}

builder = StateGraph(State)
builder.add_node("node_1", call_subgraph)
builder.add_edge(START, "node_1")
graph = builder.compile()
示例:不同状态 schema
父图和子图状态键完全不同,无共享键。
python
# 子图
class SubgraphState(TypedDict):
    bar: str
    baz: str

def subgraph_node_1(state: SubgraphState):
    return {"baz": "baz"}

def subgraph_node_2(state: SubgraphState):
    return {"bar": state["bar"] + state["baz"]}

subgraph_builder = StateGraph(SubgraphState)
subgraph_builder.add_node(subgraph_node_1)
subgraph_builder.add_node(subgraph_node_2)
subgraph_builder.add_edge(START, "subgraph_node_1")
subgraph_builder.add_edge("subgraph_node_1", "subgraph_node_2")
subgraph = subgraph_builder.compile()

# 父图
class ParentState(TypedDict):
    foo: str

def node_1(state: ParentState):
    return {"foo": "hi! " + state["foo"]}

def node_2(state: ParentState):
    response = subgraph.invoke({"bar": state["foo"]})
    return {"foo": response["bar"]}

builder = StateGraph(ParentState)
builder.add_node("node_1", node_1)
builder.add_node("node_2", node_2)
builder.add_edge(START, "node_1")
builder.add_edge("node_1", "node_2")
graph = builder.compile()
流式执行结果示例:
((), {'node_1': {'foo': 'hi! foo'}})
(('node_2:xxx',), {'subgraph_node_1': {'baz': 'baz'}})
(('node_2:xxx',), {'subgraph_node_2': {'bar': 'hi! foobaz'}})
((), {'node_2': {'foo': 'hi! foobaz'}})
示例:两级子图(父 -> 子 -> 孙)
python
# 孙图
class GrandChildState(TypedDict):
    my_grandchild_key: str

def grandchild_1(state: GrandChildState) -> GrandChildState:
    return {"my_grandchild_key": state["my_grandchild_key"] + ", how are you"}

grandchild = StateGraph(GrandChildState)
grandchild.add_node("grandchild_1", grandchild_1)
grandchild.add_edge(START, "grandchild_1")
grandchild.add_edge("grandchild_1", END)
grandchild_graph = grandchild.compile()

# 子图
class ChildState(TypedDict):
    my_child_key: str

def call_grandchild_graph(state: ChildState) -> ChildState:
    grandchild_graph_input = {"my_grandchild_key": state["my_child_key"]}
    grandchild_graph_output = grandchild_graph.invoke(grandchild_graph_input)
    return {"my_child_key": grandchild_graph_output["my_grandchild_key"] + " today?"}

child = StateGraph(ChildState)
child.add_node("child_1", call_grandchild_graph)
child.add_edge(START, "child_1")
child.add_edge("child_1", END)
child_graph = child.compile()

# 父图
class ParentState(TypedDict):
    my_key: str

def parent_1(state: ParentState) -> ParentState:
    return {"my_key": "hi " + state["my_key"]}

def parent_2(state: ParentState) -> ParentState:
    return {"my_key": state["my_key"] + " bye!"}

def call_child_graph(state: ParentState) -> ParentState:
    child_graph_input = {"my_child_key": state["my_key"]}
    child_graph_output = child_graph.invoke(child_graph_input)
    return {"my_key": child_graph_output["my_child_key"]}

parent = StateGraph(ParentState)
parent.add_node("parent_1", parent_1)
parent.add_node("child", call_child_graph)
parent.add_node("parent_2", parent_2)
parent.add_edge(START, "parent_1")
parent.add_edge("parent_1", "child")
parent.add_edge("child", "parent_2")
parent.add_edge("parent_2", END)
parent_graph = parent.compile()
流式执行结果示例:
((), {'parent_1': {'my_key': 'hi Bob'}})
(('child:xxx', 'child_1:xxx'), {'grandchild_1': {'my_grandchild_key': 'hi Bob, how are you'}})
(('child:xxx',), {'child_1': {'my_child_key': 'hi Bob, how are you today?'}})
((), {'child': {'my_key': 'hi Bob, how are you today?'}})
((), {'parent_2': {'my_key': 'hi Bob, how are you today? bye!'}})
将图作为节点添加
当父图和子图可以通过 schema 中的共享状态键(channel)通信时,你可以将一个图作为另一个图的节点添加。例如,在多代理系统中,代理通常通过共享的 messages 键进行通信。
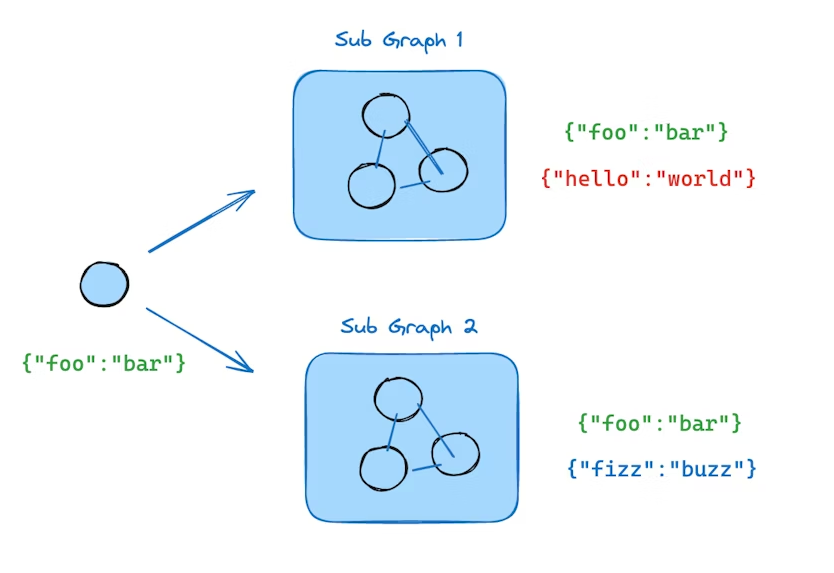
如果你的子图与父图共享状态键,可以按照以下步骤将子图添加到父图:
- 定义子图的工作流(例如下例中的
subgraph_builder)并编译 - 在定义父图工作流时,通过
add_node方法传入已编译的子图
python
from typing_extensions import TypedDict
from langgraph.graph.state import StateGraph, START

class State(TypedDict):
    foo: str

# 子图
def subgraph_node_1(state: State):
    return {"foo": "hi! " + state["foo"]}

subgraph_builder = StateGraph(State)
subgraph_builder.add_node(subgraph_node_1)
subgraph_builder.add_edge(START, "subgraph_node_1")
subgraph = subgraph_builder.compile()

# 父图
builder = StateGraph(State)
builder.add_node("node_1", subgraph)
builder.add_edge(START, "node_1")
graph = builder.compile()
示例:共享状态 schema
父图和子图有共享键 foo,子图内部还有私有键 bar。
python
# 定义子图
class SubgraphState(TypedDict):
    foo: str  # 与父图共享
    bar: str  # 子图私有

def subgraph_node_1(state: SubgraphState):
    return {"bar": "bar"}

def subgraph_node_2(state: SubgraphState):
    # 注意此节点使用了子图私有的状态键 'bar',并对共享键 'foo' 进行更新
    return {"foo": state["foo"] + state["bar"]}

subgraph_builder = StateGraph(SubgraphState)
subgraph_builder.add_node(subgraph_node_1)
subgraph_builder.add_node(subgraph_node_2)
subgraph_builder.add_edge(START, "subgraph_node_1")
subgraph_builder.add_edge("subgraph_node_1", "subgraph_node_2")
subgraph = subgraph_builder.compile()

# 定义父图
class ParentState(TypedDict):
    foo: str

def node_1(state: ParentState):
    return {"foo": "hi! " + state["foo"]}

builder = StateGraph(ParentState)
builder.add_node("node_1", node_1)
builder.add_node("node_2", subgraph)
builder.add_edge(START, "node_1")
builder.add_edge("node_1", "node_2")
graph = builder.compile()

# 流式执行
for chunk in graph.stream({"foo": "foo"}):
    print(chunk)
输出示例:
{'node_1': {'foo': 'hi! foo'}}
{'node_2': {'foo': 'hi! foobar'}}
添加持久化
在编译父图时,只需提供 checkpointer。LangGraph 会自动将 checkpointer 传播到子图。
python
from langgraph.graph import START, StateGraph
from langgraph.checkpoint.memory import MemorySaver
from typing_extensions import TypedDict

class State(TypedDict):
    foo: str

# 子图
def subgraph_node_1(state: State):
    return {"foo": state["foo"] + "bar"}

subgraph_builder = StateGraph(State)
subgraph_builder.add_node(subgraph_node_1)
subgraph_builder.add_edge(START, "subgraph_node_1")
subgraph = subgraph_builder.compile()

# 父图
builder = StateGraph(State)
builder.add_node("node_1", subgraph)
builder.add_edge(START, "node_1")

checkpointer = MemorySaver()
graph = builder.compile(checkpointer=checkpointer)
如果希望子图拥有自己的独立记忆,可以在编译子图时指定相应的 checkpointer 选项。这在多代理系统中很有用,比如希望每个代理维护自己的内部消息历史:
python
subgraph_builder = StateGraph(...)
subgraph = subgraph_builder.compile(checkpointer=True)
查看子图状态
启用持久化后,可以通过相应方法检查图的状态(checkpoint)。查看子图状态时,可使用 subgraphs 选项。
python
# 查看图状态
graph.get_state(config)

# 查看子图状态
graph.get_state(config, subgraphs=True)
⚠️ 注意:子图状态仅能在子图被中断(interrupted)时查看。一旦恢复图执行,将无法再访问子图状态。
查看中断的子图状态示例
python
from langgraph.graph import START, StateGraph
from langgraph.checkpoint.memory import MemorySaver
from langgraph.types import interrupt, Command
from typing_extensions import TypedDict

class State(TypedDict):
    foo: str

# 子图
def subgraph_node_1(state: State):
    value = interrupt("Provide value:")  # 等待中断输入
    return {"foo": state["foo"] + value}

subgraph_builder = StateGraph(State)
subgraph_builder.add_node(subgraph_node_1)
subgraph_builder.add_edge(START, "subgraph_node_1")
subgraph = subgraph_builder.compile()

# 父图
builder = StateGraph(State)
builder.add_node("node_1", subgraph)
builder.add_edge(START, "node_1")

checkpointer = MemorySaver()
graph = builder.compile(checkpointer=checkpointer)

config = {"configurable": {"thread_id": "1"}}

# 执行图
graph.invoke({"foo": ""}, config)
parent_state = graph.get_state(config)

# 仅在子图中断时可用
subgraph_state = graph.get_state(config, subgraphs=True).tasks[0].state

# 恢复子图执行
graph.invoke(Command(resume="bar"), config)
⚠️ 再次提醒:子图状态仅在子图中断时可访问,一旦恢复执行,将无法再次查看。
流式输出子图结果
如果希望在父图的流式输出中包含子图的输出,可以在父图的 stream 方法中设置 subgraphs 选项。这会同时流式输出父图和所有子图的结果。
python
for chunk in graph.stream(
    {"foo": "foo"},
    subgraphs=True,   # 包含子图输出
    stream_mode="updates",
):
    print(chunk)
子图流式输出示例
python
from typing_extensions import TypedDict
from langgraph.graph.state import StateGraph, START

# 定义子图
class SubgraphState(TypedDict):
    foo: str
    bar: str

def subgraph_node_1(state: SubgraphState):
    return {"bar": "bar"}

def subgraph_node_2(state: SubgraphState):
    # 注意:此节点使用了子图中独有的状态键 'bar'
    # 并将更新发送到共享状态键 'foo'
    return {"foo": state["foo"] + state["bar"]}

subgraph_builder = StateGraph(SubgraphState)
subgraph_builder.add_node(subgraph_node_1)
subgraph_builder.add_node(subgraph_node_2)
subgraph_builder.add_edge(START, "subgraph_node_1")
subgraph_builder.add_edge("subgraph_node_1", "subgraph_node_2")
subgraph = subgraph_builder.compile()

# 定义父图
class ParentState(TypedDict):
    foo: str

def node_1(state: ParentState):
    return {"foo": "hi! " + state["foo"]}

builder = StateGraph(ParentState)
builder.add_node("node_1", node_1)
builder.add_node("node_2", subgraph)
builder.add_edge(START, "node_1")
builder.add_edge("node_1", "node_2")
graph = builder.compile()

# 流式输出父图及子图结果
for chunk in graph.stream(
    {"foo": "foo"},
    stream_mode="updates",
    subgraphs=True,
):
    print(chunk)
输出示例:
((), {'node_1': {'foo': 'hi! foo'}})
(('node_2:e58e5673-a661-ebb0-70d4-e298a7fc28b7',), {'subgraph_node_1': {'bar': 'bar'}})
(('node_2:e58e5673-a661-ebb0-70d4-e298a7fc28b7',), {'subgraph_node_2': {'foo': 'hi! foobar'}})
((), {'node_2': {'foo': 'hi! foobar'}})
结尾
说实话,LangGraph v1.0和老版本v0.3.x相比,改动其实并不大。它之所以被迫升级,完全是因为LangChain底层升级了,LangGraph不得不跟着跳一跳。毫无意外,LangChain团队依旧在发挥自己堆屎的能力:加了各种快捷方法、API扩展、封装Task,弄得像是魔法阵一样,但每次仔细一看,你会发现------底层逻辑还是老样子,问题一样多。
我每次看LangChain和LangGraph的产品文档,总有一种"吃屎味巧克力"的错觉------外表包装得漂亮,文档写得花哨,示例代码看起来高大上,实际上用起来复杂、坑比满天飞。就像golang的for循环设计一样,其他语言堆了十几种循环结构------for, while, do while, foreach......我真想问开发者一句:你造这些轮子是为了什么?执行循环不就是重复做事吗?非得搞出十几种变体能上天吗?Go就直接一句for搞定,爱用不用,干净利落。LangGraph呢?哎呦喂,一个以图逻辑构建的框架,一会儿抽象成函数API,一会儿封装成Task,一会儿又加一堆子图、状态共享......你说这是为了方便开发,实际上就是让人头秃。
更别提子图(subgraph)这种玩意儿了,看起来高大上,能复用、能多层嵌套、能共享状态......实际上你在调试的时候就会发现,想要追踪状态、排查Bug,堪比打地鼠。状态在父图、子图、孙图之间传来传去,checkpoint、MemorySaver、interrupt,各种配置选项和参数名乱七八糟------你要不是天天盯着源码看,根本搞不清哪个状态是干啥的。(我个人推荐,agent作为微服务使用,即一个agent一个api服务,然后网关agent将下游agent配置为工具并发调用)
总结一句:LangGraph v1.0,能用是能用,功能看起来丰富是丰富,但开发体验......嗯,吃的时候请戴手套,小心你咬到那坨底层堆的屎。你想高效?想优雅?想顺手?呵呵,别做梦了。你要的高阶抽象、状态管理、多Agent系统的便利?你得到的其实是巧克力外壳里的一坨屎------外表甜,内里酸爽,吞下去前得做好心理准备。