目录
1、全选按钮案例
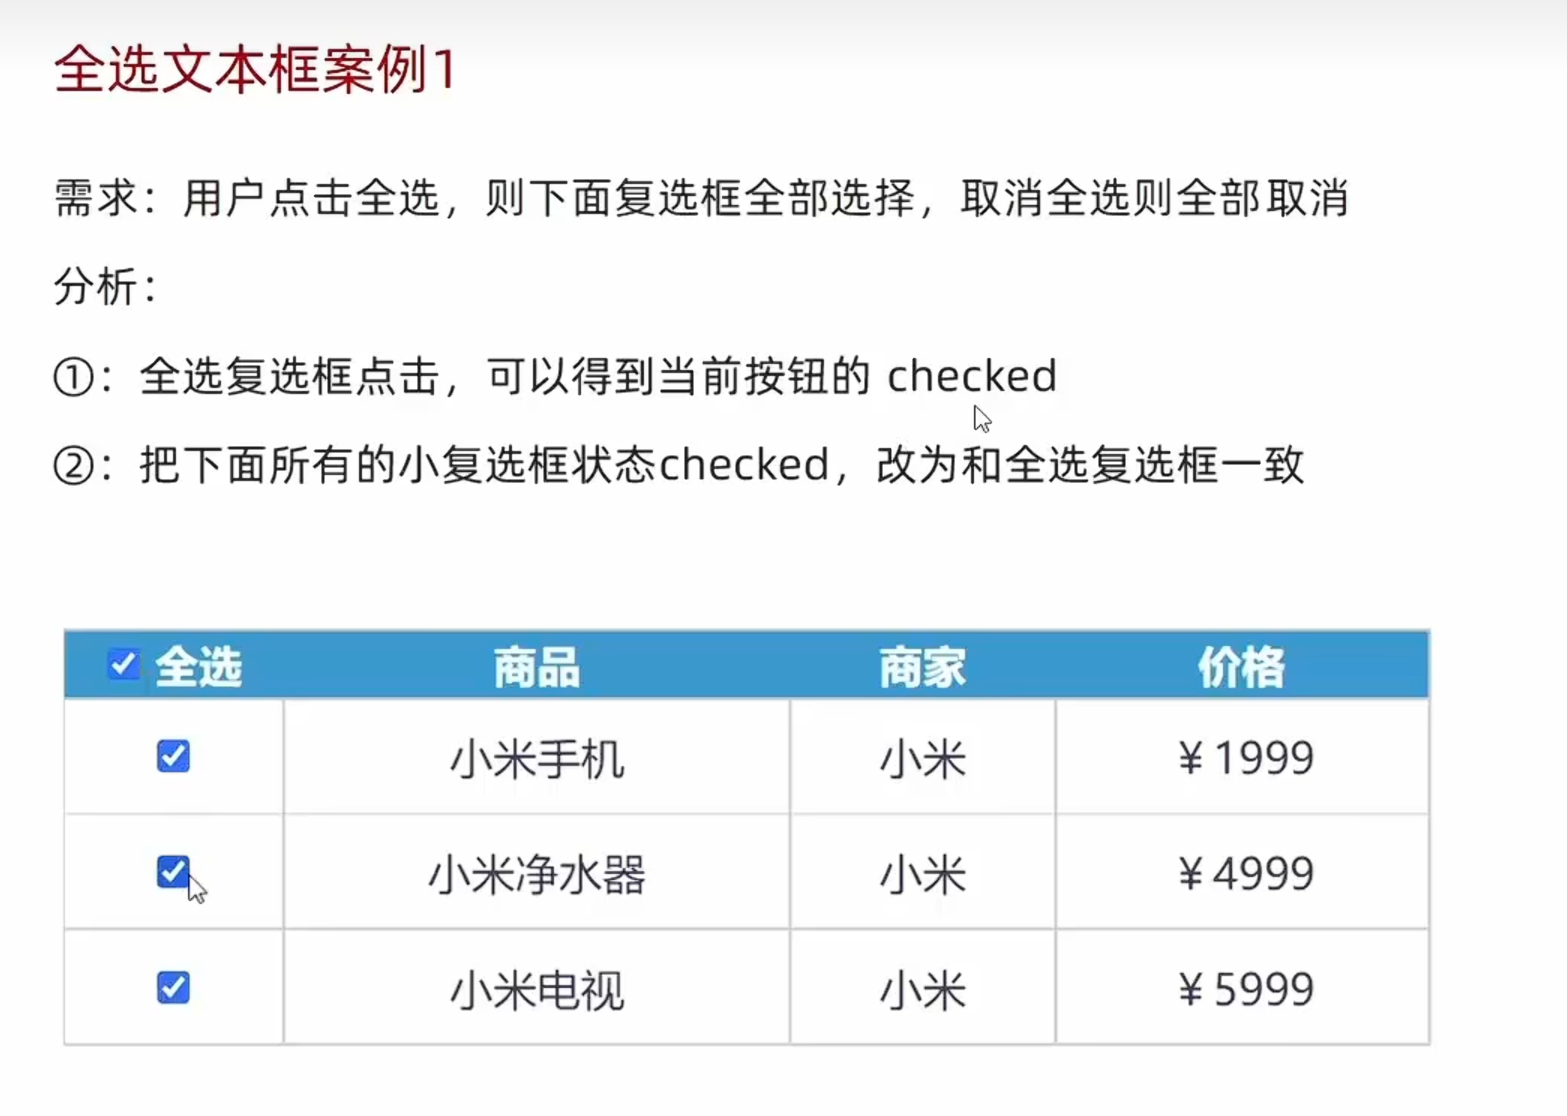
html
<!DOCTYPE html>
<html>
<head lang="en">
<meta charset="UTF-8">
<title></title>
<style>
* {
margin: 0;
padding: 0;
}
table {
border-collapse: collapse;
border-spacing: 0;
border: 1px solid #c0c0c0;
width: 500px;
margin: 100px auto;
text-align: center;
}
th {
background-color: #09c;
font: bold 16px "微软雅黑";
color: #fff;
height: 24px;
}
td {
border: 1px solid #d0d0d0;
color: #404060;
padding: 10px;
}
.allCheck {
width: 80px;
}
</style>
</head>
<body>
<table>
<tr>
<th class="allCheck">
<input type="checkbox" name="" id="checkAll"> <span class="all">全选</span>
</th>
<th>商品</th>
<th>商家</th>
<th>价格</th>
</tr>
<tr>
<td>
<input type="checkbox" name="check" class="ck">
</td>
<td>小米手机</td>
<td>小米</td>
<td>¥1999</td>
</tr>
<tr>
<td>
<input type="checkbox" name="check" class="ck">
</td>
<td>小米净水器</td>
<td>小米</td>
<td>¥4999</td>
</tr>
<tr>
<td>
<input type="checkbox" name="check" class="ck">
</td>
<td>小米电视</td>
<td>小米</td>
<td>¥5999</td>
</tr>
</table>
<script>
// 1.获取大复选框
const checkAll = document.querySelector('#checkAll')
// 2.获取所有的小复选框
const cks = document.querySelectorAll('.ck')
// 3.点击大复选框 注册事件
checkAll.addEventListener('click', function(){
// 得到当前大复选框的选中状态
// console.log(checkAll.checked) // 得到的是 true 或者是 false
// 4.遍历所有的小复选框 让小复选框的checked = 大复选框的checked
for(let i = 0; i < cks.length; i++){
cks[i].checked = this.checked
}
})
// 5.小复选框控制大复选框
for(let i = 0; i < cks.length; i++) {
// 5.1 给所有的小复选框添加点击事件
cks[i].addEventListener('click', function(){
// 判断选中的小复选框个数,是不是等于 总的小复选框的个数
// 一定要写到点击里面,因为每次要获得最新的个数
// console.log(document.querySelectorAll('.ck:checked').length)
// console.log(document.querySelectorAll('.ck:checked').length === cks.length)
checkAll.checked = document.querySelectorAll('.ck:checked').length === cks.length
})
}
</script>
</body>
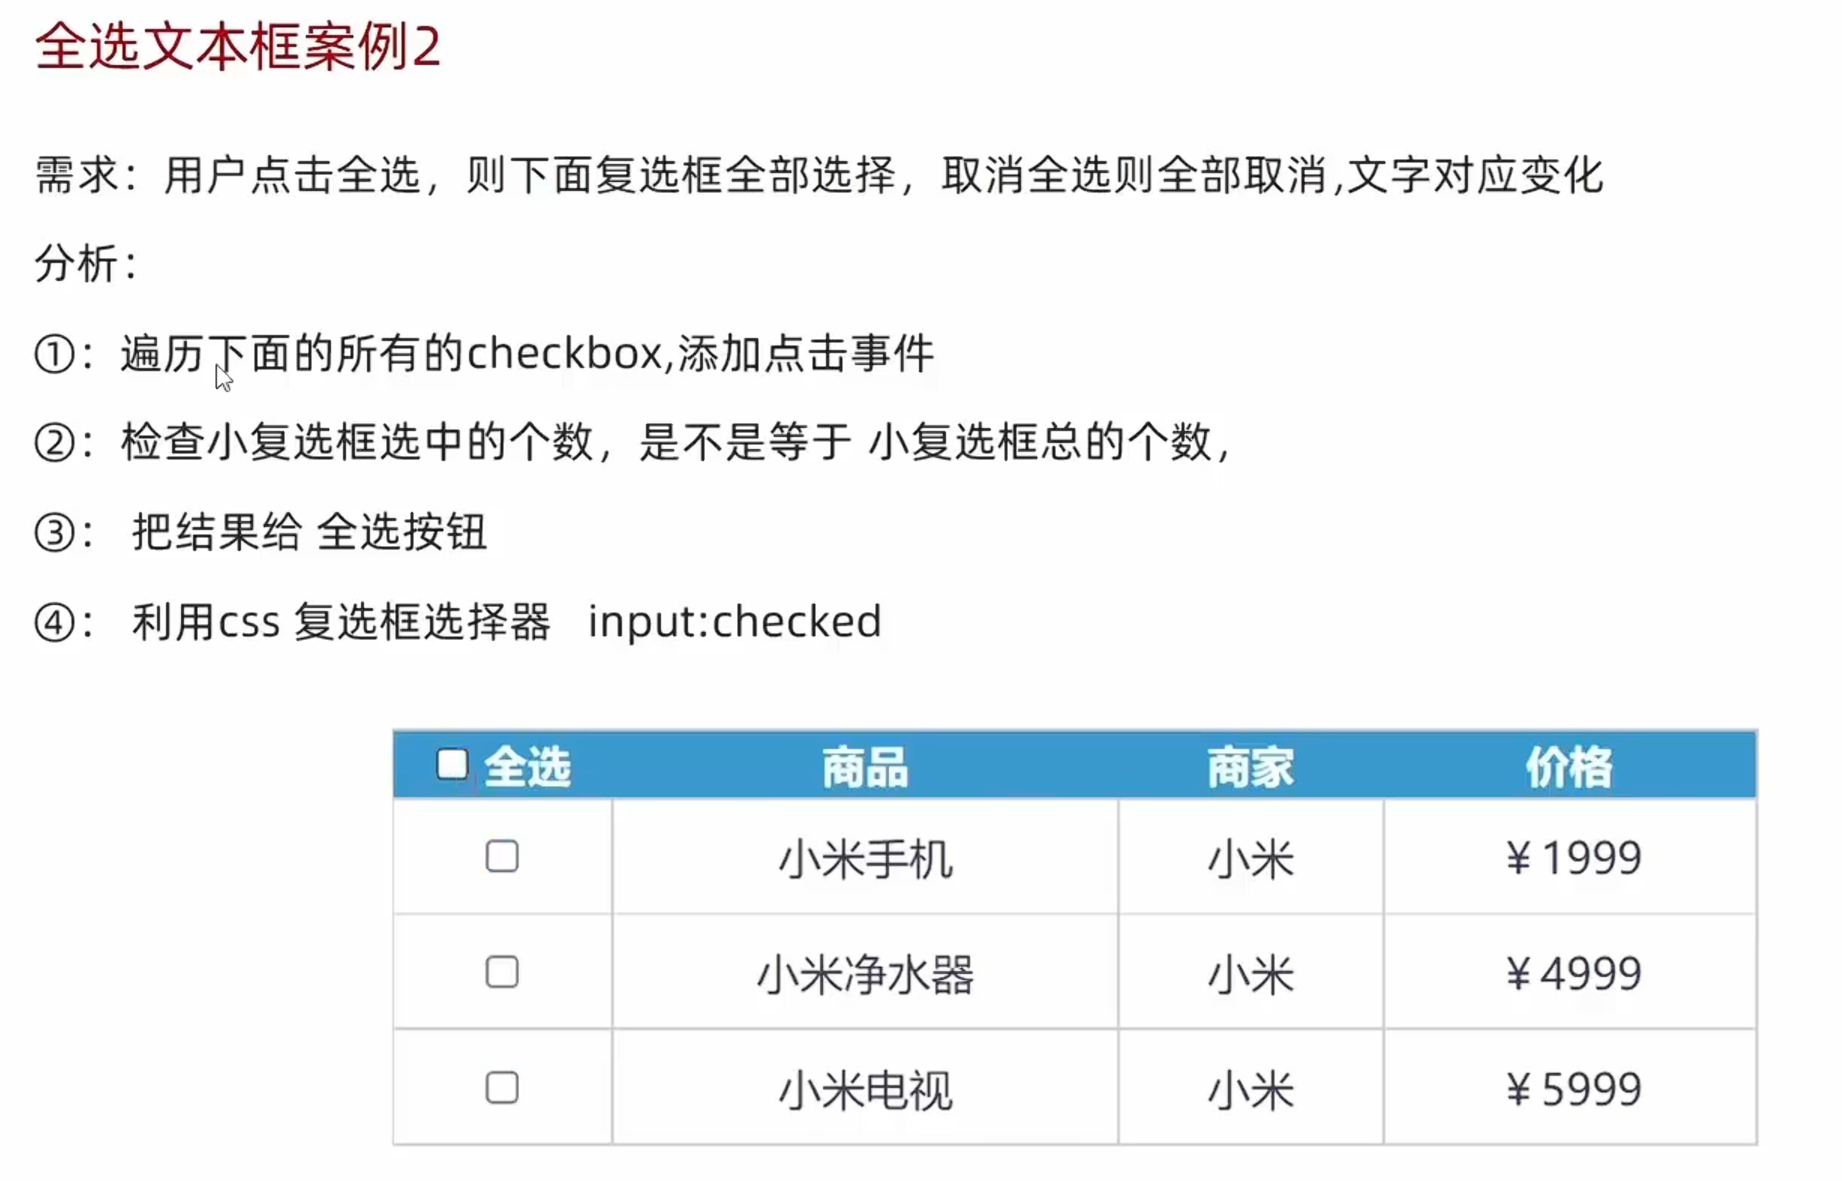
</html>2、css伪类选择器checked
html
<!DOCTYPE html>
<html lang="en">
<head>
<meta charset="UTF-8">
<meta name="viewport" content="width=device-width, initial-scale=1.0">
<title>css伪类选择器checked</title>
<style>
/* 选择被勾选的复选框 */
.ck:checked {
width: 20px;
height: 20px;
}
</style>
</head>
<body>
<input type="checkbox" class="ck">
<input type="checkbox" class="ck">
<input type="checkbox" class="ck">
<input type="checkbox" class="ck">
</body>
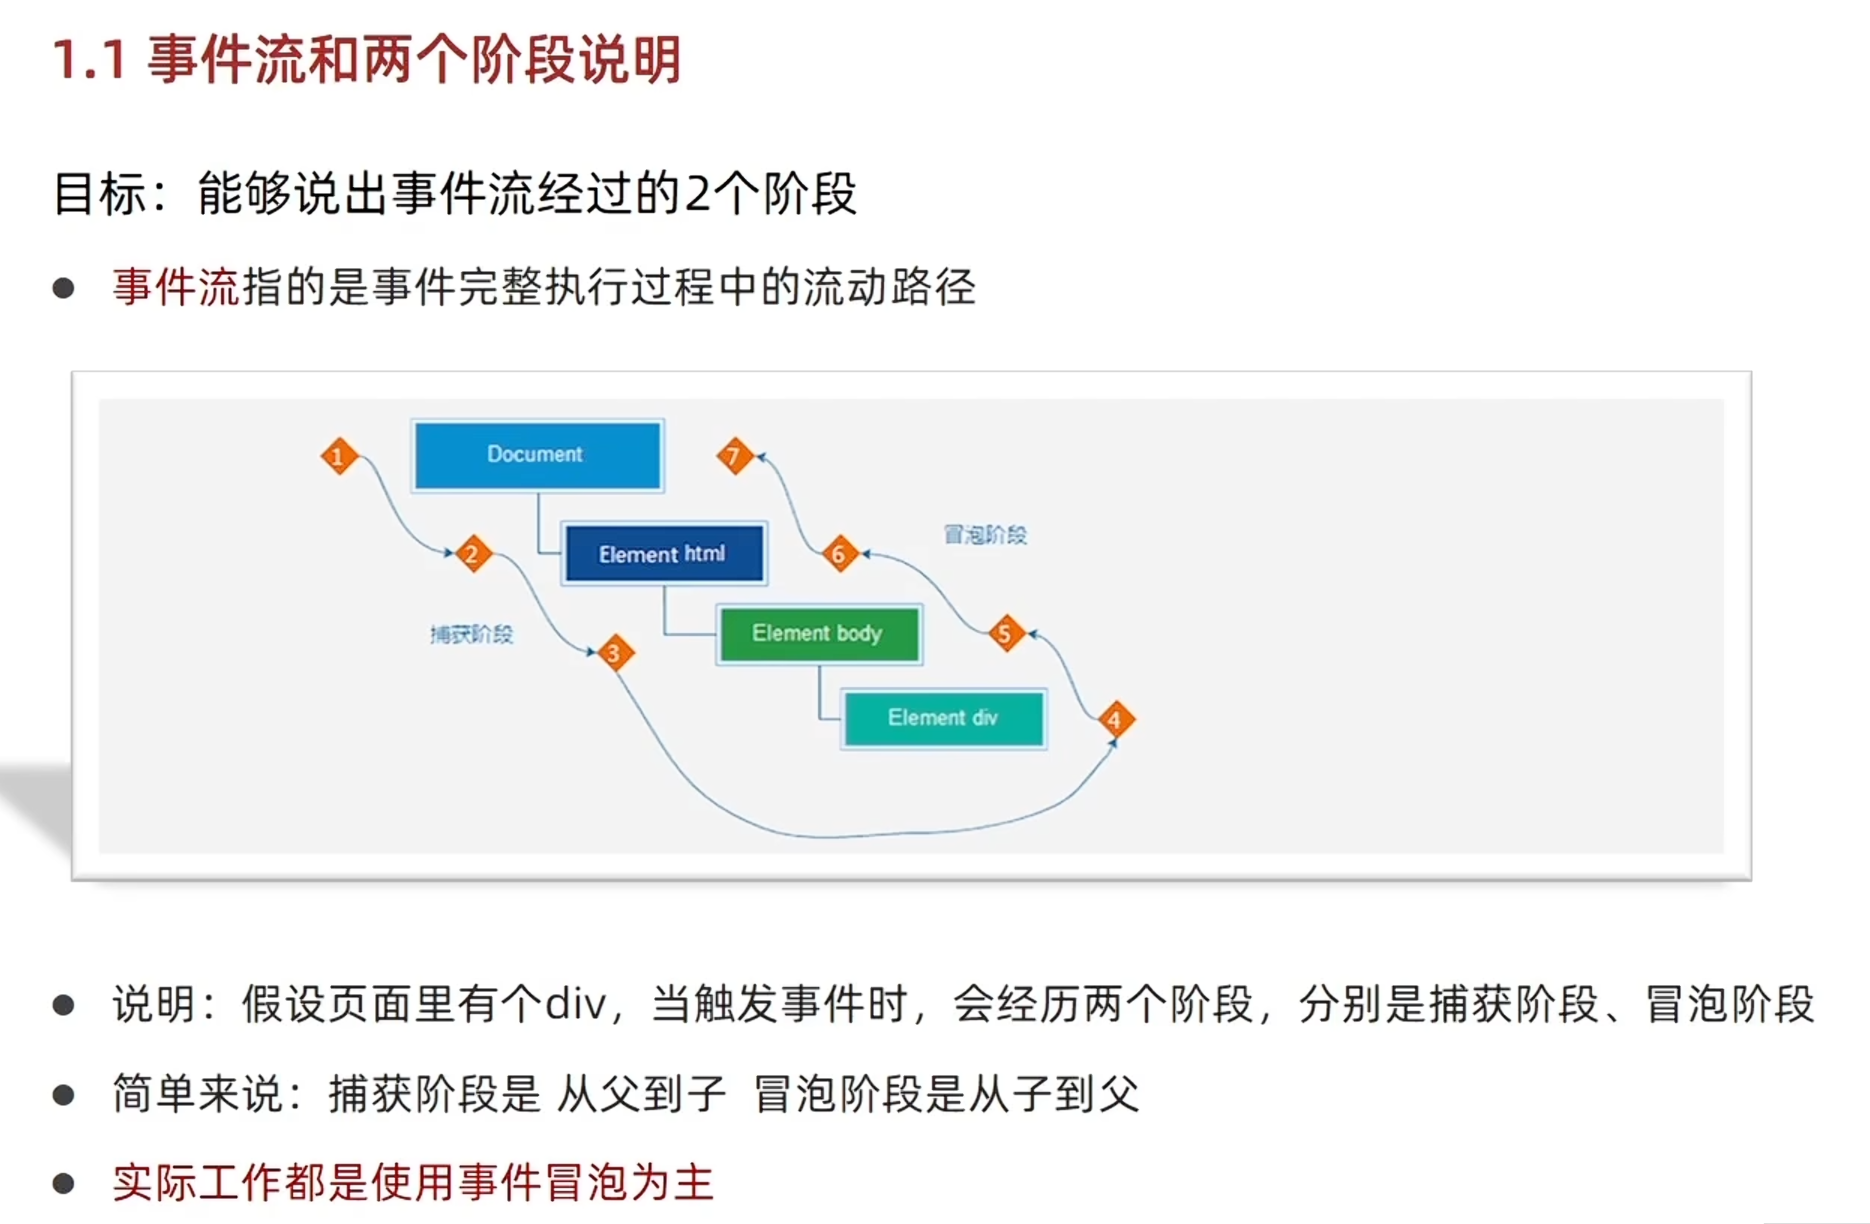
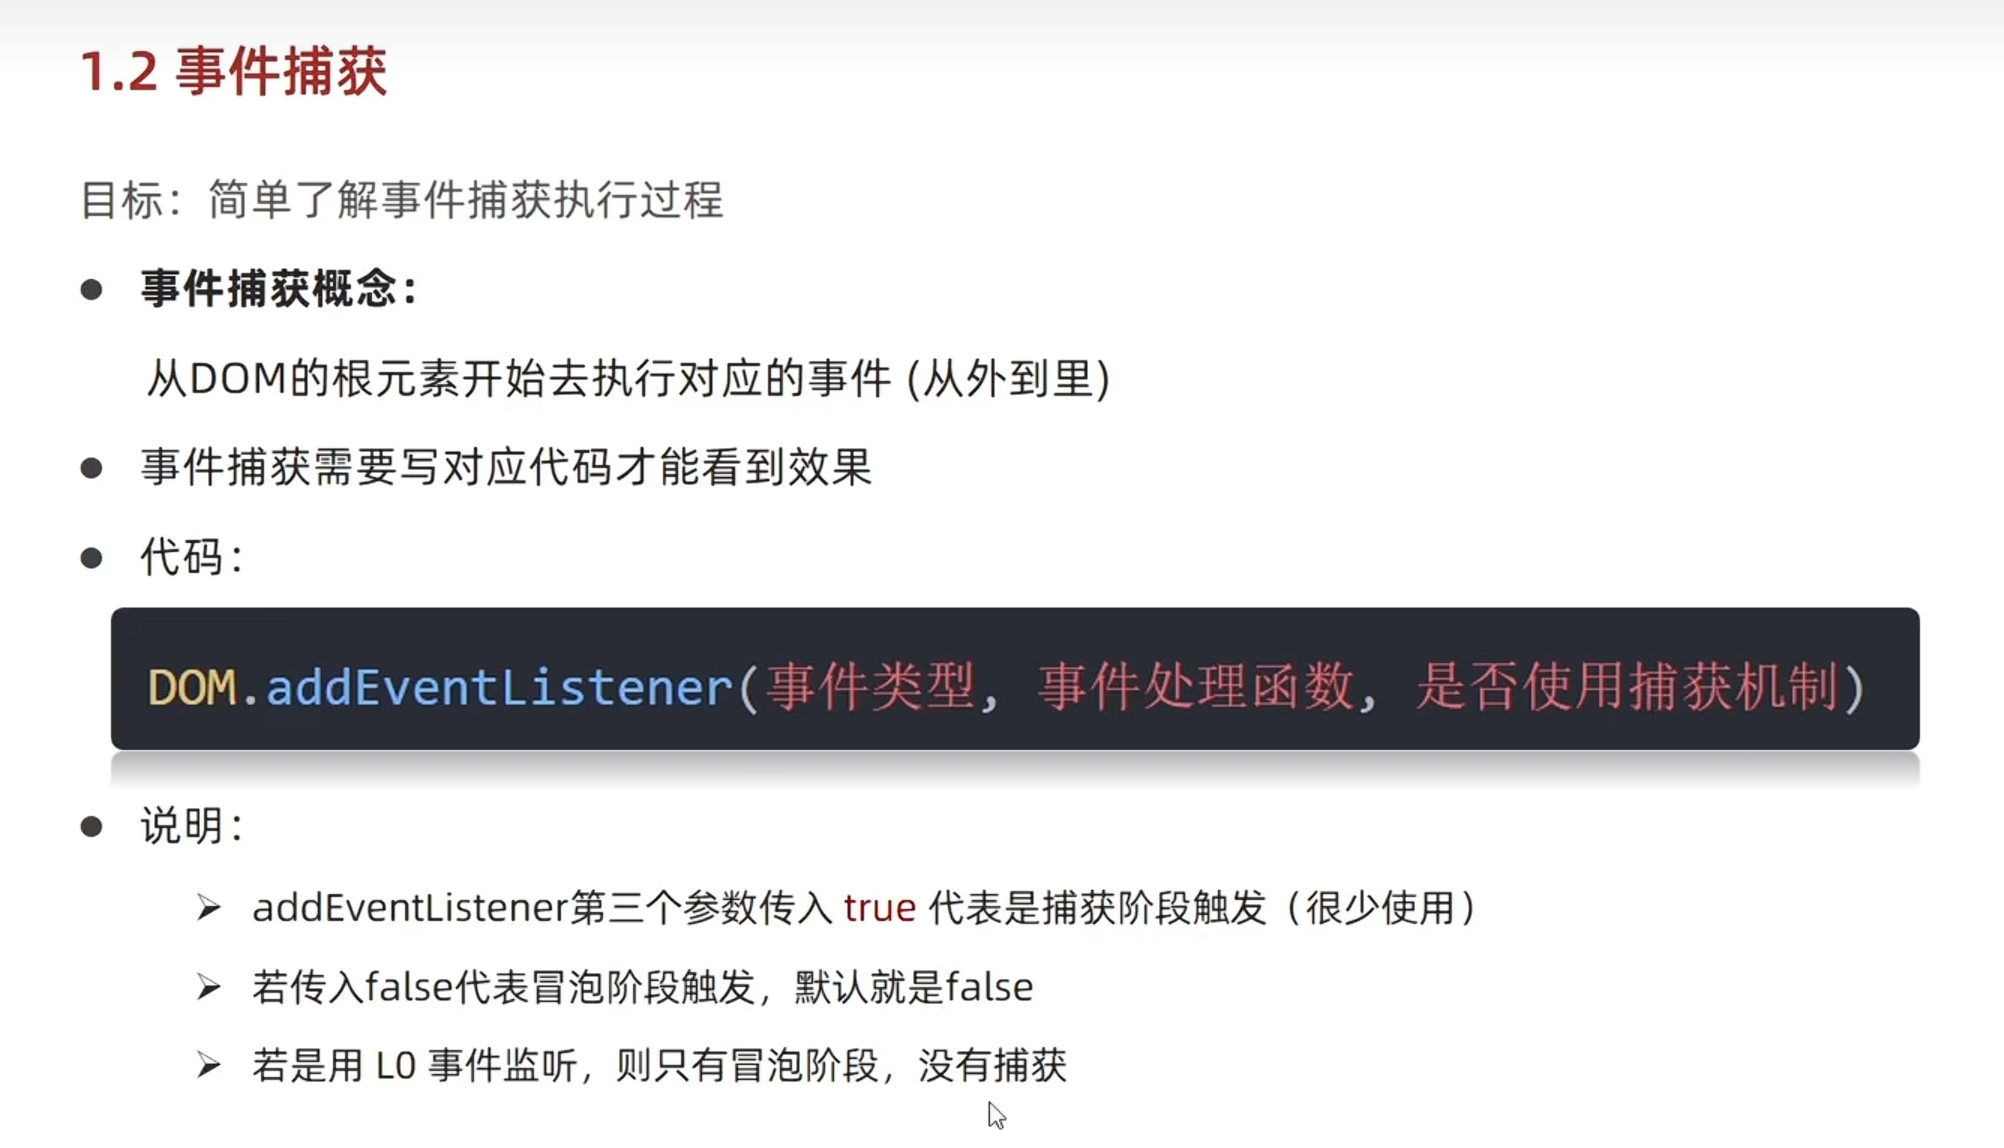
</html>3、事件流
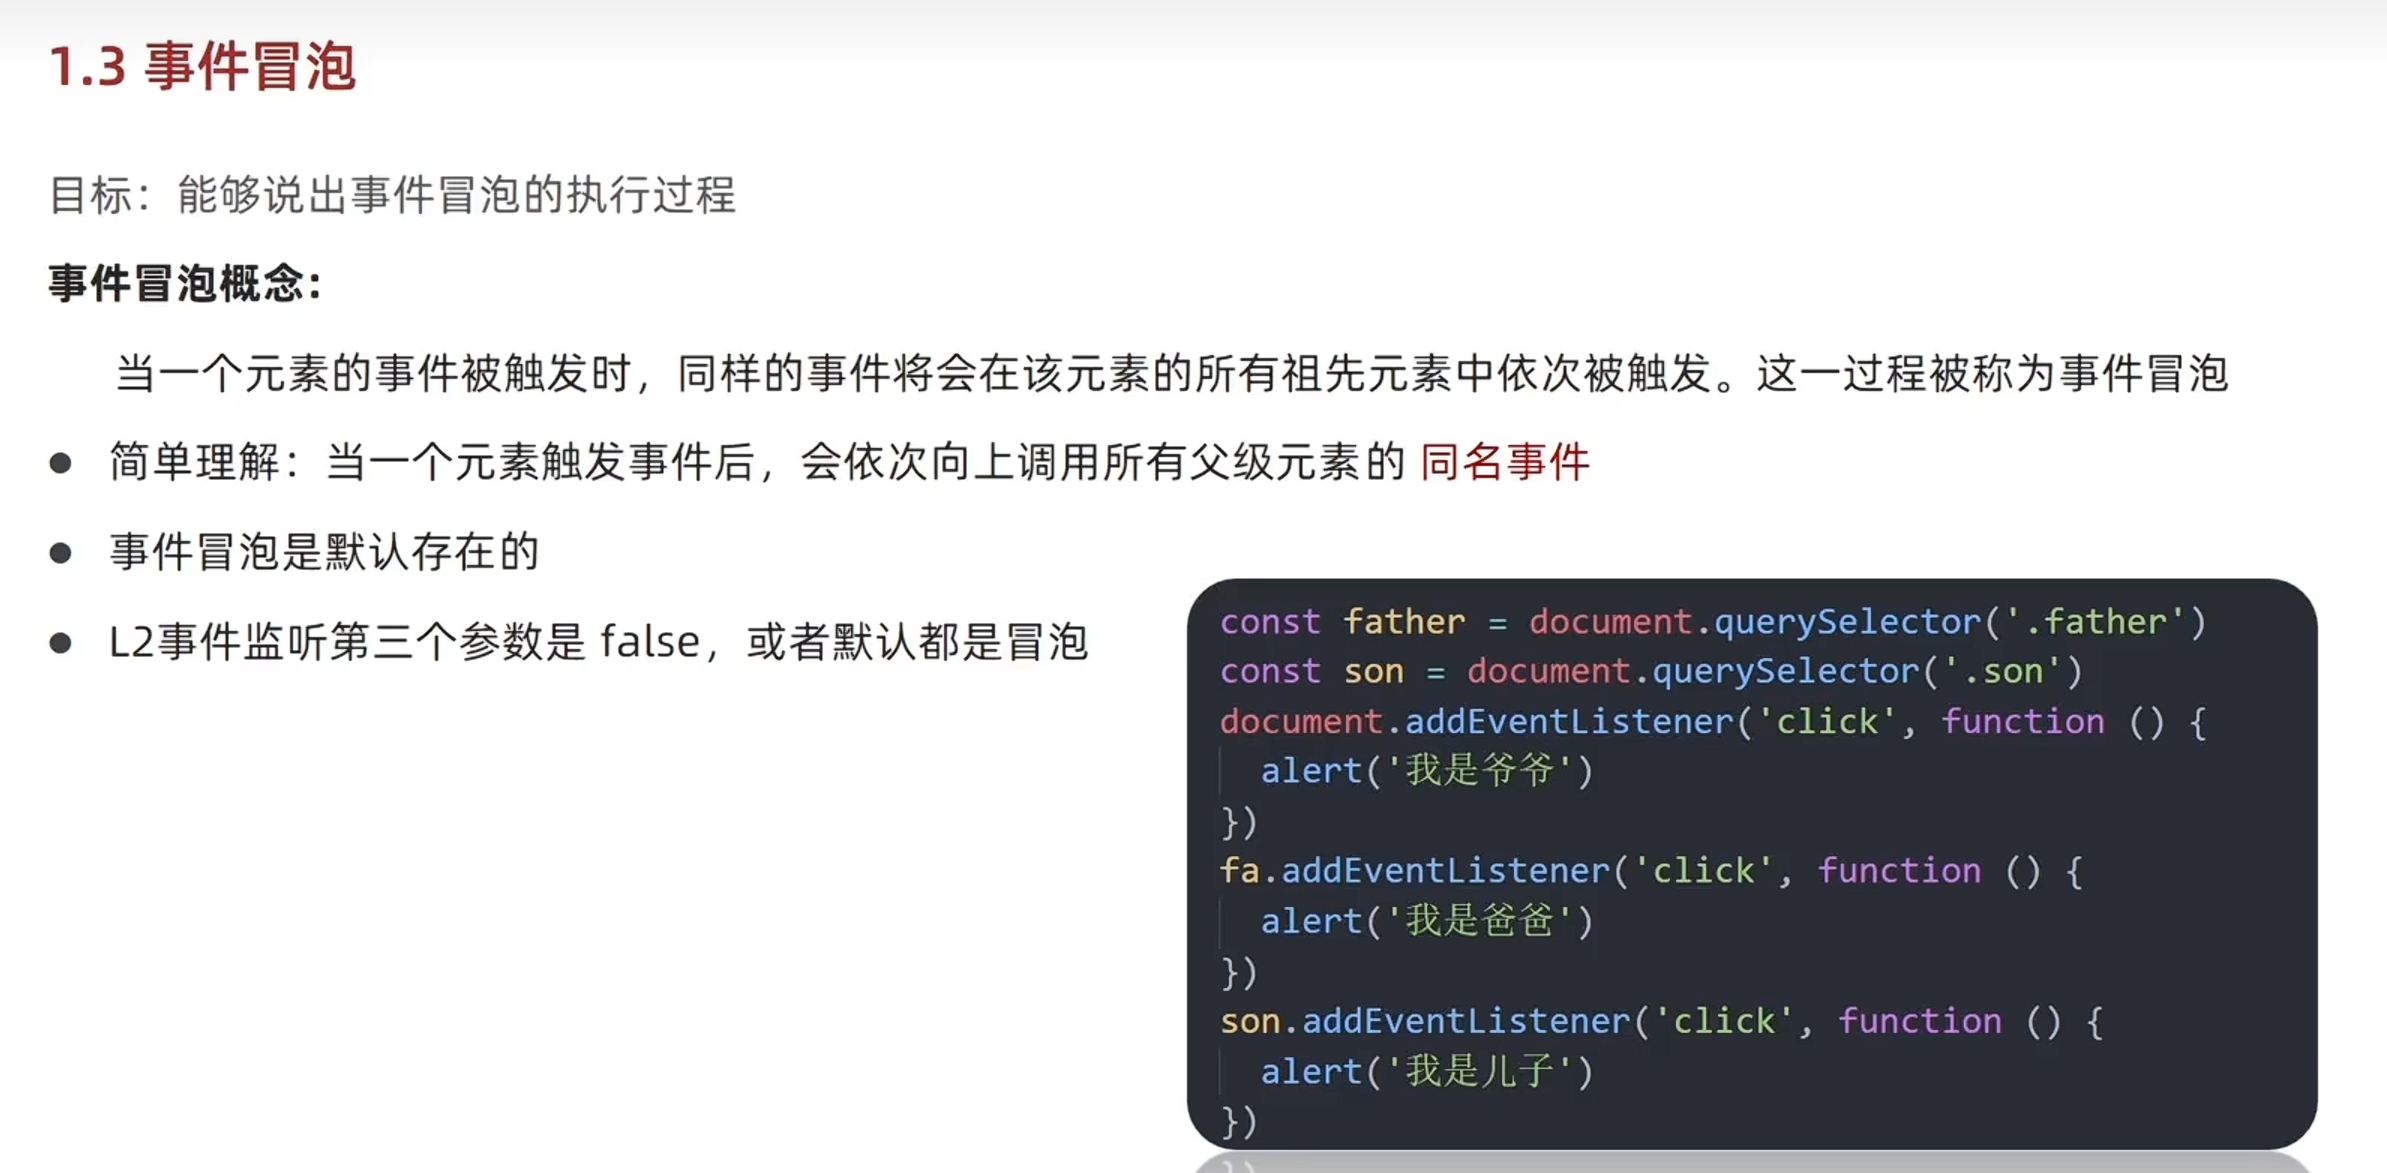
html
<!DOCTYPE html>
<html lang="en">
<head>
<meta charset="UTF-8">
<meta name="viewport" content="width=device-width, initial-scale=1.0">
<title>事件流</title>
<style>
.father {
width: 500px;
height: 500px;
background-color: pink;
}
.son {
width: 200px;
height: 200px;
background-color: purple;
}
</style>
</head>
<body>
<div class="father">
<div class="son"></div>
</div>
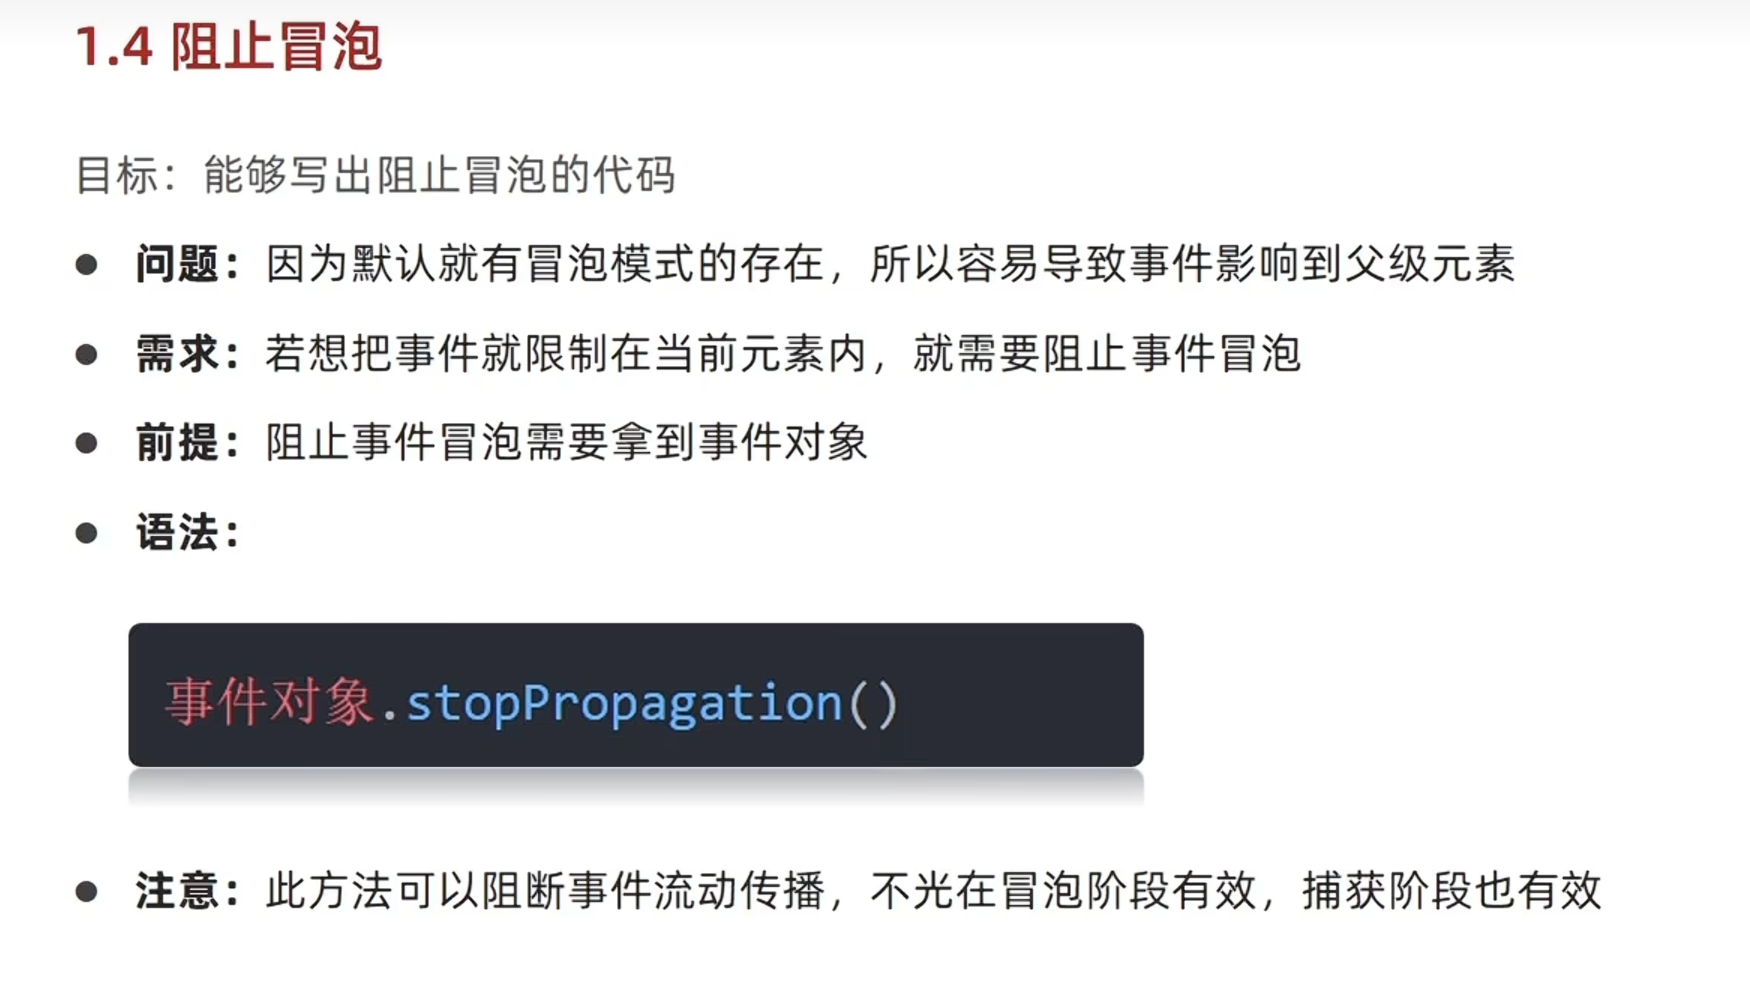
<script>
const fa = document.querySelector('.father')
const son = document.querySelector('.son')
// 山东 济南 蓝翔 目标 捕获阶段
// 蓝翔 济南 山东 冒泡阶段
document.addEventListener('click',function(){
alert('我是爷爷')
})
fa.addEventListener('click',function(){
alert('我是爸爸')
})
son.addEventListener('click',function(e){
alert('我是儿子')
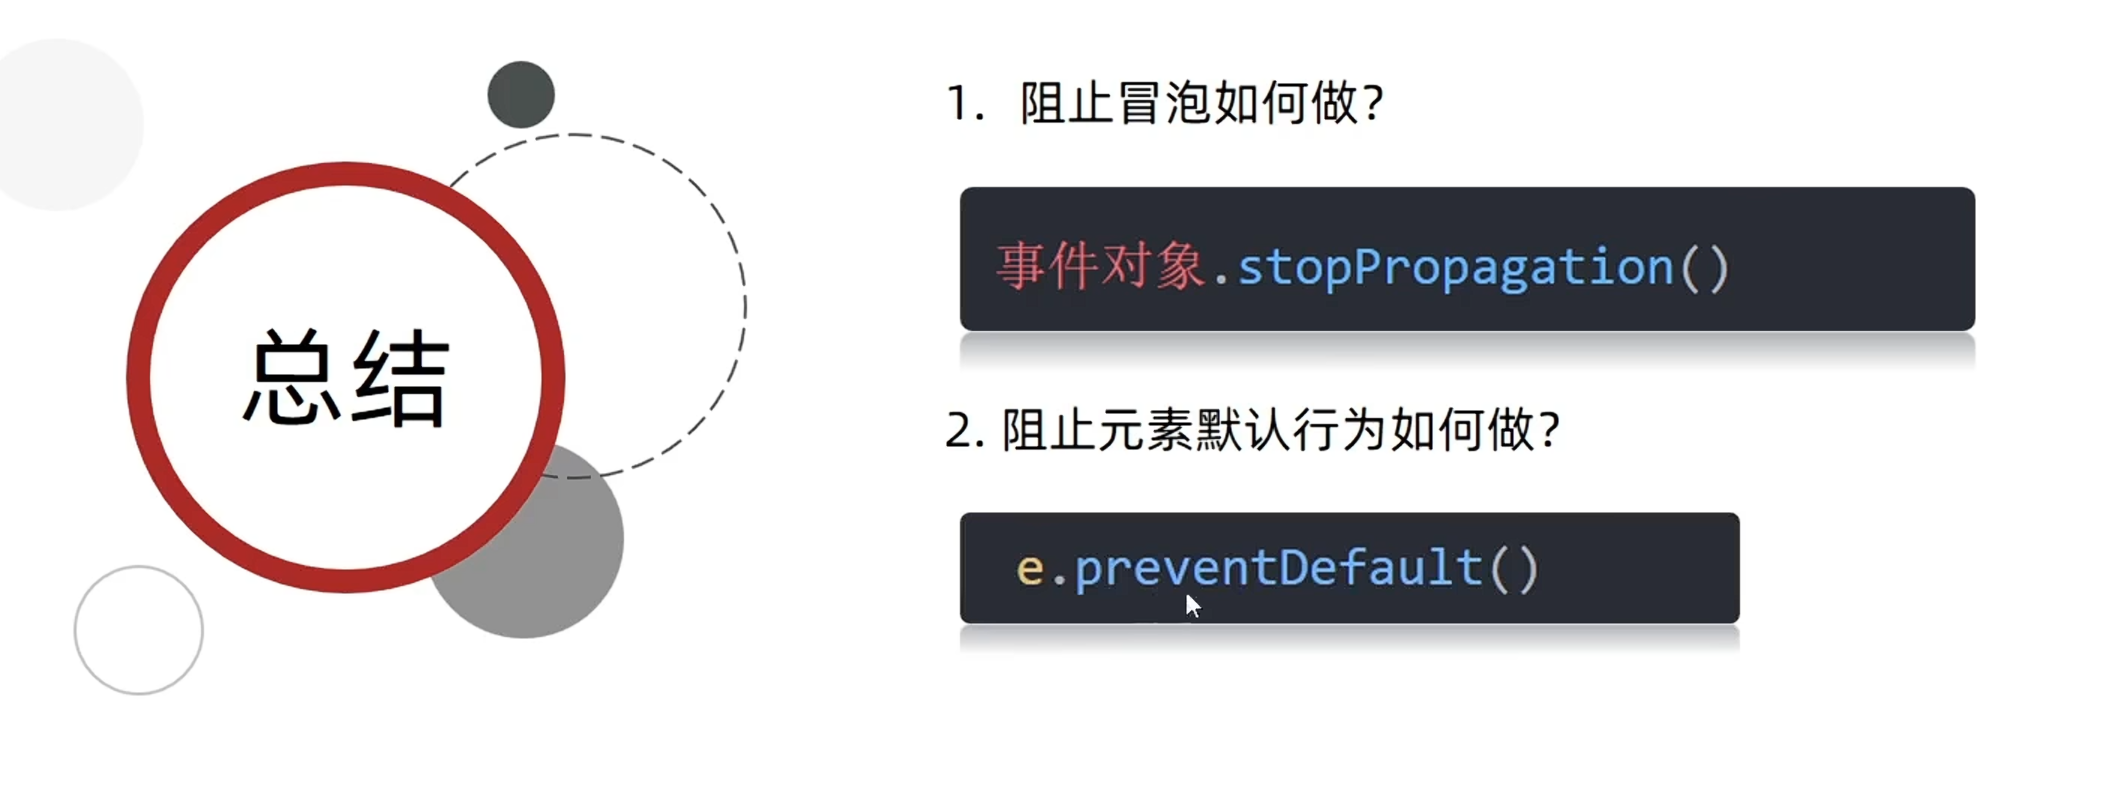
// 阻止流动传播 事件对象.stopPropagation()
e.stopPropagation()
})
</script>
</body>
</html>4、事件解绑
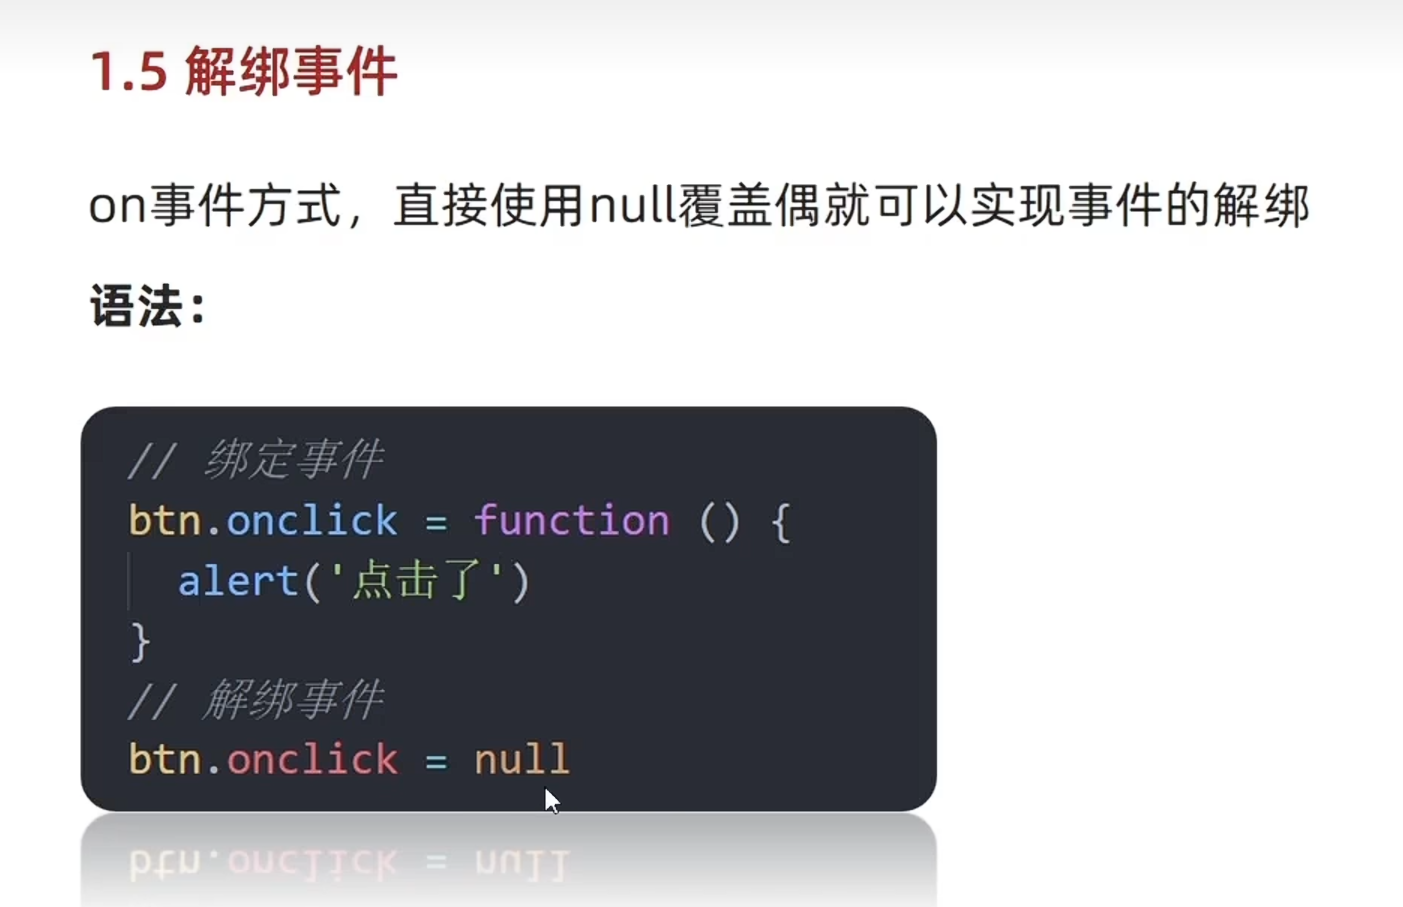

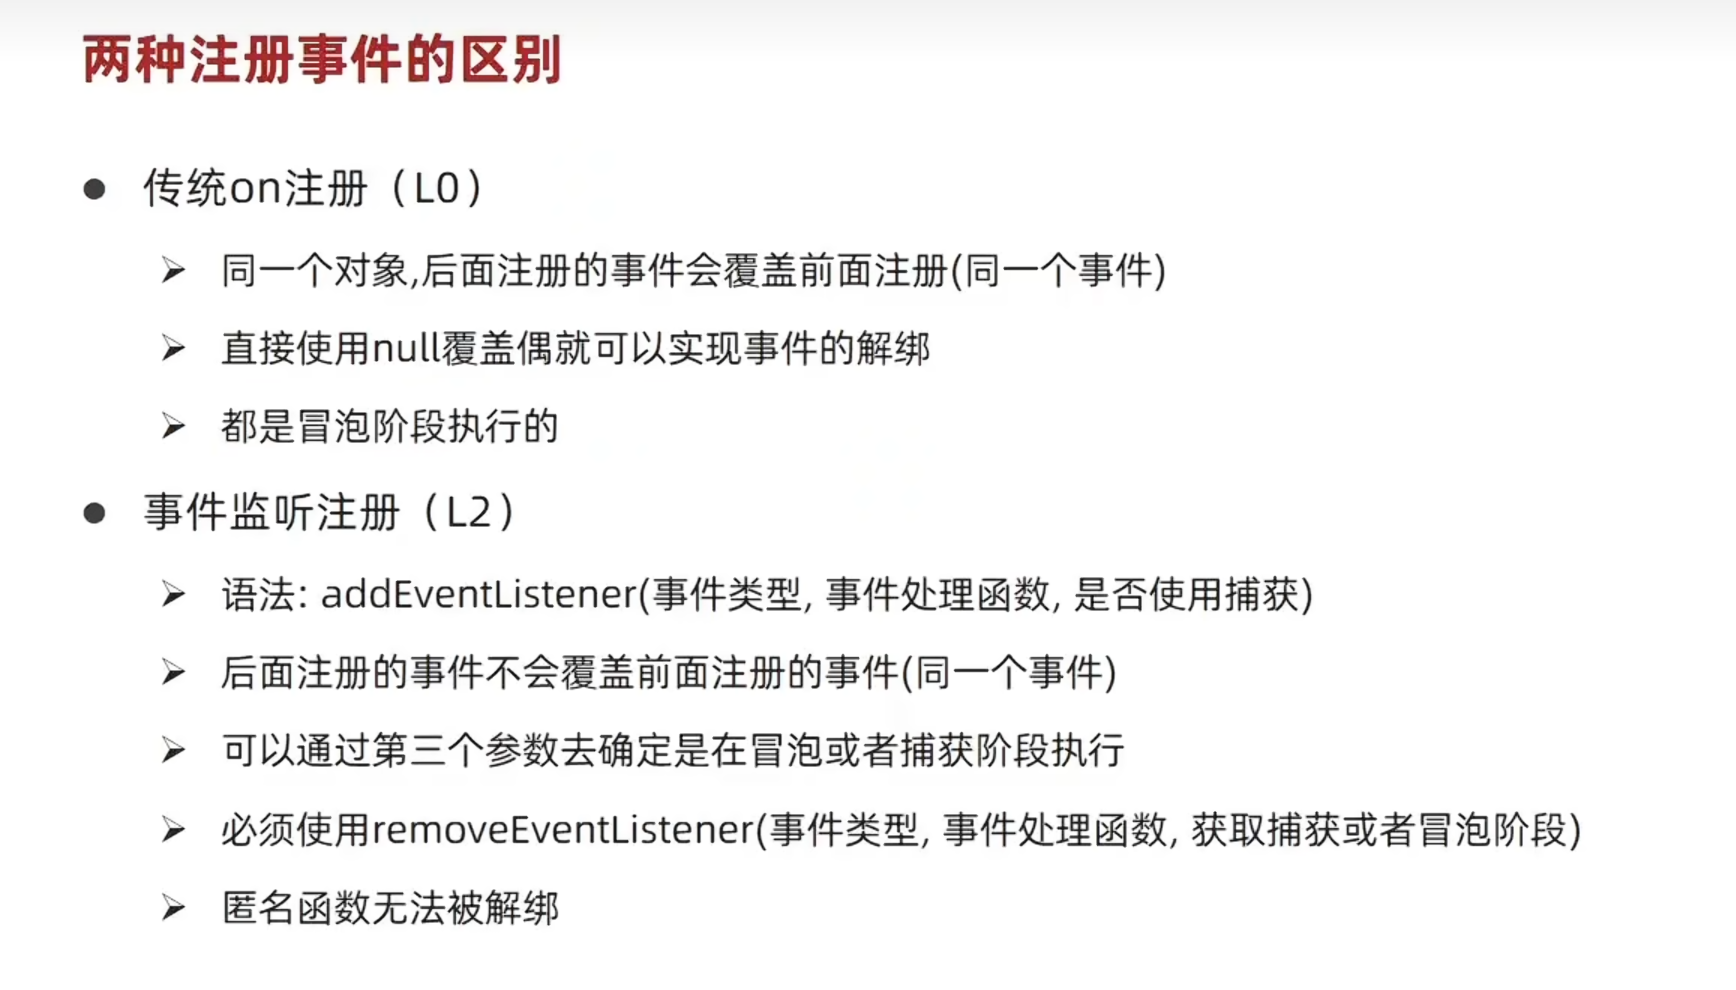
html
<!DOCTYPE html>
<html lang="en">
<head>
  <meta charset="UTF-8">
  <meta name="viewport" content="width=device-width, initial-scale=1.0">
  <title>事件解绑</title>
</head>
<body>
  <button>点击</button>
  <script>
    const btn = document.querySelector('button')
    // btn.onclick = function(){
    //   alert('点击了')
    //   // L0 事件移除解绑
    //   btn.onclick = null
    // }

    function fn(){
      alert('点击了')
    }
    btn.addEventListener('click',fn)
    // L2 事件移除解绑
    btn.removeEventListener('click',fn)
  </script>
</body>
</html>
5、鼠标经过事件的区别
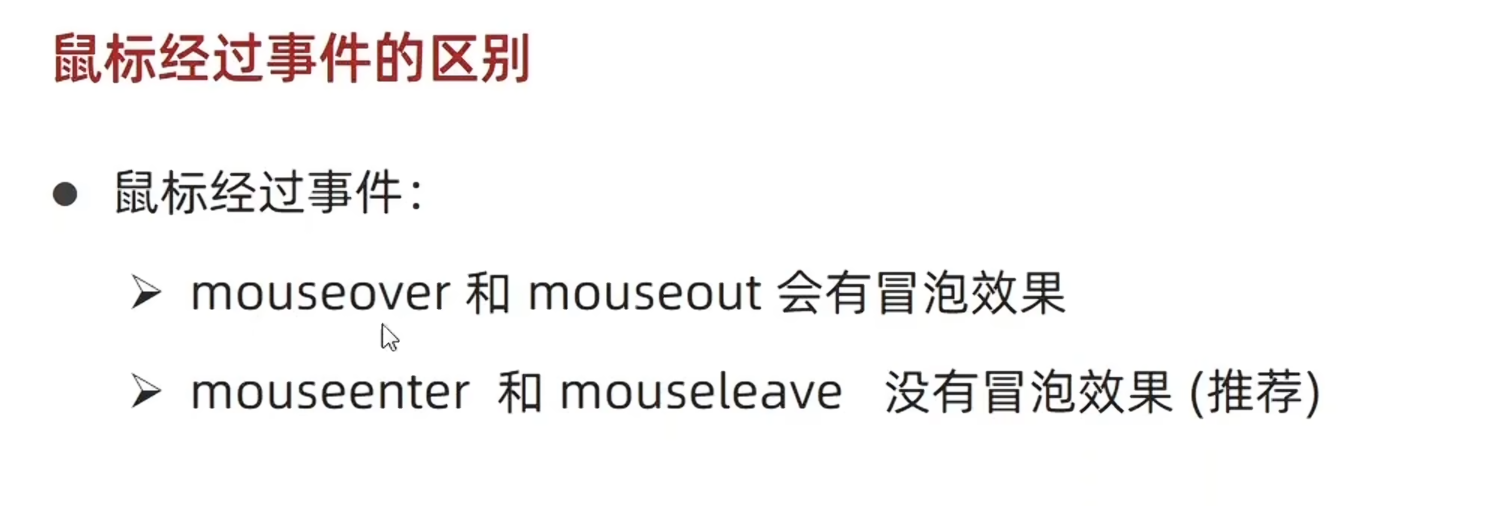
html
<!DOCTYPE html>
<html lang="en">
<head>
<meta charset="UTF-8">
<meta name="viewport" content="width=device-width, initial-scale=1.0">
<title>鼠标经过事件的区别</title>
<style>
.dad {
width: 400px;
height: 400px;
background-color: pink;
}
.baby {
width: 200px;
height: 200px;
background-color: purple;
}
</style>
</head>
<body>
<div class="dad">
<div class="baby"></div>
</div>
<script>
const dad = document.querySelector('.dad')
const baby = document.querySelector('.baby')
// 1、mouseover和 mouseout 有冒泡事件
// dad.addEventListener('mouseover',function(){
// console.log('鼠标经过')
// })
// dad.addEventListener('mouseout',function(){
// console.log('鼠标离开')
// })
// 2、mouseenter和 mouseleave 无冒泡事件 推荐使用
dad.addEventListener('mouseenter',function(){
console.log('鼠标经过')
})
dad.addEventListener('mouseleave',function(){
console.log('鼠标离开')
})
</script>
</body>
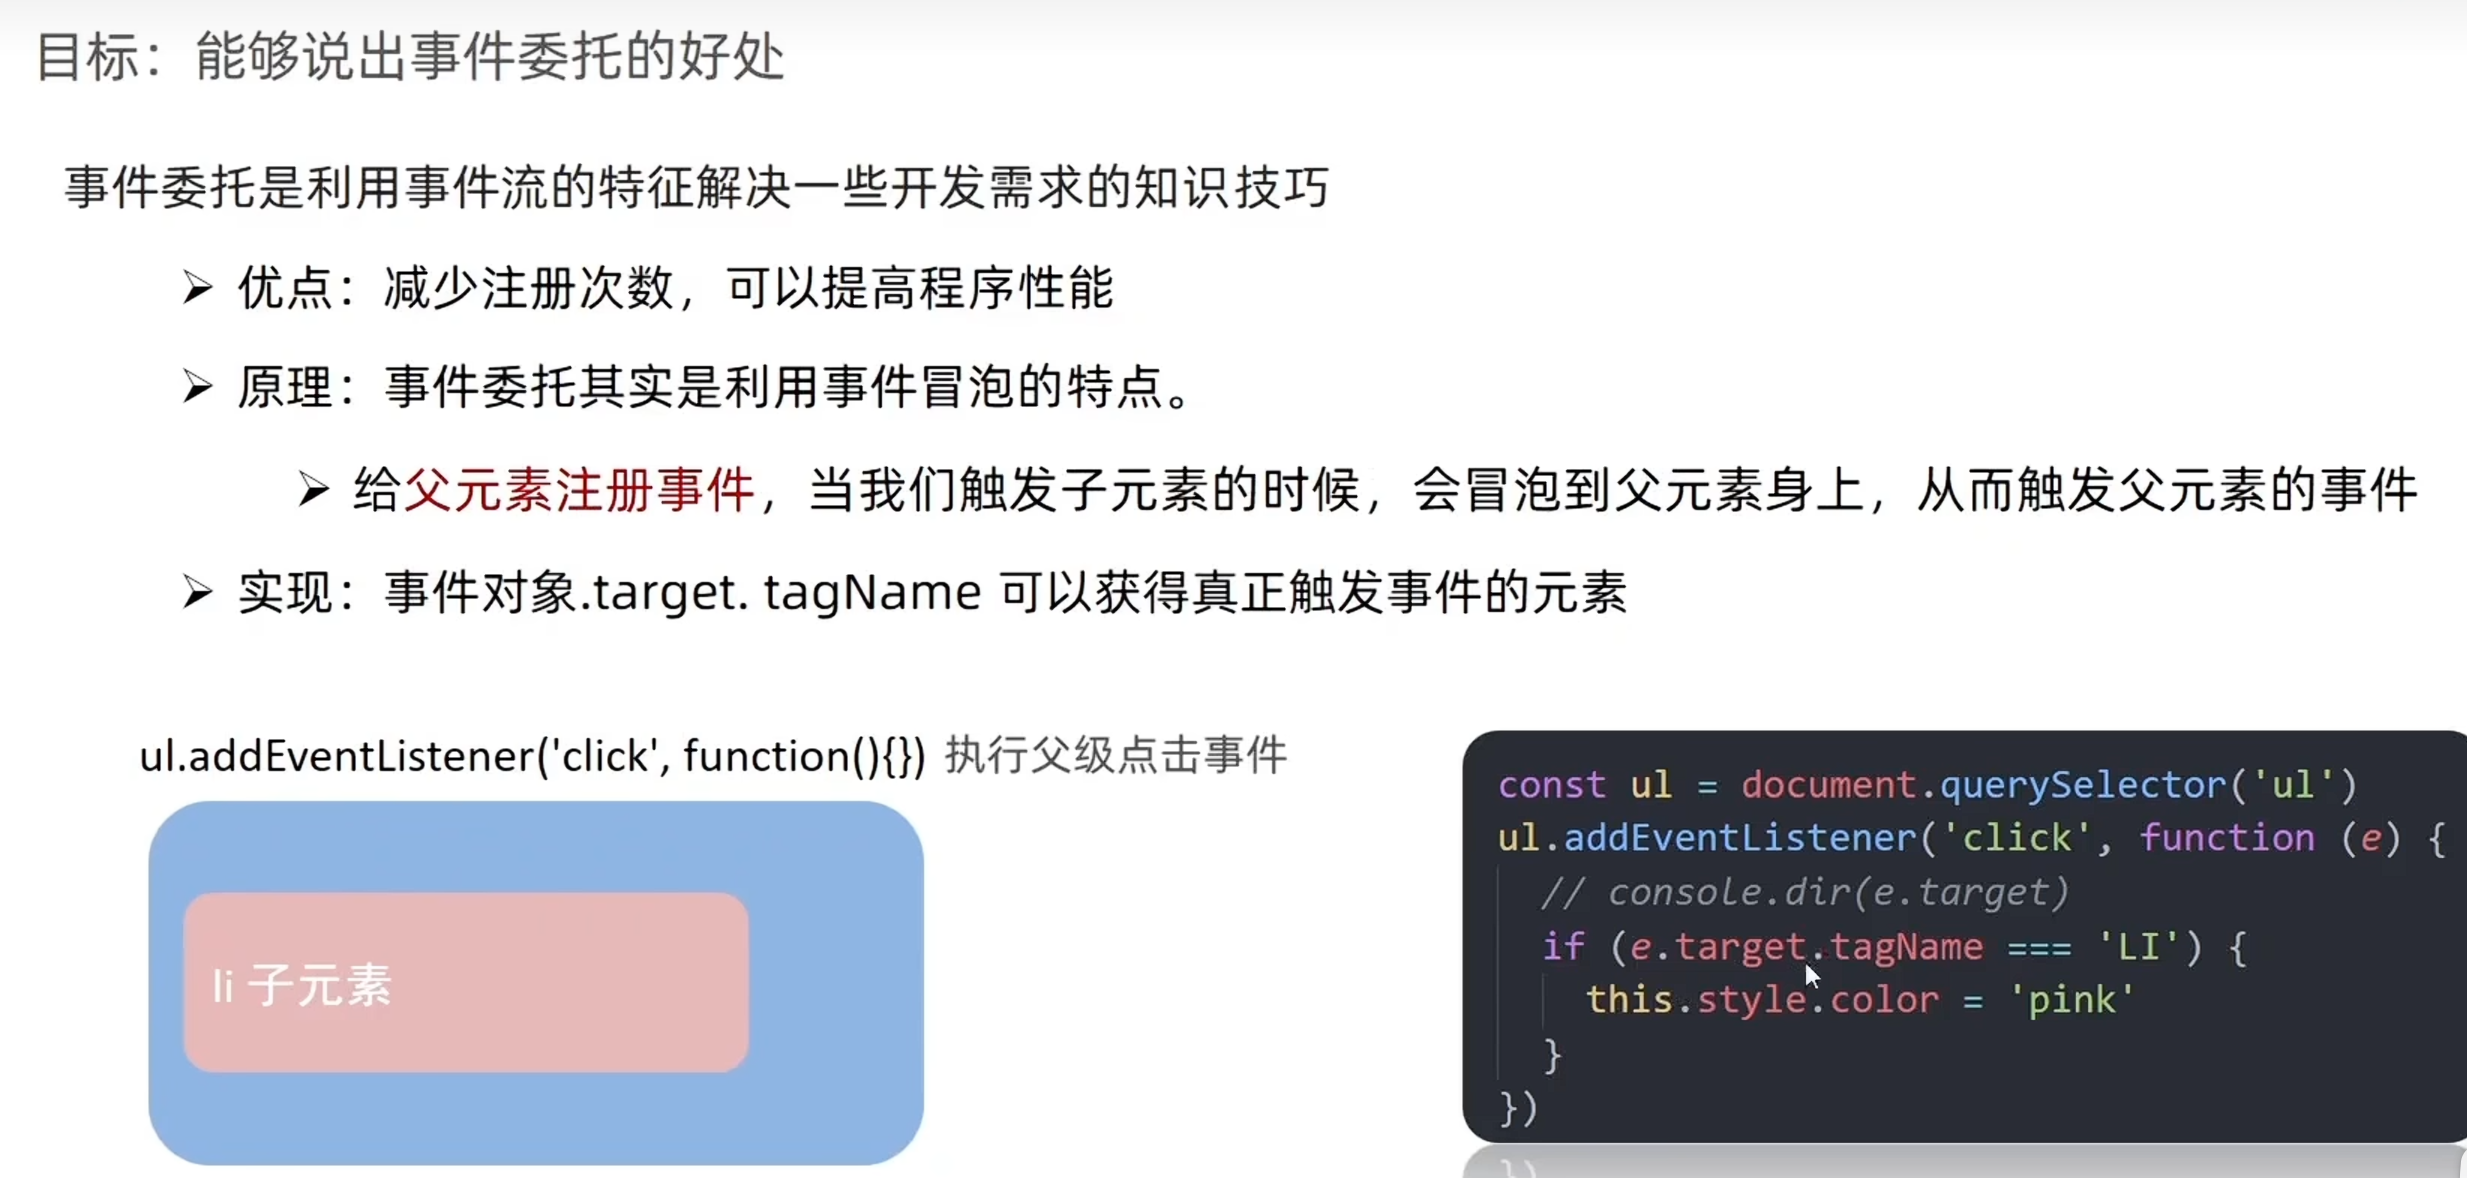
</html>6、事件委托
html
<!DOCTYPE html>
<html lang="en">
<head>
  <meta charset="UTF-8">
  <meta name="viewport" content="width=device-width, initial-scale=1.0">
  <title>事件委托</title>
</head>
<body>
  <ul>
    <li>第1个孩子</li>
    <li>第2个孩子</li>
    <li>第3个孩子</li>
    <li>第4个孩子</li>
    <li>第5个孩子</li>
    <p>我不需要变色</p>
  </ul>
  <script>
    // 点击每个小li,当前文字变为红色
    // 按照事件委托的方式  委托给父级,事件写到父级身上
    // 1、获得父级元素
    const ul = document.querySelector('ul')
    ul.addEventListener('click',function(e){
      // this.style.color = 'red'
      // console.dir(e.target)  e.target 就是点击的对象
      // e.target.style.color = 'red'
      //需求:只有点击li才会有效果
      if(e.target.tagName === 'LI'){
        e.target.style.color = 'red'
      }
    })
  </script>
</body>
</html>
7、tab栏切换
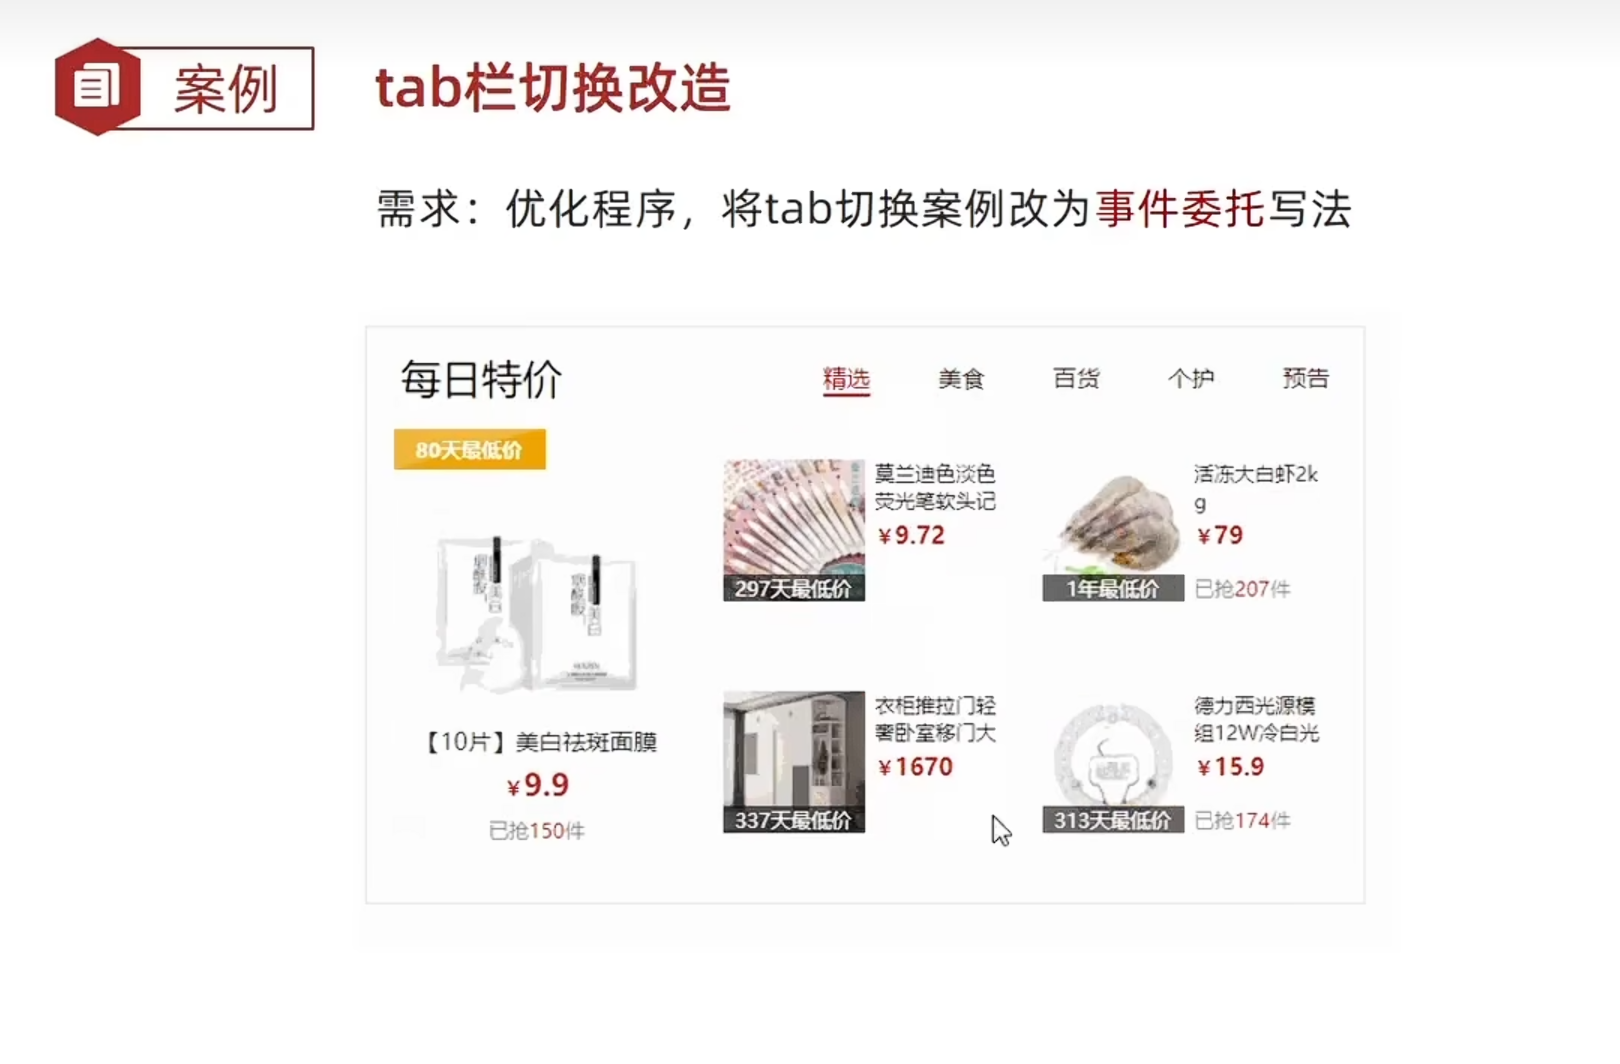
html
<!DOCTYPE html>
<html lang="en">
<head>
  <meta charset="UTF-8" />
  <meta http-equiv="X-UA-Compatible" content="IE=edge" />
  <meta name="viewport" content="width=device-width, initial-scale=1.0" />
  <title>tab栏切换</title>
  <style>
    * {
      margin: 0;
      padding: 0;
    }

    .tab {
      width: 590px;
      height: 340px;
      margin: 20px;
      border: 1px solid #e4e4e4;
    }

    .tab-nav {
      width: 100%;
      height: 60px;
      line-height: 60px;
      display: flex;
      justify-content: space-between;
    }

    .tab-nav h3 {
      font-size: 24px;
      font-weight: normal;
      margin-left: 20px;
    }

    .tab-nav ul {
      list-style: none;
      display: flex;
      justify-content: flex-end;
    }

    .tab-nav ul li {
      margin: 0 20px;
      font-size: 14px;
    }

    .tab-nav ul li a {
      text-decoration: none;
      border-bottom: 2px solid transparent;
      color: #333;
    }

    .tab-nav ul li a.active {
      border-color: #e1251b;
      color: #e1251b;
    }

    .tab-content {
      padding: 0 16px;
    }

    .tab-content .item {
      display: none;
    }

    .tab-content .item.active {
      display: block;
    }
  </style>
</head>
<body>
  <div class="tab">
    <div class="tab-nav">
      <h3>每日特价</h3>
      <ul>
        <li><a class="active" href="javascript:;" data-id="0">精选</a></li>
        <li><a href="javascript:;" data-id="1">美食</a></li>
        <li><a href="javascript:;" data-id="2">百货</a></li>
        <li><a href="javascript:;" data-id="3">个护</a></li>
        <li><a href="javascript:;" data-id="4">预告</a></li>
      </ul>
    </div>
    <div class="tab-content">
      <div class="item active"><img src="./images/tab00.png" alt="" /></div>
      <div class="item"><img src="./images/tab01.png" alt="" /></div>
      <div class="item"><img src="./images/tab02.png" alt="" /></div>
      <div class="item"><img src="./images/tab03.png" alt="" /></div>
      <div class="item"><img src="./images/tab04.png" alt="" /></div>
    </div>
  </div>
  <script>
    // 采取事件委托的形式 tab栏切换
    // 1、获取 ul 父元素 因为 ul只有一个
    const ul = document.querySelector('.tab-nav ul')
    // 获取 5个item
    const items = document.querySelectorAll('.tab-content .item')
    // 2、添加事件
    ul.addEventListener('click',function(e){
      // console.log(e.target)  e.target是我们点击的对象
      // 我们只有点击了 a 才会进行 添加类和删除类操作
      // console.log(e.target.tagName)  e.target.tagName 点击对象的标签名
      if(e.target.tagName === 'A'){
        // console.log('我选的是a')
        // 排他思想,先移除原来的active
        document.querySelector('.tab-nav .active').classList.remove('active')
        // 当前元素添加 active 是 e.target
        // this 指向ul 不能用this
        e.target.classList.add('active')

        // 下面大盒子模块
        // console.log(e.target.dataset.id)
        const i = +e.target.dataset.id
        // 排他思想,先移除原来的active
        document.querySelector('.tab-content .active').classList.remove('active')
        // 对应的大盒子 添加 active.tab-content
        // document.querySelector(`.tab-content .item:nth-child(${i+1})`).classList.add('active')
        items[i].classList.add('active')
      }
    })
  </script>
</body>
</html>
8、自定义属性
html
<!DOCTYPE html>
<html lang="en">
<head>
  <meta charset="UTF-8">
  <meta name="viewport" content="width=device-width, initial-scale=1.0">
  <title>自定义属性</title>
</head>
<body>
  <div data-id="0"></div>
  <script>
    const div = document.querySelector('div')
    console.log(div.dataset.id) // 0
  </script>
</body>
</html>
9、阻止默认行为
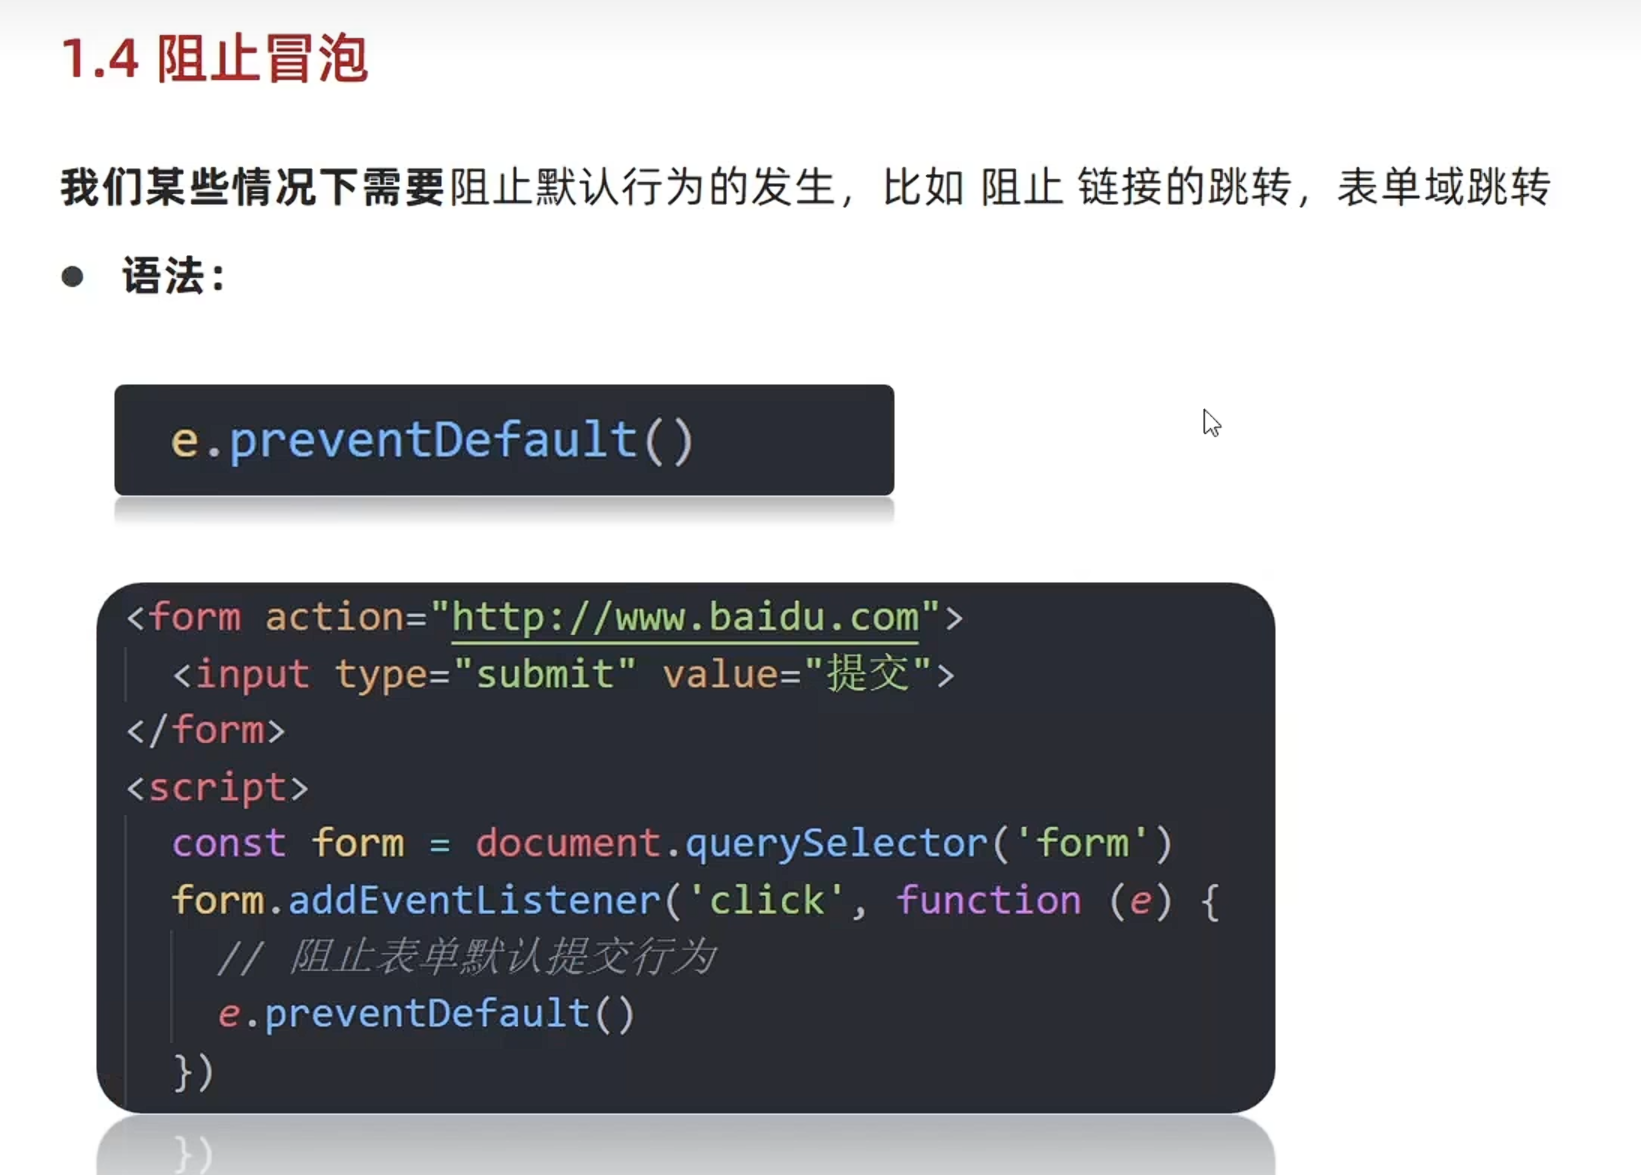
html
<!DOCTYPE html>
<html lang="en">
<head>
  <meta charset="UTF-8">
  <meta name="viewport" content="width=device-width, initial-scale=1.0">
  <title>阻止默认行为</title>
</head>
<body>
  <form action="http://www.baidu.com">
    <input type="submit" value="免费注册">
  </form>
  <a href="http://www.baidu.com">百度一下</a>
  <script>
    const form = document.querySelector('form')
    form.addEventListener('submit',function(e){
      // 阻止默认行为,提交
      e.preventDefault()
    })

    const a = document.querySelector('a')
    a.addEventListener('click',function(e){
       e.preventDefault()
    })
  </script>
</body>
</html>
10、页面加载事件
html
<!DOCTYPE html>
<html lang="en">
<head>
<meta charset="UTF-8">
<meta name="viewport" content="width=device-width, initial-scale=1.0">
<title>页面加载事件</title>
<script>
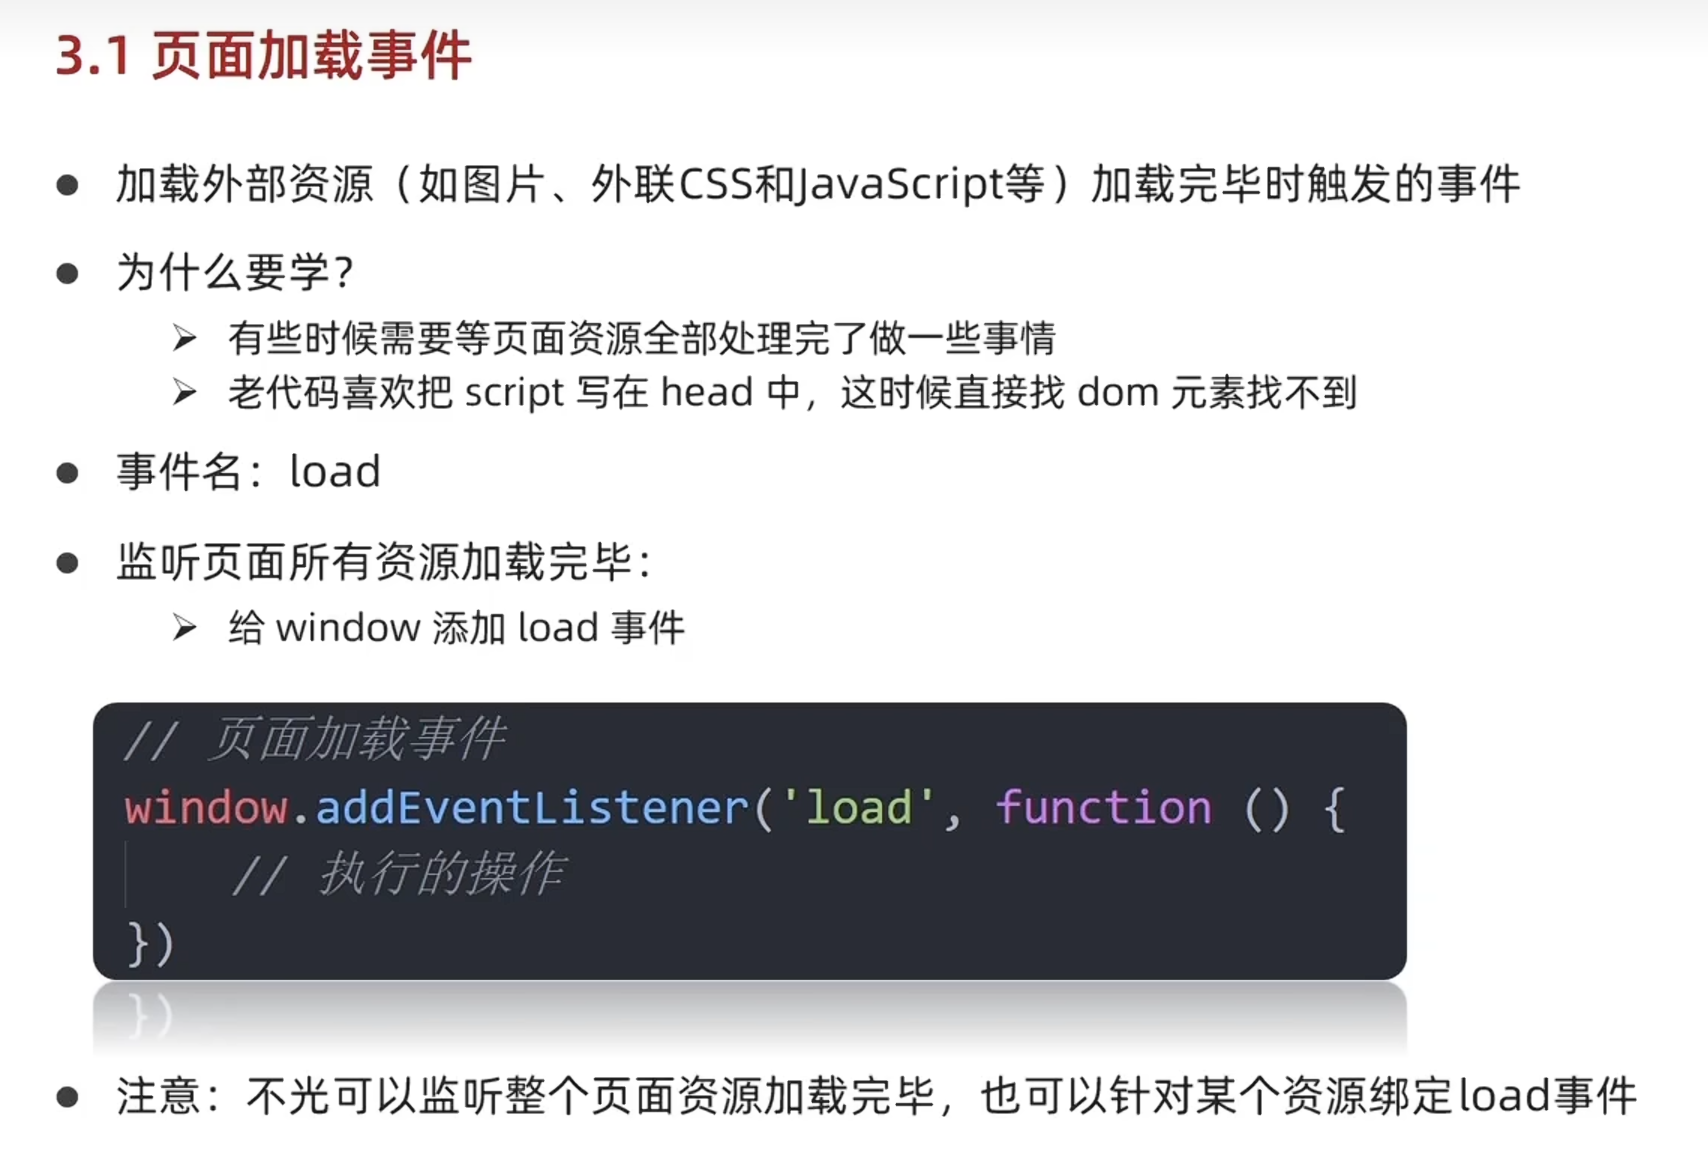
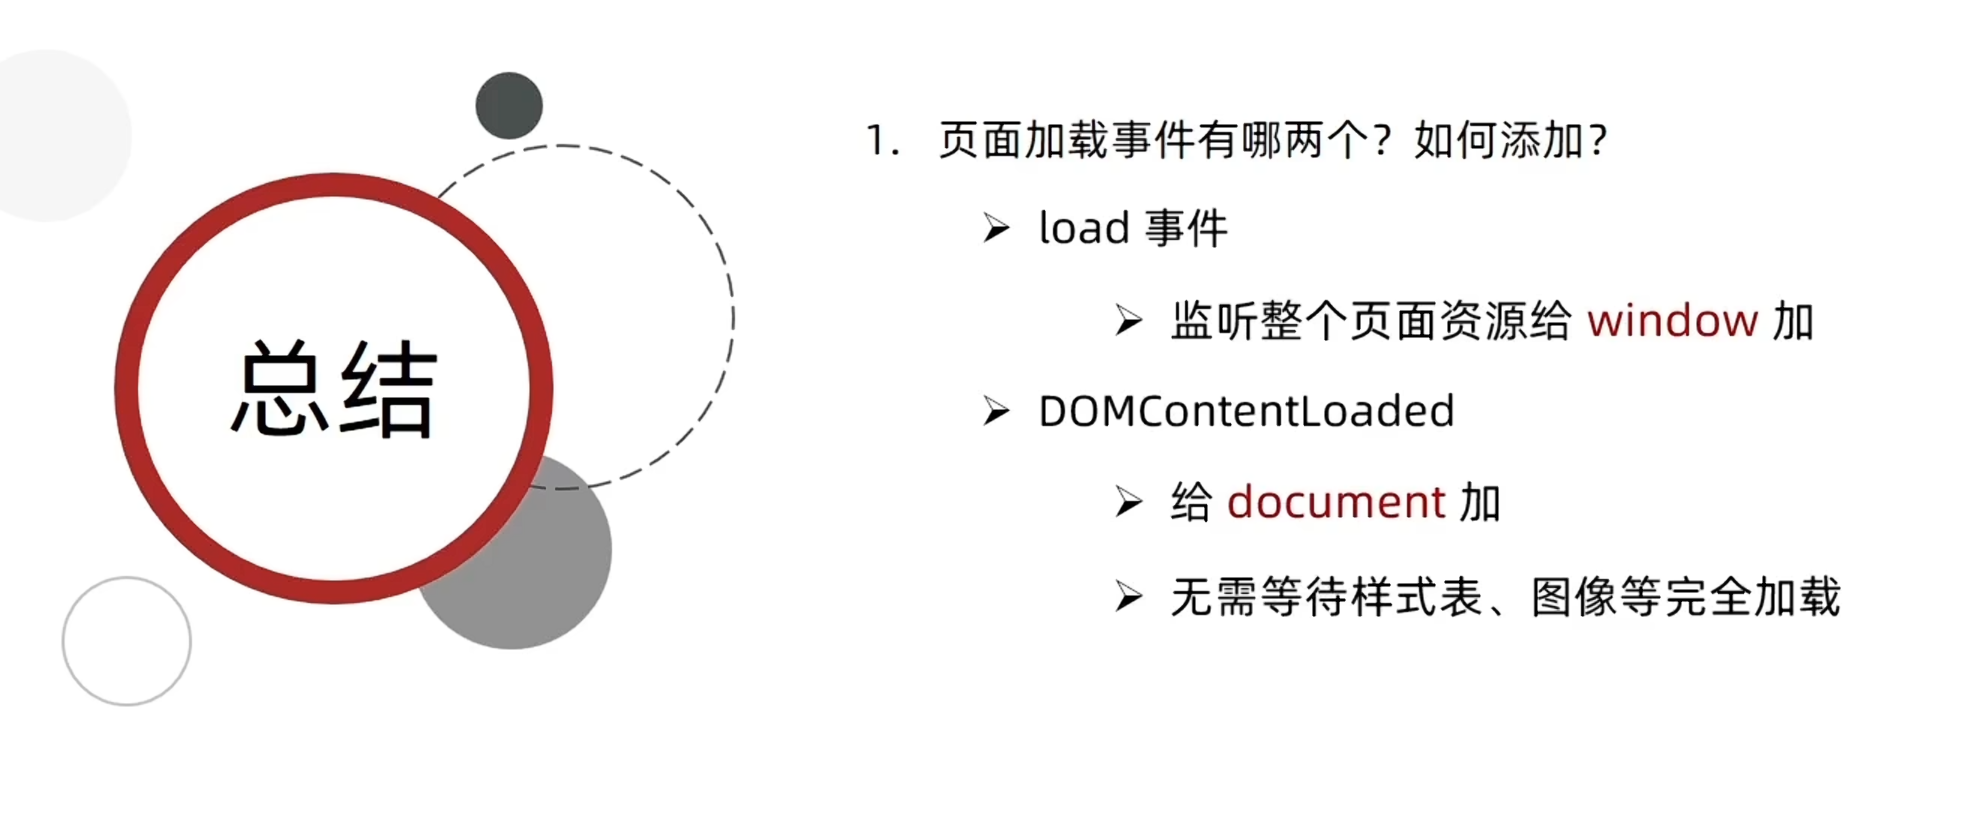
// 等待页面所有资源加载完毕,就回去执行回调函数
// window.addEventListener('load',function(){
// const btn = document.querySelector('button')
// btn.addEventListener('click',function(){
// alert(111)
// })
// })
// img.addEventListener('load',function(){
// // 等待图片加载完毕,再去执行里面的代码
// })
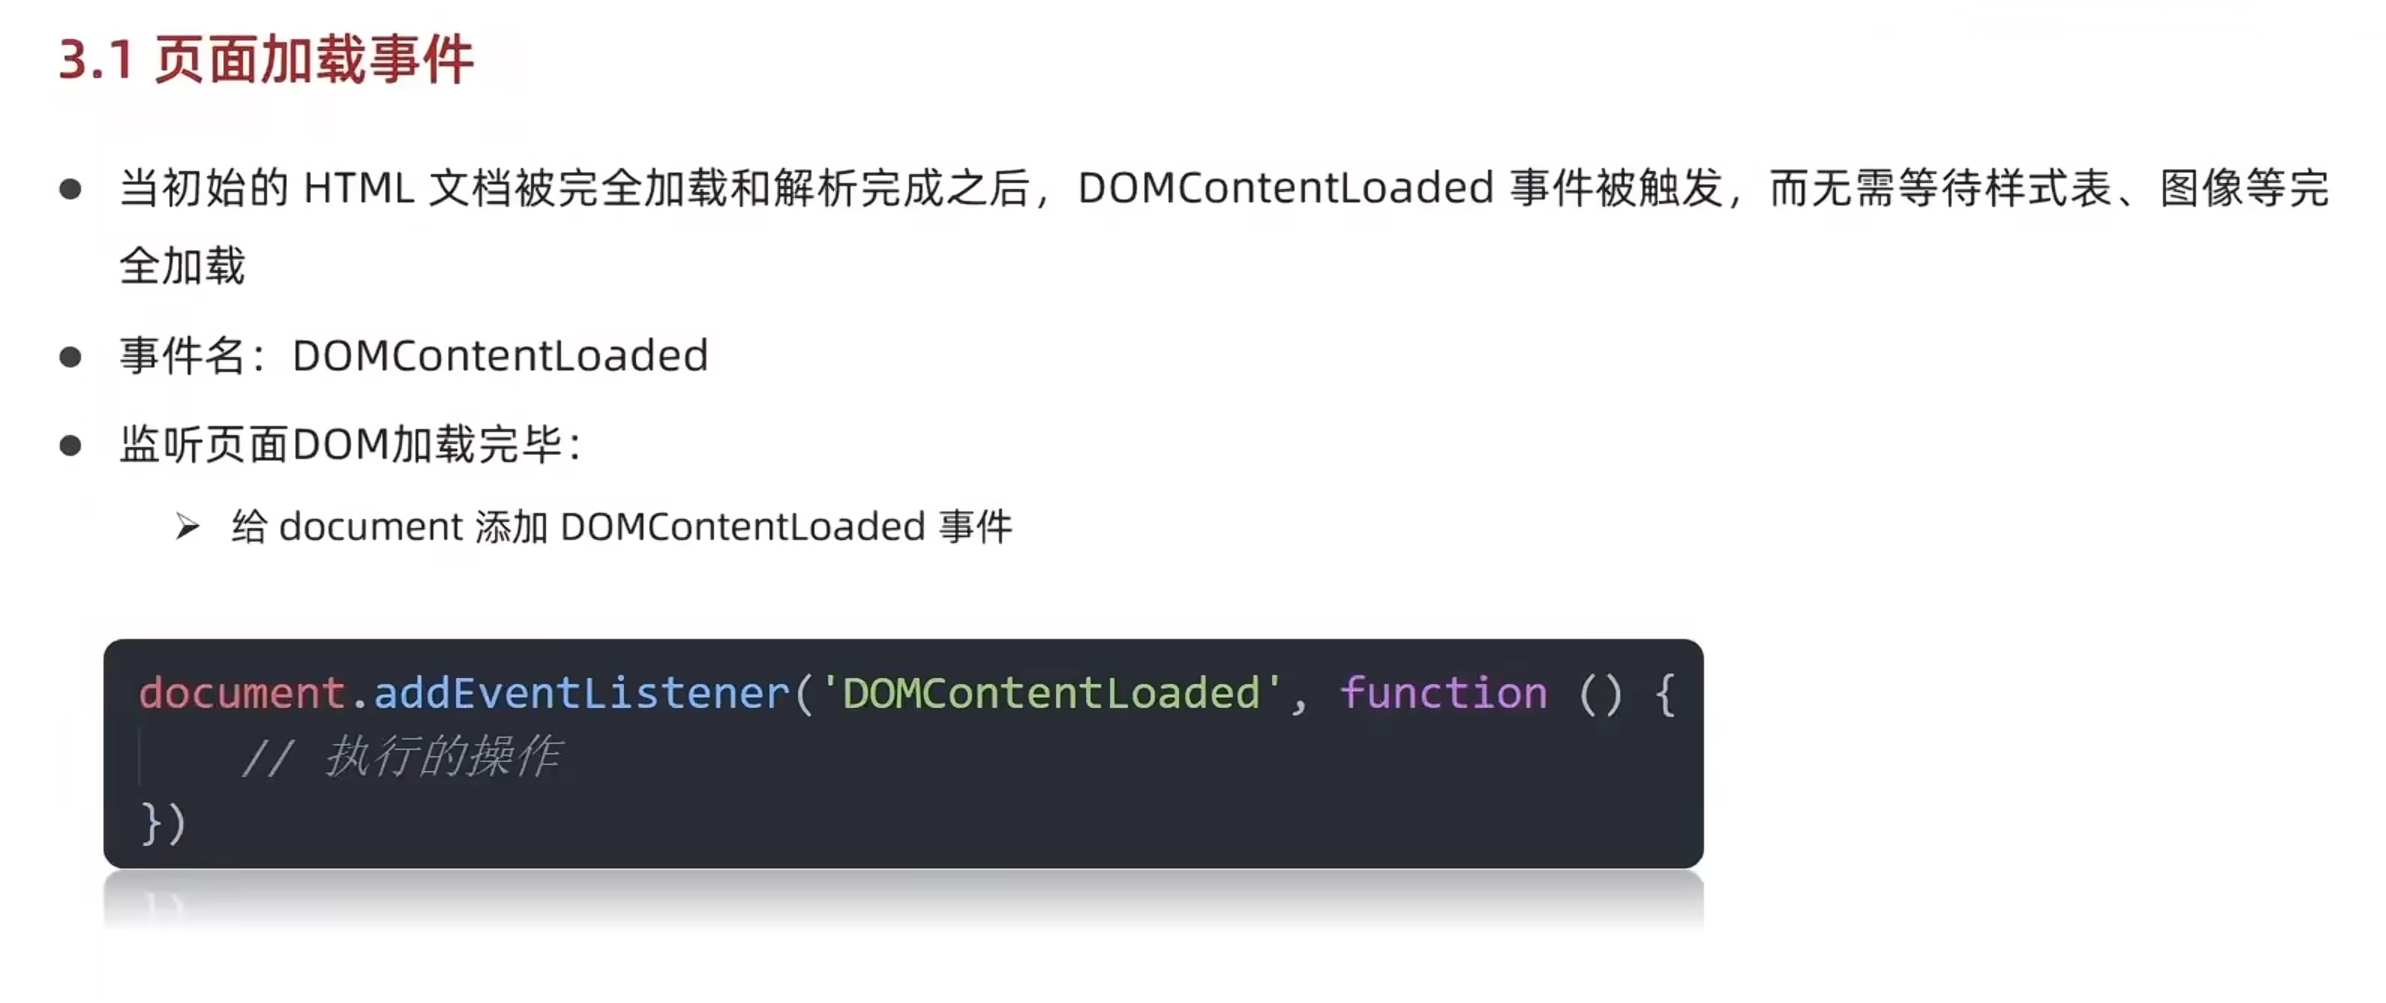
document.addEventListener('DOMContentLoaded',function(){
const btn = document.querySelector('button')
btn.addEventListener('click',function(){
alert(111)
})
})
</script>
</head>
<body>
<button>点击</button>
</body>
</html>11、页面滚动事件
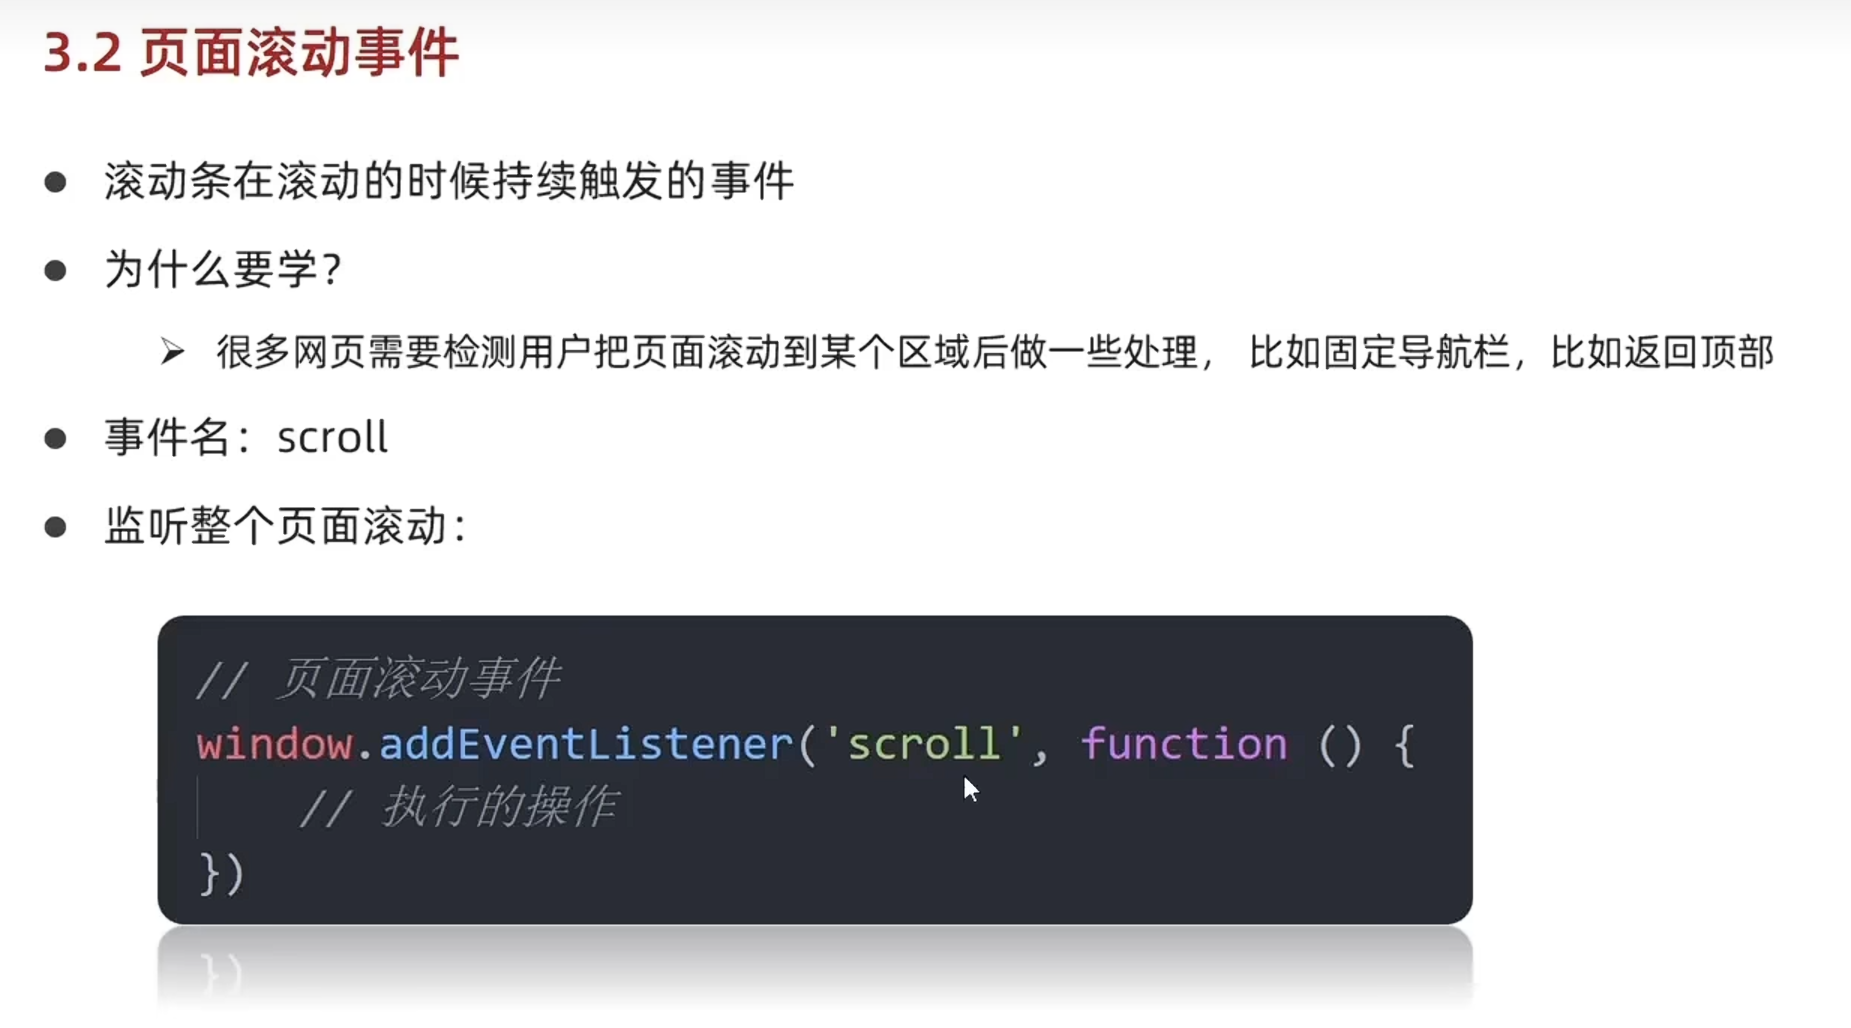
html
<!DOCTYPE html>
<html lang="en">
<head>
<meta charset="UTF-8">
<meta name="viewport" content="width=device-width, initial-scale=1.0">
<title>页面滚动事件</title>
<style>
body {
padding-top: 100px;
height: 3000px;
}
div {
display: none;
margin: 100px;
overflow: scroll;
width: 200px;
height: 200px;
border: 1px solid #000;
}
</style>
</head>
<body>
<div>
我里面有很多很多的文字
我里面有很多很多的文字
我里面有很多很多的文字
我里面有很多很多的文字
我里面有很多很多的文字
我里面有很多很多的文字
我里面有很多很多的文字
我里面有很多很多的文字
我里面有很多很多的文字
我里面有很多很多的文字
我里面有很多很多的文字
我里面有很多很多的文字
我里面有很多很多的文字
我里面有很多很多的文字
我里面有很多很多的文字
</div>
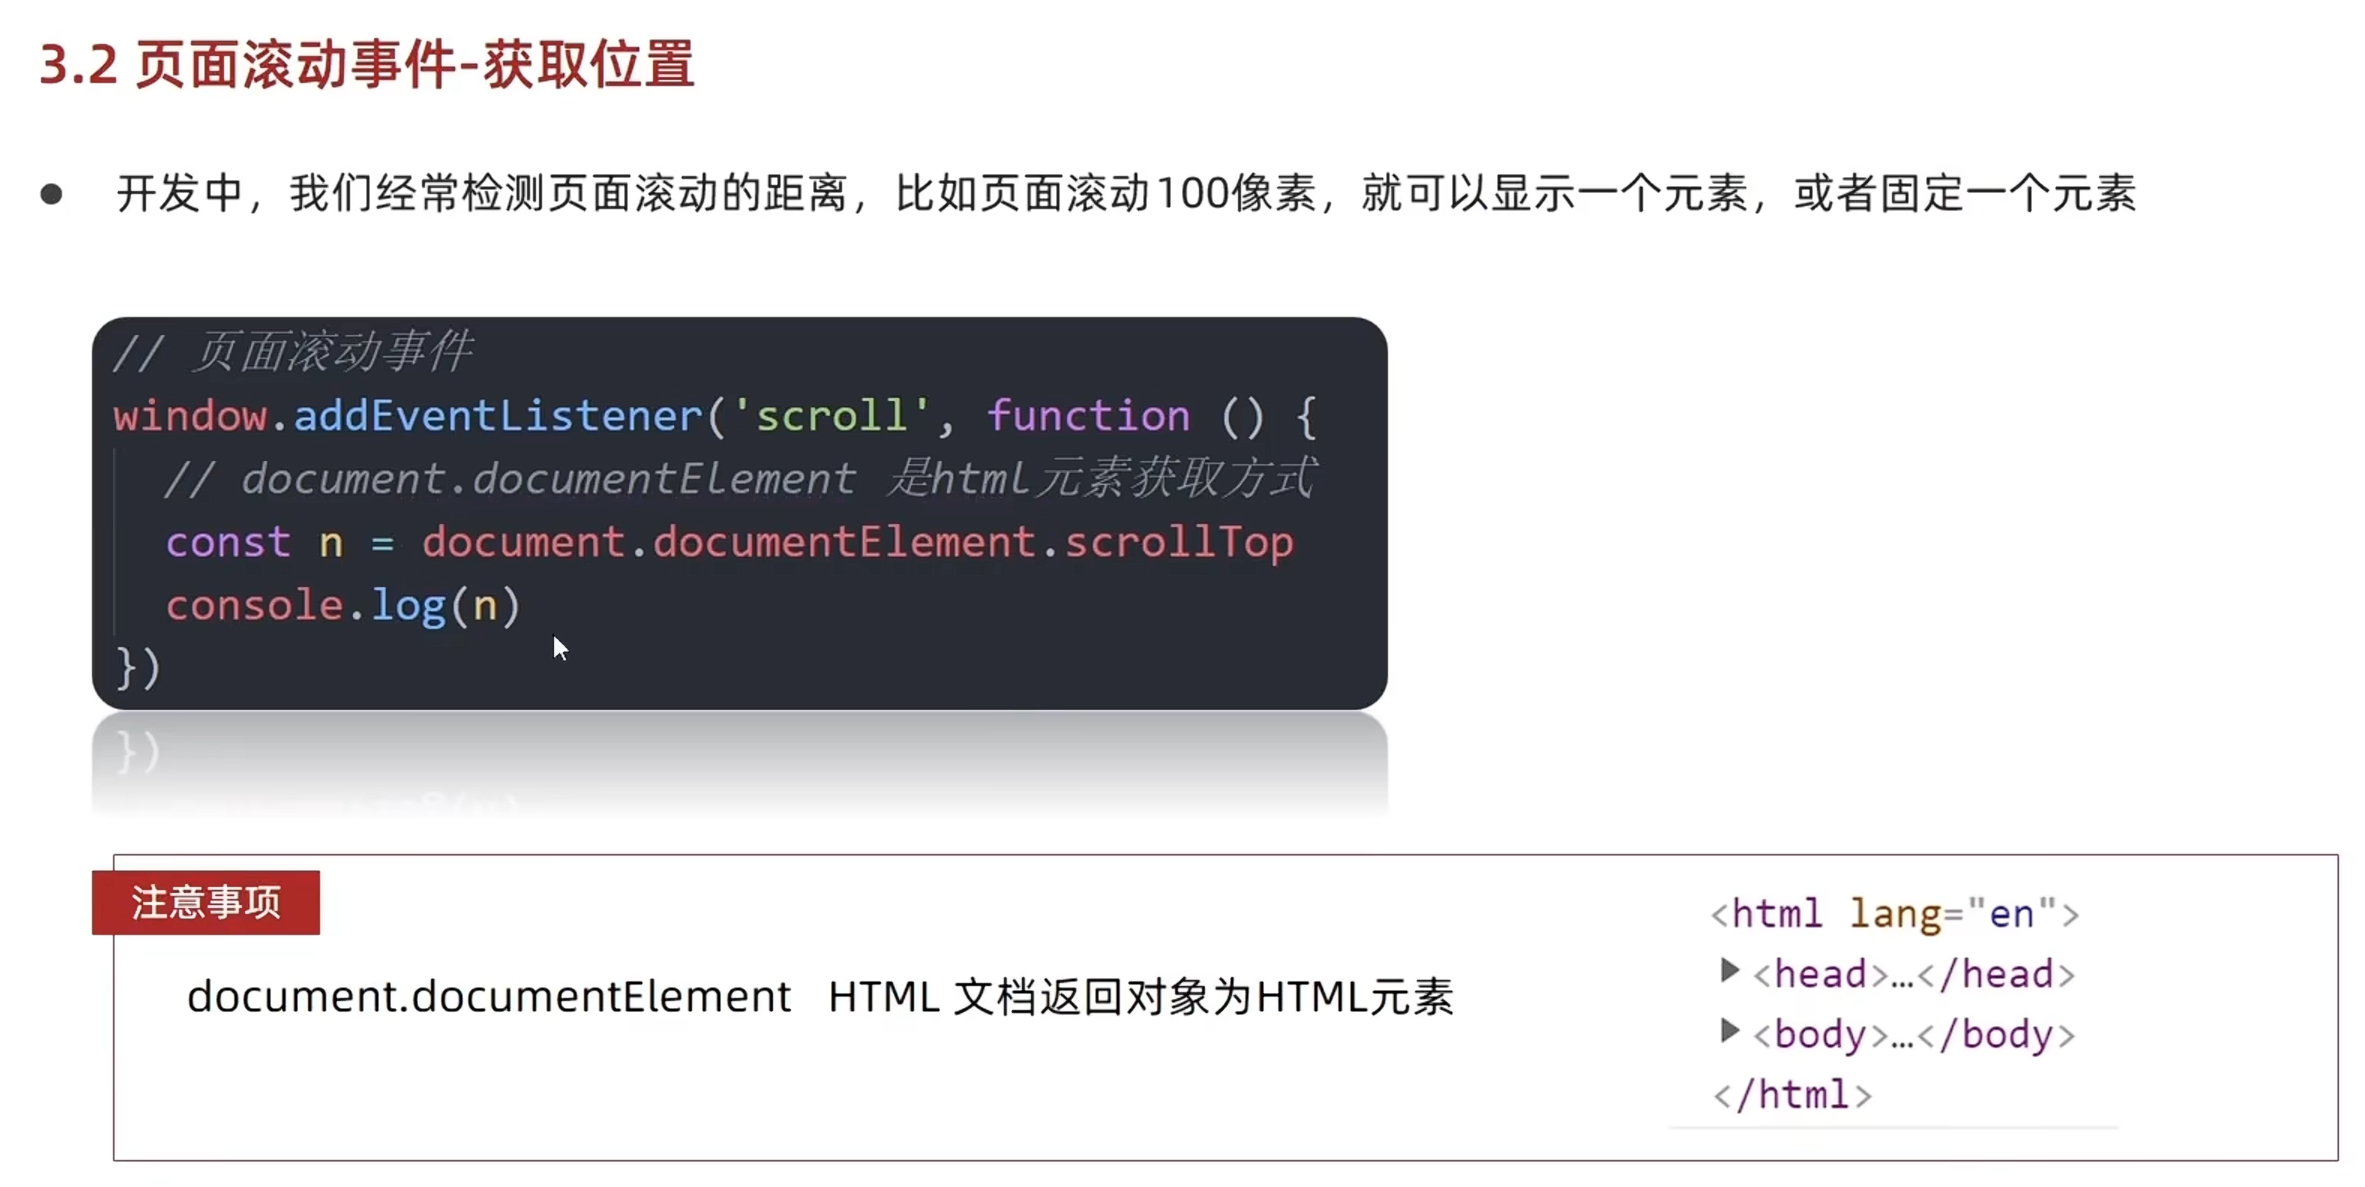
<script>
const div = document.querySelector('div')
// 页面滚动事件
window.addEventListener('scroll',function(){
// console.log('滚动了')
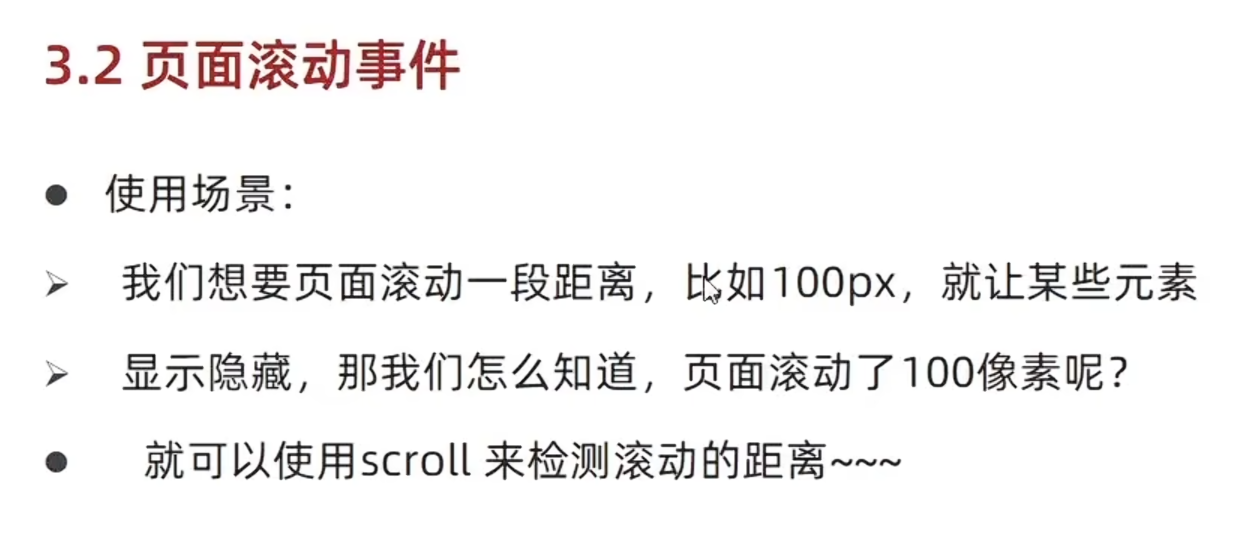
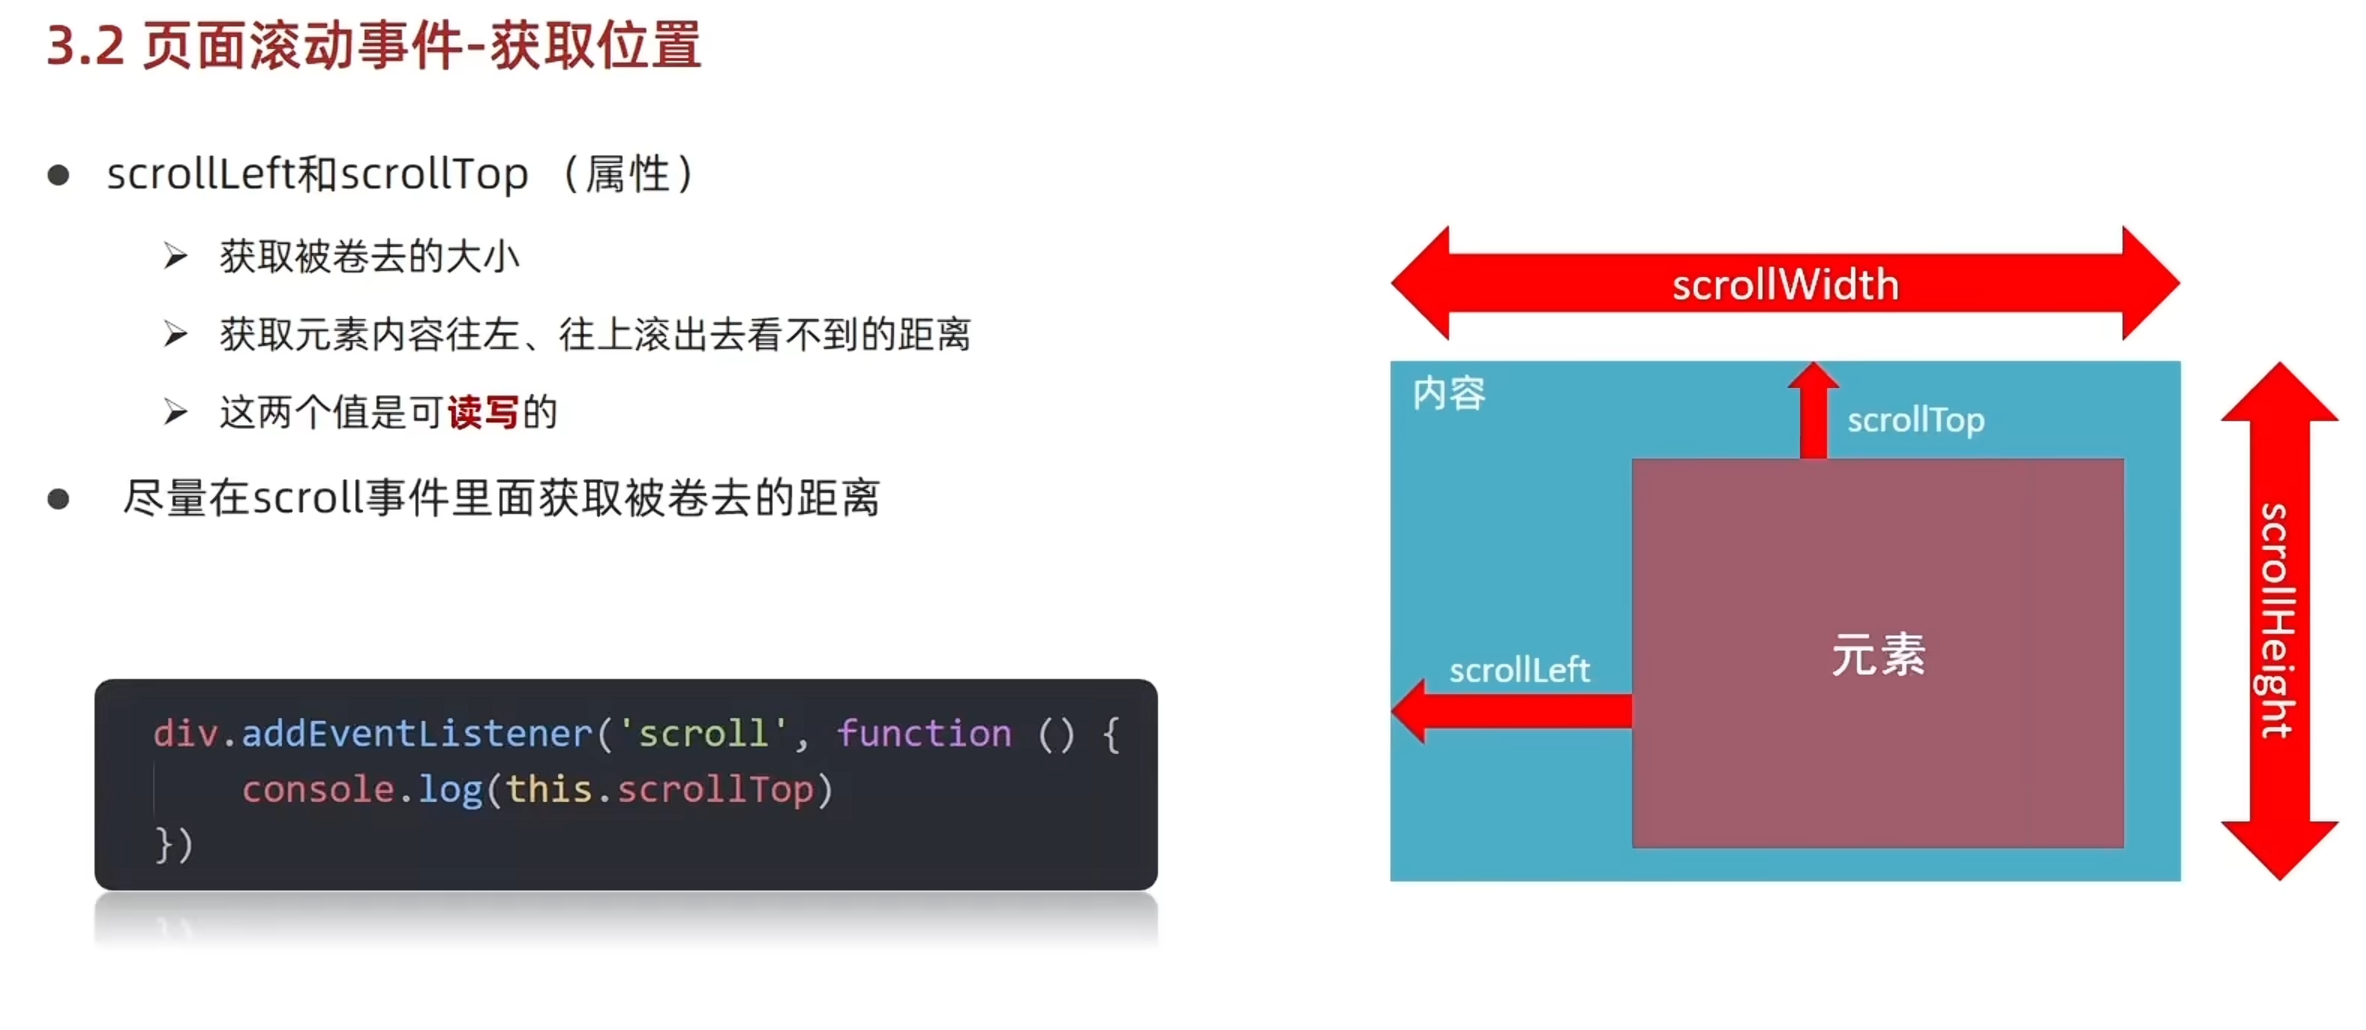
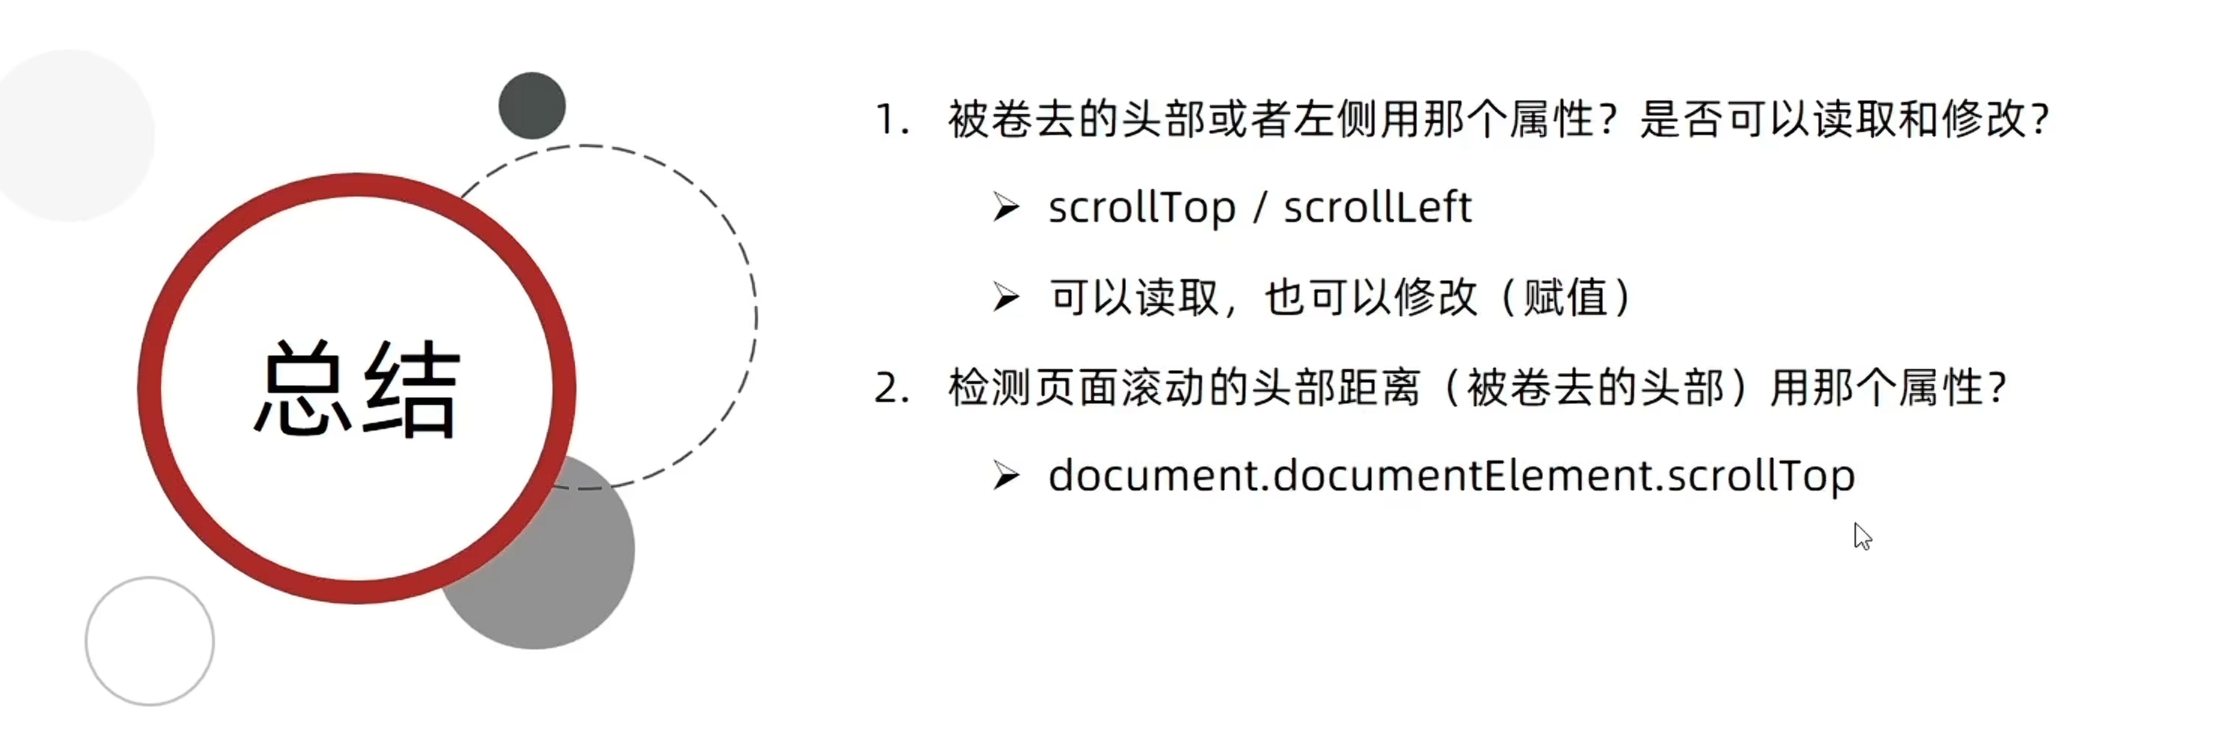
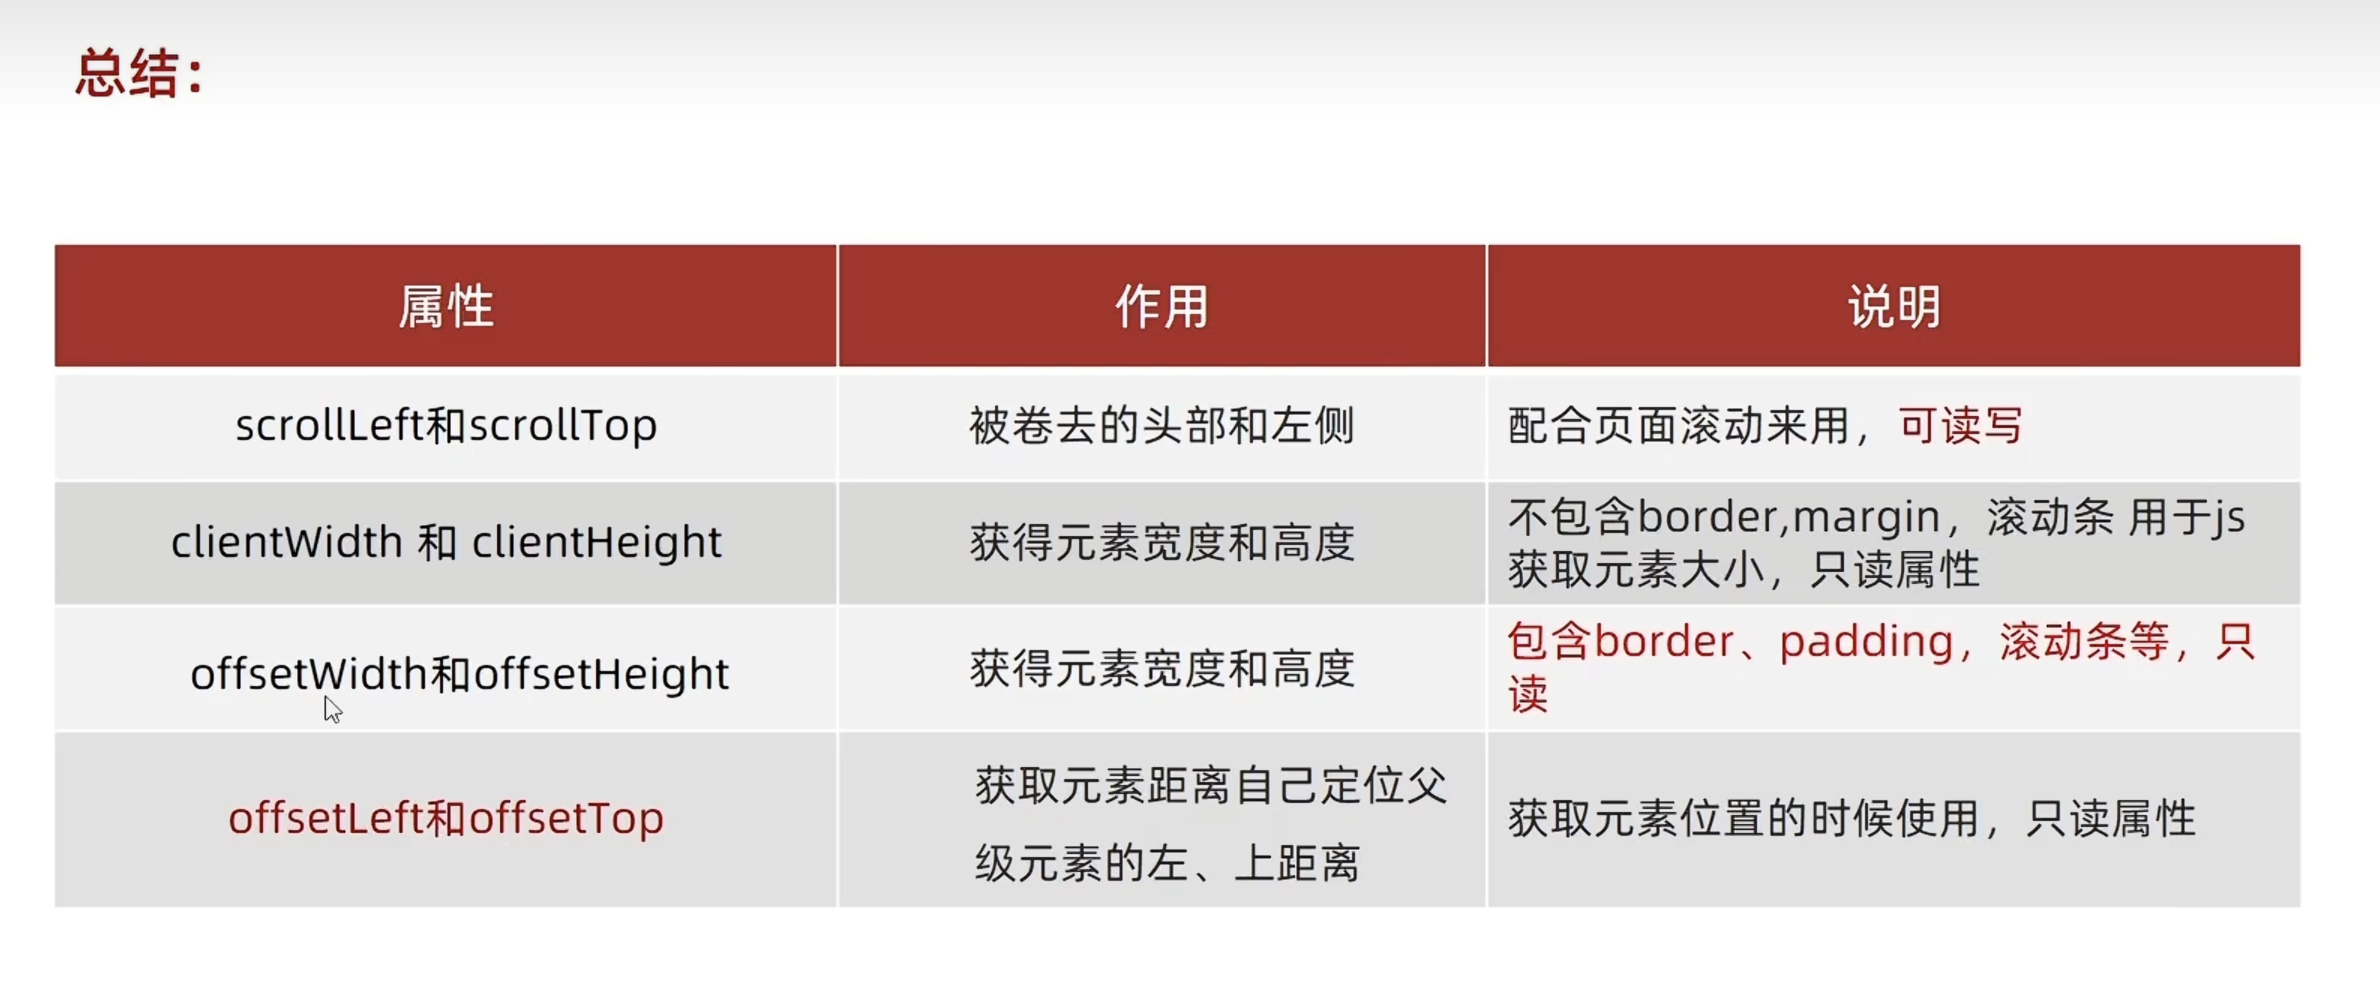
// 想知道页面到底滚动了多少像素,被卷去了多少,scrollTop
// 获取html元素写法 document.documentElement
// console.log(document.documentElement.scrollTop)
const n = document.documentElement.scrollTop
if(n >= 100) {
div.style.display = 'block'
} else {
div.style.display = 'none'
}
})
// const div = document.querySelector('div')
// div.addEventListener('scroll',function(){
// // console.log(111)
// // scrollTop 被卷去的头部
// console.log(div.scrollTop)
// })
</script>
</body>
</html>12、scrollTop细节
html
<!DOCTYPE html>
<html lang="en">
<head>
  <meta charset="UTF-8">
  <meta name="viewport" content="width=device-width, initial-scale=1.0">
  <title>scrollTop细节</title>
  <style>
    body {
      height: 3000px;
    }
  </style>
</head>
<body>
  <script>
    // 3、可以赋初始值,即刚打开时,滚动条不在顶部
    document.documentElement.scrollTop = 800
    window.addEventListener('scroll',function(){
      // 1、必须写到里面
      const n =document.documentElement.scrollTop
      // 2、得到的是什么数据   数字型  不带单位
      // console.log(n)
    })
  </script>
</body>
</html>
13、页面尺寸事件
html
<!DOCTYPE html>
<html lang="en">
<head>
<meta charset="UTF-8">
<meta name="viewport" content="width=device-width, initial-scale=1.0">
<title>页面尺寸事件</title>
<style>
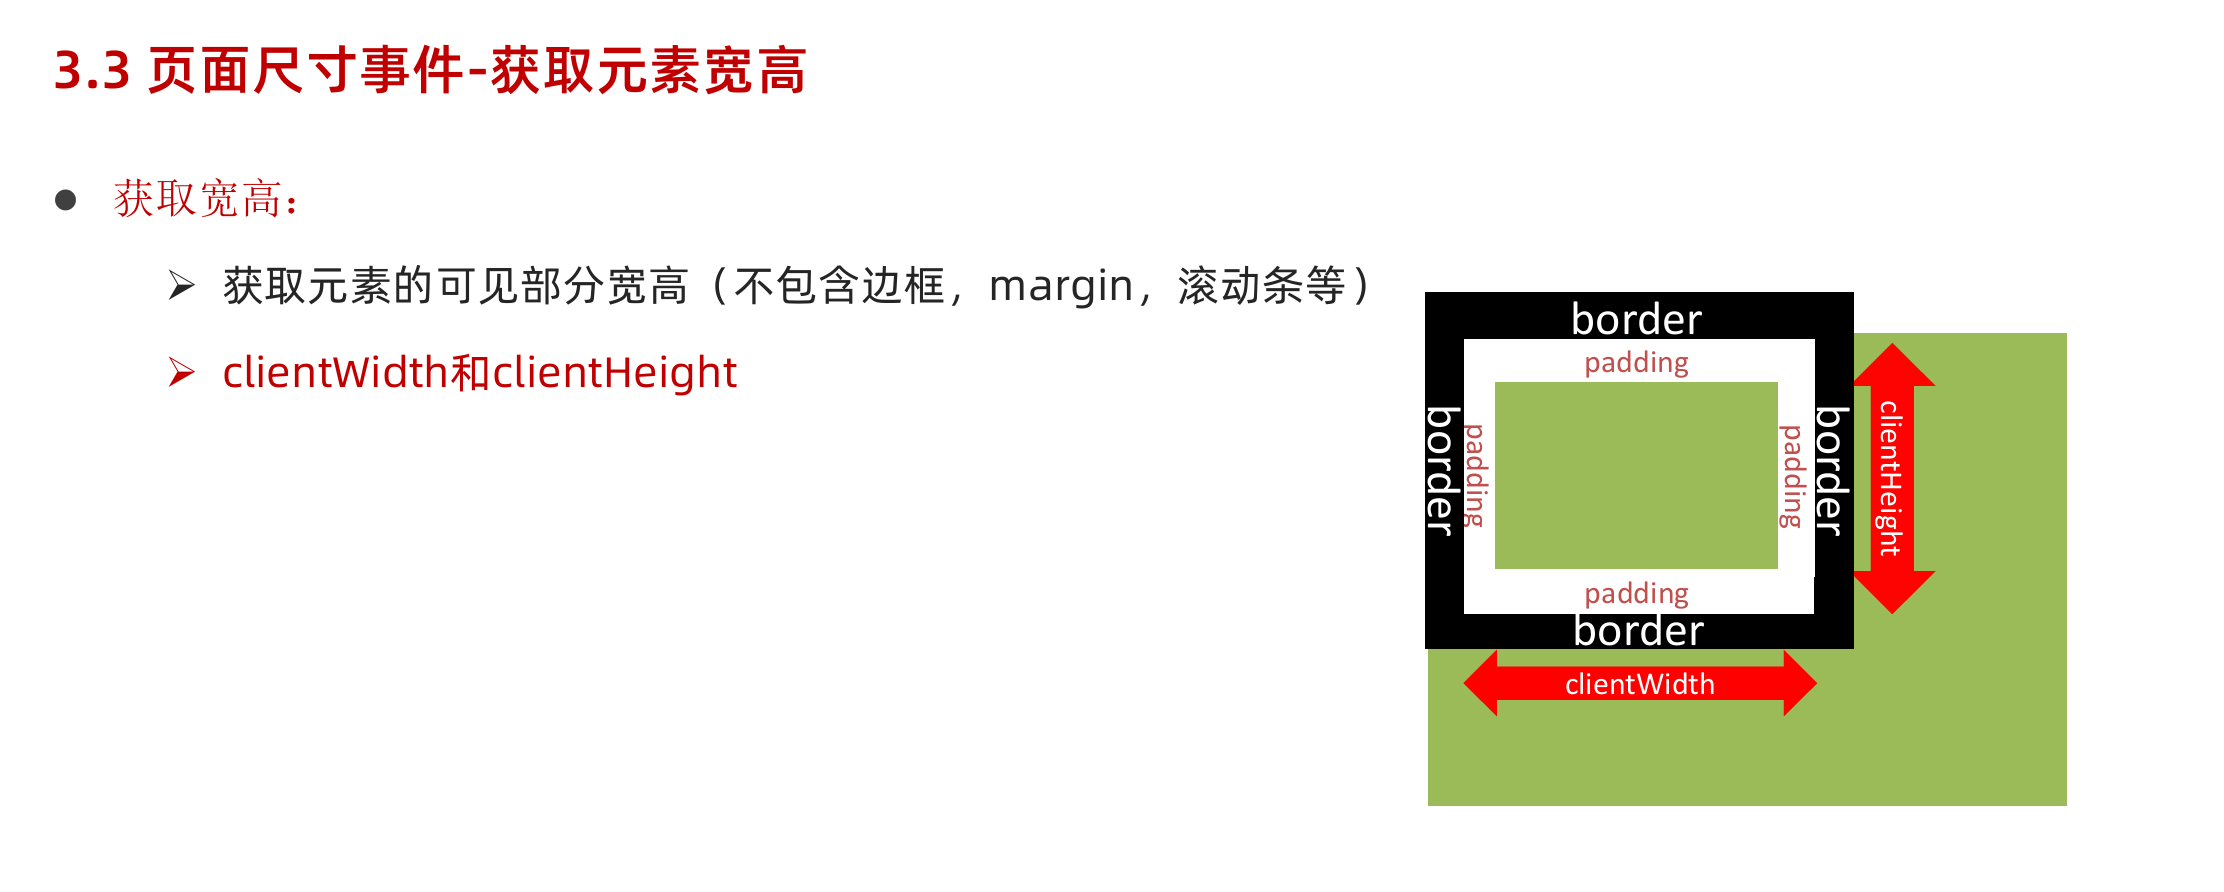
div {
display: inline-block;
/* width: 200px; */
height: 200px;
background-color: pink;
padding: 10px; /* padding 要加到 clientWidth */
border: 20px solid red; /* border 不需要加到 clientWidth */
}
</style>
</head>
<body>
<div>123123123123123123123123123123</div>
<script>
const div = document.querySelector('div')
console.log(div.clientWidth) // 检测盒子宽度
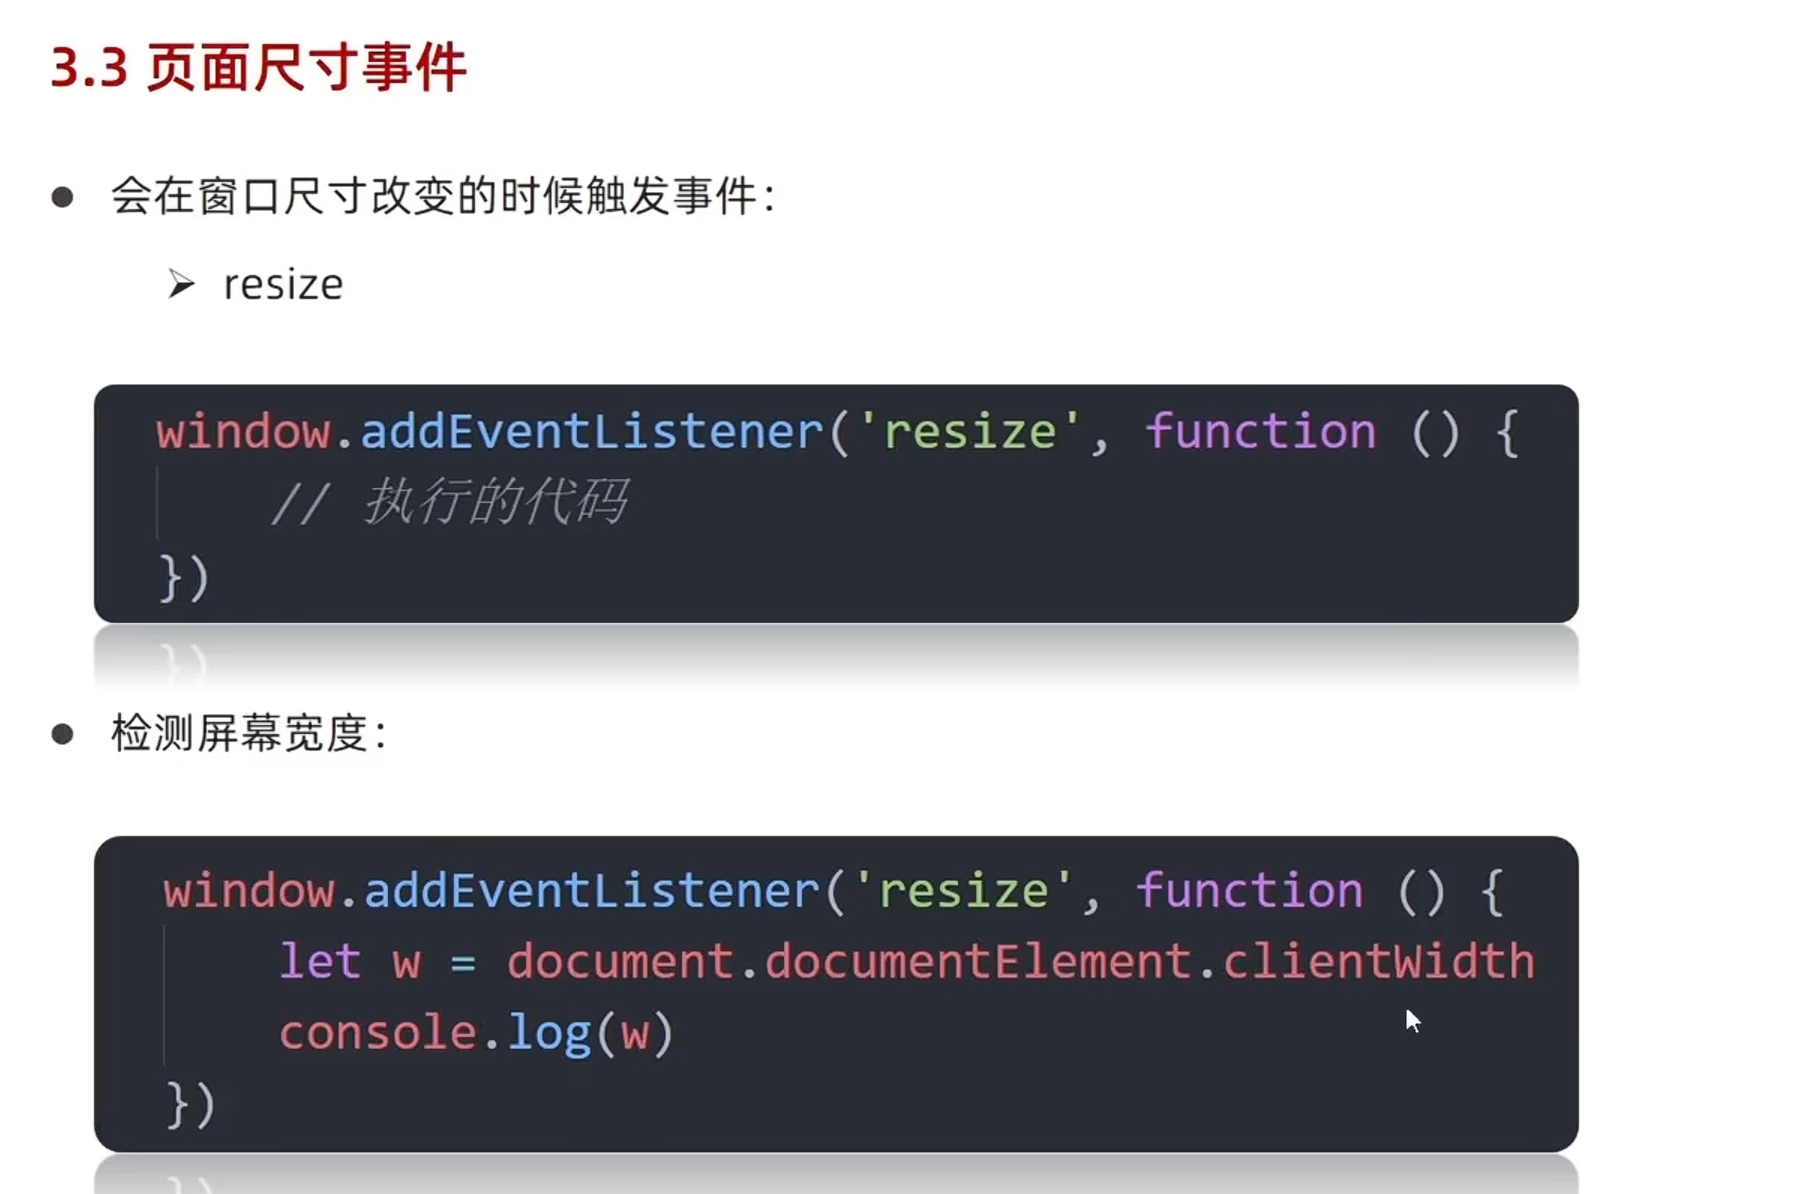
// resize 浏览器窗口大小发生变化的时候触发的事件
window.addEventListener('resize',function(){
console.log(1)
})
</script>
</body>
</html>14、offsetLeft
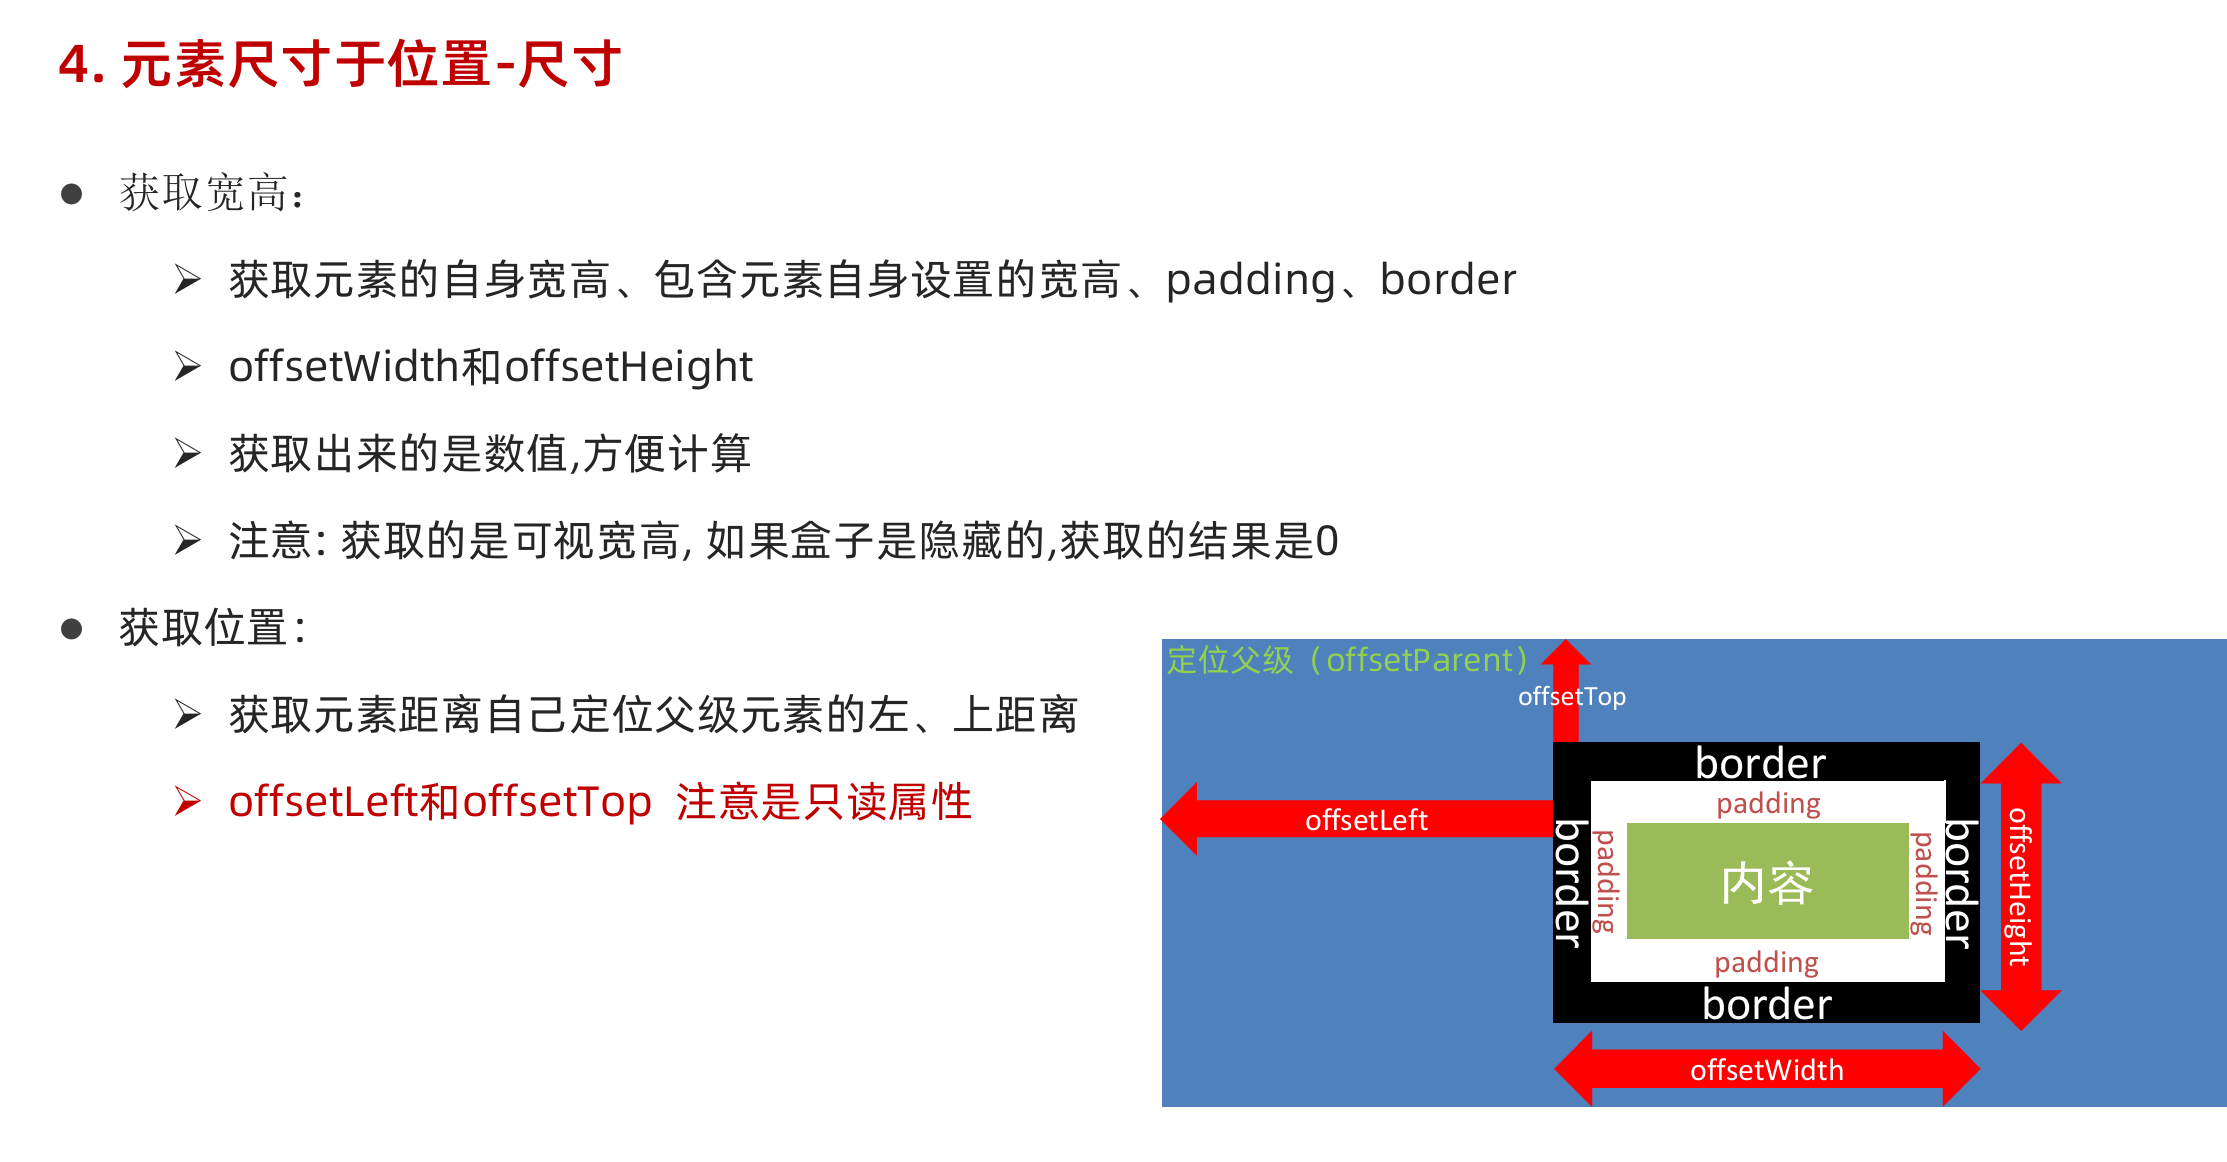
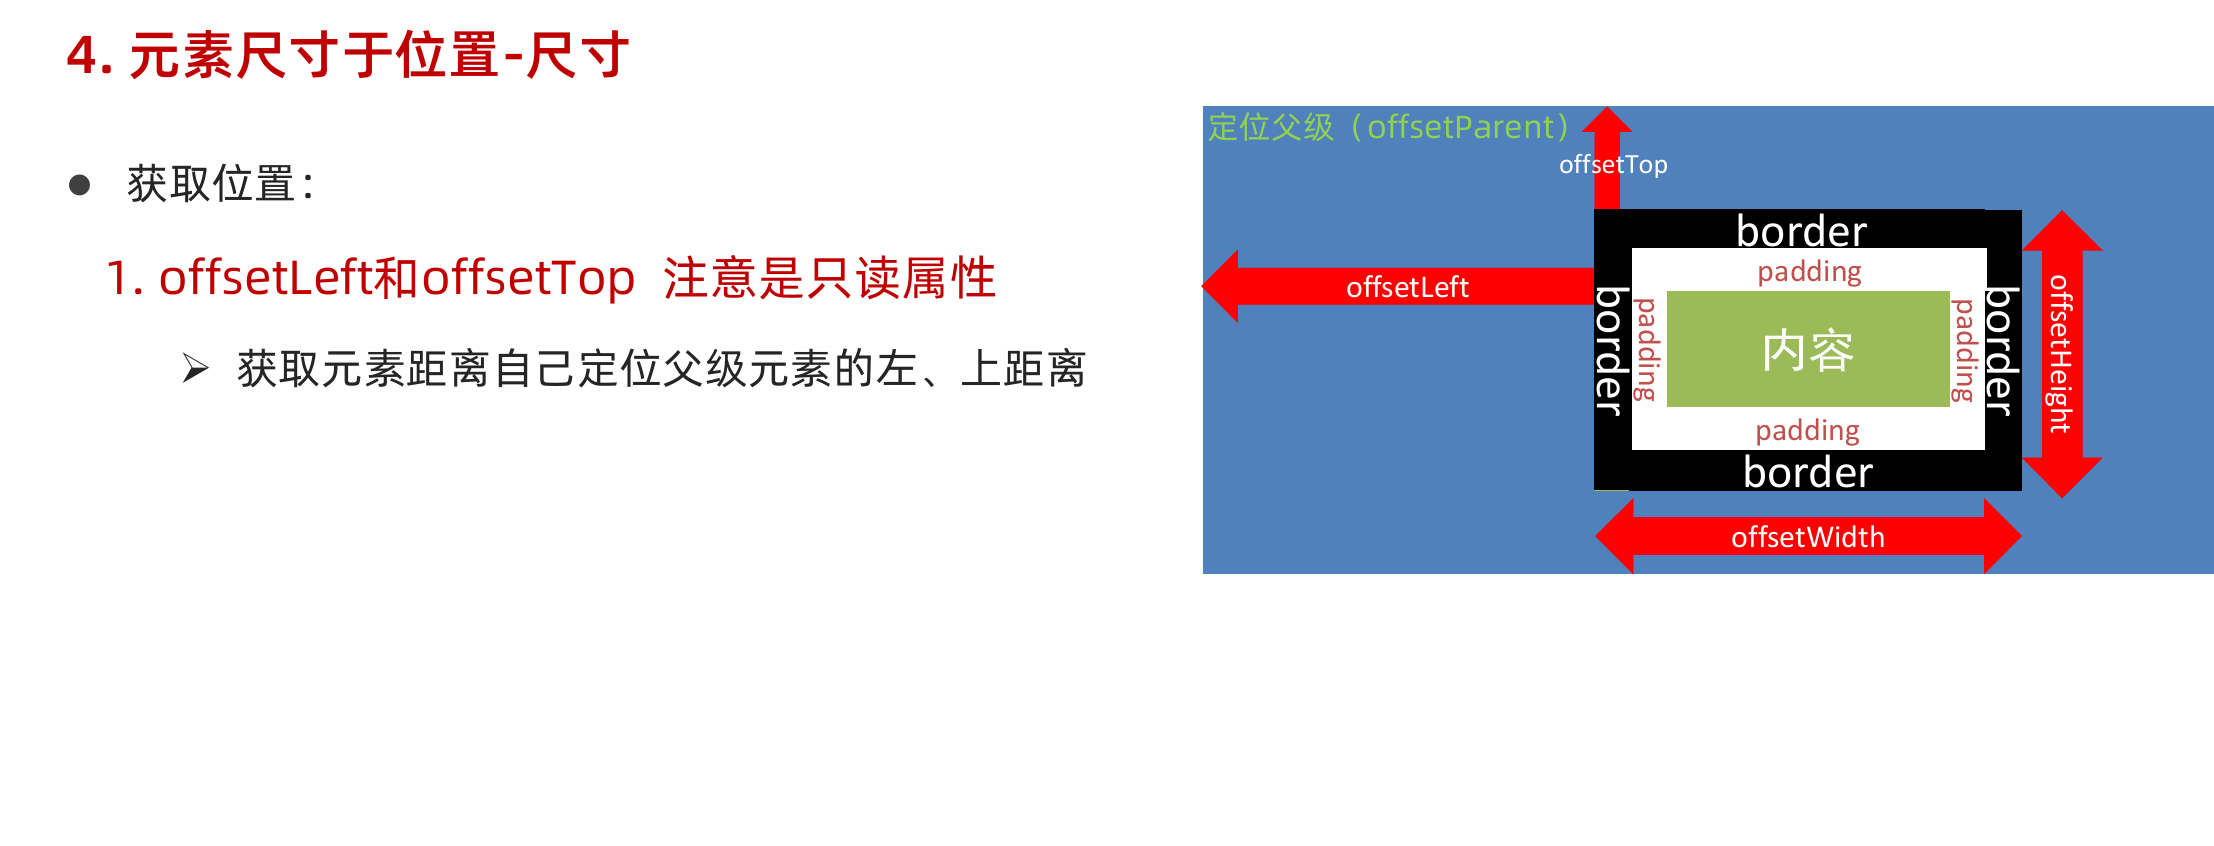
html
<!DOCTYPE html>
<html lang="en">
<head>
  <meta charset="UTF-8">
  <meta name="viewport" content="width=device-width, initial-scale=1.0">
  <title>offsetLeft</title>
  <style>
    div {
      position: relative;
      width: 200px;
      height: 200px;
      background-color: pink;
      margin: 100px;
    }

    p {
      width: 100px;
      height: 100px;
      background-color: purple;
      margin: 50px;
    }
  </style>
</head>
<body>
  <div>
    <p></p>
  </div>
  <script>
    const div = document.querySelector('div')
    const p = document.querySelector('p')
    // console.log(div.offsetLeft)
    // 检测盒子的位置,最近一级带有定位的祖先元素
    console.log(p.offsetLeft)
  </script>
</body>
</html>
15、仿京东固定头部
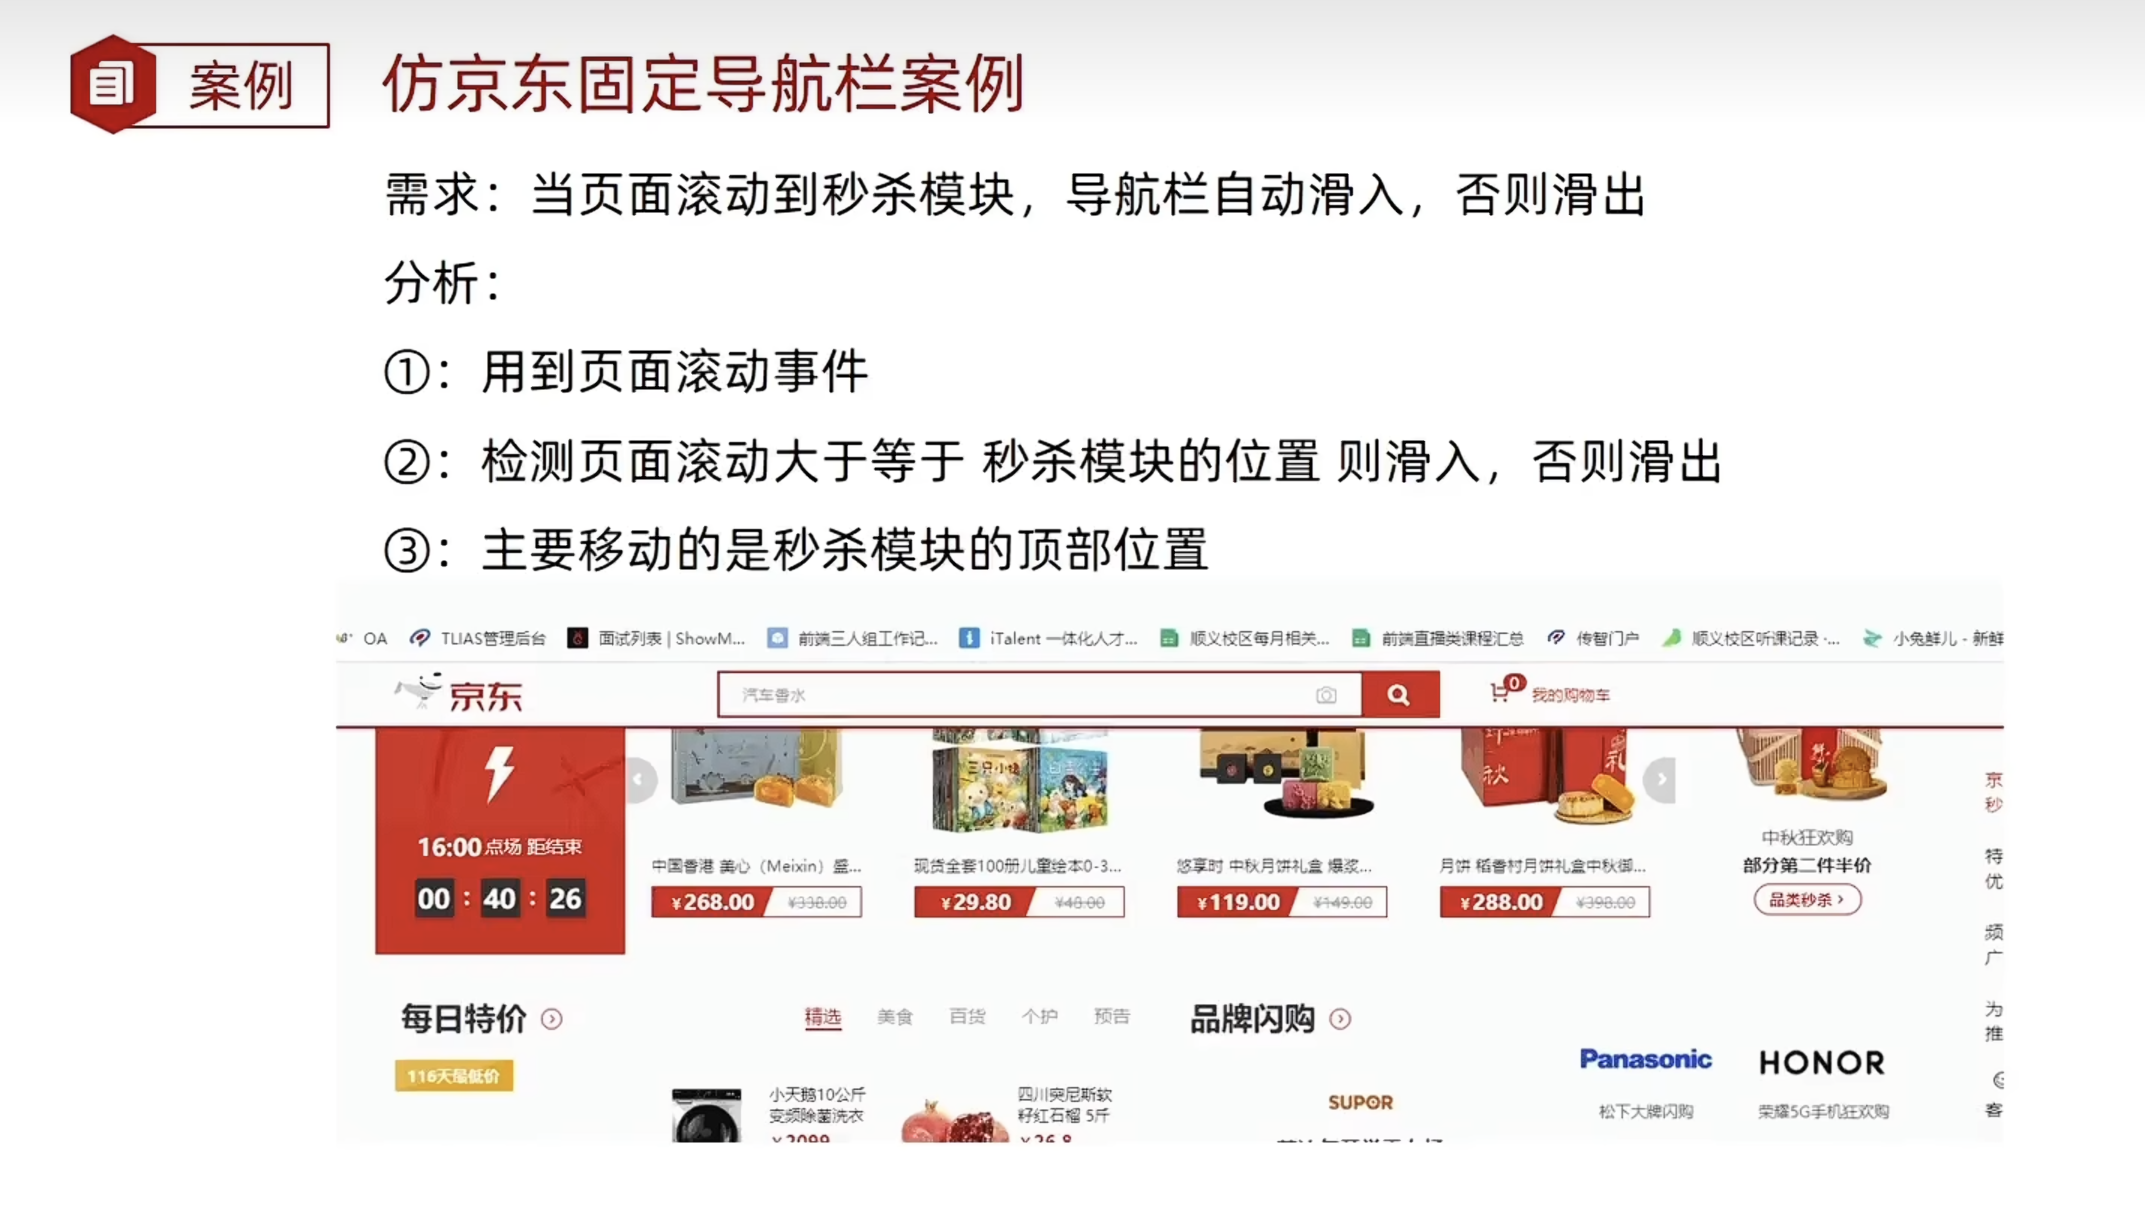
html
<!DOCTYPE html>
<html lang="en">
<head>
<meta charset="UTF-8">
<meta http-equiv="X-UA-Compatible" content="IE=edge">
<meta name="viewport" content="width=device-width, initial-scale=1.0">
<title>仿京东固定头部</title>
<style>
* {
margin: 0;
padding: 0;
box-sizing: border-box;
}
.content {
overflow: hidden;
width: 1000px;
height: 3000px;
background-color: pink;
margin: 0 auto;
}
.backtop {
display: none;
width: 50px;
left: 50%;
margin: 0 0 0 505px;
position: fixed;
bottom: 60px;
z-index: 100;
}
.backtop a {
height: 50px;
width: 50px;
background: url(./images/bg2.png) 0 -600px no-repeat;
opacity: 0.35;
overflow: hidden;
display: block;
text-indent: -999em;
cursor: pointer;
}
.header {
position: fixed;
top: -80px;
left: 0;
width: 100%;
height: 80px;
background-color: purple;
text-align: center;
color: #fff;
line-height: 80px;
font-size: 30px;
transition: all .3s;
}
.sk {
width: 300px;
height: 300px;
background-color: skyblue;
margin-top: 500px;
}
</style>
</head>
<body>
<div class="header">我是顶部导航栏</div>
<div class="content">
<div class="sk">秒杀模块</div>
</div>
<div class="backtop">
<img src="./images/close2.png" alt="">
<a href="javascript:;"></a>
</div>
<script>
const sk = document.querySelector('.sk')
const header = document.querySelector('.header')
// 页面滚动事件
window.addEventListener('scroll',function(){
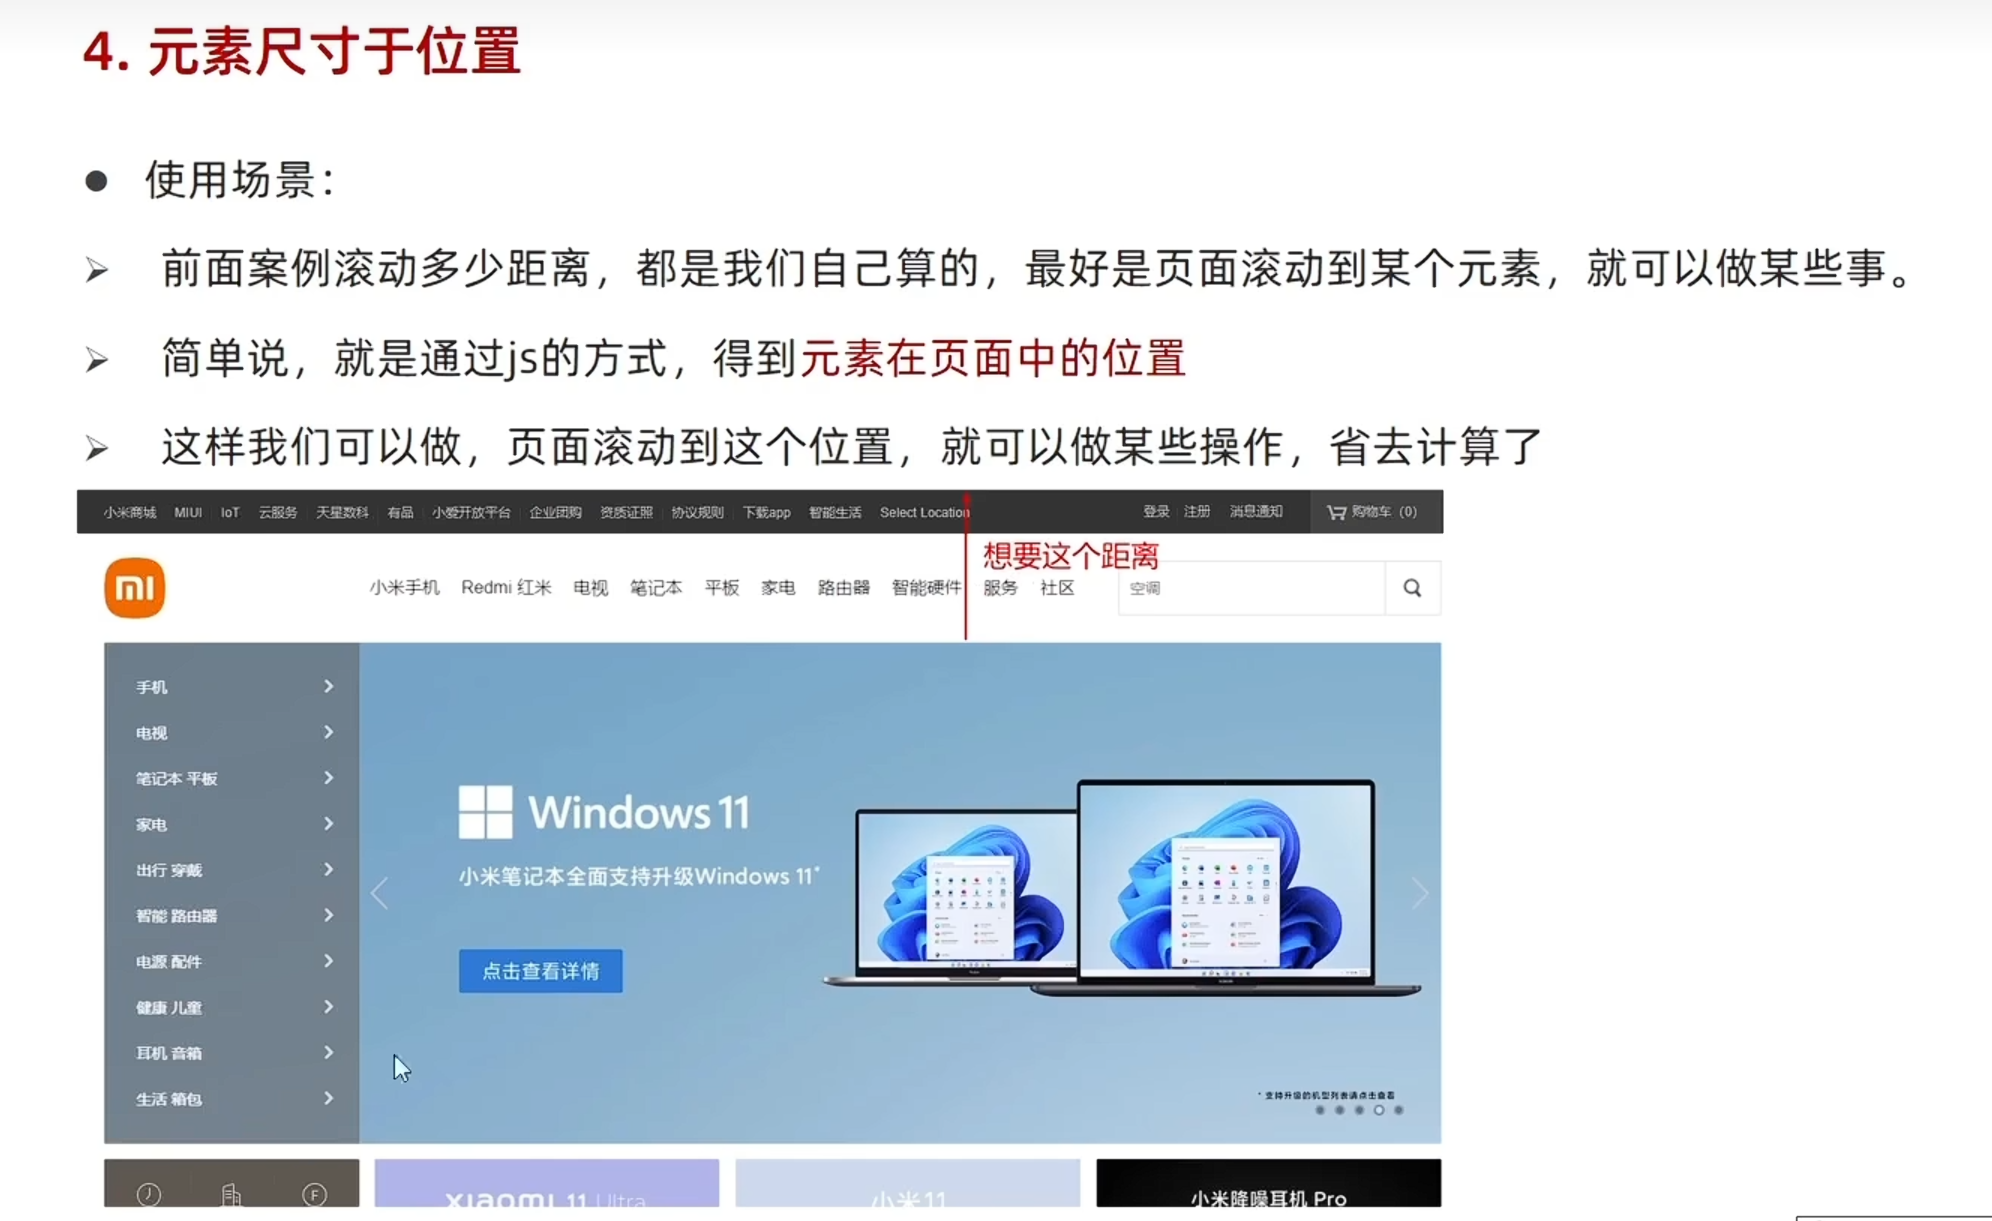
// 当页面滚动到秒杀模块的时候,就改变头部的top值
// 页面被卷去的头部 >= 秒杀模块的位置 offsetTop
const n = document.documentElement.scrollTop
// if(n >= sk.offsetTop) {
// header.style.top = 0
// } else {
// header.style.top = '-80px'
// }
header.style.top = n >= sk.offsetTop ? 0 : '-80px'
})
</script>
</body>
</html>16、获取元素大小位置
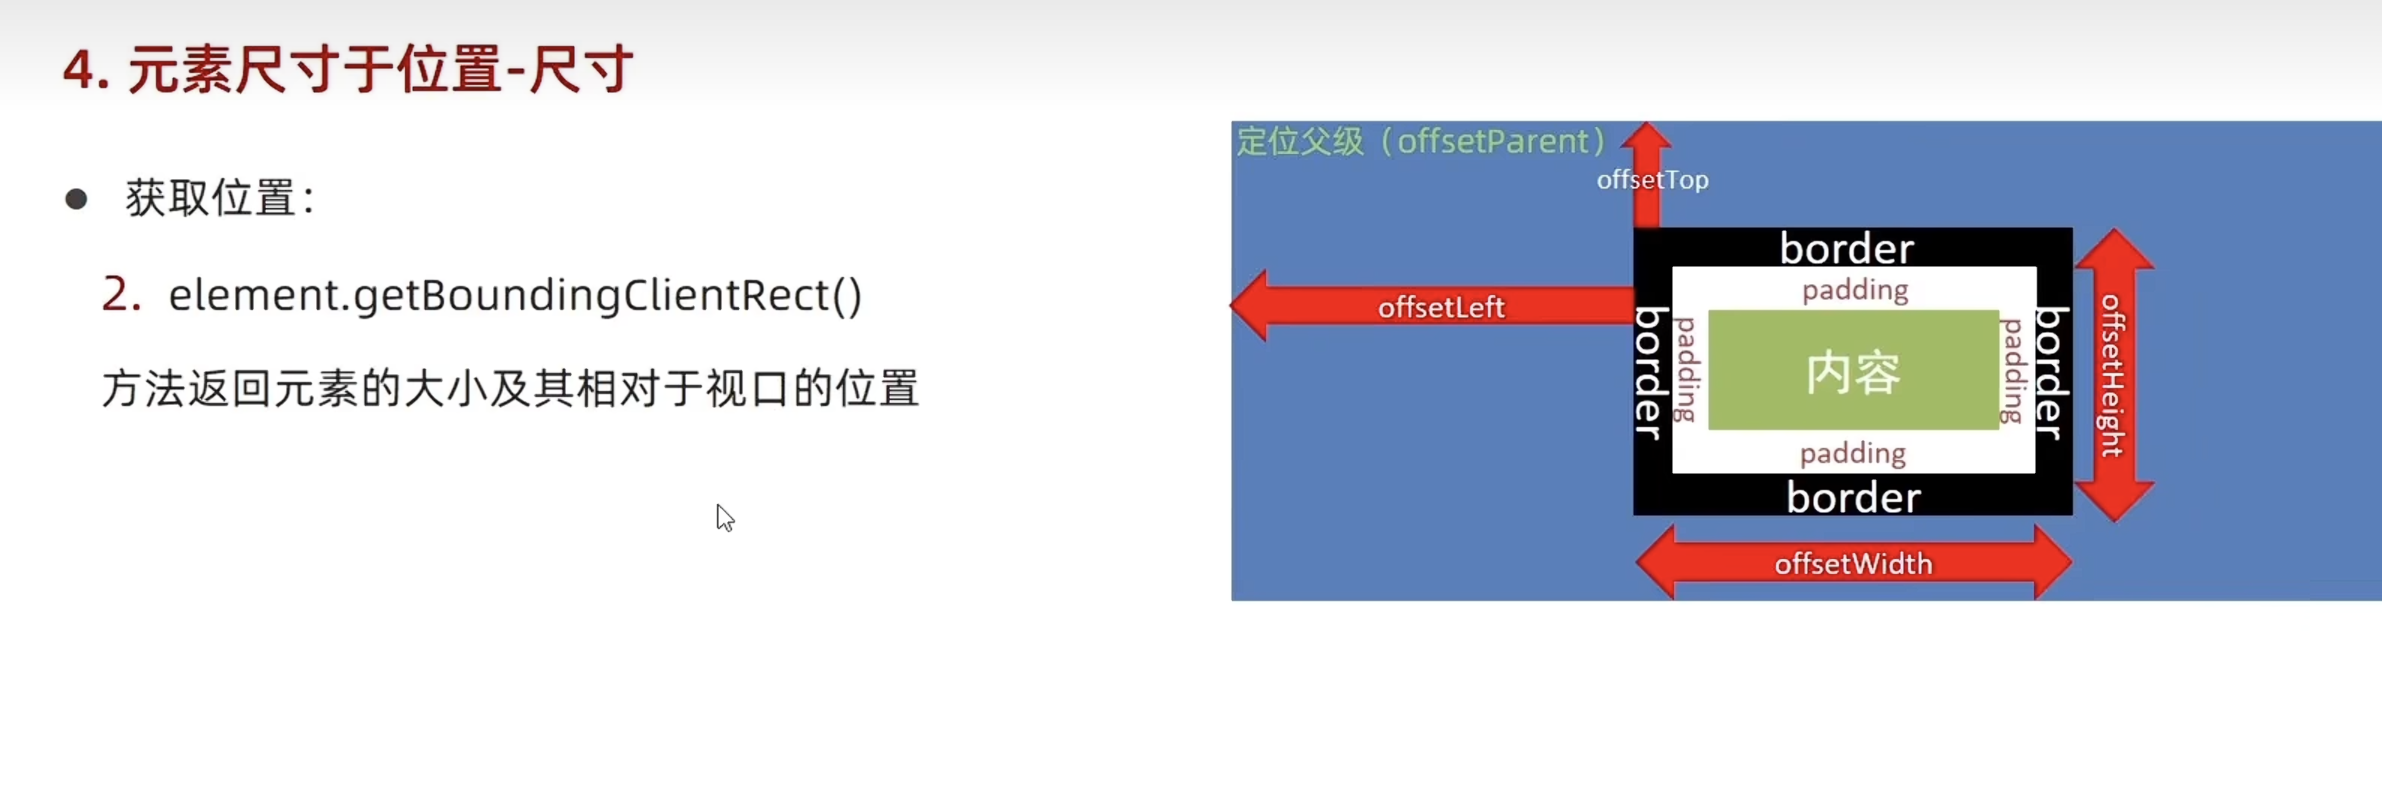
html
<!DOCTYPE html>
<html lang="en">
<head>
  <meta charset="UTF-8">
  <meta name="viewport" content="width=device-width, initial-scale=1.0">
  <title>获取元素大小位置</title>
  <style>
    div {
      width: 200px;
      height: 200px;
      background-color: pink;
      margin: 100px;
    }
  </style>
</head>
<body>
  <div></div>
  <script>
    const div = document.querySelector('div')
    console.log(div.getBoundingClientRect())
  </script>
</body>
</html>
17、属性选择器
html
<!DOCTYPE html>
<html lang="en">
<head>
<meta charset="UTF-8">
<meta http-equiv="X-UA-Compatible" content="IE=edge">
<meta name="viewport" content="width=device-width, initial-scale=1.0">
<title>Document</title>
<style>
/* input[value] {
color: red;
} */
input[type=text] {
color: red;
}
</style>
</head>
<body>
<input type="text" value="123" data-id="0" data-name="andy">
<input type="password">
<script>
const input = document.querySelector('input[value]')
// console.log(input)
console.log(input.dataset) // 自定义属性集合
console.log(input.dataset.name) // 自定义属性集合
</script>
</body>
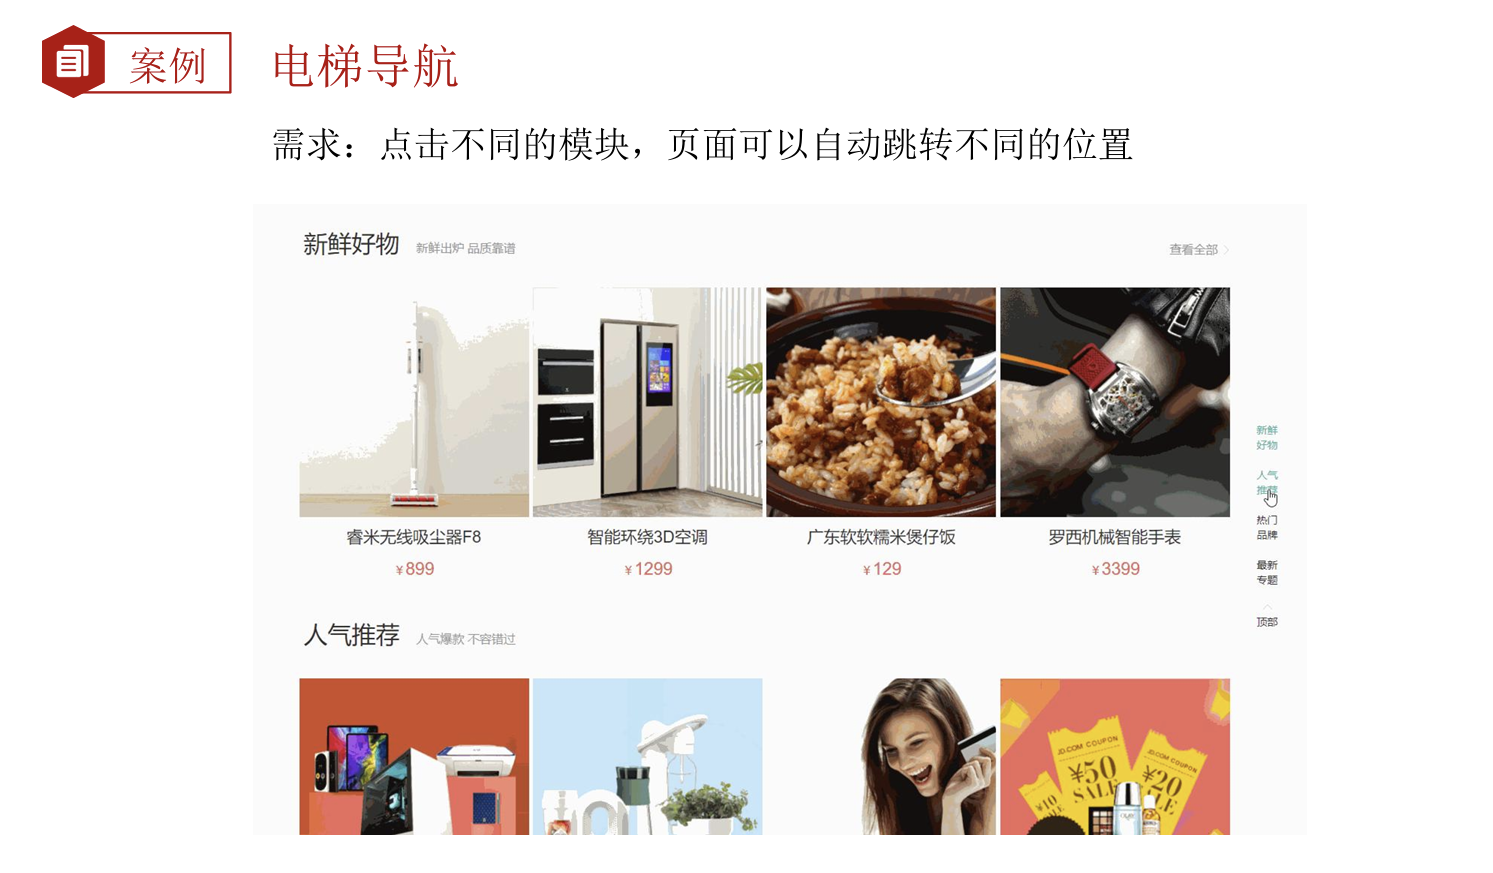
</html>18、综合案例-电梯导航
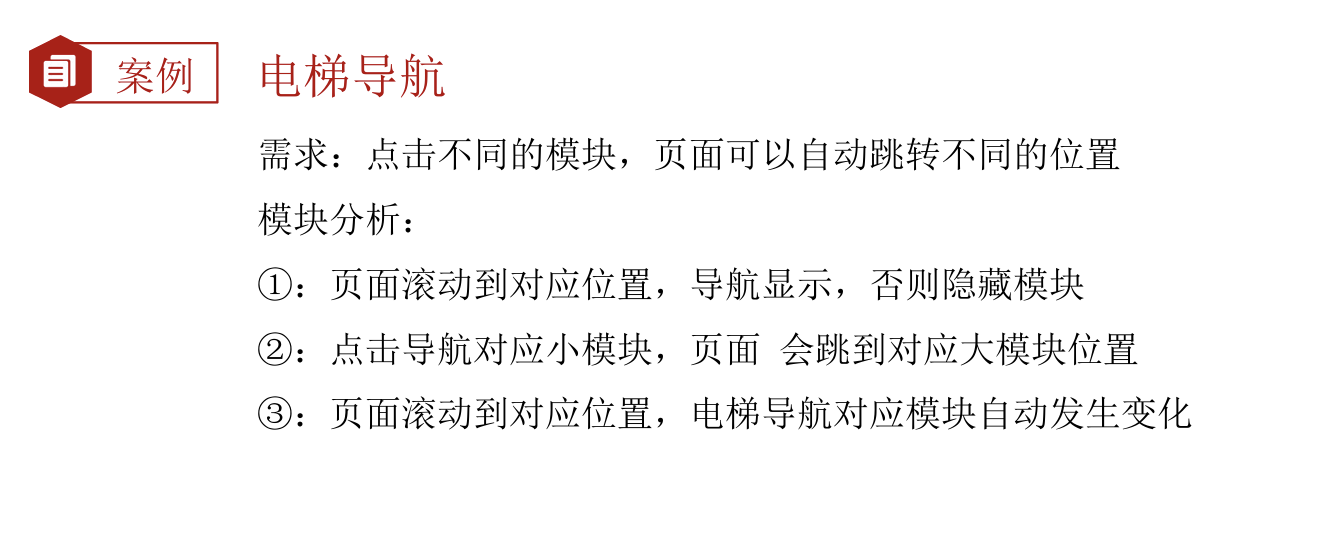
javascript
<script>
    // 第一大模块,页面滑动可以显示和隐藏
    (function(){
      // 获取元素
      const entry = document.querySelector('.xtx_entry')
      const elevator = document.querySelector('.xtx-elevator')
      // 1、当页面滚动大于300像素,就显示电梯导航
      // 2、给页面添加滚动事件
      window.addEventListener('scroll',function(){
        // 被卷去的头部大于300
        const n = document.documentElement.scrollTop
        // if(n >= 300) {
        //   elevator.style.opacity = 1
        // } else{
        //   elevator.style.opacity = 0
        // }
        // elevator.style.opacity = n >= 300 ? 1 : 0
        elevator.style.opacity = n >= entry.offsetTop ? 1 : 0
      })

      // 点击返回页面顶部
      const backTop = document.querySelector('#backTop')
      backTop.addEventListener('click',function(){
        document.documentElement.scrollTop = 0
        // window.scrollTo(x, y)
        // window.scrollTo(0, 0)
      })
    })();

    // 第二大模块和第三大模块都放到另外一个执行函数里面
    (function(){
      // 2、点击页面可以滑动
      const list = document.querySelector('.xtx-elevator-list')
      list.addEventListener('click',function(e){
        // console.log(11)
        if(e.target.tagName === 'A' && e.target.dataset.name){
          // 排他思想
          // 先获取这个active的对象
          const old = document.querySelector('.xtx-elevator-list .active')
          // console.log(old)
          // 判断  如果原来有active类的对象,就移除类,如果开始就没有对象,就不移除,所以不报错
          if(old){
            old.classList.remove('active')
          }
          // 当前元素添加 active
          e.target.classList.add('active')
          // 获得自定义属性  new  topic
          // console.log(e.target.dataset.name)
          // 根据小盒子的自定义属性值  去选择 对应的大盒子
          // console.log(document.querySelector(`.xtx_goods_${e.target.dataset.name}`).offsetTop)
          // 获得对应大盒子的offsetTop
          const top = document.querySelector(`.xtx_goods_${e.target.dataset.name}`).offsetTop
          // 让页面滚动到对应的位置
          document.documentElement.scrollTop = top
        }
      })

      // 3、页面滚动,可以根据大盒子选小盒子,添加active类
      window.addEventListener('scroll',function(){
        // 3.1 先移除类
        // 先获取这个active的对象
        const old = document.querySelector('.xtx-elevator-list .active')
        // console.log(old)
        // 判断  如果原来有active类的对象,就移除类,如果开始就没有对象,就不移除,所以不报错
        if(old){
          old.classList.remove('active')
        }
        // 3.2 判断页面当前滑动的位置,选择小盒子
        // 获取4个大盒子
        const news = document.querySelector('.xtx_goods_new')
        const popular = document.querySelector('.xtx_goods_popular')
        const brand = document.querySelector('.xtx_goods_brand')
        const topic = document.querySelector('.xtx_goods_topic')
        const n = document.documentElement.scrollTop
        if(n >= news.offsetTop && n < popular.offsetTop){
          document.querySelector('[data-name=new]').classList.add('active')
        }else if(n >= popular.offsetTop && n < brand.offsetTop){
          document.querySelector('[data-name=popular]').classList.add('active')
        }else if(n >= brand.offsetTop && n < topic.offsetTop){
          document.querySelector('[data-name=brand]').classList.add('active')
        }else if(n >= topic.offsetTop){
          document.querySelector('[data-name=topic]').classList.add('active')
        }
      })
    })();
  </script>