前言
在之前的文章中,已经较为详细地探讨了Qt中线程的使用和线程间的通信,但对于多进程,我一直了解得比较浅薄。在早起学习Linux的时候,就有一堆让人容易混淆的进程间通信方式,什么有名管道无名管道、信号和信号量、共享内存、socket套接字什么的,当时也只是简单跟着教程跑了一遍,其实也一知半解的。最近找工作时,突然被问了一下对多进程有多少了解,我当时只回答了:"我在调用打开另一个exe的时候,我用了tcp的方式和它连接和通信",面试官说是本地socket吗,我说应该是吧,他又问除此之外还知道哪些?我尴尬摇头......显然,这样的回答实在是差强人意。
于是,我也打算"稍微"深入了解和实践一下多进程相关的东西,起码下一次被人问到,就能给出一个合格的回答。当然,多进程的通信方式有很多,特别是在不同架构系统下的方式都不大一样,我也不可能一下子全部都掌握。我的当前开发环境是Windows下的Qt6.10,之后的尝试都是基于这个环境下进行。
一、IPC通信方式
IPC,即Inter-Process Communication,也被称为进程间通信,是指在操作系统中,不同进程之间进行数据交换和信息共享的一种技术或机制。此后多进程这个概念,我可能会用IPC来指代。
正式开始之前,我尝试让AI帮忙总结推荐一下,得到了以下回答:
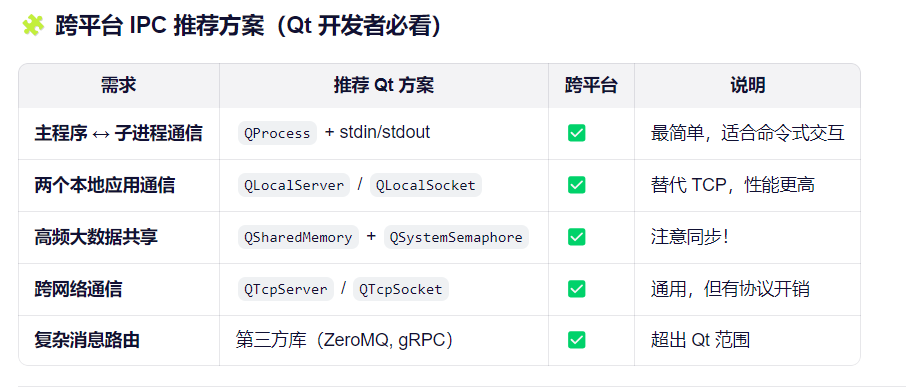
这里说的其实也不太全面,但前四种都还蛮常见的,适合深入学习一下的。
我打算后续每一种方式都用单独的一篇文章来记录。
二、测试工程的搭建
多进程,顾名思义需要双开两个exe,比如一个当服务端,一个当客户端。但考虑到开发测试的复杂程度,我决定还是将所有功能整合在同一个测试工程里面,命名为IPCTest。也就是说,实际测试的时候,需要打开两次IPCTest.exe。
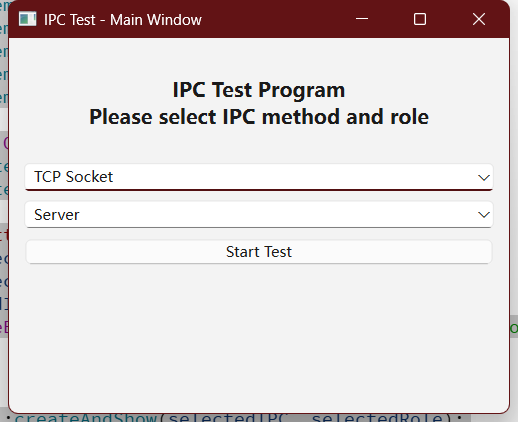
因此,这个工程不仅要整合所有通信方式,还要支持服务端客户端的选择,因此我在主界面中用下拉选择框的方式供用户选择:
dart
#ifndef MAINWINDOW_H
#define MAINWINDOW_H

#include <QWidget>
#include <QVBoxLayout>
#include <QHBoxLayout>
#include <QGridLayout>
#include <QLabel>
#include <QPushButton>
#include <QComboBox>
#include <QDialog>

class MainWindow : public QWidget
{
    Q_OBJECT

public:
    explicit MainWindow(QWidget *parent = nullptr);

private:
    void setupUI();

    QVBoxLayout *mainLayout;
    QLabel *titleLabel;
    QPushButton *startButton;

    QComboBox *ipcCombo;
    QComboBox *roleCombo;
};

#endif // MAINWINDOW_H
dart
#include "mainwindow.h"
#include "ipcselector.h"
#include <QApplication>
#include <QMessageBox>

MainWindow::MainWindow(QWidget *parent)
    : QWidget(parent)
{
    setWindowTitle("IPC Test - Main Window");
    resize(400, 300);

    setupUI();
}

void MainWindow::setupUI()
{
    mainLayout = new QVBoxLayout(this);

    titleLabel = new QLabel("IPC Test Program\nPlease select IPC method and role");
    titleLabel->setAlignment(Qt::AlignCenter);
    titleLabel->setStyleSheet("font-size: 16px; font-weight: bold; margin: 20px;");

    startButton = new QPushButton("Start Test");

    ipcCombo = new QComboBox();
    ipcCombo->addItem("TCP Socket");
    ipcCombo->addItem("Local Socket");
    ipcCombo->addItem("Shared Memory");
    ipcCombo->addItem("File Queue");
    ipcCombo->addItem("Memory Map");
    ipcCombo->addItem("UDP Socket");
    ipcCombo->addItem("Stdio");

    roleCombo = new QComboBox();
    roleCombo->addItem("Server");
    roleCombo->addItem("Client");

    connect(startButton, &QPushButton::clicked, this, [this]() {
        QString selectedIPC = ipcCombo->currentText();
        QString selectedRole = roleCombo->currentText();
        if (selectedIPC.isEmpty() || selectedRole.isEmpty()) {
            QMessageBox::warning(this, "Warning", "Please select both IPC method and role!");
            return;
        }

        IPCSelector::createAndShow(selectedIPC, selectedRole);
        this->close();
    });

    mainLayout->addWidget(titleLabel);
    mainLayout->addWidget(ipcCombo);
    mainLayout->addWidget(roleCombo);
    mainLayout->addWidget(startButton);
    mainLayout->addStretch();
}
运行时大概是这样子的:
点击开始后,会根据当前的选择,动态创建不同IPC通信方式对应的界面类:
dart
#ifndef IPCSELECTOR_H
#define IPCSELECTOR_H

#include <QString>
#include <QWidget>

class IPCSelector
{
public:
    static QWidget* createAndShow(const QString &ipcType, const QString &role);
};

#endif // IPCSELECTOR_H
dart
#include <QMessageBox>
#include "ipcselector.h"
#include "tcpwindow.h"
#include "localsocketwindow.h"
#include "sharedmemorywindow.h"
#include "filequeuewindow.h"
#include "memorymapwindow.h"
#include "udpwindow.h"
#include "stdiowindow.h"

QWidget* IPCSelector::createAndShow(const QString &ipcType, const QString &role)
{
    QWidget *window = nullptr;

    if (ipcType == "TCP Socket") {
        window = new TCPWindow(role);
    } else if (ipcType == "Local Socket") {
        window = new LocalSocketWindow(role);
    } else if (ipcType == "Shared Memory") {
        window = new SharedMemoryWindow(role);
    } else if (ipcType == "File Queue") {
        window = new FileQueueWindow(role);
    } else if (ipcType == "Memory Map") {
        window = new MemoryMapWindow(role);
    } else if (ipcType == "UDP Socket") {
        window = new UDPWindow(role);
    } else if (ipcType == "Stdio") {
        window = new StdioWindow(role);
    } else {
        QMessageBox::warning(nullptr, "Error", "Unknown IPC type: " + ipcType);
        return nullptr;
    }

    if (window) {
        window->show();
    }

    return window;
}
这种方式类似于工厂模式,能够很好地兼容后续的扩展,也具有良好的代码维护性。
三、总结
初步搭建好工程后,就可以进入后续的每一种方式的单独测试了。
希望能好好记录,完全掌握IPC的使用。