核心目标
本指南专为Java工程师设计,通过使用Python构建MCP(Model Context Protocol)服务器这一实际项目,系统讲解Python语法要点。我们将采用"结果导向"模式:先展示完整代码,再逐行解析Python语法特性,并与Java进行对比,帮助您快速建立Python语法体系认知。
代码实现
1. 创建项目
作为Java工程师,我们熟悉Maven的项目管理和依赖控制。在Python世界中,我们需要适应类似的工具。
python
# 安装uv(Python包管理工具,类似Maven/Gradle)
curl -LsSf https://astral.sh/uv/install.sh | sh
# PowerShell 安装
irm https://astral.sh/uv/install.ps1 | iex
# pip 安装(适合已装 Python 的环境)
pip install uv
# ======== 以上3种任选其一 ========

# 创建项目目录
uv init weather-service
cd weather-service

# 创建虚拟环境(类似Maven的依赖隔离)
uv venv
# Windows下使用: .venv\Scripts\activate
source .venv/bin/activate

# 安装依赖(类似在pom.xml中添加依赖)
uv add mcp[cli] httpx

# PowerShell Create our server file
new-item weather.py
项目结构:
python
weather-service/
├── pyproject.toml      # 项目配置文件,类似pom.xml
├── .gitignore
├── README.md
├── uv.lock
└── weather.py   # 我们的主程序文件
1. 导入必要的包和设置服务器
python
from typing import Any
import httpx
from mcp.server.fastmcp import FastMCP

# 初始化MCP服务器
mcp = FastMCP("weather")

# 常量定义
NWS_API_BASE = "https://api.weather.gov"
USER_AGENT = "weather-app/1.0"Java工程师注释:
from typing import Any:Python 3.5+的类型提示系统,等效于Java的泛型声明。在Java中,我们使用Object来表示"任何类型",而Python的Any是类似的概念,但用于类型提示系统(不是强制类型检查);import httpx:模块导入语法,类似Java的import语句;httpx 是 Python的HTTP客户端库,类似于Java的OkHttp;from mcp.server.fastmcp import FastMCP:模块导入语法,从包中导入具体类;mcp = FastMCP("weather"):类实例化语法,与Java的Fast mcp = new FastMCP("weather")关键字功能相同;mcp变量声明无需类型注解,但可选类型提示(如mcp: FastMCP = ...)增强可读性。NWS_API_BASE和USER_AGENT:常量定义,类似于 Java 中的 public static final
2. 创建辅助函数
python
async def make_nws_request(url: str) -> dict[str, Any] | None:
    """
    使用适当的错误处理向NWS API发送请求。
    """
    headers = {
        "User-Agent": USER_AGENT,
        "Accept": "application/geo+json"
    }
    async with httpx.AsyncClient() as client:
        try:
            response = await client.get(url, headers=headers, timeout=30.0)
            response.raise_for_status()
            return response.json()
        except Exception:
            return None

def format_alert(feature: dict) -> str:
    """
    将警报特征格式化为可读字符串。
    """
    props = feature["properties"]
    return f"""
Event: {props.get("event", "Unknown")}
Area: {props.get("areaDesc", "Unknown")}
Severity: {props.get("severity", "Unknown")}
Description: {props.get("description", "No description available")}
Instructions: {props.get("instruction", "No specific instructions provided")}
"""Java工程师注释:
async def make_nws_request(...):Python的异步函数,类似Java中的CompletableFuture或async/await,用于非阻塞I/O操作async with httpx.AsyncClient() as client:使用异步HTTP客户端,类似于Java中使用AsyncHttpClient或WebClient进行异步请求response.raise_for_status():如果HTTP状态码不是2xx,会抛出异常,类似Java中使用ResponseEntity检查状态码props.get('event', 'Unknown'):安全获取字典值,类似Java中使用Map.getOrDefault,避免NullPointerExceptionf"""...""":Python的f-string,类似Java的字符串模板,但更简洁await:等待异步结果,类似Java的future.get()但更简洁async with:异步上下文管理器,自动处理资源释放(类似Java的try-with-resources)- 返回类型标注:
dict[str, Any] | None表示返回字典或None,类似Java的Map<String, Object>
3. 实现工具执行
python
@mcp.tool()
async def get_alerts(state: str) -> str:
    """
    获取美国各州的天气警报。
    Args:
        state: 美国州代码(例如CA, NY)
    """
    url = f"{NWS_API_BASE}/alerts/active/area/{state}"
    data = await make_nws_request(url)
    if not data or "features" not in data:
        return "Unable to fetch alerts or no alerts found."
    if not data["features"]:
        return "No active alerts for this state."
    alerts = [format_alert(feature) for feature in data["features"]]
    return "\n---\n".join(alerts)

@mcp.tool()
async def get_forecast(latitude: float, longitude: float) -> str:
    """
    获取某地点的天气预报。
    Args:
        latitude: 位置纬度
        longitude: 位置经度
    """
    # 首先获取预报网格端点
    points_url = f"{NWS_API_BASE}/points/{latitude},{longitude}"
    points_data = await make_nws_request(points_url)
    if not points_data:
        return "Unable to fetch forecast data for this location."
    # 从点响应中获取预报URL
    forecast_url = points_data["properties"]["forecast"]
    forecast_data = await make_nws_request(forecast_url)
    if not forecast_data:
        return "Unable to fetch detailed forecast."
    # 将时段格式化为可读的预报
    periods = forecast_data["properties"]["periods"]
    forecasts = []
    for period in periods[:5]:  # 仅显示前5个时段
        forecast = f"""
        {period['name']}: Temperature: {period['temperature']}°{period['temperatureUnit']}
        Wind: {period['windSpeed']} {period['windDirection']}
        Forecast: {period['detailedForecast']}
        """
        forecasts.append(forecast)
return "\n---\n".join(forecasts)Java工程师注释:
@mcp.tool():装饰器,用于标记这是一个MCP工具,类似Java中使用@Bean或@Controller标记Spring组件async def get_alerts(...):异步函数,处理HTTP请求,避免阻塞主线程,类似Java中使用CompletableFuture或@Asyncdata = await make_nws_request(url):等待异步请求完成,类似Java中使用CompletableFuture.get()if not data or "features" not in data:检查数据是否存在,类似Java中检查null和Map.containsKey()[format_alert(feature) for feature in data["features"]]:列表推导式,类似Java的Stream API的map操作periods[:5]:切片操作,获取前5个元素,类似Java的List.subList(0, 5)"\n---\n".join(alerts):将列表元素用分隔符连接成字符串,类似Java的String.join
4. 运行服务器
python
if __name__ == "__main__":
    # 初始化并运行服务器
mcp.run(transport='stdio')Java工程师注释:
if __name__ == "__main__":Python的入口点,类似Java的public static void main(String[] args)mcp.run(transport='stdio'):启动服务器,使用标准输入/输出传输,类似Java中启动Tomcat或Jetty服务器
完整代码:
python
from typing import Any

import httpx
from mcp.server.fastmcp import FastMCP

# Initialize FastMCP server
mcp = FastMCP("weather")

# Constants
NWS_API_BASE = "https://api.weather.gov"
USER_AGENT = "weather-app/1.0"

async def make_nws_request(url: str) -> dict[str, Any] | None:
    """Make a request to the NWS API with proper error handling."""
    headers = {"User-Agent": USER_AGENT, "Accept": "application/geo+json"}
    async with httpx.AsyncClient() as client:
        try:
            response = await client.get(url, headers=headers, timeout=30.0)
            response.raise_for_status()
            return response.json()
        except Exception:
            return None


def format_alert(feature: dict) -> str:
    """Format an alert feature into a readable string."""
    props = feature["properties"]
    return f"""
Event: {props.get("event", "Unknown")}
Area: {props.get("areaDesc", "Unknown")}
Severity: {props.get("severity", "Unknown")}
Description: {props.get("description", "No description available")}
Instructions: {props.get("instruction", "No specific instructions provided")}
"""

@mcp.tool()
async def get_alerts(state: str) -> str:
    """Get weather alerts for a US state.

    Args:
        state: Two-letter US state code (e.g. CA, NY)
    """
    url = f"{NWS_API_BASE}/alerts/active/area/{state}"
    data = await make_nws_request(url)

    if not data or "features" not in data:
        return "Unable to fetch alerts or no alerts found."

    if not data["features"]:
        return "No active alerts for this state."

    alerts = [format_alert(feature) for feature in data["features"]]
    return "\n---\n".join(alerts)


@mcp.tool()
async def get_forecast(latitude: float, longitude: float) -> str:
    """Get weather forecast for a location.

    Args:
        latitude: Latitude of the location
        longitude: Longitude of the location
    """
    # First get the forecast grid endpoint
    points_url = f"{NWS_API_BASE}/points/{latitude},{longitude}"
    points_data = await make_nws_request(points_url)

    if not points_data:
        return "Unable to fetch forecast data for this location."

    # Get the forecast URL from the points response
    forecast_url = points_data["properties"]["forecast"]
    forecast_data = await make_nws_request(forecast_url)

    if not forecast_data:
        return "Unable to fetch detailed forecast."

    # Format the periods into a readable forecast
    periods = forecast_data["properties"]["periods"]
    forecasts = []
    for period in periods[:5]:  # Only show next 5 periods
        forecast = f"""
{period["name"]}:
Temperature: {period["temperature"]}°{period["temperatureUnit"]}
Wind: {period["windSpeed"]} {period["windDirection"]}
Forecast: {period["detailedForecast"]}
"""
        forecasts.append(forecast)

    return "\n---\n".join(forecasts)

def main():
    # Initialize and run the server
    mcp.run(transport="stdio")


if __name__ == "__main__":
    main()
与 Trae 集成测试
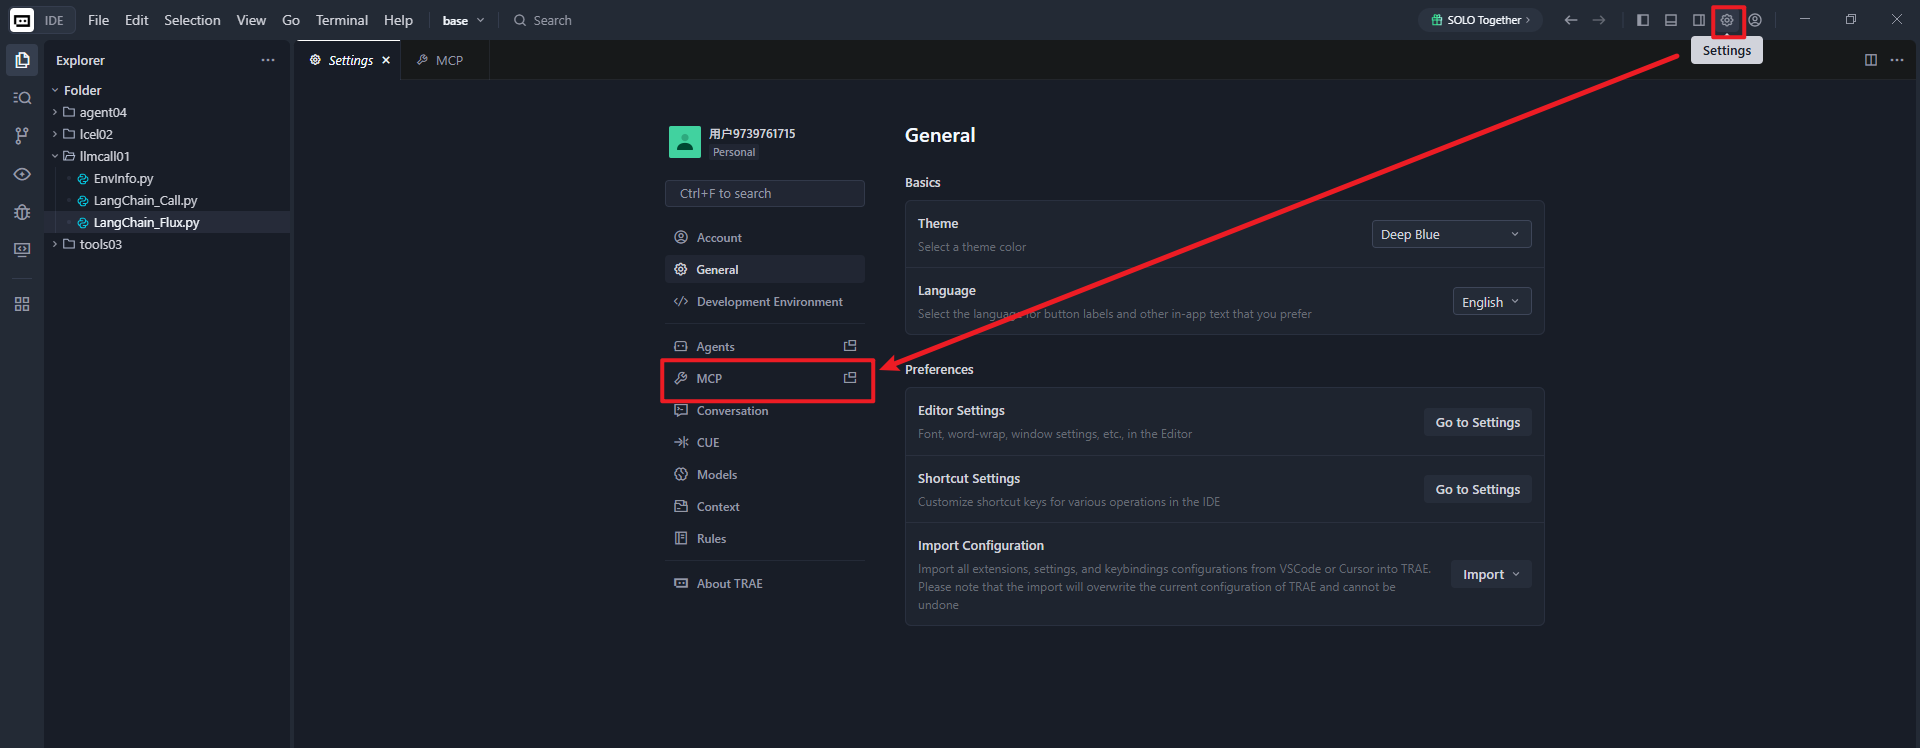
配置Trae
找到设置(Settings)里的 MCP
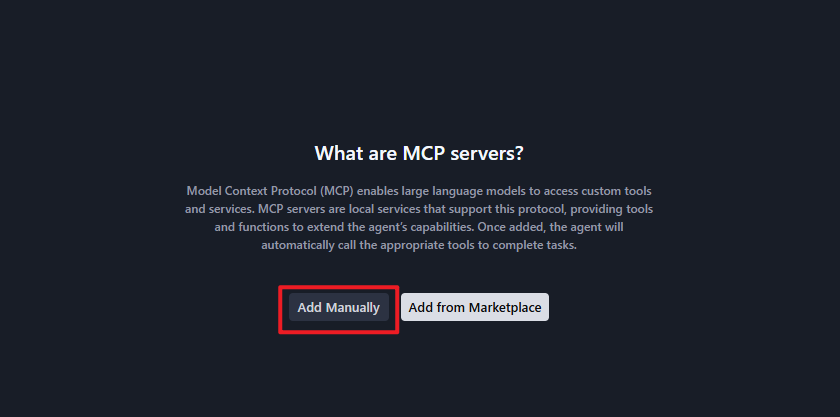
选择手动添加(Add Manually)
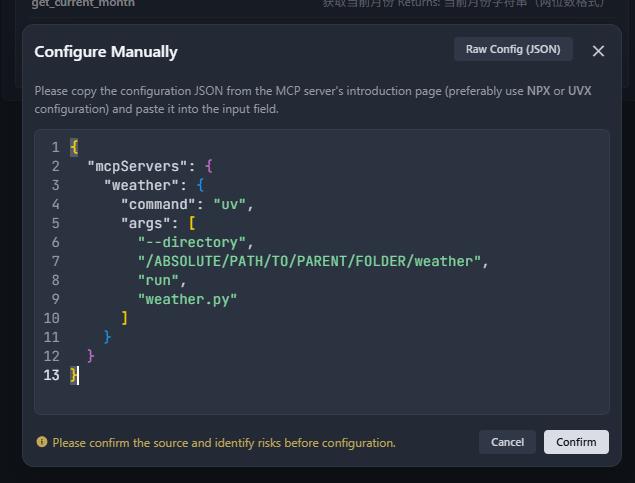
添加以下配置:
json
{
  "mcpServers": {
    "weather": {
      "command": "uv",
      "args": [
        "--directory",
        "/ABSOLUTE/PATH/TO/PARENT/FOLDER/weather",
        "run",
        "weather.py"
      ]
    }
  }
}
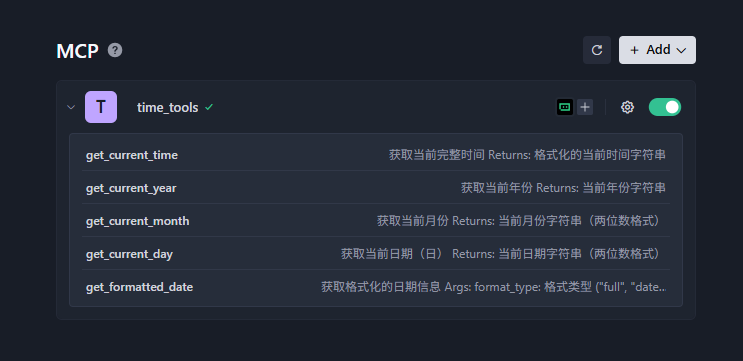
添加完成可以看到 MCP 下的工具列表
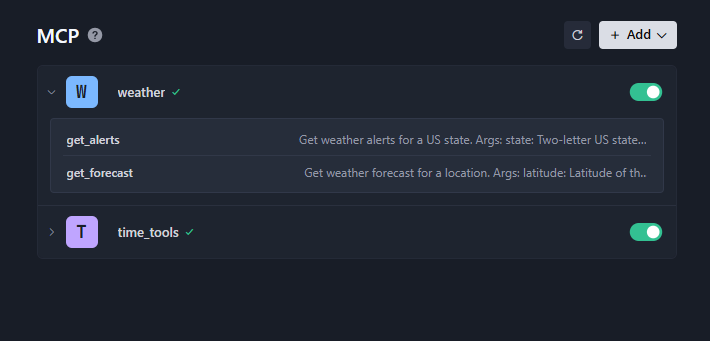
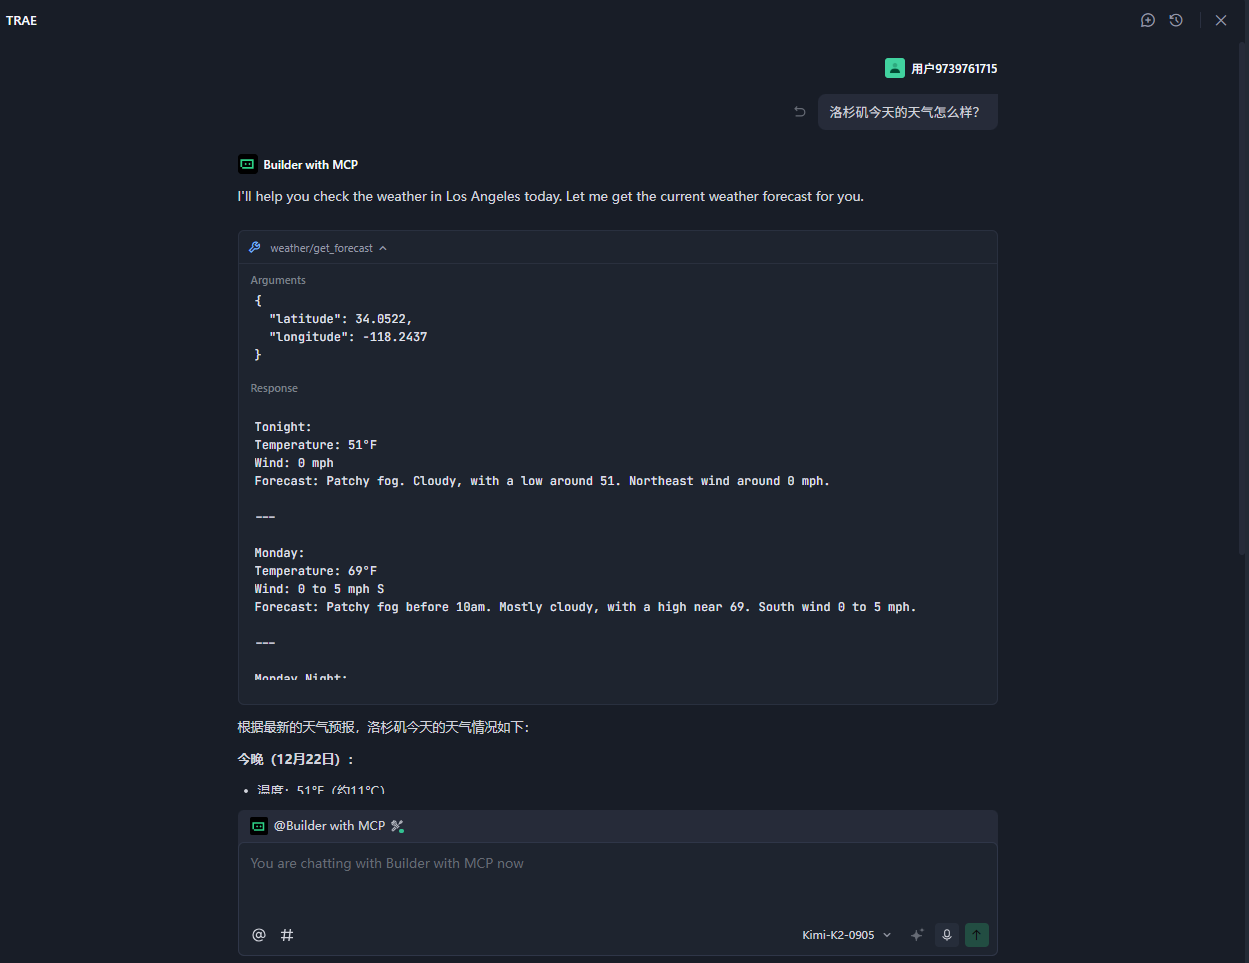
对话可以看到使用了我们开发的 MCP 工具
MCP 工作原理
当您提出问题时:
- 客户端将您的问题发送给 Trae
- Trae 分析可用的工具并决定使用哪个工具
- 客户端通过MCP服务器执行选定的工具
- 结果发送回Trae
- Trae生成自然语言响应
- 响应显示给您
练习
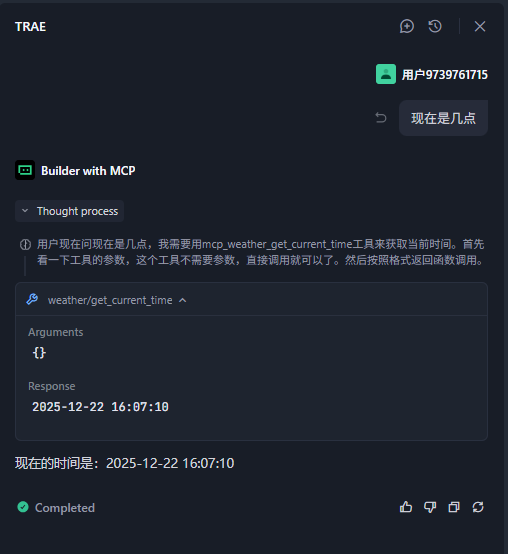
以下是我通过上述内容自己练习的代码
创建项目
bash
D:\cyao\codes>uv init time-tools
Initialized project `time-tools` at `D:\cyao\codes\time-tools`

D:\cyao\codes>cd time-tools

D:\cyao\codes\time-tools>uv venv
Using CPython 3.11.12
Creating virtual environment at: .venv
Activate with: .venv\Scripts\activate

D:\cyao\codes\time-tools>uv add mcp[cli]
Resolved 38 packages in 1.64s
Prepared 2 packages in 552ms创建主程序文件time_tools.py:
bash
type nul > time_tools.py 项目结构
python
time-tools/
├── pyproject.toml      # 项目配置文件,类似pom.xml
├── .gitignore
├── README.md
├── uv.lock
└── time_tools.py   # 我们的主程序文件
bash
{
  "mcpServers": {
    "time_tools": {
      "command": "uv",
      "args": [
        "--directory",
        "/ABSOLUTE/PATH/TO/PARENT/FOLDER/weather",
        "run",
        "time_tools.py"
      ]
    }
  }
}
总结
通过本教程,您已经学会了:
- 如何使用Python构建MCP服务器
- 如何与Claude for Desktop集成
- 如何调试MCP服务器
这些技能类似于Java中使用Spring Boot构建REST API并进行集成,但使用了更标准化的MCP协议,专门针对AI模型交互设计。
对Java工程师的提示:MCP本质上是一种标准化的API协议,类似于我们使用OpenAPI定义REST API。通过MCP,我们可以让AI模型像调用Java服务一样安全、结构化地调用我们的Python服务。这为AI应用开发提供了更便捷的集成方式。
Java工程师视角:如果您已经熟悉Java的Spring Boot或JAX-RS,那么MCP的开发体验会非常相似,只是使用了Python语言和特定的MCP框架。MCP的核心思想是让AI模型能够像调用Java微服务一样调用我们的服务,但使用了更简单的协议和更少的样板代码。