介绍
项目的README.md文件是前端项目的「使用说明书」,开发者在接触一个新项目的时候,首先都会先阅读一下项目的README文档,因此一个README的质量在一定程度上决定一个项目的上手难易程度。尤其对于不熟悉该项目的开发者,若没有一个良好的释义指引,刚接手的时候往往开发起来会比较困难。因此编写README文档对于项目运维而言至关重要。
本文会带领大家实现一个自动生成README的VSCode插件,根据AI大模型自动识别项目结构、阅读项目代码并进行总结,最后产出对应的README文档。通过和VSCode结合,开发者可以在本地直接通过编译器访问该插件,并自动实现README文档的生成。
初始化项目
要初始化一个VSCode插件,需要安装以下依赖包:
js
npm install -g yo generator-code
css
yo code然后按照提示选择配置:
js
-   项目类型:New Extension (TypeScript)
-   项目名称:your-extension-name
-   标识符:your-extension-identifier
-   描述:项目描述
-   是否初始化git仓库:Yes
-   是否使用webpack打包:Yes/No
-   是否使用ESLint:Yes
此时会生成一个预设好的项目模板:
js
your-extension/
├── src/
│   └── extension.ts          # 插件入口文件
├── package.json              # 插件配置
├── tsconfig.json            # TypeScript配置
├── .gitignore               # Git忽略文件
├── README.md                # 项目说明
└── vsc-extension-quickstart.md # VSCode快速开始指南extension可以理解为插件的入口文件,在该文件内定义activate方法,该方法是VSCode的插件激活钩子函数(入口函数)。在该函数内,注册插件命令:
js
export function activate(context: vscode.ExtensionContext) {
    console.log('AI Generate Markdown 扩展已激活!');

    // 注册生成README命令
    const generateReadmeCommand = vscode.commands.registerCommand('ai-gen-markdown.generateReadme', async () => {
        await generateReadmeCommand_handler();
    });

    // 注册配置API Key命令
    const configureApiKeyCommand = vscode.commands.registerCommand('ai-gen-markdown.configureApiKey', async () => {
        await configureApiKeyCommand_handler();
    });

    // 注册测试连接命令
    const testConnectionCommand = vscode.commands.registerCommand('ai-gen-markdown.testConnection', async () => {
        await testConnectionCommand_handler();
    });

    // 将以上命令加入vscode插件订阅列表
    context.subscriptions.push(
        generateReadmeCommand,
        configureApiKeyCommand,
        testConnectionCommand
    );
}
通过上述注册的方法可以看出,我们要实现的vscode插件具备三个主要功能------生成README、配置API Key和测试大模型连接。下面我们会通过代码演示的形式,逐一讲解这三个主要功能。
上述注册的命令,需要对应到package.json文件,定义vscode的命令列表:
js
"commands": [
  {
    "command": "ai-gen-markdown.generateReadme",
    "title": "生成 README.md",
    "category": "AI Generate Markdown"
  },
  {
    "command": "ai-gen-markdown.configureApiKey",
    "title": "配置 API Key",
    "category": "AI Generate Markdown"
  },
  {
    "command": "ai-gen-markdown.testConnection",
    "title": "测试 AI 模型连接",
    "category": "AI Generate Markdown"
  }
]
由此可见,该插件有四个功能,分别对应四个处理函数,下面我们按照功能模块进行划分。
vscode插件继承了vscode客户端相关功能,因此我们需要引入vscode包。
js
import * as vscode from 'vscode';后续所有涉及到vscode的功能,我们都从这个命名空间下进行访问。

生成README
生成README之前,需要先检查一下工作区(是否在一个项目中打开),若是空工作区,则直接提示让用户先打开一个项目工作区,否则返回当前工作区目录。
js
function getWorkspaceFolder(): vscode.WorkspaceFolder | undefined {
    const workspaceFolders = vscode.workspace.workspaceFolders;
    if (!workspaceFolders || workspaceFolders.length === 0) {
        vscode.window.showErrorMessage('请先打开一个工作区文件夹');
        return undefined;
    }
    return workspaceFolders[0];
}
检查完毕后,进入生成README逻辑,在整个生成过程中,对外展示一个全局进度条,该进度条可以直接通过vscode的工具方法实现:
js
await vscode.window.withProgress({
    location: vscode.ProgressLocation.Notification, // 用于指定进度条显示的位置,Notification表示进度条会显示在VSCode的**通知区域**(右下角的通知弹窗中)
    title: "正在生成README...", // 标题
    cancellable: false // 不可取消
}, async (progress) => {
    // 核心逻辑...
})
实现了进度条,我们开始填充进度条执行回调逻辑。第一步,要先全局分析项目结构。
分析项目结构
设计一个项目分析类ProjectAnalyzer,实例化时传入一个当前工作根目录的命名空间,同时预定义一个排除的文件列表。
js
export class ProjectAnalyzer {
    private workspaceRoot: string;
    // 定义排除的文件和目录
    private ignoredPatterns: string[] = [
        'node_modules',
        '.git',
        'dist',
        'build',
        'out',
        '.vscode',
        'coverage',
        '.nyc_output',
        '*.log',
        '.DS_Store',
        'Thumbs.db'
    ];
    constructor(workspaceRoot: string) {
        this.workspaceRoot = workspaceRoot;
    }
}定义一个分析项目的方法analyzeProject,通过该方法实现项目的整体分析,实现如下:
js
private getProjectName(): string {
    return path.basename(this.workspaceRoot);
}
public async analyzeProject(): Promise<ProjectInfo> {
    // 定义工作目录内的文件结构信息
    const projectInfo: ProjectInfo = {
        name: this.getProjectName(),
        description: '',
        technologies: [],
        structure: [],
        mainFiles: [],
        totalFiles: 0,
        totalLines: 0
    };

    // 分析package.json
    await this.analyzePackageJson(projectInfo);

    // 分析文件结构
    await this.analyzeFileStructure(projectInfo);

    // 检测技术栈
    await this.detectTechnologies(projectInfo);

    // 查找主要文件
    await this.findMainFiles(projectInfo);

    return projectInfo;
}
整个数据流转结构如下,最终将新的项目结构信息返回:
分析package.json
analyzePackageJson方法实现如下:
js
private async analyzePackageJson(projectInfo: ProjectInfo): Promise<void> {
    const packageJsonPath = path.join(this.workspaceRoot, 'package.json');

    try {
        if (fs.existsSync(packageJsonPath)) {
            const packageContent = fs.readFileSync(packageJsonPath, 'utf-8');
            const packageJson = JSON.parse(packageContent);

            projectInfo.packageInfo = packageJson;
            projectInfo.name = packageJson.name || projectInfo.name;
            projectInfo.description = packageJson.description || '';

            // 从依赖中提取技术栈信息
            const dependencies = { ...packageJson.dependencies, ...packageJson.devDependencies };
            projectInfo.technologies = this.extractTechnologiesFromDependencies(dependencies);
        }
    } catch (error) {
        console.error('Error analyzing package.json:', error);
    }
}
上述代码将package.json的内容解析成json,将json转化成projectInfo的结构,同时从依赖列表中提取依赖信息,将依赖过滤后,赋值给projectInfo。
extractTechnologiesFromDependencies方法如下:
js
private extractTechnologiesFromDependencies(dependencies: any): string[] {
    const technologies: string[] = [];
    const techMap: { [key: string]: string } = {
        'react': 'React',
        'vue': 'Vue.js',
        'angular': 'Angular',
        'typescript': 'TypeScript',
        'javascript': 'JavaScript',
        'express': 'Express.js',
        'fastify': 'Fastify',
        'next': 'Next.js',
        'nuxt': 'Nuxt.js',
        'webpack': 'Webpack',
        'vite': 'Vite',
        'rollup': 'Rollup',
        'babel': 'Babel',
        'eslint': 'ESLint',
        'prettier': 'Prettier',
        'jest': 'Jest',
        'mocha': 'Mocha',
        'cypress': 'Cypress',
        'playwright': 'Playwright',
        'tailwindcss': 'Tailwind CSS',
        'sass': 'Sass',
        'less': 'Less',
        'styled-components': 'Styled Components',
        'material-ui': 'Material-UI',
        'antd': 'Ant Design',
        'bootstrap': 'Bootstrap',
        'mongoose': 'Mongoose',
        'prisma': 'Prisma',
        'sequelize': 'Sequelize',
        'redis': 'Redis',
        'socket.io': 'Socket.IO',
        'graphql': 'GraphQL',
        'apollo': 'Apollo GraphQL',
        'langchain': 'LangChain'
    };

    Object.keys(dependencies).forEach(dep => {
        const lowerDep = dep.toLowerCase();
        Object.keys(techMap).forEach(tech => {
            if (lowerDep.includes(tech) && !technologies.includes(techMap[tech])) {
                technologies.push(techMap[tech]);
            }
        });
    });

    return technologies;
}
经过过滤后,只保留预设的依赖包列表中的内容,其他权重较小的依赖包会被丢弃,之所以这么做,是为了限制prompt的长度,避免大规模的依赖包造成token长度失控。
分析文件结构
这一步比较复杂,由于项目是树结构,因此需要递归整个项目的所有文件。
js
private async analyzeFileStructure(projectInfo: ProjectInfo): Promise<void> {
    const structure = await this.buildFileStructure(this.workspaceRoot);
    projectInfo.structure = structure;

    // 计算总文件数和代码行数
    const stats = await this.calculateProjectStats(this.workspaceRoot);
    projectInfo.totalFiles = stats.fileCount;
    projectInfo.totalLines = stats.lineCount;
}首先要构建一个文件结构,由buildFileStructure实现
js
private async buildFileStructure(dirPath: string, relativePath: string = ''): Promise<FileStructure[]> {
    const items: FileStructure[] = [];

    try {
        const entries = fs.readdirSync(dirPath, { withFileTypes: true });

        for (const entry of entries) {
            const fullPath = path.join(dirPath, entry.name);
            const relPath = path.join(relativePath, entry.name);

            // 跳过忽略的文件/目录
            if (this.shouldIgnore(entry.name)) {
                continue;
            }

            if (entry.isDirectory()) {
                const children = await this.buildFileStructure(fullPath, relPath);
                items.push({
                    name: entry.name,
                    path: relPath,
                    type: 'directory',
                    children
                });
            } else {
                const stats = fs.statSync(fullPath);
                items.push({
                    name: entry.name,
                    path: relPath,
                    type: 'file',
                    size: stats.size,
                    extension: path.extname(entry.name)
                });
            }
        }
    } catch (error) {
        console.error(`Error reading directory ${dirPath}:`, error);
    }

    return items;
}以上是一个递归查找,可以理解成将项目树组装成一个新的树,树的每一个节点包括文件名、路径、类型、大小和扩展名等信息。拿到这个树,赋值给projectInfo.structure,实现了项目结构的加工。
下一步获取总文件数和代码总行数,实现calculateProjectStats方法:
js
private async calculateProjectStats(dirPath: string): Promise<{ fileCount: number; lineCount: number }> {
        let fileCount = 0;
        let lineCount = 0;

        const processDirectory = async (currentPath: string): Promise<void> => {
            try {
                const entries = fs.readdirSync(currentPath, { withFileTypes: true });

                for (const entry of entries) {
                    const fullPath = path.join(currentPath, entry.name);

                    if (this.shouldIgnore(entry.name)) {
                        continue;
                    }

                    if (entry.isDirectory()) {
                        await processDirectory(fullPath);
                    } else {
                        fileCount++;

                        // 只计算文本文件的行数
                        if (this.isTextFile(entry.name)) {
                            try {
                                const content = fs.readFileSync(fullPath, 'utf-8');
                                lineCount += content.split('\n').length;
                            } catch (error) {
                                // 忽略无法读取的文件
                            }
                        }
                    }
                }
            } catch (error) {
                console.error(`Error processing directory ${currentPath}:`, error);
            }
        };

        await processDirectory(dirPath);
        return { fileCount, lineCount };
}遍历文件目录结构,若遇到子目录,则递归,否则累加文件总数,若该文件是纯文本文件,则处理内部字符串,将行数计算出来进行累加。通过闭包,拿到fileCount和lineCount,不断累加其值,最终返回最终的操作结果。
我们注意到,以上调用了shouldIgnore和isTextFile两个方法,这里贴一下这两个方法的实现:
js
private shouldIgnore(fileName: string): boolean {
    return this.ignoredPatterns.some(pattern => {
        if (pattern.includes('*')) {
            const regex = new RegExp(pattern.replace(/\*/g, '.*'));
            return regex.test(fileName);
        }
        return fileName === pattern;
    });
}
js
private isTextFile(fileName: string): boolean {
    const textExtensions = [
        '.js', '.ts', '.jsx', '.tsx', '.vue', '.py', '.java', '.c', '.cpp', '.h',
        '.css', '.scss', '.sass', '.less', '.html', '.xml', '.json', '.yaml', '.yml',
        '.md', '.txt', '.sh', '.bat', '.ps1', '.php', '.rb', '.go', '.rs', '.swift',
        '.kt', '.scala', '.clj', '.hs', '.elm', '.dart', '.r', '.sql', '.graphql'
    ];

    const ext = path.extname(fileName).toLowerCase();
    return textExtensions.includes(ext);
}
具体实现如上,这里不再赘述。
经过上述操作,我们整理好了整个项目下的所有文件内容,并统计完成相应的文件数量和代码总行数,下面,我们进入第三步,获取项目的技术栈。
获取项目技术栈
获取技术栈的方式很灵活,本文用一种很简单的方式去获取项目技术栈,只需要根据项目中文件后缀名来推断具体的技术栈。
js
private async detectTechnologies(projectInfo: ProjectInfo): Promise<void> {
        // 基于文件扩展名检测技术栈
        const fileExtensions = new Set<string>();

        const collectExtensions = (structure: FileStructure[]): void => {
            structure.forEach(item => {
                if (item.type === 'file' && item.extension) {
                    fileExtensions.add(item.extension.toLowerCase());
                }
                if (item.children) {
                    collectExtensions(item.children);
                }
            });
        };

        collectExtensions(projectInfo.structure);

        // 基于文件扩展名推断技术栈
        const extToTech: { [key: string]: string } = {
            '.ts': 'TypeScript',
            '.js': 'JavaScript',
            '.jsx': 'React',
            '.tsx': 'React + TypeScript',
            '.vue': 'Vue.js',
            '.py': 'Python',
            '.java': 'Java',
            '.cpp': 'C++',
            '.c': 'C',
            '.cs': 'C#',
            '.php': 'PHP',
            '.rb': 'Ruby',
            '.go': 'Go',
            '.rs': 'Rust',
            '.swift': 'Swift',
            '.kt': 'Kotlin',
            '.scala': 'Scala',
            '.dart': 'Dart',
            '.css': 'CSS',
            '.scss': 'Sass',
            '.less': 'Less'
        };

        fileExtensions.forEach(ext => {
            const tech = extToTech[ext];
            if (tech && !projectInfo.technologies.includes(tech)) {
                projectInfo.technologies.push(tech);
            }
        });
    }
拿到所有文件后缀对应的技术栈,并将其放入到对应的技术栈列表中。
查找主要文件
该步骤主要提取一些关键文件,比如一些入口文件、关键配置文件等。实现方案也很简单,首先预定义一个关键文件名列表,然后找到匹配的文件,将该文件放入收集到的关键文件列表中。
js
private async findMainFiles(projectInfo: ProjectInfo): Promise<void> {
        const mainFilePatterns = [
            'README.md', 'readme.md', 'README.txt',
            'package.json', 'composer.json', 'Cargo.toml', 'go.mod',
            'index.js', 'index.ts', 'main.js', 'main.ts', 'app.js', 'app.ts',
            'server.js', 'server.ts', 'index.html', 'main.py', '__init__.py',
            'Dockerfile', 'docker-compose.yml', 'docker-compose.yaml',
            '.gitignore', 'tsconfig.json', 'webpack.config.js', 'vite.config.js'
        ];

        const findFiles = (structure: FileStructure[], currentPath: string = ''): void => {
            structure.forEach(item => {
                const fullPath = currentPath ? `${currentPath}/${item.name}` : item.name;

                if (item.type === 'file' && mainFilePatterns.includes(item.name)) {
                    projectInfo.mainFiles.push(fullPath);
                }

                if (item.children) {
                    findFiles(item.children, fullPath);
                }
            });
        };

        findFiles(projectInfo.structure);
}走完这一步骤后,我们的项目就分析完了,最后得到的是一个分析完成后的projectInfo。
生成配置
这一步,主要用于设置要生成的README文件中包含的信息,可以选择自定义配置 和默认配置。自定义配置是用户自己决定最终README文件中要展示的内容,而默认配置则是我们预设好的配置直接使用。
获取用户配置
让用户选择具体需要什么配置
 定义一个获取用户选项的
getReadmeConfig方法,在这里进行用户定制化输出处理:
js
async function getReadmeConfig(): Promise<ReadmeConfig | undefined> {
const generator = new ReadmeGenerator(); // readme生成器,后续会讲
const defaultConfig = generator.getDefaultConfig(); // 获取默认配置
// 询问用户配置选项
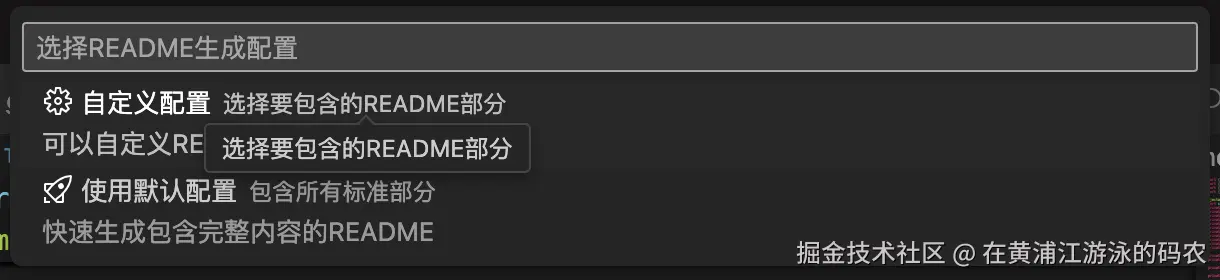
const options = await vscode.window.showQuickPick([
{
label: '$(gear) 自定义配置',
description: '选择要包含的README部分',
detail: '可以自定义README的内容和格式'
},
{
label: '$(rocket) 使用默认配置',
description: '包含所有标准部分',
detail: '快速生成包含完整内容的README'
}
], {
placeHolder: '选择README生成配置'
});
if (!options) {
return undefined; // 用户取消
}
if (options.label.includes('默认配置')) {
return defaultConfig;
}
// 自定义配置
const config: ReadmeConfig = { ...defaultConfig };
// 语言选择
const language = await vscode.window.showQuickPick([
{ label: '中文', value: 'zh' },
{ label: 'English', value: 'en' }
], {
placeHolder: '选择README语言'
});
if (!language) return undefined;
config.language = language.value as 'zh' | 'en';
// 风格选择
const style = await vscode.window.showQuickPick([
{ label: '专业风格', value: 'professional', description: '适合企业项目和开源项目' },
{ label: '技术风格', value: 'technical', description: '更注重技术细节和实现' },
{ label: '轻松风格', value: 'casual', description: '更加友好和易读' }
], {
placeHolder: '选择README风格'
});
if (!style) return undefined;
config.style = style.value as 'professional' | 'casual' | 'technical';
// 内容选择
const sections = await vscode.window.showQuickPick([
{ label: '安装说明', picked: config.includeInstallation },
{ label: '使用方法', picked: config.includeUsage },
{ label: '项目结构', picked: config.includeProjectStructure },
{ label: '技术栈', picked: config.includeTechnologies },
{ label: '贡献指南', picked: config.includeContributing },
{ label: '许可证', picked: config.includeLicense }
], {
canPickMany: true,
placeHolder: '选择要包含的README部分(可多选)'
});
if (!sections) return undefined;
// 更新配置
config.includeInstallation = sections.some(s => s.label === '安装说明');
config.includeUsage = sections.some(s => s.label === '使用方法');
config.includeProjectStructure = sections.some(s => s.label === '项目结构');
config.includeTechnologies = sections.some(s => s.label === '技术栈');
config.includeContributing = sections.some(s => s.label === '贡献指南');
config.includeLicense = sections.some(s => s.label === '许可证');
return config;
}vscode.window.showQuickPick是一个vscode原生的选择器,可以让用户完成单选操作;canPickMany: true设置为多选。
整体流程是先获取默认配置,若用户选择的是自定义配置,则引导用户完成类型选择,将用户选中的项覆盖掉默认的项,最后生成出一份定制的配置结构。
配置生成完成后,我们就需要连接大模型生成最终的README文件。
构建README内容
README的生成器,需要单独为其设计一个类ReadmeGenerator,该类将通过langchain完成和大模型的交互。
初始化
js
import { ChatOpenAI } from '@langchain/openai';
import { PromptTemplate } from '@langchain/core/prompts';
import { StringOutputParser } from '@langchain/core/output_parsers';
import { RunnableSequence } from '@langchain/core/runnables';
import { BaseChatModel } from '@langchain/core/language_models/chat_models';
import * as vscode from 'vscode';
import { ProjectInfo, FileStructure } from './projectAnalyzer';

export class ReadmeGenerator {
    private llm: BaseChatModel; // 大模型实例
    private outputParser: StringOutputParser; // 输出内容解析器,用于将AI模型的输出转换为字符串格式
    constructor() {
        // 初始化LangChain组件
        this.llm = this.createLLMInstance();
        this.outputParser = new StringOutputParser();
    }
}createLLMInstance用于实例化一个大模型,一般使用langchain的ChatOpenAI。
js
private createLLMInstance(): BaseChatModel {
        return new ChatOpenAI({
            modelName: 'gpt-3.5-turbo',
            temperature: 0.7,
            maxTokens: 2000,
            openAIApiKey: this.getOpenAIApiKey()
        });
    }
上述例子使用gpt-3.5-turbo模型,需要获取ApiKey,这一步让用户自定义设置,我们不预设这个值。
js
private getOpenAIApiKey(): string {
    const config = vscode.workspace.getConfiguration('aiGenMarkdown');
    const apiKey = config.get<string>('openaiApiKey');

    if (!apiKey) {
        throw new Error('请在VSCode设置中配置OpenAI API Key (aiGenMarkdown.openaiApiKey)');
    }

    return apiKey;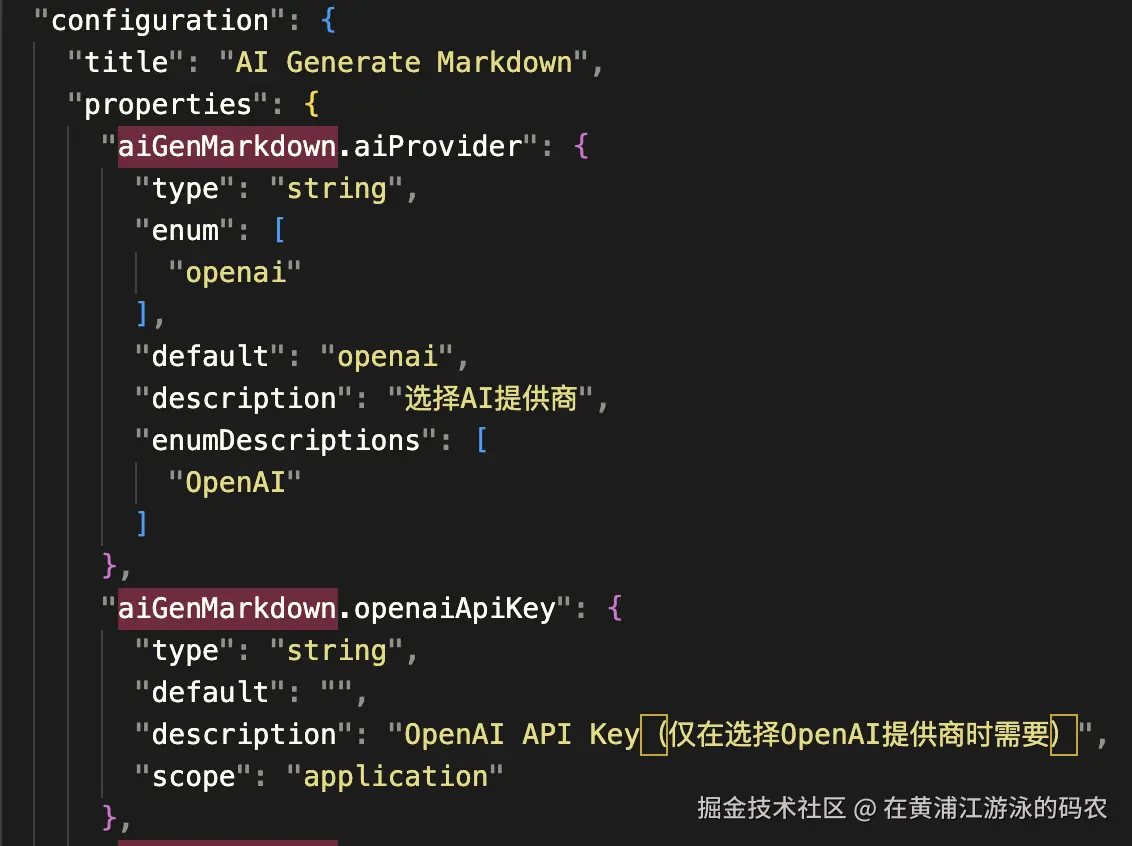
}vscode.workspace.getConfiguration用于获取用户选择的配置,这里的配置项需要预先在package.json中定义好,定义的模板如下:
json
"configuration": {
      "title": "AI Generate Markdown",
      "properties": {
        "aiGenMarkdown.aiProvider": {
          "type": "string",
          "enum": [
            "openai"
          ],
          "default": "openai",
          "description": "选择AI提供商",
          "enumDescriptions": [
            "OpenAI"
          ]
        },
        "aiGenMarkdown.openaiApiKey": {
          "type": "string",
          "default": "",
          "description": "OpenAI API Key(仅在选择OpenAI提供商时需要)",
          "scope": "application"
        },
        "aiGenMarkdown.defaultLanguage": {
          "type": "string",
          "enum": [
            "zh",
            "en"
          ],
          "default": "zh",
          "description": "默认生成README的语言",
          "enumDescriptions": [
            "中文",
            "English"
          ]
        },
        "aiGenMarkdown.defaultStyle": {
          "type": "string",
          "enum": [
            "professional",
            "technical",
            "casual"
          ],
          "default": "professional",
          "description": "默认README风格",
          "enumDescriptions": [
            "专业风格",
            "技术风格",
            "轻松风格"
          ]
        },
        "aiGenMarkdown.includeProjectStructure": {
          "type": "boolean",
          "default": true,
          "description": "是否在README中包含项目结构"
        },
        "aiGenMarkdown.includeTechnologies": {
          "type": "boolean",
          "default": true,
          "description": "是否在README中包含技术栈信息"
        }
      }
}这只是预设模版,需要在实际代码中通过update选中(更新)对应的值。 大模型初始化完成后,就可以设计提示词,调用大模型进行解析处理了。
大模型解析
调用大模型的前提,一定要设计好一套提示词,可以说提示词在一定程度上可以决定大模型生成的结果是否符合我们的预期。如果提示词比较宽泛,不够聚焦,那么模型的注意力就有可能分散,生成的结果自然会存在一定偏差。
因此,我们首先应该根据用户先前选择好的配置结构,来辅助最终提示词的生成。
js
private buildSectionRequirements(config: ReadmeConfig): string {
    const sections: string[] = ['项目简介', '功能特性'];

    if (config.includeTechnologies) {
        sections.push('技术栈');
    }

    if (config.includeProjectStructure) {
        sections.push('项目结构');
    }

    if (config.includeInstallation) {
        sections.push('安装说明');
    }

    if (config.includeUsage) {
        sections.push('使用方法');
    }

    if (config.includeContributing) {
        sections.push('贡献指南');
    }

    if (config.includeLicense) {
        sections.push('许可证');
    }

    return sections.join('、');
}

private createPromptTemplate(config: ReadmeConfig): PromptTemplate {
    const language = config.language === 'zh' ? '中文' : 'English';
    const sections = this.buildSectionRequirements(config);

    const template = `你是一个专业的技术文档编写专家。请根据以下项目信息生成一个高质量的README.md文件。

项目信息:
- 项目名称: {projectName}
- 项目描述: {description}
- 技术栈: {technologies}
- 详细信息: {projectContext}

要求:
- 使用{language}编写
- 风格: {style}
- 包含以下部分: ${sections}
- 使用Markdown格式
- 内容要专业、准确、有用
- 根据项目的实际情况调整内容
- 如果是开源项目,添加适当的徽章和链接
- 确保README结构清晰、易读

请生成完整的README.md内容:`;

    return PromptTemplate.fromTemplate(template);
}
上述只是生成了一份提示词模板,下面我们要利用langchain的能力,将提示词模板中预留的插槽进行真实内容的替换填充。
下面我们还需要生成项目的详细信息projectContext,作为提示词的一部分。
js
private prepareProjectContext(projectInfo: ProjectInfo, config: ReadmeConfig): string {
    let context = '';

    // 基本信息
    context += `项目统计: ${projectInfo.totalFiles} 个文件, ${projectInfo.totalLines} 行代码\n`;

    // 主要文件
    if (projectInfo.mainFiles.length > 0) {
        context += `主要文件: ${projectInfo.mainFiles.slice(0, 10).join(', ')}\n`;
    }

    // 包信息
    if (projectInfo.packageInfo) {
        const pkg = projectInfo.packageInfo;
        if (pkg.scripts) {
            context += `可用脚本: ${Object.keys(pkg.scripts).join(', ')}\n`;
        }
        if (pkg.dependencies) {
            const depCount = Object.keys(pkg.dependencies).length;
            context += `生产依赖: ${depCount} 个\n`;
        }
        if (pkg.devDependencies) {
            const devDepCount = Object.keys(pkg.devDependencies).length;
            context += `开发依赖: ${devDepCount} 个\n`;
        }
    }

    // 项目结构(如果需要)
    if (config.includeProjectStructure) {
        context += '\n项目结构:\n';
        context += this.generateStructureText(projectInfo.structure, 0, 3); // 限制深度为3
    }

    return context;
}通过上文生成的projectInfo,将其解析成对应的提示词内容。
完成这一步操作后,我们回到调用大模型的地方,组建一个langchain的调用链。
js
// 创建处理链
const chain = RunnableSequence.from([
    promptTemplate,
    this.llm,
    this.outputParser,
]);得到chain调用对象,调用它的invoke方法。
js
// 生成README内容
const result = await chain.invoke({
    projectName: projectInfo.name,
    description: projectInfo.description || '一个优秀的项目',
    technologies: projectInfo.technologies.join(', '),
    projectContext: projectContext,
    style: config.style,
    language: config.language
});
return result;
上述方法是langchain的核心方法,它的执行流程如下:
-
数据注入:将项目信息封装成对象,传递给处理链的第一个组件
-
链式处理:项目数据 → promptTemplate → 提示词 → LLM → AI响应 → outputParser → Markdown字符串
-
结果返回:返回解析后的纯文本字符串,内容已经是格式化的Markdown
上述流程均在generateReadme中实现,若langchain生成失败,则执行generateTemplateReadme方法,整体流程如下:
js
 public async generateReadmeWithFallback(projectInfo: ProjectInfo, config: ReadmeConfig): Promise<string> {
    try {
        return await this.generateReadme(projectInfo, config);
    } catch (error) {
        console.warn('LangChain生成失败,使用模板生成:', error);
        return this.generateTemplateReadme(projectInfo, config);
    }
}generateTemplateReadme方法系手动生成README文件方法,其作为langchain执行异常的兜底策略。该方法通过之前拿到的projectInfo,加上一定的文字描述,最后产出相应的README文件内容。注意,拼接的字符串要满足markdown格式。
js
private generateTemplateReadme(projectInfo: ProjectInfo, config: ReadmeConfig): string {
        const isZh = config.language === 'zh';

        let readme = '';

        // 标题
        readme += `# ${projectInfo.name}\n\n`;

        // 描述
        if (projectInfo.description) {
            readme += `${projectInfo.description}\n\n`;
        }

        // 技术栈
        if (config.includeTechnologies && projectInfo.technologies.length > 0) {
            readme += `## ${isZh ? '技术栈' : 'Technologies'}\n\n`;
            projectInfo.technologies.forEach(tech => {
                readme += `- ${tech}\n`;
            });
            readme += '\n';
        }

        // 项目结构
        if (config.includeProjectStructure) {
            readme += `## ${isZh ? '项目结构' : 'Project Structure'}\n\n`;
            readme += '```\n';
            readme += this.generateStructureText(projectInfo.structure, 0, 3);
            readme += '```\n\n';
        }

        // 安装说明
        if (config.includeInstallation) {
            readme += `## ${isZh ? '安装' : 'Installation'}\n\n`;
            if (projectInfo.packageInfo) {
                readme += '```bash\n';
                readme += 'npm install\n';
                readme += '# 或者\n';
                readme += 'yarn install\n';
                readme += '# 或者\n';
                readme += 'pnpm install\n';
                readme += '```\n\n';
            }
        }

        // 使用方法
        if (config.includeUsage) {
            readme += `## ${isZh ? '使用方法' : 'Usage'}\n\n`;
            if (projectInfo.packageInfo?.scripts) {
                readme += `${isZh ? '可用的脚本命令:' : 'Available scripts:'}\n\n`;
                Object.entries(projectInfo.packageInfo.scripts).forEach(([script, command]) => {
                    readme += `- \`npm run ${script}\`: ${command}\n`;
                });
                readme += '\n';
            }
        }

        // 贡献指南
        if (config.includeContributing) {
            readme += `## ${isZh ? '贡献' : 'Contributing'}\n\n`;
            readme += isZh
                ? '欢迎提交 Pull Request 和 Issue!\n\n'
                : 'Pull requests and issues are welcome!\n\n';
        }

        // 许可证
        if (config.includeLicense) {
            readme += `## ${isZh ? '许可证' : 'License'}\n\n`;
            const license = projectInfo.packageInfo?.license || 'MIT';
            readme += `${license}\n\n`;
        }

        return readme;
    }
到这一步,我们就算完成了README内容的生成,接着,我们要把生成的内容保存成文件,文件保存位置为当前工作目录。
保存README文件
首先设计一个保存方法saveReadmeFile,传入当前工作目录路径和生成的README内容。同时方法内要做重复性判断,若已经存在README文件,则要让用户决策是否进行文件覆盖,若覆盖则将原来的README文件内容全量覆盖,否则生成一个新的README文件,和原来的文件区分命名。
js
async function saveReadmeFile(workspacePath: string, content: string): Promise<void> {
    const readmePath = path.join(workspacePath, 'README.md');

    // 如果文件已存在,询问是否覆盖
    if (fs.existsSync(readmePath)) {
        const overwrite = await vscode.window.showQuickPick(['是', '否'], {
            placeHolder: 'README.md 已存在,是否覆盖?'
        });

        if (overwrite !== '是') {
            // 生成备份文件名
            const timestamp = new Date().toISOString().replace(/[:.]/g, '-');
            const backupPath = path.join(workspacePath, `README-generated-${timestamp}.md`);
            fs.writeFileSync(backupPath, content, 'utf-8');
            vscode.window.showInformationMessage(`README已保存为: ${path.basename(backupPath)}`);
            return;
        }
    }

    fs.writeFileSync(readmePath, content, 'utf-8');
}vscode.window.showQuickPick是vscode内置的决策弹窗,我们直接通过该方法取到用户选择的值。将备份文件通过时间戳后缀命名,防止命名冲突。其余情况均用「README」命名。
保存完成后,提示用户最终的README文件生成完成。
js
vscode.window.showInformationMessage('README.md 生成成功!');同时为了优化用户体验,可以在最后询问用户是否自动打开生成的README文件。
js
// 询问是否打开文件
const openFile = await vscode.window.showQuickPick(['是', '否'], {
    placeHolder: '是否打开生成的README.md文件?'
});

if (openFile === '是') {
    const readmePath = path.join(workspaceFolder.uri.fsPath, 'README.md');
    const document = await vscode.workspace.openTextDocument(readmePath);
    await vscode.window.showTextDocument(document);
}注意:由于这里默认打开的是README.md文件,不默认打开备份文件。vscode.workspace.openTextDocument为在扩展中打开或创建文本文件,调用该方法需要传入文件路径,返回 TextDocument 对象。然后调用vscode.window.showTextDocument传入 TextDocument 对象,自动访问该文件。
到此,我们的第一个主要功能------生成README就实现完成了,整体流程可以通过以下流程图表示:
配置API Key
由上文调用大模型API可知,用户需要申请一个API Key用于访问大模型服务。我们的插件需要外露一个入口,让用户可以通过该入口手动输入自己在官网上申请好的Key进行注入。
方法实现如下:
js
async function configureApiKeyCommand_handler() {
    try {
        // 首先让用户选择AI提供商
        const provider = await vscode.window.showQuickPick([
            {
                label: '$(globe) OpenAI',
                description: 'OpenAI GPT 模型',
                value: 'openai'
            }
        ], {
            placeHolder: '选择要配置的AI提供商'
        });

        if (!provider) return;

        const config = vscode.workspace.getConfiguration('aiGenMarkdown');
        const apiKey = await vscode.window.showInputBox({
            prompt: '请输入您的OpenAI API Key',
            password: true,
            placeHolder: 'sk-...',
            validateInput: (value) => {
                if (!value || value.trim().length === 0) {
                    return 'API Key不能为空';
                }
                if (!value.startsWith('sk-')) {
                    return 'OpenAI API Key格式不正确,应该以 sk- 开头';
                }
                return null;
            }
        });

        if (apiKey) {
            await config.update('aiProvider', 'openai', vscode.ConfigurationTarget.Global);
            await config.update('openaiApiKey', apiKey, vscode.ConfigurationTarget.Global);
            vscode.window.showInformationMessage('OpenAI API Key 配置成功!');
        }

    } catch (error) {
        console.error('配置API Key失败:', error);
        vscode.window.showErrorMessage(`配置失败: ${error instanceof Error ? error.message : '未知错误'}`);
    }
}让用户选择预设的大模型厂商,我们默认提供OpenAI大模型供用户使用;用户选择完成后,开始准备注入Key的配置,这里需要获取之前在pakcage.json预设好的aiGenMarkdown配置命名空间,方便我们后续针对这些配置进行全局注入。
利用vscode.window.showInputBox,实现一个输入框,获取用户输入的Key值。将Key值update到全局配置(vscode.ConfigurationTarget.Global参数控制)。
获取用户的API Key,可参考上文的getOpenAIApiKey方法。
测试大模型连接
用户配置完成API Key后,可以自己验证大模型连接是否成功,如果不成功,便无法利用大模型解析README。测试链接功能实现如下:
js
// 获取当前AI服务提供商
public getCurrentProvider(): string {
    const config = vscode.workspace.getConfiguration('aiGenMarkdown');
    return config.get<string>('aiProvider')
}
async function testConnectionCommand_handler() {
    try {
        const generator = new ReadmeGenerator();
        const currentProvider = generator.getCurrentProvider();
        const providerName = currentProvider;

        await vscode.window.withProgress({
            location: vscode.ProgressLocation.Notification,
            title: `测试${providerName}连接...`,
            cancellable: false
        }, async (progress) => {
            try {
                progress.report({ increment: 50, message: `连接到${providerName}...` });

                const isConnected = await generator.testConnection();

                progress.report({ increment: 50, message: "验证连接..." });

                if (isConnected) {
                    vscode.window.showInformationMessage(`${providerName}连接测试成功!`);
                } else {
                    vscode.window.showWarningMessage(`${providerName}连接测试失败,请检查API Key配置`);
                }
            } catch (error) {
                console.error('连接测试失败:', error);
                const errorMessage = error instanceof Error ? error.message : '未知错误';
                vscode.window.showErrorMessage(`连接测试失败: ${errorMessage}`);

                // 如果是API Key相关错误,提供配置建议
                if (errorMessage.includes('API Key')) {
                    const configureKey = await vscode.window.showInformationMessage(
                        '是否现在配置API Key?',
                        '配置'
                    );
                    if (configureKey === '配置') {
                        await configureApiKeyCommand_handler();
                    }
                }
            }
        });
    } catch (error) {
        console.error('测试命令失败:', error);
        vscode.window.showErrorMessage(`测试失败: ${error instanceof Error ? error.message : '未知错误'}`);
    }
}我们关注generator.testConnection,它是测试连接的关键方法,返回一个连接标识,通过该标识可以知道连接状态。
若连接失败,我们需要根据报错类型来提供一些建议,比如如果报错类型涉及到API Key的问题,可以告知用户需要配置API Key,来引导用户去配置。
testConnection实现如下:
js
public async testConnection(): Promise<boolean> {
    try {
        // OpenAI模型测试
        const testChain = RunnableSequence.from([
            PromptTemplate.fromTemplate("Say 'Hello, LangChain!'"),
            this.llm,
            this.outputParser,
        ]);
        const result = await testChain.invoke({});
        return result.includes('Hello') || result.includes('LangChain');
    } catch (error) {
        console.error('LangChain连接测试失败:', error);
        return false;
    }
}
构建一个langchian执行链并执行,这里给一个简单的提示词,给大模型打个招呼👋,看看大模型会不会给我们返回相应的招呼信息。通过这种方式,我们可以测试和大模型之间的连接。
最后
本文我带着大家一步步实现了一个可以自动生成项目README文档的vscode插件,实现该项目需要大家具备一定的NodeJS开发能力和对vscode一些原生能力的理解。
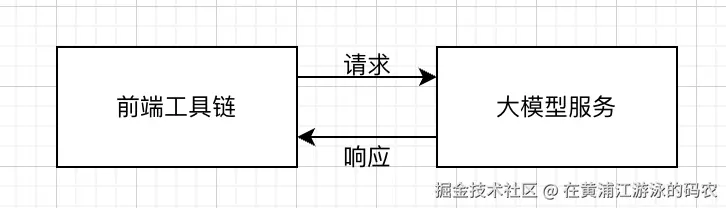 通过前端工具链+AI的结合,我们可以将AI赋能到我们的业务开发中,不断提高我们的生产效率,现在AI在逐渐成为前端工具链中不可或缺的一部分。对于本文这类的应用,可以理解为在原来写Node工具的基础上加上一层大模型API的调用即可,相当于请求了一个第三方服务。
即将岁末,在2025年最后一篇文章的最后,祝大家2026年,所愿皆所成!