【数字人学习之语音合成】Fun-CosyVoice3-0.5B-2512的windows系统中本地部署的方法
第一步:下载源代码:
对于不方便访问github的使用者,可以使用我的镜像地址:https://gitee.com/wei__yongda/CosyVoice
根据官方的教程:
bash
git clone --recursive https://github.com/FunAudioLLM/CosyVoice.git
\# If you failed to clone the submodule due to network failures, please run the following command until success
cd CosyVoice
git submodule update --init --recursive
我的地址是:
bash
git clone --recursive https://gitee.com/wei__yongda/CosyVoic
\# If you failed to clone the submodule due to network failures, please run the following command until success
cd CosyVoice
git submodule update --init --recursive
由于我的网络问题,我会出现一个坑:
bash
git clone --recursive https://gitee.com/wei__yongda/CosyVoice
Cloning into 'CosyVoice'...
remote: Enumerating objects: 3328, done.
remote: Counting objects: 100% (3328/3328), done.
remote: Compressing objects: 100% (1271/1271), done.
remote: Total 3328 (delta 1896), reused 3328 (delta 1896), pack-reused 0 (from 0)
Receiving objects: 100% (3328/3328), 2.60 MiB | 797.00 KiB/s, done.
Resolving deltas: 100% (1896/1896), done.
Submodule 'third_party/Matcha-TTS' (https://github.com/shivammehta25/Matcha-TTS.git) registered for path 'third_party/Matcha-TTS'
Cloning into 'E:/123/cosy/CosyVoice/third_party/Matcha-TTS'...
fatal: unable to access 'https://github.com/shivammehta25/Matcha-TTS.git/': Recv failure: Connection was aborted
fatal: clone of 'https://github.com/shivammehta25/Matcha-TTS.git' into submodule path 'E:/123/cosy/CosyVoice/third_party/Matcha-TTS' failed
Failed to clone 'third_party/Matcha-TTS'. Retry scheduled
Cloning into 'E:/123/cosy/CosyVoice/third_party/Matcha-TTS'...
fatal: unable to access 'https://github.com/shivammehta25/Matcha-TTS.git/': Failed to connect to github.com port 443 after 21051 ms: Couldn't connect to server
fatal: clone of 'https://github.com/shivammehta25/Matcha-TTS.git' into submodule path 'E:/123/cosy/CosyVoice/third_party/Matcha-TTS' failed
Failed to clone 'third_party/Matcha-TTS' a second time, aborting
这个时候,我就手动创建子模块目录并下载 Matcha-TTS,在 CosyVoice 项目根目录下,执行以下操作:
bash
# 创建 third_party 目录(如果不存在)
mkdir -p third_party
cd third_party

# 从 Gitee 镜像克隆 Matcha-TTS(避开 GitHub 网络问题)
git clone https://gitee.com/sleepingOuku/Matcha-TTS.git
第二步:虚拟环境(conda)注意,现在只支持python 3.11以前,请勿使用python 3.12版:
用conda的专用命令行工具,打开,然后进入到文件目录:
填坑记录:这里用conda create -n cosyvoice -y python=3.10命令创建虚拟环境时,最好而且必须指定一个版本,我没指定3.10,结果给我安装了3.14,然后后面浪费了大量时间。
powershell
#确认你的python版本
python --version
Python 3.10.10

# 创建名为 cosyvoice 的虚拟环境,必须指定3.10版!
conda create -n cosyvoice -y python=3.10
done
#
# To activate this environment, use
#
#     $ conda activate cosyvoice
#
# To deactivate an active environment, use
#
#     $ conda deactivate

#如果被提示conda有升级,可以升级以下conda
conda install conda=25.11.1

# 激活conda的虚拟环境
conda activate cosyvoice
(cosyvoice) PS E:\123\cosy\CosyVoice>
第三步:安装需要的依赖(这一步耗时长一些)
powershell
pip install -r requirements.txt -i https://mirrors.aliyun.com/pypi/simple/ --trusted-host=mirrors.aliyun.com

#如果遇到网络问题,可以考虑换下载源(例如腾讯云或者清华的)
# 激活 Python 3.10 的 venv 环境 或者 conda的虚拟环境 后执行
pip install -r requirements.txt -i https://mirrors.cloud.tencent.com/pypi/simple/ --trusted-host mirrors.cloud.tencent.com
pip install -r requirements.txt -i https://pypi.tuna.tsinghua.edu.cn/simple/ --trusted-host pypi.tuna.tsinghua.edu.cn
一号坑:
powershelll
Collecting wetext==0.0.4 (from -r requirements.txt (line 41))
  Downloading https://pypi.tuna.tsinghua.edu.cn/packages/12/27/83996eae3c30b4d551eb672a8c56215121cc88f7da022c258aa02f8166e2/wetext-0.0.4-py3-none-any.whl (10 kB)
Collecting wget==3.2 (from -r requirements.txt (line 42))
  Downloading https://pypi.tuna.tsinghua.edu.cn/packages/47/6a/62e288da7bcda82b935ff0c6cfe542970f04e29c756b0e147251b2fb251f/wget-3.2.zip (10 kB)
  Preparing metadata (setup.py) ... error
  error: subprocess-exited-with-error

  × python setup.py egg_info did not run successfully.
  │ exit code: 1
  ╰─> [1 lines of output]
      ERROR: Can not execute `setup.py` since setuptools is not available in the build environment.
      [end of output]

  note: This error originates from a subprocess, and is likely not a problem with pip.
error: metadata-generation-failed

× Encountered error while generating package metadata.
╰─> See above for output.

note: This is an issue with the package mentioned above, not pip.
hint: See above for details.
错误分析:
你在安装依赖时遇到了 wget==3.2 包的元数据生成失败问题,核心原因是该包的 setup.py 依赖 setuptools,但当前环境中 setuptools 版本不足或未正确安装
解决方法:
powershell
# 激活 cosyvoice 环境后执行
pip install --upgrade setuptools wheel -i https://pypi.tuna.tsinghua.edu.cn/simple
修改 requirements.txt 移除 wget:
打开项目根目录的 requirements.txt 文件,找到第 42 行的 wget==3.2,删除这一行,保存后重新安装依赖:
powershell
pip install -r requirements.txt -i https://pypi.tuna.tsinghua.edu.cn/simple/ --trusted-host pypi.tuna.tsinghua.edu.cn后来还是重新报错,还是没有找到setuptools.因为conda环境下,没有安装的有setuptools,所以pip无法找到。即使前面用pip安装了setuptools,但是仍然无果。因此,我们需要在conda中安装setuptools,因此进入到二号坑。
二号坑:conda版本更新
一定要用管理员身份启动conda的终端或者powershell
powershell
#先升级conda,先用管理员启动conda的终端
conda update -n base -c defaults conda
....
....
Done
#然后再安装 setuptools
conda install setuptools wheel -y
全部完成之后,关闭这个管理员身份的窗口。新打开一个conda的窗口。
powershell
(base) PS C:\Users\Mayn> cd E:\123\cosy\CosyVoice\
(base) PS E:\123\cosy\CosyVoice> conda activate cosyvoice
(cosyvoice) PS E:\123\cosy\CosyVoice>
重新进入激活后的虚拟环境。
再次执行依赖安装:
powershell
pip install -r requirements.txt -i https://mirrors.aliyun.com/pypi/simple/ --trusted-host=mirrors.aliyun.com
...
...
Collecting antlr4-python3-runtime==4.9.* (from hydra-core==1.3.2->-r requirements.txt (line 12))
  Using cached https://mirrors.aliyun.com/pypi/packages/3e/38/7859ff46355f76f8d19459005ca000b6e7012f2f1ca597746cbcd1fbfe5e/antlr4-python3-runtime-4.9.3.tar.gz (117 kB)
  Preparing metadata (setup.py) ... error
  error: subprocess-exited-with-error

  × python setup.py egg_info did not run successfully.
  │ exit code: 1
  ╰─> [1 lines of output]
      ERROR: Can not execute `setup.py` since setuptools is not available in the build environment.
      [end of output]

  note: This error originates from a subprocess, and is likely not a problem with pip.
error: metadata-generation-failed

× Encountered error while generating package metadata.
╰─> See above for output.

note: This is an issue with the package mentioned above, not pip.
hint: See above for details.
错误原因:
antlr4-python3-runtime==4.9这个包编译失败。核心原因是即便装好了 setuptools,pip 默认的「构建隔离环境」依然无法访问它(和你 pip 路径在系统全局、不在 conda 环境内有关)。解决这个问题的关键是强制关闭构建隔离,同时指定用 conda 环境内的 setuptools 来编译,
最终解决方案:重建干净的 conda 环境(仅需 5 步)
- 先删除当前有冲突的 cosyvoice 环境:
- 重新创建纯净的 Python 3.10 环境(关键!)
- 激活新环境并升级基础工具(仅装必要的)
- 安装 jaraco.functools 最新版(补全 splat 函数)
- 关闭构建隔离安装所有依赖(最终一步)
详细过程见下面命令行:
powershell
# 先退出当前环境(如果激活了)
conda deactivate

# 删除损坏的环境
conda remove -n cosyvoice --all -y
# 创建新环境,指定 Python 3.10.11(最稳定版本)+ 国内源
conda create -n cosyvoice_clean python=3.10.11 -y -c https://mirrors.tuna.tsinghua.edu.cn/anaconda/pkgs/main/
# 激活干净的新环境
conda activate cosyvoice_clean

# 升级 pip + 安装稳定版 setuptools/wheel(避免冲突)
python -m pip install --upgrade pip==24.0 setuptools==65.5.0 wheel==0.43.0 -i https://pypi.tuna.tsinghua.edu.cn/simple
pip install --upgrade jaraco.functools -i https://pypi.tuna.tsinghua.edu.cn/simple
# 进入 CosyVoice 项目目录
cd E:\123\cosy\CosyVoice

# 核心命令:干净环境 + 关闭构建隔离 + 阿里云源
pip install -r requirements.txt --no-build-isolation -i https://pypi.tuna.tsinghua.edu.cn/simple/ --trusted-host pypi.tuna.tsinghua.edu.cn --timeout 600
pip install mkl==2021.4.0 -i https://pypi.tuna.tsinghua.edu.cn/simple/ --trusted-host pypi.tuna.tsinghua.edu.cn --timeout 600
pip install -r requirements.txt --no-build-isolation -i https://pypi.tuna.tsinghua.edu.cn/simple/ --trusted-host pypi.tuna.tsinghua.edu.cn --timeout 600
同时可进行的:下载需要的模型
按照官方网站的方法:
python
(cosyvoice_clean) PS E:\123\cosy\CosyVoice> python
Python 3.10.11 | packaged by Anaconda, Inc. | (main, May 16 2023, 00:55:32) [MSC v.1916 64 bit (AMD64)] on win32
Type "help", "copyright", "credits" or "license" for more information.
>>> from modelscope import snapshot_download
>>>snapshot_download('FunAudioLLM/Fun-CosyVoice3-0.5B-2512', local_dir='pretrained_models/Fun-CosyVoice3-0.5B')
>>>snapshot_download('iic/CosyVoice-ttsfrd', local_dir='pretrained_models/CosyVoice-ttsfrd')我的做法是在modelscope社区的主页上下载文件:https://www.modelscope.cn/models/FunAudioLLM/Fun-CosyVoice3-0.5B-2512/files
因为要下载的文件大约有8G左右,我就用迅雷下载。(记得新建一个名为"pretrained_models"的文件夹),它的路径应该是:E:\123\cosy\CosyVoice\pretrained_models
下载的文件列表中,比较占用网络和下载时间的有:
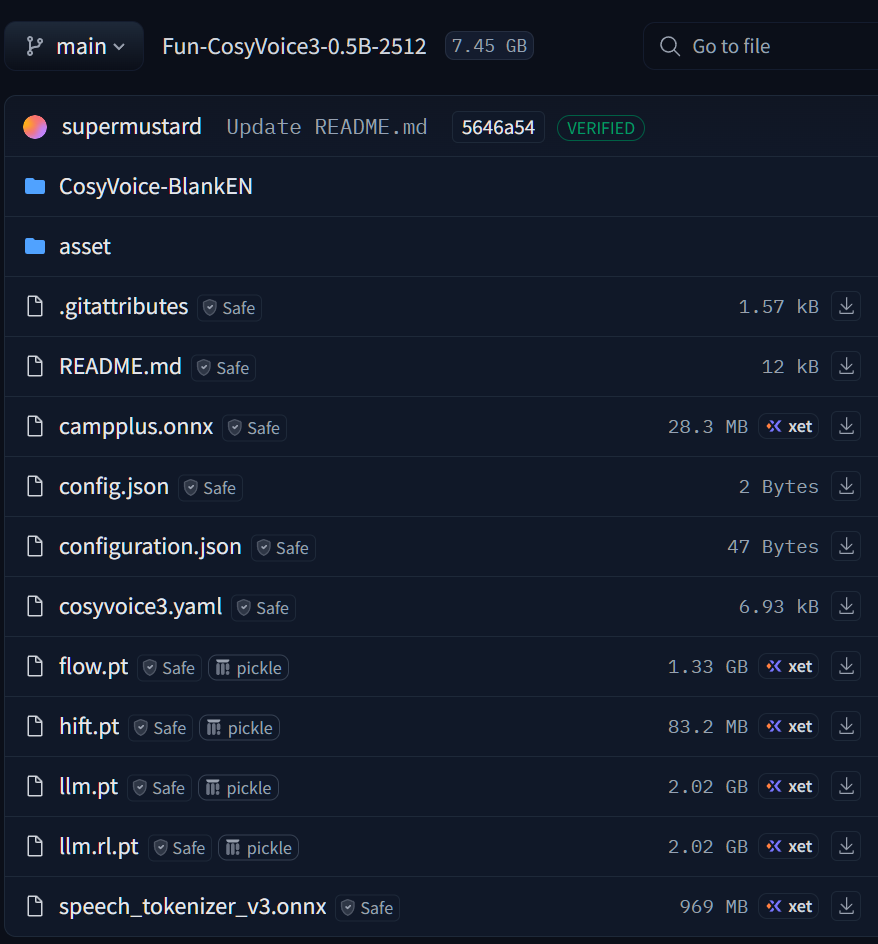
我们注意到,1G左右及以上的文件有4个左右。可以用下载工具先进行下载来代替官方网站的做法。
下载完之后,就会有:
E:\123\cosy\CosyVoice\pretrained_models\CosyVoice-ttsfrd
E:\123\cosy\CosyVoice\pretrained_models\Fun-CosyVoice3-0.5B
不过由于windows不能使用CosyVoice-ttsfrd,我们这里略过,因为:
ttsfrd 本身就没有 Windows 版本的预编译包,且该库是 Linux 专属的文本归一化工具,Windows 下无法安装。不过你完全不用纠结这个包 ------ 之前启动 Web UI 时的 failed to import ttsfrd, use wetext instead 是友好降级提示,程序已经自动用 wetext 替代了 ttsfrd,缺失 ttsfrd 完全不影响 CosyVoice 的核心功能。
尝试启动:webui.py
powershell
 (cosyvoice_clean) PS E:\123\cosy\CosyVoice> python webui.py --server_port 8880
failed to import ttsfrd, use wetext instead
Traceback (most recent call last):
  File "E:\123\cosy\CosyVoice\cosyvoice\cli\frontend.py", line 28, in <module>
    import ttsfrd
ModuleNotFoundError: No module named 'ttsfrd'

During handling of the above exception, another exception occurred:

Traceback (most recent call last):
  File "E:\123\cosy\CosyVoice\webui.py", line 25, in <module>
    from cosyvoice.cli.cosyvoice import AutoModel
  File "E:\123\cosy\CosyVoice\cosyvoice\cli\cosyvoice.py", line 21, in <module>
    from cosyvoice.cli.frontend import CosyVoiceFrontEnd
  File "E:\123\cosy\CosyVoice\cosyvoice\cli\frontend.py", line 32, in <module>
    from wetext import Normalizer as ZhNormalizer
  File "C:\Users\Mayn\.conda\envs\cosyvoice_clean\lib\site-packages\wetext\__init__.py", line 15, in <module>
    from .wetext import Normalizer
  File "C:\Users\Mayn\.conda\envs\cosyvoice_clean\lib\site-packages\wetext\wetext.py", line 17, in <module>
    from kaldifst import TextNormalizer as normalizer
  File "C:\Users\Mayn\.conda\envs\cosyvoice_clean\lib\site-packages\kaldifst\__init__.py", line 1, in <module>
    from _kaldifst import (
ImportError: DLL load failed while importing _kaldifst: 动态链接库(DLL)初始化例程失败。
kaldifst 的 DLL 加载失败,90% 是因为缺少微软 VC++ 运行库,先安装必备组件:
下载 Microsoft Visual C++ 2015-2022 运行库 (x64);
双击安装(默认下一步即可),安装完成后重启电脑(必须重启,让运行库生效)。
重启之后,然后重新打开conda powershell,再次激活环境
powershell
(base) PS E:\123\cosy\CosyVoice> conda activate cosyvoice_clean
(cosyvoice_clean) PS E:\123\cosy\CosyVoice> python webui.py
我还是出错,我尝试下载缺失的 DLL 文件(兜底方案)
如果修复运行库后仍报错,下载 kaldifst 依赖的 libstdc+±6.dll 和 libgcc_s_seh-1.dll:
访问 DLL 下载站,搜索并下载这两个 DLL(选择 64 位版本);
将 DLL 文件复制到 C:\Users\Mayn.conda\envs\cosyvoice_clean\Lib\site-packages\kaldifst 目录下。
结果还是报错。
解决
powershell
Traceback (most recent call last):
  File "E:\123\cosy\CosyVoice\webui.py", line 25, in <module>
    from cosyvoice.cli.cosyvoice import AutoModel
  File "E:\123\cosy\CosyVoice\cosyvoice\cli\cosyvoice.py", line 21, in <module>
    from cosyvoice.cli.frontend import CosyVoiceFrontEnd
  File "E:\123\cosy\CosyVoice\cosyvoice\cli\frontend.py", line 32, in <module>
    from wetext import Normalizer as ZhNormalizer
  File "C:\Users\Mayn\.conda\envs\cosyvoice_clean\lib\site-packages\wetext\__init__.py", line 15, in <module>
    from .wetext import Normalizer
  File "C:\Users\Mayn\.conda\envs\cosyvoice_clean\lib\site-packages\wetext\wetext.py", line 17, in <module>
    from kaldifst import TextNormalizer as normalizer
  File "C:\Users\Mayn\.conda\envs\cosyvoice_clean\lib\site-packages\kaldifst\__init__.py", line 1, in <module>
    from _kaldifst import (
ImportError: DLL load failed while importing _kaldifst: 动态链接库(DLL)初始化例程失败。
我已经下载好了libgcc_s_seh-1.dll和libstdc+±6.dll放在C:\Users\Mayn.conda\envs\cosyvoice_clean\Lib\site-packages\kaldifst 位置上了:
最终解决方案:注释掉 wetext/kaldifst 相关代码
步骤 1:打开 cosyvoice/cli/frontend.py 文件
找到文件路径:E:\123\cosy\CosyVoice\cosyvoice\cli\frontend.py,用记事本 / VS Code 打开。
修改代码:
python
try:
    import ttsfrd
    use_ttsfrd = True
except ImportError:
    print("failed to import ttsfrd, skip text normalization (Windows compatible mode)")
    # 定义空的归一化器类,替代 wetext
    class DummyNormalizer:
        def normalize(self, text):
            return text
    ZhNormalizer = DummyNormalizer
    EnNormalizer = DummyNormalizer
    use_ttsfrd = False

# ... 中间代码省略 ...

if self.use_ttsfrd:
    self.frd = ttsfrd.TtsFrontendEngine()
    ROOT_DIR = os.path.dirname(os.path.abspath(__file__))
    assert self.frd.initialize('{}/../../pretrained_models/CosyVoice-ttsfrd/resource'.format(ROOT_DIR)) is True, \
        'failed to initialize ttsfrd resource'
    self.frd.set_lang_type('pinyinvg')
else:
    self.zh_tn_model = ZhNormalizer()  # 使用空归一化器
    self.en_tn_model = EnNormalizer()  # 使用空归一化器
    self.inflect_parser = inflect.engine()
如果你不想找,可以复制以下E:\123\cosy\CosyVoice\cosyvoice\cli\frontend.py的完整的代码:
python
# Copyright (c) 2024 Alibaba Inc (authors: Xiang Lyu)
#
# Licensed under the Apache License, Version 2.0 (the "License");
# you may not use this file except in compliance with the License.
# You may obtain a copy of the License at
#
#   http://www.apache.org/licenses/LICENSE-2.0
#
# Unless required by applicable law or agreed to in writing, software
# distributed under the License is distributed on an "AS IS" BASIS,
# WITHOUT WARRANTIES OR CONDITIONS OF ANY KIND, either express or implied.
# See the License for the specific language governing permissions and
# limitations under the License.
from functools import partial
from typing import Generator
import json
import onnxruntime
import torch
import numpy as np
import whisper
from typing import Callable
import torchaudio.compliance.kaldi as kaldi
import torchaudio
import os
import re
import inflect
try:
    import ttsfrd
    use_ttsfrd = True
except ImportError:
    print("failed to import ttsfrd, skip text normalization (Windows compatible mode)")
    # 定义空的归一化器类,替代 wetext
    class DummyNormalizer:
        def normalize(self, text):
            return text
    ZhNormalizer = DummyNormalizer
    EnNormalizer = DummyNormalizer
    use_ttsfrd = False
from cosyvoice.utils.file_utils import logging, load_wav
from cosyvoice.utils.frontend_utils import contains_chinese, replace_blank, replace_corner_mark, remove_bracket, spell_out_number, split_paragraph, is_only_punctuation


class CosyVoiceFrontEnd:

    def __init__(self,
                 get_tokenizer: Callable,
                 feat_extractor: Callable,
                 campplus_model: str,
                 speech_tokenizer_model: str,
                 spk2info: str = '',
                 allowed_special: str = 'all'):
        self.tokenizer = get_tokenizer()
        self.feat_extractor = feat_extractor
        self.device = torch.device('cuda' if torch.cuda.is_available() else 'cpu')
        option = onnxruntime.SessionOptions()
        option.graph_optimization_level = onnxruntime.GraphOptimizationLevel.ORT_ENABLE_ALL
        option.intra_op_num_threads = 1
        self.campplus_session = onnxruntime.InferenceSession(campplus_model, sess_options=option, providers=["CPUExecutionProvider"])
        self.speech_tokenizer_session = onnxruntime.InferenceSession(speech_tokenizer_model, sess_options=option,
                                                                     providers=["CUDAExecutionProvider" if torch.cuda.is_available() else
                                                                                "CPUExecutionProvider"])
        if os.path.exists(spk2info):
            self.spk2info = torch.load(spk2info, map_location=self.device)
        else:
            self.spk2info = {}
        self.allowed_special = allowed_special
        self.use_ttsfrd = use_ttsfrd
        if self.use_ttsfrd:
            self.frd = ttsfrd.TtsFrontendEngine()
            ROOT_DIR = os.path.dirname(os.path.abspath(__file__))
            assert self.frd.initialize('{}/../../pretrained_models/CosyVoice-ttsfrd/resource'.format(ROOT_DIR)) is True, \
                'failed to initialize ttsfrd resource'
            self.frd.set_lang_type('pinyinvg')
        else:
            self.zh_tn_model = ZhNormalizer()  # 使用空归一化器
            self.en_tn_model = EnNormalizer()  # 使用空归一化器
            self.inflect_parser = inflect.engine()

    def _extract_text_token(self, text):
        if isinstance(text, Generator):
            logging.info('get tts_text generator, will return _extract_text_token_generator!')
            # NOTE add a dummy text_token_len for compatibility
            return self._extract_text_token_generator(text), torch.tensor([0], dtype=torch.int32).to(self.device)
        else:
            text_token = self.tokenizer.encode(text, allowed_special=self.allowed_special)
            text_token = torch.tensor([text_token], dtype=torch.int32).to(self.device)
            text_token_len = torch.tensor([text_token.shape[1]], dtype=torch.int32).to(self.device)
            return text_token, text_token_len

    def _extract_text_token_generator(self, text_generator):
        for text in text_generator:
            text_token, _ = self._extract_text_token(text)
            for i in range(text_token.shape[1]):
                yield text_token[:, i: i + 1]

    def _extract_speech_token(self, prompt_wav):
        speech = load_wav(prompt_wav, 16000)
        assert speech.shape[1] / 16000 <= 30, 'do not support extract speech token for audio longer than 30s'
        feat = whisper.log_mel_spectrogram(speech, n_mels=128)
        speech_token = self.speech_tokenizer_session.run(None,
                                                         {self.speech_tokenizer_session.get_inputs()[0].name:
                                                          feat.detach().cpu().numpy(),
                                                          self.speech_tokenizer_session.get_inputs()[1].name:
                                                          np.array([feat.shape[2]], dtype=np.int32)})[0].flatten().tolist()
        speech_token = torch.tensor([speech_token], dtype=torch.int32).to(self.device)
        speech_token_len = torch.tensor([speech_token.shape[1]], dtype=torch.int32).to(self.device)
        return speech_token, speech_token_len

    def _extract_spk_embedding(self, prompt_wav):
        speech = load_wav(prompt_wav, 16000)
        feat = kaldi.fbank(speech,
                           num_mel_bins=80,
                           dither=0,
                           sample_frequency=16000)
        feat = feat - feat.mean(dim=0, keepdim=True)
        embedding = self.campplus_session.run(None,
                                              {self.campplus_session.get_inputs()[0].name: feat.unsqueeze(dim=0).cpu().numpy()})[0].flatten().tolist()
        embedding = torch.tensor([embedding]).to(self.device)
        return embedding

    def _extract_speech_feat(self, prompt_wav):
        speech = load_wav(prompt_wav, 24000)
        speech_feat = self.feat_extractor(speech).squeeze(dim=0).transpose(0, 1).to(self.device)
        speech_feat = speech_feat.unsqueeze(dim=0)
        speech_feat_len = torch.tensor([speech_feat.shape[1]], dtype=torch.int32).to(self.device)
        return speech_feat, speech_feat_len

    def text_normalize(self, text, split=True, text_frontend=True):
        if isinstance(text, Generator):
            logging.info('get tts_text generator, will skip text_normalize!')
            return [text]
        # NOTE skip text_frontend when ssml symbol in text
        if '<|' in text and '|>' in text:
            text_frontend = False
        if text_frontend is False or text == '':
            return [text] if split is True else text
        text = text.strip()
        if self.use_ttsfrd:
            texts = [i["text"] for i in json.loads(self.frd.do_voicegen_frd(text))["sentences"]]
            text = ''.join(texts)
        else:
            if contains_chinese(text):
                text = self.zh_tn_model.normalize(text)
                text = text.replace("\n", "")
                text = replace_blank(text)
                text = replace_corner_mark(text)
                text = text.replace(".", "。")
                text = text.replace(" - ", ",")
                text = remove_bracket(text)
                text = re.sub(r'[,,、]+$', '。', text)
                texts = list(split_paragraph(text, partial(self.tokenizer.encode, allowed_special=self.allowed_special), "zh", token_max_n=80,
                                             token_min_n=60, merge_len=20, comma_split=False))
            else:
                text = self.en_tn_model.normalize(text)
                text = spell_out_number(text, self.inflect_parser)
                texts = list(split_paragraph(text, partial(self.tokenizer.encode, allowed_special=self.allowed_special), "en", token_max_n=80,
                                             token_min_n=60, merge_len=20, comma_split=False))
        texts = [i for i in texts if not is_only_punctuation(i)]
        return texts if split is True else text

    def frontend_sft(self, tts_text, spk_id):
        tts_text_token, tts_text_token_len = self._extract_text_token(tts_text)
        embedding = self.spk2info[spk_id]['embedding']
        model_input = {'text': tts_text_token, 'text_len': tts_text_token_len, 'llm_embedding': embedding, 'flow_embedding': embedding}
        return model_input

    def frontend_zero_shot(self, tts_text, prompt_text, prompt_wav, resample_rate, zero_shot_spk_id):
        tts_text_token, tts_text_token_len = self._extract_text_token(tts_text)
        if zero_shot_spk_id == '':
            prompt_text_token, prompt_text_token_len = self._extract_text_token(prompt_text)
            speech_feat, speech_feat_len = self._extract_speech_feat(prompt_wav)
            speech_token, speech_token_len = self._extract_speech_token(prompt_wav)
            if resample_rate == 24000:
                # cosyvoice2, force speech_feat % speech_token = 2
                token_len = min(int(speech_feat.shape[1] / 2), speech_token.shape[1])
                speech_feat, speech_feat_len[:] = speech_feat[:, :2 * token_len], 2 * token_len
                speech_token, speech_token_len[:] = speech_token[:, :token_len], token_len
            embedding = self._extract_spk_embedding(prompt_wav)
            model_input = {'prompt_text': prompt_text_token, 'prompt_text_len': prompt_text_token_len,
                           'llm_prompt_speech_token': speech_token, 'llm_prompt_speech_token_len': speech_token_len,
                           'flow_prompt_speech_token': speech_token, 'flow_prompt_speech_token_len': speech_token_len,
                           'prompt_speech_feat': speech_feat, 'prompt_speech_feat_len': speech_feat_len,
                           'llm_embedding': embedding, 'flow_embedding': embedding}
        else:
            model_input = self.spk2info[zero_shot_spk_id]
        model_input['text'] = tts_text_token
        model_input['text_len'] = tts_text_token_len
        return model_input

    def frontend_cross_lingual(self, tts_text, prompt_wav, resample_rate, zero_shot_spk_id):
        model_input = self.frontend_zero_shot(tts_text, '', prompt_wav, resample_rate, zero_shot_spk_id)
        # in cross lingual mode, we remove prompt in llm
        del model_input['prompt_text']
        del model_input['prompt_text_len']
        del model_input['llm_prompt_speech_token']
        del model_input['llm_prompt_speech_token_len']
        return model_input

    def frontend_instruct(self, tts_text, spk_id, instruct_text):
        model_input = self.frontend_sft(tts_text, spk_id)
        # in instruct mode, we remove spk_embedding in llm due to information leakage
        del model_input['llm_embedding']
        instruct_text_token, instruct_text_token_len = self._extract_text_token(instruct_text)
        model_input['prompt_text'] = instruct_text_token
        model_input['prompt_text_len'] = instruct_text_token_len
        return model_input

    def frontend_instruct2(self, tts_text, instruct_text, prompt_wav, resample_rate, zero_shot_spk_id):
        model_input = self.frontend_zero_shot(tts_text, instruct_text, prompt_wav, resample_rate, zero_shot_spk_id)
        del model_input['llm_prompt_speech_token']
        del model_input['llm_prompt_speech_token_len']
        return model_input

    def frontend_vc(self, source_speech_16k, prompt_wav, resample_rate):
        prompt_speech_token, prompt_speech_token_len = self._extract_speech_token(prompt_wav)
        prompt_speech_feat, prompt_speech_feat_len = self._extract_speech_feat(prompt_wav)
        embedding = self._extract_spk_embedding(prompt_wav)
        source_speech_token, source_speech_token_len = self._extract_speech_token(source_speech_16k)
        model_input = {'source_speech_token': source_speech_token, 'source_speech_token_len': source_speech_token_len,
                       'flow_prompt_speech_token': prompt_speech_token, 'flow_prompt_speech_token_len': prompt_speech_token_len,
                       'prompt_speech_feat': prompt_speech_feat, 'prompt_speech_feat_len': prompt_speech_feat_len,
                       'flow_embedding': embedding}
        return model_input
接着报错:没有wget
现在遇到的是 third_party/Matcha-TTS 目录下的代码依赖 wget 包的报错,核心原因是:不仅 requirements.txt 里有 wget,第三方依赖 Matcha-TTS 也引用了 wget,之前只删了 requirements.txt 的 wget 但没处理源码中的引用。
如果不想修改源码,也可以安装 Windows 兼容的 wget 替代包:
pip install pywget -i https://pypi.tuna.tsinghua.edu.cn/simple
python
# 新建一个 wget.py 文件在项目根目录,做兼容映射:
# E:\123\cosy\CosyVoice\wget.py
import pywget
download = pywget.download
然后把这个 wget.py 所在目录加入 Python 路径(在 webui.py 开头加,即修改webui.py主文件):
python
import sys
sys.path.insert(0, 'E:\\123\\cosy\\CosyVoice')
启动成功!!
由于使用了ffmpeg的组件,你使用的时候可能还需要安装它(如果你有,可以跳过。)
conda install ffmpeg -y -c conda-forge
powershell
#启动命令:
(cosyvoice_clean) PS E:\123\cosy\CosyVoice> python webui.py --model_dir pretrained_models/Fun-CosyVoice3-0.5B
...
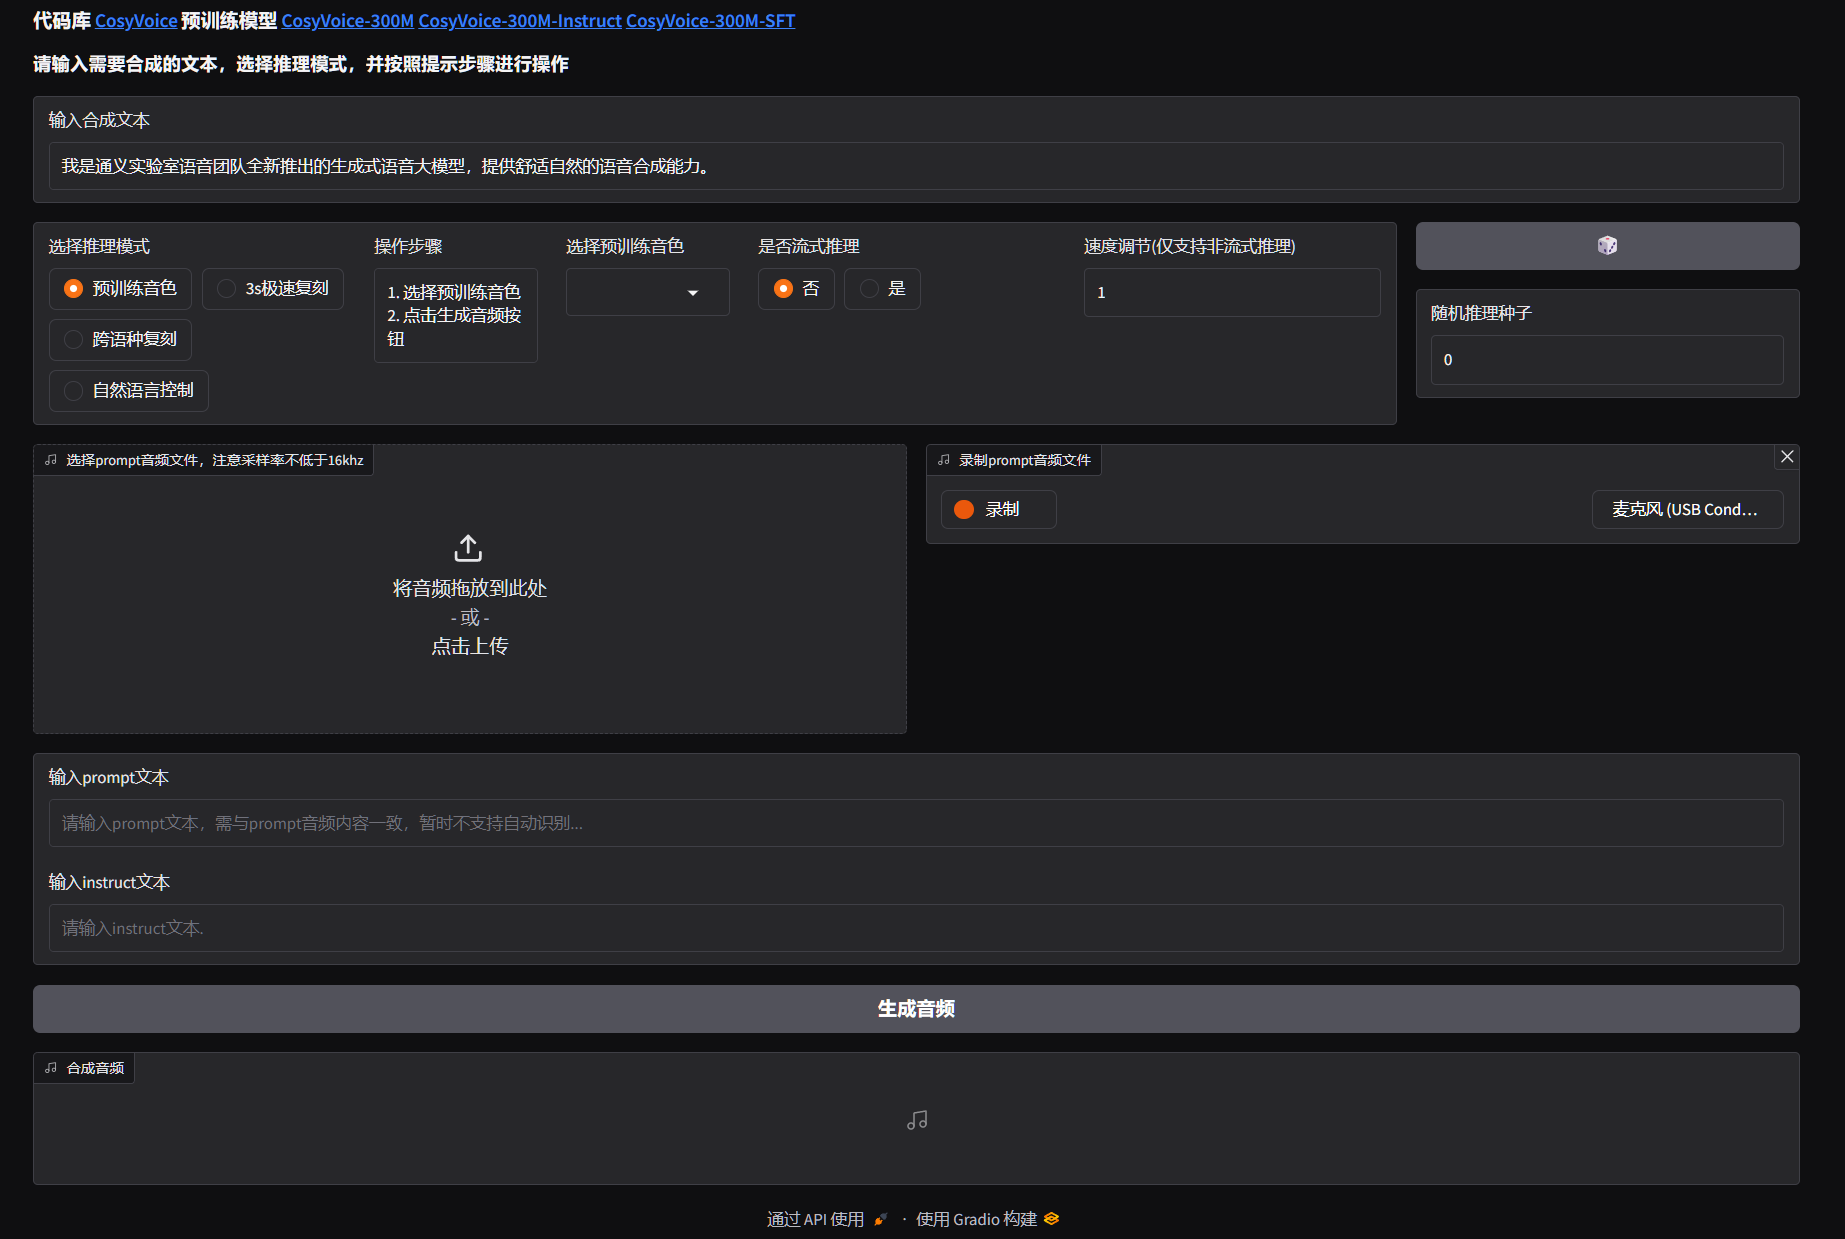
* Running on local URL: http://0.0.0.0:8000
...打开浏览器,输入地址:http://localhost:8000/ 看到页面:
使用example.py:
powershell
#执行运行示例可以检验安装是否完成:
(cosyvoice_clean) PS E:\123\cosy\CosyVoice> python example.py
运行之后本地产生以下音频:
zero_shot_0.wav ...
共四个wav文件。
我们在E:\123\cosy\CosyVoice\asset路径上找到zero_shot_prompt.wav这个文件,替换成你自己喜欢人物的声音文件,即可。
当然,你也可以修改 example.py 的代码,
python
#源代码89行
    for i, j in enumerate(cosyvoice.inference_instruct2('收到好友从远方寄来的生日礼物,那份意外的惊喜与深深的祝福让我心中充满了甜蜜的快乐,笑容如花儿般绽放。', 'You are a helpful assistant. 请用尽可能快地语速说一句话。<|endofprompt|>',
                                                        './asset/zero_shot_prompt.wav', stream=False)):
#改成:
    for i, j in enumerate(cosyvoice.inference_instruct2('收到好友从远方寄来的生日礼物,那份意外的惊喜与深深的祝福让我心中充满了甜蜜的快乐,笑容如花儿般绽放。', 'You are a helpful assistant. 请用尽可能快地语速说一句话。<|endofprompt|>',
                                                        './asset/new_voice.wav', stream=False)):
扩展功能:
1:替换参考音:通过录制新的声音作为音色参考。
2:直接替换语音。例如你用粤语录制一首歌,清唱,歌词例如是"喜欢你,那双眼动人,笑声更迷人。"。然后,我们输入另外一个性别的参考音(主要是利于区别),然后用以下代码进行生成新的音频(wav)
python
import sys
import torch
import torchaudio
sys.path.append('third_party/Matcha-TTS')
from cosyvoice.cli.cosyvoice import AutoModel

def convert_to_stereo(audio: torch.Tensor) -> torch.Tensor:
    """
    将单声道音频转换为立体声(左右声道相同)
    :param audio: 输入音频,shape [1, n_samples](单声道)
    :return: 立体声音频,shape [2, n_samples]
    """
    if audio.dim() == 2 and audio.shape[0] == 1:
        # 复制单声道为双声道
        stereo_audio = torch.cat([audio, audio], dim=0)
        return stereo_audio
    return audio

def resample_audio(audio: torch.Tensor, src_sr: int, target_sr: int) -> torch.Tensor:
    """
    重采样音频到目标采样率
    :param audio: 输入音频,shape [channels, n_samples]
    :param src_sr: 原采样率
    :param target_sr: 目标采样率
    :return: 重采样后的音频
    """
    if src_sr != target_sr:
        # torchaudio重采样要求输入为 [n_channels, n_samples]
        resampler = torchaudio.transforms.Resample(
            orig_freq=src_sr,
            new_freq=target_sr,
            dtype=audio.dtype
        )
        audio = resampler(audio)
    return audio

def generate_cantonese_reference_audio(cosyvoice, text: str, prompt_wav: str) -> str:
    """
    生成粤语风格的参考音频(用于VC的目标音色)
    :param cosyvoice: CosyVoice模型实例
    :param text: 粤语文本
    :param prompt_wav: 基础参考音频
    :return: 粤语参考音频路径
    """
    # 指令:强制用粤语合成
    instruct_text = "You are a helpful assistant. 请用标准粤语(广东话)朗读下面的文本,语气自然。<|endofprompt|>"
    # 生成粤语参考音频
    ref_audio_path = "./need/cantonese_ref.wav"
    for i, output in enumerate(cosyvoice.inference_instruct2(
        tts_text=text,
        instruct_text=instruct_text,
        prompt_wav=prompt_wav,
        stream=False
    )):
        # 保存粤语参考音频(单声道+默认采样率)
        torchaudio.save(
            ref_audio_path,
            output['tts_speech'],
            cosyvoice.sample_rate
        )
    return ref_audio_path

def cosyvoice3_example():
    """ CosyVoice3 语音转换 + 立体声 + 自定义采样率 + 粤语风格 """
    # 1. 加载模型
    cosyvoice = AutoModel(model_dir='pretrained_models/Fun-CosyVoice3-0.5B')

    # 2. 配置参数
    target_sample_rate = 44100  # 目标采样率(常用:16000/22050/44100/48000)
    cantonese_text = '如果天气不错,就出去晒太阳。真的是一个好主意!请一定要用广东话表达你的意思。'  # 粤语文本(用于生成粤语参考音频)

    # 3. 生成粤语风格的参考音频(关键:让VC转换后的音频带粤语风格)
    cantonese_ref_wav = generate_cantonese_reference_audio(
        cosyvoice,
        cantonese_text,
        "./asset/bufeiyan.wav"  # 基础参考音频
    )

    # 4. 语音转换(使用粤语参考音频)
    for i, output in enumerate(cosyvoice.inference_vc(
        source_wav="./need/source_audio.wav",  # 源音频(要转换的内容)
        prompt_wav=cantonese_ref_wav,          # 粤语风格的目标音色参考音频
        stream=False
    )):
        # 提取生成的音频数据(默认:单声道 + cosyvoice.sample_rate采样率)
        audio = output['tts_speech']

        # 5. 转换为立体声
        stereo_audio = convert_to_stereo(audio)

        # 6. 重采样到目标采样率
        resampled_audio = resample_audio(stereo_audio, cosyvoice.sample_rate, target_sample_rate)

        # 7. 保存最终音频
        save_path = f"./need/vc_conversion_cantonese_stereo_{target_sample_rate}Hz_{i}.wav"
        torchaudio.save(
            save_path,
            resampled_audio,
            target_sample_rate
        )
        print(f"✅ 粤语立体声音频已保存:{save_path}")

def main():
    cosyvoice3_example()

if __name__ == '__main__':
    main()
这样你就可以获得"vc_conversion_cantonese_stereo_44100Hz_0.wav"作为输出,这就是你要的新的歌曲(清唱)了。
除了粤语,你还可以尝试普通话等。
这里来一个效果视频(调皮)
cosyVoice_example