1 compose输入框简介
compose中提供的输入框有TextField和BasicTextField两个组合函数,但是实际上TextField组合函数是基于BasicTextField进行了封装,在实际的开发过程中大多数情况是围绕BasicTextField进行的,本文也主要基于BasicTextField组合函数进行介绍。
1.1 BasicTextField输入框功能介绍
BasicTextField中的参数非常的多,这里就不对每一个参数进行介绍了,本文也按照实际开发中常用的参数和场景来介绍,为了方便后面的介绍,这里单独列出BasicTextField组合函数的方法入参
kotlin
@Composable
fun BasicTextField(
    value: TextFieldValue,
    onValueChange: (TextFieldValue) -> Unit,
    modifier: Modifier = Modifier,
    enabled: Boolean = true,
    readOnly: Boolean = false,
    textStyle: TextStyle = TextStyle.Default,
    keyboardOptions: KeyboardOptions = KeyboardOptions.Default,
    keyboardActions: KeyboardActions = KeyboardActions.Default,
    singleLine: Boolean = false,
    maxLines: Int = if (singleLine) 1 else Int.MAX_VALUE,
    minLines: Int = 1,
    visualTransformation: VisualTransformation = VisualTransformation.None,
    onTextLayout: (TextLayoutResult) -> Unit = {},
    interactionSource: MutableInteractionSource? = null,
    cursorBrush: Brush = SolidColor(Color.Black),
    decorationBox: @Composable (innerTextField: @Composable () -> Unit) -> Unit =
        @Composable { innerTextField -> innerTextField() }
)
这里重点介绍几个参数,value参数意思是当前输入框展示的输入文本,onValueChange参数是输入框数据变化回调,这两个是必传参数。keyboardOptions是输入框键盘选项,支持自定义的键盘选项,其构造参数如下:
kotlin
class KeyboardOptions(
// a、输入文案大小写控制
val capitalization: KeyboardCapitalization = KeyboardCapitalization.Unspecified,
// b、自动纠错
val autoCorrectEnabled: Boolean? = null,
// c、键盘类型
val keyboardType: KeyboardType = KeyboardType.Unspecified,
// d、键盘功能按钮设置(通常是右下角的按钮)
val imeAction: ImeAction = ImeAction.Unspecified,
val platformImeOptions: PlatformImeOptions? = null,
// e、获得焦点时展示键盘
val showKeyboardOnFocus: Boolean? = null,
val hintLocales: LocaleList? = null,
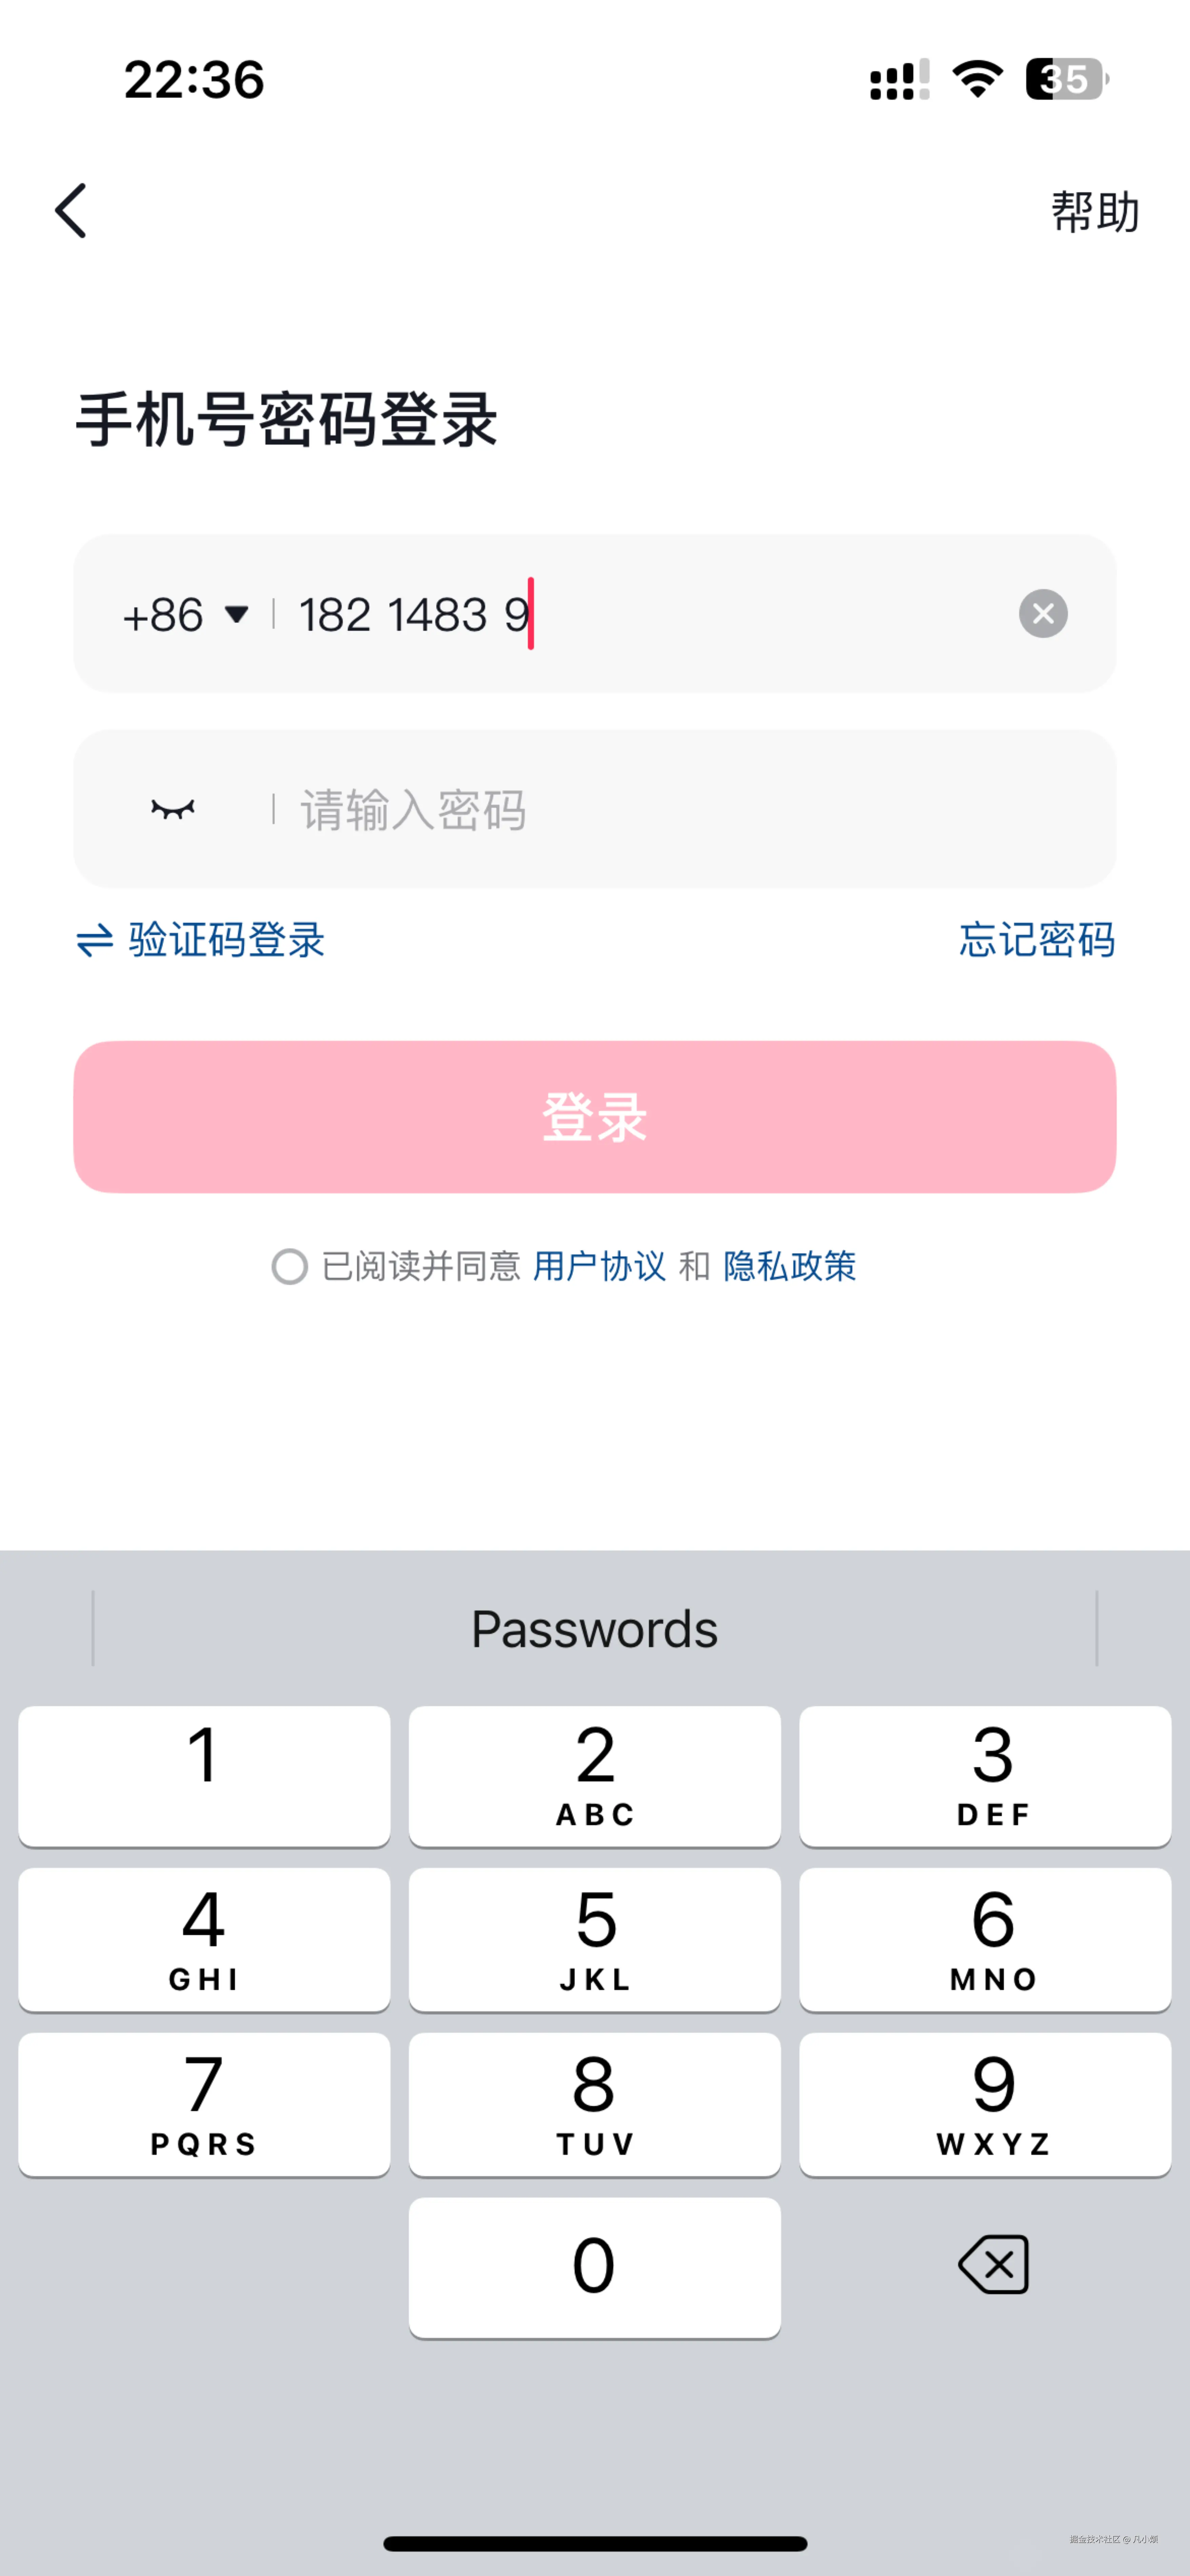
)上述注释的参数中重点讲一下keyboardType和imeAction参数的意义,其中keyboardType用于指定输入框中输入的数据内容,如电话号码、邮箱、密码等类型,以keyboardType设置为KeyboardType.Phone为例,输入框在获取焦点后默认弹出纯数字键盘,不过需要注意的是这个弹出的键盘类型系统是不保证默认的键盘类型的,具体依赖于各个键盘输入法的实现。imeAction则定义输入框获取焦点后弹出键盘的功能按钮样式,以设置imeAction为ImeAction.Search为例,键盘的功能按钮可能会显示搜索文案或者一个放大镜icon,具体的展示样式与使用的键盘软件实现有关。imeAction参数在实际的开发中很有用,比如在一个聊天输入框中,可能需要默认展示的按钮为发送,则可以设置为ImeAction.Send(下图为设置了imeAction为ImeAction.Search)。
BasicTextField的keyboardActions参数是另一个需要关注的参数,前面介绍imeAction的时候知道imeAction可以定义键盘功能按钮的展示,而keyboardActions可以定义imeAction展示的按钮对应的行为,例如前面设置了ImeAction.Send,对应的可以设置keyboardActions的onSend参数行为(一般是处理业务逻辑),这样用户在点击键盘的功能按钮时可以按照预设的业务逻辑执行。
1.2 BasicTextField输入框的实例介绍
前面介绍了BasicTextField的几个重要参数,接下来就以BasicTextField在实际开发中的常见的几个使用场景为例展开,本文的例子主要包括手机号输入框、密码输入框和验证码输入框。接下来的章节一起看看这几种输入框的在compose中的实现吧。
2 compose输入框实例
2.1 手机号码输入框
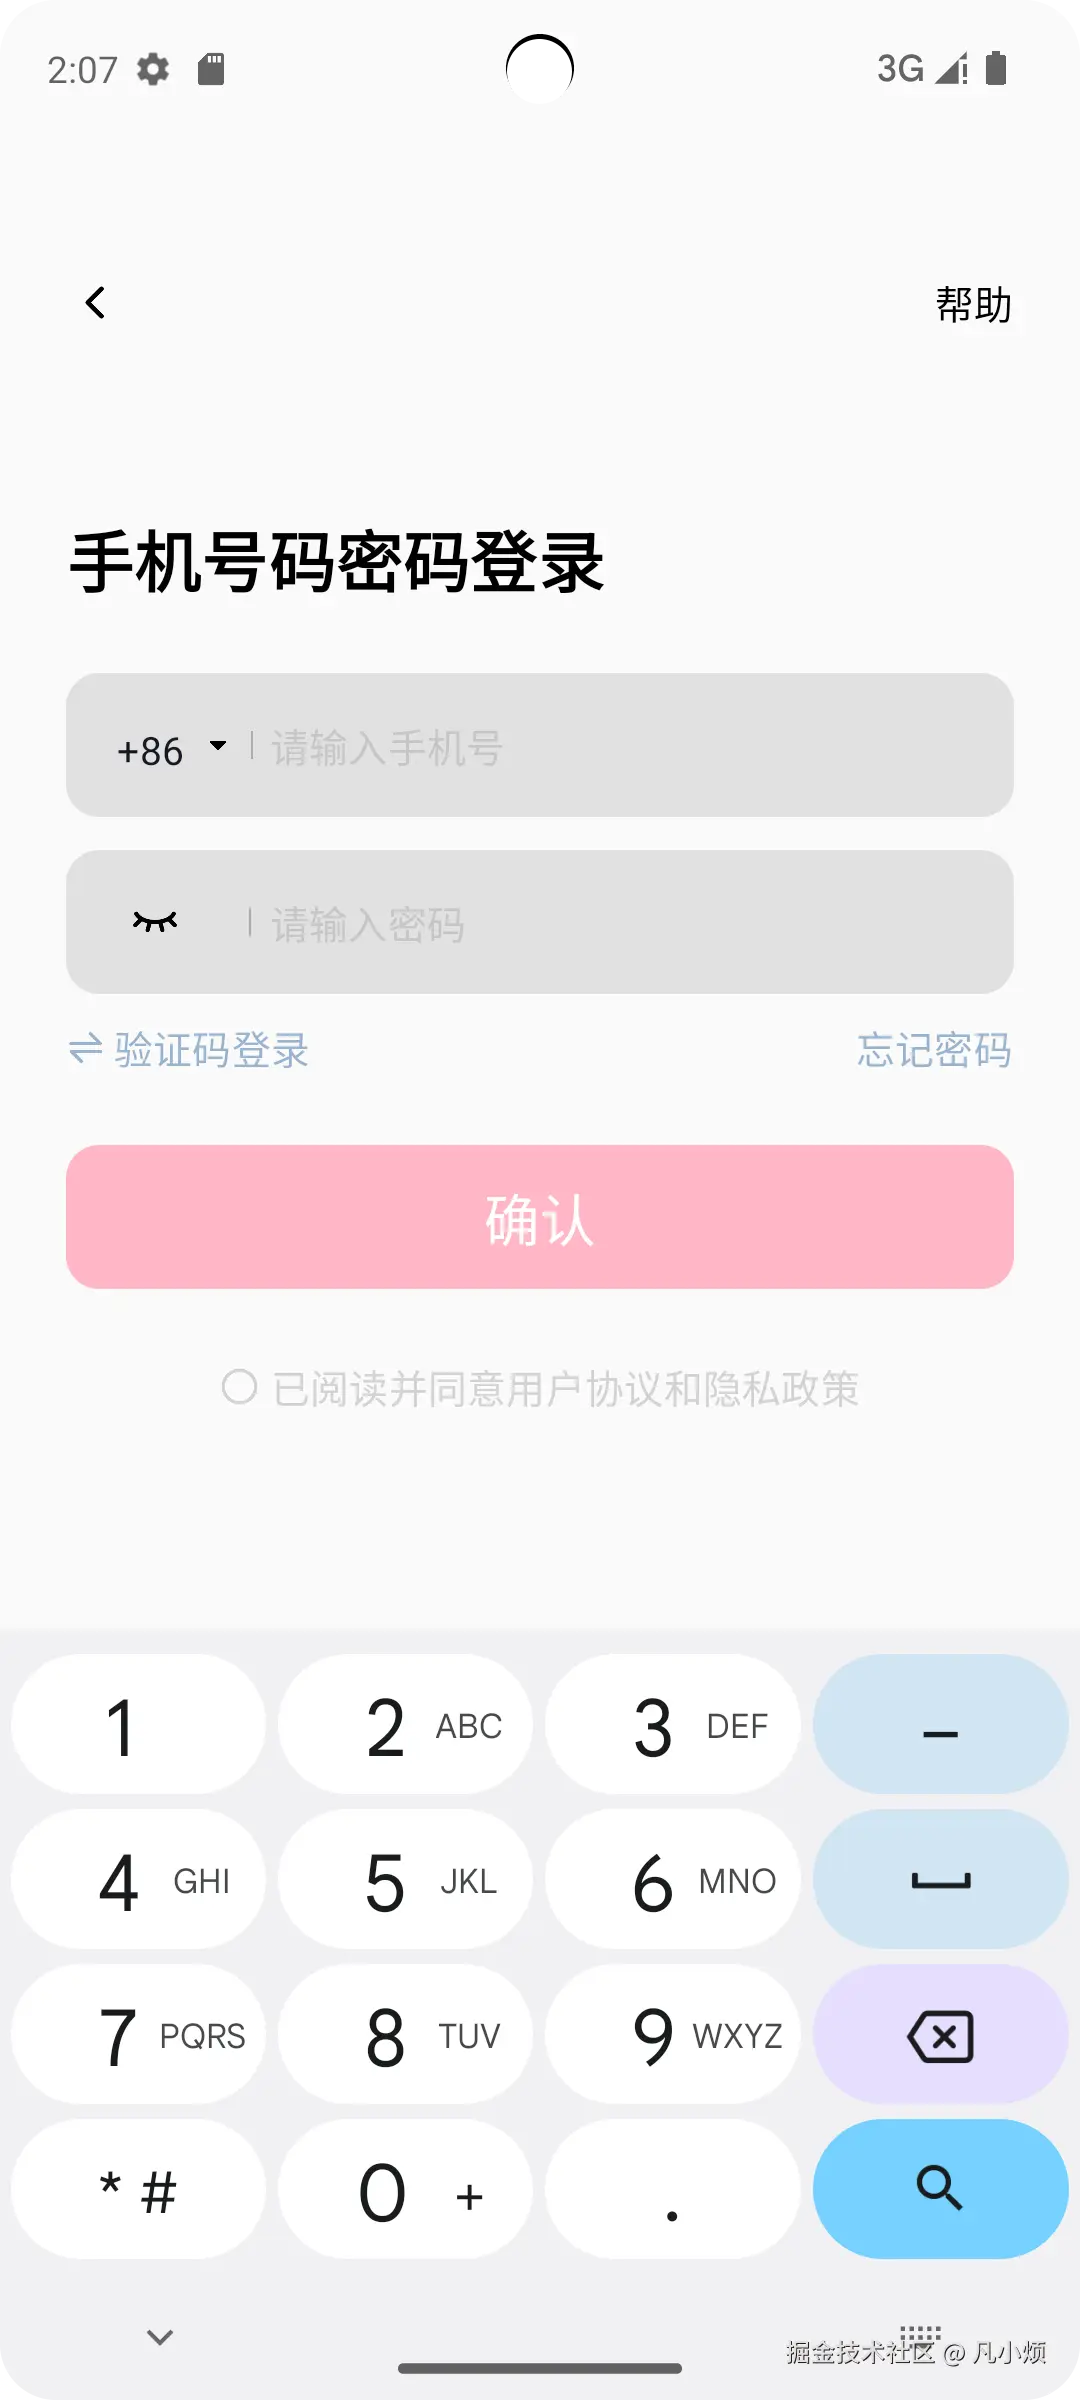
可能有朋友觉得手机输入框很简单,这里就以大家日常刷视频的某音为例,看看手机输入框里的小九九。以下是某音视频的密码登录页面的UI样式
仔细看了一下,未输入手机号的时候出现提示词"请输入手机号",手机号输入框有数字的时候输入框的尾部会展示一个清除按钮,手机号码的第3位数字、第7位数字后面会有空格分隔开(不得不佩服某音的产品还是很细节的,这么设计方便手机号输入的时候看清输入的号码),另外输入框的游标颜色是红色的,talk is cheap,下面直接看看这个输入框的实现:
kotlin
@Composable
fun PhoneNumberEditor(
    phoneNumber: String = "",
    regionCode: String = "+86",
    onTextChangeAct: (String) -> Unit = {},
    onClearAct: () -> Unit = {},
    onClickRegionCodeAct: () -> Unit = {}
) {
    var curTextStr by remember {
        mutableStateOf(phoneNumber)
    }

    var curRegionCode by remember {
        mutableStateOf(regionCode)
    }

    Box(
        modifier = Modifier
            .padding(horizontal = 24.cdp)
            .fillMaxWidth()
            .height(52.cdp)
            .clip(shape = RoundedCornerShape(12.cdp))
            .background(Color(0x337f7f7f))
    ) {
        Row(
            modifier = Modifier.fillMaxSize(), verticalAlignment = Alignment.CenterVertically
        ) {
            Spacer(modifier = Modifier.width(18.cdp))
            // TODO: 添加点击选号码区域码功能
            PhoneNumberPrefix(curRegionCode) {
                onClickRegionCodeAct()
            }
            Spacer(modifier = Modifier.width(7.cdp))
            Spacer(
                modifier = Modifier
                    .height(10.cdp)
                    .width(0.67.cdp)
                    .background(Color(0xffababab))
            )
            Spacer(modifier = Modifier.width(7.cdp))
            // TODO: 复制粘贴功能
            BasicTextField(
                modifier = Modifier
                    .wrapContentWidth()
                    .wrapContentHeight(),
                value = curTextStr,
                onValueChange = { text ->
                    if (text.length <= 11) {
                        curTextStr = text
                        onTextChangeAct(text)
                    }
                },
                textStyle = TextStyle(
                    fontSize = TextUnit(18.csp.value, TextUnitType.Sp),
                    color = Color(0xff161823)
                ),
                singleLine = true,
                keyboardOptions = KeyboardOptions(keyboardType = KeyboardType.Phone),
                visualTransformation = object : VisualTransformation {
                    override fun filter(text: AnnotatedString): TransformedText {
                        var output = ""
                        for (i in text.text.indices) {
                            output += text.text[i]
                            // 字符串的index为2和index为6时添加空格
                            if (i == 2 || i == 6) {
                                output += " "
                            }
                        }
                        return TransformedText(AnnotatedString(output), object : OffsetMapping {
                            override fun originalToTransformed(offset: Int): Int {
                                return when {
                                    offset < 3 -> offset

                                    offset in 3..6 -> offset + 1

                                    offset > 6 -> offset + 2

                                    else -> 13
                                }
                            }

                            override fun transformedToOriginal(offset: Int): Int {
                                return when {
                                    offset < 4 -> offset

                                    offset in 4..8 -> offset - 1

                                    offset > 8 -> offset - 2

                                    else -> 11
                                }
                            }
                        })
                    }
                },
                // 设置游标颜色
                cursorBrush = SolidColor(Color(0xfffe2c55))
            )
        }

        if (curTextStr.isEmpty()) {
            // 空输入的时候提示输入手机号文案
            Row(
                modifier = Modifier.fillMaxSize(),
                verticalAlignment = Alignment.CenterVertically
            ) {
                Spacer(modifier = Modifier.width(73.33.cdp))
                Text(text = "请输入手机号", fontSize = 14.csp, color = Color(0x7fababaf))
            }
        } else {
            // 清除输入icon
            Row(
                modifier = Modifier.fillMaxSize(),
                verticalAlignment = Alignment.CenterVertically
            ) {
                Spacer(modifier = Modifier.width(309.33.cdp))
                Image(
                    modifier = Modifier
                        .size(18.cdp)
                        .clickable {
                            curTextStr = ""
                            onClearAct()
                        },
                    painter = painterResource(R.drawable.login_clear_input),
                    contentDescription = ""
                )
            }
        }
    }
}
前面的游标颜色、无输入时候的hint和有输入时的清除输入按钮都很简单,我们重点介绍下手机号码的第3位数字、第7位数字后面会有空格分隔开的实现,从上面的代码可以看到这个需求点的实现主要和BasicTextField的visualTransformation参数有关系,visualTransformation参数需要输入一个VisualTransformation类型的接口实现,VisualTransformation接口只有一个方法需要实现,方法定义如下:
kotlin
fun filter(text: AnnotatedString): TransformedTextfilter方法的入参text就是我们输入框输入的字符串,另外这个方法需要返回一个TransformedText类型对象,顾名思义,也就是返回转换后的对象,接下来看看TransformedText类定义:
kotlin
class TransformedText(
    /** The transformed text */
    val text: AnnotatedString,

    /** The map used for bidirectional offset mapping from original to transformed text. */
    val offsetMapping: OffsetMapping
)
从TransformedText类的构造函数得知,需要一个转换后的字符串和一个OffsetMapping对象,这个OffsetMapping对象非常重要控制如何从原始字符串转换到目标字符串,OffsetMapping接口内部需要实现两个方法,具体的定义如下:
kotlin
interface OffsetMapping {
// 从原始输入文案到转换后文案的字符指针偏移值(offset为原始输入的index)
fun originalToTransformed(offset: Int): Int
// 从转换后的文案到原始文案的字符指针偏移值(offset为转换后文案的index)
fun transformedToOriginal(offset: Int): Int
}
以这个输入框为例,假设我们输入的手机号码为12345678901,那么我们需要在输入手机号码字符串的index为2和index为6处添加空格字符,那么转换后的字符串就是123-4567-8901,这里为了方便大家直观看到将空格符号换成了连接符,这个转换后的text就是TransformedText的AnnotatedString入参。转换后的字符串为123-4567-8901,那么OffsetMapping接口的两个方法实现我们也就可以总结出来了:
- 从原始输入(12345678901)到转换后的输入(123-4567-8901)时,原始index值在0,2之间(对应输入123时)offset值不变,而index值在3,6之间(对应输入4567时)需要增加1,index从3,6之间原始文案到转换后文案增加了一个空格符号,而原始index值为7,10之间(对应输入8901时)原始文案到转换后文案增加了两个空格符号,对应的index值需要加2
- 从转换后文案(123-4567-8901)到原始文案(12345678901)时,转换后index值在0,3之间(对应转换后文案123-)保持不变,在4,8之间(对应转换后文案4567-)index值需要减1,而index值为9,12之间(对应转换后文案8901)的需要减2
通过上面这种字符串index的偏移和字符串的index映射,compose输入框就能够理解原始输入和转换后输入的index映射关系,我们就可以实现手机号的123-4567-8901格式输入,重点还是OffsetMapping接口的两个方法的作用需要明白。
2.2 密码输入框
前面介绍了手机号码输入框的实现方式,其中重点介绍了BasicTextField的visualTransformation参数的作用和用法。理解了前面的visualTransformation参数之后,那么密码的输入框就很简单了。还是以前面的抖音登录界面为例子,输入的字符串默认显示为星号,点击显示按钮则展示输入的密码原始值,未输入密码的情况下展示输入提示,输入密码后展示清除密码按钮。需求很简单,不废话直接看代码:
kotlin
@Composable
fun PasswordInputBar(
    password: String = "",
    passwordVisibility: Boolean = false,
    onPasswordChangeAct: (String) -> Unit = {},
    onChangePasswordVisibility: (Boolean) -> Unit = {},
    onClearPassword: () -> Unit = {}
) {
    // 密码是否可见标志位
    var isPasswordVisible by remember {
        mutableStateOf(passwordVisibility)
    }

    // 输入的字符串
    var realInputStr by remember {
        mutableStateOf(password)
    }

    Box(
        modifier = Modifier
            .padding(horizontal = 24.cdp)
            .fillMaxWidth()
            .height(52.cdp)
            .clip(shape = RoundedCornerShape(12.cdp))
            .background(Color(0x337f7f7f))
    ) {
        Row(
            modifier = Modifier.fillMaxSize(),
            verticalAlignment = Alignment.CenterVertically
        ) {
            Spacer(modifier = Modifier.width(23.cdp))
            Icon(
                modifier = Modifier
                    .size(18.cdp)
                    .clickable {
                        isPasswordVisible = !isPasswordVisible
                        onChangePasswordVisibility(isPasswordVisible)
                    },
                painter = painterResource(
                    if (isPasswordVisible) {
                        R.drawable.password_preview_open
                    } else {
                        R.drawable.password_preview_close
                    }
                ),
                contentDescription = ""
            )
            Spacer(modifier = Modifier.width(25.cdp))
            Spacer(
                modifier = Modifier
                    .height(10.cdp)
                    .width(0.67.cdp)
                    .background(Color(0xffababab))
            )
            Spacer(modifier = Modifier.width(7.cdp))
            BasicTextField(
                modifier = Modifier
                    .wrapContentWidth()
                    .wrapContentHeight(),
                value = realInputStr,
                onValueChange = { pwd ->
                    // TODO: 密码合法性校验
                    if (pwd.length <= 20) {
                        realInputStr = pwd
                        onPasswordChangeAct(pwd)
                    }
                },
                textStyle = TextStyle(
                    fontSize = TextUnit(18.csp.value, TextUnitType.Sp),
                    color = Color(0xff161823)
                ),
                singleLine = true,
                keyboardOptions = KeyboardOptions(keyboardType = KeyboardType.Password),
                cursorBrush = SolidColor(Color(0xfffe2c55)),
                visualTransformation = if (!isPasswordVisible) {
                    // 输入密码转为星号
                    PasswordVisualTransformation()
                } else {
                    // 展示输入的原始密码
                    VisualTransformation.None
                }
            )
        }

        if (realInputStr.isEmpty()) {
            // 空输入提示输入密码
            Row(
                modifier = Modifier.fillMaxSize(),
                verticalAlignment = Alignment.CenterVertically
            ) {
                Spacer(modifier = Modifier.width(73.33.cdp))
                Text(text = "请输入密码", fontSize = 14.csp, color = Color(0x7fababaf))
            }
        } else {
            // 有输入时展示清空密码按钮
            Row(
                modifier = Modifier.fillMaxSize(),
                verticalAlignment = Alignment.CenterVertically
            ) {
                Spacer(modifier = Modifier.width(309.33.cdp))
                Image(
                    modifier = Modifier
                        .size(18.cdp)
                        .clickable {
                            realInputStr = ""
                            onClearPassword()
                        },
                    painter = painterResource(R.drawable.login_clear_input),
                    contentDescription = ""
                )
            }
        }
    }
}
可以看到密码输入框的visualTransformation跟密码是否可见有关,当打开了密码预览时,visualTransformation参数为VisualTransformation.None,这个参数表示不做任何处理,而关闭密码预览时,visualTransformation参数为PasswordVisualTransformation类型对象,这个对象可以把我们输入的密码明文转成星号。
2.3 验证码输入框实现
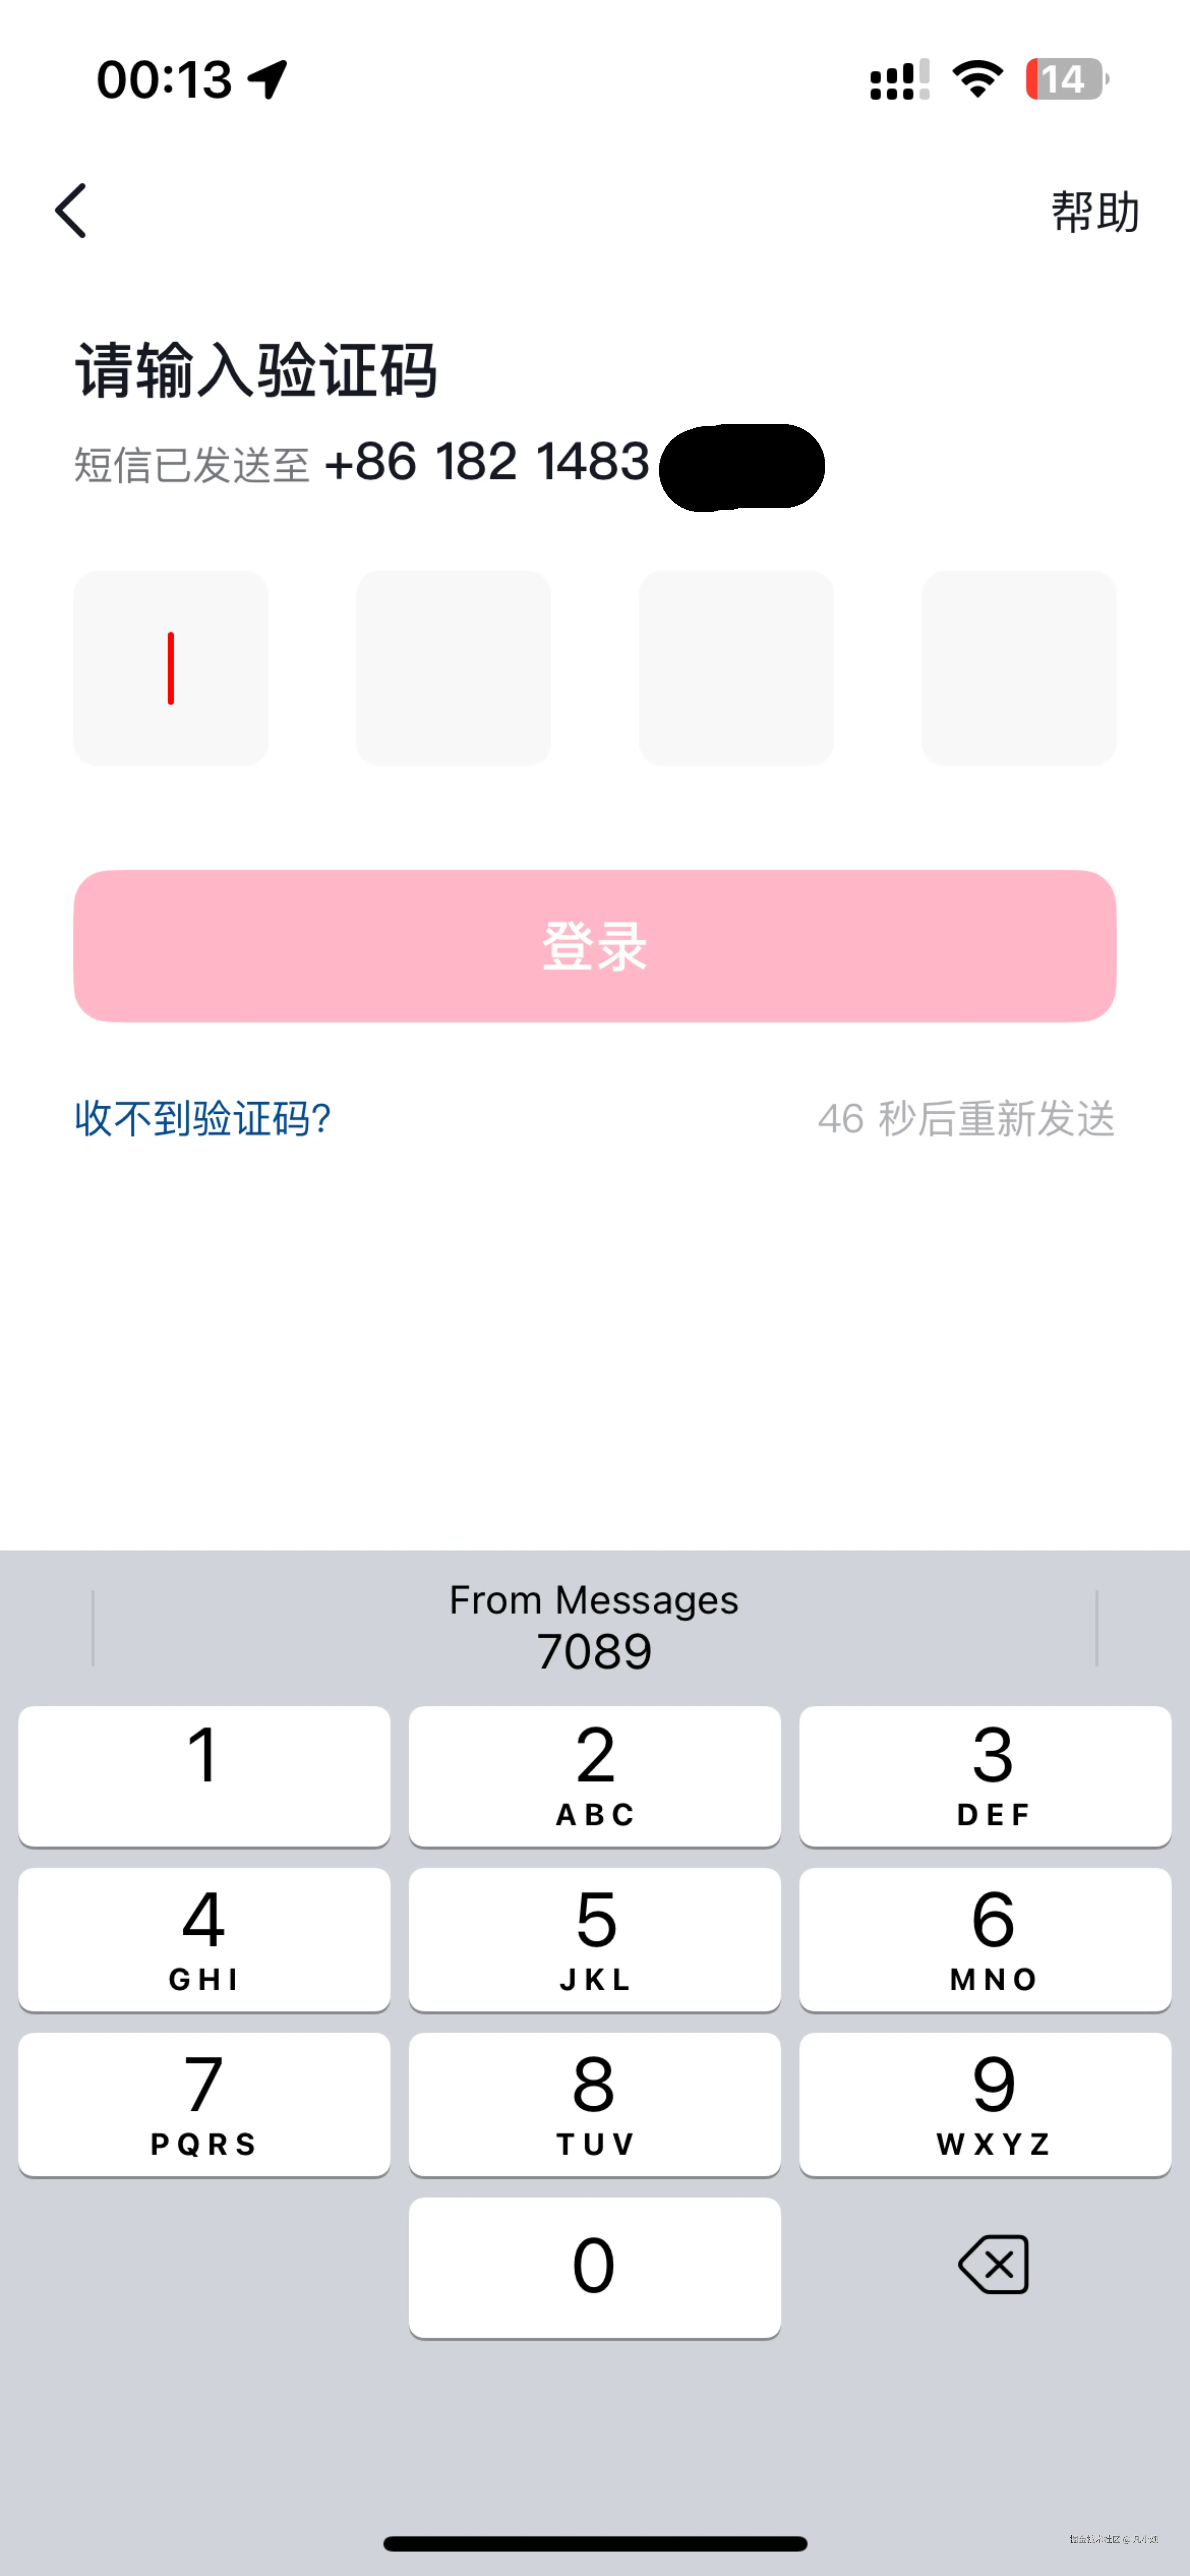
还是以某音的登录验证码输入框为例,拆解下需求,首先是有四个验证码输入方框,然后输入的过程中游标会随着输入的验证码位数移动,另外游标会在界面展示的时候一直闪烁。某音验证码输入框的图片如下:
分析了下需求,其实可以用四个BasicTextField输入框来实现这个需求,但是游标的控制逻辑会比较麻烦一些,但是神奇的BasicTextField中有个decorationBox参数,通过这个参数我们只需要使用一个BasicTextField输入框就可以实现这个需求,接下来看看代码怎么实现的:
kotlin
@Composable
fun CaptchaCodeEditor(
    inputCode: String = "",
    onCaptchaCodeChange: (String) -> Unit = {}
) {
    // 当前输入的验证码
    var curCaptchaCode by remember {
        mutableStateOf(inputCode)
    }

    // 输入框焦点和键盘处理
    val focusRequester = remember {
        FocusRequester()
    }

    val softKeyBoard = LocalSoftwareKeyboardController.current

    LaunchedEffect(Unit) {
        delay(100)
        focusRequester.requestFocus()
        softKeyBoard?.show()
    }

    BasicTextField(
        modifier = Modifier
            .padding(horizontal = 24.cdp)
            .fillMaxWidth()
            .height(65.cdp)
            .focusRequester(focusRequester),
        value = curCaptchaCode,
        onValueChange = { code ->
            // TODO: 验证码输入类型校验
            if (code.length <= 4) {
                curCaptchaCode = code
                onCaptchaCodeChange(code)
            }
        },
        singleLine = true,
        textStyle = TextStyle(
            color = Color(0xff161823),
            fontSize = 20.csp,
            fontWeight = FontWeight.Bold
        ),
        keyboardOptions = KeyboardOptions(keyboardType = KeyboardType.NumberPassword),
        cursorBrush = SolidColor(Color(0xfffe2c55)),
        decorationBox = { innerTextField ->
            // 重点在这里,输入框中有四个重复CodeBox组件
            Row(
                modifier = Modifier.fillMaxSize(),
                horizontalArrangement = Arrangement.SpaceBetween
            ) {
                repeat(4) {
                    val curChar = if (it in 0..curCaptchaCode.lastIndex) {
                        curCaptchaCode[it].toString()
                    } else {
                        ""
                    }
                    CodeBox(curChar, it == curCaptchaCode.lastIndex + 1)
                }
            }
        }
    )
}

@Composable
fun CodeBox(singleCode: String, isShowCursor: Boolean) {
    // 当前游标是否可见标志位
    var cursorVisible by remember {
        mutableStateOf(false)
    }

    LaunchedEffect(Unit) {
        while (true) {
            cursorVisible = !cursorVisible
            delay(500)
        }
    }

    Row(
        modifier = Modifier
            .size(65.cdp)
            .clip(shape = RoundedCornerShape(10.cdp))
            .background(Color(0x337f7f7f)),
        verticalAlignment = Alignment.CenterVertically,
        horizontalArrangement = Arrangement.Center
    ) {
        Text(
            text = singleCode,
            fontSize = 20.csp,
            color = Color(0xff161823)
        )
        if (isShowCursor && cursorVisible) {
            // 展示游标
            Spacer(
                modifier = Modifier
                    .width(3.cdp)
                    .height(20.cdp)
                    .background(Color(0xfffe2c55))
            )
        }
    }
}
可以看到,通过decorationBox设置四个重复的CodeBox组件就可以实现验证码输入框了,CodeBox中根据传入的isShowCursor和当前游标是否可见的标志位进行游标的显示和隐藏,是不是实现起来很简单,compose的实现就是这么的高效,如果是传统的view来实现这个可能需要依赖自定view了。而且这个验证码输入框扩展很简单,比如要实现6位的验证码,只需要把CodeBox重复的次数修改一下即可,包括CodeBox的样式也可以很方便的修改,比如改成下划线等形式。
3 总结
本文主要介绍了BasicTextField的常用参数的使用,并结合实际开发中常用到的情形为例,以输入手机号和登录密码为例重点介绍了visualTransformation的使用方法和参数实现,然后在2.3节介绍了验证码输入框的实现。虽然一共就三个例子,但是能够覆盖日常开发的大部分场景了。尤其是手机号的输入,妈妈再也不怕我被产品要命的小细节折磨了。另外本文在介绍验证码输入框的实现时,顺带简单注释了一下输入框的焦点和键盘弹出处理,相信眼尖的读者早就发现了我夹带的私活了,哈哈。相信认真看完这篇文章的你,再也不怕输入框需求了,毕竟你已经恰恰进化成了古希腊掌管compose输入框的神了!!!
另外这个专栏准备不定时更新一些compose相关的文章,欢迎大家常过来看看。创作不易,一键三连走起!!!